Page 593 of 3342
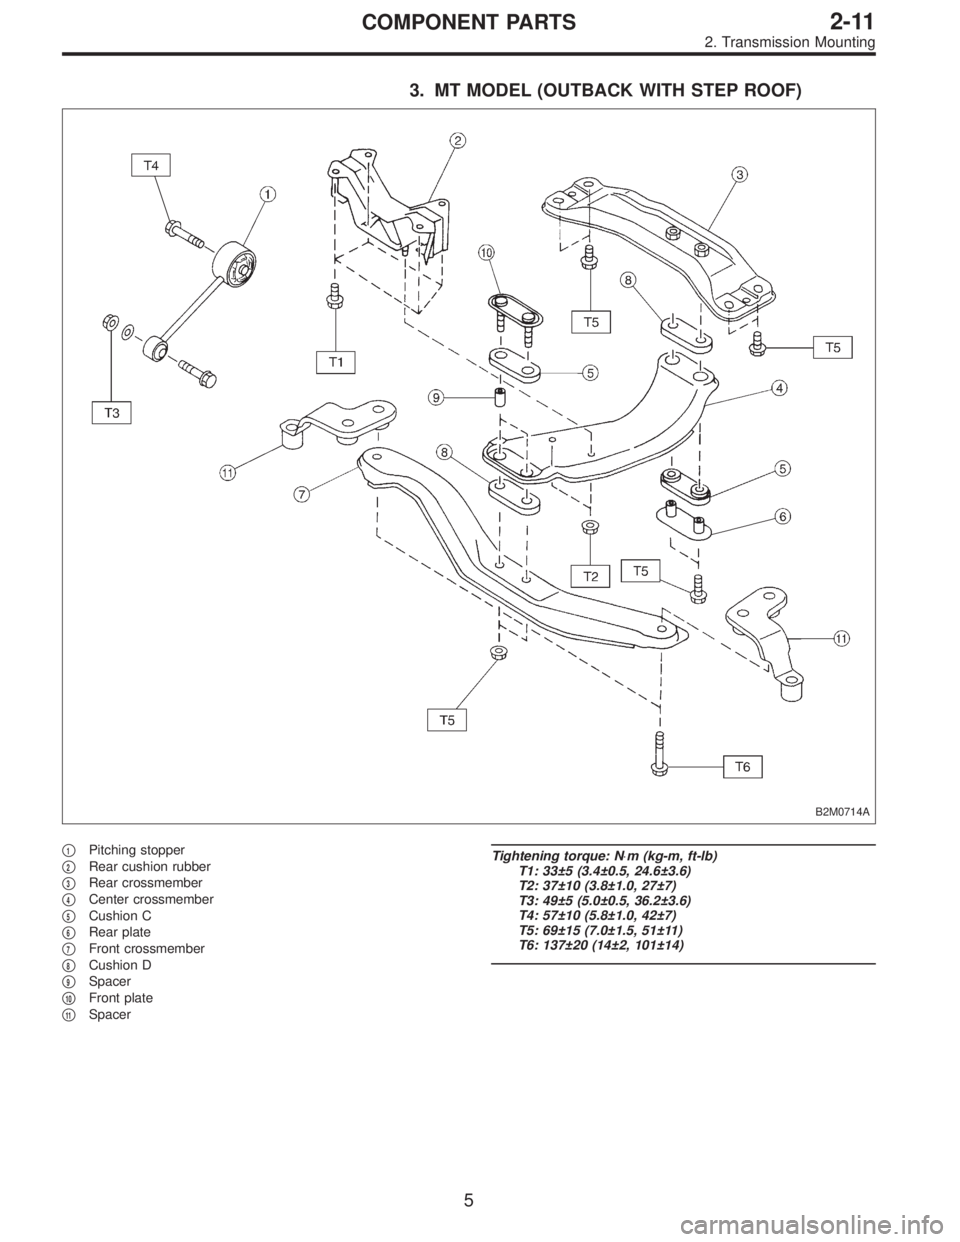
3. MT MODEL (OUTBACK WITH STEP ROOF)
B2M0714A
�1Pitching stopper
�
2Rear cushion rubber
�
3Rear crossmember
�
4Center crossmember
�
5Cushion C
�
6Rear plate
�
7Front crossmember
�
8Cushion D
�
9Spacer
�
10Front plate
�
11Spacer
Tightening torque: N⋅m (kg-m, ft-lb)
T1: 33±5 (3.4±0.5, 24.6±3.6)
T2: 37±10 (3.8±1.0, 27±7)
T3: 49±5 (5.0±0.5, 36.2±3.6)
T4: 57±10 (5.8±1.0, 42±7)
T5: 69±15 (7.0±1.5, 51±11)
T6: 137±20 (14±2, 101±14)
5
2-11COMPONENT PARTS
2. Transmission Mounting
Page 594 of 3342
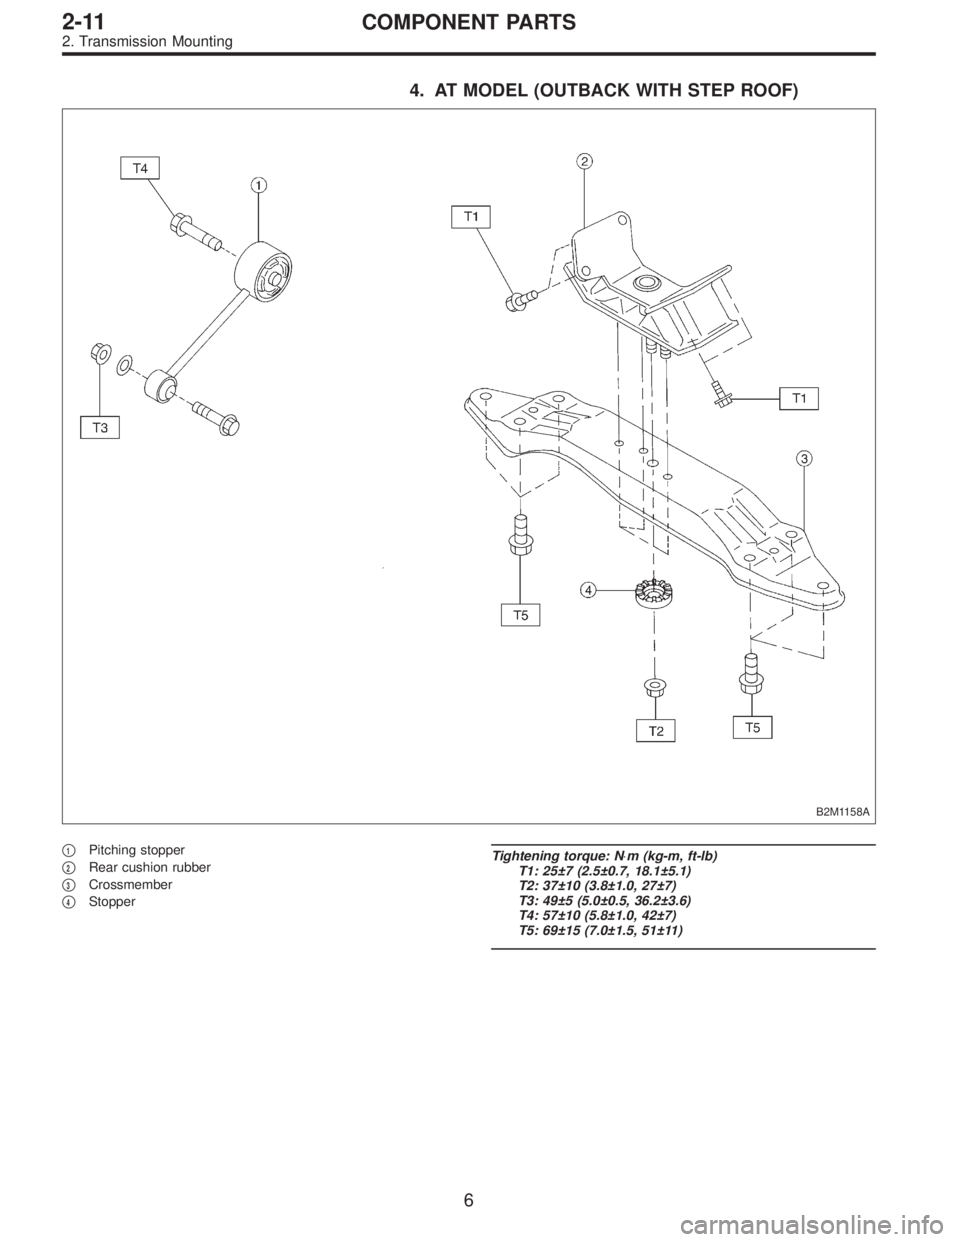
4. AT MODEL (OUTBACK WITH STEP ROOF)
B2M1158A
�1Pitching stopper
�
2Rear cushion rubber
�
3Crossmember
�
4Stopper
Tightening torque: N⋅m (kg-m, ft-lb)
T1: 25±7 (2.5±0.7, 18.1±5.1)
T2: 37±10 (3.8±1.0, 27±7)
T3: 49±5 (5.0±0.5, 36.2±3.6)
T4: 57±10 (5.8±1.0, 42±7)
T5: 69±15 (7.0±1.5, 51±11)
6
2-11COMPONENT PARTS
2. Transmission Mounting
Page 596 of 3342

2. Engine
A: REMOVAL
1. Set the vehicle on lift arms.
2. Open front hood and support with a stay.
3. Release fuel pressure.
4. Disconnect battery cable and remove battery from vehicle.
5. Drain coolant.
6. Remove cooling system.
With A/C
7. Collect refrigerant, and remove pressure hoses.
8. Remove air intake system.
9. Remove canister and bracket.
10. Disconnect connectors, cables and hoses.
11. Remove power steering pump from bracket.
12. Remove front exhaust pipe and center exhaust pipe.
13. Remove nuts which hold lower side of transmission to
engine.
14. Remove nuts which install front cushion rubber onto front
crossmember.
AT model
15. Separate torque converter from drive plate.
16. Remove pitching stopper.
17. Disconnect fuel delivery hose, return hose and evaporation
hoses.
18. Support engine with a lifting device and wire ropes.
19. Support transmission with a garage jack.
20. Remove bolts which hold upper side of transmission to
engine.
21. Remove engine from vehicle.
�
�
�
�
�
�
�
�
�
�
�
�
�
�
�
8
2-11SERVICE PROCEDURE
2. Engine
Page 606 of 3342
G2M0294
15) Separate torque converter from drive plate. (AT model)
(1) Lower the vehicle.
(2) Remove service hole plug.
(3) Remove bolts which hold torque converter to drive
plate.
(4) Remove other bolts while rotating the engine using
ST.
ST 499977000 CRANK PULLEY WRENCH
G2M0295
16) Remove pitching stopper.
B2M0336
17) Disconnect fuel delivery hose, return hose and evapo-
ration hose.
CAUTION:
�Disconnect hose with its end wrapped with cloth to
prevent fuel from splashing.
�Catch fuel from hose into container.
G2M0297
18) Support engine with a lifting device and wire ropes.
G2M0298
19) Support transmission with a garage jack.
CAUTION:
Before moving engine away from transmission, check
to be sure no work has been overlooked. Doing this is
very important in order to facilitate re-installation and
because transmission lowers under its own weight.
18
2-11SERVICE PROCEDURE
2. Engine
Page 608 of 3342

B: INSTALLATION
1. Install engine to transmission.
2. Tighten bolts which hold upper side of transmission to engine.
3. Remove lifting device and wire rope.
4. Remove garage jack.
5. Install pitching stopper.
AT model
6. Install torque converter onto drive plate.
7. Install canister and bracket.
8. Install power steering pump on bracket.
9. Tighten nuts which hold lower side of transmission to engine.
10. Tighten nuts which install front cushion rubber onto cross-
member.
11. Install front exhaust pipe and center exhaust pipe.
12. Connect hoses, connectors and cables.
13. Install air intake system.
�Air intake duct
�Air cleaner element and upper cover.
With A/C
14. Install A/C pressure hoses.
15. Install cooling system.
16. Install battery onto the vehicle, and connect cables.
17. Fill coolant.
18. Check ATF level, and connect if necessary. [AT]
19. Correct power steering oil, and bleed air.
20. Remove front hood stay, and close front hood.
21. Take off the vehicle from lift arms.
�
�
�
�
�
�
�
�
�
�
�
�
20
2-11SERVICE PROCEDURE
2. Engine
Page 609 of 3342
G2M0301
1) Install engine onto transmission.
(1) Position engine in engine compartment and align it
with transmission.
CAUTION:
Be careful not to damage adjacent parts or body pan-
els with crank pulley, oil pressure gauge, etc.
(2) Apply a small amount of grease to spline of main-
shaft.
G2M0299
2) Tighten bolts which hold upper side of transmission to
engine.
Tightening torque:
50±4 N⋅m (5.1±0.4 kg-m, 36.9±2.9 ft-lb)
G2M0297
3) Remove lifting device and wire ropes.
4) Remove garage jack.
21
2-11SERVICE PROCEDURE
2. Engine
Page 610 of 3342
G2M0302
5) Install pitching stopper.
Tightening torque:
T1: 49±5 N⋅m (5.0±0.5 kg-m, 36.2±3.6 ft-lb)
T2: 57±10 N⋅m (5.8±1.0 kg-m, 42±7 ft-lb)
G2M0294
6) Install torque converter onto drive plate. (AT model)
(1) Tighten bolts which hold torque converter to drive
plate.
(2) Tighten other bolts while rotating the engine by
using ST.
ST 499977000 CRANK PULLEY WRENCH
CAUTION:
Be careful not to drop bolts into torque converter
housing.
Tightening torque:
25±2 N⋅m (2.5±0.2 kg-m, 18.1±1.4 ft-lb)
(3) Clog plug onto service hole.
G2M0272
7) Install canister and bracket. (2500 cc, 2200 cc FWD and
Taiwan spec. vehicles)
B2M0334
8) Install power steering pump on bracket.
(1) Install power steering pump on bracket, and tighten
bolts.
Tightening torque:
39±10 N⋅m (4.0±1.0 kg-m, 29±7 ft-lb)
22
2-11SERVICE PROCEDURE
2. Engine
Page 611 of 3342
B2M0340
(2) Install power steering pipe bracket on right side
intake manifold, and install spark plug codes.
G2M0286
(3) Install front side V-belt, and adjust it.
G2M0292
9) Tighten nuts which hold lower side of transmission to
engine.
Tightening torque:
50±4 N⋅m (5.1±0.4 kg-m, 36.9±2.9 ft-lb)
G2M0303
10) Tighten nuts which install front cushion rubber onto
crossmember.
Tightening torque:
69±15 N⋅m (7.0±1.5 kg-m, 51±11 ft-lb)
CAUTION:
Be sure to tighten front cushion rubber mounting bolts
in the innermost elliptical hole in the front crossmem-
ber.
23
2-11SERVICE PROCEDURE
2. Engine
 Separate torque converter from drive plate. (AT model)
(1) Lower the vehicle.
(2) Remove service hole plug.
(3) Remove bolts which hold torque converter to drive
plate.
(4) Remove other bo")
 Install engine onto transmission.
(1) Position engine in engine compartment and align it
with transmission.
CAUTION:
Be careful not to damage adjacent parts or body pan-
els with crank pull")
 Install pitching stopper.
Tightening torque:
T1: 49±5 N⋅m (5.0±0.5 kg-m, 36.2±3.6 ft-lb)
T2: 57±10 N⋅m (5.8±1.0 kg-m, 42±7 ft-lb)
G2M0294
6) Install torque converter onto drive pl")
![SUBARU LEGACY 1997 Service Repair Manual B2M0340
(2) Install power steering pipe bracket on right side
intake manifold, and install spark plug codes.
G2M0286
(3) Install front side V-belt, and adjust it.
<Ref. to 1-5 [01A0].>
G2M0292
9) Tigh](/manual-img/17/57434/w960_57434-610.png "SUBARU LEGACY 1997 Service Repair Manual B2M0340
(2) Install power steering pipe bracket on right side
intake manifold, and install spark plug codes.
G2M0286
(3) Install front side V-belt, and adjust it.
<Ref. to 1-5 [01A0].>
G2M0292
9) Tigh")