Page 1663 of 1954
Entry Ligh t Contro l Syste m
Front Ceilin g Ligh t Tes t
1. Tur n th e ligh t switc h OFF .
2 . Pr y of f th e lens .
Rear Ceilin g Ligh t Tes t
1. Tur n th e ligh t switc h OFF .
2 . Pr y of f th e lens .
BULB S(5 W x 3)
SCRE W
HOUSIN G
LEN S
3. Remov e th e tw o screw s fro m th e housing .
4 . Disconnec t th e 4 P connector , an d remov e th e hous -
ing.
5. Chec k fo r continuit y betwee n th e terminal s i n eac h
switc h positio n accordin g to th e table .
3. Remov e th e tw o screw s fro m th e housing .
4 . Disconnec t th e 4 P connector , an d remov e th e hous -
ing.
5. Chec k fo r continuit y betwee n th e terminal s i n eac h
switc h positio n accordin g t o th e table .
HOUSIN G
SCREW
BULBS(5 W x 3)
LEN S
ProCarManuals.com
Page 1664 of 1954
Courtesy Ligh t Replacemen t
NOTE: Th e bul b o r len s alon e ca n b e replace d withou t re -
movin g th e doo r panel .
1 . Remov e th e doo r pane l (se e sectio n 20 ).
2 . Remov e th e tw o screw s an d retaine r plat e fro m be -
hin d th e doo r panel .
RETAINE R PLAT E
HOUSIN G
DOOR PANE L
BULB (3. 4 W )
3. Replac e th e courtes y light .
LENS
3. Chec k continuit y betwee n th e No . 2 an d No . 7 termi -
nals .
• Ther e shoul d b e continuit y wit h th e ignitio n ke y
inserted .
• Ther e shoul d b e n o continuit y whe n th e ignitio n
ke y i s removed .
Ignition Ke y Switc h Tes t
1. Remov e th e dashboar d lowe r cove r (se e sectio n 20 ).
2 . Disconnec t th e 8 P connecto r fro m th e mai n wir e
harness .
8P CONNECTO R
Wire sid e o ffemal e terminal s
ProCarManuals.com
Page 1669 of 1954

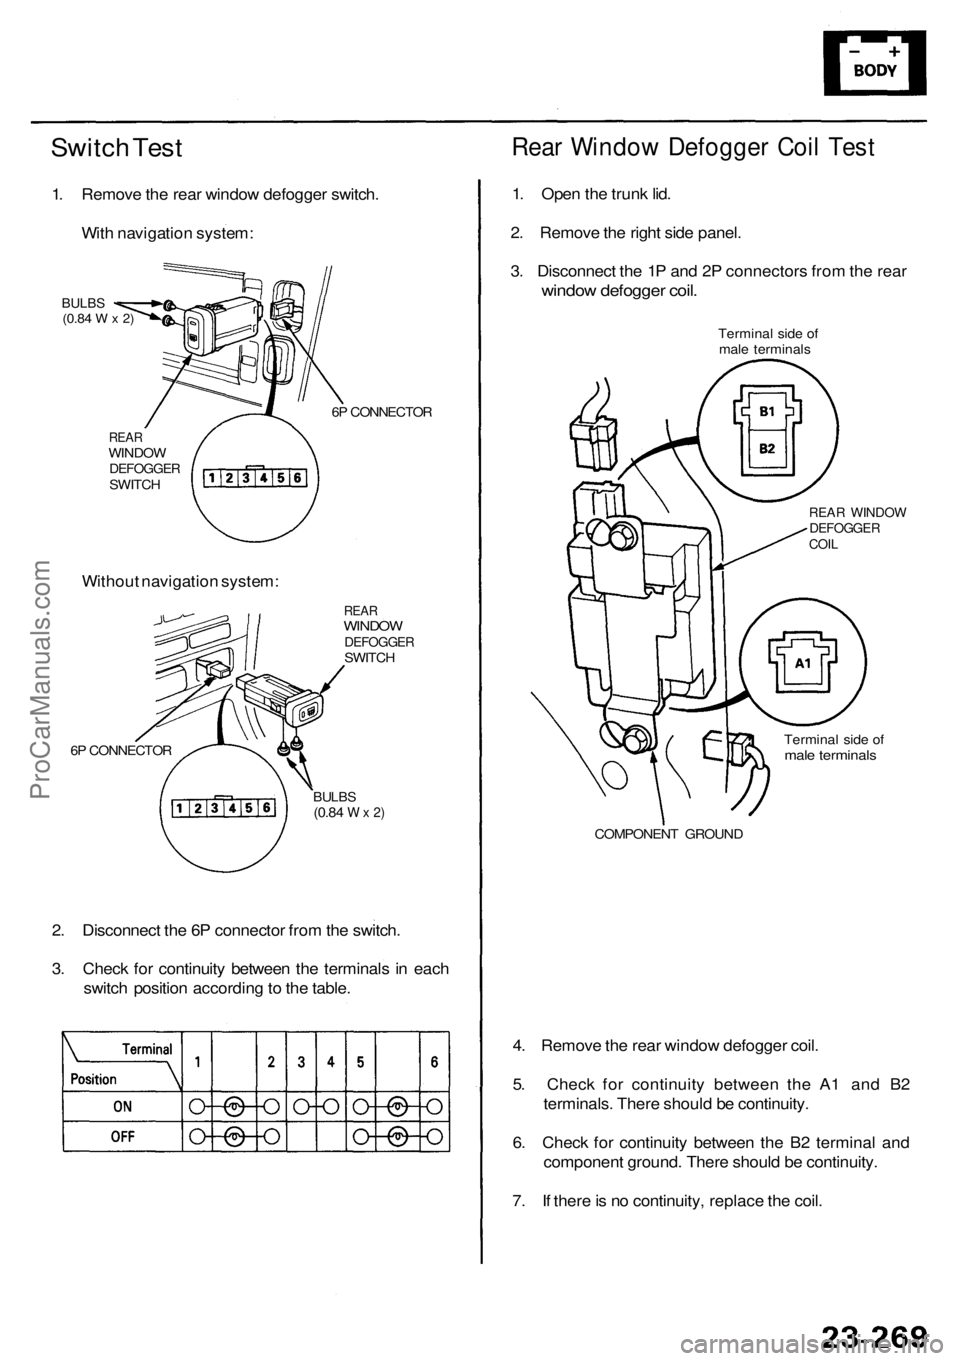
Switch Tes t
1. Remov e th e rea r windo w defogge r switch .
Wit h navigatio n system :
REARWINDO WDEFOGGE RSWITCH 6
P CONNECTO R
BULBS(0.84 W x 2)
Withou t navigatio n system :
REARWINDO WDEFOGGE RSWITCH
6 P CONNECTO R
BULBS(0.84 W x 2)
2. Disconnec t th e 6 P connecto r fro m th e switch .
3 . Chec k fo r continuit y betwee n th e terminal s i n eac h
switc h positio n accordin g to th e table .
Rear Windo w Defogge r Coi l Tes t
1. Ope n th e trunk lid.
2 . Remov e th e righ t sid e panel .
3 . Disconnec t th e 1 P an d 2 P connector s fro m th e rea r
windo w defogge r coil .
Termina l sid e o f
mal e terminal s
REAR WINDO WDEFOGGE RCOIL
Termina l sid e o fmal e terminal s
COMPONEN T GROUN D
4. Remov e th e rea r windo w defogge r coil .
5 . Chec k fo r continuit y betwee n th e A 1 an d B 2
terminals . Ther e shoul d b e continuity .
6 . Chec k fo r continuit y betwee n th e B 2 termina l an d
componen t ground . Ther e shoul d b e continuity .
7 . I f ther e is n o continuity , replac e th e coil .
ProCarManuals.com
Page 1700 of 1954
Passenger's Windo w Switc h Tes t
1. Remove the passenger's window switch (see
section 20 ).
'9 6 - 9 7 models :
'98 - 0 1 model s
Passenger' s Windo w Moto r Tes t
1. Remov e th e passenger' s doo r pane l (se e sectio n 20 ).
2 . Disconnec t th e 2 P connecto r fro m th e windo w motor .
Termina l sid e o f
mal e terminal s
3. Chec k windo w moto r operatio n b y connectin g powe r
an d groun d accordin g to th e table .
CAUTION : Whe n th e moto r stop s running , discon -
nec t on e lea d immediately .
4 . I f th e moto r doe s no t ru n o r fail s t o ru n smoothly ,
replac e it .
3 . Chec k fo r continuit y betwee n th e No . 4 an d No . 6
terminals . ('98-0 1 models )
Ther e shoul d b e continuity .
I f ther e i s n o continuity , chec k th e indicato r ligh t
bulb.
[ ] : '98-0 1 model s
2. Chec k fo r continuit y betwee n th e terminal s i n eac h
switc h positio n accordin g to th e table .
PASSENGER' SWINDOW SWITC H
ProCarManuals.com
Page 1811 of 1954

To page 24-42 To page 24-42
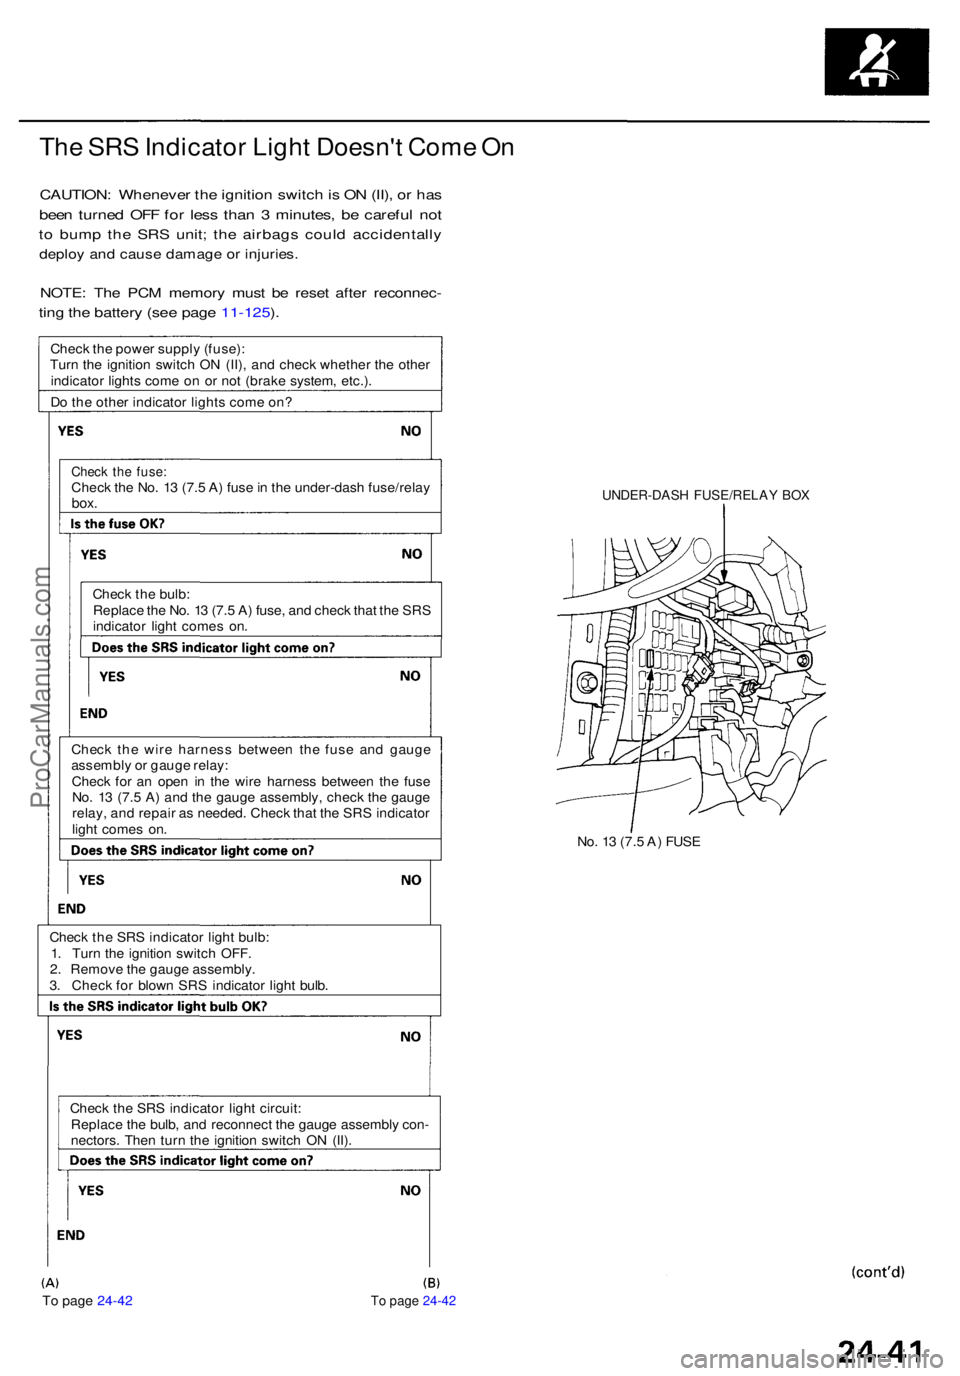
The SR S Indicato r Ligh t Doesn' t Com e O n
CAUTION : Wheneve r th e ignitio n switc h is O N (II) , o r ha s
bee n turne d OF F fo r les s tha n 3 minutes , b e carefu l no t
to bum p th e SR S unit ; th e airbag s coul d accidentall y
deploy an d caus e damag e o r injuries .
NOTE: Th e PC M memor y mus t b e rese t afte r reconnec -
ting th e batter y (se e pag e 11-125 ).
Chec k th e powe r suppl y (fuse) :
Tur n th e ignitio n switc h O N (II) , an d chec k whethe r th e othe r
indicato r light s com e o n o r no t (brak e system , etc.) .
D o th e othe r indicato r light s com e on ?
Chec k th e fuse :Chec k th e No . 1 3 (7. 5 A ) fus e in th e under-das h fuse/rela ybox.
Chec k th e bulb :
Replac e th e No . 1 3 (7. 5 A ) fuse , an d chec k tha t th e SR S
indicato r ligh t come s on .
Chec k th e wir e harnes s betwee n th e fus e an d gaug e
assembl y o r gaug e relay :
Chec k fo r a n ope n i n th e wir e harnes s betwee n th e fus e
No . 1 3 (7. 5 A ) an d th e gaug e assembly , chec k th e gaug e
relay , an d repai r a s needed . Chec k tha t th e SR S indicato r
ligh t come s on .
Chec k th e SR S indicato r ligh t bulb :
1 . Tur n th e ignitio n switc h OFF .
2 . Remov e th e gaug e assembly .
3 . Chec k fo r blow n SR S indicato r ligh t bulb .
Chec k th e SR S indicato r ligh t circuit :
Replac e th e bulb , an d reconnec t th e gaug e assembl y con -
nectors . The n tur n th e ignitio n switc h O N (II) .
UNDER-DAS H FUSE/RELA Y BO X
No. 1 3 (7. 5 A ) FUS E
ProCarManuals.com