Page 2162 of 2543
Rear Holder
Locking Clip
Pull Out
Connector
Wire Harness
Terminal
Retainer
Locking
Clip ºWaterproof Typeº
Special
Tool
B±23
TERMINAL AND CONNECTOR REPAIR±TERMINAL REPLACEMENT
33
Wire Harness Repair Manual (RM1022E)
4. Disconnect Terminal from Connector
(a)Determine the primary locking system from the
charts.
1. Lock Located on terminal
2. Lock Located on connector
3. Method of entry and operation
(b)Push the terminal gently into the connector and hold
it in this position.
(c)Insert the special tool into the connector in the
direction shown in the chart.
(d)Move the locking clip to the unlock position and hold
it there.
NOTE: Do not apply excessive force to the terminal.
Do not pry on the terminal with the special tool.
(e)Carefully withdraw the terminal from the connector by
pulling the lead toward the rear of the connector.
NOTE: Do not use too much force. If the terminal
does not come out easily, repeat steps (a) through
(e).
Page 2163 of 2543

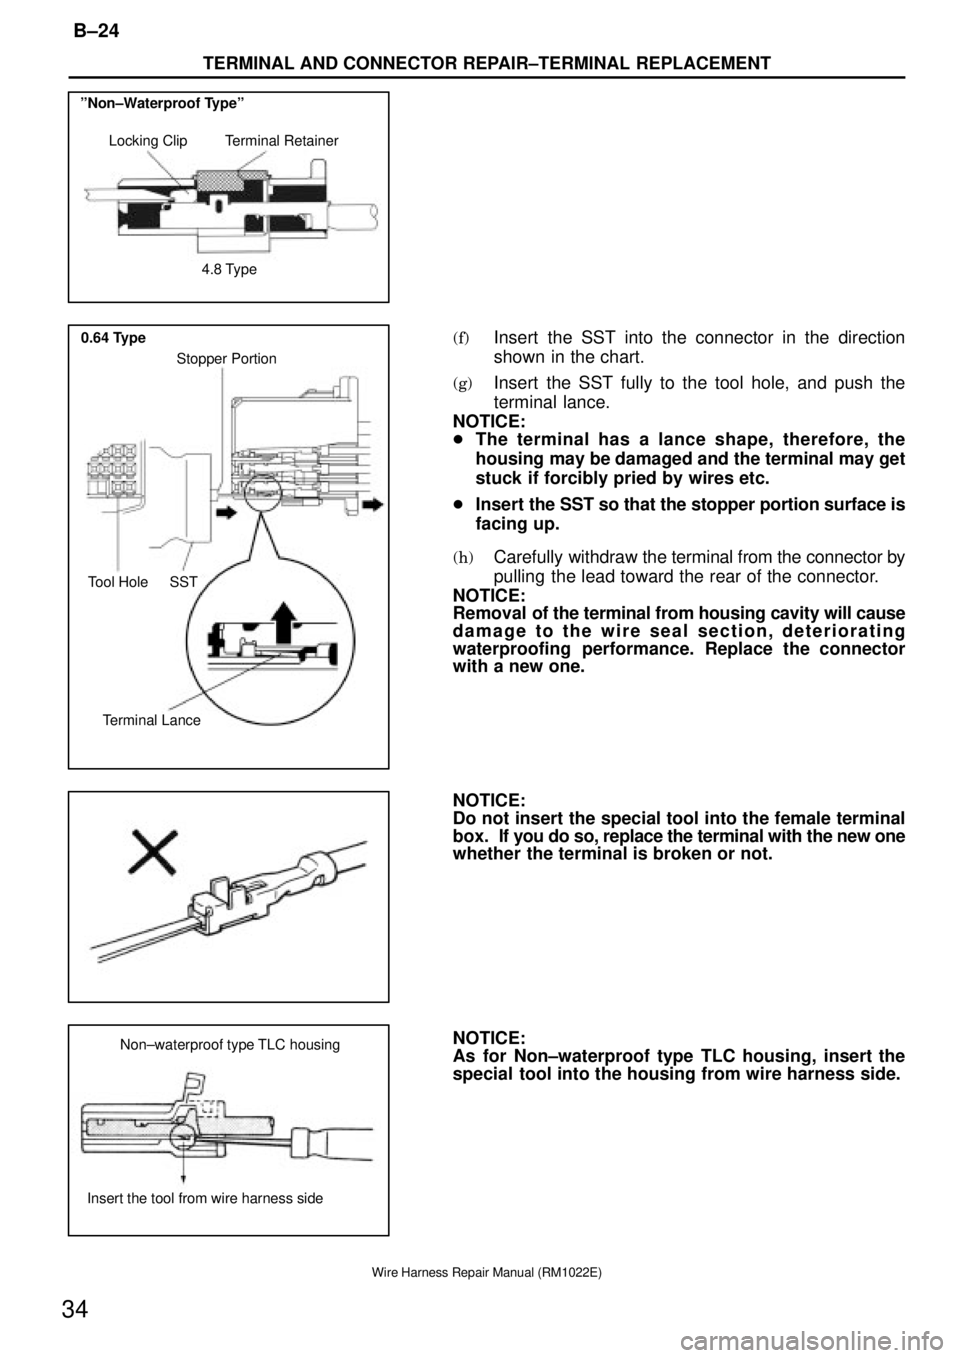
Locking Clip Terminal Retainer
4.8 Type ºNon±Waterproof Typeº
SST Tool Hole
Terminal LanceStopper Portion 0.64 Type
Non±waterproof type TLC housing
Insert the tool from wire harness side
TERMINAL AND CONNECTOR REPAIR±TERMINAL REPLACEMENT
B±24
34
Wire Harness Repair Manual (RM1022E)
(f)Insert the SST into the connector in the direction
shown in the chart.
(g)Insert the SST fully to the tool hole, and push the
terminal lance.
NOTICE:
�The terminal has a lance shape, therefore, the
housing may be damaged and the terminal may get
stuck if forcibly pried by wires etc.
�Insert the SST so that the stopper portion surface is
facing up.
(h)Carefully withdraw the terminal from the connector by
pulling the lead toward the rear of the connector.
NOTICE:
Removal of the terminal from housing cavity will cause
damage to the wire seal section, deteriorating
waterproofing performance. Replace the connector
with a new one.
NOTICE:
Do not insert the special tool into the female terminal
box. If you do so, replace the terminal with the new one
whether the terminal is broken or not.
NOTICE:
As for Non±waterproof type TLC housing, insert the
special tool into the housing from wire harness side.
Page 2164 of 2543
Tool Hole
Terminal LanceSpecial
Tool
Special
Tool
Tool HoleSpecial Tool
Terminal
Lance Special Tool 0.64 Type
B±25
TERMINAL AND CONNECTOR REPAIR±TERMINAL REPLACEMENT
35
Wire Harness Repair Manual (RM1022E)
Insulation Displacement Connector Type
(a)Using a special tool, push the terminal lance from the
tool hole.
(b)Carefully withdraw the terminal from the connector by
pulling the lead toward the rear of the connector.
NOTICE:
�Do not use too much force. If the terminal does not
come out easily, repeat step (a).
�Always change the wire with the repair wire, in
accordance with page B±27.
Page 2170 of 2543

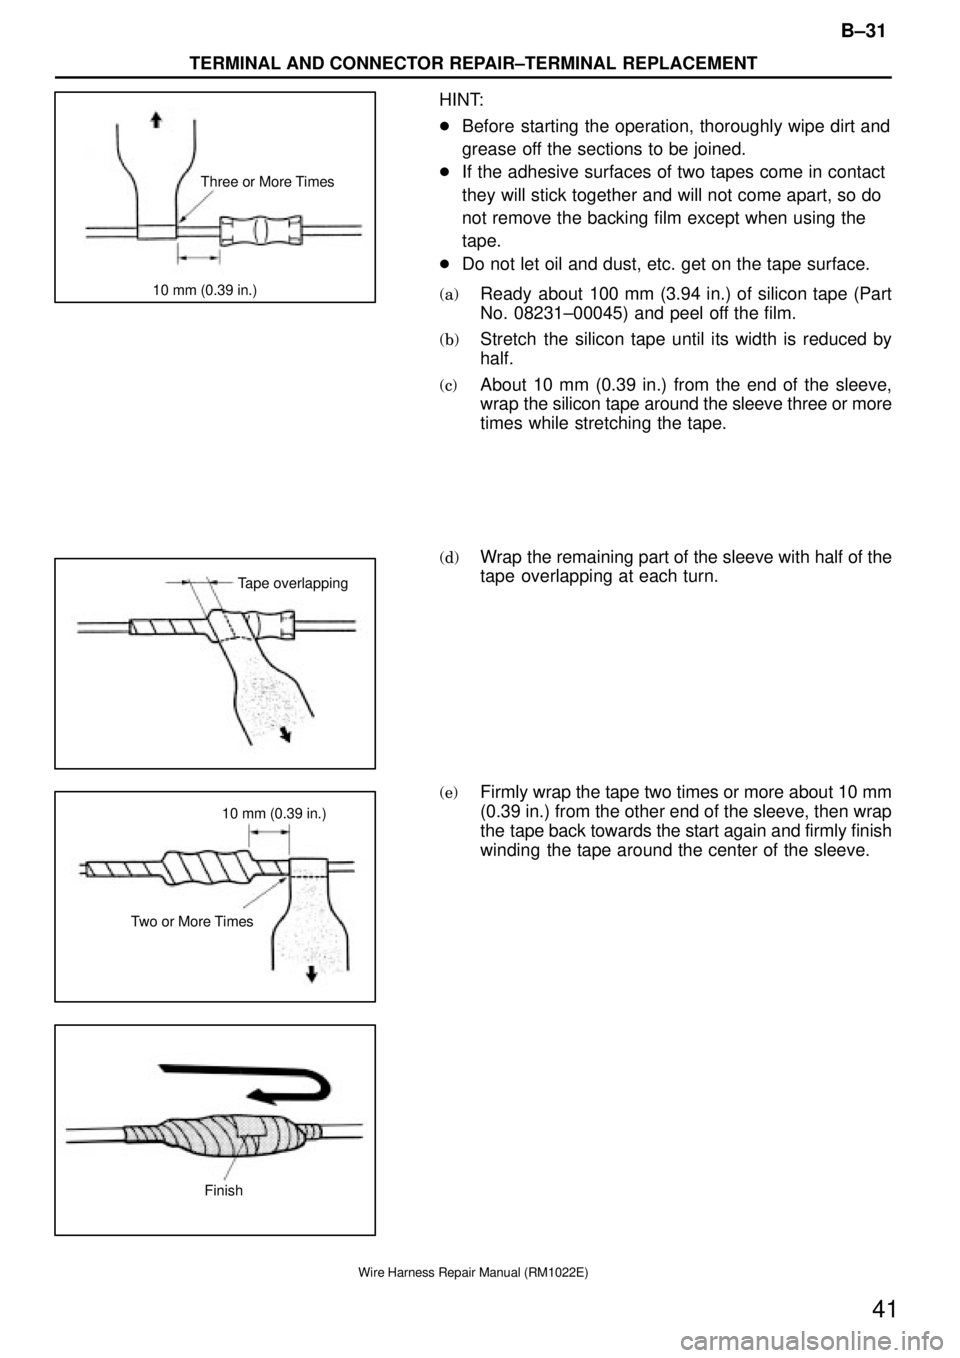
Three or More Times
10 mm (0.39 in.)
Tape overlapping
10 mm (0.39 in.)
Two or More Times
Finish
B±31
TERMINAL AND CONNECTOR REPAIR±TERMINAL REPLACEMENT
41
Wire Harness Repair Manual (RM1022E)
HINT:
�Before starting the operation, thoroughly wipe dirt and
grease off the sections to be joined.
�If the adhesive surfaces of two tapes come in contact
they will stick together and will not come apart, so do
not remove the backing film except when using the
tape.
�Do not let oil and dust, etc. get on the tape surface.
(a)Ready about 100 mm (3.94 in.) of silicon tape (Part
No. 08231±00045) and peel off the film.
(b)Stretch the silicon tape until its width is reduced by
half.
(c)About 10 mm (0.39 in.) from the end of the sleeve,
wrap the silicon tape around the sleeve three or more
times while stretching the tape.
(d)Wrap the remaining part of the sleeve with half of the
tape overlapping at each turn.
(e)Firmly wrap the tape two times or more about 10 mm
(0.39 in.) from the other end of the sleeve, then wrap
the tape back towards the start again and firmly finish
winding the tape around the center of the sleeve.