Page 352 of 1701
TROUBLEDIAGNOSES
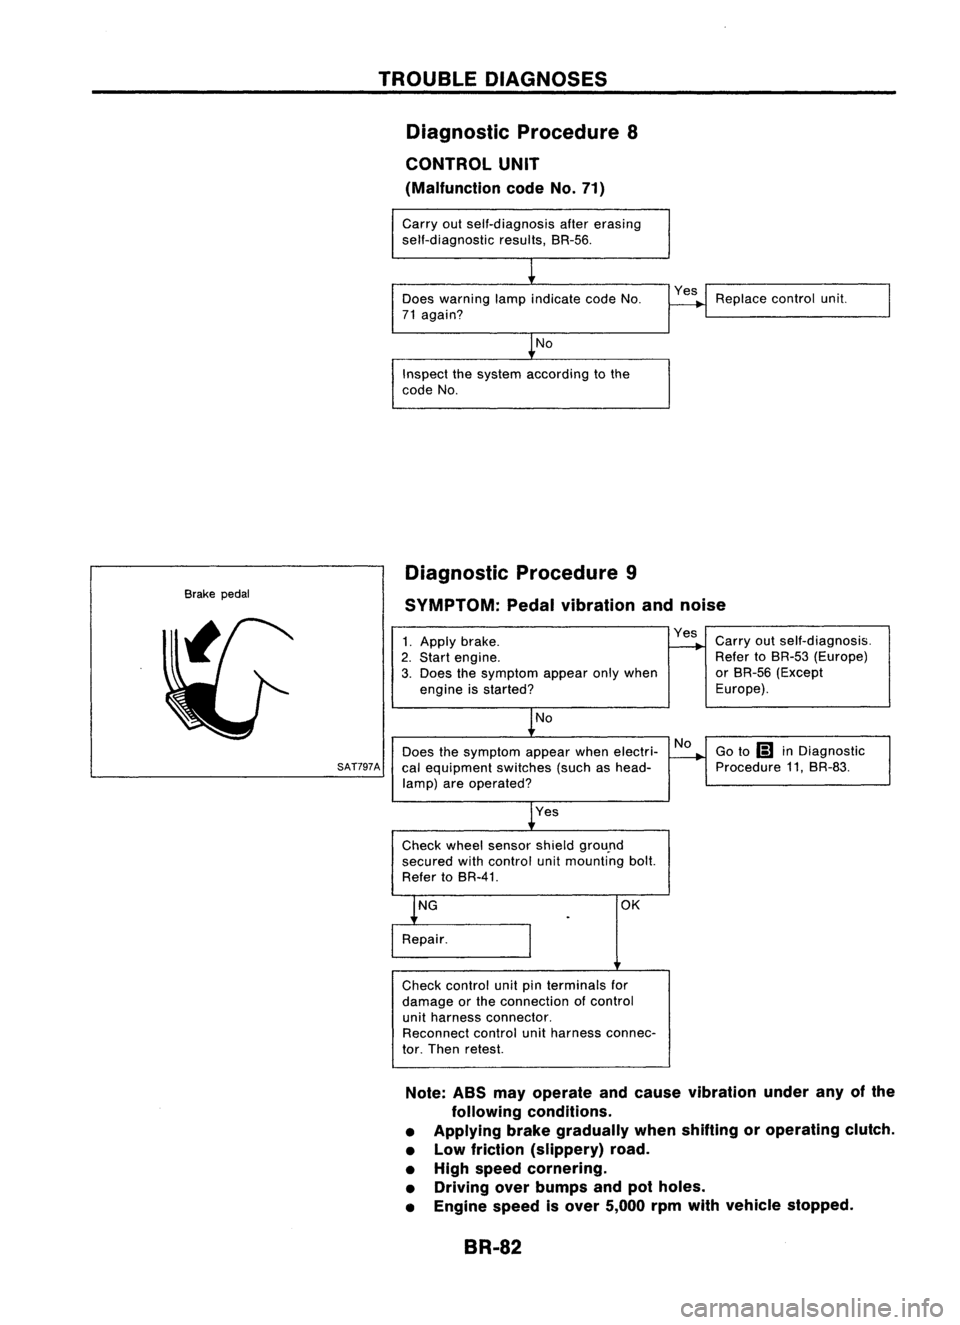
Diagnostic Procedure8
CONTROL UNIT
(Malfunction codeNo.71)
Carry outself-diagnosis aftererasing
self-diagnostic results,BR-56.
Does warning lampindicate codeNo.
71 again?
No
Inspect thesystem according tothe
code No. Yes
Replace controlunit.
Brake pedal Diagnostic
Procedure9
SYMPTOM: Pedalvibration andnoise
No
Does thesymptom appearwhenelectri-
SAT797A
calequipment switches(suchashead-
lamp) areoperated?
1.
Apply brake.
2. Start engine.
3. Does thesymptom appearonlywhen
engine isstarted?
No
Yes
Check wheelsensor shieldgrou.nd
secured withcontrol unitmounting bolt.
Refer toBR-41. Yes
Carryoutself-diagnosis.
Refer toBR-53 (Europe)
or BR-56 (Except
Europe).
Go to
Ii1
inDiagnostic
Procedure 11,BR-83.
OK
Check control unitpinterminals for
damage orthe connection ofcontrol
unit harness connector.
Reconnect controlunitharness connec-
tor. Then retest.
Note: ABSmayoperate andcause vibration underanyofthe
following conditions.
• Applying brakegradually whenshifting oroperating clutch.
• Low friction (slippery) road.
• High speed cornering.
• Driving overbumps andpotholes.
• Engine speedisover 5,000 rpmwith vehicle stopped.
BR-82
Page 419 of 1701
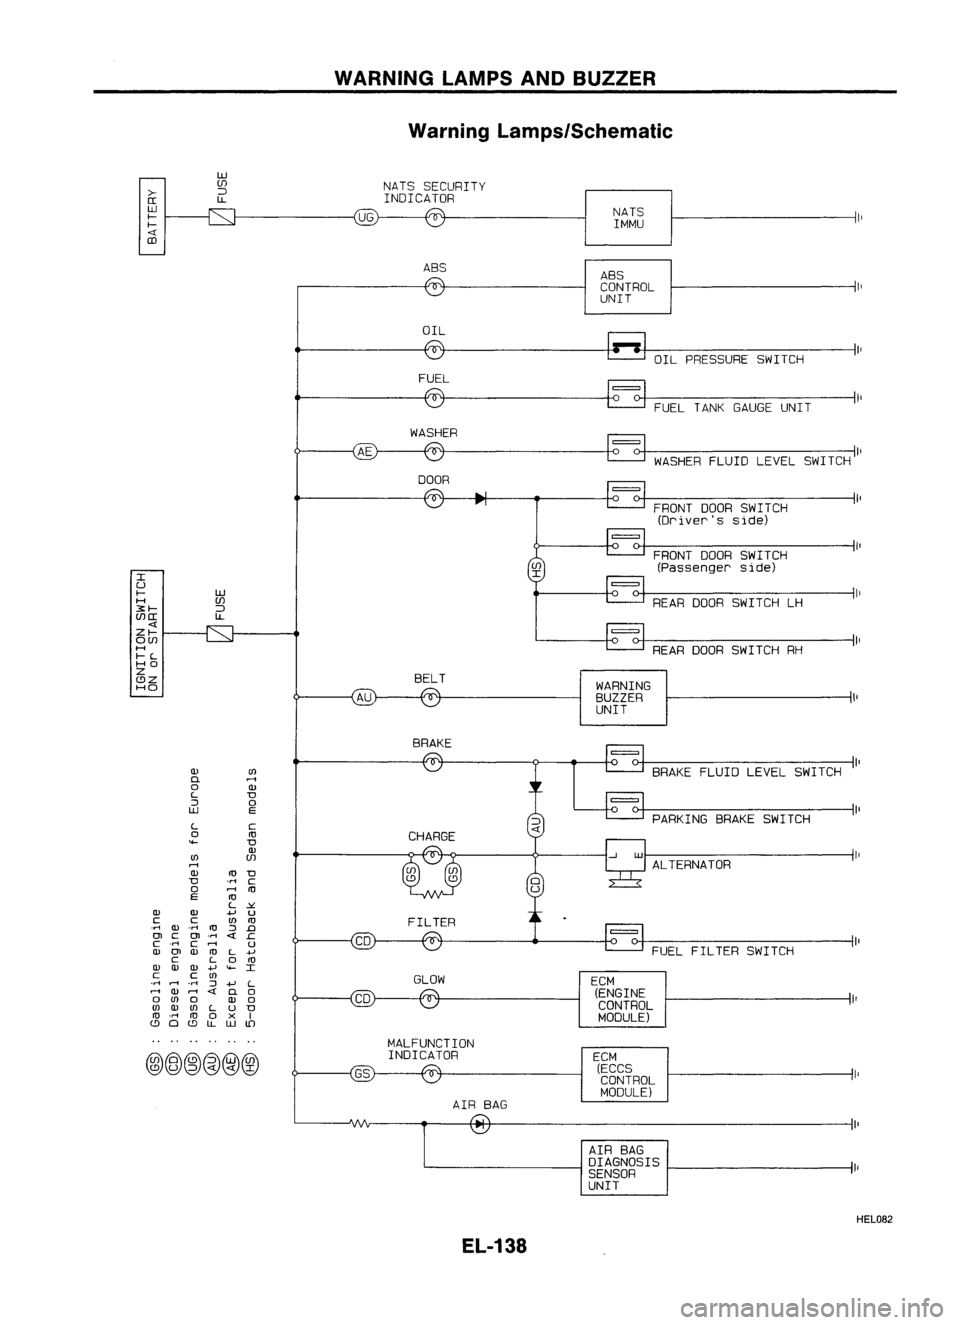
Brush/
Brush spring
SEL015Z STARTING
SYSTEM
Brush Check (Conl'd)
BRUSH SPRING PRESSURE
Check brushspring pressure withbrush spring detached from
brush.
Spring pressure (withnewbrush):
Refer toSOS (EL-50).
e Not within thespecified values...Replace.
Type 1
Type 2
Type 3
SEL016ZBRUSH
HOLDER
1. Perform insulation testbetween brushholder (positive side)
and itsbase (negative side).
e.
Continuity exists....Replace.
2. Check brushtosee ifitmoves smoothly.
e Ifbrush holder isbent, replace it;ifsliding surface isdirty,
clean.
Type 1
Type 2
SEL018ZYoke
Check
Magnet issecured toyoke bybonding agent.Checkmagnet to
see that itis secured toyoke andforany cracks. Replace mal-
functioning partsasan assembly.
Holder maymove slightly asitis only inserted andnotbonded.
CAUTION: Do not clamp yokeinavice orstrike itwith ahammer .
EL-47
•
Page 510 of 1701
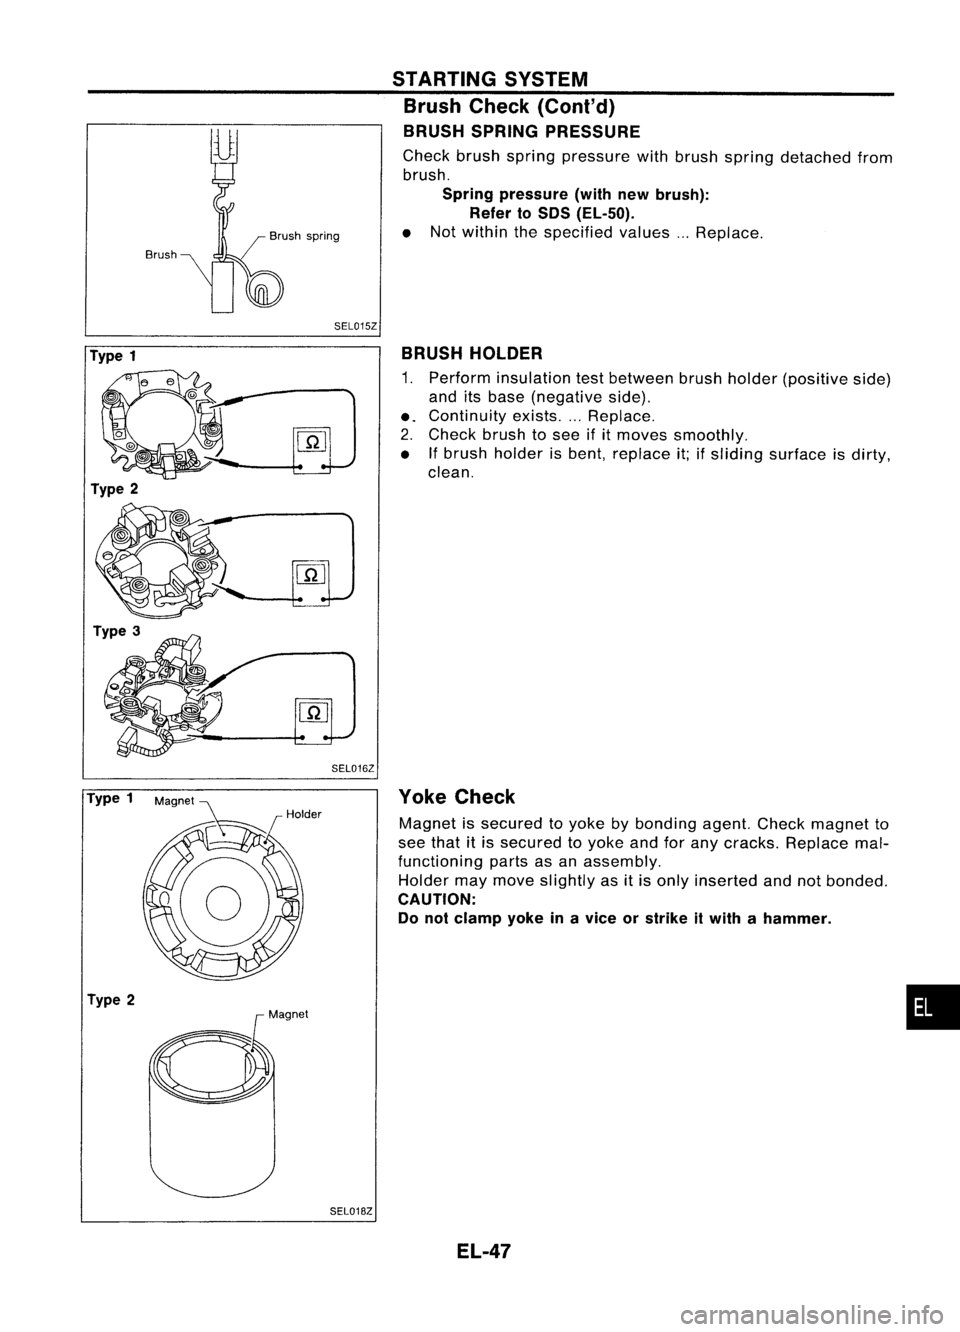
WARNINGLAMPSANDBUZZER
Warning Lamps/Schematic
>-
[[
W
f-
f-
CD
w
(f)
:J
l.L
UG
NATS
SECURITY
INDICATOR
NATSIMMU
ABS ABS
CONTROL
UNIT
OIL OILPRESSURE SWITCH
FUEL
FUELTANKGAUGE UNIT
WASHER
WASHERFLUIDLEVELSWITCH
DOOR
FRONTDOORSWITCH
(Driver's side)
FRONT DOORSWITCH
(Passenger side)
REAR ODOR SWITCH LH
ALTERNATOR PARKING
BRAKESWITCH
FUEL FILTER SWITCH
=
BRAKE
FLUIDLEVEL SWITCH
REAR
ODORSWITCH RH
=
WARNING
BUZZER
UNIT
=
ECM (ECCS
CONTROL
MODULE)
ECM
(ENGINE
CONTROL
MODULE)
I
U
f- W
H (f)
3:f-
:J
(f)[[
l.L
Zf-
O(f)
H
f-L
HO
Z
BELT
C!JZ
HO
BRAKE
Q)
(I)
D.
rl
0
Q)
L
D
::J
0
W
E
L
C
0
ro
""-
D
Q)
(I)
(f)
rl
Q)
ro
D
D
'M
C
0
rl
ro
E
ro
L
~
Q) Q)
.....
u
C C
(I)
ro
.M
Q)
.M
ro
::J
.0
OJ
C
OJ
.M
.c
c
.M
C
rl
U
Q)
OJ
Q)
ro
L
+'
C
L
0
ro
Q) Q) Q)
.....
""-
I
C C
(I)
GLOW
.M
rl
.
M
::J
.....
L
rl
Q)
rl
D.
0
0
(I)
0
Q)
0
(I)
Q)
(I)
L
u
D
ro
.M
ro
0
x
I
C!J
0
C!J
l.L
W
lD
MALFUNCTION
@@~@@@
INDICATOR
AIRBAG
AIRBAG
DIAGNOSIS
SENSOR
UNIT
HEL082
EL-138
Page 511 of 1701
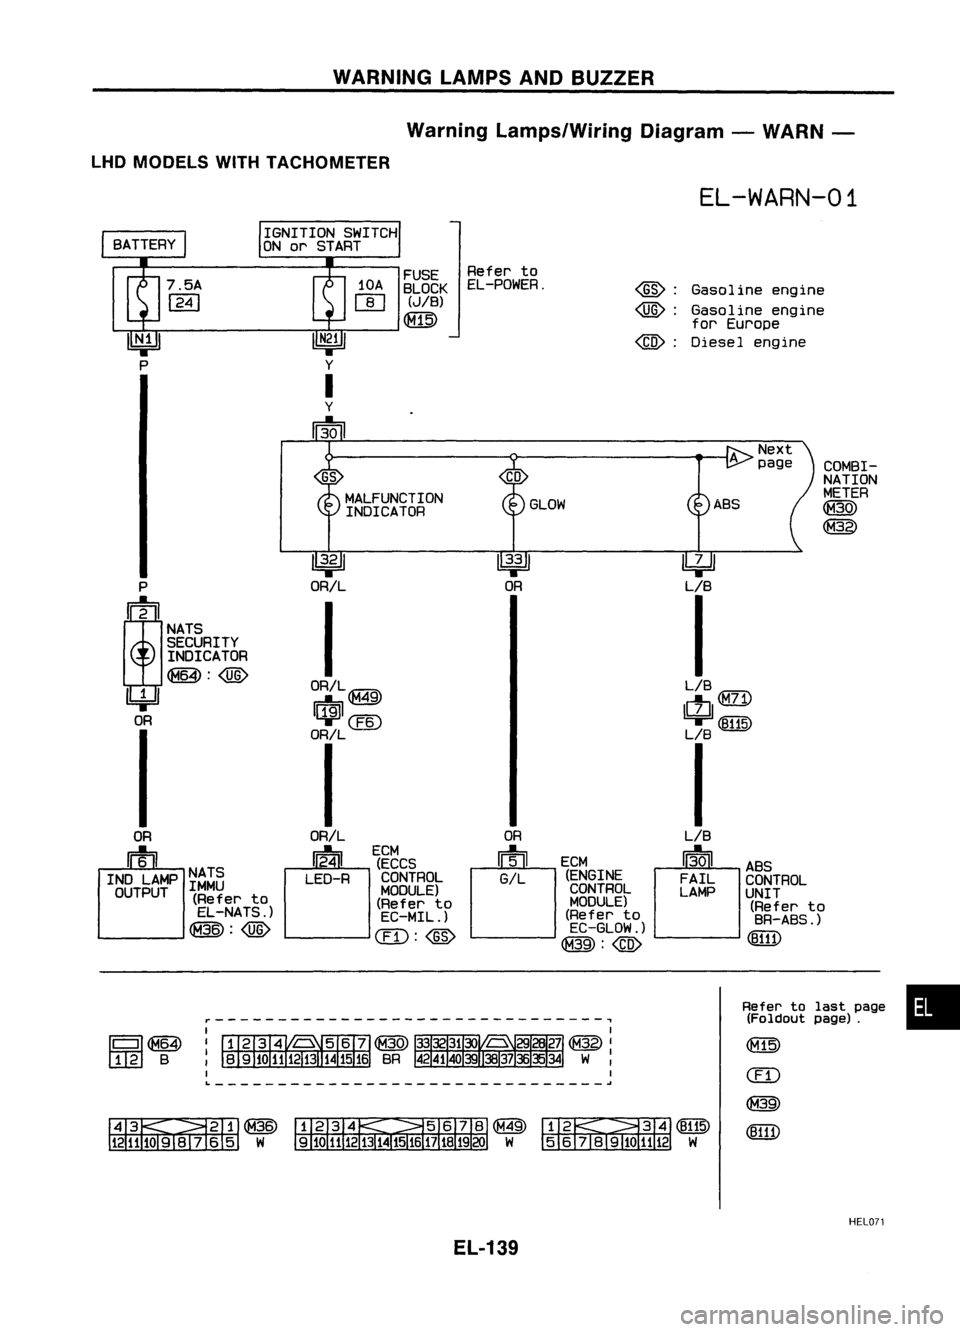
WARNINGLAMPSANDBUZZER
Warning Lamps/Wiring Diagram-WARN -
LHD MODELS WITHTACHOMETER
EL-WARN-01
Gasoline engine
Gasoline engine
for Europe
Diesel engine
@:
@):
@:
FUSE
Referto
10A BLOCK EL-POWER.
rn
(JIB)
Qill)
IGNITION
SWITCH
ON orSTART
COMBI-
GS
NATION
MALFUNCTION METER
INDICATOR GLOW
ABS
~
@)
~ ~~
P ORIL OR
LIB
;
I
I
NATS
SECURITY
INDICATOR
~:@)
ORIL@ LIB
IbjJ
rrf9il
49
ctJ
(M71)
OR
~@
'T
(8115)
ORIL LB
I I
OR ORIL OR
LIB
m
~
ECM
[~JCM
13-01
u'ECCS
ABS
INO LAMP NATS
LEO-RCONTROL GIL
(ENGINE
FAILCONTROL
OUTPUT IMMU
MODULE)CONTROL
LAMPUNIT
(Refer to
(Referto MODULE)
(Referto
EL-NATS.) EC-MIL.) (Refer
to
BR-ABS.)
~:@)
CIT):@
EC-GLOW.)
(8111)
@:@)
r-------------------------------,
IIIII~
1 2 B
~~@
1211J09lv 6
5
W
Refer
tolast page •
(Foldout page).
&~~
5
6j819101112 W
HELD?1
EL-139
Page 515 of 1701
WARNINGLAMPSANDBUZZER
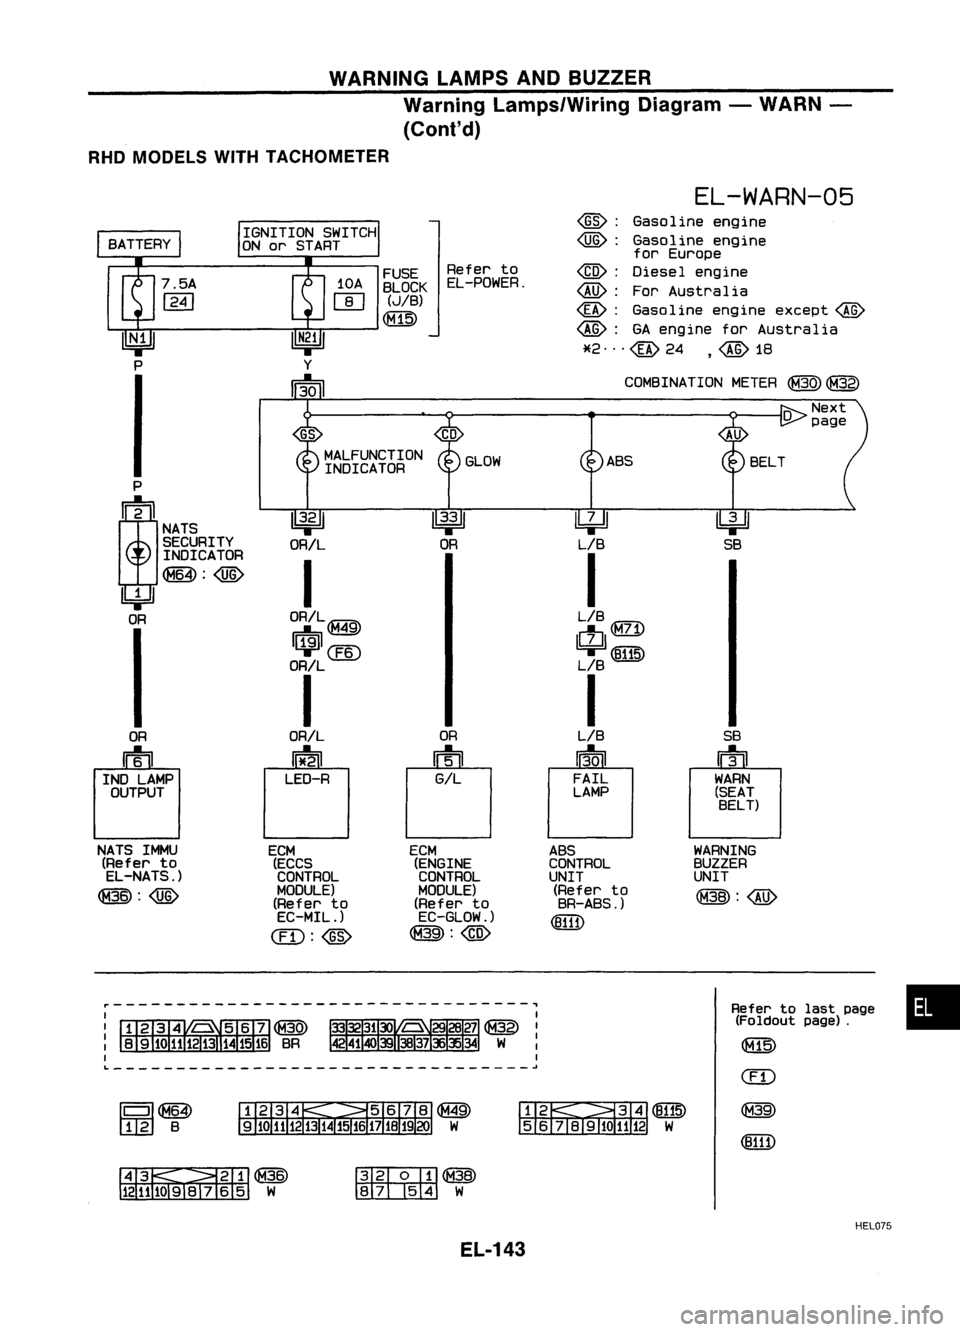
Warning Lamps/Wiring Diagram-WARN -
(Conl'd)
RHD MODELS WITHTACHOMETER
•
Refer
tolast page
(Foldout page).
(f1lli)
(ED
@
(8111)
WARNING
BUZZER
UNIT
@:@
~
SB
SB
u1il
r
WARN
(SEAT BELT)
EL-WARN-05
~: Gasoline engine
~: Gasoline engine
for Europe
~: Diesel engine
~: ForAustralia
~: Gasoline engineexcept~
~: GAengine forAustralia
*2"'@24 ,~1B
COMSINA TIONMETER
@)
@)
~~
5 6
J8191Q
1112
W
FUSE
Referto
BLOCK EL-POWER.
(JIB)
IIIII~
1 2 B
r---------------------------------,
GS
MALFUNCTION GLOWASS
INDICATOR
P
!
~
~
~
NATS
SECURITY ORIL OR
LIB
INDICATOR
I
I
~:@
'4=Jl
OR ORIL~ LIB
QQD
I$I@
ctl
71
I,
I
ORIL L
B
I I
OR ORILOR
LIB
n=til
0
U
13.0
I
IND LAMP LED-R
GILFAIL
OUTPUT LAMP
NATS IMMU
ECM ECM
ABS
(Refer to
(ECCS (ENGINECONTROL
EL-NATS.) CONTROLCONTROL
UNIT
@:~
MODULE)
MODULE)(Refer
to
(Refer to (Refer
to BR-ABS.)
EC-MIL.) EC-GLOW.)
(8111)
@: ~ @:@
~~@
12111091V
65 W
~@
~W
HEL075
EL-143
Page 519 of 1701
WARNINGLAMPSANDBUZZER
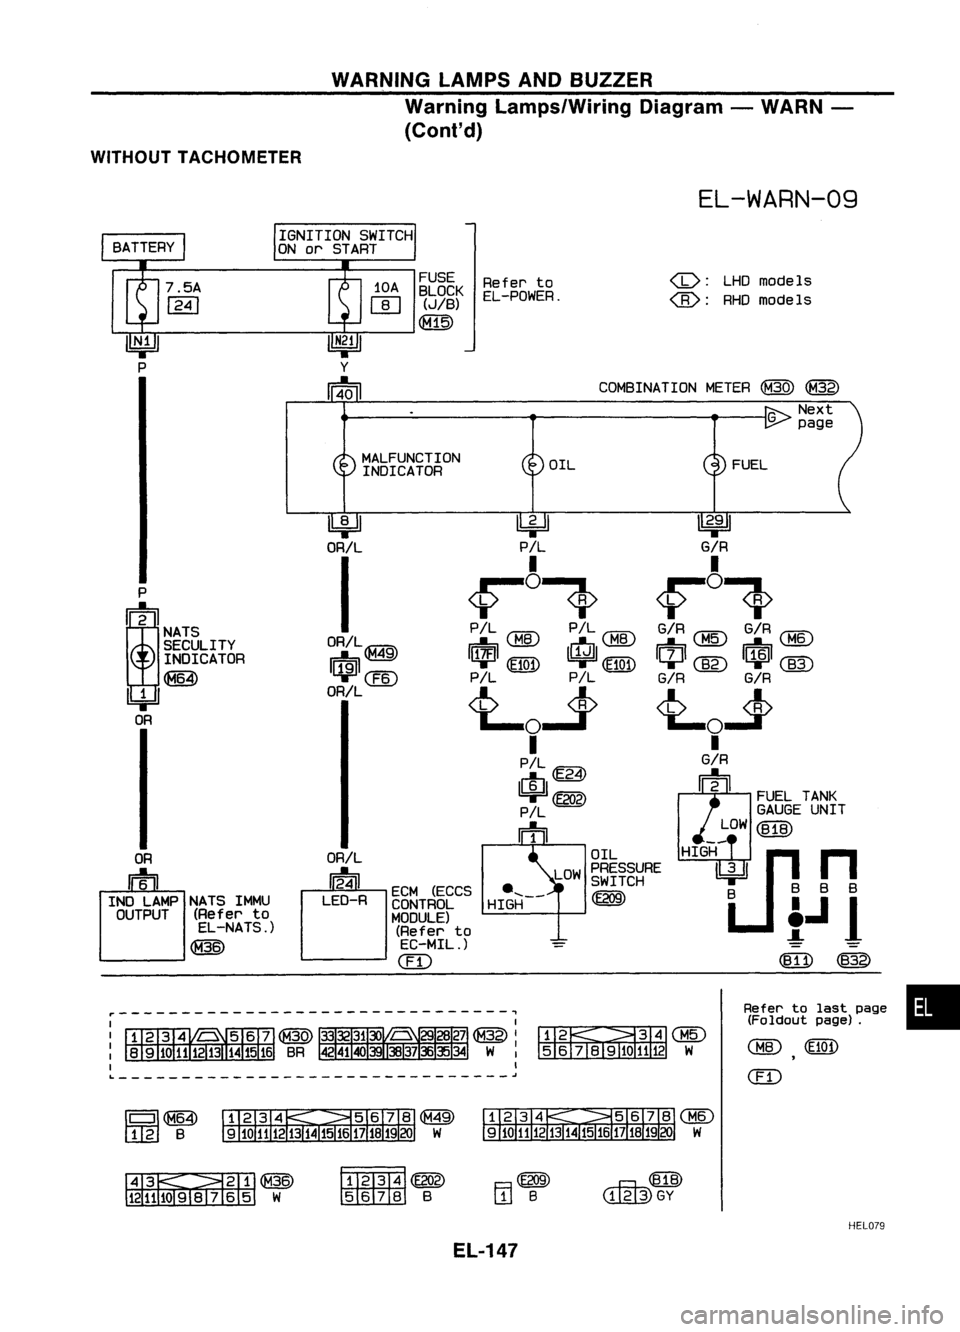
Warning Lamps/Wiring Diagram-WARN -
(Cont'd)
WITHOUT TACHOMETER
EL-WARN-09
FUELTANK
GAUGE UNIT
LOW (818)
HIGH
r.n
n
~ 888
B
i.Jl
FUEL
:
LHDmodels
@:
RHOmodels
~
G/R
I
0
1>
G/R ~ G/R~
1c!J1
@
1$1
(@
G/R G/R
~O~
I
G/R
m
OIL
LOW PRESSURE
SWITCH
HI~H-- ~
OIL
~
P/L
I
~01>
P
IL
f'UCi"\
P/L
f'UCi"\
~~ ~~
III7FII IlJdjl
T"' ~
'9F
(El0n
P/L P/L
t...oJ>
I
P/L~
c!J1illI
~(E202)
P/L
m
FUSE
Referto
8LOCK EL-POWER.
(J/8)
~
MALFUNCTION INDICATOR
~
ORIL
I
ORIL
Illii'n\
1i1'9il~
~@
ORIL
ORIL
0
24
LEO
RECM (ECCS
- CONTROL
MODULE) (Refer to
EC-MIL.)
ill)
P
;
NATS
SECULITY
INDICATOR
~
4=Jl
OR
OR
IFh
INO LAMP NATSIMMU
OUTPUT (Referto
EL-NATS.)
@>
L- __ --'
~-------------------------------~
~~@
5 6j819iO 1112W
Refer
tolast page •
(Foldout page).
CHID
(E10!)
ill)
IIIII~
128
~~@
l21U091V 65 W ~(E202)
rn::rn:rz::tm
8
([j])
<:lliTI)
GY
HEL079
EL-147
Page 539 of 1701
WIPERANDWASHER
Front Wiper Linkage
LHD models*
jfiiJ
'.8.5.1('."•'.52, ".9.45.1)
\
\
~: N.m(kg-m, in-Ib)
~
I
I
MEL664DA
'Structure isbasically theopposite forRHD models,
REMOVAL
1. Remove 4bolts thatsecure wipermotor.
2. Detach wipermotor fromwiper linkage atball joint.
3. Remove wiperlinkage.
Be careful nottobreak balljoint rubber boot.
INSTALLATION
• Grease balljoint portion beforeinstallation.
1. Installation isthe reverse orderofremoval.
EL-167
•
Page 551 of 1701
.WIPER ANDWASHER
SEL244P Headlamp
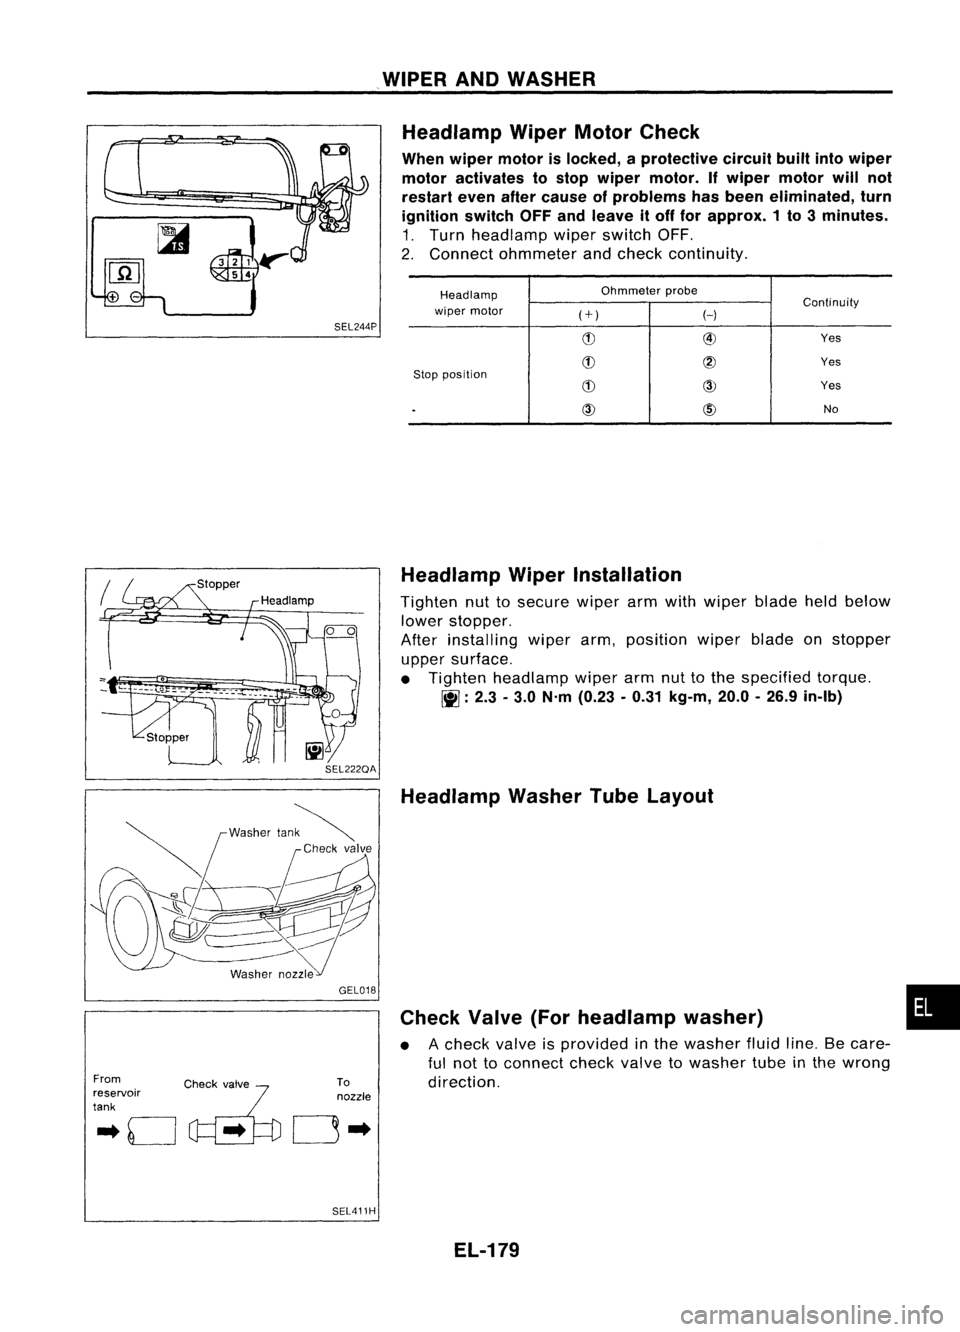
WiperMotorCheck
When wiper motor islocked, aprotective circuitbuiltintowiper
motor activates tostop wiper motor. Ifwiper motor willnot
restart evenaftercause ofproblems hasbeen eliminated, turn
ignition switchOFFandleave itoff for approx. 1to 3minutes.
1. Turn headlamp wiperswitch OFF.
2. Connect ohmmeter andcheck continuity.
Headlamp Ohmmeter
probe
Continuity
wiper motor
(+)
H
(!) @
Yes
(!)
@
Yes
Stop position
(!)
CID
Yes
.
CID
@)
No
From
.. 0
c~'..
~'fo
reservoir
tank GEL018
To
nozzle
0"
SEL411H Headlamp
WiperInstallation
Tighten nuttosecure wiperarmwith wiper bladeheldbelow
lower stopper.
After installing wiperarm,position wiperbladeonstopper
upper surface.
• Tighten headlamp wiperarmnuttothe specified torque.
~ :2.3 -3.0 N'm (0.23 -0.31 kg-m, 20.0-26.9 in-Ib)
Headlamp WasherTubeLayout
Check Valve(Forheadlamp washer)
• Acheck valveisprovided inthe washer fluidline.Becare-
ful not toconnect checkvalvetowasher tubeinthe wrong
direction.
EL-179
•

\
\
~: N.m(kg-m, in-Ib)
~
I
I
MEL664DA
'Structure isbasically theopposite forRHD mode")