Page 48 of 1771

Engine Removal/Installatio n
Removal (cont'd )
30. Remov e th e radiato r cap .
Us e car e whe n removin g th e radiato r
ca p to avoi d scaldin g b y ho t coolan t o r steam .
31 . Rais e th e hois t t o ful l height .
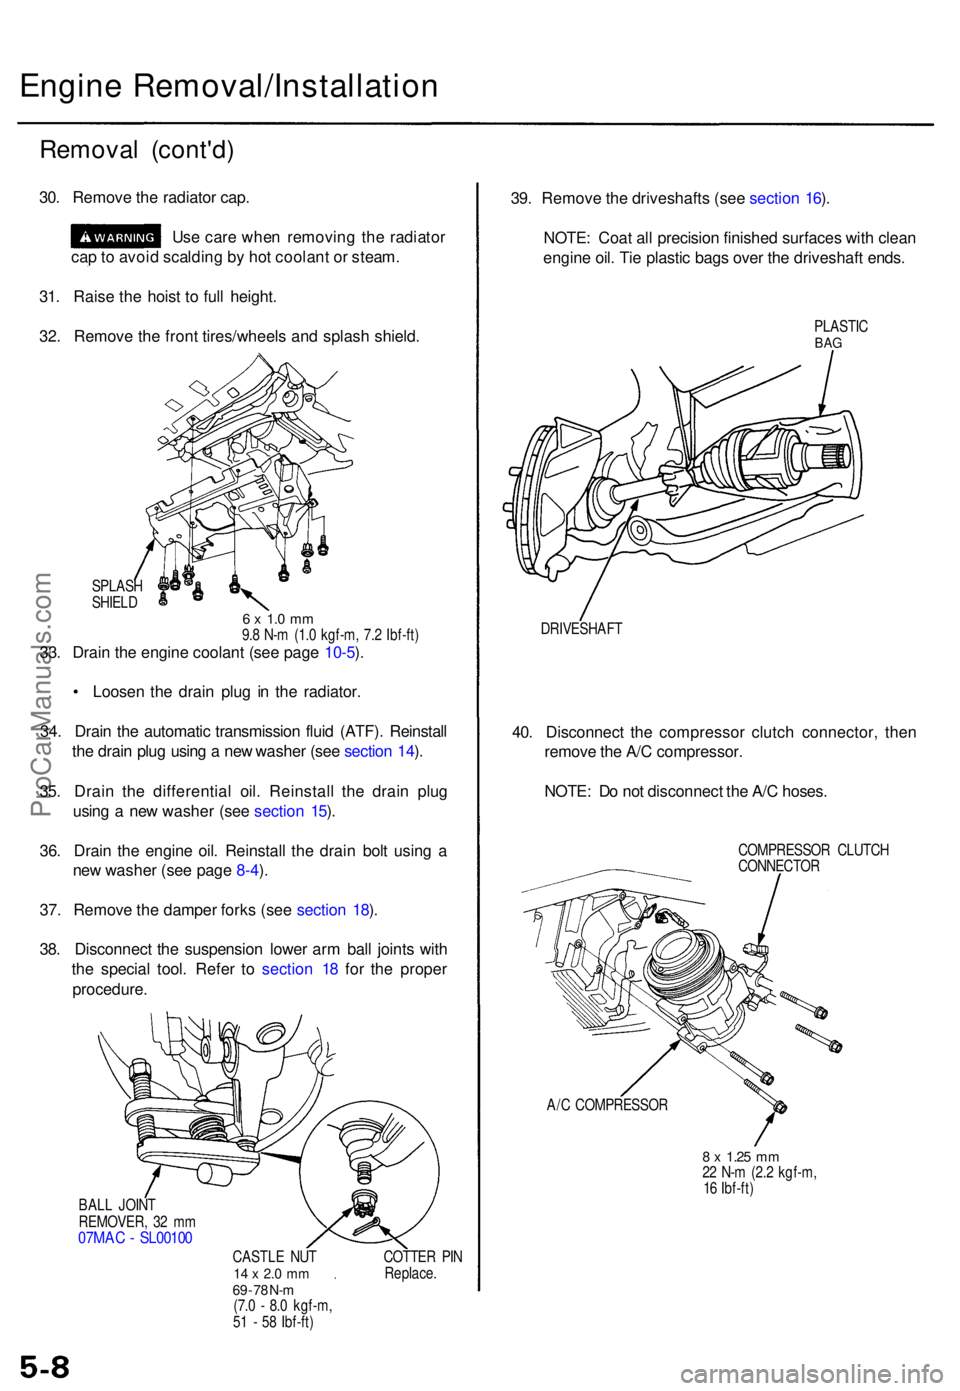
32 . Remov e th e fron t tires/wheel s an d splas h shield .
SPLAS H
SHIEL D
6 x 1. 0 m m9.8 N- m (1. 0 kgf-m , 7. 2 Ibf-ft )33. Drai n th e engin e coolan t (se e pag e 10-5 ).
• Loose n th e drai n plu g i n th e radiator .
34 . Drai n th e automati c transmissio n flui d (ATF) . Reinstal l
th e drai n plu g usin g a ne w washe r (se e sectio n 14 ).
35 . Drai n th e differentia l oil . Reinstal l th e drai n plu g
usin g a ne w washe r (se e sectio n 15 ).
36 . Drai n th e engin e oil . Reinstal l th e drai n bol t usin g a
ne w washe r (se e pag e 8-4 ).
37 . Remov e th e dampe r fork s (se e sectio n 18 ).
38 . Disconnec t th e suspensio n lowe r ar m bal l joint s wit h
th e specia l tool . Refe r t o sectio n 1 8 fo r th e prope r
procedure .
BALL JOIN T
REMOVER , 3 2 m m
07MA C - SL0010 0
CASTLE NU T14 x 2. 0 m m69 - 7 8 N- m(7. 0 - 8. 0 kgf-m ,
5 1 - 5 8 Ibf-ft ) COTTE
R PI N
Replace .
39. Remov e th e driveshaft s (se e sectio n 16 ).
NOTE : Coa t al l precisio n finishe d surface s wit h clea n
engin e oil . Ti e plasti c bag s ove r th e driveshaf t ends .
PLASTI CBAG
DRIVESHAF T
40. Disconnec t th e compresso r clutc h connector , the n
remov e th e A/ C compressor .
NOTE : D o no t disconnec t th e A/ C hoses .
COMPRESSO R CLUTC H
CONNECTO R
A/ C COMPRESSO R
8 x 1.2 5 mm22 N- m (2. 2 kgf-m ,
1 6 Ibf-ft )
ProCarManuals.com
Page 50 of 1771

Engine Removal/Installatio n
Removal (cont'd )
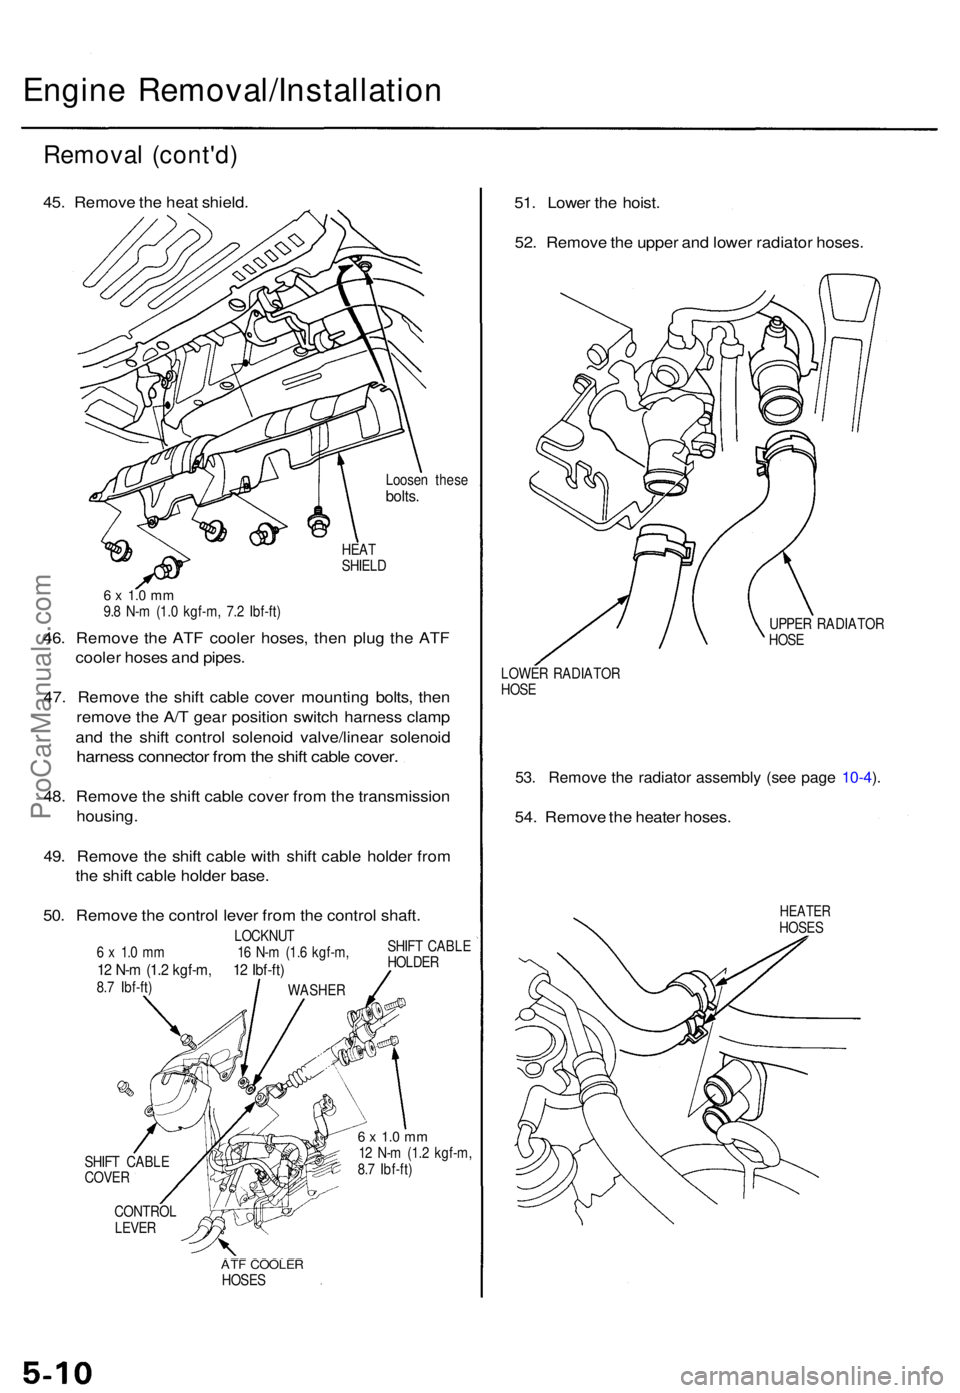
45. Remov e th e hea t shield .
Loosen thes ebolts.
HEAT
SHIEL D
6 x 1. 0 m m9.8 N- m (1. 0 kgf-m , 7. 2 Ibf-ft )
46. Remov e th e AT F coole r hoses , the n plu g th e AT F
coole r hose s an d pipes .
47 . Remov e th e shif t cabl e cove r mountin g bolts , the n
remov e th e A/ T gea r positio n switc h harnes s clam p
an d th e shif t contro l solenoi d valve/linea r solenoi d
harness connecto r fro m th e shif t cabl e cover .
48. Remov e th e shif t cabl e cove r fro m th e transmissio n
housing .
49 . Remov e th e shif t cabl e wit h shif t cabl e holde r fro m
th e shif t cabl e holde r base .
50 . Remov e th e contro l leve r fro m th e contro l shaft .
LOCKNU T
6 x 1. 0 m m 1 6 N- m (1. 6 kgf-m ,
12 N- m (1. 2 kgf-m , 1 2 Ibf-ft )8.7 Ibf-ft ) SHIF
T CABL E
HOLDE R
SHIF T CABL E
COVE R
CONTRO L
LEVER
6 x 1. 0 m m12 N- m (1. 2 kgf-m ,
8. 7 Ibf-ft )
ATF COOLE RHOSES
51. Lowe r th e hoist .
52 . Remov e th e uppe r an d lowe r radiato r hoses .
UPPER RADIATO R
HOS E
LOWE R RADIATO R
HOS E
53. Remov e th e radiato r assembl y (se e pag e 10-4 ).
54 . Remov e th e heate r hoses .
HEATE RHOSES
WASHE R
ProCarManuals.com
Page 51 of 1771
55. Attach the chain hoist to the engine.ProCarManuals.com
Page 52 of 1771
Engine Removal/Installation
Removal (cont'd)
56. Remove the center bracket.
CENTER
BRACKET
57. Remove the center mount.
CENTER
MOUNT
DAMPER
58. Separate the left and right engine mount brackets
from the left and right brackets.
LEFT:
LEFT
BRACKET
LEFT ENGINE
MOUNT BRACKET
RIGHT:
RIGHT ENGINE
MOUNT BRACKET
RIGHT
BRACKETProCarManuals.com
Page 53 of 1771
59. Raise the hoist.
60. Remove the shift cable guide bracket.
CAUTION: Take care not to bend the shift cable.
61. Remove the transmission beam from the body, and
loosen the three bolts on the transmission bracket.
SHIFT CABLE
GUIDE BRACKET
6 x 1.0 mm
9.8 N-m (1.0 kgf-m,
7.2 Ibf-ft)
TRANSMISSION
BEAM
Loosen these
bolts.
62. Remove the stop holder, mid mount stops and mid
mounts.
Replace.
MID MOUNT
STOP
(US model only)
STOP HOLDER
(US model only)
MID MOUNT
Replace.
63. Lower the hoist.
64. Raise the chain hoist to remove all slack from the
chain.
65. Check that the engine/transmission is completely
free of vacuum hoses, fuel and coolant hoses and
electrical wiring.
66. Slowly raise the engine approximately 150 mm (6 in).
Check once again that all hoses and wires are discon-
nected from the engine/transmission.
67. Remove the left and right brackets.
LEFT:
LEFT
BRACKET
RIGHT:
RIGHT
BRACKET
68. Raise the engine all the way and remove it from the
vehicle.ProCarManuals.com
Page 54 of 1771
Engine Removal/Installation
Installation
Bracket Bolts Torque Specifications:
REAR ENGINE
HANGER
P/S PUMP BRACKET
10 x
1.25
mm
44 N-m (4.5 kgf-m,
33 Ibf-ft)
ENGINE STIFFENER
10 x
1.25
mm
44 N-m (4.5 kgf-m, 33 Ibf-ft)
RIGHT ENGINE
MOUNT BRACKET
LEFT ENGINE
MOUNT BRACKET
12 x
1.25
mm
64 N-m (6.5 kgf-m,
47 Ibf-ft)
Install the bolts.
8 x
1.25
mm
22 N-m (2.2 kgf-m,
16 Ibf-ft)
ALTERNATOR
BRACKET
10 x
1.25
mm
44 N-m (4.5 kgf-m, 33 Ibf-ft)
8 x
1.25
mm
22 N-m (2.2 kgf-m,
16 Ibf-ft)
10 x
1.25
mm
44 N-m (4.5 kgf-m, 33 Ibf-ft)
10 x
1.25
mm
44 N-m (4.5 kgf-m,
33 Ibf-ft)
FRONT ENGINE
HANGERProCarManuals.com
Page 55 of 1771
Engine Installation:
Install the engine in the reverse order of removal.
Reinstall the mount bolts/nuts in the following sequence.
Failure to follow these procedures may cause excessive
noise and vibration, and reduce bushing life.
CAUTION: Take care not to damage the rear beam when
installing the engine/transmission assembly.
REAR BEAM
Mount the engine so that
the rear beam does not
hit the transmission.
1. Install the center mount, then tighten the bolts.
10 x
1.25
mm
54 N-m (5.5 kgf-m,
40 Ibf-ft)
10 x
1.25
mm
54 N-m (5.5 kgf-m,
40 Ibf-ft)
CENTER
MOUNT
DAMPER
2. Install the left bracket, then install the bolts/nut.
Do not tighten the bolts/nut.
LEFT
BRACKET
3. Install the right bracket, then install the bolts/nut.
Do not tighten the bolts/nut.
RIGHT
BRACKETProCarManuals.com
Page 56 of 1771

Engine Removal/Installatio n
Installation (cont'd )
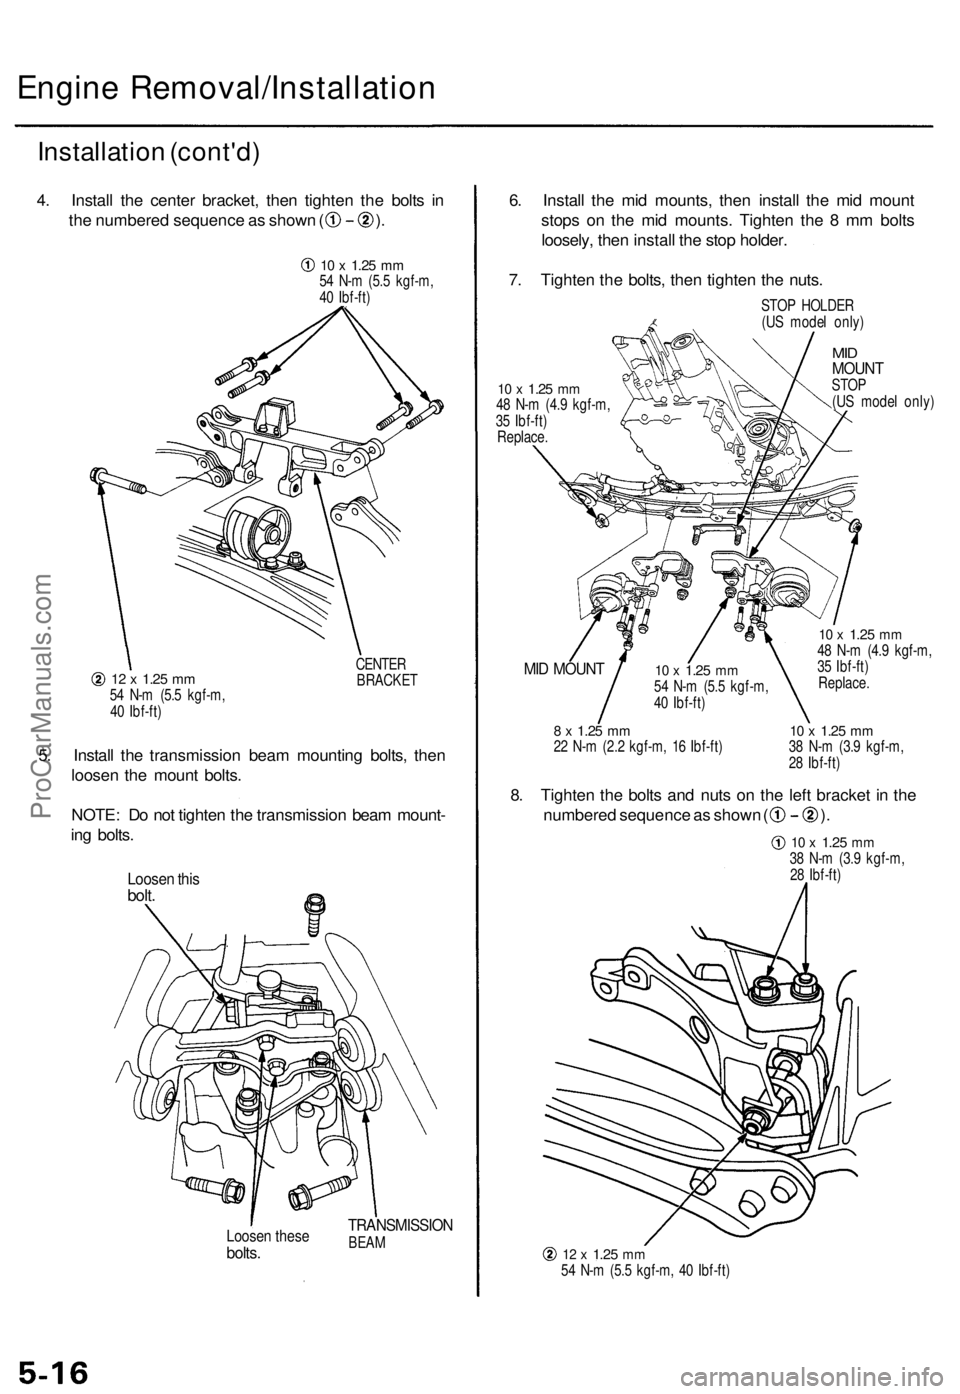
4. Instal l th e cente r bracket , the n tighte n th e bolt s i n
th e numbere d sequenc e a s show n ( ) .
12 x 1.2 5 mm54 N- m (5. 5 kgf-m ,
4 0 Ibf-ft ) CENTE
RBRACKE T
5. Instal l th e transmissio n bea m mountin g bolts , the n
loose n th e moun t bolts .
NOTE : D o no t tighte n th e transmissio n bea m mount -
in g bolts .
Loose n thi sbolt .
Loose n thes ebolts.
TRANSMISSIO NBEAM
6. Instal l th e mi d mounts , the n instal l th e mi d moun t
stop s o n th e mi d mounts . Tighte n th e 8 m m bolt s
loosely , the n instal l th e sto p holder .
7 . Tighte n th e bolts , the n tighte n th e nuts .
STOP HOLDE R
(U S mode l only )
10 x 1.2 5 mm48 N- m (4. 9 kgf-m ,
3 5 Ibf-ft )
Replace .
MIDMOUN TSTOP
(U S mode l only )
MID MOUN T
8 x 1.2 5 mm22 N- m (2. 2 kgf-m , 1 6 Ibf-ft )
10 x 1.2 5 mm48 N- m (4. 9 kgf-m ,
3 5 Ibf-ft )
Replace .
10 x 1.2 5 mm38 N- m (3. 9 kgf-m ,
2 8 Ibf-ft )
8. Tighte n th e bolt s an d nut s o n th e lef t bracke t i n th e
numbere d sequenc e a s show n ( ).
12 x 1.2 5 mm54 N- m (5. 5 kgf-m , 4 0 Ibf-ft )
10 x 1.2 5 mm54 N- m (5. 5 kgf-m ,
4 0 Ibf-ft )
10 x 1.2 5 mm38 N- m (3. 9 kgf-m ,
2 8 Ibf-ft )
10 x 1.2 5 mm54 N- m (5. 5 kgf-m ,
4 0 Ibf-ft )
ProCarManuals.com