Page 1386 of 1771
Windshield
Installation (cont'd )
8. Remov e th e windshield .
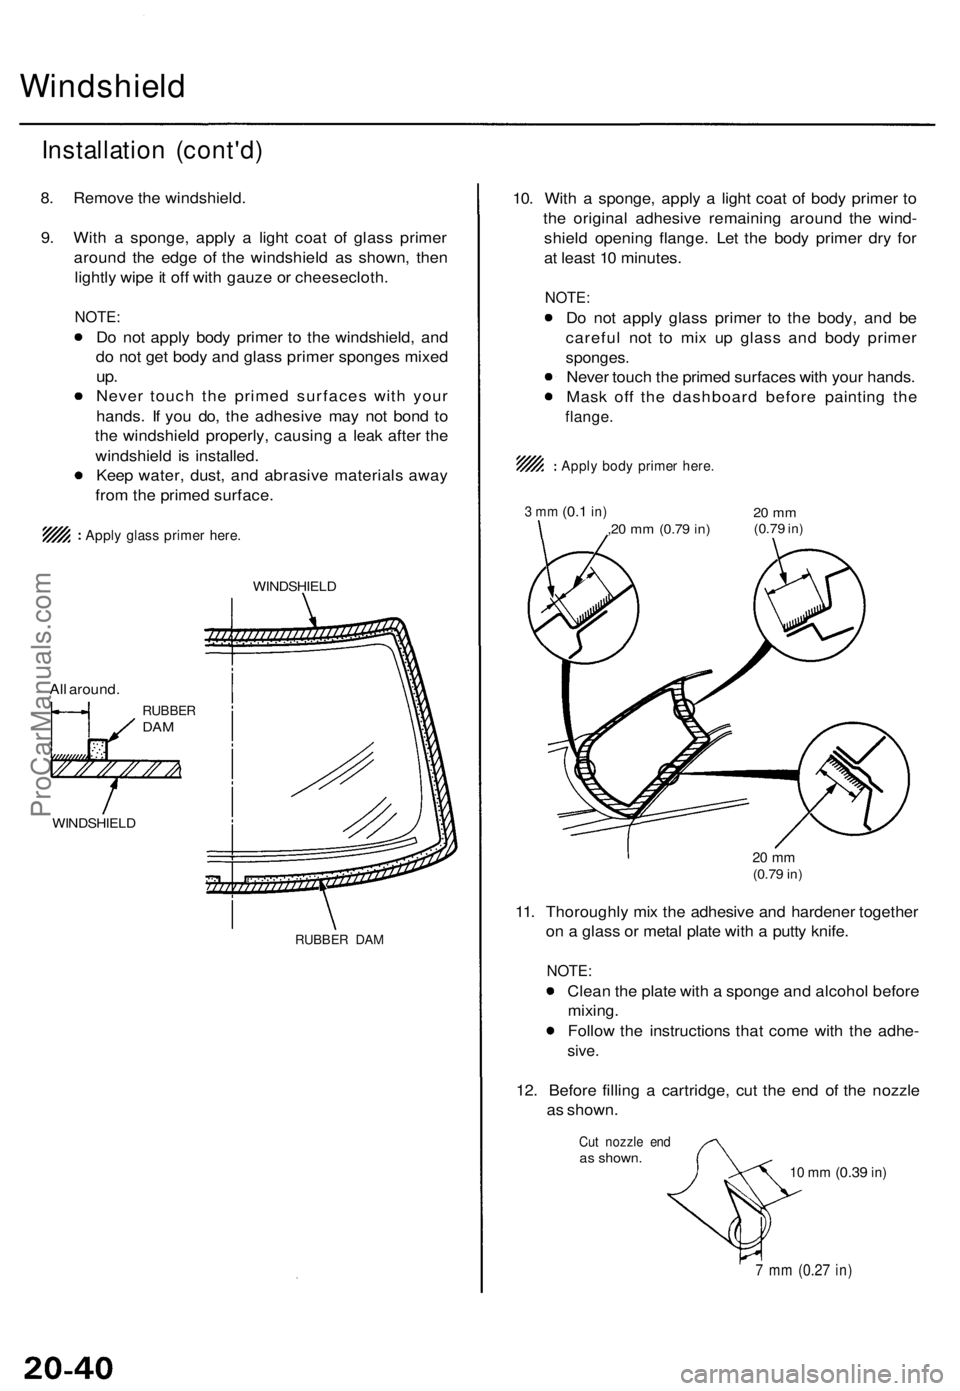
9 . Wit h a sponge , appl y a ligh t coa t o f glas s prime r
aroun d th e edg e o f th e windshiel d a s shown , the n
lightl y wip e it of f wit h gauz e o r cheesecloth .
NOTE:
Do no t appl y bod y prime r t o th e windshield , an d
d o no t ge t bod y an d glas s prime r sponge s mixe d
up.
Neve r touc h th e prime d surface s wit h you r
hands . I f yo u do , th e adhesiv e ma y no t bon d t o
th e windshiel d properly , causin g a lea k afte r th e
windshiel d i s installed.
Kee p water , dust , an d abrasiv e material s awa y
fro m th e prime d surface .
Apply glas s prime r here .
WINDSHIEL D
All around .
RUBBE RDAM
WINDSHIEL D
RUBBER DA M
10. Wit h a sponge , appl y a ligh t coa t o f bod y prime r t o
th e origina l adhesiv e remainin g aroun d th e wind -
shiel d openin g flange . Le t th e bod y prime r dr y fo r
a t leas t 1 0 minutes .
NOTE:
Do no t appl y glas s prime r t o th e body , an d b e
carefu l no t t o mi x u p glas s an d bod y prime r
sponges .
Never touc h th e prime d surface s wit h you r hands .
Mas k of f th e dashboar d befor e paintin g th e
flange .
Apply bod y prime r here .
3 m m (0. 1 in),20 m m (0.7 9 in)20 m m(0.7 9 in)
20 m m(0.7 9 in)
11. Thoroughl y mi x th e adhesiv e an d hardene r togethe r
o n a glas s o r meta l plat e wit h a putt y knife .
NOTE :
Clean th e plat e wit h a spong e an d alcoho l befor e
mixing .
Follo w th e instruction s tha t com e wit h th e adhe -
sive.
12. Befor e fillin g a cartridge , cu t th e en d o f th e nozzl e
a s shown .
Cut nozzl e en das shown .10 m m (0.3 9 in)
7 m m (0.2 7 in)
ProCarManuals.com
Page 1387 of 1771
RUBBERDAM
RUBBE RDAM
Mak e a slightl y thicke rbead a t eac h corner .
WINDSHIEL D
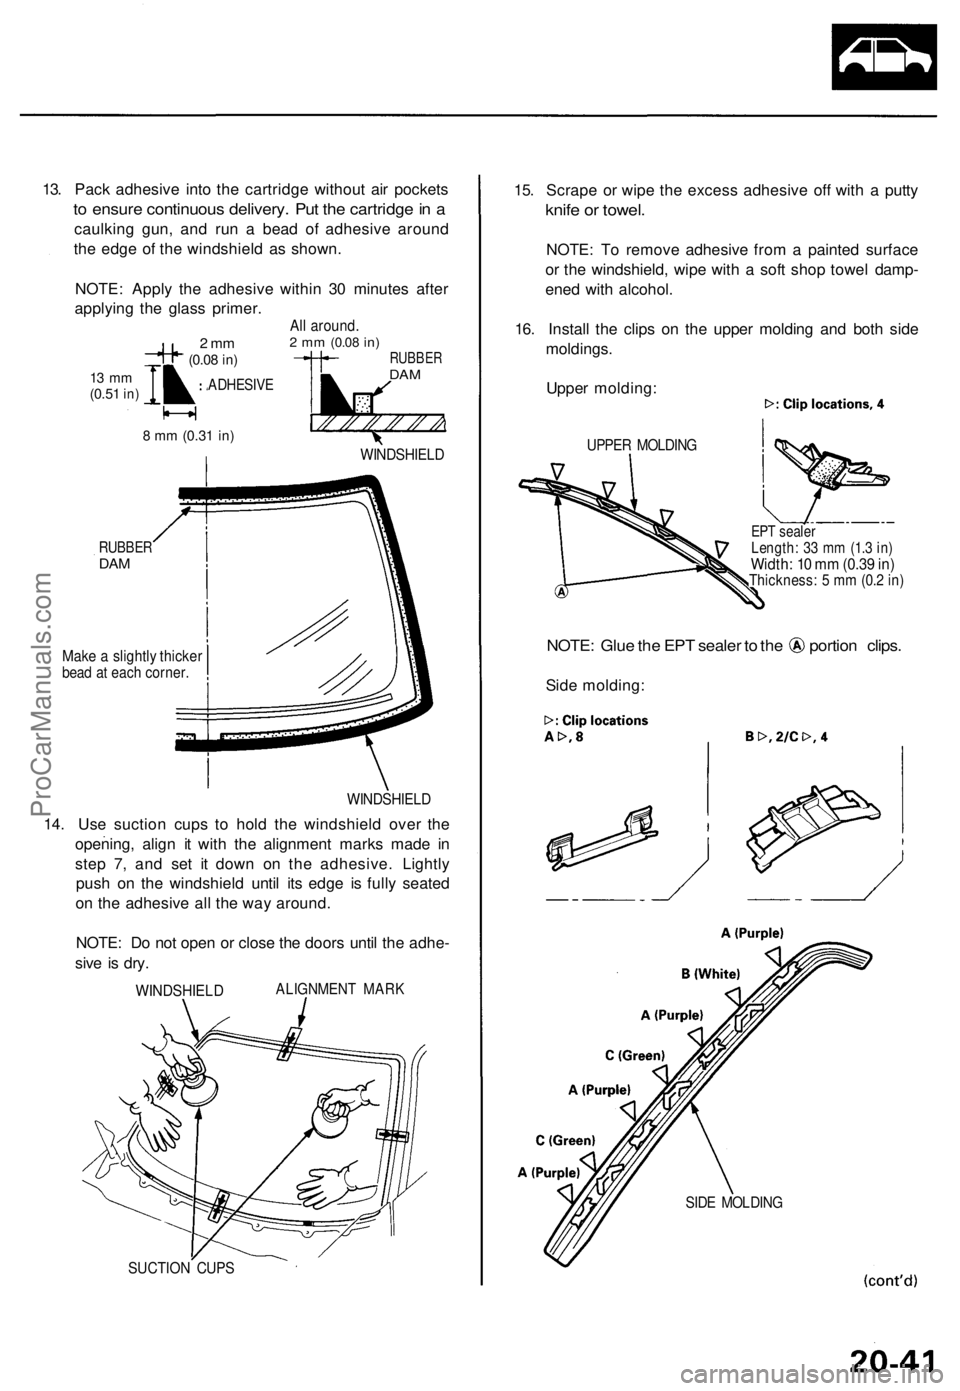
14. Us e suctio n cup s t o hol d th e windshiel d ove r th e
opening , alig n i t wit h th e alignmen t mark s mad e i n
ste p 7 , an d se t i t dow n o n th e adhesive . Lightl y
pus h o n th e windshiel d unti l it s edg e i s full y seated
o n th e adhesiv e al l th e wa y around .
NOTE : D o no t ope n o r clos e th e door s unti l th e adhe -
siv e i s dry .
ALIGNMEN T MAR KWINDSHIEL D
SUCTION CUP S
15. Scrap e o r wip e th e exces s adhesiv e of f wit h a putt y
knife o r towel .
NOTE : T o remov e adhesiv e fro m a painte d surfac e
o r th e windshield , wip e wit h a sof t sho p towe l damp -
ene d wit h alcohol .
16 . Instal l th e clip s o n th e uppe r moldin g an d bot h sid e
moldings .
Uppe r molding :
UPPER MOLDIN G
EPT seale rLength : 3 3 m m (1. 3 in )Width : 1 0 m m (0.3 9 in )Thickness : 5 m m (0. 2 in )
NOTE : Glu e th e EP T seale r t o th e portio n clips .
Side molding :
SIDE MOLDIN G
13. Pac k adhesiv e int o th e cartridg e withou t ai r pocket s
to ensur e continuou s delivery . Pu t th e cartridg e in a
caulkin g gun , an d ru n a bea d o f adhesiv e aroun d
th e edg e o f th e windshiel d a s shown .
NOTE : Appl y th e adhesiv e withi n 3 0 minute s afte r
applyin g th e glas s primer .
ADHESIV E
WINDSHIEL D
22 mm(0.08 in)
13 m m(0.5 1 in)
8 m m (0.3 1 in)
All around .2 m m (0.0 8 in)
ProCarManuals.com
Page 1393 of 1771
Rear Window
Installation (cont'd)
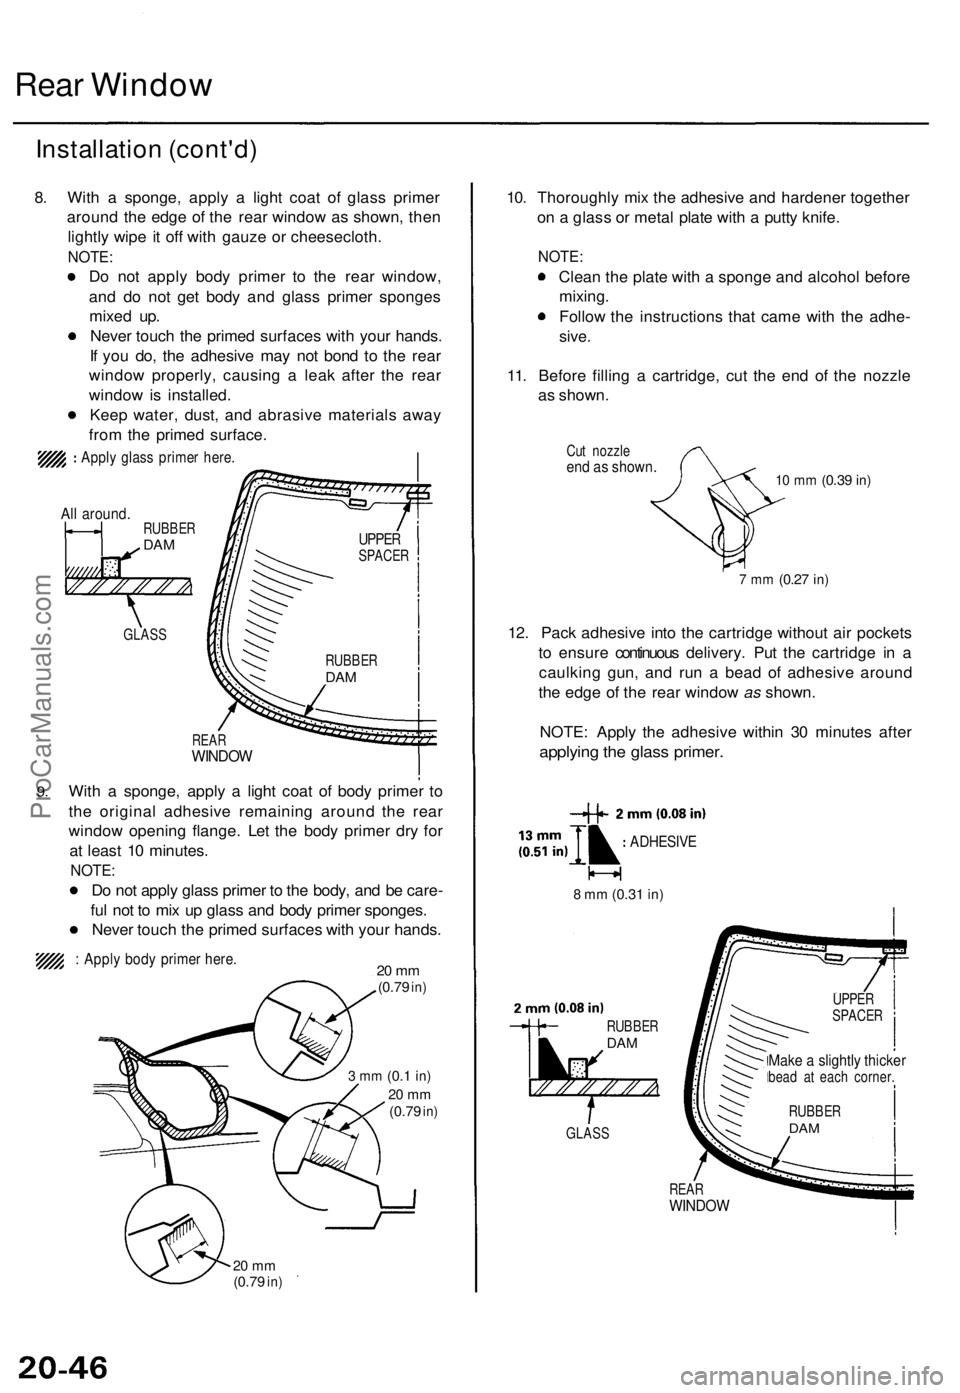
8. With a sponge, apply a light coat of glass primer
around the edge of the rear window as shown, then
lightly wipe it off with gauze or cheesecloth.
NOTE:
Do not apply body primer to the rear window,
and do not get body and glass primer sponges
mixed up.
Never touch the primed surfaces with your hands.
If you do, the adhesive may not bond to the rear
window properly, causing a leak after the rear
window is installed.
Keep water, dust, and abrasive materials away
from the primed surface.
Apply glass primer here.
All around.
9.
REAR
WINDOW
With a sponge, apply a light coat of body primer to
the original adhesive remaining around the rear
window opening flange. Let the body primer dry for
at least 10 minutes.
NOTE:
Do not apply glass primer to the body, and be care-
ful not to mix up glass and body primer sponges.
Never touch the primed surfaces with your hands.
: Apply body primer here.
20 mm
(0.79
in)
3 mm
(0.1
in)
20 mm
(0.79
in)
20 mm
(0.79
in)
10. Thoroughly mix the adhesive and hardener together
on a glass or metal plate with a putty knife.
NOTE:
Clean the plate with a sponge and alcohol before
mixing.
Follow the instructions that came with the adhe-
sive.
11. Before filling a cartridge, cut the end of the nozzle
as shown.
Cut nozzle
end as shown.
10 mm
(0.39
in)
7 mm
(0.27
in)
12. Pack adhesive into the cartridge without air pockets
to ensure continuous delivery. Put the cartridge in a
caulking gun, and run a bead of adhesive around
the edge of the rear window as shown.
NOTE: Apply the adhesive within 30 minutes after
applying the glass primer.
8 mm
(0.31
in)
REAR
WINDOW
GLASS
RUBBER
DAM
ADHESIVE
UPPER
SPACER
RUBBER
DAM
Make a slightly thicker
bead at each corner.
GLASS
RUBBER
DAM
RUBBER
DAM
UPPER
SPACERProCarManuals.com
Page 1394 of 1771
13.
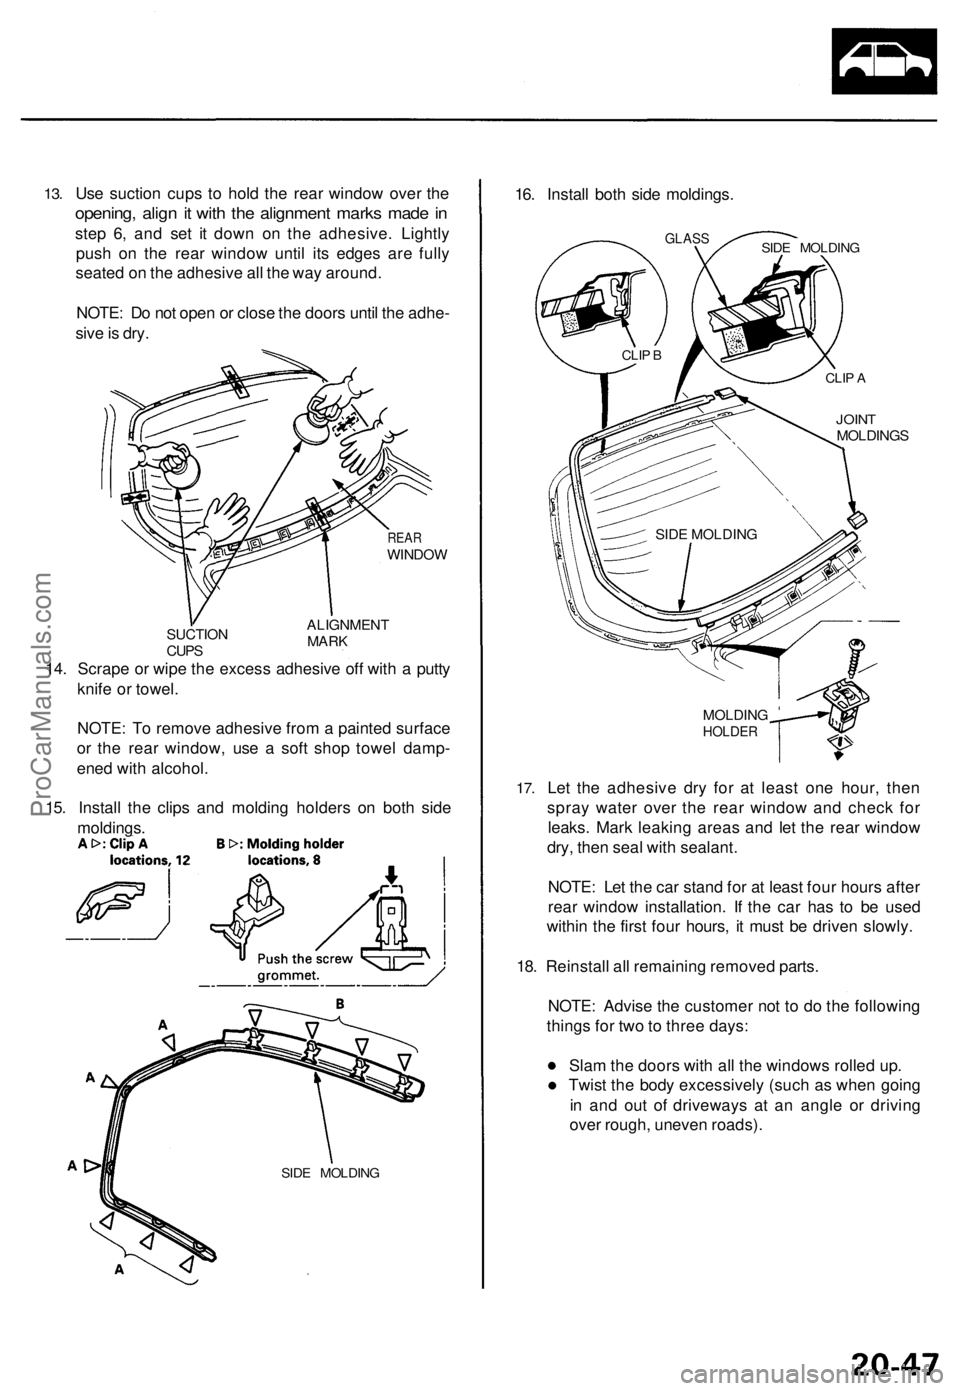
Use suction cups to hold the rear window over the
opening, align it with the alignment marks made in
step 6, and set it down on the adhesive. Lightly
push on the rear window until its edges are fully
seated on the adhesive all the way around.
NOTE: Do not open or close the doors until the adhe-
sive is dry.
REAR
WINDOW
14. Scrape or wipe the excess adhesive off with a putty
knife or towel.
NOTE: To remove adhesive from a painted surface
or the rear window, use a soft shop towel damp-
ened with alcohol.
15. Install the clips and molding holders on both side
moldings.
16. Install both side moldings.
GLASS
JOINT
MOLDINGS
MOLDING
HOLDER
17.
Let the adhesive dry for at least one hour, then
spray water over the rear window and check for
leaks. Mark leaking areas and let the rear window
dry, then seal with sealant.
NOTE: Let the car stand for at least four hours after
rear window installation. If the car has to be used
within the first four hours, it must be driven slowly.
18. Reinstall all remaining removed parts.
NOTE: Advise the customer not to do the following
things for two to three days:
Slam the doors with all the windows rolled up.
Twist the body excessively (such as when going
in and out of driveways at an angle or driving
over rough, uneven roads).
SIDE MOLDING
CLIP A
CLIP B
SIDE MOLDING
SIDE MOLDING
ALIGNMENT
MARK
SUCTION
CUPSProCarManuals.com
Page 1408 of 1771
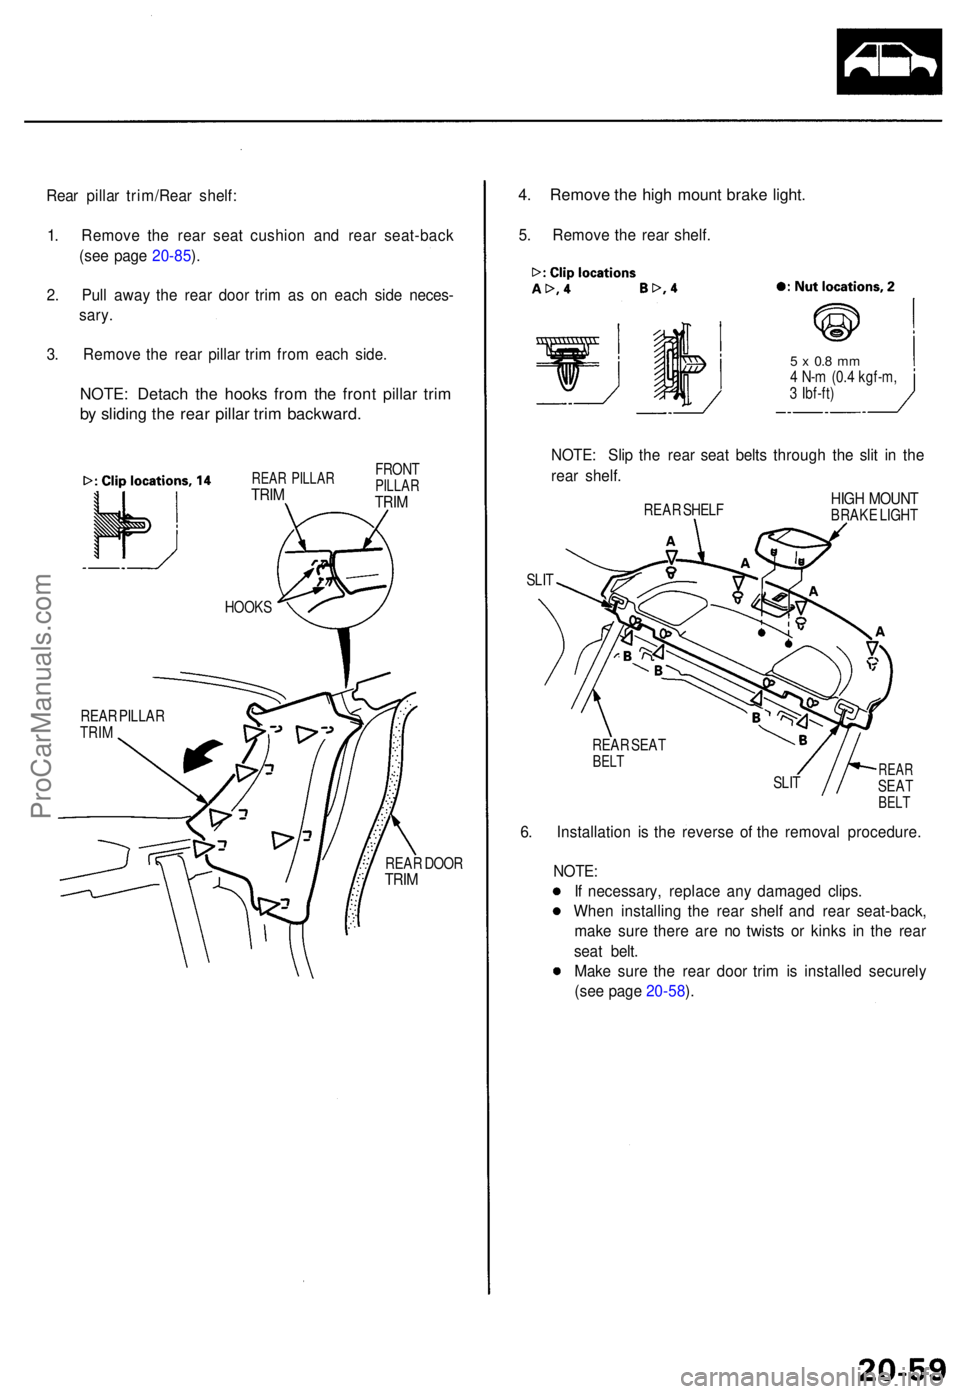
Rear pilla r trim/Rea r shelf :
1 . Remov e th e rea r sea t cushio n an d rea r seat-bac k
(se e pag e 20-85 ).
2 . Pul l awa y th e rea r doo r tri m a s o n eac h sid e neces -
sary .
3 . Remov e th e rea r pilla r tri m fro m eac h side .
NOTE : Detac h th e hook s fro m th e fron t pilla r tri m
by slidin g th e rea r pilla r tri m backward .
REAR DOO RTRIM
4. Remov e th e hig h moun t brak e light .
5. Remov e th e rea r shelf .
5 x 0. 8 m m4 N- m (0. 4 kgf-m ,
3 Ibf-ft )
NOTE : Sli p th e rea r sea t belt s throug h th e sli t i n th e
rea r shelf .
HIGH MOUN TBRAKE LIGH T
SLI T
REAR SEA T
BELT
SLITREA RSEATBELT
6. Installatio n i s th e revers e o f th e remova l procedure .
NOTE :
I f necessary , replac e an y damage d clips .
Whe n installin g th e rea r shel f an d rea r seat-back,
mak e sur e ther e ar e n o twist s o r kink s i n th e rea r
sea t belt .
Mak e sur e th e rea r doo r tri m is installe d securel y
(se e pag e 20-58 ).
REA R SHEL F
FRON
T
PILLA RTRIM
REA R PILLA RTRIM
REA R PILLA R
TRI M HOOK
S
ProCarManuals.com
Page 1415 of 1771
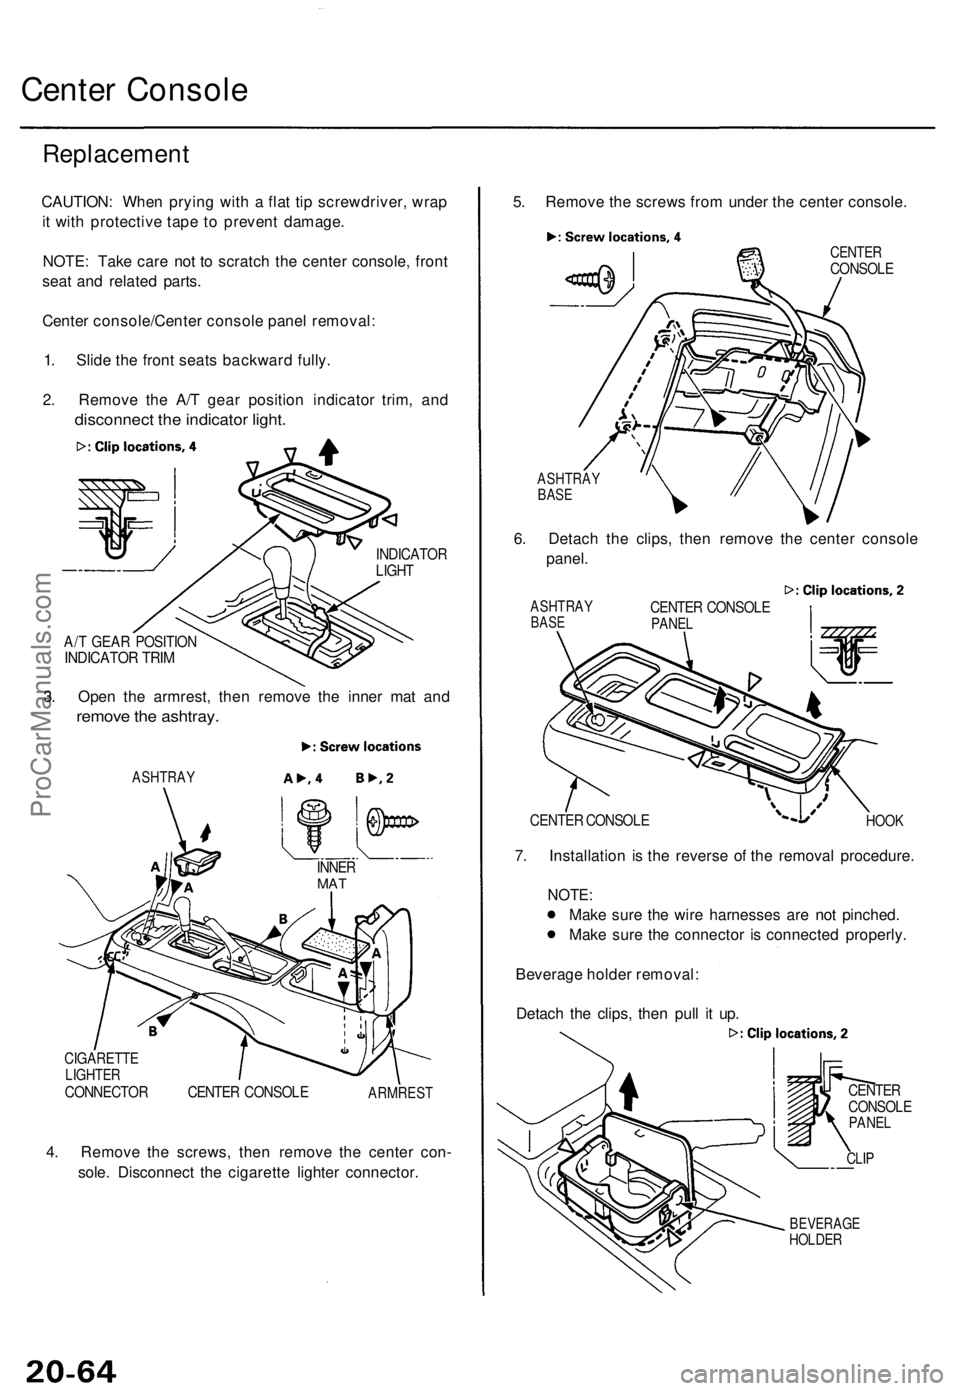
Center Console
Replacement
CAUTION: When prying with a flat tip screwdriver, wrap
it with protective tape to prevent damage.
NOTE: Take care not to scratch the center console, front
seat and related parts.
Center console/Center console panel removal:
1. Slide the front seats backward fully.
2. Remove the A/T gear position indicator trim, and
disconnect the indicator light.
INDICATOR
LIGHT
A/T GEAR POSITION
INDICATOR TRIM
3. Open the armrest, then remove the inner mat and
remove the ashtray.
ASHTRAY
CIGARETTE
LIGHTER
CONNECTOR CENTER CONSOLE
ARMREST
4. Remove the screws, then remove the center con-
sole. Disconnect the cigarette lighter connector.
5. Remove the screws from under the center console.
CENTER
CONSOLE
ASHTRAY
BASE
6. Detach the clips, then remove the center console
panel.
ASHTRAY
BASE
CENTER CONSOLE
PANEL
7. Installation is the reverse of the removal procedure.
NOTE:
Make sure the wire harnesses are not pinched.
Make sure the connector is connected properly.
Beverage holder removal:
Detach the clips, then pull it up.
CENTER
CONSOLE
PANEL
CLIP
BEVERAGE
HOLDER
INNER
MAT
HOOK
CENTER CONSOLEProCarManuals.com
Page 1448 of 1771
Front Bumper
Replacement (cont'd)
7. Installation is the reverse of the removal procedure.
NOTE: Align the front bumper with the front fender
and headlight properly, then tighten the bolts.
HOOK
FRONT BUMPER
UPPER BEAM
FRONT BUMPER
BOLTS
SIDE
CLIPProCarManuals.com
Page 1452 of 1771
Adjustment
NOTE: Before adjusting the hood, loosen each bolt slightly.
1. Adjust the hood hinges right and left, as well as fore and aft, by using the elongated holes.
2. Turn the hood edge cushions, as necessary, to make the hood fit flush with the body at front and side edges.
3. Adjust the hood latch to obtain the proper height at the forward edge.
4. After adjustment, tighten each bolt securely.
HOOD
HINGE
6 x 1.0 mm
9.8 N-m (1.0 kgf-m,
7.2 Ibf-ft)
HOOD EDGE
CUSHION
HOOD
LATCH
NOTE: Move the hood latch right or left until the striker
is centered in the hood latch as shown.
HOOD EDGE
CUSHIONS
(Body side)
HOOD
LATCH
STRIKER
HOOD
LATCH
6 x 1.0 mm
9.8 N-m (1.0 kgf-m,
7.2 Ibf-ft)
HOOD
HINGE
HOOD
HOODProCarManuals.com