Page 1352 of 1771
Rear Doo r Inde x
WEATHERSTRI PReplacement, pag e 20-2 3
OUTE RMOLDIN G
Replacement , pag e 20-2 1
PLASTI C COVE R
Replacement ,
pag e 20-1 6
DETEN TROD
BRACKE T
ARMRES TPOCKETDOOR PANE L
Replacement , pag e 20-1 5
POWE RWINDO WSWITCH
COURTES YLIGHT
INNER MOLDIN G
LOWERWEATHERSTRI P
HINGE
ProCarManuals.com
Page 1354 of 1771
Door Panel/Plastic Cover Replacement
NOTE: Take care not to scratch the door panel and other
parts.
1. Pry the cap and remove the screw. Remove the inner
handle trim while pulling the inner handle.
CAP
INNER HANDLE
TRIM
2. Pry the cap and remove the screw. Remove the arm-
rest pocket and disconnect the power window switch
connector.
ARMREST
POCKET
POWER WINDOW
SWITCH CONNECTOR
3. Release the clips that hold the door panel. Disconnect
the courtesy light, then remove the door panel by
pulling it upward.
NOTE: Remove the door panel with as little bending
as possible to avoid creasing or breaking it.
TRIM PAD
REMOVER
SNAP-ON
#A177, or
equivalent
TRIM PAD
REMOVER
DOOR PANEL
COURTESY LIGHT
CONNECTORProCarManuals.com
Page 1369 of 1771

Doors
Glass Adjustmen t (cont'd )
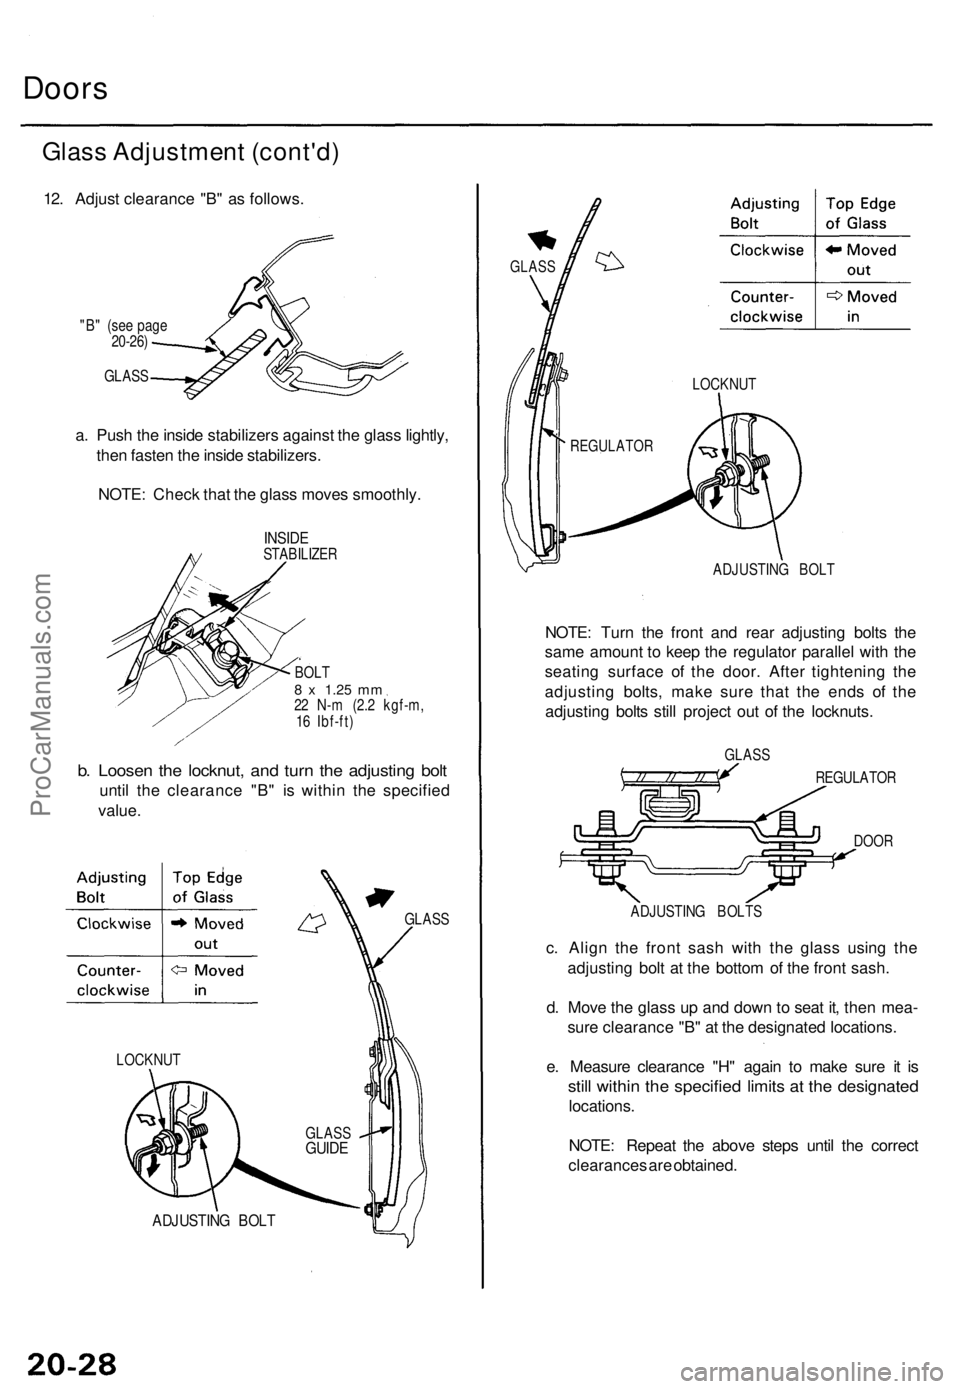
12. Adjus t clearanc e "B " a s follows .
"B" (se e pag e
20-26 )
GLAS S
a. Pus h th e insid e stabilizer s agains t th e glas s lightly ,
the n faste n th e insid e stabilizers .
NOTE : Chec k tha t th e glas s move s smoothly .
INSIDESTABILIZE R
BOLT8 x 1.2 5 mm22 N- m (2. 2 kgf-m ,
1 6 Ibf-ft )
b. Loose n th e locknut , an d tur n th e adjustin g bol t
unti l th e clearanc e "B " i s withi n th e specifie d
value .
LOCKNU T
ADJUSTIN G BOL T
GLAS S
GLAS S
GUIDE
GLAS S
ADJUSTIN G BOL T
NOTE: Tur n th e fron t an d rea r adjustin g bolt s th e
sam e amoun t t o kee p th e regulato r paralle l wit h th e
seatin g surfac e o f th e door . Afte r tightenin g th e
adjustin g bolts , mak e sur e tha t th e end s o f th e
adjustin g bolt s stil l projec t ou t o f th e locknuts .
GLASS
REGULATO R
DOO R
ADJUSTIN G BOLT S
c. Alig n th e fron t sas h wit h th e glas s usin g th e
adjustin g bol t a t th e botto m o f th e fron t sash .
d . Mov e th e glas s u p an d dow n to sea t it , the n mea -
sur e clearanc e "B " a t th e designate d locations .
e . Measur e clearanc e "H " agai n t o mak e sur e i t i s
stil l withi n th e specifie d limit s a t th e designate d
locations.
NOTE : Repea t th e abov e step s unti l th e correc t
clearance s ar e obtained .
LOCKNU T
REGULATO R
ProCarManuals.com
Page 1371 of 1771

Doors
Glass Adjustmen t (cont'd )
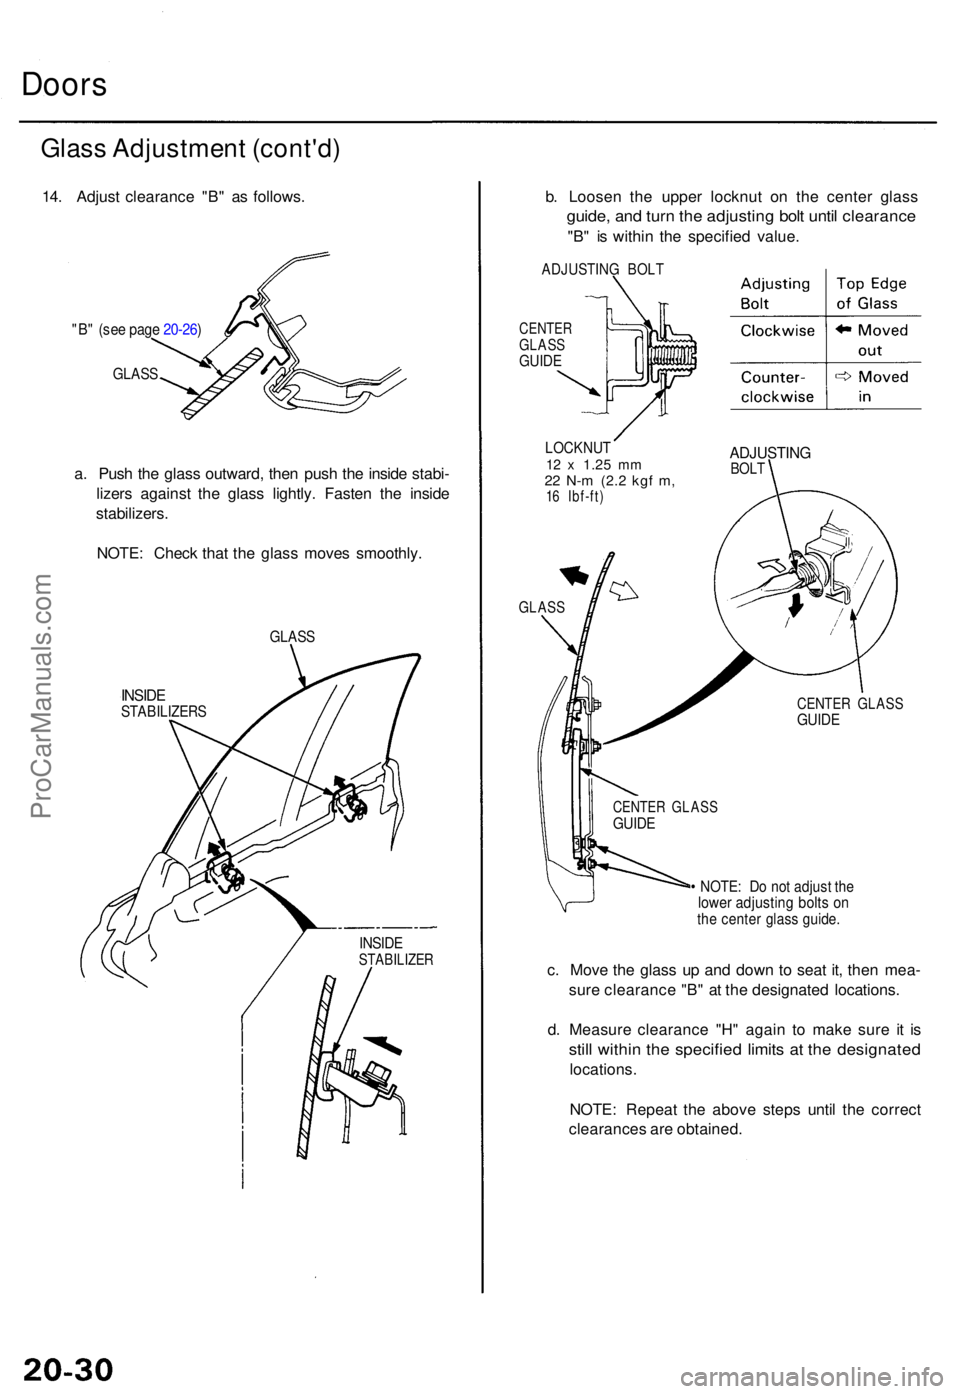
14. Adjus t clearanc e "B " a s follows .
"B" (se e pag e 20-26 )
GLAS S
a. Pus h th e glas s outward , the n pus h th e insid e stabi -
lizer s agains t th e glas s lightly . Faste n th e insid e
stabilizers .
NOTE : Chec k tha t th e glas s move s smoothly .
GLASS
INSIDESTABILIZER S
INSIDESTABILIZE R
b. Loose n th e uppe r locknu t o n th e cente r glas s
guide, an d tur n th e adjustin g bol t unti l clearanc e
"B" i s withi n th e specifie d value .
ADJUSTIN G BOL T
CENTE RGLASSGUIDE
LOCKNU T12 x 1.2 5 mm22 N- m (2. 2 kgf m ,16 Ibf-ft )
ADJUSTIN GBOLT
GLAS S
• NOTE : D o no t adjus t th elowe r adjustin g bolt s o nthe cente r glas s guide .
c. Mov e th e glas s u p an d dow n t o sea t it , the n mea -
sur e clearanc e "B " a t th e designate d locations .
d . Measur e clearanc e "H " agai n t o mak e sur e i t i s
stil l withi n th e specifie d limit s a t th e designate d
locations.
NOTE : Repea t th e abov e step s unti l th e correc t
clearance s ar e obtained .
CENTER GLAS SGUIDE
CENTE R GLAS SGUIDE
ProCarManuals.com
Page 1373 of 1771

Doors
Positio n Adjustmen t
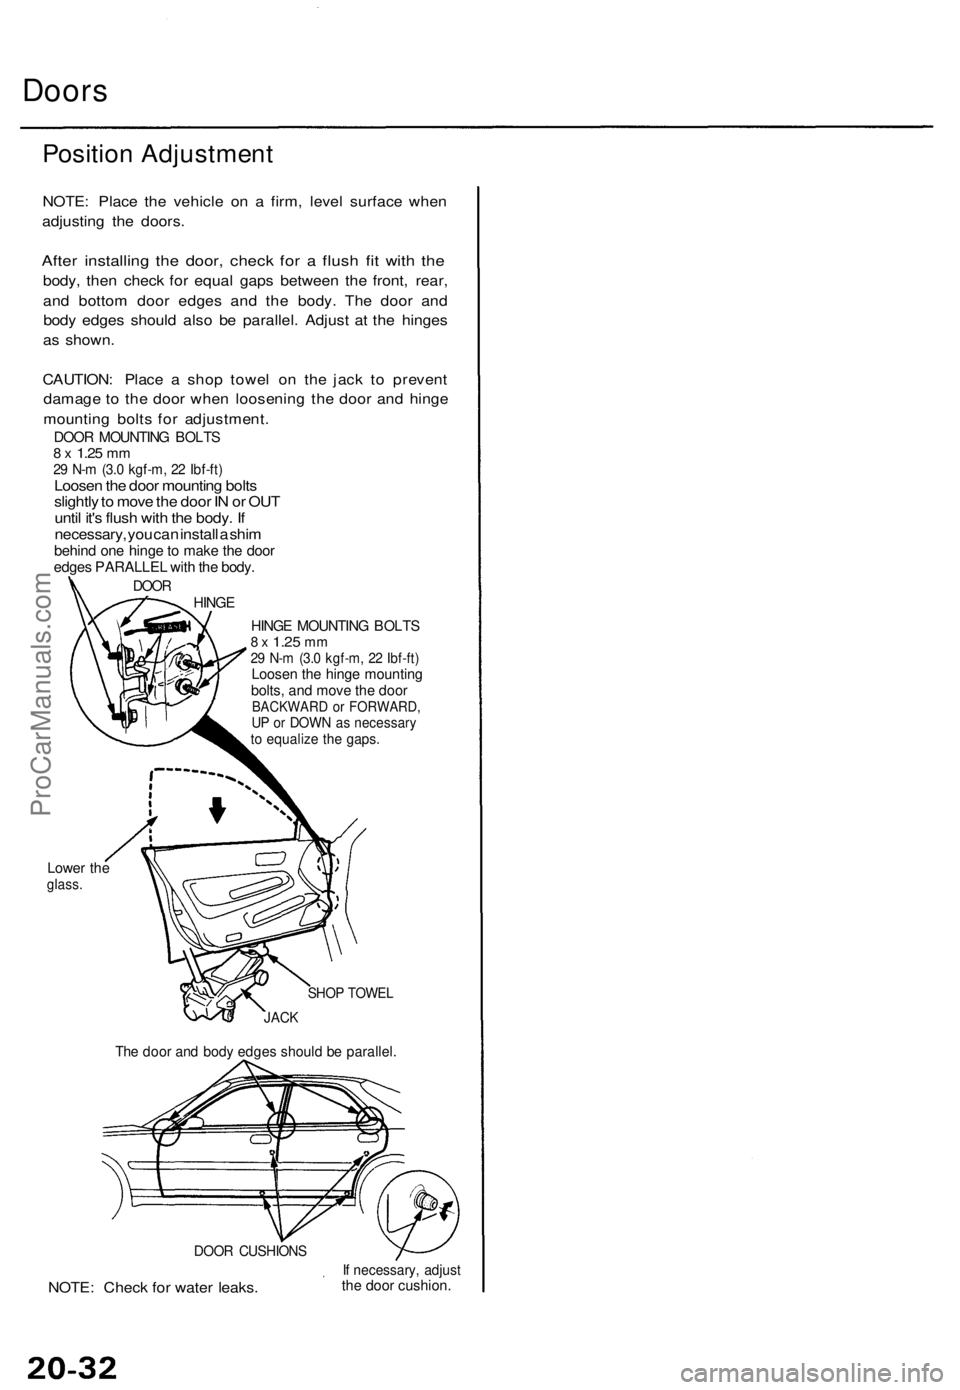
NOTE: Plac e th e vehicl e o n a firm , leve l surfac e whe n
adjustin g th e doors .
After installin g th e door , chec k fo r a flus h fi t wit h th e
body , the n chec k fo r equa l gap s betwee n th e front , rear ,
an d botto m doo r edge s an d th e body . Th e doo r an d
bod y edge s shoul d als o b e parallel . Adjus t a t th e hinge s
a s shown .
CAUTION : Plac e a sho p towe l o n th e jac k t o preven t
damag e t o th e doo r whe n loosenin g th e doo r an d hing e
mountin g bolt s fo r adjustment .
DOOR MOUNTIN G BOLT S8 x 1.2 5 mm29 N- m (3. 0 kgf-m , 2 2 Ibf-ft )Loose n th e doo r mountin g bolt s
slightl y to mov e th e doo r I N o r OU T
unti l it' s flus h wit h th e body . I f
necessary , yo u ca n instal l a shi m
behin d on e hing e to mak e th e doo redge s PARALLE L wit h th e body .
DOORHING E
HINGE MOUNTIN G BOLT S8 x 1.2 5 mm29 N- m (3. 0 kgf-m , 2 2 Ibf-ft )Loose n th e hing e mountin gbolts, an d mov e th e doo rBACKWAR D o r FORWARD ,UP o r DOW N a s necessar yto equaliz e th e gaps .
Lower th eglass .
DOOR CUSHION S
NOTE: Chec k fo r wate r leaks .If necessary , adjustth e doo r cushion .
SHOP TOWE L
JACK
The doo r an d bod y edge s shoul d b e parallel .
ProCarManuals.com
Page 1374 of 1771
Doors
Strike r Adjustmen t
Front:
Make sur e th e doo r latche s securel y withou t slamming .
I f i t need s adjustment :
1 . Dra w a lin e aroun d th e strike r fo r reference .
2 . Loose n th e screws , an d mov e th e strike r I N o r OU T
to mak e th e latc h fi t tighte r o r looser . Mov e th e
strike r U P o r DOW N t o alig n i t wit h th e latc h open -
ing . The n lightl y tighte n th e screw s an d recheck .
NOTE : Hol d th e oute r handl e out , an d pus h th e
doo r agains t th e bod y t o b e sur e th e strike r allow s a
flus h fit .
STRIKE R
SCREW S8 x 1.2 5 mm18 N- m (1. 8 kgf-m , 1 3 Ibf-ft )
3. I f th e doo r latche s properly , tighte n th e screw s an d
recheck .
ProCarManuals.com
Page 1375 of 1771
Rear:
Make sure the door latches securely without slamming.
If it needs adjustment:
NOTE: The striker nuts are fixed. The striker can be
adjusted 1.5 mm (0.059 in) up or down, and 3 mm (0.1 in)
in or
out.
1. Loosen the screws, then insert a shop towel between
the body and striker.
3 mm
(0.1
in)
STRIKER
Insert a shop towel
between the body and
striker.
PLASTIC
HAMMER
SCREWS
8 x
1.25
mm
18 N-m (1.8 kgf-m,
13 Ibf-ft)
SHOP
TOWEL
2. Lightly tighten the screws.
3. Wrap the striker with a shop towel, then adjust the
striker by tapping it with a plastic hammer.
CAUTION: Do not strike the striker too hard.
NOTE: Hold the outer handle out, and push the door
against the body to be sure the striker allows a flush
fit.
4. If the door latches properly, loosen the screws, then
remove a shop towel. Tighten the screws and
recheck.
3 mm
(0.1
in)
1.5 mm
(0.059 in)
1.5 mm
(0.059 in)ProCarManuals.com
Page 1380 of 1771
Rearview Mirror Replacement
1. Remove the spotlight, then remove the spotlight
trim.
CAUTION: When prying with a flat tip screwdriver,
wrap it with a shop towel to prevent damage.
Lower the sunvisor.
SPOTLIGHT
TRIM
SPOTLIGHT
LENS
2. Remove the screws, then remove the rearview mir-
ror.
REARVIEW
MIRROR
SCREW
5 x 0.8 mm
4 N-m (0.4 kgf-m,
3 Ibf-ft)
3. Installation is the reverse of the removal procedure.
Screw location, 1
Clip locations, 2ProCarManuals.com