1995 ACURA TL parking brake
[x] Cancel search: parking brakePage 11 of 1771
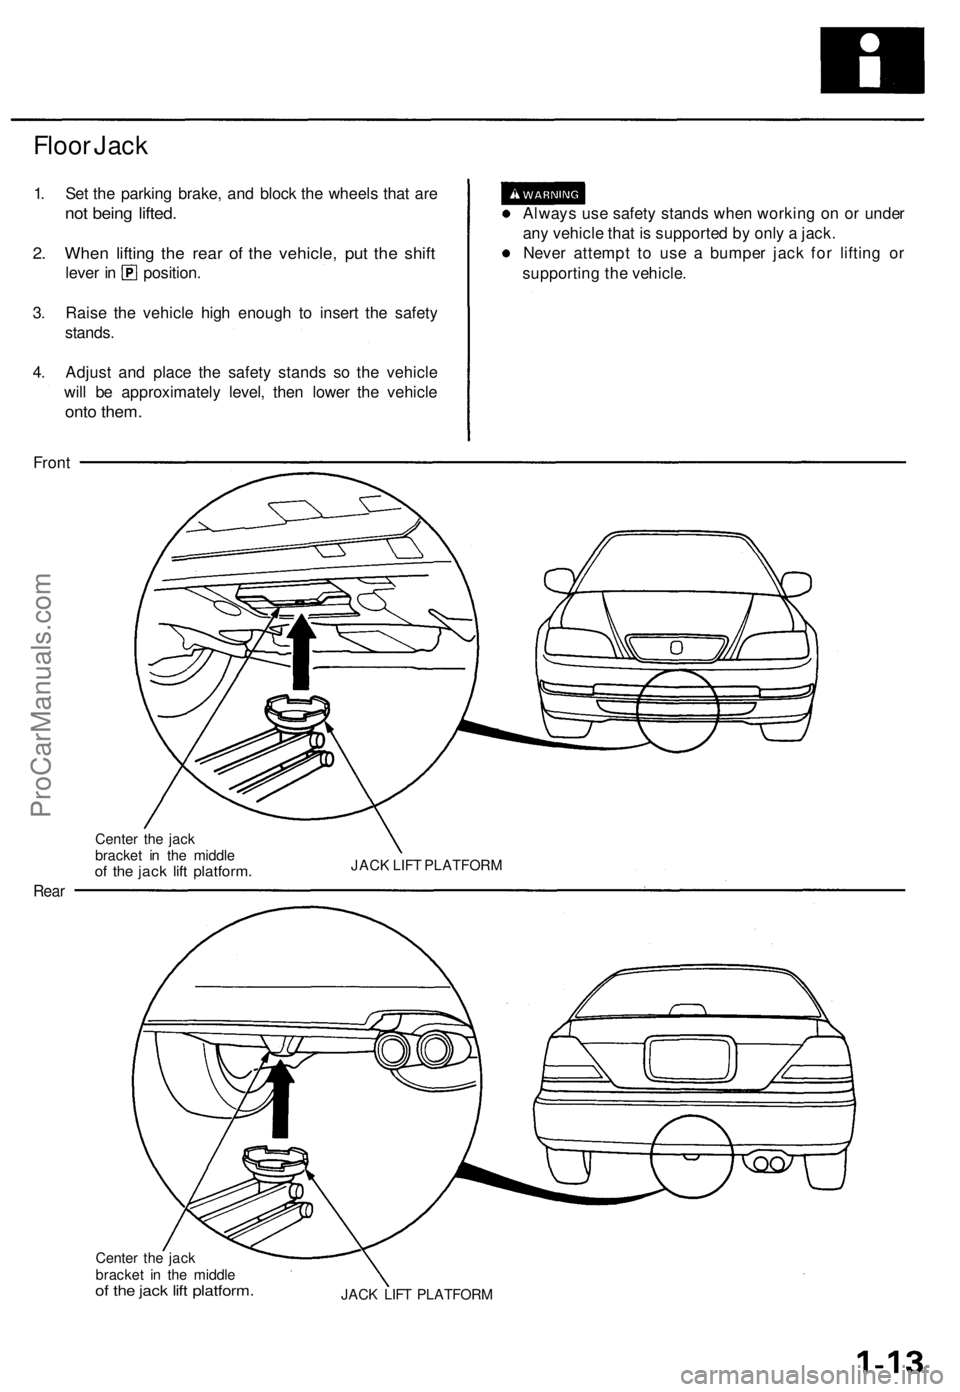
Floor Jack
1. Set the parking brake, and block the wheels that are
not being lifted.
2. When lifting the rear of the vehicle, put the shift
lever in position.
3. Raise the vehicle high enough to insert the safety
stands.
4. Adjust and place the safety stands so the vehicle
will be approximately level, then lower the vehicle
onto them.
Always use safety stands when working on or under
any vehicle that is supported by only a jack.
Never attempt to use a bumper jack for lifting or
supporting the vehicle.
Front
Center the jack
bracket in the middle
of the jack lift platform.
JACK LIFT PLATFORM
Rear
Center the jack
bracket in the middle
of the jack lift platform.
JACK LIFT PLATFORMProCarManuals.com
Page 12 of 1771
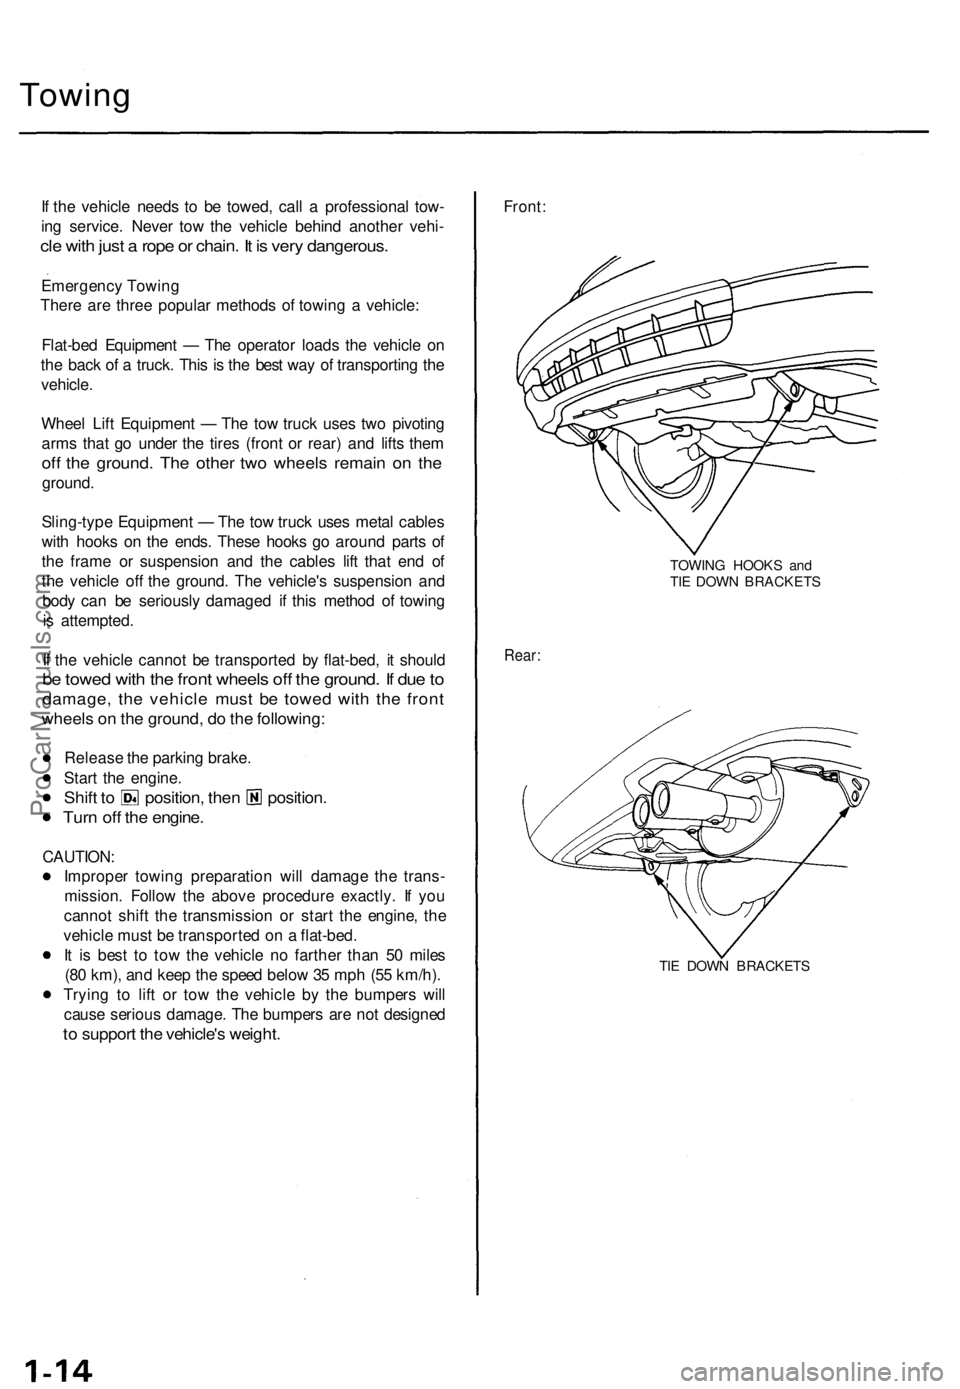
Towing
If the vehicle needs to be towed, call a professional tow-
ing service. Never tow the vehicle behind another vehi-
cle with just a rope or chain. It is very dangerous.
Emergency Towing
There are three popular methods of towing a vehicle:
Flat-bed Equipment — The operator loads the vehicle on
the back of a truck. This is the best way of transporting the
vehicle.
Wheel Lift Equipment — The tow truck uses two pivoting
arms that go under the tires (front or rear) and lifts them
off the ground. The other two wheels remain on the
ground.
Sling-type Equipment — The tow truck uses metal cables
with hooks on the ends. These hooks go around parts of
the frame or suspension and the cables lift that end of
the vehicle off the ground. The vehicle's suspension and
body can be seriously damaged if this method of towing
is attempted.
If the vehicle cannot be transported by flat-bed, it should
be towed with the front wheels off the ground. If due to
damage, the vehicle must be towed with the front
wheels on the ground, do the following:
Release the parking brake.
Start the engine.
Shift to position, then position.
Turn off the engine.
CAUTION:
Improper towing preparation will damage the trans-
mission. Follow the above procedure exactly. If you
cannot shift the transmission or start the engine, the
vehicle must be transported on a flat-bed.
It is best to tow the vehicle no farther than 50 miles
(80 km), and keep the speed below 35 mph (55 km/h).
Trying to lift or tow the vehicle by the bumpers will
cause serious damage. The bumpers are not designed
to support the vehicle's weight.
Front:
TOWING HOOKS and
TIE DOWN BRACKETS
Rear:
TIE DOWN BRACKETSProCarManuals.com
Page 326 of 1771
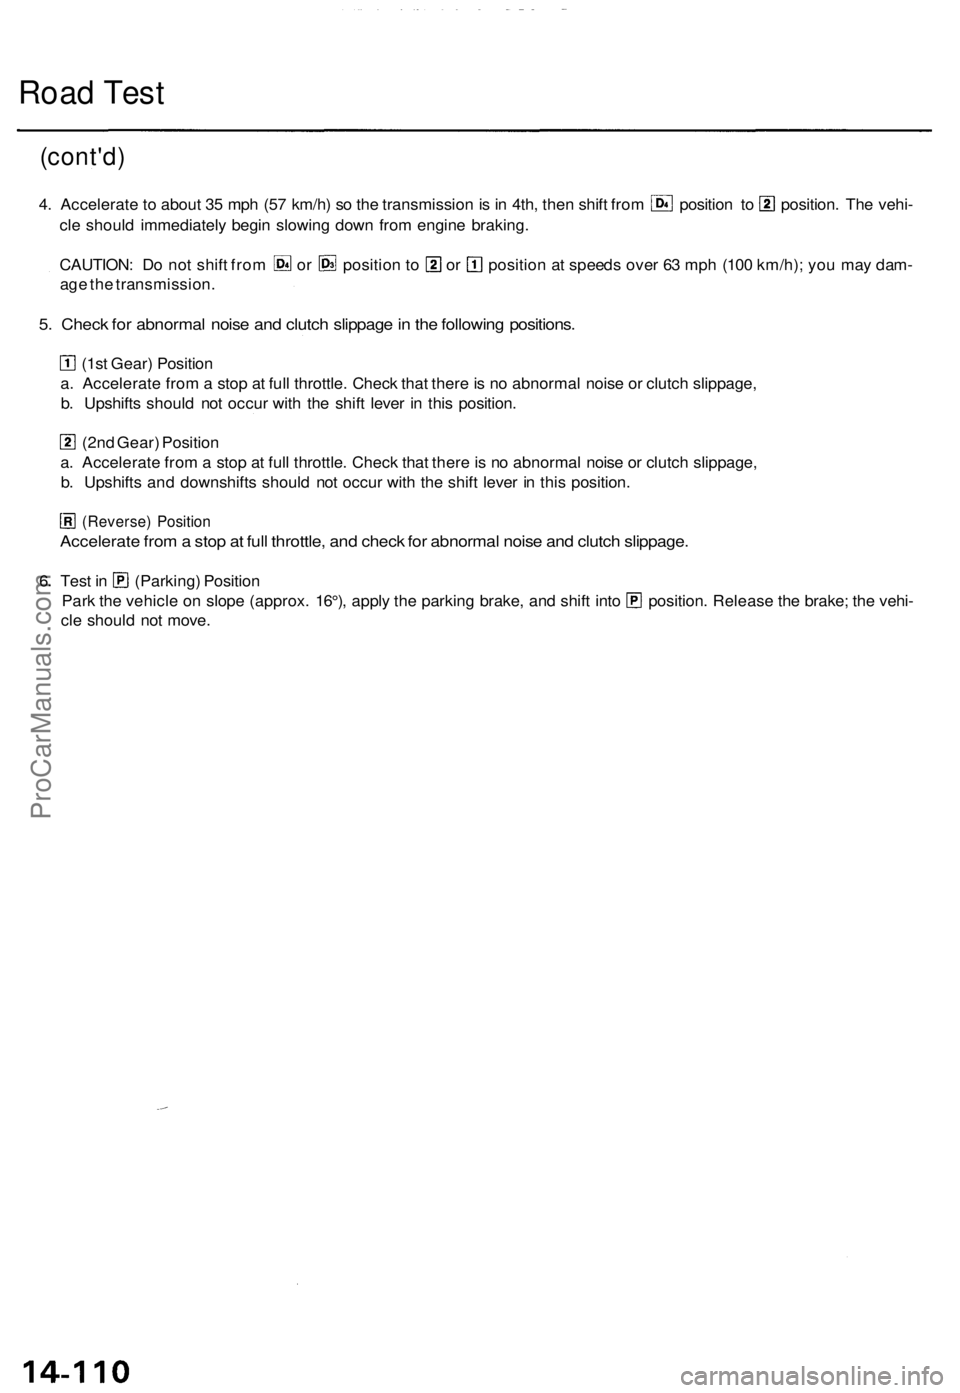
Road Test
(cont'd)
4. Accelerate to about 35 mph (57 km/h) so the transmission is in 4th, then shift from position to position. The vehi-
cle should immediately begin slowing down from engine braking.
CAUTION: Do not shift from or position to or position at speeds over 63 mph (100 km/h); you may dam-
age the transmission.
5. Check for abnormal noise and clutch slippage in the following positions.
(1st Gear) Position
a. Accelerate from a stop at full throttle. Check that there is no abnormal noise or clutch slippage,
b. Upshifts should not occur with the shift lever in this position.
(2nd Gear) Position
a. Accelerate from a stop at full throttle. Check that there is no abnormal noise or clutch slippage,
b. Upshifts and downshifts should not occur with the shift lever in this position.
(Reverse) Position
Accelerate from a stop at full throttle, and check for abnormal noise and clutch slippage.
6. Test in (Parking) Position
Park the vehicle on slope (approx. 16°), apply the parking brake, and shift into position. Release the brake; the vehi-
cle should not move.ProCarManuals.com
Page 327 of 1771
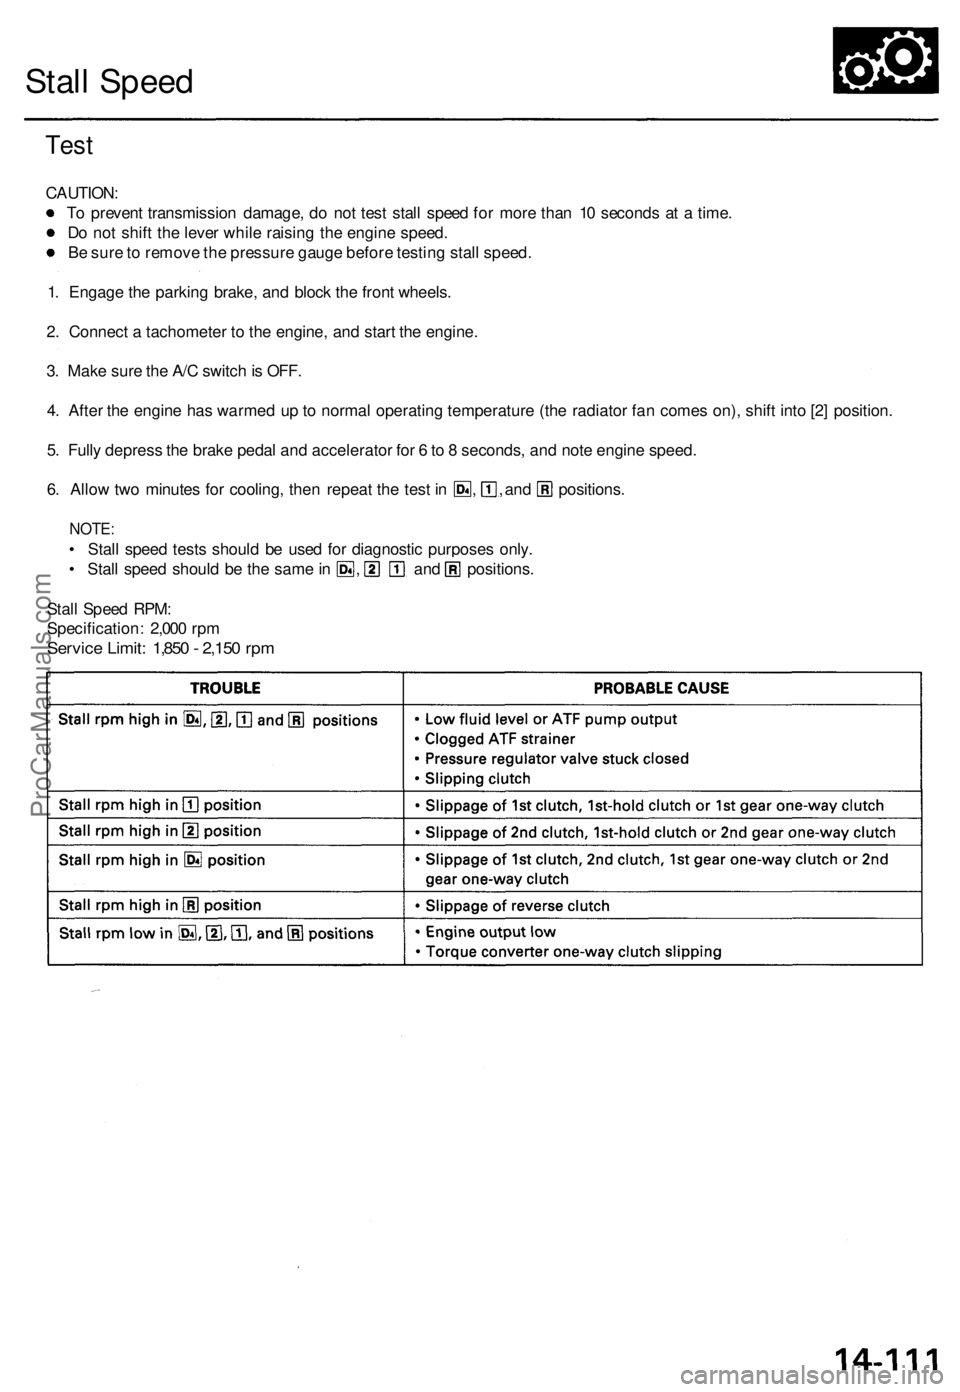
Stall Speed
Test
CAUTION:
To prevent transmission damage, do not test stall speed for more than 10 seconds at a time.
Do not shift the lever while raising the engine speed.
Be sure to remove the pressure gauge before testing stall speed.
1. Engage the parking brake, and block the front wheels.
2. Connect a tachometer to the engine, and start the engine.
3. Make sure the A/C switch is OFF.
4. After the engine has warmed up to normal operating temperature (the radiator fan comes on), shift into [2] position.
5. Fully depress the brake pedal and accelerator for 6 to 8 seconds, and note engine speed.
6. Allow two minutes for cooling, then repeat the test in , , and positions.
NOTE:
• Stall speed tests should be used for diagnostic purposes only.
• Stall speed should be the same in , and positions.
Stall Speed RPM:
Specification: 2,000 rpm
Service Limit: 1,850 - 2,150 rpmProCarManuals.com
Page 508 of 1771

Troubleshooting Precautions
ABS Indicator Light:
The ABS indicator light comes on for three seconds and then goes off when the control unit detects no problem during the
initial diagnosis right after the engine starts. However, the ABS indicator light can stay on for up to 40 seconds when the
control unit starts to check for pump overrun, etc. during the initial diagnosis. The ABS indicator light comes on, and the
ABS control unit memorizes the diagnostic trouble code (DTC) under certain conditions.
• The parking brake is applied for more than 30 seconds while the vehicle is being driven. (DTC 2-1)
• The transmission downshifted excessively. (DTC 4-1, 4-2)
• The vehicle loses traction, and the front wheels spin for more than one minute when starting from a stuck condition on
a muddy, snowy, or sandy road. (DTC 4-8)
• Tire adhesion is lost due to excessive cornering speed. (DTC 5, 5-4, 5-8)
• The vehicle is driven on an extremely rough road. (DTC 8-1)
• The vehicle is interfered by strong radio waves (noise), for example, illegal radio, etc. (DTC 8-2)
NOTE: If there is any trouble in the system, the ABS indicator light comes on during driving.
Diagnostic Trouble Code (DTC):
• When the control unit detects a problem and the ABS indicator light comes on, the control unit memorizes the DTC.
• The control unit has three memory registers. When a problem occurs, the control unit stores the DTC in the first memory
register. If another problem occurs, or the same problem occurs again, the control unit moves the first DTC to the next
memory register, and stores the second DTC in the first register. If there's a third problem occurrence, the two existing
DTCs are moved up one register, and the third DTC is stored in the first register. If problems continue to occur, the oldest
problem is moved out of the last register and lost, and the most recent problem is stored in the first register. When the
same problem occurs three times, the same DTC is stored in all memory registers. (Refer to the Symptom-to-System
Chart for diagnostic period.)
• The most recent DTC is indicated first, and the oldest DTC is indicated last.
• The DTCs are erased from the control unit when the ABS control unit +B2 power supply or connector is disconnected.
• The control unit's memory can be erased by disconnecting the ABS B2 fuse for more than three seconds.
Self-diagnosis:
• There are three self-diagnosises described below.
Initial diagnosis: Performed right after the engine starts until the ABS indicator light goes off.
Regular diagnosis: Continuously performed (under some conditions) after the ABS indicator light goes off until the
engine stops.
Individual part/system diagnosis: Diagnosis about a specific part/system under its operating conditions.
• The CPU (central processing unit) controls the following when it detects a problem during self-diagnosis:
Turns the ABS indicator light ON.
Turns the front and rear fail-safe relays off.
Stops the ABS control.
Stops the ABS pump. (The pump may work under some conditions.)
After the DTC is stored in the control unit, the CPU stops self-diagnosis.ProCarManuals.com
Page 537 of 1771
Diagnostic Trouble Code (DTC)
DTC Erasure
1. Pull the parking brake lever up.
2. Push and hold the TCS switch, then turn the ignition switch ON (II).
3. Hold the TCS switch pushed for four seconds (do not release the TCS switch), then release the TCS switch for less than
six seconds.
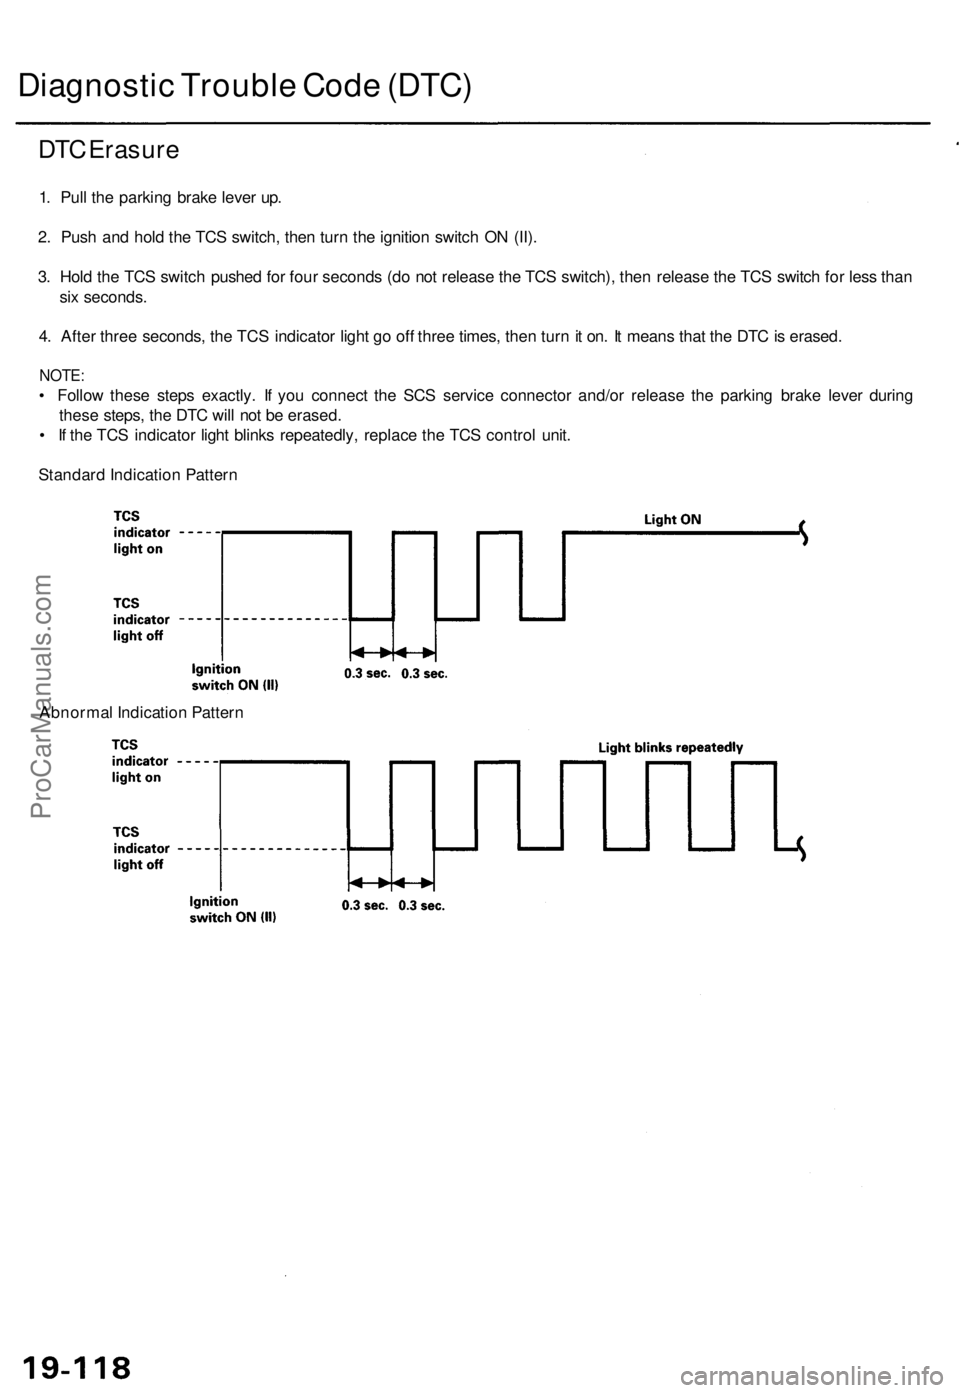
4. After three seconds, the TCS indicator light go off three times, then turn it on. It means that the DTC is erased.
NOTE:
• Follow these steps exactly. If you connect the SCS service connector and/or release the parking brake lever during
these steps, the DTC will not be erased.
• If the TCS indicator light blinks repeatedly, replace the TCS control unit.
Standard Indication Pattern
Abnormal Indication PatternProCarManuals.com
Page 687 of 1771
Floor Jack
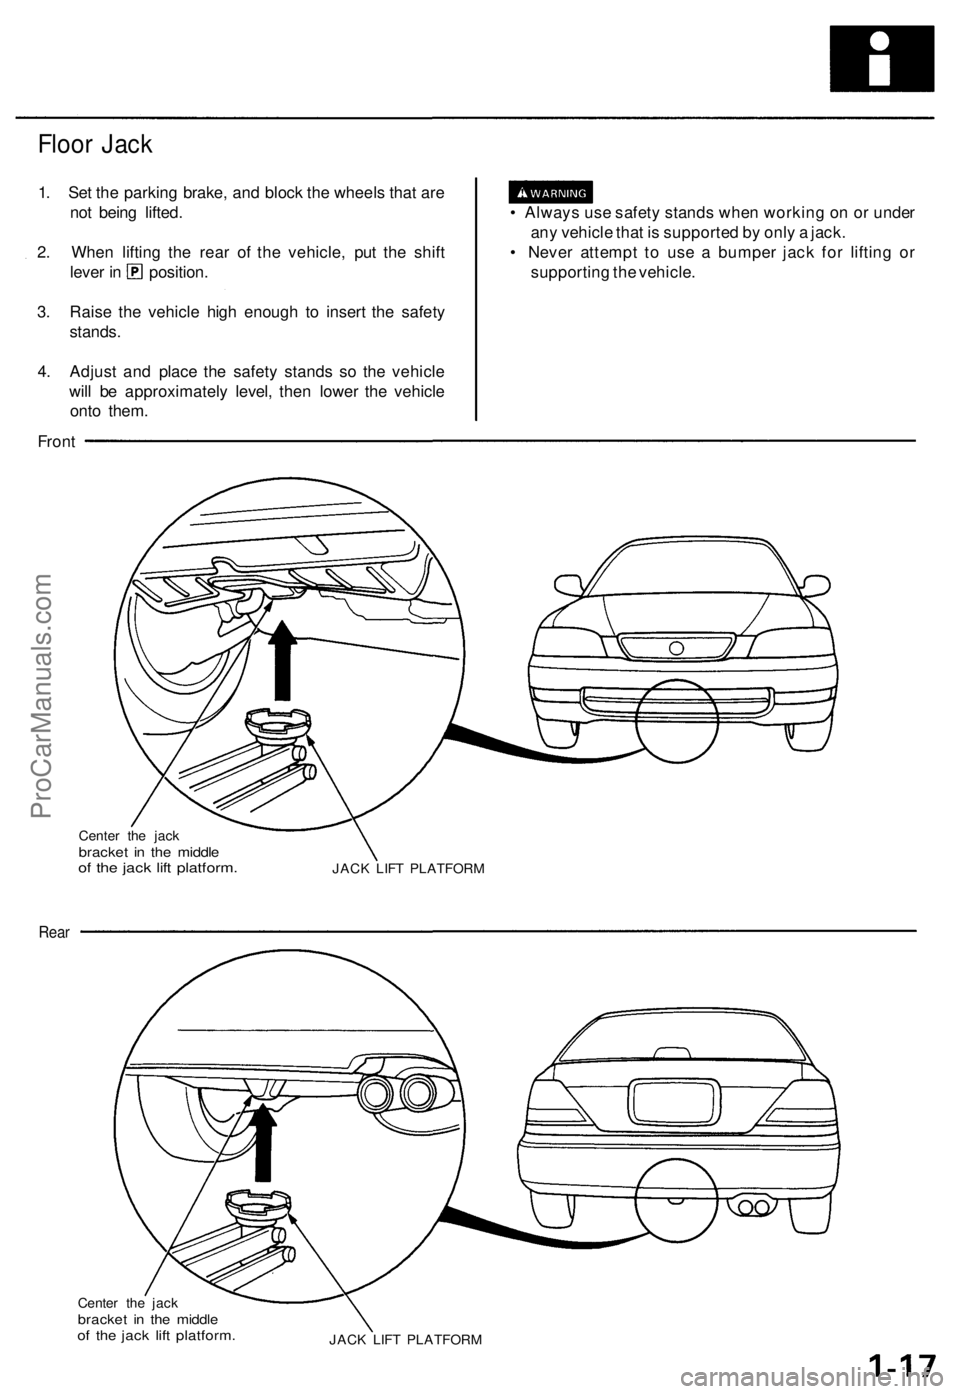
1. Set the parking brake, and block the wheels that are
not being lifted.
2. When lifting the rear of the vehicle, put the shift
lever in position.
3. Raise the vehicle high enough to insert the safety
stands.
4. Adjust and place the safety stands so the vehicle
will be approximately level, then lower the vehicle
onto them.
• Always use safety stands when working on or under
any vehicle that is supported by only a jack.
• Never attempt to use a bumper jack for lifting or
supporting the vehicle.
Front
Center the jack
bracket in the middle
of the jack lift platform.
JACK LIFT PLATFORM
Rear
Center the jack
bracket in the middle
of the jack lift platform.
JACK LIFT PLATFORMProCarManuals.com
Page 688 of 1771
Towing
If the vehicle needs to be towed, call a professional tow-
ing service. Never tow the vehicle behind another vehi-
cle with just a rope or chain. It is very dangerous.
Emergency Towing
There are three popular methods of towing a vehicle:
Flat-bed Equipment — The operator loads the vehicle on
the back of a truck. This is the best way of transporting the
vehicle.
Wheel Lift Equipment — The tow truck uses two pivoting
arms that go under the tires (front or rear) and lifts them
off the ground. The other two wheels remain on the
ground.
Sling-type Equipment — The tow truck uses metal cables
with hooks on the ends. These hooks go around parts of
the frame or suspension and the cables lift that end of
the vehicle off the ground. The vehicle's suspension and
body can be seriously damaged if this method of towing
is attempted.
If the vehicle cannot be transported by flat-bed, it should
be towed with the front wheels off the ground. If due to
damage, the vehicle must be towed with the front
wheels on the ground, do the following:
• Release the parking brake.
• Start the engine.
• Shift to position, then position.
• Turn off the engine.
CAUTION:
• Improper towing preparation will damage the trans-
mission. Follow the above procedure exactly. If you
cannot shift the transmission or start the engine, the
vehicle must be transported on a flat-bed.
• It is best to tow the vehicle no farther than 50 miles
(80 km), and keep the speed below 35 mph (55
km/h).
• Trying to lift or tow the vehicle by the bumpers will
cause serious damage. The bumpers are not
designed to support the vehicle's weight.
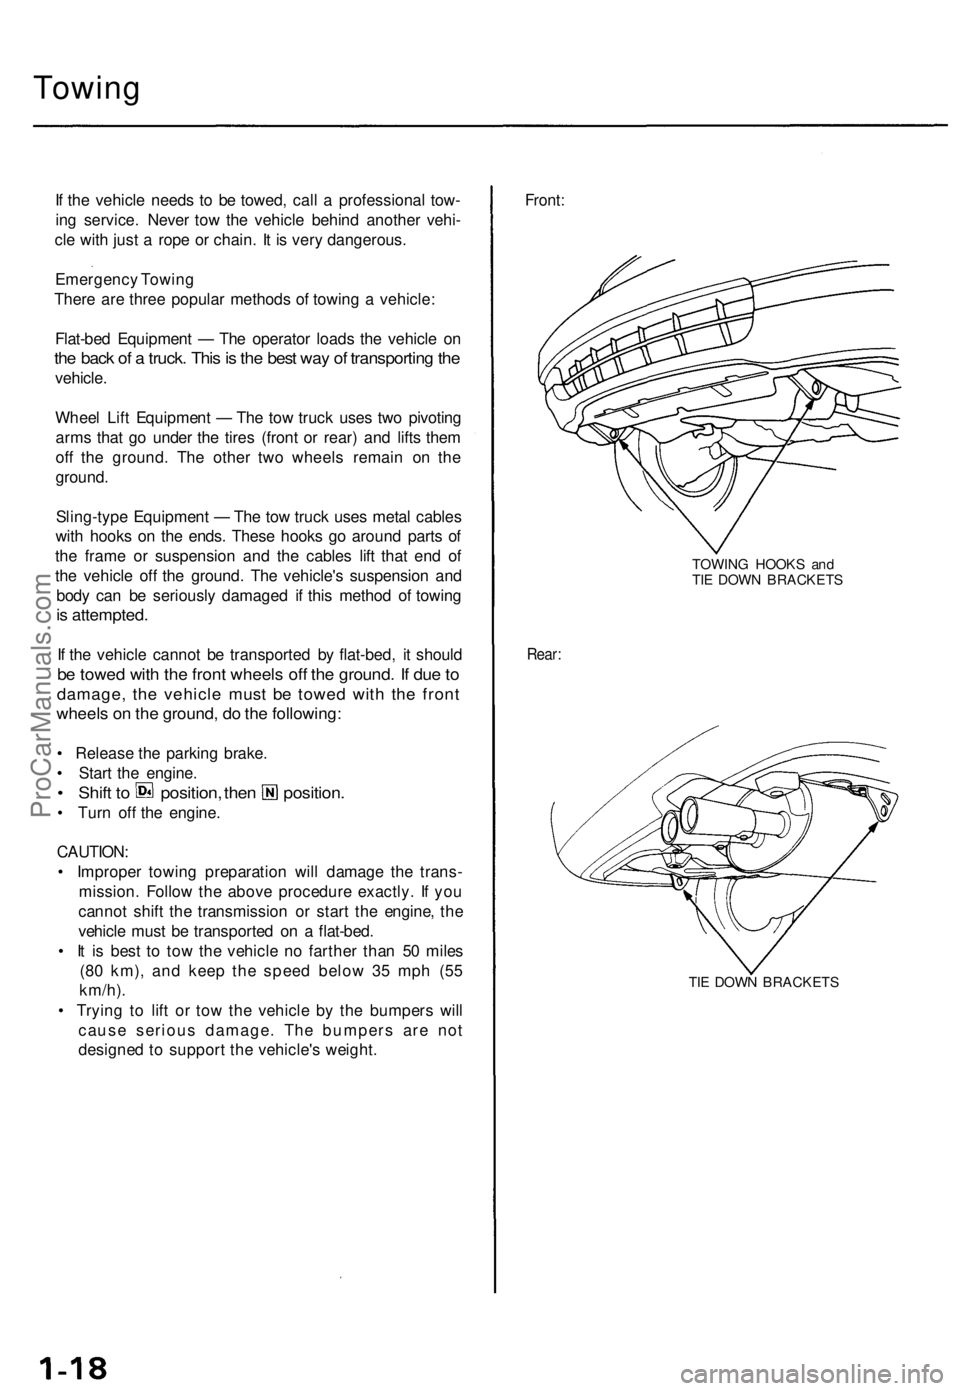
Front:
TOWING HOOKS and
TIE DOWN BRACKETS
Rear:
TIE DOWN BRACKETSProCarManuals.com