Page 1008 of 1771

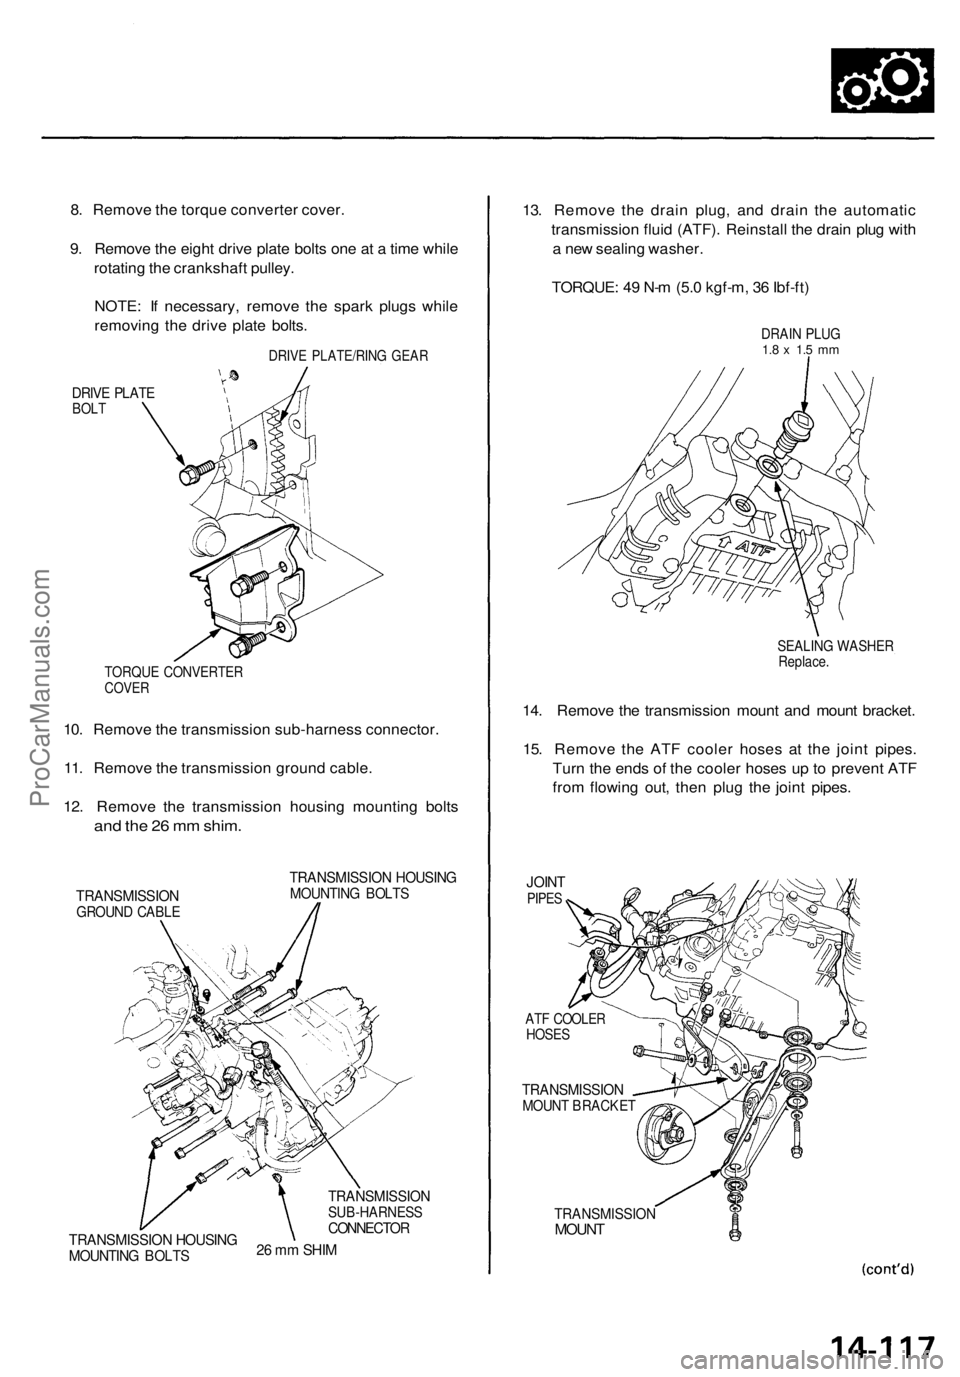
8. Remove the torque converter cover.
9. Remove the eight drive plate bolts one at a time while
rotating the crankshaft pulley.
NOTE: If necessary, remove the spark plugs while
removing the drive plate bolts.
DRIVE PLATE/RING GEAR
DRIVE PLATE
BOLT
TORQUE CONVERTER
COVER
10. Remove the transmission sub-harness connector.
11. Remove the transmission ground cable.
12. Remove the transmission housing mounting bolts
and the 26 mm shim.
TRANSMISSION
GROUND CABLE
TRANSMISSION HOUSING
MOUNTING BOLTS
TRANSMISSION HOUSING
MOUNTING BOLTS
TRANSMISSION
SUB-HARNESS
CONNECTOR
26 mm SHIM
13. Remove the drain plug, and drain the automatic
transmission fluid (ATF). Reinstall the drain plug with
a new sealing washer.
TORQUE: 49 N-m (5.0 kgf-m, 36 Ibf-ft)
DRAIN PLUG
1.8 x 1.5 mm
SEALING WASHER
Replace.
14. Remove the transmission mount and mount bracket.
15. Remove the ATF cooler hoses at the joint pipes.
Turn the ends of the cooler hoses up to prevent ATF
from flowing out, then plug the joint pipes.
JOINT
PIPES
ATF COOLER
HOSES
TRANSMISSION
MOUNT BRACKET
TRANSMISSION
MOUNTProCarManuals.com
Page 1010 of 1771
25. Remove the transmission mid mount nuts.
26. Place a jack under the transmission and raise the
transmission just enough to take weight off of the
mounts, then remove the mid mounts and mid mount
spacer as shown.
TRANSMISSION
TRANSMISSION
MID MOUNT
NUT
MID MOUNT
SPACER
MID MOUNT
MID MOUNTS
OFFSET WRENCH
(Commercially available)
27. Remove the transmission housing mounting bolts.
28. Remove the torque converter cover mounting bolt on
the torque converter housing side.
NOTE: Do not remove the torque converter cover
mounting bolt on the differential carrier side and the
torque converter cover.
TRANSMISSION
HOUSING
MOUNTING
BOLT
DOWEL PIN
TORQUE CONVERTER
COVER
Do not remove.
Do not remove
this bolt.
TRANSMISSION HOUSING
MOUNTING BOLT
TORQUE CONVERTER COVER
MOUNTING BOLT
Remove this bolt.
29. Pull the transmission away from the engine until it
clears the dowel pins, then lower it on the transmis-
sion jack.ProCarManuals.com
Page 1017 of 1771
Illustrated Index
Torque Converter Housing/Valve BodyProCarManuals.com
Page 1023 of 1771
Transmission Housing
Removal
NOTE:
Clean all parts thoroughly in solvent or carburetor cleaner, and dry with compressed air.
Blow out all passages.
When removing the transmission housing, replace the following:
O-rings
Transmission housing gasket
TRANSMISSION HOUSING
TRANSMISSION HOUSING
MOUNTING BOLTS
10 x
1.25
mm
10 Bolts
COUNTERSHAFT SPEED
SENSOR
MAINSHAFT SPEED
SENSOR
TRANSMISSION
HOUSING GASKET
Replace.
COUNTERSHAFT
SUB-ASSEMBLY
MAINSHAFT
SUB-ASSEMBLY
SECONDARY DRIVEN
GEAR/SHAFT
TRANSMISSION HOUSING
MOUNTING BOLTS
8 x
1.25
mm
3 Bolts
EXTENSION SHAFT
CONNECTOR BRACKETS
TORQUE CONVERTER
HOUSING
TRANSMISSION HOUSING
MOUNTING BOLT
10 x
1.25
mm
DOWEL PINS, 3
WASHER (M1WA-3010520~)
CONNECTOR HOLDERProCarManuals.com
Page 1025 of 1771
Torque Converter Housing/Valve Body
Removal
NOTE:
Clean all parts thoroughly in solvent or carburetor cleaner, and dry with compressed air.
Blow out all passages.
When removing the valve bodies, replace the following:
O-rings
Filters
2ND ACCUMULATOR
BODY
ATF FEED PIPE
THROTTLE
VALVE BODY
SEPARATOR
PLATE
2ND ACCUMULATOR
SPRING
2ND ACCUMULATOR
PISTON
ATF FEED PIPES
6 x 1.0 mm BOLTS
9 Bolts
REGULATOR VALVE BODY
STATOR SHAFT
STOPPER SHAFT
REGULATOR
SEPARATOR PLATE
ATF PUMP BODY
ATF FEED PIPES
8 x 1.25 mm BOLTS
3 Bolts
6 x 1.0 mm BOLTS
2 Bolts
ATF PUMP DRIVE GEAR
ATF PUMP DRIVEN GEAR
TORQUE CONVERTER
CHECK VALVE
TORQUE CONVERTER
CHECK VALVE SPRING
ATF PUMP BODY
SEPARATOR PLATE
ATF PUMP DRIVEN GEAR SHAFT
LOCK-UP CONTROL
SOLENOID VALVE
CONNECTOR
LINEAR SOLENOID
CONNECTOR
TORQUE CONVERTER
HOUSING
LINEAR SOLENOID
HARNESS CONNECTOR
LINEAR SOLENOID
HARNESS
HARNESS
CLAMP
THROTTLE VALVE
BODY/LINEAR
SOLENOID ASSEMBLY
FLANGE NUTSProCarManuals.com
Page 1026 of 1771

1. Remove the ATF feed pipe from the ATF pump
body and two ATF feed pipes from the torque con-
verter housing.
2. Remove the two flange nuts securing the linear
solenoid harness, then disconnect the harness from
the linear solenoid and harness clamp.
3. Remove the regulator valve body (nine bolts).
4. Remove the stopper shaft and stator shaft.
5. Remove the regulator separator plate with two dowel
pins.
6. Remove the six bolts securing the 2nd accumulator
body, then remove the 2nd accumulator body and
throttle valve body/linear solenoid as an assembly.
7. Remove the ATF pump body (five bolts).
8. Remove the ATF pump gears and ATF pump driven
gear shaft.
9. Remove the torque converter check valve and spring.
10. Remove the ATF pump body separator plate with
three dowel pins.
11. Remove the one bolt securing the linear solenoid
harness connector, then remove the linear solenoid
harness from the torque converter housing.
12. Disconnect the lock-up control solenoid valve con-
nector, then remove the transmission sub-harness.ProCarManuals.com
Page 1033 of 1771
ATF Pum p Bod y
Disassembly/lnspection/Reassembl y
NOTE:
Clean al l part s thoroughl y i n solven t o r carbureto r cleaner , an d dr y wit h compresse d air . Blo w ou t al l passages .
Replace th e valv e bod y a s a n assembl y if an y part s ar e wor n o r damaged .
Check al l valve s fo r fre e movement . I f an y fai l t o slid e freely , se e Valv e Bod y Repai r o n pag e 14-136 .
Coa t al l part s wit h AT F durin g assembly .
Instal l th e filter s i n th e directio n shown .
VALVE SLEEV E
LOCK-U P CONTRO L VALV E
LOCK-U P TIMIN G VALV E
SPRIN G SEA T VALV
E CA P
ROLLE R
RELIEF VALV E
MODULATO R VALV E
ATF PUM P BOD Y
Inspec t fo r wear , scratche sand scoring .
TORQUE CONVERTE R CHEC K VALV E
SPRING SPECIFICATION SUnit: m m (in )
FILTE RReplace .
FILTE R
Replace .
ProCarManuals.com
Page 1062 of 1771

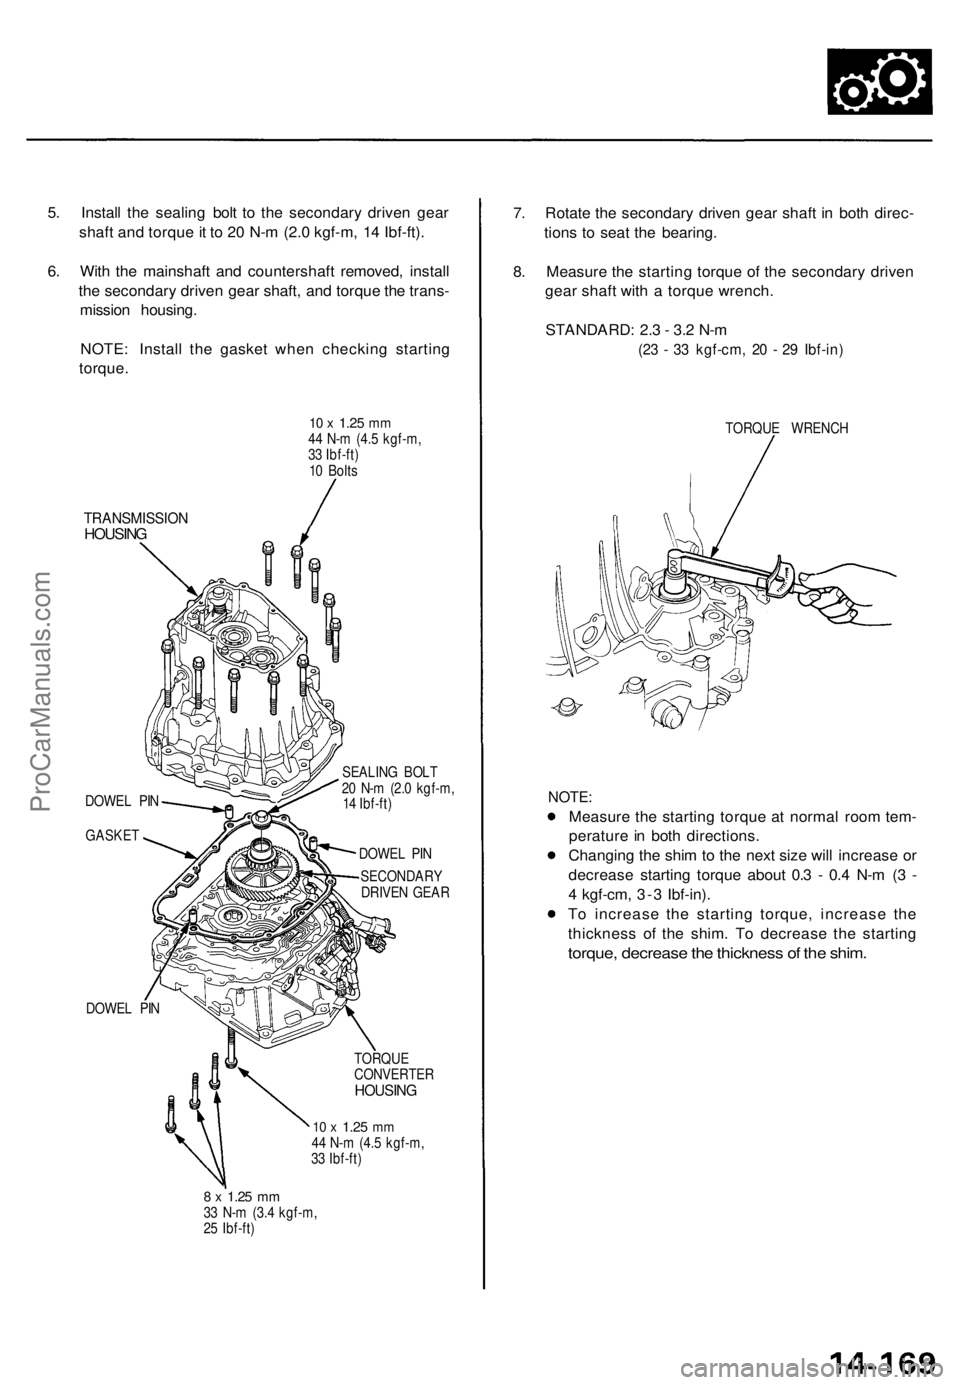
5. Install the sealing bolt to the secondary driven gear
shaft and torque it to 20 N-m (2.0 kgf-m, 14 Ibf-ft).
6. With the mainshaft and countershaft removed, install
the secondary driven gear shaft, and torque the trans-
mission housing.
NOTE: Install the gasket when checking starting
torque.
10 x
1.25
mm
44 N-m (4.5 kgf-m,
33 Ibf-ft)
10 Bolts
TRANSMISSION
HOUSING
DOWEL PIN
GASKET
DOWEL PIN
SEALING BOLT
20 N-m (2.0 kgf-m,
14 Ibf-ft)
DOWEL PIN
SECONDARY
DRIVEN GEAR
TORQUE
CONVERTER
HOUSING
10 x
1.25
mm
44 N-m (4.5 kgf-m,
33 Ibf-ft)
8 x
1.25
mm
33 N-m (3.4 kgf-m,
25 Ibf-ft)
7. Rotate the secondary driven gear shaft in both direc-
tions to seat the bearing.
8. Measure the starting torque of the secondary driven
gear shaft with a torque wrench.
STANDARD: 2.3 - 3.2 N-m
(23 - 33 kgf-cm, 20 - 29 Ibf-in)
TORQUE WRENCH
NOTE:
Measure the starting torque at normal room tem-
perature in both directions.
Changing the shim to the next size will increase or
decrease starting torque about 0.3 - 0.4 N-m (3 -
4 kgf-cm, 3-3 Ibf-in).
To increase the starting torque, increase the
thickness of the shim. To decrease the starting
torque, decrease the thickness of the shim.ProCarManuals.com