Page 1476 of 1771
Sub-frame
Sub-frame Torque Sequence:
CAUTION: After loosening the sub-frame mounting bolts, be sure to replace them with new ones.
To body
REAR CROSS
BEAM
SPECIAL BOLTS
1 2x
1.25
mm
54 N-m (5.5 kgf-m,
40 Ibf-ft)
Replace.
To body
To body
SPECIAL BOLT
14 x 1.5 mm
95 N-m (9.7 kgf-m,
70 Ibf-ft)
Replace.
10 x
1.25
mm
38 N-m (3.9 kgf-m,
28 Ibf-ft)
LOWER PLATE
SPECIAL BOLT
14 x 1.5 mm
95 N-m (9.7 kgf-m,
70 Ibf-ft)
Replace.
SPECIAL BOLT
12 x
1.25
mm
64 N-m (6.5 kgf-m,
47 Ibf-ft)
Replace.
FRONT BEAMProCarManuals.com
Page 1557 of 1771

Check for Wear and Damage
The starter should crank the engine smoothly and steadily.
If the starter engages, but cranks the engine erratically,
remove it, and inspect the starter drive gear and torque
converter ring gear for damage.
Check the drive gear overrunning clutch for binding or
slipping when the armature is rotated with the drive
gear held. If the clutch is damaged, replace the clutch
assembly.
Check Cranking Voltage and Current Draw
Cranking voltage should be no less than 8.5 volts.
Current draw should be no more than 380 amperes.
If cranking voltage is too low, or current draw too high,
check for:
Dead or low battery
Open circuit in starter armature commutator segments
Starter armature dragging
Shorted armature winding
Excessive drag in engine
Check Cranking rpm
Engine speed during cranking should be above 100 rpm.
If speed is too low, check for:
Loose battery or starter terminals
Excessively worn starter brushes
Open circuit in commutator segments
Dirty or damaged helical spline or drive gear
Defective drive gear overrunning clutch
Check Starter Disengagement
With the shift lever in turn the ignition switch to
"START (III)", and release to "ON (II)". The starter drive
gear should disengage from the drive plate/ring gear
when you release the key.
If the drive gear hangs up on the drive plate/ring gear,
check for:
• Solenoid plunger and switch malfunction
• Dirty drive gear assembly or damaged overrunning
clutchProCarManuals.com
Page 1576 of 1771
Ignition System
Spark Plug Inspection
1. Inspect the electrodes and ceramic insulator for:
2. Check the electrode gap.
• Adjust the gap with a suitable gapping tool.
Electrode Gap
• Replace the plug if the center electrode is rounded
as shown below:
Burned or worn electrodes may be caused by:
• Advanced ignition timing
• Loose spark plug
• Plug heat range too low
• Insufficient cooling
Fouled plug may be caused by:
Retarded ignition timing
Oil in combustion chamber
Incorrect spark plug gap
Plug heat range too high
Excessive idling/low speed running
Clogged air cleaner element
Deteriorated ignition coil or ignition wires
3. Apply a small quantity of anti-seize compound to
the plug threads, and screw the plugs into the cylin-
der head finger-tight. Then torque them to 18 N-m
(1.8 kgf-m, 13 Ibf-ft).
Spark PlugsProCarManuals.com
Page 1768 of 1771

Cable Ree l
Replacemen t (cont'd )
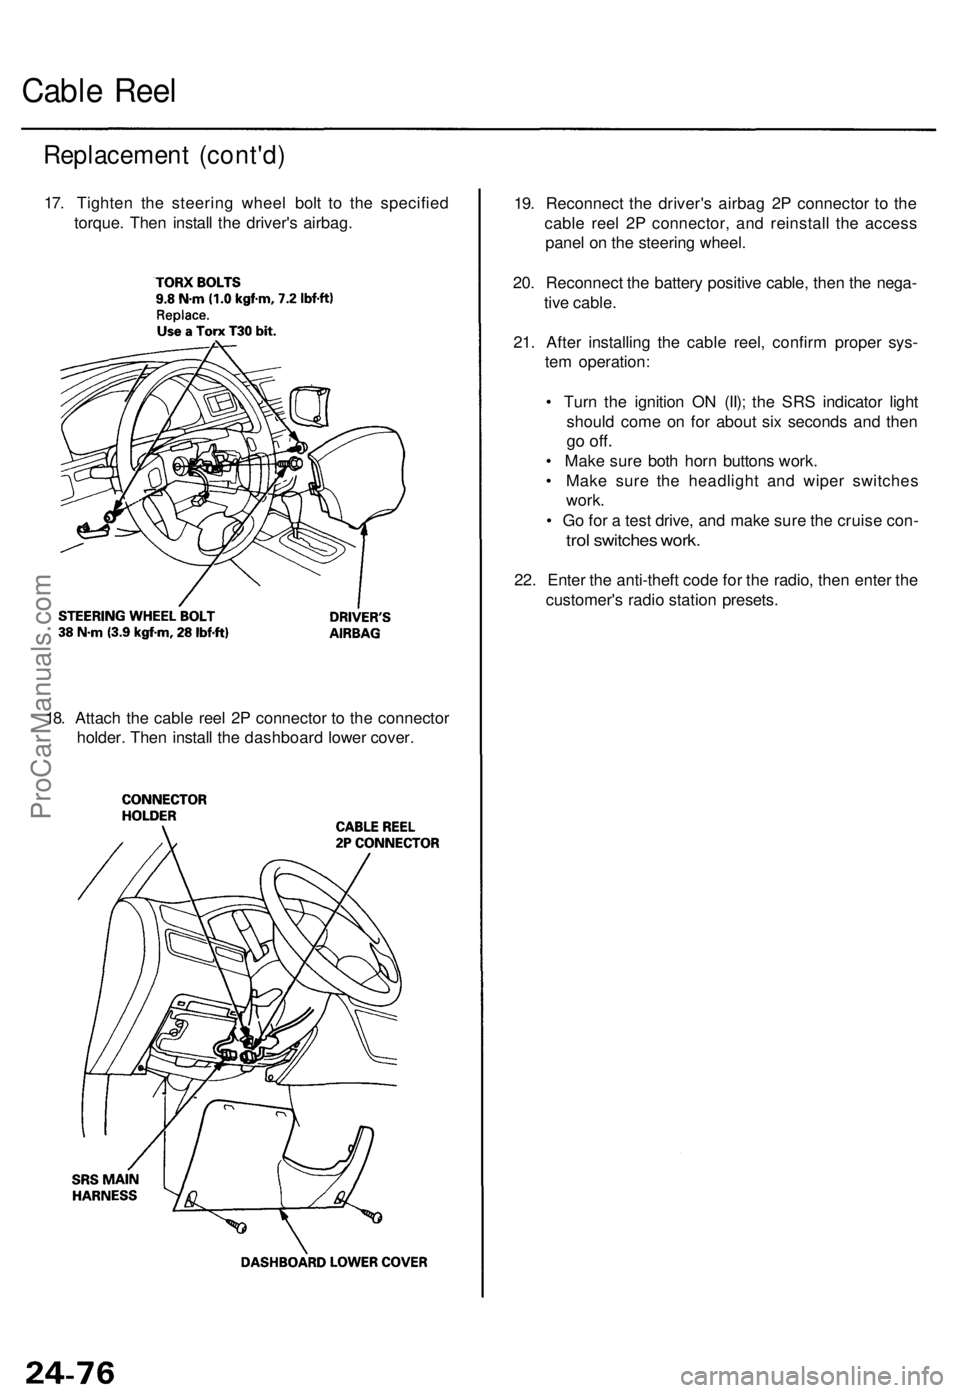
17. Tighte n th e steerin g whee l bol t t o th e specifie d
torque . The n instal l th e driver' s airbag .
18 . Attac h th e cabl e ree l 2 P connecto r t o th e connecto r
holder . The n instal l th e dashboar d lowe r cover . 19
. Reconnec t th e driver' s airba g 2 P connecto r t o th e
cabl e ree l 2 P connector , an d reinstal l th e acces s
pane l o n th e steerin g wheel .
20 . Reconnec t th e batter y positiv e cable , the n th e nega -
tiv e cable .
21 . Afte r installin g th e cabl e reel , confir m prope r sys -
te m operation :
• Tur n th e ignitio n O N (II) ; th e SR S indicato r ligh t
shoul d com e o n fo r abou t si x second s an d the n
go off .
• Mak e sur e bot h hor n button s work .
• Mak e sur e th e headligh t an d wipe r switche s
work .
• G o fo r a tes t drive , an d mak e sur e th e cruis e con -
trol switche s work .
22. Ente r th e anti-thef t cod e fo r th e radio , the n ente r th e
customer' s radi o statio n presets .
ProCarManuals.com