1994 JEEP CHEROKEE torque
[x] Cancel search: torquePage 1529 of 1784
INSTALLATION
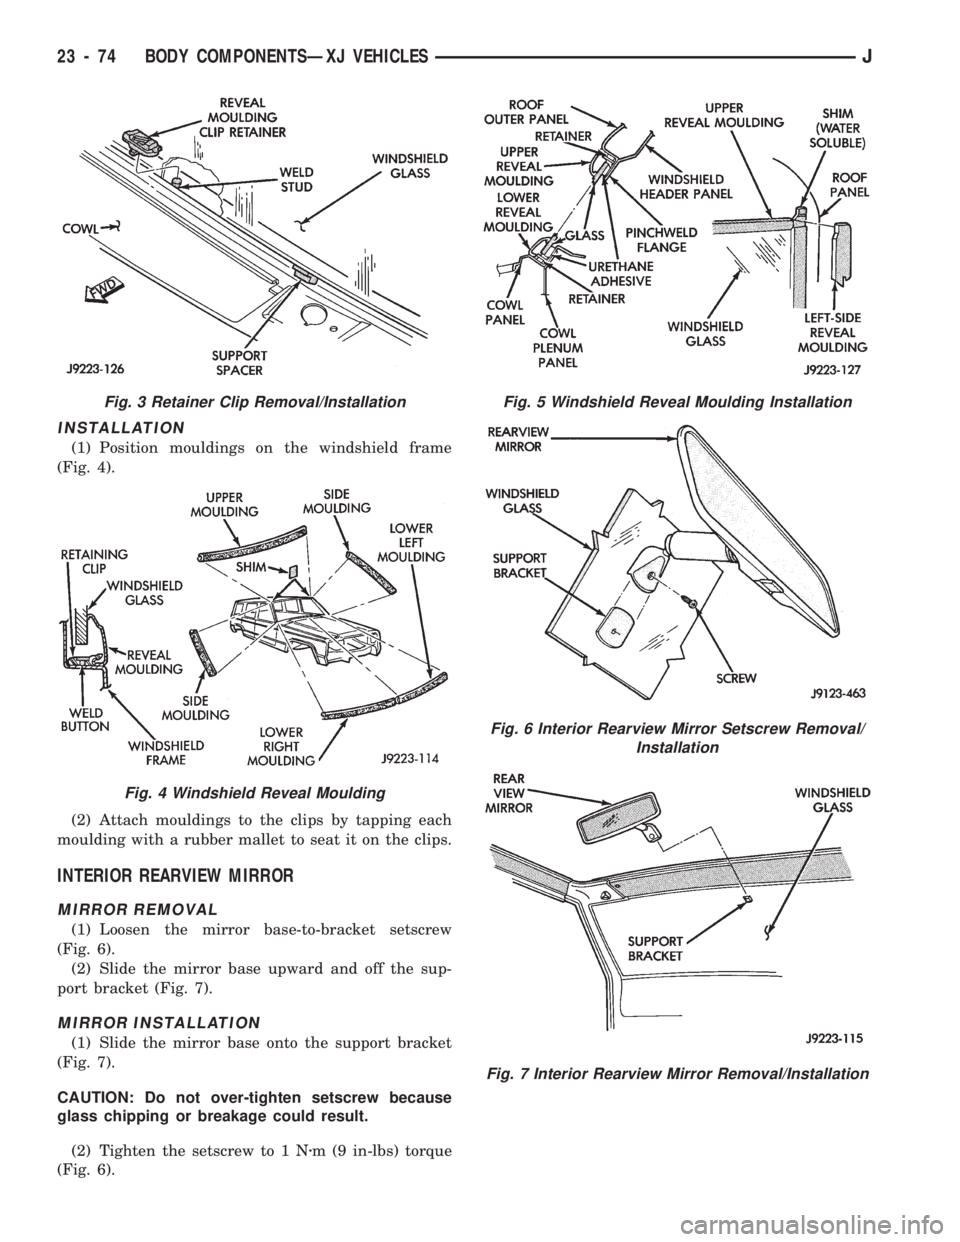
(1) Position mouldings on the windshield frame
(Fig. 4).
(2) Attach mouldings to the clips by tapping each
moulding with a rubber mallet to seat it on the clips.
INTERIOR REARVIEW MIRROR
MIRROR REMOVAL
(1) Loosen the mirror base-to-bracket setscrew
(Fig. 6).
(2) Slide the mirror base upward and off the sup-
port bracket (Fig. 7).
MIRROR INSTALLATION
(1) Slide the mirror base onto the support bracket
(Fig. 7).
CAUTION: Do not over-tighten setscrew because
glass chipping or breakage could result.
(2) Tighten the setscrew to 1 Nzm (9 in-lbs) torque
(Fig. 6).
Fig. 5 Windshield Reveal Moulding Installation
Fig. 6 Interior Rearview Mirror Setscrew Removal/
Installation
Fig. 7 Interior Rearview Mirror Removal/Installation
Fig. 3 Retainer Clip Removal/Installation
Fig. 4 Windshield Reveal Moulding
23 - 74 BODY COMPONENTSÐXJ VEHICLESJ
Page 1533 of 1784
CAUTION: Avoid spilling or dripping primer on
painted surfaces. Clean spills or drips immediately.
The primer will damage the paint if it remains on
the surface for any length of time.
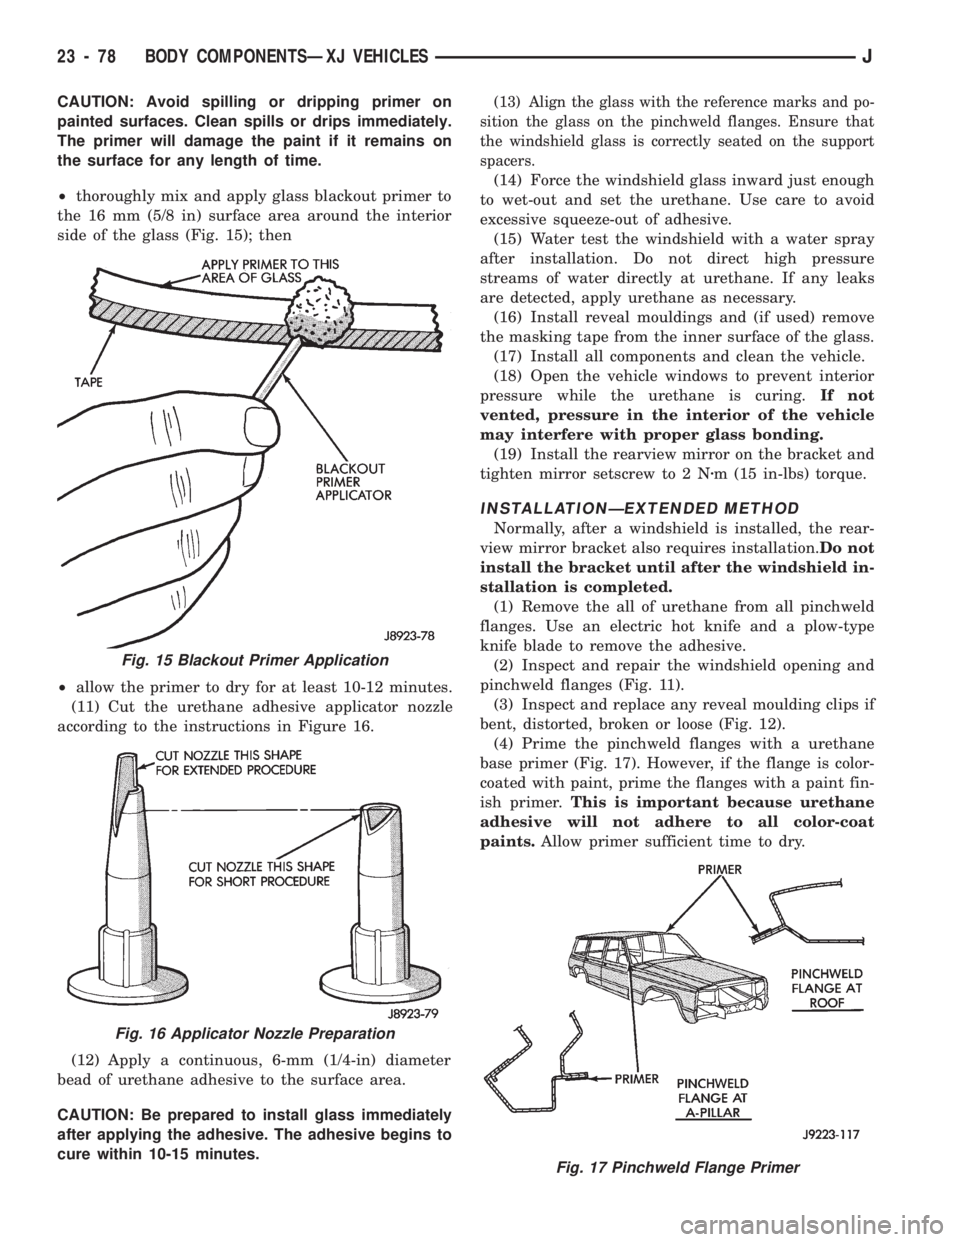
²thoroughly mix and apply glass blackout primer to
the 16 mm (5/8 in) surface area around the interior
side of the glass (Fig. 15); then
²allow the primer to dry for at least 10-12 minutes.
(11) Cut the urethane adhesive applicator nozzle
according to the instructions in Figure 16.
(12) Apply a continuous, 6-mm (1/4-in) diameter
bead of urethane adhesive to the surface area.
CAUTION: Be prepared to install glass immediately
after applying the adhesive. The adhesive begins to
cure within 10-15 minutes.(13) Align the glass with the reference marks and po-
sition the glass on the pinchweld flanges. Ensure that
the windshield glass is correctly seated on the support
spacers.
(14) Force the windshield glass inward just enough
to wet-out and set the urethane. Use care to avoid
excessive squeeze-out of adhesive.
(15) Water test the windshield with a water spray
after installation. Do not direct high pressure
streams of water directly at urethane. If any leaks
are detected, apply urethane as necessary.
(16) Install reveal mouldings and (if used) remove
the masking tape from the inner surface of the glass.
(17) Install all components and clean the vehicle.
(18) Open the vehicle windows to prevent interior
pressure while the urethane is curing.If not
vented, pressure in the interior of the vehicle
may interfere with proper glass bonding.
(19) Install the rearview mirror on the bracket and
tighten mirror setscrew to 2 Nzm (15 in-lbs) torque.
INSTALLATIONÐEXTENDED METHOD
Normally, after a windshield is installed, the rear-
view mirror bracket also requires installation.Do not
install the bracket until after the windshield in-
stallation is completed.
(1) Remove the all of urethane from all pinchweld
flanges. Use an electric hot knife and a plow-type
knife blade to remove the adhesive.
(2) Inspect and repair the windshield opening and
pinchweld flanges (Fig. 11).
(3) Inspect and replace any reveal moulding clips if
bent, distorted, broken or loose (Fig. 12).
(4) Prime the pinchweld flanges with a urethane
base primer (Fig. 17). However, if the flange is color-
coated with paint, prime the flanges with a paint fin-
ish primer.This is important because urethane
adhesive will not adhere to all color-coat
paints.Allow primer sufficient time to dry.
Fig. 15 Blackout Primer Application
Fig. 16 Applicator Nozzle Preparation
Fig. 17 Pinchweld Flange Primer
23 - 78 BODY COMPONENTSÐXJ VEHICLESJ
Page 1535 of 1784
(18) Install the rearview mirror on the bracket and
tighten the mirror setscrew to 2 Nzm (15 in-lbs) torque.
REAR QUARTER VENT WINDOW GLASSÐXJ
VEHICLES
REMOVAL
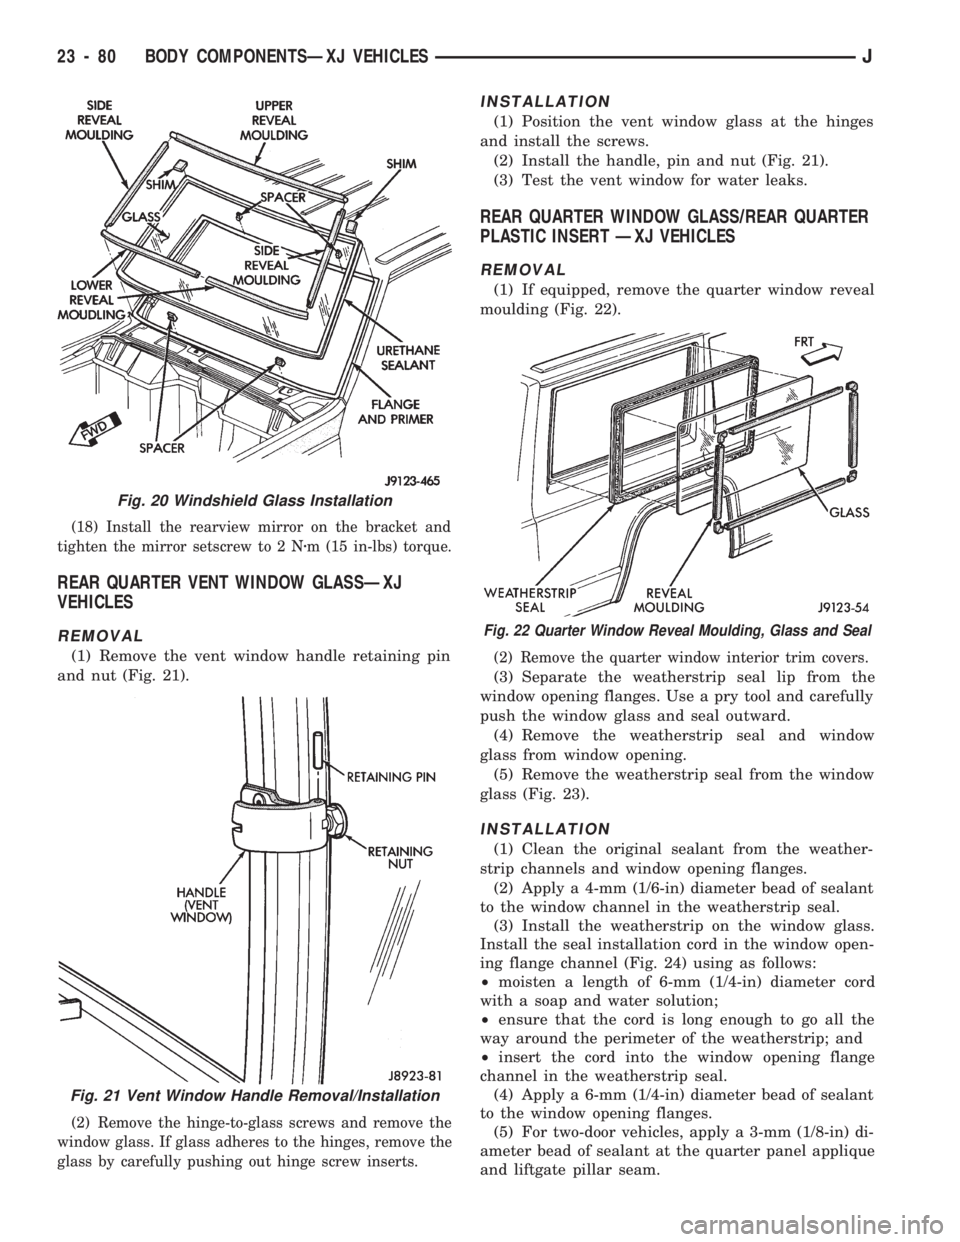
(1) Remove the vent window handle retaining pin
and nut (Fig. 21).
(2) Remove the hinge-to-glass screws and remove the
window glass. If glass adheres to the hinges, remove the
glass by carefully pushing out hinge screw inserts.
INSTALLATION
(1) Position the vent window glass at the hinges
and install the screws.
(2) Install the handle, pin and nut (Fig. 21).
(3) Test the vent window for water leaks.
REAR QUARTER WINDOW GLASS/REAR QUARTER
PLASTIC INSERT ÐXJ VEHICLES
REMOVAL
(1) If equipped, remove the quarter window reveal
moulding (Fig. 22).
(2) Remove the quarter window interior trim covers.
(3) Separate the weatherstrip seal lip from the
window opening flanges. Use a pry tool and carefully
push the window glass and seal outward.
(4) Remove the weatherstrip seal and window
glass from window opening.
(5) Remove the weatherstrip seal from the window
glass (Fig. 23).
INSTALLATION
(1) Clean the original sealant from the weather-
strip channels and window opening flanges.
(2) Apply a 4-mm (1/6-in) diameter bead of sealant
to the window channel in the weatherstrip seal.
(3) Install the weatherstrip on the window glass.
Install the seal installation cord in the window open-
ing flange channel (Fig. 24) using as follows:
²moisten a length of 6-mm (1/4-in) diameter cord
with a soap and water solution;
²ensure that the cord is long enough to go all the
way around the perimeter of the weatherstrip; and
²insert the cord into the window opening flange
channel in the weatherstrip seal.
(4) Apply a 6-mm (1/4-in) diameter bead of sealant
to the window opening flanges.
(5) For two-door vehicles, apply a 3-mm (1/8-in) di-
ameter bead of sealant at the quarter panel applique
and liftgate pillar seam.
Fig. 20 Windshield Glass Installation
Fig. 21 Vent Window Handle Removal/Installation
Fig. 22 Quarter Window Reveal Moulding, Glass and Seal
23 - 80 BODY COMPONENTSÐXJ VEHICLESJ
Page 1539 of 1784
UNDERBODY COMPONENTS
INDEX
page page
Catalytic Converter/Muffler/Tailpipe Support
Brackets............................. 85
Front Skid Plate......................... 84
Fuel and Brake Fluid Tube Retainer Clip....... 86
Fuel Filler Hose Splash ShieldÐXJ Vehicles.... 86
Fuel Filter Bracket........................ 86Fuel Tank Skid Plate...................... 84
Fuel Tank Support Strap................... 86
Rear Tow HookÐXJ Vehicles............... 87
Service Information....................... 84
Trailer Hitches........................... 88
Transfer Case Skid Plate.................. 84
SERVICE INFORMATION
In some cases, components in the following proce-
dures either support, or are concealed by other com-
ponents. When necessary, refer to component
removal procedure for service access.
FRONT SKID PLATE
REMOVAL
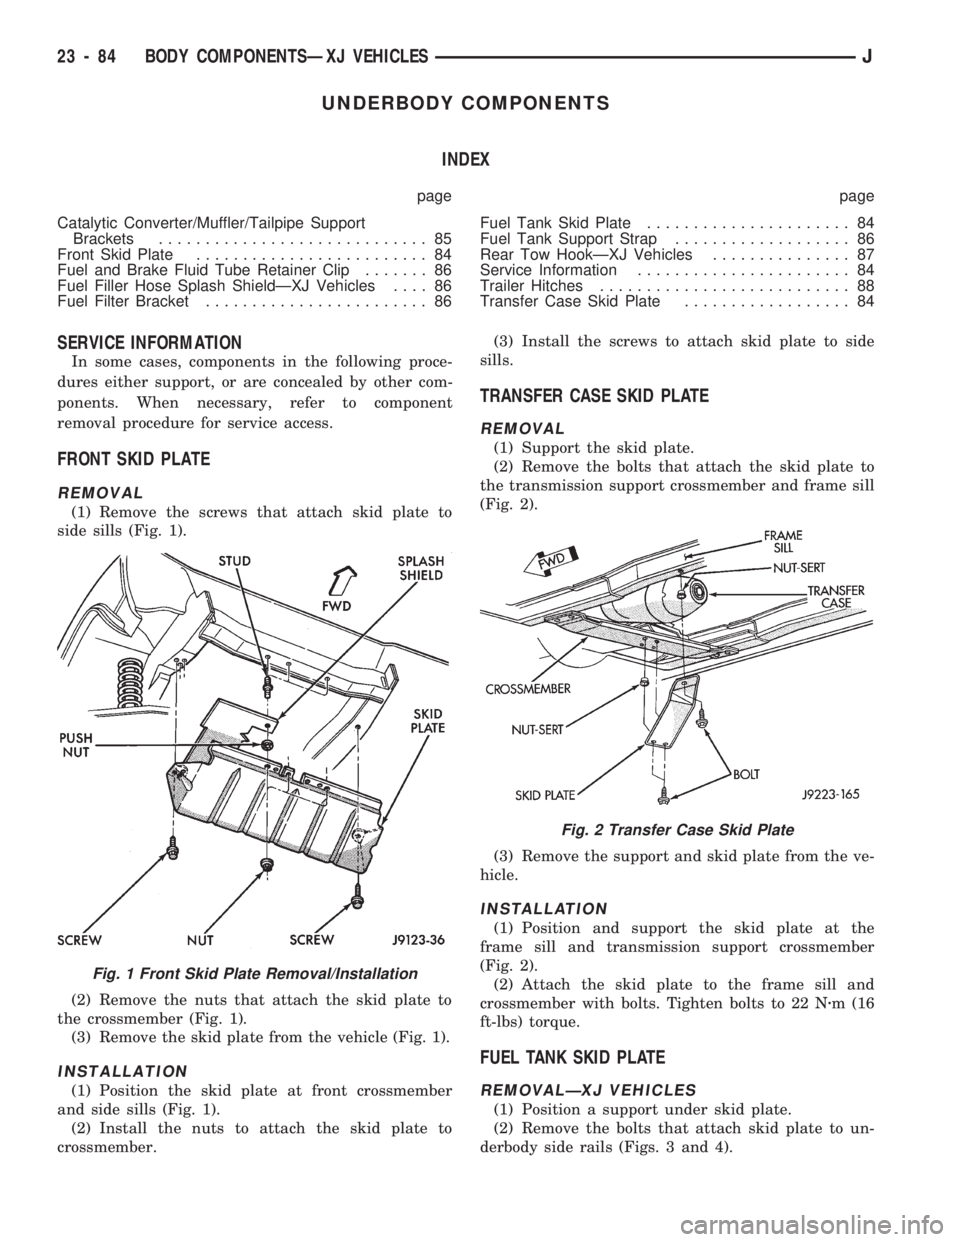
(1) Remove the screws that attach skid plate to
side sills (Fig. 1).
(2) Remove the nuts that attach the skid plate to
the crossmember (Fig. 1).
(3) Remove the skid plate from the vehicle (Fig. 1).
INSTALLATION
(1) Position the skid plate at front crossmember
and side sills (Fig. 1).
(2) Install the nuts to attach the skid plate to
crossmember.(3) Install the screws to attach skid plate to side
sills.
TRANSFER CASE SKID PLATE
REMOVAL
(1) Support the skid plate.
(2) Remove the bolts that attach the skid plate to
the transmission support crossmember and frame sill
(Fig. 2).
(3) Remove the support and skid plate from the ve-
hicle.
INSTALLATION
(1) Position and support the skid plate at the
frame sill and transmission support crossmember
(Fig. 2).
(2) Attach the skid plate to the frame sill and
crossmember with bolts. Tighten bolts to 22 Nzm (16
ft-lbs) torque.
FUEL TANK SKID PLATE
REMOVALÐXJ VEHICLES
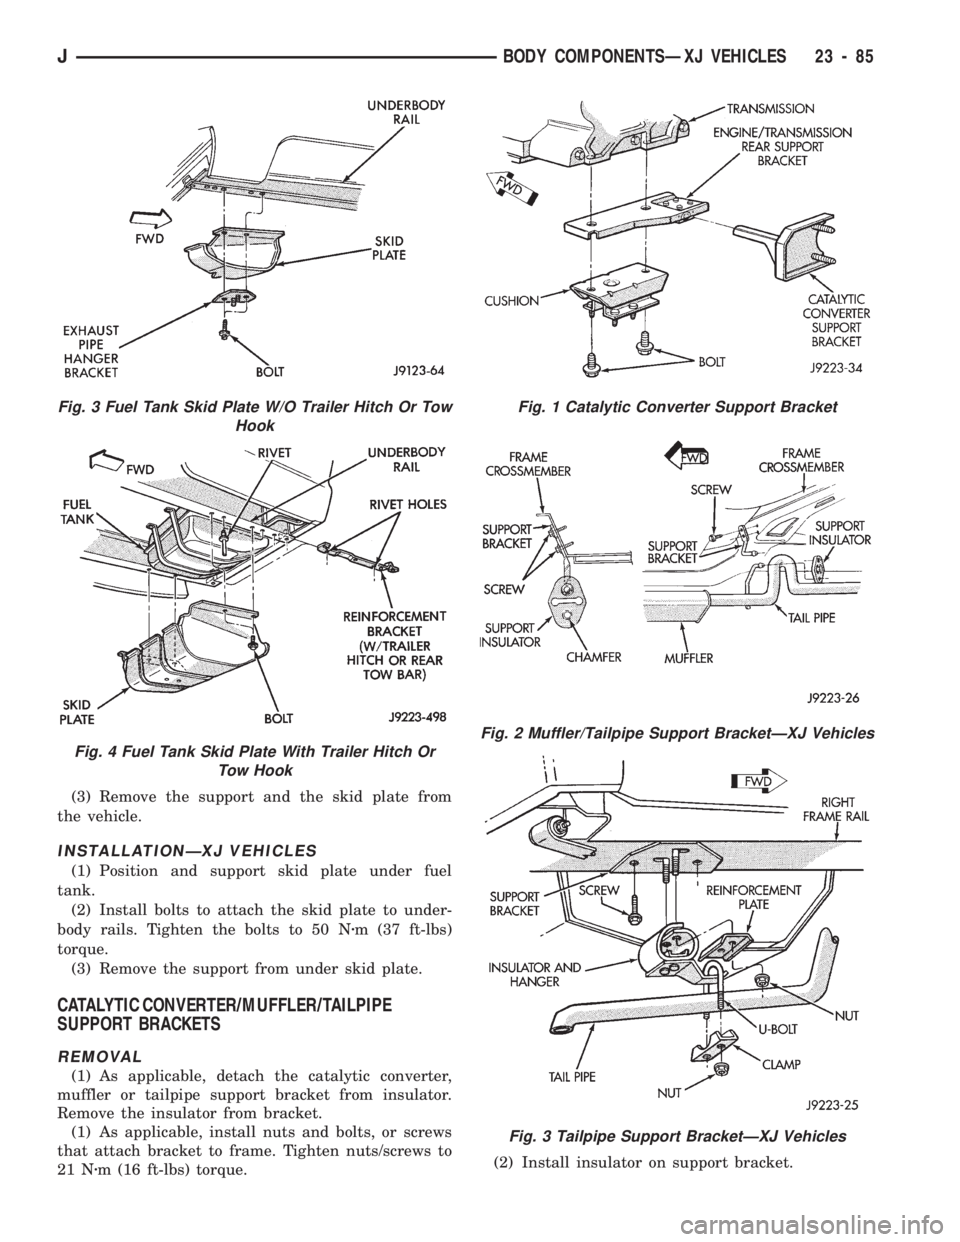
(1) Position a support under skid plate.
(2) Remove the bolts that attach skid plate to un-
derbody side rails (Figs. 3 and 4).
Fig. 1 Front Skid Plate Removal/Installation
Fig. 2 Transfer Case Skid Plate
23 - 84 BODY COMPONENTSÐXJ VEHICLESJ
Page 1540 of 1784
(3) Remove the support and the skid plate from
the vehicle.
INSTALLATIONÐXJ VEHICLES
(1) Position and support skid plate under fuel
tank.
(2) Install bolts to attach the skid plate to under-
body rails. Tighten the bolts to 50 Nzm (37 ft-lbs)
torque.
(3) Remove the support from under skid plate.
CATALYTIC CONVERTER/MUFFLER/TAILPIPE
SUPPORT BRACKETS
REMOVAL
(1) As applicable, detach the catalytic converter,
muffler or tailpipe support bracket from insulator.
Remove the insulator from bracket.
(1) As applicable, install nuts and bolts, or screws
that attach bracket to frame. Tighten nuts/screws to
21 Nzm (16 ft-lbs) torque.(2) Install insulator on support bracket.
Fig. 1 Catalytic Converter Support Bracket
Fig. 2 Muffler/Tailpipe Support BracketÐXJ Vehicles
Fig. 3 Tailpipe Support BracketÐXJ Vehicles
Fig. 3 Fuel Tank Skid Plate W/O Trailer Hitch Or Tow
Hook
Fig. 4 Fuel Tank Skid Plate With Trailer Hitch Or
Tow Hook
JBODY COMPONENTSÐXJ VEHICLES 23 - 85
Page 1541 of 1784
(3) Attach catalytic converter, muffler or tailpipe
insulator to support hanger to insulator.
FUEL AND BRAKE FLUID TUBE RETAINER CLIP
REMOVAL
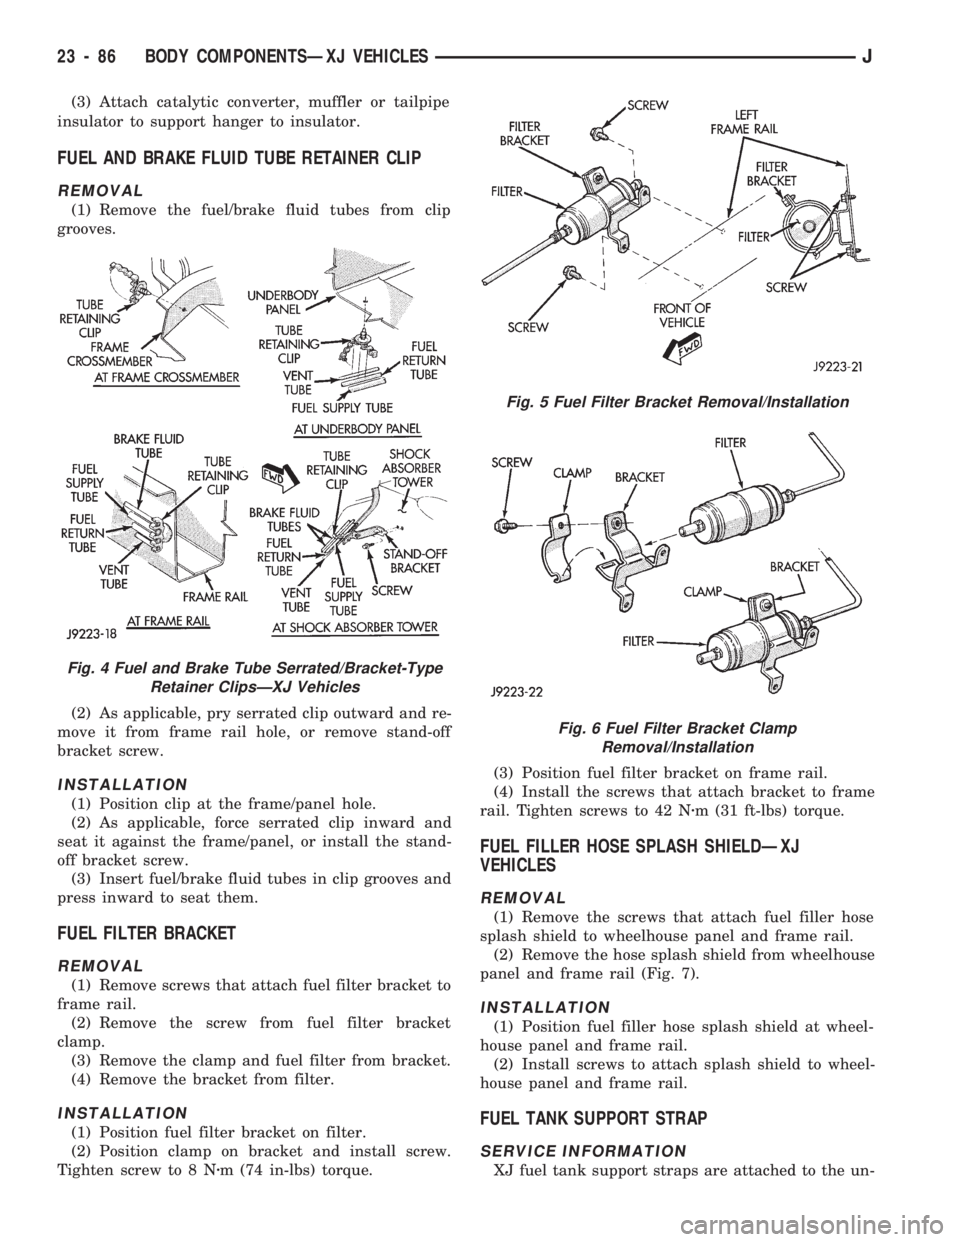
(1) Remove the fuel/brake fluid tubes from clip
grooves.
(2) As applicable, pry serrated clip outward and re-
move it from frame rail hole, or remove stand-off
bracket screw.
INSTALLATION
(1) Position clip at the frame/panel hole.
(2) As applicable, force serrated clip inward and
seat it against the frame/panel, or install the stand-
off bracket screw.
(3) Insert fuel/brake fluid tubes in clip grooves and
press inward to seat them.
FUEL FILTER BRACKET
REMOVAL
(1) Remove screws that attach fuel filter bracket to
frame rail.
(2) Remove the screw from fuel filter bracket
clamp.
(3) Remove the clamp and fuel filter from bracket.
(4) Remove the bracket from filter.
INSTALLATION
(1) Position fuel filter bracket on filter.
(2) Position clamp on bracket and install screw.
Tighten screw to 8 Nzm (74 in-lbs) torque.(3) Position fuel filter bracket on frame rail.
(4) Install the screws that attach bracket to frame
rail. Tighten screws to 42 Nzm (31 ft-lbs) torque.
FUEL FILLER HOSE SPLASH SHIELDÐXJ
VEHICLES
REMOVAL
(1) Remove the screws that attach fuel filler hose
splash shield to wheelhouse panel and frame rail.
(2) Remove the hose splash shield from wheelhouse
panel and frame rail (Fig. 7).
INSTALLATION
(1) Position fuel filler hose splash shield at wheel-
house panel and frame rail.
(2) Install screws to attach splash shield to wheel-
house panel and frame rail.
FUEL TANK SUPPORT STRAP
SERVICE INFORMATION
XJ fuel tank support straps are attached to the un-
Fig. 4 Fuel and Brake Tube Serrated/Bracket-Type
Retainer ClipsÐXJ Vehicles
Fig. 5 Fuel Filter Bracket Removal/Installation
Fig. 6 Fuel Filter Bracket Clamp
Removal/Installation
23 - 86 BODY COMPONENTSÐXJ VEHICLESJ
Page 1542 of 1784
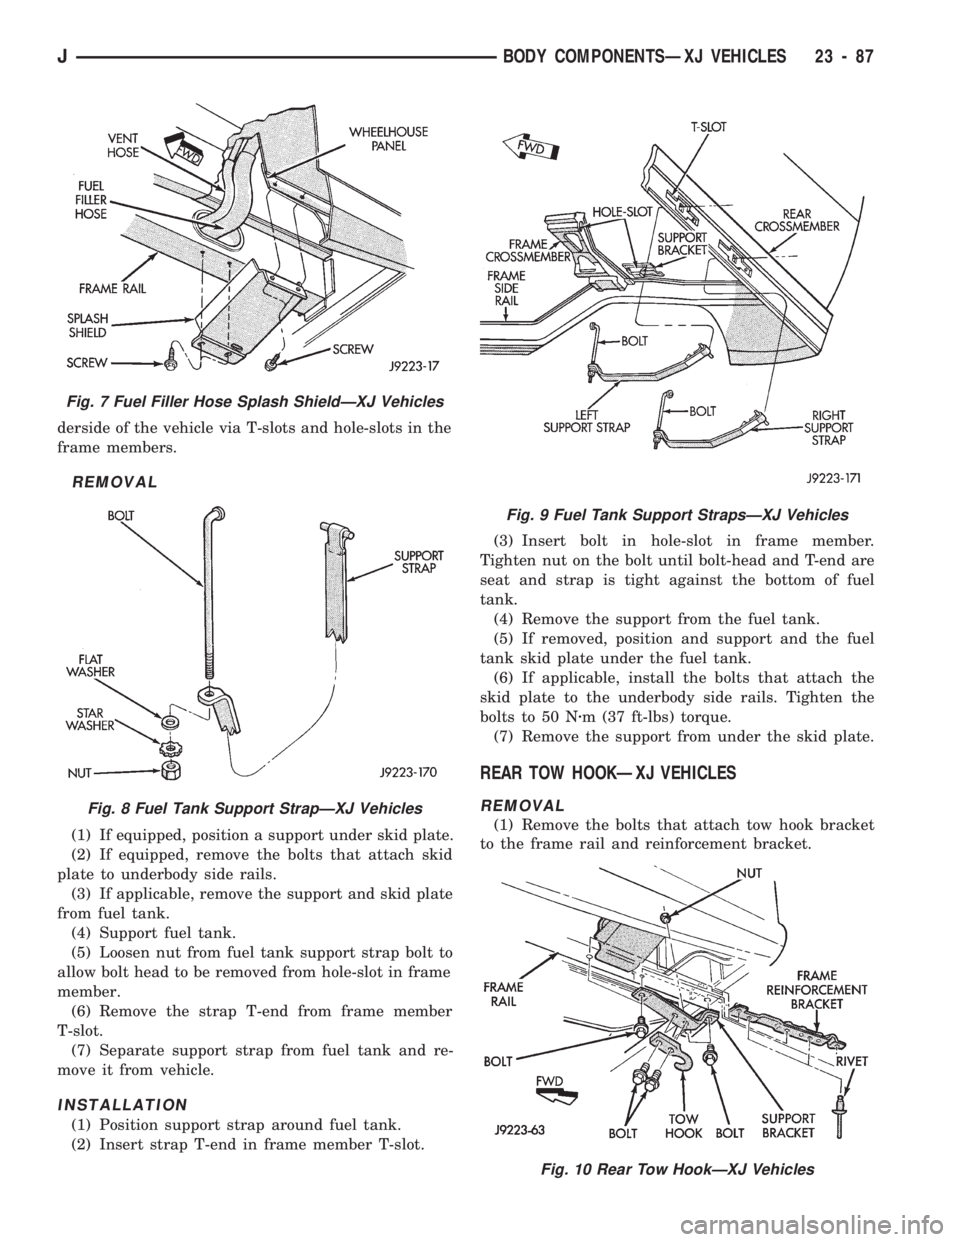
derside of the vehicle via T-slots and hole-slots in the
frame members.
REMOVAL
(1) If equipped, position a support under skid plate.
(2) If equipped, remove the bolts that attach skid
plate to underbody side rails.
(3) If applicable, remove the support and skid plate
from fuel tank.
(4) Support fuel tank.
(5) Loosen nut from fuel tank support strap bolt to
allow bolt head to be removed from hole-slot in frame
member.
(6) Remove the strap T-end from frame member
T-slot.
(7) Separate support strap from fuel tank and re-
move it from vehicle.
INSTALLATION
(1) Position support strap around fuel tank.
(2) Insert strap T-end in frame member T-slot.(3) Insert bolt in hole-slot in frame member.
Tighten nut on the bolt until bolt-head and T-end are
seat and strap is tight against the bottom of fuel
tank.
(4) Remove the support from the fuel tank.
(5) If removed, position and support and the fuel
tank skid plate under the fuel tank.
(6) If applicable, install the bolts that attach the
skid plate to the underbody side rails. Tighten the
bolts to 50 Nzm (37 ft-lbs) torque.
(7) Remove the support from under the skid plate.
REAR TOW HOOKÐXJ VEHICLES
REMOVAL
(1) Remove the bolts that attach tow hook bracket
to the frame rail and reinforcement bracket.
Fig. 7 Fuel Filler Hose Splash ShieldÐXJ Vehicles
Fig. 8 Fuel Tank Support StrapÐXJ Vehicles
Fig. 9 Fuel Tank Support StrapsÐXJ Vehicles
Fig. 10 Rear Tow HookÐXJ Vehicles
JBODY COMPONENTSÐXJ VEHICLES 23 - 87
Page 1543 of 1784
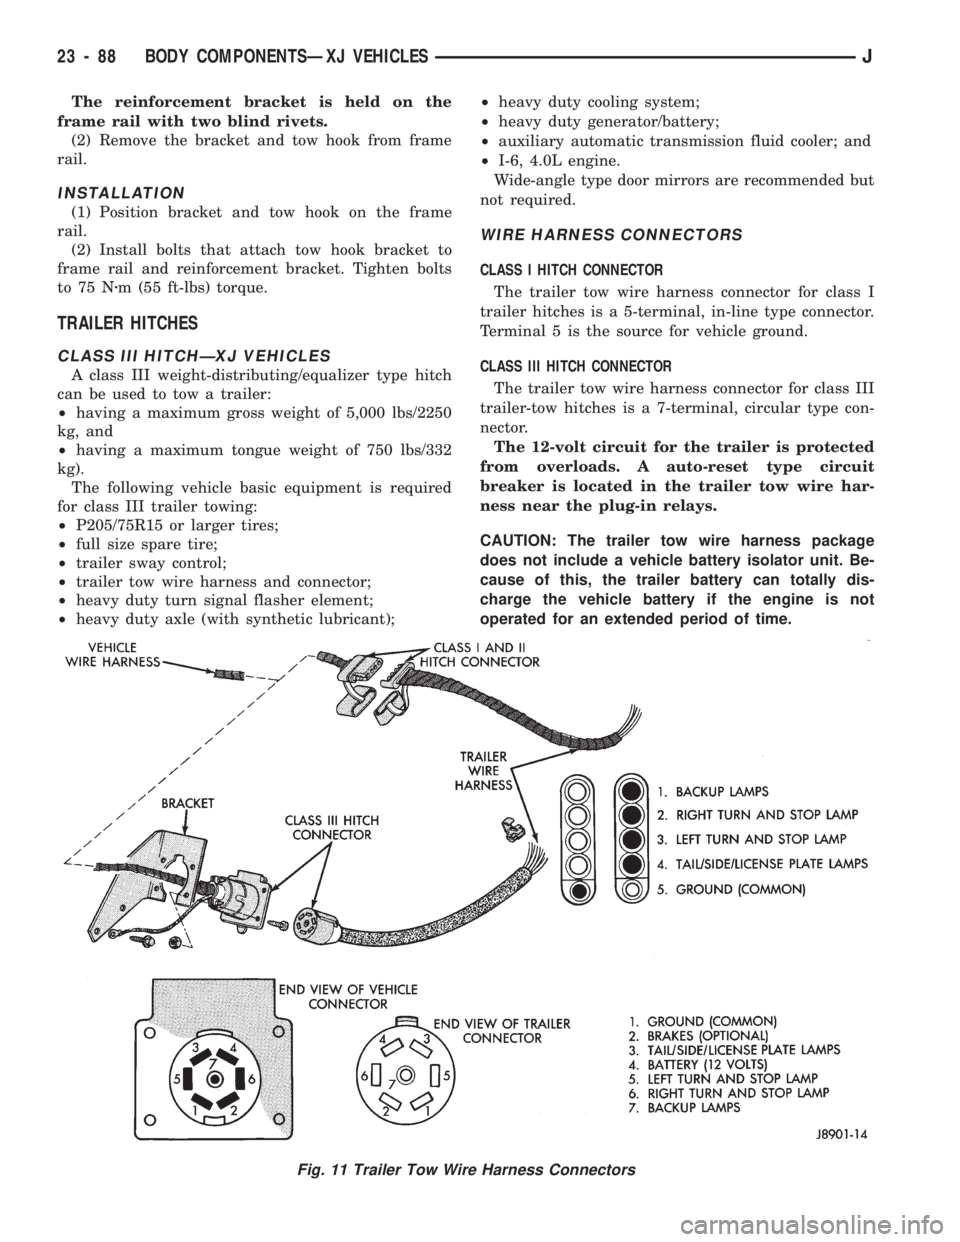
The reinforcement bracket is held on the
frame rail with two blind rivets.
(2) Remove the bracket and tow hook from frame
rail.
INSTALLATION
(1) Position bracket and tow hook on the frame
rail.
(2) Install bolts that attach tow hook bracket to
frame rail and reinforcement bracket. Tighten bolts
to 75 Nzm (55 ft-lbs) torque.
TRAILER HITCHES
CLASS III HITCHÐXJ VEHICLES
A class III weight-distributing/equalizer type hitch
can be used to tow a trailer:
²having a maximum gross weight of 5,000 lbs/2250
kg, and
²having a maximum tongue weight of 750 lbs/332
kg).
The following vehicle basic equipment is required
for class III trailer towing:
²P205/75R15 or larger tires;
²full size spare tire;
²trailer sway control;
²trailer tow wire harness and connector;
²heavy duty turn signal flasher element;
²heavy duty axle (with synthetic lubricant);²heavy duty cooling system;
²heavy duty generator/battery;
²auxiliary automatic transmission fluid cooler; and
²I-6, 4.0L engine.
Wide-angle type door mirrors are recommended but
not required.
WIRE HARNESS CONNECTORS
CLASS I HITCH CONNECTOR
The trailer tow wire harness connector for class I
trailer hitches is a 5-terminal, in-line type connector.
Terminal 5 is the source for vehicle ground.
CLASS III HITCH CONNECTOR
The trailer tow wire harness connector for class III
trailer-tow hitches is a 7-terminal, circular type con-
nector.
The 12-volt circuit for the trailer is protected
from overloads. A auto-reset type circuit
breaker is located in the trailer tow wire har-
ness near the plug-in relays.
CAUTION: The trailer tow wire harness package
does not include a vehicle battery isolator unit. Be-
cause of this, the trailer battery can totally dis-
charge the vehicle battery if the engine is not
operated for an extended period of time.
Fig. 11 Trailer Tow Wire Harness Connectors
23 - 88 BODY COMPONENTSÐXJ VEHICLESJ