1993 DODGE TRUCK spark plugs replace
[x] Cancel search: spark plugs replacePage 612 of 1502
•
ENGINES
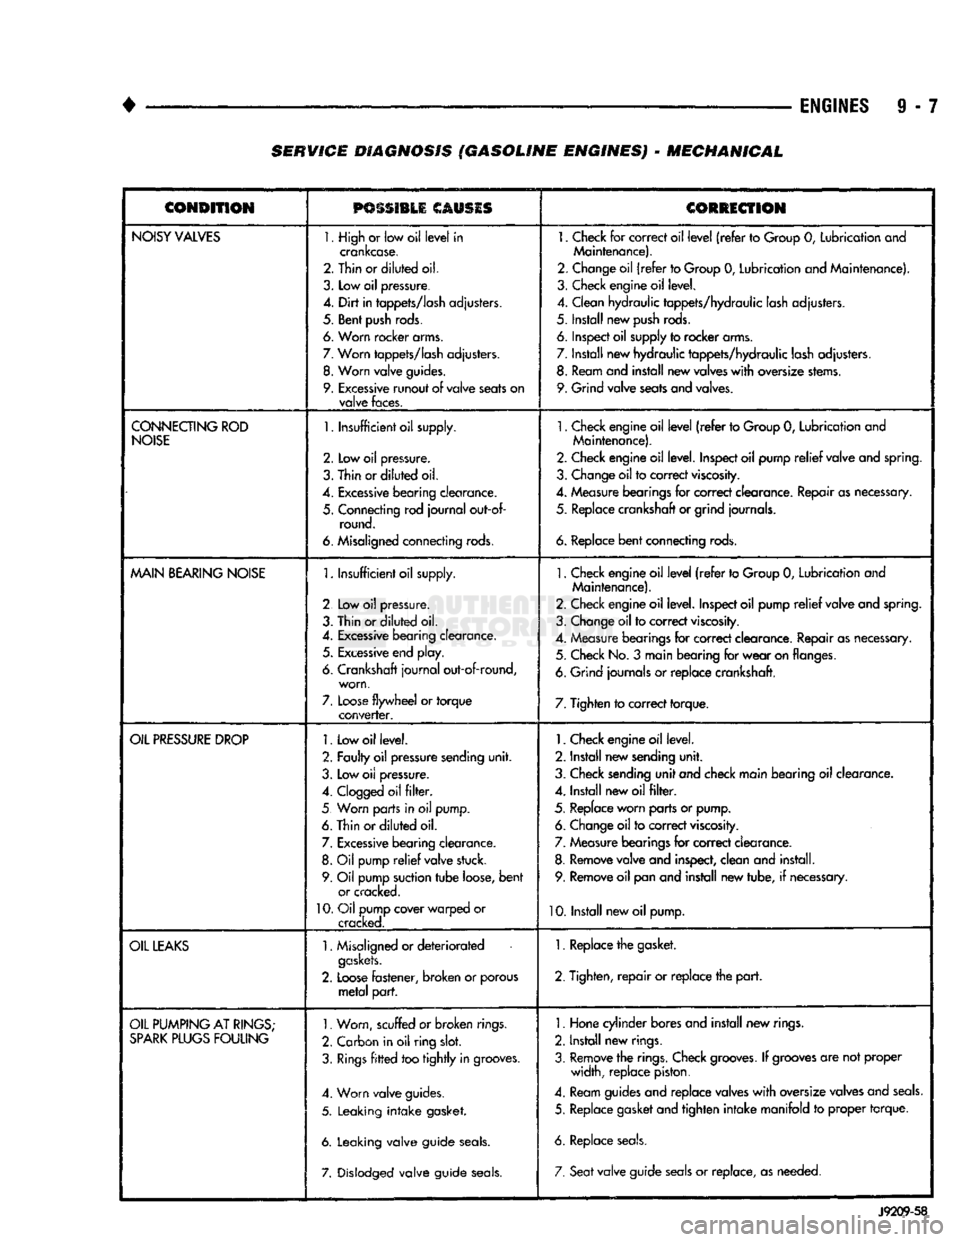
9 - 7 SERVICE DIAGNOSIS (GASOLINE ENGINES) - MECHANICAL
CONDITION
PSSSI1LI
CAUSIS
CORRECTION
NOISY
VALVES
1. High
or
low oil
level
in
crankcase.
2. Thin or
diluted
oil.
3.
Low
oil
pressure.
4.
Dirt
in
tappets/lash
adjusters.
5. Bent
push
rods.
6. Worn rocker arms.
7.
Worn
tappets/lash
adjusters.
8.
Worn
valve
guides.
9.
Excessive
runout
of
valve
seats
on
valve
faces.
1.
Check
for
correct oil
level
(refer
to
Group
0,
Lubrication and
Maintenance).
2. Change oil
(refer
to Group
0,
Lubrication and Maintenance).
3. Check engine oil level.
4. Clean hydraulic tappets/hydraulic lash adjusters.
5. Install new
push
rods.
6. Inspect oil supply to rocker arms.
7. Install new hydraulic tappets/hydraulic lash adjusters. 8. Ream and install new valves
with
oversize stems.
9. Grind valve seats and valves.
CONNECTING
ROD
NOISE
1.
Insufficient oil supply.
2.
Low oil
pressure.
3.
Thin
or
diluted
oil.
4.
Excessive
bearing
clearance.
5. Connecting rod
journal
out-of- round.
6. Misaligned connecting rods.
1.
Check engine oil
level
(refer
to Group
0,
Lubrication and
Maintenance).
2. Check engine oil level. Inspect oil pump
relief
valve and spring.
3. Change oil to correct
viscosity.
4. Measure bearings for correct clearance. Repair as necessary, 5. Replace crankshaft or grind journals.
6.
Replace
bent
connecting rods.
MAIN
BEARING
NOISE
1.
Insufficient oil supply.
2 Low
oil
pressure.
3. Thin or
diluted
oil.
4.
Excessive
bearing clearance. 5.
Excessive
end play.
6. Crankshaft
journal
out-of-round, worn,
7.
Loose
flywheel
or
torque
converter.
1.
Check engine oil
level
(refer
to Group
0,
Lubrication and
Maintenance).
2. Check engine oil level. Inspect oil pump
relief
valve and spring.
3. Change oil to correct
viscosity.
4. Measure bearings for correct clearance. Repair as necessary. 5. Check No.
3
main bearing for
wear
on flanges.
6. Grind journals
or
replace crankshaft.
7. Tighten to correct torque.
OIL
PRESSURE
DROP
1.
Low oil level.
2. Faulty oil pressure sending
unit.
3. Low
oil
pressure.
4.
Clogged
oil
filter.
5 Worn parts in
oil
pump.
6. Thin or
diluted
oil.
7.
Excessive
bearing clearance. 8.
Oil
pump
relief
valve stuck.
9. Oil pump suction
tube
loose,
bent
or cracked.
10.
Oil pump cover warped
or
cracked.
1.
Check engine oil level.
2. Install new sending
unit.
3. Check sending
unit
and check main bearing oil clearance.
4. Install new oil
filter.
5. Replace worn parts or pump. 6. Change oil to correct
viscosity.
7. Measure bearings for correct clearance.
8. Remove valve and inspect, clean and install. 9. Remove oil pan and install new tube,
if
necessary.
10. Install new oil pump.
OIL
LEAKS
1.
Misaligned or
deteriorated
gaskets.
2.
Loose
fastener, broken
or
porous
metal
part.
1. Replace the gasket.
2. Tighten,
repair
or replace the
part.
OIL
PUMPING
AT
RINGS;
SPARK
PLUGS
FOULING
1.
Worn, scuffed
or broken
rings.
2. Carbon in oil ring
slot.
3.
Rings
fitted
too
tightly
in grooves.
4. Worn valve guides.
5. Leaking
intake
gasket.
6. Leaking valve guide
seals.
7. Dislodged valve guide
seals.
1.
Hone cylinder bores and install new rings.
2. Install new rings.
3. Remove the rings. Check
grooves.
If
grooves
are not proper width, replace piston.
4. Ream guides and replace valves
with
oversize valves and
seals.
5. Replace gasket and tighten
intake
manifold
to
proper torque.
6. Replace
seals.
7. Seat
valve guide
seals
or
replace, as needed.
J9209-58
Page 628 of 1502
•
3.9L
ENGINE
9 - 23 (19) Remove the head bolts from each cylinder
head and remove cylinder heads. Discard the cylin der head gasket.
(20) Remove spark plugs.
CLEANING
Clean all surfaces of cylinder block and cylinder
heads.
Clean cylinder block front and rear gasket surfaces
using a suitable solvent.
INSPECTION
Inspect all surfaces with a straightedge if there is
any reason to suspect leakage. If out-of-flatness ex
ceeds 0.00075 mm/mm (0.00075 inch/inch) times the
span length in any direction, either replace head or
lightly machine the head surface.
FOR EXAMPLE:—A 305 mm (12 inch) span is
0.102 mm (0.004 inch) out-of-flat. The allowable out-
of-flat is 305 x 0,00075 (12 x 0.00075) equals 0.23
mm (0.009 inch). This amount of out-of-flat is accept
able.
The cylinder head surface finish should be 1.78-
3.00 microns (70-125 microinches). Inspect push rods. Replace worn or bent rods.
INSTALLATION
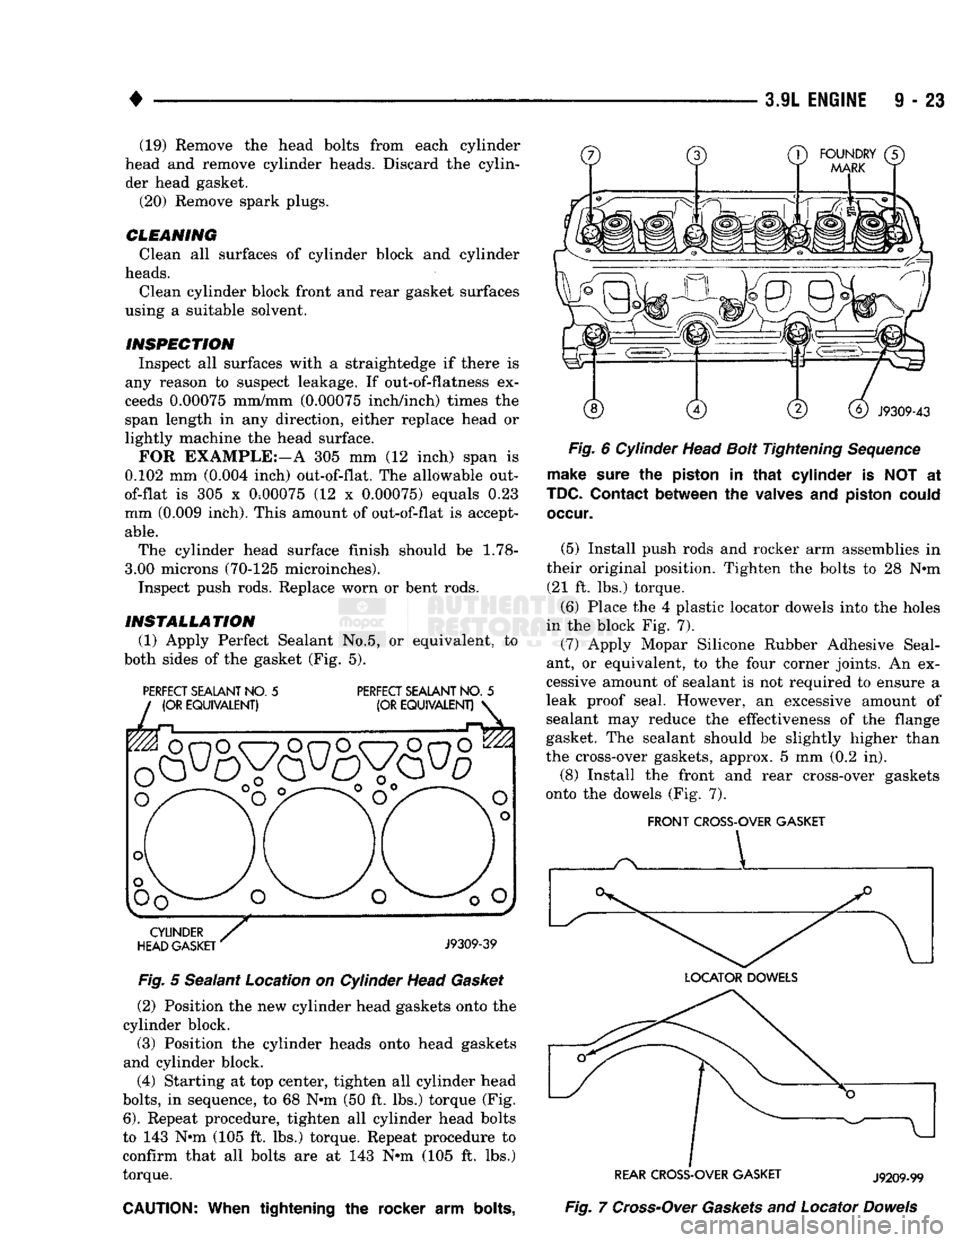
(1) Apply Perfect Sealant No.5, or equivalent, to
both sides of the gasket (Fig. 5).
PERFECT
SEALANT
NO.
5
PERFECT
SEALANT
NO.
5
Fig.
5 Sealant Location on Cylinder Head
Gasket
(2) Position the new cylinder head gaskets onto the
cylinder block.
(3) Position the cylinder heads onto head gaskets
and cylinder block.
(4) Starting at top center, tighten all cylinder head
bolts,
in sequence, to 68 N»m (50 ft. lbs.) torque (Fig.
6).
Repeat procedure, tighten all cylinder head bolts
to 143 N»m (105 ft. lbs.) torque. Repeat procedure to
confirm that all bolts are at 143 N*m (105 ft. lbs.)
torque.
CAUTION:
When
tightening the rocker arm
bolts,
Fig.
6 Cylinder Head
Bolt
Tightening
Sequence
make
sure
the
piston
in
that
cylinder is NOT at
TDC.
Contact
between the
valves
and
piston
could
occur.
(5) Install push rods and rocker arm assemblies in
their original position. Tighten the bolts to 28 Nnn (21 ft. lbs.) torque.
(6) Place the 4 plastic locator dowels into the holes
in the block Fig. 7). (7) Apply Mopar Silicone Rubber Adhesive Seal
ant, or equivalent, to the four corner joints. An ex
cessive amount of sealant is not required to ensure a
leak proof seal. However, an excessive amount of sealant may reduce the effectiveness of the flange
gasket. The sealant should be slightly higher than
the cross-over gaskets, approx. 5 mm (0.2 in).
(8) Install the front and rear cross-over gaskets
onto the dowels (Fig. 7).
FRONT
CROSS-OVER
GASKET
REAR
CROSS-OVER
GASKET
J9209-99
Fig.
7
Cross-Over
Gaskets
and Locator
Dowels
Page 632 of 1502
•
3.9L
ENGINE
9 - 27 (2) If valves or seats are reground, check valve
stem height. If valve is too long, replace cylinder
head.
(3) Install new seals on all valve guides. Install
valve springs and valve retainers.
(4) Compress valve springs with Valve Spring
Compressor Tool MD-998772A, install locks and re
lease tool. If valves and/or seats are ground, measure
the installed height of springs. Make sure the mea surement is taken from bottom of spring seat in cyl
inder head to the bottom surface of spring retainer. If
spacers are installed, measure from the top of spacer.
If height is greater than 42.86 mm (1-11/16 inches), install a 1.587 mm (1/16 inch) spacer in head coun-
terbore. This should bring spring height back to nor
mal 41.27 to 42.86 mm (1-5/8 to
1-11/16
inch).
VALVE STEM SEAL
/
SPRING REPLACEMENT
This procedure is done with the cylinder head in
stalled. (1) Set engine basic timing to TDC and remove air
cleaner. (2) Remove cylinder head covers and spark plugs.
(3) Remove coil wire from distributor and secure to
good ground to prevent engine from starting. (4) Using suitable socket and flex handle at crank
shaft retaining bolt, turn engine so the No.l piston is
at Top Dead Center on the compression stroke. (5) Remove rocker arms.
(6) With air hose attached to an adapter installed
in No.l spark plug hole, apply 620-689 kPa (90-100
psi) air pressure. (7) Using Valve Spring Compressor Tool
MD-998772A, compress valve spring and remove re
tainer valve locks and valve spring. (8) Install seals on the exhaust valve stem and po
sition down against valve guides. (9) The intake valve stem seals should be pushed
firmly and squarely over the valve guide using the valve stem as a guide. DO NOT force seal against
top of guide. When installing the valve retainer
locks,
compress the spring only enough to install the
locks.
(10) Follow the same procedure on the remaining 5
cylinders using the firing sequence
1-6-5-4-3-2.
Make sure piston in cylinder is at TDC on the valve spring
that is being removed. (11) Remove adapter from the No.l spark plug
hole.
(12) Install rocker arms.
(13) Install covers and coil wire to distributor.
(14) Install air cleaner.
(15) Road test vehicle.
HYDRAULIC
TAPPETS
Before disassembling any part of the engine to cor
rect tappet noise, check the oil pressure. If vehicle
has no oil pressure gauge, install a reliable gauge at the pressure sending unit. The pressure should be be
tween 207-552 kPa (30-80 psi) at 3,000 RPM.
Check the oil level after the engine reaches normal
operating temperature. Allow 5 minutes to stabilize
oil level, check dipstick.
The oil level in the pan should never be above the
FULL mark or below the ADD OIL mark on dipstick.
Either of these 2 conditions could be responsible for
noisy tappets.
OIL
LEWEL
HIGH
If oil level is above the FULL mark, it is possible
for the connecting rods to dip into the oil. With the engine running, this condition could create foam in
the oil pan. Foam in oil pan would be fed to the hy draulic tappets by the oil pump causing them to lose
length and allow valves to seat noisily.
LOW
Low oil level may allow oil pump to take in air.
When air is fed to the tappets, they lose length
which allows valves to seat noisily. Any leaks on in
take side of oil pump through which air can be drawn will create the same tappet action. Check the
lubrication system from the intake strainer to the
pump cover, including the relief valve retainer cap.
When tappet noise is due to aeration, it may be in
termittent or constant, and usually more than 1 tap
pet will be noisy. When oil level and leaks have been corrected, operate the engine at fast idle. Run engine
for a sufficient time to allow all of the air inside the
tappets to be bled out.
TAPPET
NOISE DIAGNOSIS
(1) To determine source of tappet noise, operate en
gine at idle with cylinder head covers removed. (2) Feel each valve spring or rocker arm to detect
noisy tappet. The noisy tappet will cause the affected
spring and/or rocker arm to vibrate or feel rough in
operation.
Worn valve guides or cocked springs are some
times mistaken for noisy tappets. If such is the
case, noise may be dampened by applying side
thrust on the valve spring. If noise is not appre ciably reduced, it can be assumed the noise is in
the tappet. Inspect the rocker arm push rod sockets and push rod ends for wear.
(3) Valve tappet noise ranges from light noise to a
heavy click. A light noise is usually caused by exces sive leak down around the unit plunger or by the
plunger partially sticking in the tappet body cylin der. The tappet should be replaced. A heavy click is
caused by a tappet check valve not seating or by for
eign particles becoming wedged between the plunger
and the tappet body. This will cause the plunger to
stick in the down position. This heavy click will be
Page 659 of 1502
FLANGE GASKET
X
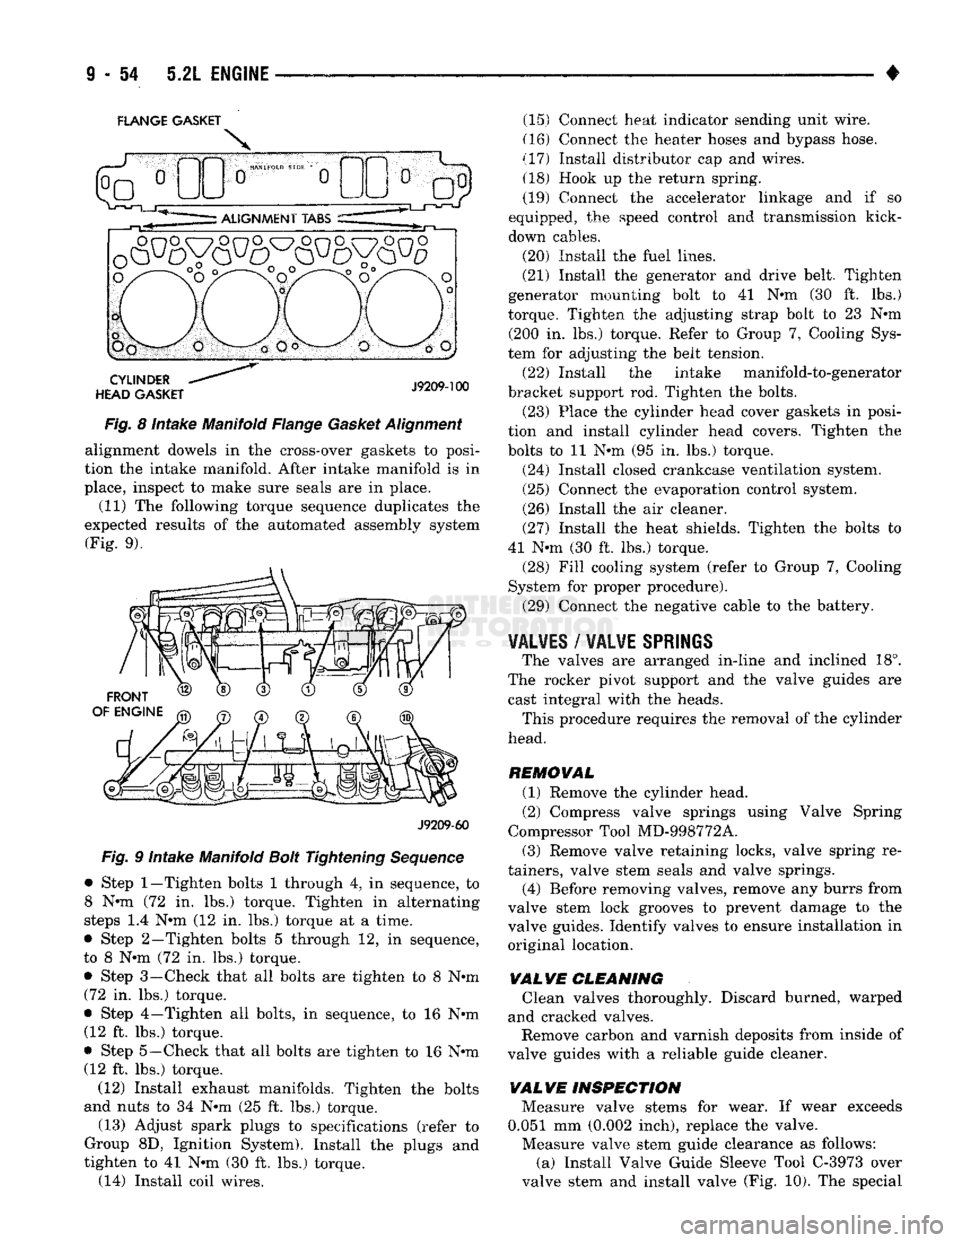
Fig. 8 intake Manifold Flange Gasket Alignment alignment dowels in the cross-over gaskets to posi
tion the intake manifold. After intake manifold is in
place, inspect to make sure seals are in place. (11) The following torque sequence duplicates the
expected results of the automated assembly system (Fig. 9).
J9209-60
Fig. 9 Intake Manifold Bolt Tightening Sequence
• Step
1—Tighten
bolts 1 through 4, in sequence, to
8 N-m (72 in. lbs.) torque. Tighten in alternating
steps 1.4 N-m (12 in. lbs.) torque at a time.
• Step 2—Tighten bolts 5 through 12, in sequence,
to 8 N-m (72 in. lbs.) torque.
• Step 3—Check that all bolts are tighten to 8 N-m (72 in. lbs.) torque.
• Step 4—Tighten all bolts, in sequence, to 16 N-m (12 ft. lbs.) torque.
• Step
5—Check
that all bolts are tighten to 16 N-m (12 ft. lbs.) torque.
(12) Install exhaust manifolds. Tighten the bolts
and nuts to 34 N-m (25 ft. lbs.) torque.
(13) Adjust spark plugs to specifications (refer to
Group 8D, Ignition System). Install the plugs and
tighten to 41 N-m (30 ft. lbs.) torque. (14) Install coil wires. (15) Connect heat indicator sending unit wire.
(16) Connect the heater hoses and bypass hose.
(17) Install distributor cap and wires. (18) Hook up the return spring.
(19) Connect the accelerator linkage and if so
equipped, the speed control and transmission kick-
down cables.
(20) Install the fuel lines.
(21) Install the generator and drive belt. Tighten
generator mounting bolt to 41 N-m (30 ft. lbs.)
torque. Tighten the adjusting strap bolt to 23 N-m (200 in. lbs.) torque. Refer to Group 7, Cooling Sys
tem for adjusting the belt tension.
(22) Install the intake manifold-to-generator
bracket support rod. Tighten the bolts. (23) Place the cylinder head cover gaskets in posi
tion and install cylinder head covers. Tighten the
bolts to 11 N-m (95 in. lbs.) torque.
(24) Install closed crankcase ventilation system.
(25) Connect the evaporation control system.
(26) Install the air cleaner.
(27) Install the heat shields. Tighten the bolts to
41 N-m (30 ft. lbs.) torque. (28) Fill cooling system (refer to Group 7, Cooling
System for proper procedure).
(29) Connect the negative cable to the battery.
VALVES
/
VALVE
SPRINGS
The valves are arranged in-line and inclined 18°.
The rocker pivot support and the valve guides are cast integral with the heads. This procedure requires the removal of the cylinder
head.
REMOVAL (1) Remove the cylinder head.
(2) Compress valve springs using Valve Spring
Compressor Tool MD-998772A.
(3) Remove valve retaining locks, valve spring re
tainers, valve stem seals and valve springs.
(4) Before removing valves, remove any burrs from
valve stem lock grooves to prevent damage to the
valve guides. Identify valves to ensure installation in
original location.
VALVE CLEANING Clean valves thoroughly. Discard burned, warped
and cracked valves. Remove carbon and varnish deposits from inside of
valve guides with a reliable guide cleaner.
VAL VE INSPECTION Measure valve stems for wear. If wear exceeds
0.051 mm (0.002 inch), replace the valve. Measure valve stem guide clearance as follows:
(a) Install Valve Guide Sleeve Tool C-3973 over
valve stem and install valve (Fig. 10). The special
Page 661 of 1502
9
- 56 5.2L
ENGINE
•
VALVE
SPRING
RETAINER LOCK GROOVE
EXHAUST
VALVE
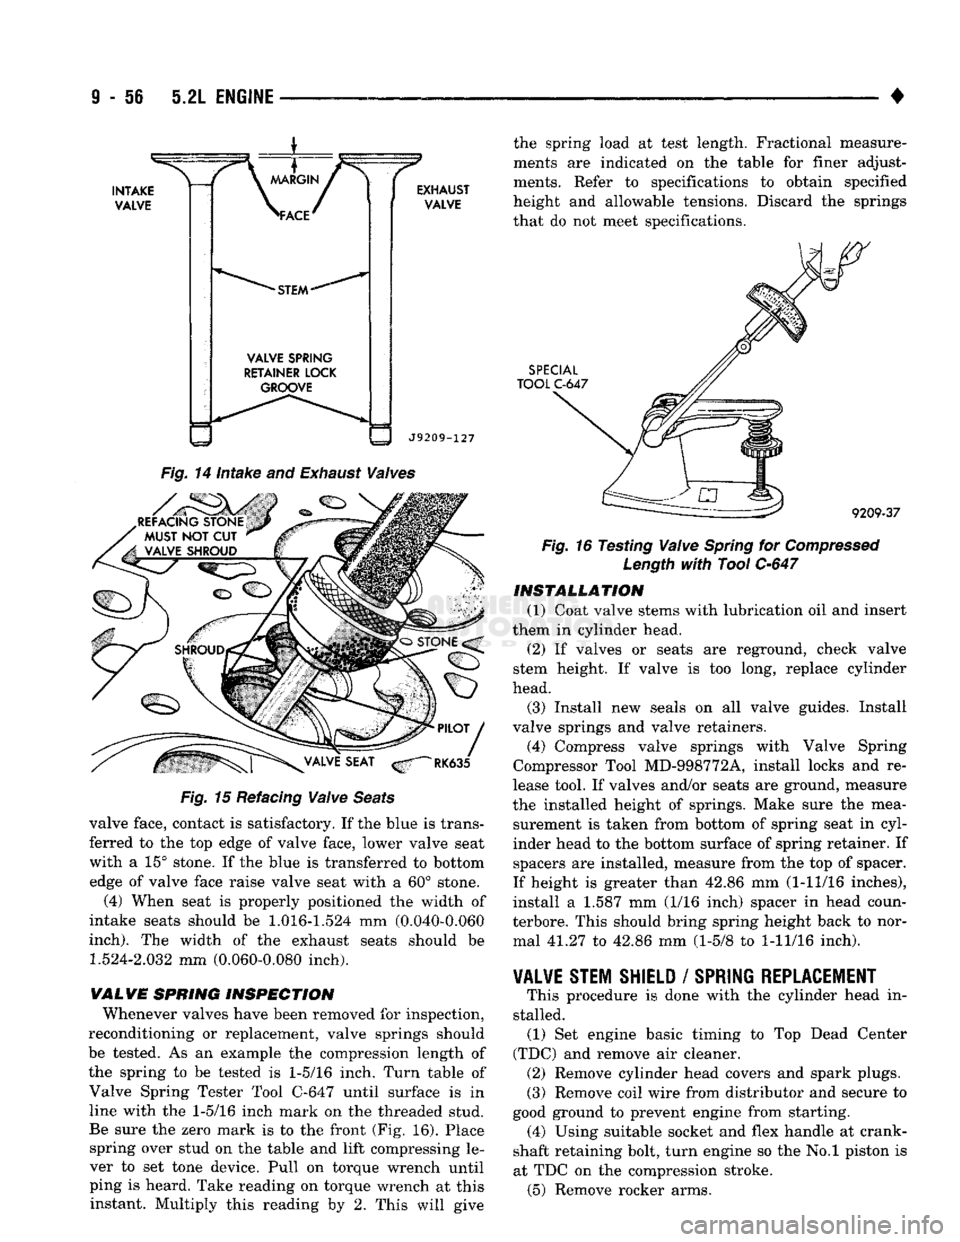
J9209-127 the spring load at test length. Fractional measure
ments are indicated on the table for finer adjust
ments. Refer to specifications to obtain specified
height and allowable tensions. Discard the springs
that do not meet specifications.
SPECIAL
TOOL
C-647
Fig.
14 Intake and
Exhaust
Valves
Fig.
15 Refacing
Valve
Seats
valve face, contact is satisfactory. If the blue is trans
ferred to the top edge of valve face, lower valve seat
with a 15° stone. If the blue is transferred to bottom edge of valve face raise valve seat with a 60° stone.
(4) When seat is properly positioned the width of
intake seats should be
1.016-1.524
mm (0.040-0.060
inch).
The width of the exhaust seats should be
1.524-2.032
mm (0.060-0.080 inch).
WALVE SPRING INSPECTION Whenever valves have been removed for inspection,
reconditioning or replacement, valve springs should
be tested. As an example the compression length of
the spring to be tested is
1-5/16
inch. Turn table of Valve Spring Tester Tool C-647 until surface is in line with the
1-5/16
inch mark on the threaded stud.
Be sure the zero mark is to the front (Fig. 16). Place spring over stud on the table and lift compressing le
ver to set tone device. Pull on torque wrench until ping is heard. Take reading on torque wrench at this instant. Multiply this reading by 2. This will give ^
9209-37
Fig.
16 Testing
Valve
Spring
for
Compressed
Length
with
Tool
C-647
INSTALLATION
(1) Coat valve stems with lubrication oil and insert
them in cylinder head.
(2) If valves or seats are reground, check valve
stem height. If valve is too long, replace cylinder
head.
(3) Install new seals on all valve guides. Install
valve springs and valve retainers.
(4) Compress valve springs with Valve Spring
Compressor Tool MD-998772A, install locks and re
lease tool. If valves and/or seats are ground, measure
the installed height of springs. Make sure the mea surement is taken from bottom of spring seat in cyl
inder head to the bottom surface of spring retainer. If spacers are installed, measure from the top of spacer.
If height is greater than 42.86 mm (1-11/16 inches),
install a 1.587 mm (1/16 inch) spacer in head coun-
terbore. This should bring spring height back to nor mal 41.27 to 42.86 mm (1-5/8 to
1-11/16
inch).
VALVE STEM SHIELD
/
SPRING REPLACEMENT
# This procedure is done with the cylinder head in
stalled. (1) Set engine basic timing to Top Dead Center
(TDC) and remove air cleaner. (2) Remove cylinder head covers and spark plugs.
(3) Remove coil wire from distributor and secure to
good ground to prevent engine from starting. (4) Using suitable socket and flex handle at crank
shaft retaining bolt, turn engine so the No.l piston is
at TDC on the compression stroke. (5) Remove rocker arms.
Page 689 of 1502
FLANGE GASKET
Fig. 8 Intake Manifold Flange Gasket Alignment alignment dowels in the cross-over gaskets to posi
tion the intake manifold. After intake manifold is in
place, inspect to make sure seals are in place.
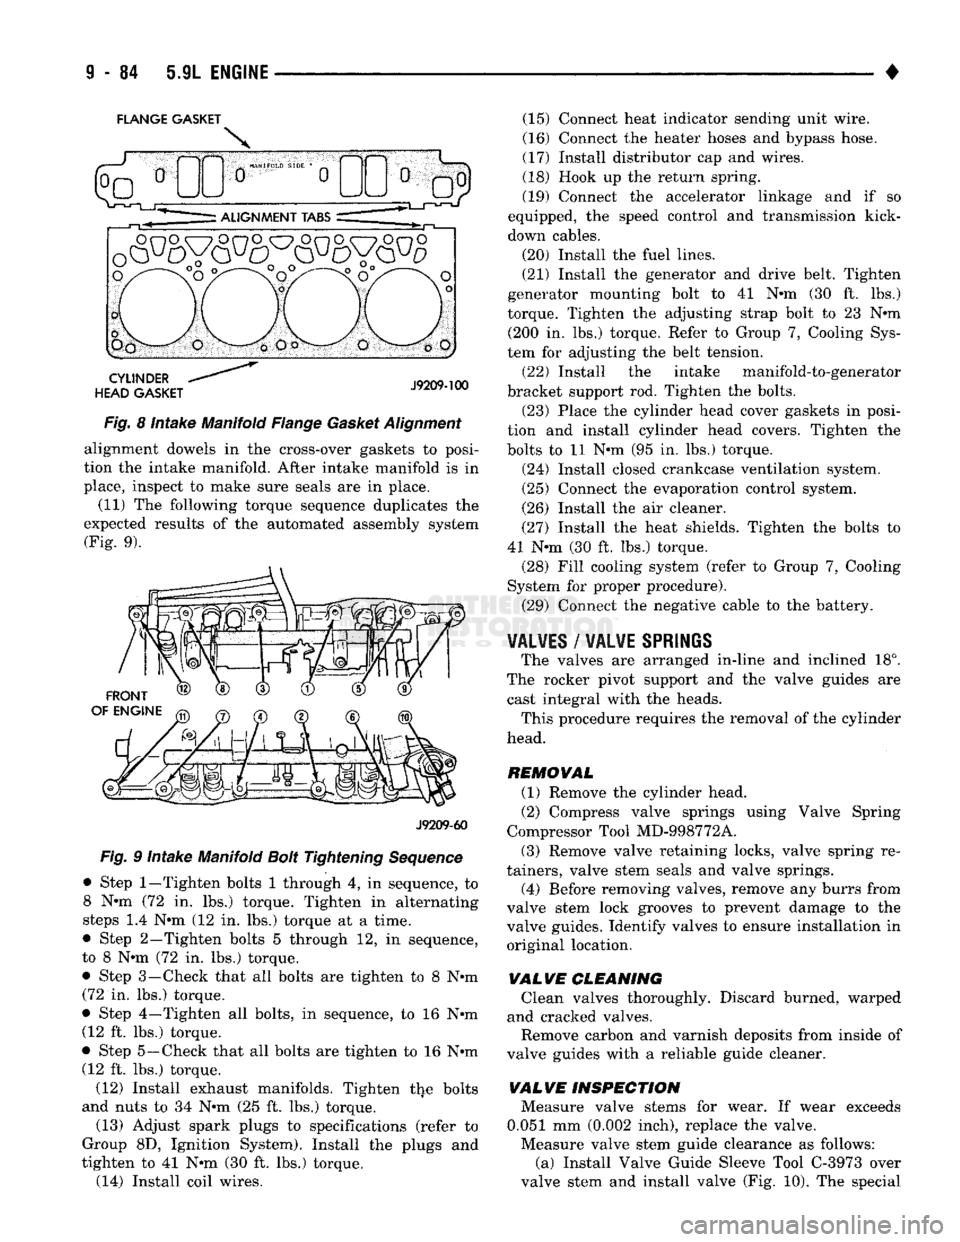
(11) The following torque sequence duplicates the
expected results of the automated assembly system (Fig. 9).
J9209-60
Fig. 9 Intake Manifold Bolt Tightening Sequence
• Step
1—Tighten
bolts 1 through 4, in sequence, to 8 N-m (72 in. lbs.) torque. Tighten in alternating
steps 1.4 N-m (12 in. lbs.) torque at a time.
• Step 2—Tighten bolts 5 through 12, in sequence,
to 8 N-m (72 in. lbs.) torque. • Step 3—-Check that all bolts are tighten to 8 N-m
(72 in. lbs.) torque.
• Step 4—Tighten all bolts, in sequence, to 16 N-m (12 ft. lbs.) torque.
• Step 5—Check that all bolts are tighten to 16 N-m (12 ft. lbs.) torque.
(12) Install exhaust manifolds. Tighten the bolts
and nuts to 34 N-m (25 ft. lbs.) torque.
(13) Adjust spark plugs to specifications (refer to
Group 8D, Ignition System). Install the plugs and
tighten to 41 N-m (30 ft. lbs.) torque. (14) Install coil wires. (15) Connect heat indicator sending unit wire.
(16) Connect the heater hoses and bypass hose.
(17) Install distributor cap and wires.
(18) Hook up the return spring.
(19) Connect the accelerator linkage and if so
equipped, the speed control and transmission kick-
down cables.
(20) Install the fuel lines.
(21) Install the generator and drive belt. Tighten
generator mounting bolt to 41 N-m (30 ft. lbs.)
torque. Tighten the adjusting strap bolt to 23 N-m (200 In. lbs.) torque. Refer to Group 7, Cooling Sys
tem for adjusting the belt tension.
(22) Install the intake manifold-to-generator
bracket support rod. Tighten the bolts.
(23) Place the cylinder head cover gaskets in posi
tion and install cylinder head covers. Tighten the
bolts to 11 N-m (95 in. lbs.) torque.
(24) Install closed crankcase ventilation system.
(25) Connect the evaporation control system.
(26) Install the air cleaner.
(27) Install the heat shields. Tighten the bolts to
41 N-m (30 ft. lbs.) torque. (28) Fill cooling system (refer to Group 7, Cooling
System for proper procedure).
(29) Connect the negative cable to the battery.
¥AL¥ES
/
WALWE SPRIliS
The valves are arranged in-line and inclined 18°.
The rocker pivot support and the valve guides are cast integral with the heads. This procedure requires the removal of the cylinder
head.
REMOVAL (1) Remove the cylinder head.
(2) Compress valve springs using Valve Spring
Compressor Tool MD-998772A.
(3) Remove valve retaining locks, valve spring re
tainers, valve stem seals and valve springs.
(4) Before removing valves, remove any burrs from
valve stem lock grooves to prevent damage to the
valve guides. Identify valves to ensure Installation in original location,
VALVE
CLEANING Clean valves thoroughly. Discard burned, warped
and cracked valves.
Remove carbon and varnish deposits from Inside of
valve guides with a reliable guide cleaner.
VALVE
INSPECTION Measure valve stems for wear. If wear exceeds
0.051 mm (0.002 Inch), replace the valve.
Measure valve stem guide clearance as follows: (a) Install Valve Guide Sleeve Tool C-3973 over
valve stem and install valve (Fig. 10). The special
Page 691 of 1502
9
• 86 5.9L
ENGINE
•
INTAKE
VALVE
\
MARGIN
/ >
\ACE^
*
STEM
*
VALVE
SPRING
RETAINER
LOCK
GROOVE EXHAUST
VALVE
J9209-127
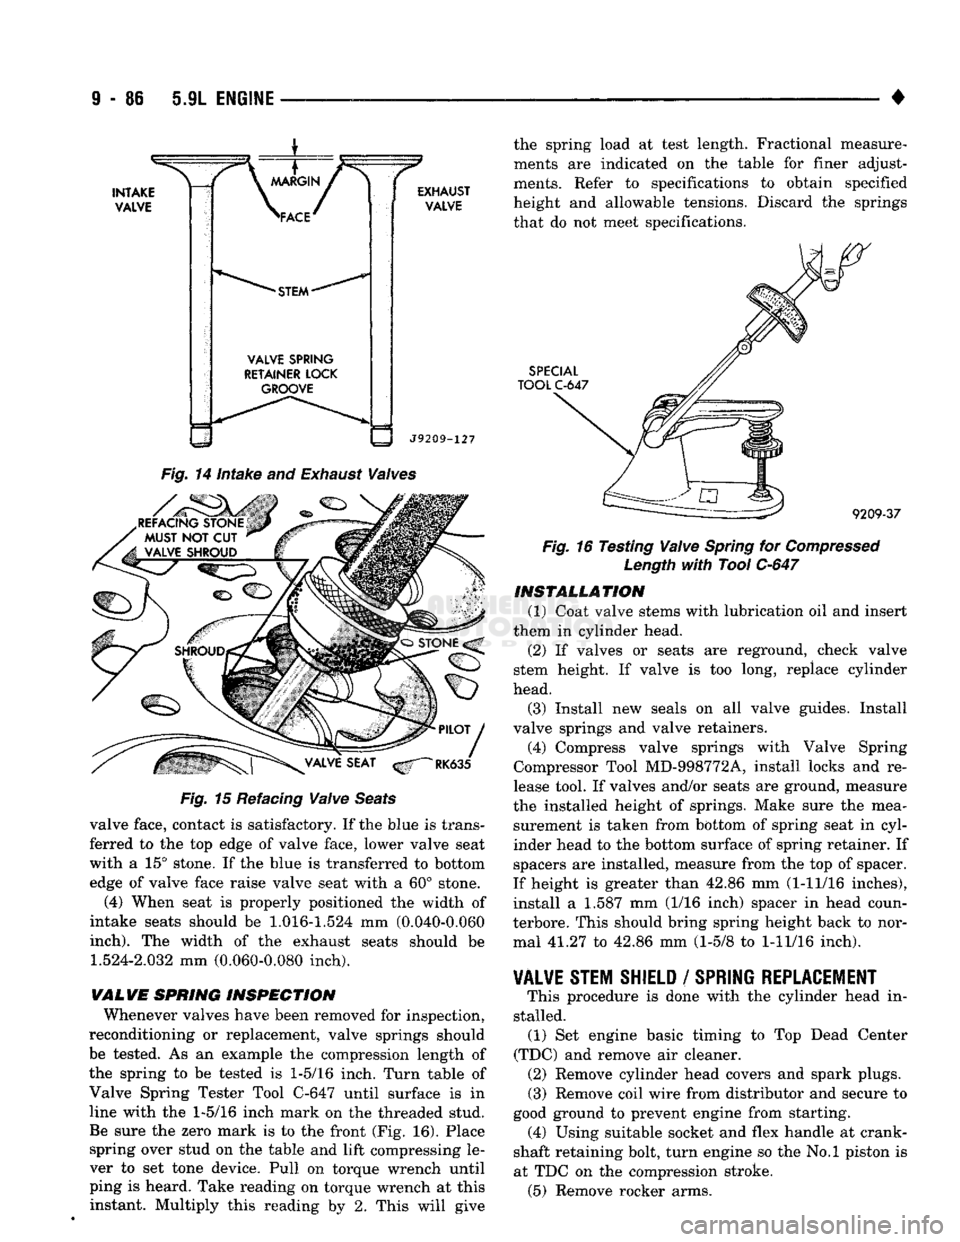
Fig.
14
intake
and
Exhaust
Waives
REFACING STONE MUST
NOT CUT
VALVE SHROUD Fig.
15 Refacing
Waive
Seats
valve face, contact is satisfactory. If the blue is trans ferred to the top edge of valve face, lower valve seat
with a 15° stone. If the blue is transferred to bottom edge of valve face raise valve seat with a 60° stone.
(4) When seat is properly positioned the width of
intake seats should be
1.016-1.524
mm (0.040-0.060
inch).
The width of the exhaust seats should be
1.524-2.032
mm (0.060-0.080 inch).
VALVE
SPRING
INSPECTION
Whenever valves have been removed for inspection,
reconditioning or replacement, valve springs should be tested. As an example the compression length of
the spring to be tested is
1-5/16
inch. Turn table of
Valve Spring Tester Tool C-647 until surface is in
line with the
1-5/16
inch mark on the threaded stud. Be sure the zero mark is to the front (Fig. 16). Place spring over stud on the table and lift compressing le
ver to set tone device. Pull on torque wrench until
ping is heard. Take reading on torque wrench at this instant. Multiply this reading by 2. This will give the spring load at test length. Fractional measure
ments are indicated on the table for finer adjust
ments. Refer to specifications to obtain specified
height and allowable tensions. Discard the springs that do not meet specifications.
SPECIAL
TOOL
C-647
9209-37
Fig.
16 Testing
Waive
Spring
for
Compressed
Length
with
Tool
C-647
INSTALLATION
(1) Coat valve stems with lubrication oil and insert
them in cylinder head.
(2) If valves or seats are reground, check valve
stem height. If valve is too long, replace cylinder
head.
(3) Install new seals on all valve guides. Install
valve springs and valve retainers.
(4) Compress valve springs with Valve Spring
Compressor Tool MD-998772A, install locks and re
lease tool. If valves and/or seats are ground, measure
the installed height of springs. Make sure the mea surement is taken from bottom of spring seat in cyl
inder head to the bottom surface of spring retainer. If
spacers are installed, measure from the top of spacer.
If height is greater than 42.86 mm (1-11/16 inches),
install a 1.587 mm (1/16 inch) spacer in head coun-
terbore. This should bring spring height back to nor mal 41.27 to 42.86 mm (1-5/8 to
1-11/16
inch).
¥AL¥E
STEM SHIELD
/
SPRING REPLACEMENT
This procedure is done with the cylinder head in
stalled. (1) Set engine basic timing to Top Dead Center
(TDC) and remove air cleaner. (2) Remove cylinder head covers and spark plugs. (3) Remove coil wire from distributor and secure to
good ground to prevent engine from starting. (4) Using suitable socket and flex handle at crank
shaft retaining bolt, turn engine so the No.l piston is
at TDC on the compression stroke. (5) Remove rocker arms.
Page 760 of 1502
•
EXHAUST SYSTEM
AND
INTAKE MANIFOLD
11-1
CONTENTS
page
EXHAUST SYSTEM DIAGNOSIS
3
GENERAL
INFORMATION
1
SERVICE
PROCEDURES (DIESEL ENGINES)
. 17
page
SERVICE
PROCEDURES (GASOLINE ENGINES)
. 4
SPECIFICATIONS
27
GENERAL INFORMATION
EXHAUST SYSTEM
The gasoline engine exhaust system consists
of en
gine exhaust manifolds, exhaust pipe(s), catalytic converter(s), extension pipe(s), exhaust heat shields,
muffler(s)
and
exhaust tailpipe
(Fig. 1).
The diesel engine exhaust system consists
of an en
gine exhaust manifold, turbocharger, exhaust pipe,
extension pipe, muffler
and
exhaust tailpipe
(Fig. 2).
The engine exhaust manifolds
on
gasoline engines
are equipped with ball flange outlets
to
assure
a
tight seal
and
strain free connections. The exhaust system must
be
properly aligned
to
prevent stress, leakage
and
body contact.
If the
sys
tem contacts
any
body panel,
it may
amplify objec
tionable noises from
the
engine
or
body. When inspecting
an
exhaust system, critically
in
spect
for
cracked
or
loose joints, stripped screw
or
bolt threads, corrosion damage
and
worn, cracked
or
broken hangers. Replace
all
components that
are
badly corroded
or
damaged.
DO NOT
attempt
to re
pair. When replacement
is
required,
use
original equip
ment parts
(or
their equivalent). This will assure
proper alignment
and
provide acceptable exhaust
noise levels.
CAUTION:
Avoid
application
of
rust
prevention
compounds
or
undercoating materials
to
exhaust
system
floor
pan
exhaust
heat
shields.
Light
overs-
pray
near
the
edges
is
permitted. Application
of
coating
will
result
in
excessive
floor
pan
tempera
tures
and
objectionable
fumes.
CATALYTIC CONVERTER (GASOLINE ENGINES)
The stainless steel catalytic converter body
is de
signed
to
last
the
life
of the
vehicle. Excessive heat
can result
in
bulging
or
other distortion,
but
exces sive heat will
not be the
fault
of the
converter.
If un-
burned fuel enters
the
converter, overheating
may
occur.
If a
converter
is
heat-damaged, correct
the
cause
of the
damage
at the
same time
the
converter is replaced. Also, inspect
all
other components
of the
exhaust system
for
heat damage.
Unleaded gasoline must
be
used
to
avoid contami
nating
the
catalyst core.
EXHAUST HEAT SHIELDS (GASOLINE ENGINES)
Exhaust heat shields
are
needed
to
protect both
the
vehicle
and the
environment from
the
high tempera
tures developed
by the
catalytic converter.
The
com
bustion reaction facilitated
by the
catalyst releases additional heat
in the
exhaust system. Under severe
operating conditions,
the
temperature increases
in
the area
of the
reactor. Such conditions
can
exist
when
the
engine misfires
or
otherwise does
not
oper ate
at
peak efficiency.
DO NOT
remove spark plug
wires from plugs
or by any
other means short
out
cylinders. Failure
of the
catalytic converter
can
occur
due
to a
temperature increase caused
by
unburned
fuel passing through
the
converter. Do
not
allow
the
engine
to
operate
at
fast idle
for
extended periods (over
5
minutes). This condition
may result
in
excessive temperatures
in the
exhaust system
and on the
floor
pan.
EXHAUST GAS RECIRCULATION
(EGR)—(GASOLINE ENGINES)
To assist
in the
control
of
oxides
of
nitrogen
(NOx)
in engine exhaust,
all
engines
are
equipped with
an
exhaust
gas
recirculation system.
The use of
exhaust
gas
to
dilute incoming air/fuel mixtures lowers peak
flame temperatures during combustion, thus limiting
the formation
of NOx.
Exhaust gases
are
taken from openings
in the ex
haust
gas
crossover passage
in the
intake manifold. Refer
to
Group
25,
Emission Control Systems
for
complete description, diagnosis
and
service proce
dures
of the
exhaust
gas
recirculation system
and
components.
TURBOCHARGER
(5.9L
DIESEL ENGINE)
A turbocharger
is
used
to
force more
air
into
the
engine cylinders. Exhaust
gas
energy
is
used
to
turn
EXHAUST SYSTEM
AND
INTAKE MANIFOLD