1993 DODGE TRUCK OBD port
[x] Cancel search: OBD portPage 862 of 1502

MULTI-PORT
FUEL
INJECTION
(MPI)—GENERAL DIAGNOSIS—EXCEPT DIESEL
INDEX
page
Camshaft Position Sensor Testing
............
52
Charge
Air
Temperature Sensor Test
52
Coolant Temperature Sensor Test
52
Crankshaft Position Sensor Test
54
Diagnostic Trouble Code (DTC)
60
DRB
II
Scan
Tool
........................
60
Fuel
Injector
Test
57
Fuel Pump Pressure Test
57
Idle
Air
Control
(IAC) Motor Test
55
Manifold Absolute Pressure (MAP) Sensor Test
. 53
page
On-Board
Diagnostics (OBD)
59
Oxygen
(02)
Sensor Heating Element Test
54
Powertrain
Control
Module (PCM) 60-Way Connector
. 47
Relays—Operation/Testing
56
Starter
Motor Relay Test
57
System
Schematics
. 47
Throttle
Position Sensor (TPS) Test
54
Visual Inspection
43
VISUAL
INSPECTION
A visual inspection
for
loose, disconnected,
or
incor
rectly routed wires
and
hoses should
be
made. This should
be
done before attempting
to
diagnose
or
ser
vice
the
fuel injection system.
A
visual check will
help spot these faults
and
save unnecessary test
and
diagnostic time.
A
thorough visual inspection will
in
clude
the
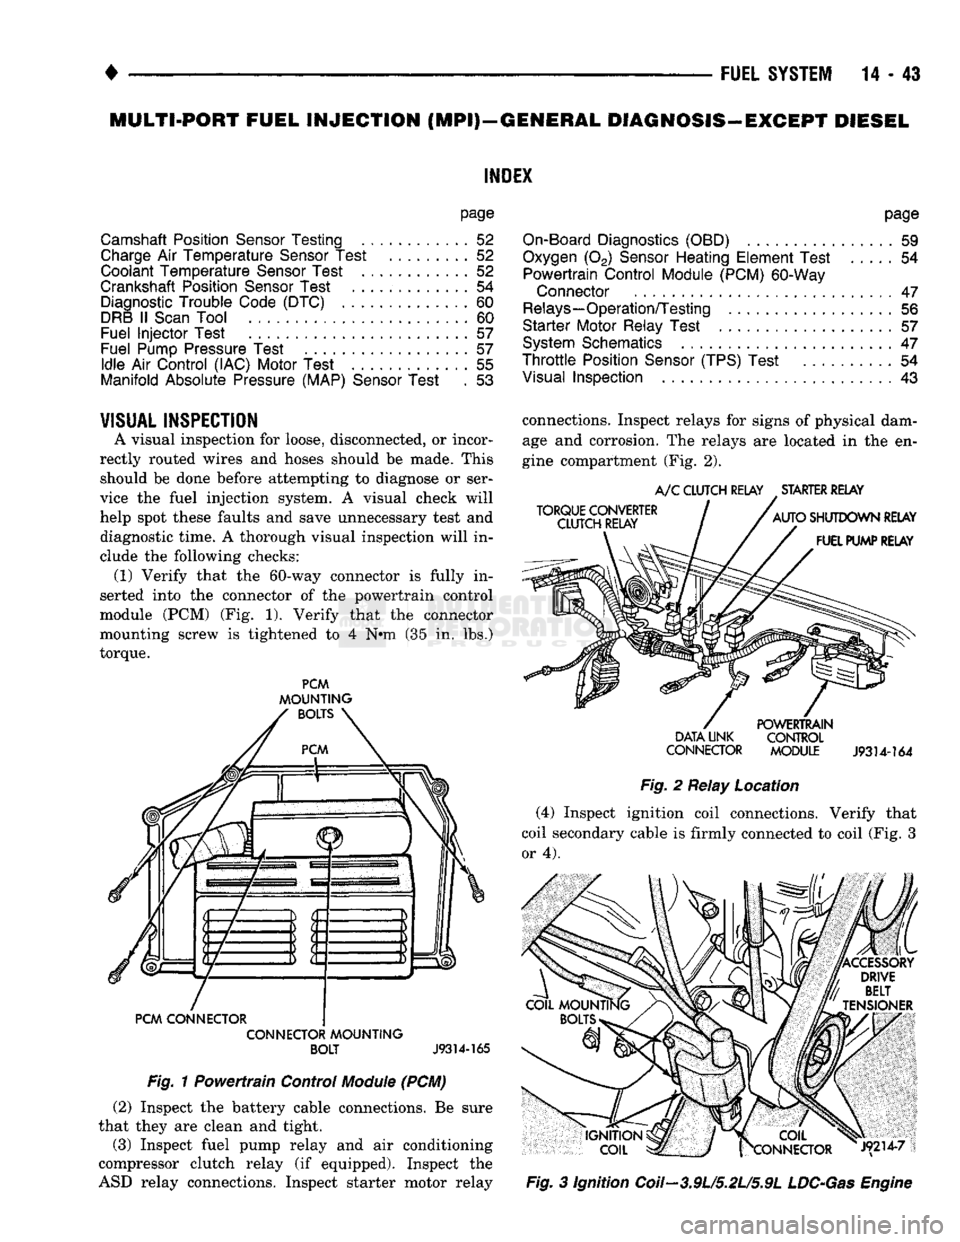
following checks: (1) Verify that
the
60-way connector
is
fully
in
serted into
the
connector
of the
powertrain control
module
(PCM) (Fig. 1).
Verify that
the
connector
mounting screw
is
tightened
to 4 N#m (35 in. lbs.)
torque.
PCM
MOUNTING
BOLTS
PCM CONNECTOR CONNECTOR MOUNTING BOLT
J9314-165
Fig.
1
Powertrain Control
Module
(PCM) (2) Inspect
the
battery cable connections.
Be
sure
that they
are
clean
and
tight.
(3) Inspect fuel pump relay
and air
conditioning
compressor clutch relay
(if
equipped). Inspect
the
ASD relay connections. Inspect starter motor relay connections. Inspect relays
for
signs
of
physical dam
age
and
corrosion.
The
relays
are
located
in the en
gine compartment
(Fig. 2).
TORQUE CONVERTER
CLUTCH RELAY
A/C
CLUTCH RELAY STARTER RELAY
AUTO SHUTDOWN RELAY FUEL PUMP RELAY POWERTRAIN
DATA UNK CONTROL
CONNECTOR MODULE
J9314-164
Fig.
2
Relay Location (4) Inspect ignition coil connections. Verify that
coil secondary cable
is
firmly connected
to
coil (Fig.
3
or 4).
|X COIL
frCONNECTOR J9214-7
Fig.
3
Ignition Coil—3.9U5.2L/5.9L
LDC-Gas
Engine
Page 1488 of 1502

•
EMISSION
CONTROL
SYSTEMS
25 - 11 • The electrical solenoid portion of the EET is not
energized.
• The engine back pressure entering the EGR valve
inlet is strong enough to close the transducer bleed
valve.
If back pressure is not strong enough to close the
transducer bleed valve, the transducer will bleed off the vacuum preventing EGR operation.
When the electrical solenoid portion of the EET is
de-energized by the powertrain control module (PCM), vacuum flows to the transducer. The trans
ducer is connected to the engine exhaust system by a small hose that connects to the base of the EGR
valve.
The vacuum section of the transducer is controlled
by exhaust system back pressure. When back pres sure is high enough it will close a bleed valve in the
transducer allowing vacuum to actuate the EGR
valve. If back pressure does not close the bleed valve,
vacuum will be bled off.
For more information, refer to Group 14, Fuel Sys
tems.
Refer to the Component Removal/Installation sec
tion of this group for EGR valve replacement proce
dures.
EGR SYSTEM ON-BOARD DIAGNOSTICS
(CALIFORNIA VEHICLES
ONLY)
The powertrain control module (PCM) performs an
On-Board Diagnostic (OBD) check of the EGR system
on all California vehicles. The diagnostic system uses
the electric EGR transducer (EET) for the system
tests.
The OBD check activates only during selected en
gine/driving conditions. When the conditions are met,
the PCM energizes the EET solenoid to disable the EGR. The PCM checks for a change in the oxygen sensor signal. If the air-fuel mixture goes lean, the
PCM will attempt to enrichen the mixture. The PCM
registers a diagnostic trouble code (DTC) if the EGR system has failed or degraded. After registering a
DTC,
the PCM turns the malfunction indicator
lamp (MIL) on. (The malfunction indicator lamp was formerly referred to as the check engine lamp). The
malfunction indicator lamp indicates the need for im
mediate service.
If a malfunction is indicated by the malfunction in
dicator lamp and a DTC for the EGR system was set,
check for proper operation of EGR system. Use the
following: System Test, EGR Gas Flow Test and EGR
Diagnosis Chart.
If the EGR system tests properly, check the system
using the DRB II scan tool. For use of the DRB II,
refer to the appropriate Powertrain Diagnostics Pro cedure service manual. EGR SYSTEM SERVICE
A malfunctioning EGR system can cause engine
spark knock, sags or hesitation, rough idle, engine
stalling and poor driveability. To be sure of proper
operation of the EGR system, inspect all passages for
blockage. Check moving parts for binding. Inspect
the complete system for leaks. Replace system com ponents or hoses that are leaking.
Inspect all hose connections between throttle body,
intake manifold, EGR valve and EGR purge solenoid.
Replace any vacuum harness components that are
leaking or damaged. Refer to EGR Control System Test and EGR Gas
Flow Test to check EGR System operation.
EGR GAS FLOW TEST (1) Disconnect hose from EGR valve and connect a
hand vacuum pump to EGR valve nipple. Apply a
minimum of 12 inches vacuum the valve.
(2) The engine should now idle roughly or stall. If
this occurs, the valve is performing correctly. Proceed
to Electric EGR Transducer Test.
(3) If the engine idle speed did not change, remove
the EGR valve and inspect the valve and the exhaust passage in the manifold for blockage. Repair as nec
essary. If blockage is not present, replace the EGR
valve.
ELECTRIC EGR TRANSDUCER (EET)
TESTING ELECTRIC SOLENOID PORTION OF TRANSDUCER
(1) Bring the engine to normal operating tempera
ture.
Operate at idle speed. Test the EET as follows: (2) Check vacuum at EET vacuum source. Discon
nect the hose and attach a vacuum gauge to it.
(3) Vacuum should be a minimum of 15 inches:
• If vacuum is low, check the line for kinks, twists
or a loose connection at vacuum connector or intake
manifold.
• If vacuum is correct, remove gauge. Connect the
vacuum line and proceed to next step. (4) Check EET operation using the appropriate
Powertrain Diagnostic Procedures service manual.
Refer to this manual for use of the DRB II scan tool and repair EET as necessary.
TESTING VACUUM PORTION
OF
TRANSDUCER
(1) Disconnect the EET vacuum lines, back pres
sure line and electrical connector. Remove trans
ducer.
(2) Plug the EET EGR valve port.
(3) Apply 1-2 pounds air pressure to exhaust back
pressure port. Air pressure can be supplied with a
hand operated air pump or compressed air (regulated
to correct psi).
(4) Apply a minimum of 12 inches of vacuum to
vacuum supply port.
Replace the EET if it will not hold vacuum.