Page 1491 of 4087
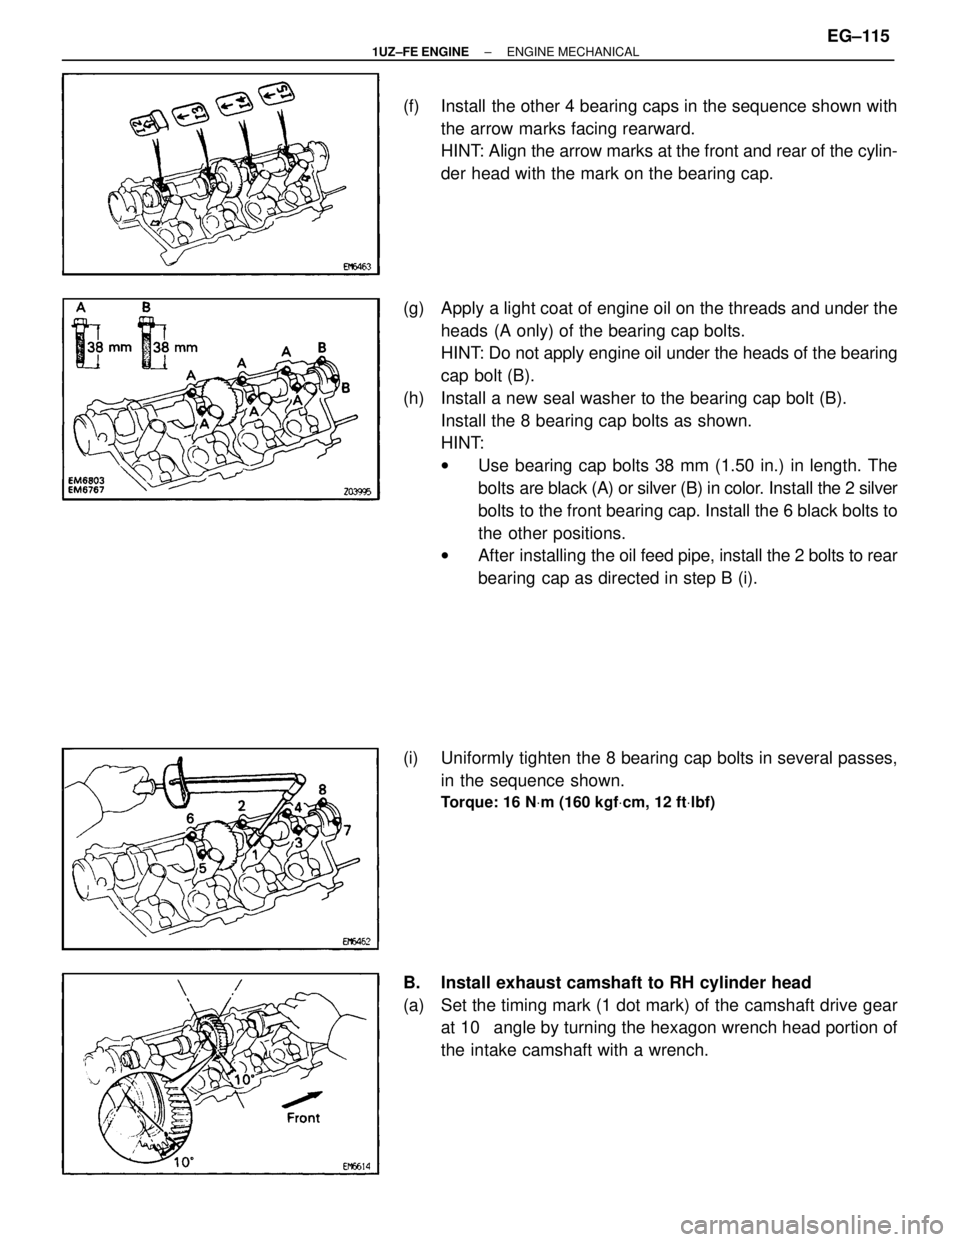
(f) Install the other 4 bearing caps in the sequence shown withthe arrow marks facing rearward.
HINT: Align the arrow marks at the front and rear of the cylin-
der head with the mark on the bearing cap.
(g) Apply a light coat of engine oil on the threads and under the heads (A only) of the bearing cap bolts.
HINT: Do not apply engine oil under the heads of the bearing
cap bolt (B).
(h) Install a new seal washer to the bearing cap bolt (B). Install the 8 bearing cap bolts as shown.
HINT:
wUse bearing cap bolts 38 mm (1.50 in.) in length. The
bolts are black (A) or silver (B) in color. Install the 2 silver
bolts to the front bearing cap. Install the 6 black bolts to
the other positions.
w After installing the oil feed pipe, install the 2 bolts to rear
bearing cap as directed in step B (i).
(i) Uniformly tighten the 8 bearing cap bolts in several passes, in the sequence shown.
Torque: 16 N Vm (160 kgf Vcm, 12 ft Vlbf)
B. Install exhaust camshaft to RH cylinder head
(a) Set the timing mark (1 dot mark) of the camshaft drive gear
at 10 � angle by turning the hexagon wrench head portion of
the intake camshaft with a wrench.
±
1UZ±FE ENGINE ENGINE MECHANICALEG±115
WhereEverybodyKnowsYourName
Page 1492 of 4087
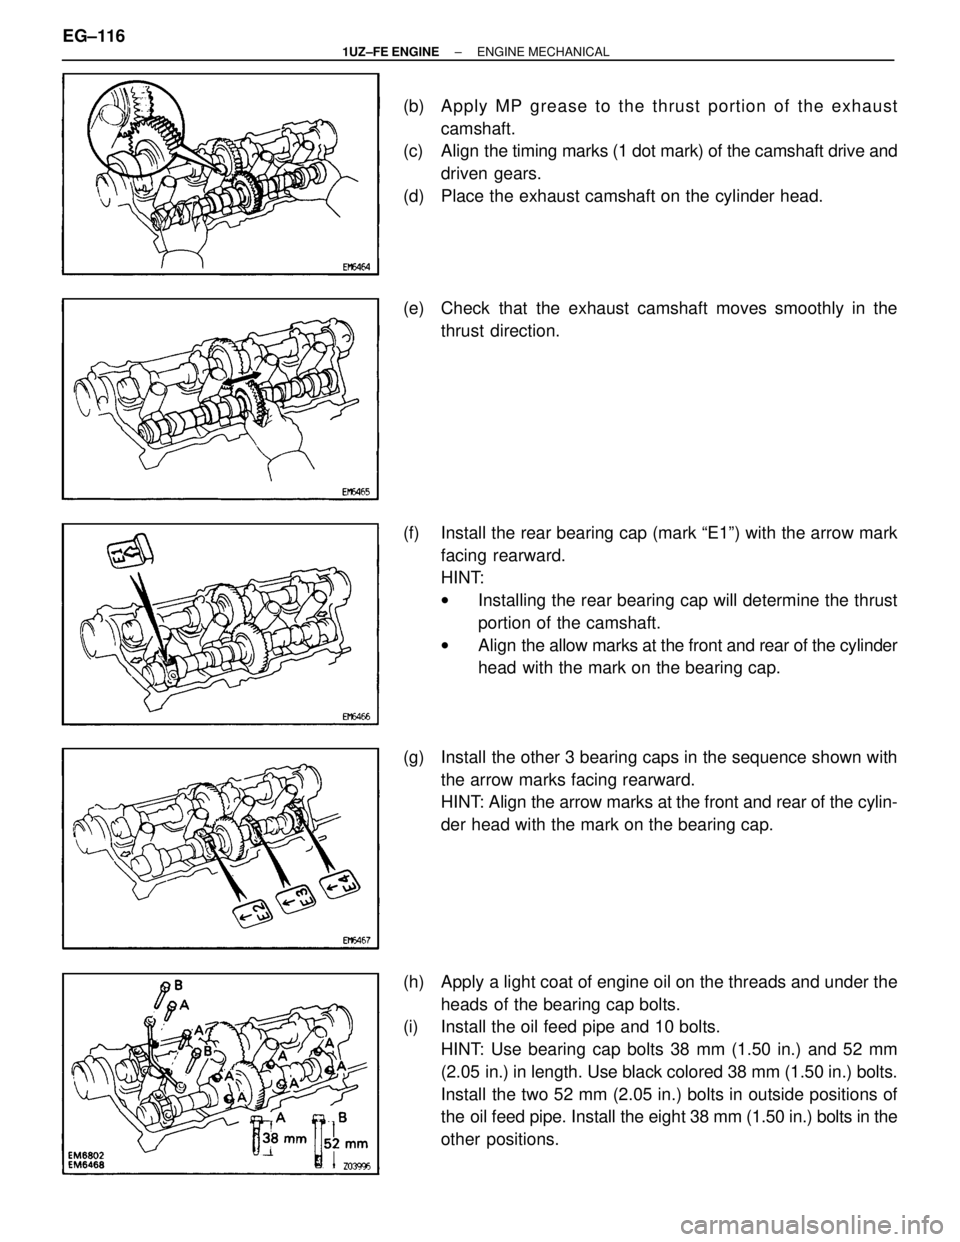
(b) Apply MP grease to the thrust portion of the exhaustcamshaft.
(c) Align the timing marks (1 dot mark) of the camshaft drive and
driven gears.
(d) Place the exhaust camshaft on the cylinder head.
(e) Check that the exhaust camshaft moves smoothly in the thrust direction.
(f) Install the rear bearing cap (mark ªE1º) with the arrow mark facing rearward.
HINT:
wInstalling the rear bearing cap will determine the thrust
portion of the camshaft.
w Align the allow marks at the front and rear of the cylinder
head with the mark on the bearing cap.
(g) Install the other 3 bearing caps in the sequence shown with the arrow marks facing rearward.
HINT: Align the arrow marks at the front and rear of the cylin-
der head with the mark on the bearing cap.
(h) Apply a light coat of engine oil on the threads and under the heads of the bearing cap bolts.
(i) Install the oil feed pipe and 10 bolts.
HINT: Use bearing cap bolts 38 mm (1.50 in.) and 52 mm
(2.05 in.) in length. Use black colored 38 mm (1.50 in.) bolts.
Install the two 52 mm (2.05 in.) bolts in outside positions of
the oil feed pipe. Install the eight 38 mm (1.50 in.) bolts in the
other positions.
EG±116
±
1UZ±FE ENGINE ENGINE MECHANICAL
WhereEverybodyKnowsYourName
Page 1494 of 4087
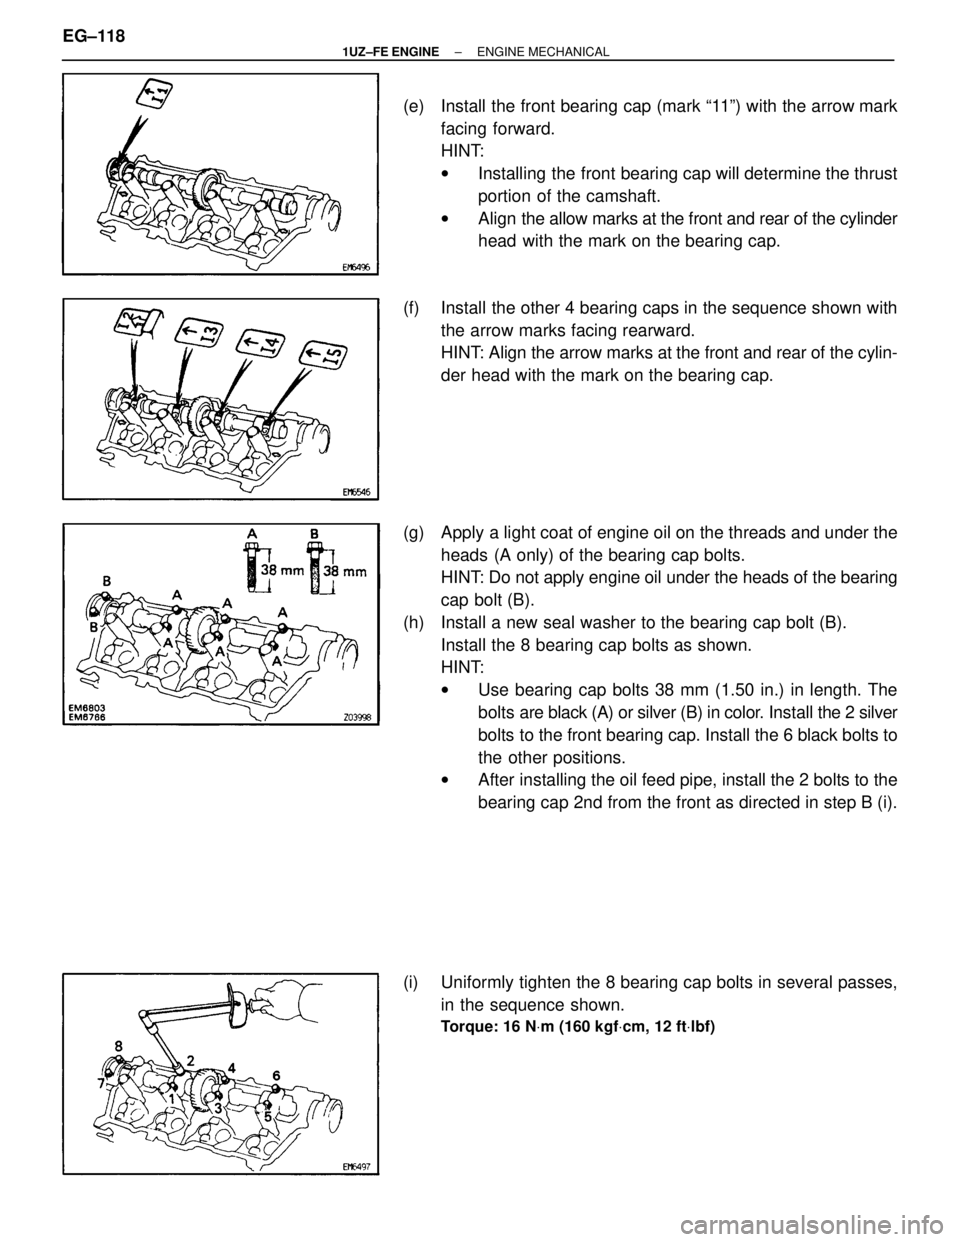
(e) Install the front bearing cap (mark ª11º) with the arrow markfacing forward.
HINT:
wInstalling the front bearing cap will determine the thrust
portion of the camshaft.
w Align the allow marks at the front and rear of the cylinder
head with the mark on the bearing cap.
(f) Install the other 4 bearing caps in the sequence shown with the arrow marks facing rearward.
HINT: Align the arrow marks at the front and rear of the cylin-
der head with the mark on the bearing cap.
(g) Apply a light coat of engine oil on the threads and under the heads (A only) of the bearing cap bolts.
HINT: Do not apply engine oil under the heads of the bearing
cap bolt (B).
(h) Install a new seal washer to the bearing cap bolt (B). Install the 8 bearing cap bolts as shown.
HINT:
wUse bearing cap bolts 38 mm (1.50 in.) in length. The
bolts are black (A) or silver (B) in color. Install the 2 silver
bolts to the front bearing cap. Install the 6 black bolts to
the other positions.
w After installing the oil feed pipe, install the 2 bolts to the
bearing cap 2nd from the front as directed in step B (i).
(i) Uniformly tighten the 8 bearing cap bolts in several passes, in the sequence shown.
Torque: 16 N Vm (160 kgf Vcm, 12 ft Vlbf)
EG±118±
1UZ±FE ENGINE ENGINE MECHANICAL
WhereEverybodyKnowsYourName
Page 1496 of 4087
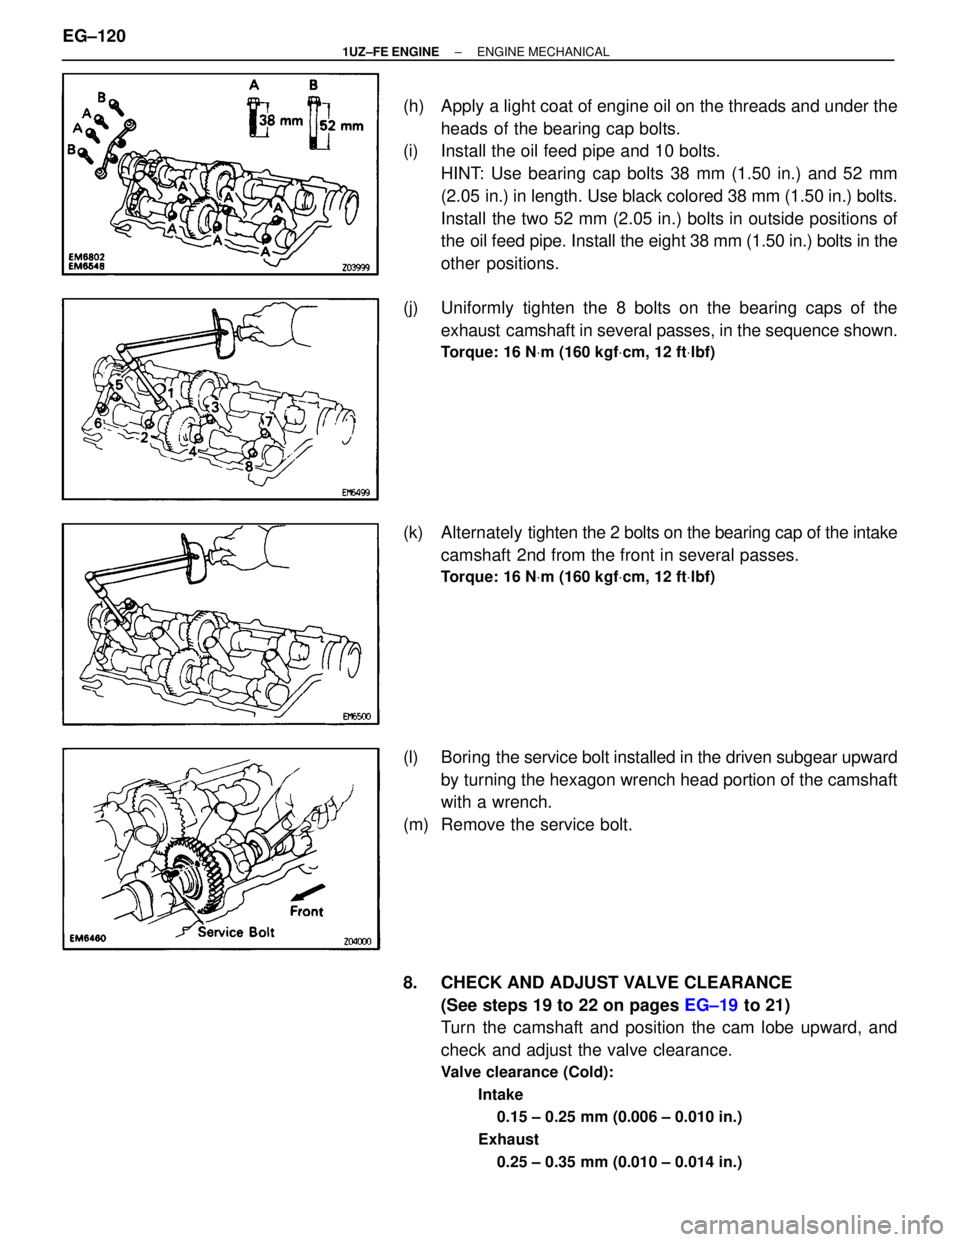
(h) Apply a light coat of engine oil on the threads and under theheads of the bearing cap bolts.
(i) Install the oil feed pipe and 10 bolts.
HINT: Use bearing cap bolts 38 mm (1.50 in.) and 52 mm
(2.05 in.) in length. Use black colored 38 mm (1.50 in.) bolts.
Install the two 52 mm (2.05 in.) bolts in outside positions of
the oil feed pipe. Install the eight 38 mm (1.50 in.) bolts in the
other positions.
(j) Uniformly tighten the 8 bolts on the bearing caps of the exhaust camshaft in several passes, in the sequence shown.
Torque: 16 N Vm (160 kgf Vcm, 12 ft Vlbf)
(k) Alternately ti ghten the 2 bolts on the bearing cap of the intake
camshaft 2nd from the front in several passes.
Torque: 16 N Vm (160 kgf Vcm, 12 ft Vlbf)
(l) Boring the service bolt installed in the driven subgear upward
by turning the hexagon wrench head portion of the camshaft
with a wrench.
(m) Remove the service bolt.
8. CHECK AND ADJUST VALVE CLEARANCE (See steps 19 to 22 on pages EG±19 to 21)
Turn the camshaft and position the cam lobe upward, and
check and adjust the valve clearance.
Valve clearance (Cold):
Intake0.15 ± 0.25 mm (0.006 ± 0.010 in.)
Exhaust 0.25 ± 0.35 mm (0.010 ± 0.014 in.)
EG±120±
1UZ±FE ENGINE ENGINE MECHANICAL
WhereEverybodyKnowsYourName
Page 1500 of 4087
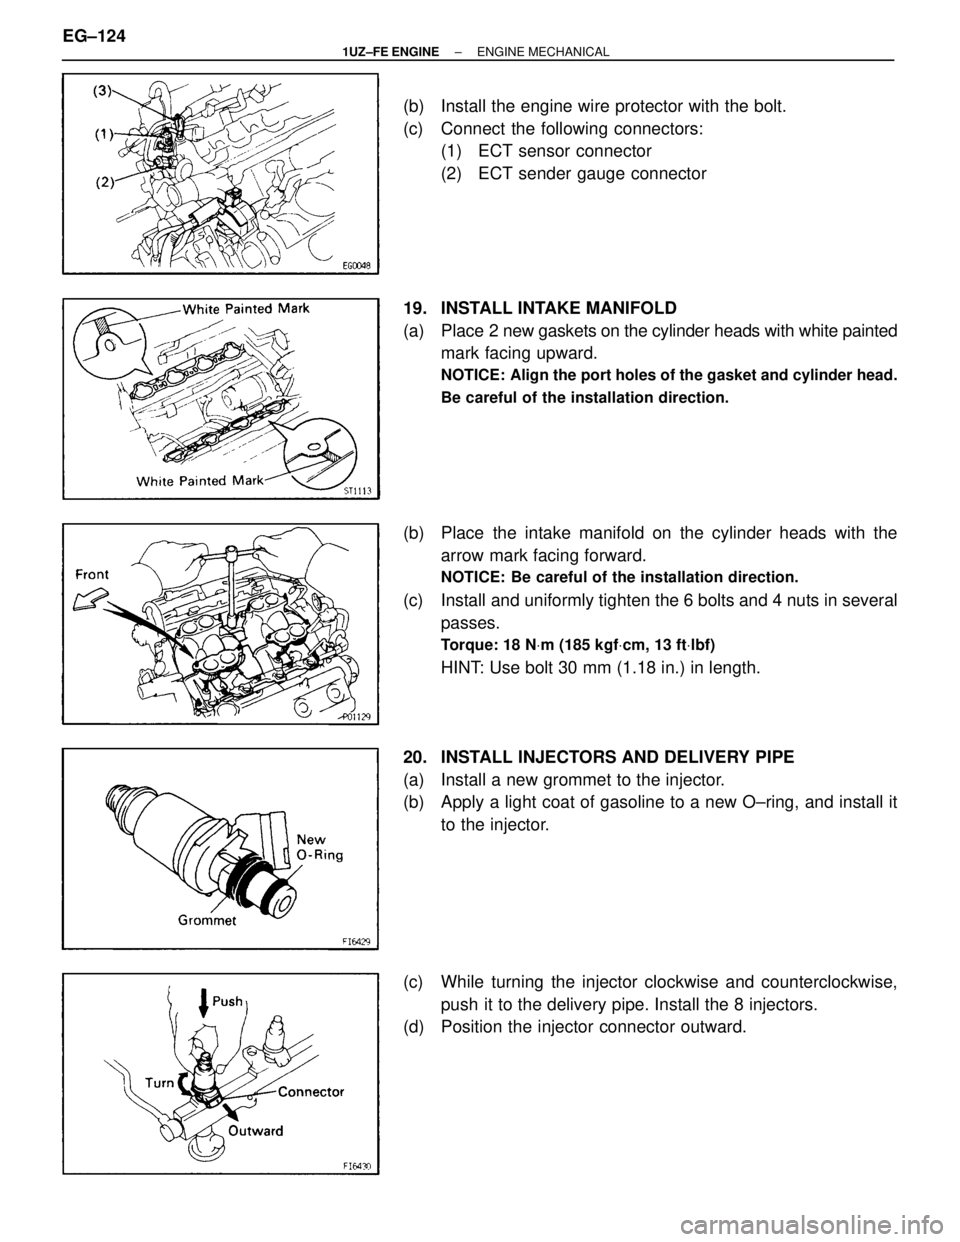
(b) Install the engine wire protector with the bolt.
(c) Connect the following connectors:(1) ECT sensor connector
(2) ECT sender gauge connector
19. INSTALL INTAKE MANIFOLD
(a) Place 2 new gaskets on the cylinder heads with white painted
mark facing upward.
NOTICE: Align the port holes of the gasket and cylinder head.
Be careful of the installation direction.
(b) Place the intake manifold on the cylinder heads with the
arrow mark facing forward.
NOTICE: Be careful of the installation direction.
(c) Install and uniformly tighten the 6 bolts and 4 nuts in severalpasses.
Torque: 18 N Vm (185 kgf Vcm, 13 ft Vlbf)
HINT: Use bolt 30 mm (1.18 in.) in length.
20. INSTALL INJECTORS AND DELIVERY PIPE
(a) Install a new grommet to the injector.
(b) Apply a light coat of gasoline to a new O±ring, and install it to the injector.
(c) While turning the injector clockwise and counterclockwise, push it to the delivery pipe. Install the 8 injectors.
(d) Position the injector connector outward.
EG±124
±
1UZ±FE ENGINE ENGINE MECHANICAL
WhereEverybodyKnowsYourName
Page 1518 of 4087
(3) 2 oil cooler hoses (for transmission) from radiator
HINT: Plug the hose ends.
(4) Suction hose from hydraulic pump
(5) Pressure hose from hydraulic pump
(d) Remove the 2 bolts, screw and upper radiator support. Remove the 2 upper radiator supports.
(e) Slightly lift the radiator, and disconnect the 2 oil cooler hoses (for cooling fan) from the hose clamp on the radiator fan
shroud.
(f) Remove the radiator assembly.
(g) Remove the 2 lower radiator supports from the radiator.
14. DISCONNECT IGNITER CONNECTORS
(a) Disconnect the 2 igniter connectors.
(b) Disconnect the wire clamp from the body.
EG±142
±
1UZ±FE ENGINE ENGINE MECHANICAL
WhereEverybodyKnowsYourName
Page 1543 of 4087
7. IF NECESSARY, REPLACE MAIN BEARING CAP STUDBOLTS
(a) Using the 2 main bearing cap nuts, remove the stud bolt.
(b) Apply a light coat of engine oil on the threads and under
flange of new stud bolts.
(c) Using the 2 main bearing cap nuts, install the stud bolt.
Torque: 15 N Vm (150 kgf Vcm, 11 ft Vlbf)
HINT: Stud bolts come in lengths of 90.0 mm (3.543 in.) and
101.5 mm (3.996 in.). Install the 101.5 mm (3.996 in.) bolts
in inside positions. Install the 90.0 mm (3.543 in.) bolts in out-
side positions.
PISTON AND CONNECTING ROD
DISASSEMBLY
EG0BV±06
1. CHECK FIT BETWEEN PISTON AND PISTON PIN
Try to move the piston back and forth on the piston pin.
If any movement is felt, replace the piston and pin as a set.
2. REMOVE PISTON RINGS
(a) Using a piston ring expander, remove the 2 compression rings.
±
1UZ±FE ENGINE ENGINE MECHANICALEG±167
WhereEverybodyKnowsYourName
Page 1544 of 4087
(b) Remove the 2 side rails and oil ring by hand.HINT: Arrange the piston rings in correct order only.
3. DISCONNECT CONNECTING ROD FROM PISTON
(a) Using a small screwdriver, pry out the 2 snap rings.
(b) Gradually heat the piston to approx. 60 �C (140 �F).
(c) Using a plastic±faced hammer and brass bar, lightly tap out the piston pin and pin and remove the connecting rod.
EG±168
±
1UZ±FE ENGINE ENGINE MECHANICAL
WhereEverybodyKnowsYourName