1991 ACURA NSX light
[x] Cancel search: lightPage 471 of 1640
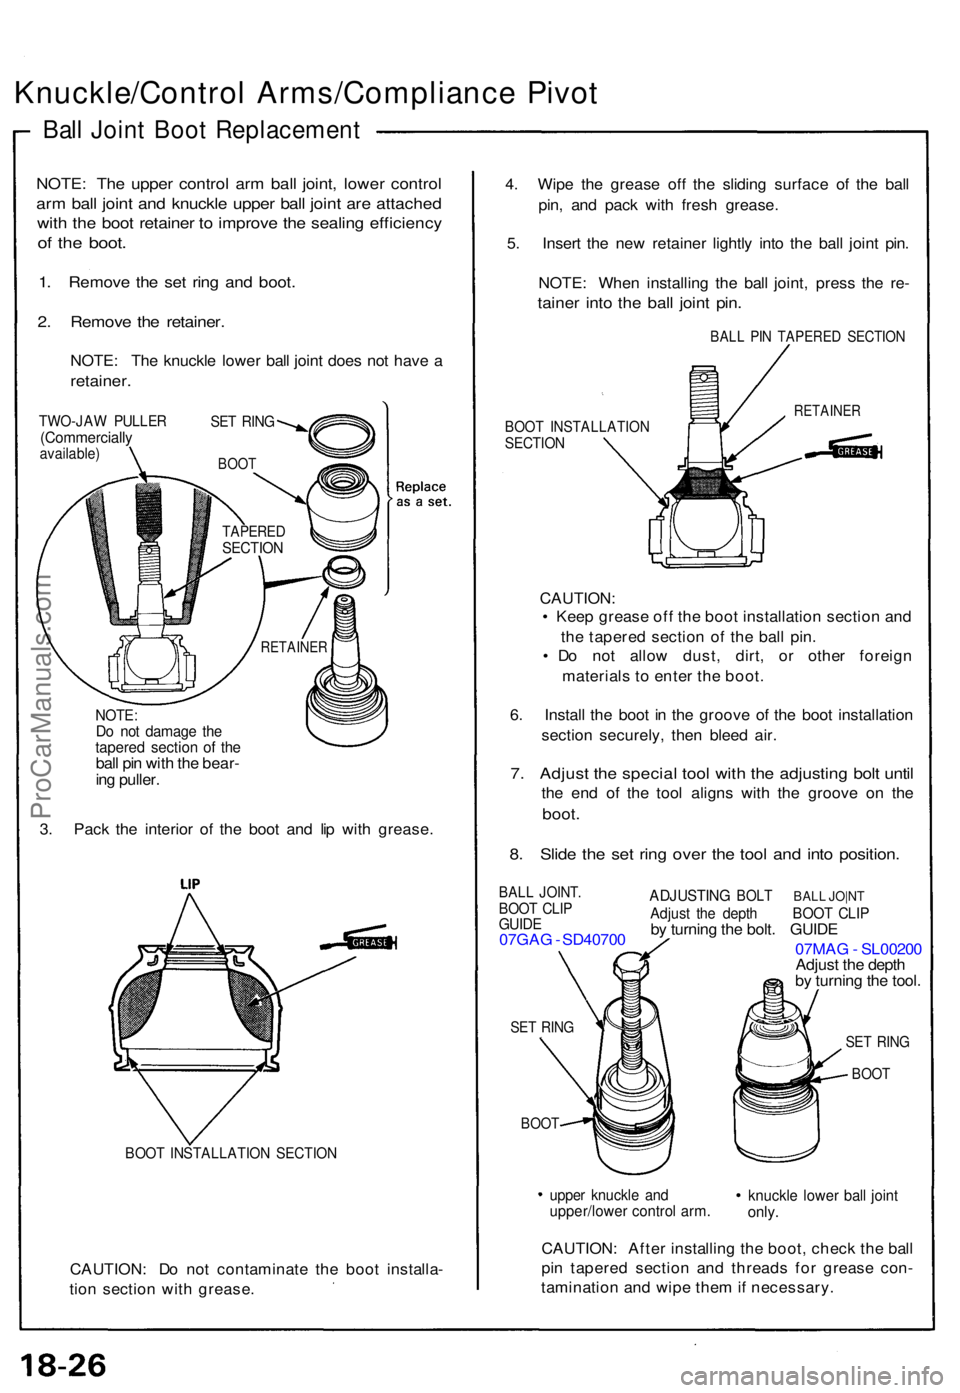
Knuckle/Control Arms/Complianc e Pivo t
Ball Join t Boo t Replacemen t
NOTE:Do no t damag e th etapere d section of th ebal l pi n wit h th e bear -
in g puller .
3 . Pac k th e interio r of the boo t an d li p wit h grease .
BOOT INSTALLATIO N SECTIO N
CAUTION : D o no t contaminat e th e boo t installa -
tio n sectio n wit h grease . 4
. Wip e th e greas e of f th e slidin g surfac e o f th e bal l
pin , an d pac k wit h fres h grease .
5 . Inser t th e ne w retaine r lightl y int o th e bal l join t pin .
NOTE : Whe n installin g th e bal l joint , pres s th e re -
taine r int o th e bal l join t pin .
BAL L PI N TAPERE D SECTIO N
BOOT INSTALLATIO NSECTION
CAUTION :
• Kee p greas e of f th e boo t installatio n sectio n an d
th e tapere d sectio n o f th e bal l pin .
• D o no t allo w dust , dirt , o r othe r foreig n
material s t o ente r th e boot .
6 . Instal l th e boo t i n th e groov e o f th e boo t installatio n
sectio n securely , the n blee d air .
7. Adjus t th e specia l too l wit h th e adjustin g bol t unti l
the en d o f th e too l align s wit h th e groov e o n th e
boot .
8. Slid e th e se t rin g ove r th e too l an d int o position .
BALL JOINT .BOOT CLI PGUID E07GA G - SD4070 0
SET RIN G
BOO T
ADJUSTIN G BOLT BALL JO|N TAdjus t th e dept h BOO T CLI Pby turnin g th e bolt . GUID E
07MA G - SL0020 0
Adjus t th e dept h
b y turnin g th e tool .
uppe r knuckl e an dupper/lowe r contro l arm .knuckl e lowe r bal l join tonly.
CAUTION : Afte r installin g th e boot , chec k th e bal l
pi n tapere d sectio n an d thread s fo r greas e con -
taminatio n an d wip e the m if necessary .
NOTE: Th e uppe r contro l ar m bal l joint , lowe r contro l
arm bal l join t an d knuckl e uppe r bal l join t ar e attache d
with the boo t retaine r t o improv e th e sealin g efficienc y
of th e boot .
1. Remov e th e se t rin g an d boot .
2. Remov e th e retainer .
NOTE: Th e knuckl e lowe r bal l join t doe s no t hav e a
retainer .
TWO-JA W PULLE R(Commerciall yavailable)
SET RIN G
BOO T
TAPERE DSECTION
RETAINE R
RETAINER
SET RIN G
BOO T
ProCarManuals.com
Page 484 of 1640
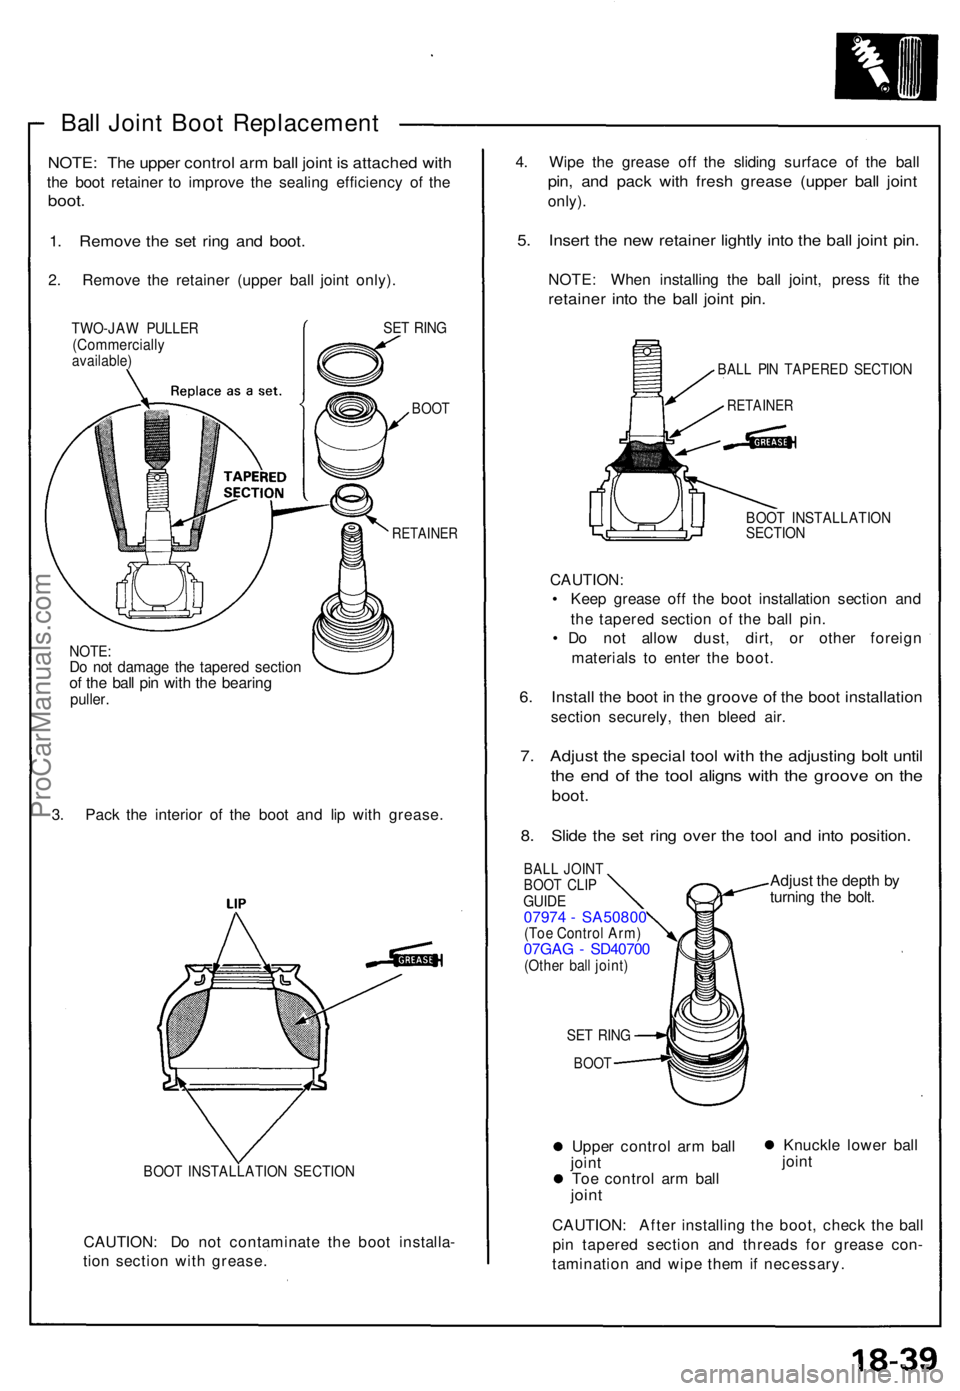
Ball Join t Boo t Replacemen t
NOTE: Th e uppe r contro l ar m bal l join t i s attache d wit h
the boo t retaine r t o improv e th e sealin g efficienc y o f th e
boot .
1. Remov e th e se t rin g an d boot .
2. Remov e th e retaine r (uppe r bal l join t only) .
TWO-JA W PULLE R(Commerciall yavailable)
SET RIN G
BOO T
RETAINE R
NOTE:Do no t damag e th e tapere d sectio nof th e bal l pi n wit h th e bearin gpuller.
3. Pack the interio r o f th e boo t an d li p wit h grease .
BOOT INSTALLATIO N SECTIO N
CAUTION : D o no t contaminat e th e boo t installa -
tio n sectio n wit h grease . 4
. Wip e th e greas e of f th e slidin g surfac e of the bal l
pin, an d pac k wit h fres h greas e (uppe r bal l join t
only) .
5. Inser t th e ne w retaine r lightl y int o th e bal l join t pin .
NOTE : Whe n installin g th e bal l joint , pres s fi t th e
retaine r int o th e bal l join t pin .
BAL L PI N TAPERE D SECTIO N
RETAINE R
BOOT INSTALLATIO NSECTION
CAUTION :
• Kee p greas e of f th e boo t installatio n sectio n an d
th e tapere d sectio n o f th e bal l pin .
• D o no t allo w dust , dirt , o r othe r foreig n
material s t o ente r th e boot .
6. Instal l th e boo t i n th e groov e o f th e boo t installatio n
section securely , the n blee d air .
7. Adjus t th e specia l too l wit h th e adjustin g bol t unti l
the en d o f th e too l align s wit h th e groov e o n th e
boot .
8. Slid e th e se t rin g ove r th e too l an d int o position .
BALL JOIN TBOOT CLI PGUID E07974 - SA5080 0(Toe Contro l Arm )07GA G - SD4070 0(Other bal l joint )
SET RIN G
BOO T
Uppe r contro l ar m bal l
join t
To e contro l ar m bal l
joint
Adjus t th e dept h b y
turnin g th e bolt .
Knuckl e lowe r bal l
join t
CAUTION : Afte r installin g th e boot , chec k th e bal l
pi n tapere d sectio n an d thread s fo r greas e con -
taminatio n an d wip e the m if necessary .
ProCarManuals.com
Page 493 of 1640
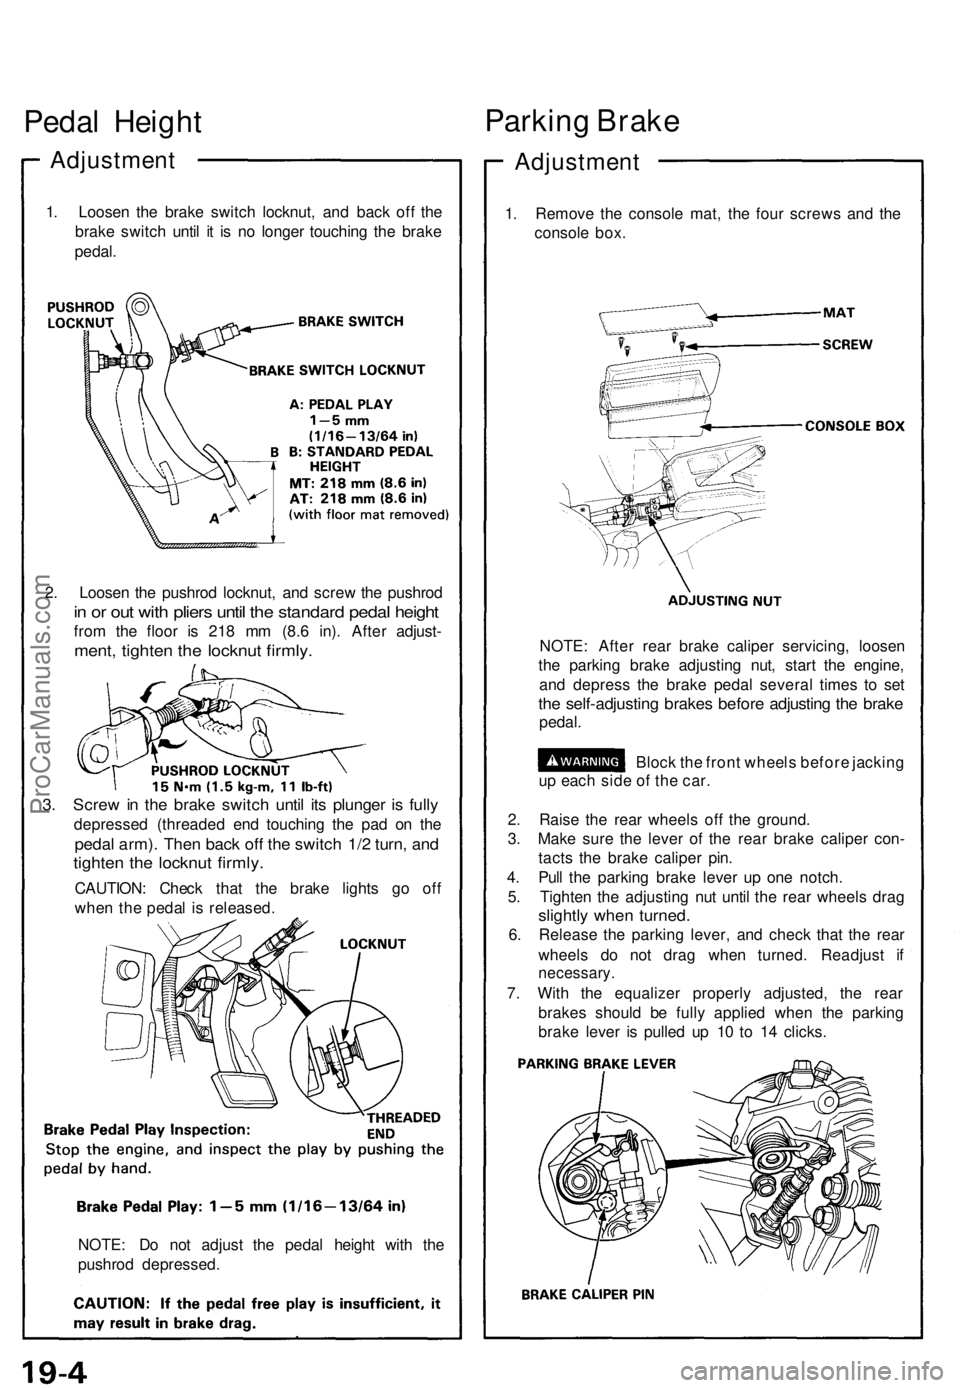
Pedal Heigh t
Adjustmen t
1. Loose n th e brak e switc h locknut , an d bac k of f th e
brak e switc h unti l i t i s n o longe r touchin g th e brak e
pedal .
2 . Loose n th e pushro d locknut , an d scre w th e pushro d
in o r ou t wit h plier s unti l th e standar d peda l heigh t
from th e floo r i s 21 8 m m (8. 6 in) . Afte r adjust -
ment, tighte n th e locknu t firmly .
3. Scre w in th e brak e switc h unti l it s plunge r i s full y
depresse d (threade d en d touchin g th e pa d o n th e
peda l arm) . The n bac k of f th e switc h 1/ 2 turn , an d
tighte n th e locknu t firmly .
CAUTION : Chec k tha t th e brak e light s g o of f
whe n th e peda l i s released .
NOTE : D o no t adjus t th e peda l heigh t wit h th e
pushro d depressed .
Parking Brak e
Adjustmen t
1. Remov e th e consol e mat , th e fou r screw s an d th e
consol e box .
NOTE : Afte r rea r brak e calipe r servicing , loose n
th e parkin g brak e adjustin g nut , star t th e engine ,
an d depres s th e brak e peda l severa l time s t o se t
the self-adjustin g brake s befor e adjustin g th e brak e
pedal .
Block th e fron t wheel s befor e jackin g
u p eac h sid e o f th e car .
2 . Rais e th e rea r wheel s of f th e ground .
3 . Mak e sur e th e leve r o f th e rea r brak e calipe r con -
tact s th e brak e calipe r pin .
4 . Pul l th e parkin g brak e leve r u p on e notch .
5 . Tighte n th e adjustin g nu t unti l th e rea r wheel s dra g
slightl y whe n turned .
6. Releas e th e parkin g lever , an d chec k tha t th e rea r
wheel s d o no t dra g whe n turned . Readjus t i f
necessary .
7. Wit h th e equalize r properl y adjusted , th e rea r
brake s shoul d b e full y applie d whe n th e parkin g
brak e leve r i s pulle d u p 1 0 t o 1 4 clicks .
ProCarManuals.com
Page 495 of 1640
Front Brak e Pad s
Inspection/Replacemen t
• Neve r us e a n ai r hos e o r dr y brus h t o clea n brak e
assemblies .
• Us e a n OSHA-approve d vacuu m cleane r t o avoi d
breathin g brak e dust .
1 . Loose n th e fron t whee l nut s slightly , the n rais e eac h
sid e o f th e ca r an d suppor t i t o n safet y stand s (se e
pag e 1-9 throug h 1-11 ). Remov e th e fron t wheels .
2 . I f th e brak e pa d thicknes s i s les s tha n servic e limi t
a t ste p 5 , replac e th e fron t pad s a s a set . 3
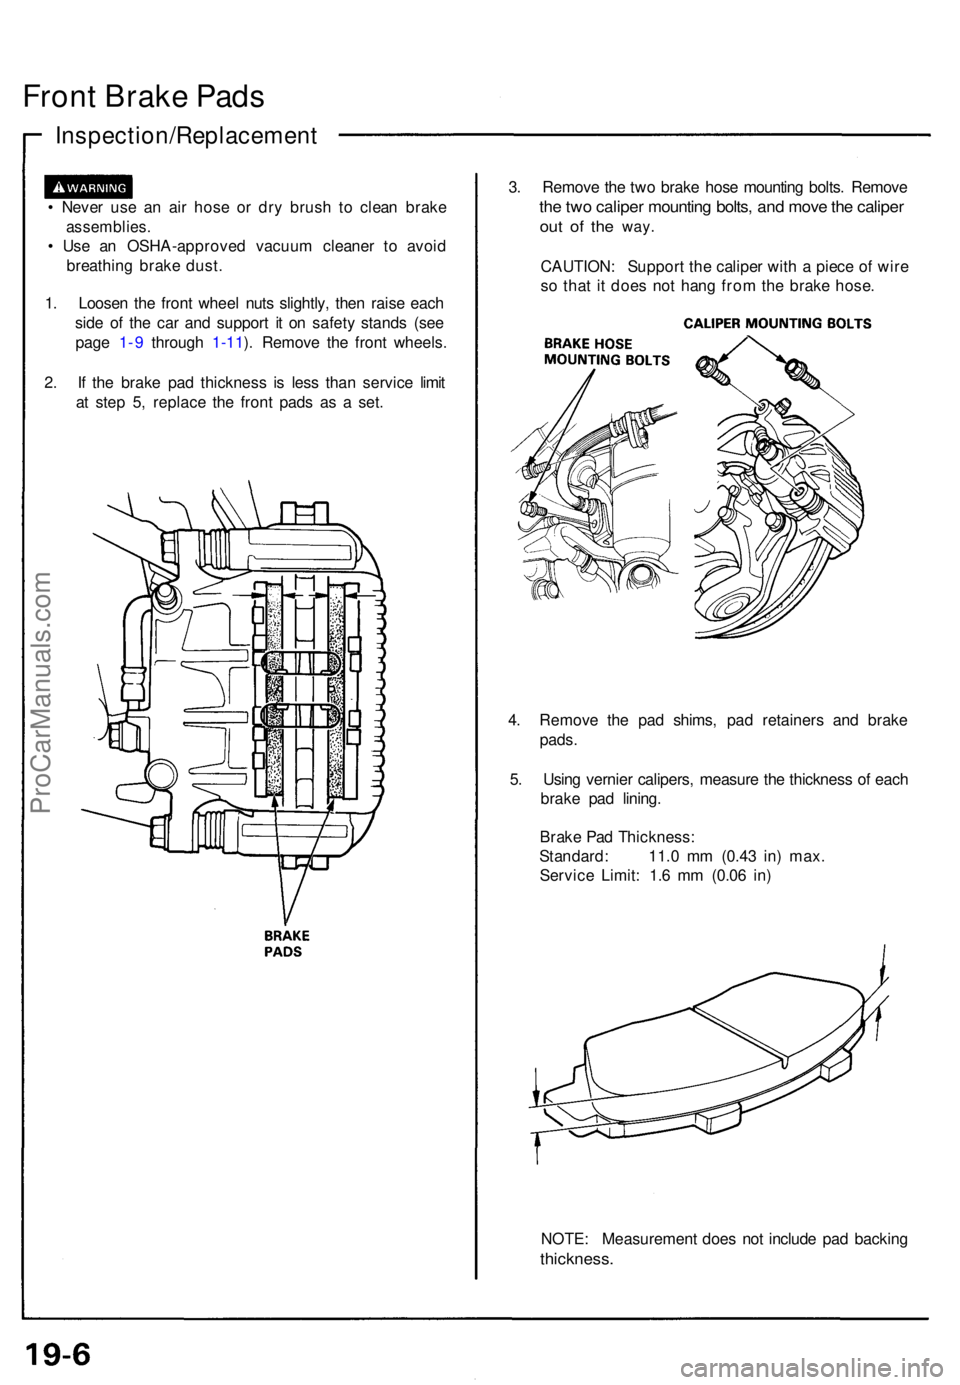
. Remov e th e tw o brak e hos e mountin g bolts . Remov e
the tw o calipe r mountin g bolts , an d mov e th e calipe r
out o f th e way .
CAUTION : Suppor t th e calipe r wit h a piec e o f wir e
s o tha t i t doe s no t han g fro m th e brak e hose .
4 . Remov e th e pa d shims , pa d retainer s an d brak e
pads .
5 . Usin g vernie r calipers , measur e th e thicknes s o f eac h
brak e pa d lining .
Brak e Pa d Thickness :
Standard : 11. 0 m m (0.4 3 in ) max .
Servic e Limit : 1. 6 m m (0.0 6 in )
NOTE : Measuremen t doe s no t includ e pa d backin g
thickness .
ProCarManuals.com
Page 502 of 1640
Brake Booste r
Tests
Functiona l Tes t
1. Wit h th e engin e stopped , depres s th e brak e peda l
severa l time s t o deplet e th e vacuu m reservoir , the n
depres s th e peda l har d an d hol d i t fo r 1 5 seconds .
I f th e peda l sinks , eithe r th e maste r cylinde r i s
bypassin g internally , o r th e brak e syste m (maste r
cylinder , lines , modulator , proportionin g valve , o r
calipers ) ar e leaking .
2 . Star t th e engin e wit h th e peda l depressed . I f th e pe -
da l sink s slightly , th e vacuu m booste r i s operatin g
normally , i f th e peda l heigh t doe s no t vary , th e
booste r o r chec k valv e i s faulty .
3 . Wit h th e engin e running , depres s th e brak e peda l
lightly . Appl y jus t enoug h pressur e t o hol d bac k au -
tomati c transmissio n creep . I f th e brak e peda l sink s
mor e tha n 2 5 m m (1. 0 in. ) i n thre e minutes , th e
maste r cylinde r i s faulty . A sligh t chang e i n peda l
heigh t whe n th e A/ C compresso r cycle s o n an d of f
i f normal . (Th e A/ C compresso r loa d change s th e
vacuu m availabl e t o th e booster. )
Leak Tes t
1. Depres s th e brak e peda l wit h th e engin e running ,
the n sto p th e engine . I f th e peda l heigh t doe s no t
var y whil e depresse d fo r 3 0 seconds , th e vacuu m
booste r i s OK . I f th e peda l rises , th e booste r i s faulty .
2 . Wit h th e engin e stopped , depres s th e brak e peda l
severa l time s usin g norma l pressure . Whe n th e pe -
da l i s firs t depressed , i t shoul d b e low . O n consecu -
tiv e applications , th e peda l heigh t shoul d graduall y
rise . I f th e peda l positio n doe s no t vary , chec k th e
booste r chec k valve .
Booste r Chec k Valv e Tes t
1. Disconnec t th e brak e booste r vacuu m hos e a t th e
booste r o r a t th e booste r sid e o f th e valve .
2 . Star t th e engin e an d le t i t idle . Ther e shoul d b e vacu -
um . I f n o vacuu m is available , th e chec k valv e is no t
workin g properly . Replac e th e chec k valv e an d
retest .
ProCarManuals.com
Page 505 of 1640
Rear Brak e Pad s
Inspection/Replacemen t
• Neve r us e a n ai r hos e o r dr y brus h t o clea n brak e
assemblies ,
Use a n OSHA-approve d vacuu m cleane r t o avoi d
breathin g brak e dust .
1 . Loose n th e rea r whee l nut s slightly , the n rais e eac h
sid e o f th e ca r an d suppor t i t o n safet y stand s (se e
pag e 1-9 throug h 1-11 ).
Remov e th e rea r wheels .
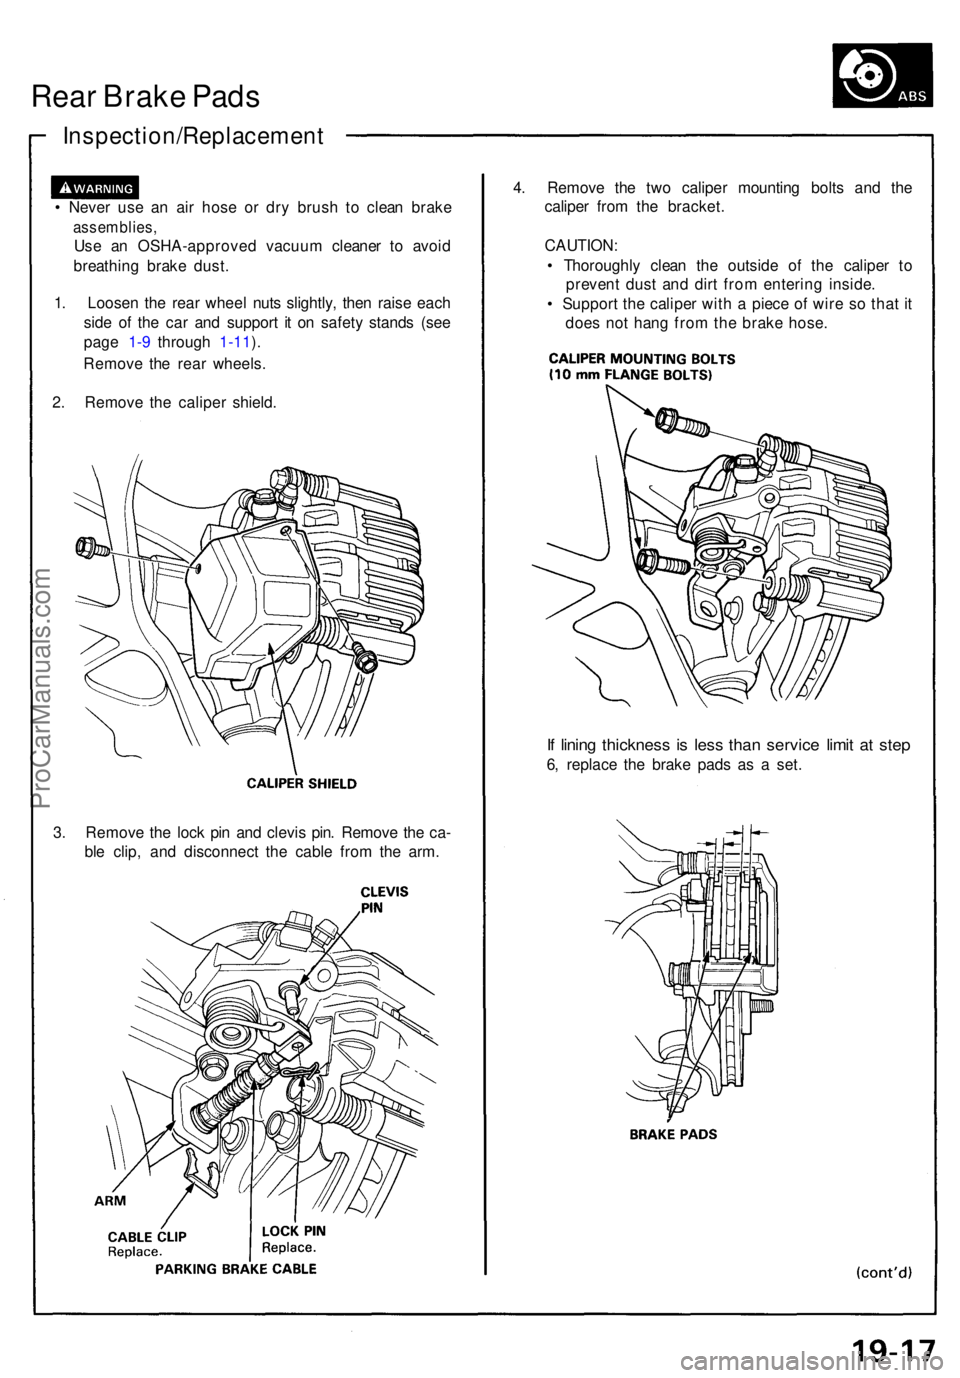
2 . Remov e th e calipe r shield .
3 . Remov e th e loc k pi n an d clevi s pin . Remov e th e ca -
bl e clip , an d disconnec t th e cabl e fro m th e arm . 4
. Remov e th e tw o calipe r mountin g bolt s an d th e
calipe r fro m th e bracket .
CAUTION :
• Thoroughl y clea n th e outsid e o f th e calipe r t o
preven t dus t an d dir t fro m enterin g inside .
• Suppor t th e calipe r wit h a piec e o f wir e s o tha t i t
doe s no t han g fro m th e brak e hose .
If linin g thicknes s i s les s tha n servic e limi t a t ste p
6, replac e th e brak e pad s a s a set .
ProCarManuals.com
Page 517 of 1640
Anti-lock Brake System (ABS) Description
Features/Construction/Operation
General
In a conventional brake system, if the brake pedal is depressed excessively, the wheels can lock before the vehicle
comes to a stop. In such a case, the stability of the vehicle is reduced if the rear wheels are locked, and maneuverabily of
the vehicle is reduced if the front wheels are locked, creating an extremely unstable condition.
The Anti-lock Brake System (ABS) modulates the pressure of the brake fluid applied to each caliper, thereby preventing
the locking of the wheels, whenever the wheels are likely to be locked due to excessive braking. It then restores normal
hydraulic pressure when there is no longer any possibility of wheel locking.
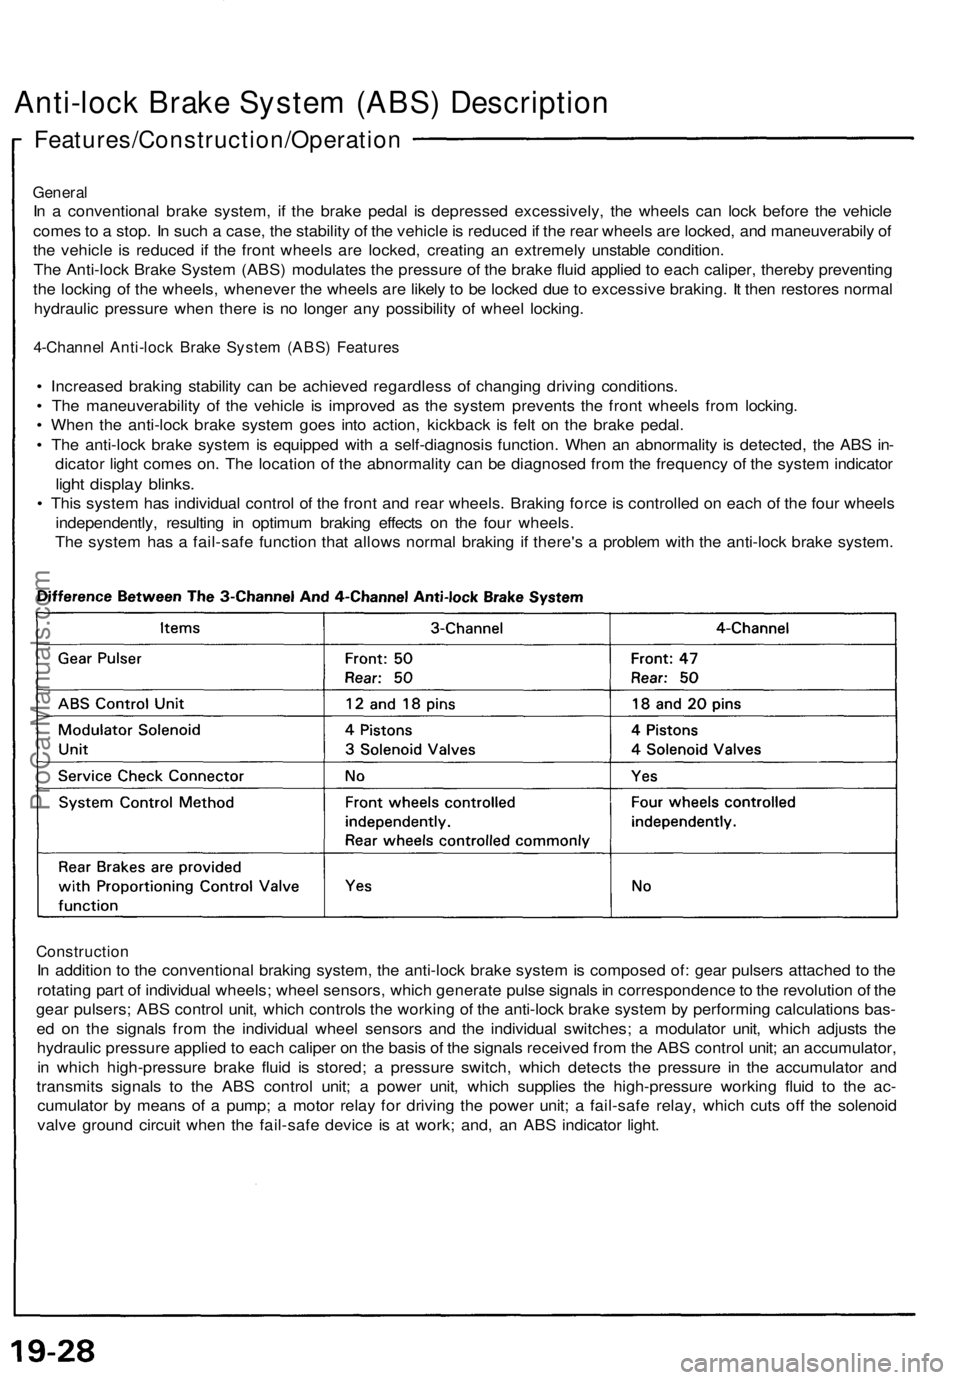
4-Channel Anti-lock Brake System (ABS) Features
• Increased braking stability can be achieved regardless of changing driving conditions.
• The maneuverability of the vehicle is improved as the system prevents the front wheels from locking.
• When the anti-lock brake system goes into action, kickback is felt on the brake pedal.
• The anti-lock brake system is equipped with a self-diagnosis function. When an abnormality is detected, the ABS in-
dicator light comes on. The location of the abnormality can be diagnosed from the frequency of the system indicator
light display blinks.
• This system has individual control of the front and rear wheels. Braking force is controlled on each of the four wheels
independently, resulting in optimum braking effects on the four wheels.
The system has a fail-safe function that allows normal braking if there's a problem with the anti-lock brake system.
Construction
In addition to the conventional braking system, the anti-lock brake system is composed of: gear pulsers attached to the
rotating part of individual wheels; wheel sensors, which generate pulse signals in correspondence to the revolution of the
gear pulsers; ABS control unit, which controls the working of the anti-lock brake system by performing calculations bas-
ed on the signals from the individual wheel sensors and the individual switches; a modulator unit, which adjusts the
hydraulic pressure applied to each caliper on the basis of the signals received from the ABS control unit; an accumulator,
in which high-pressure brake fluid is stored; a pressure switch, which detects the pressure in the accumulator and
transmits signals to the ABS control unit; a power unit, which supplies the high-pressure working fluid to the ac-
cumulator by means of a pump; a motor relay for driving the power unit; a fail-safe relay, which cuts off the solenoid
valve ground circuit when the fail-safe device is at work; and, an ABS indicator light.ProCarManuals.com
Page 521 of 1640
Anti-lock Brake System (ABS) Description
Features/Construction/Operation (cont'd)
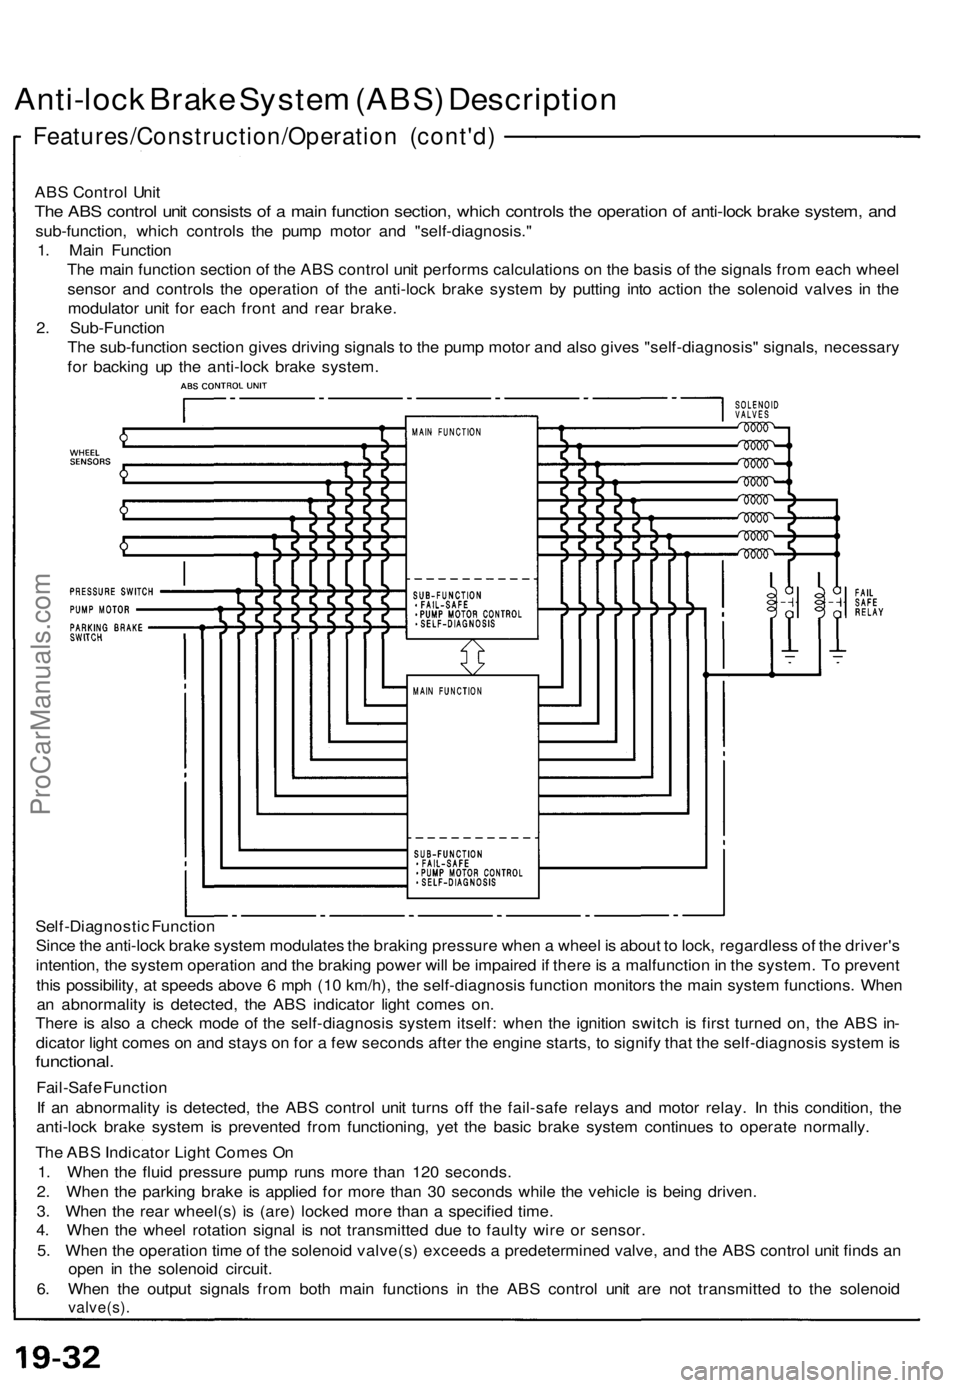
ABS Control Unit
The ABS control unit consists of a main function section, which controls the operation of anti-lock brake system, and
sub-function, which controls the pump motor and "self-diagnosis."
1. Main Function
The main function section of the ABS control unit performs calculations on the basis of the signals from each wheel
sensor and controls the operation of the anti-lock brake system by putting into action the solenoid valves in the
modulator unit for each front and rear brake.
2. Sub-Function
The sub-function section gives driving signals to the pump motor and also gives "self-diagnosis" signals, necessary
for backing up the anti-lock brake system.
Self-Diagnostic Function
Since the anti-lock brake system modulates the braking pressure when a wheel is about to lock, regardless of the driver's
intention, the system operation and the braking power will be impaired if there is a malfunction in the system. To prevent
this possibility, at speeds above 6 mph (10 km/h), the self-diagnosis function monitors the main system functions. When
an abnormality is detected, the ABS indicator light comes on.
There is also a check mode of the self-diagnosis system itself: when the ignition switch is first turned on, the ABS in-
dicator light comes on and stays on for a few seconds after the engine starts, to signify that the self-diagnosis system is
functional.
Fail-Safe Function
If an abnormality is detected, the ABS control unit turns off the fail-safe relays and motor relay. In this condition, the
anti-lock brake system is prevented from functioning, yet the basic brake system continues to operate normally.
The ABS Indicator Light Comes On
1. When the fluid pressure pump runs more than 120 seconds.
2. When the parking brake is applied for more than 30 seconds while the vehicle is being driven.
3. When the rear wheel(s) is (are) locked more than a specified time.
4. When the wheel rotation signal is not transmitted due to faulty wire or sensor.
5. When the operation time of the solenoid valve(s) exceeds a predetermined valve, and the ABS control unit finds an
open in the solenoid circuit.
6. When the output signals from both main functions in the ABS control unit are not transmitted to the solenoid
valve(s).ProCarManuals.com