Page 427 of 1640
Steering Wheel
Removal
7. Disconnect the connectors from the horn and cruise
control set/resume switches, then remove the cable
reel connector from its clips.
CRUISE CONTROL
SET/RESUME SWITCHES
4P CONNECTOR
HORN
CONNECTOR
CABLE
REEL
CONNECTOR
8. Remove the steering wheel nut.
9. Remove the steering wheel by rocking it slightly
from side-to-side as you pull steadily with both
hands.
STEERING WHEEL
NUT
Replace.ProCarManuals.com
Page 430 of 1640
Steering Wheel
Installation
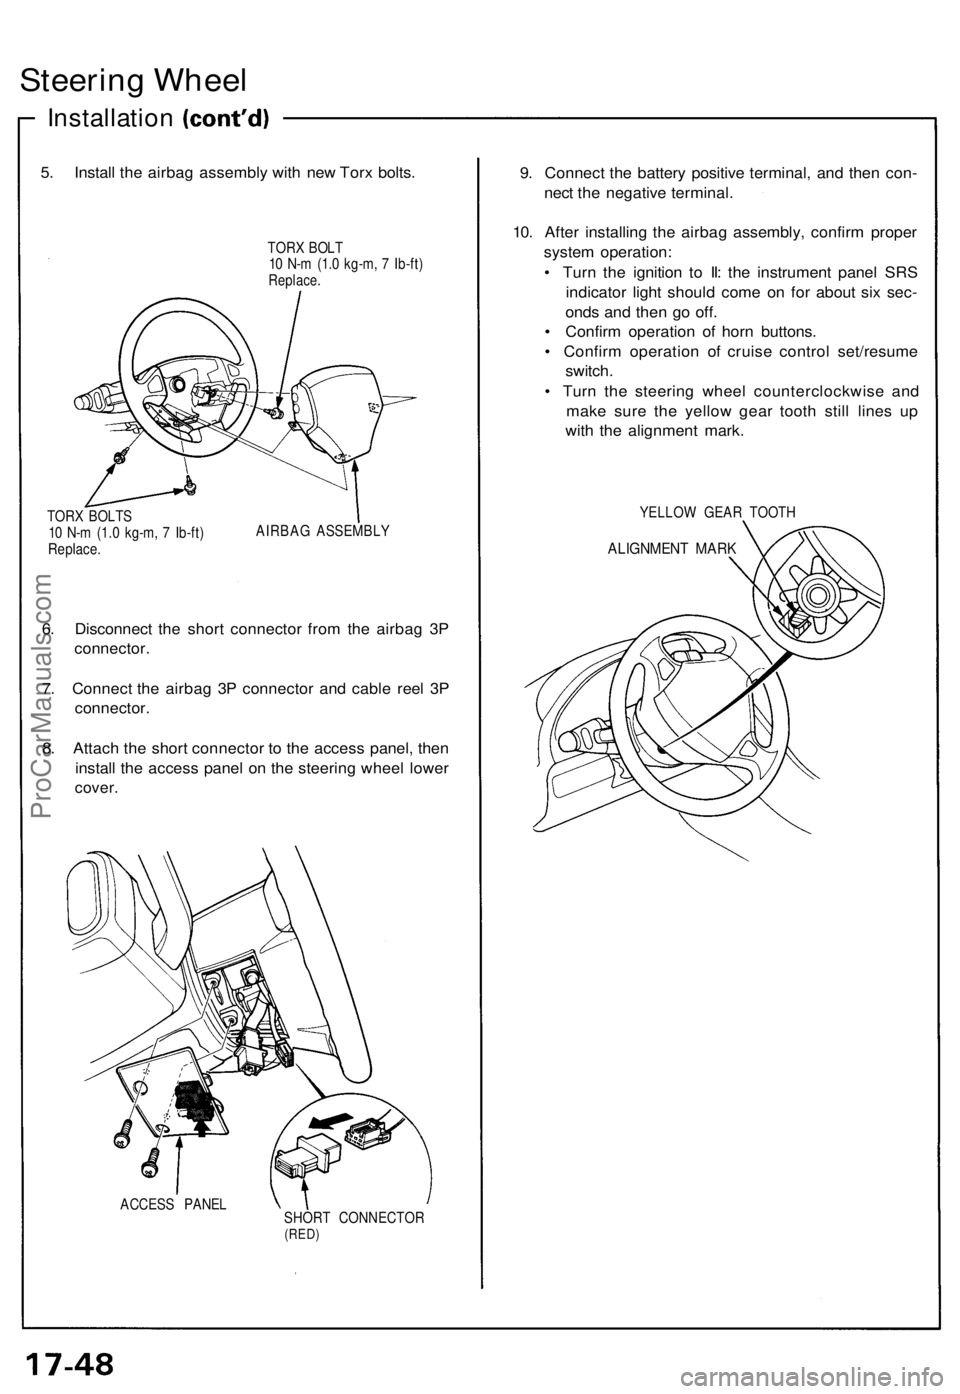
5. Install the airbag assembly with new Torx bolts.
TORX BOLT
10 N-m (1.0 kg-m, 7 Ib-ft)
Replace.
TORX BOLTS
10 N-m (1.0 kg-m, 7 Ib-ft)
Replace.
AIRBAG ASSEMBLY
6. Disconnect the short connector from the airbag 3P
connector.
7. Connect the airbag 3P connector and cable reel 3P
connector.
8. Attach the short connector to the access panel, then
install the access panel on the steering wheel lower
cover.
ACCESS PANEL
SHORT CONNECTOR
(RED)
9. Connect the battery positive terminal, and then con-
nect the negative terminal.
10. After installing the airbag assembly, confirm proper
system operation:
• Turn the ignition to II: the instrument panel SRS
indicator light should come on for about six sec-
onds and then go off.
• Confirm operation of horn buttons.
• Confirm operation of cruise control set/resume
switch.
• Turn the steering wheel counterclockwise and
make sure the yellow gear tooth still lines up
with the alignment mark.
YELLOW GEAR TOOTH
ALIGNMENT MARKProCarManuals.com
Page 436 of 1640
Steering Colum n
Installatio n
12. Instal l th e dashboar d brac e an d dashboar d lowe r
pad.
13. Connec t th e foo t wel l ligh t harnes s an d light-o n
warnin g chim e t o th e dashboar d lowe r panel , the n
instal l th e dashboar d lowe r panel .
DASHBOAR D BRAC E
DASHBOAR D LOWE RPAD
DASHBOAR DLOWER PANE L
14. Instal l th e steerin g whee l an d airba g assembl y t o
th e colum n (se e pag e 17-45 ).
ProCarManuals.com
Page 439 of 1640
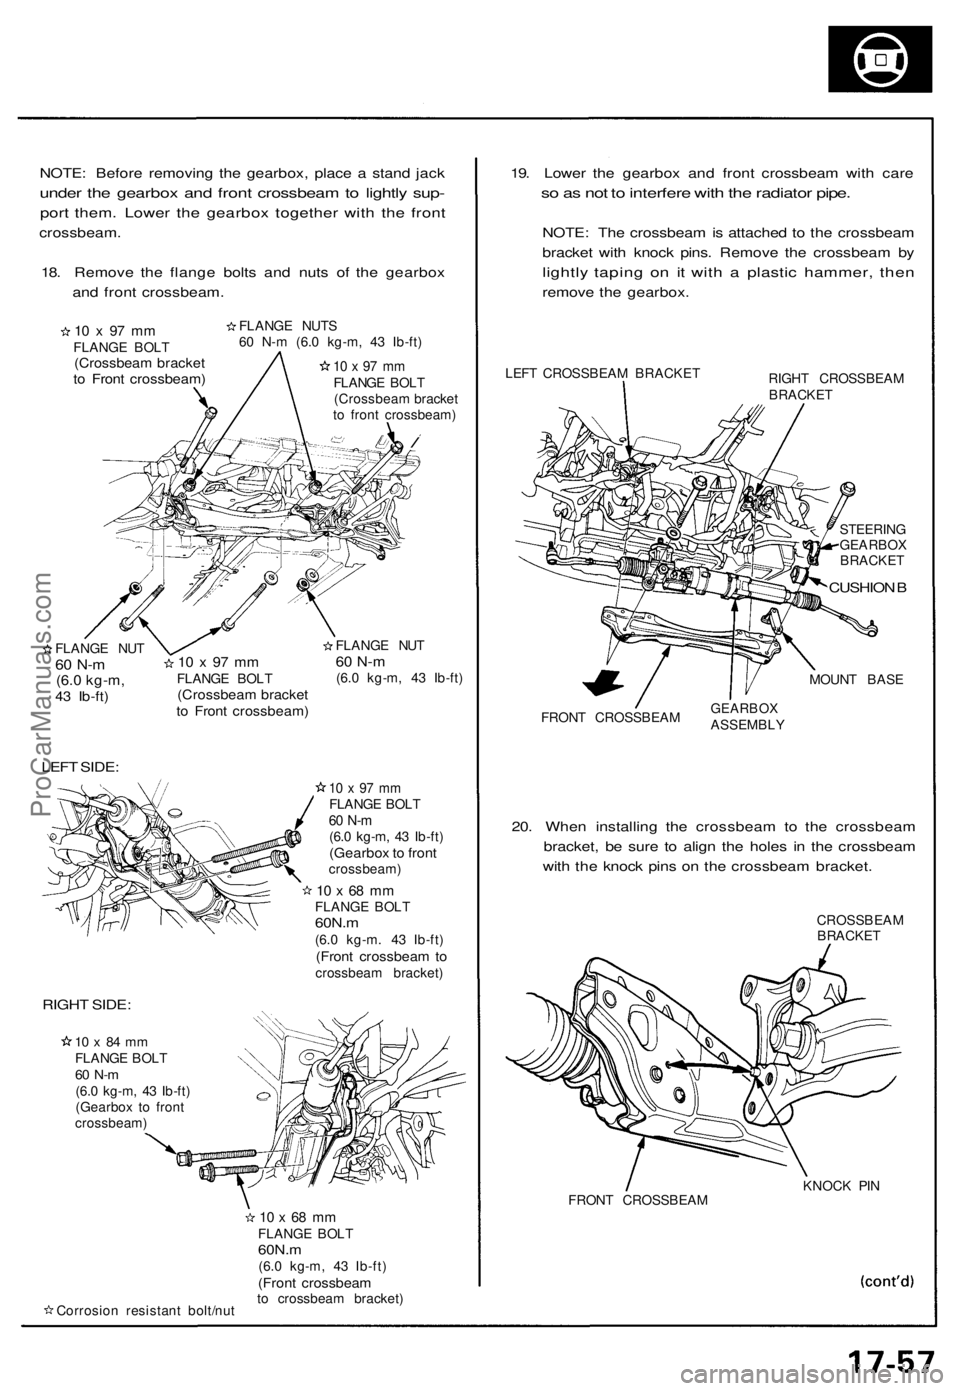
NOTE: Before removing the gearbox, place a stand jack
under the gearbox and front crossbeam to lightly sup-
port them. Lower the gearbox together with the front
crossbeam.
18. Remove the flange bolts and nuts of the gearbox
and front crossbeam.
10 x 97 mm
FLANGE BOLT
(Crossbeam bracket
to Front crossbeam)
FLANGE NUTS
60 N-m (6.0 kg-m, 43 Ib-ft)
10 x 97 mm
FLANGE BOLT
(Crossbeam bracket
to front crossbeam)
/
FLANGE NUT
60 N-m
(6.0 kg-m,
43 Ib-ft)
LEFT SIDE:
10 x 97 mm
FLANGE BOLT
(Crossbeam bracket
to Front crossbeam)
FLANGE NUT
60 N-m
(6.0 kg-m, 43 Ib-ft)
10 x 97 mm
FLANGE BOLT
60 N-m
(6.0 kg-m, 43 Ib-ft)
(Gearbox to front
crossbeam)
10 x 68 mm
FLANGE BOLT
60N.m
(6.0 kg-m. 43 Ib-ft)
(Front crossbeam to
crossbeam bracket)
RIGHT SIDE:
10 x 84 mm
FLANGE BOLT
60 N-m
(6.0 kg-m, 43 Ib-ft)
(Gearbox to front
crossbeam)
Corrosion resistant bolt/nut
10 x 68 mm
FLANGE BOLT
60N.m
(6.0 kg-m, 43 Ib-ft)
(Front crossbeam
to crossbeam bracket)
19. Lower the gearbox and front crossbeam with care
so as not to interfere with the radiator pipe.
NOTE: The crossbeam is attached to the crossbeam
bracket with knock pins. Remove the crossbeam by
lightly taping on it with a plastic hammer, then
remove the gearbox.
LEFT CROSSBEAM BRACKET
RIGHT CROSSBEAM
BRACKET
STEERING
GEARBOX
BRACKET
CUSHION B
MOUNT BASE
FRONT CROSSBEAM
GEARBOX
ASSEMBLY
20. When installing the crossbeam to the crossbeam
bracket, be sure to align the holes in the crossbeam
with the knock pins on the crossbeam bracket.
CROSSBEAM
BRACKET
FRONT CROSSBEAM
KNOCK PINProCarManuals.com
Page 444 of 1640
Steering Gearbo x
Inspectio n
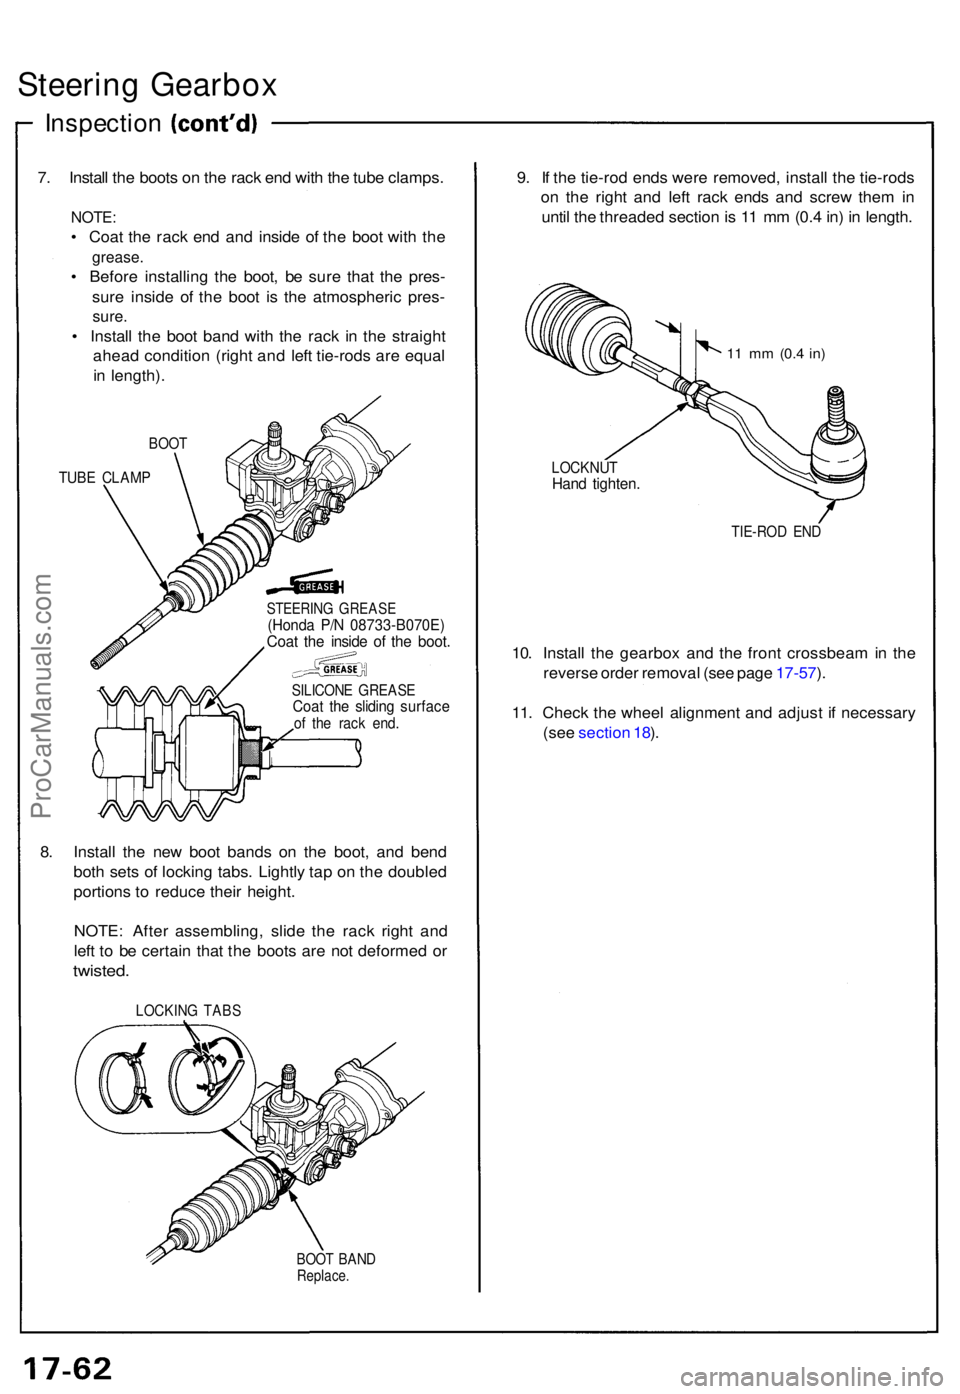
7. Instal l th e boot s o n th e rac k en d wit h th e tub e clamps .
NOTE:
• Coa t th e rac k en d an d insid e o f th e boo t wit h th e
grease .
• Befor e installin g th e boot , b e sur e tha t th e pres -
sur e insid e o f th e boo t i s th e atmospheri c pres -
sure.
• Instal l th e boo t ban d wit h th e rac k i n th e straigh t
ahea d conditio n (righ t an d lef t tie-rod s ar e equa l
i n length) .
BOOT
TUBE CLAM P
STEERIN G GREAS E(Honda P/ N 08733-B070E )Coat th e insid e o f th e boot .
SILICON E GREAS ECoat th e slidin g surfac eof th e rac k end .
8. Instal l th e ne w boo t band s o n th e boot , an d ben d
bot h set s o f lockin g tabs . Lightl y ta p o n th e double d
portion s t o reduc e thei r height .
NOTE : Afte r assembling , slid e th e rac k righ t an d
lef t t o b e certai n tha t th e boot s ar e no t deforme d o r
twisted .
LOCKIN G TAB S
BOOT BAN DReplace .
9. I f th e tie-ro d end s wer e removed , instal l th e tie-rod s
o n th e righ t an d lef t rac k end s an d scre w the m in
unti l th e threade d sectio n is 1 1 m m (0. 4 in ) i n length .
11 m m (0. 4 in)
LOCKNU THand tighten .
TIE-RO D EN D
10. Instal l th e gearbo x an d th e fron t crossbea m in th e
revers e orde r remova l (se e pag e 17-57 ).
11 . Chec k th e whee l alignmen t an d adjus t i f necessar y
(se e sectio n 18 ).
ProCarManuals.com
Page 449 of 1640
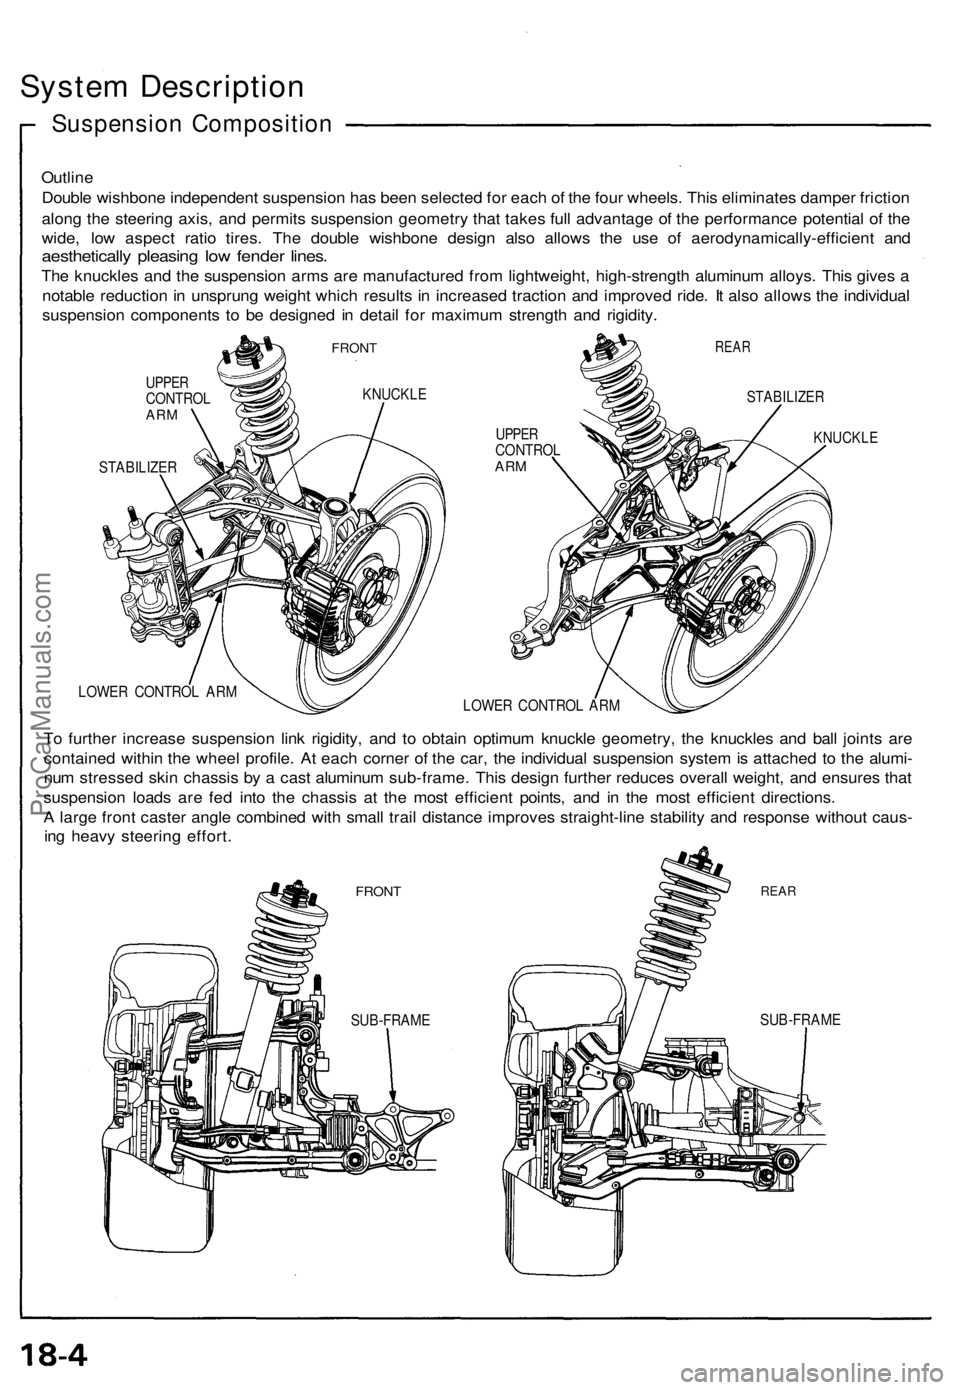
System Description
Suspension Composition
Outline
Double wishbone independent suspension has been selected for each of the four wheels. This eliminates damper friction
along the steering axis, and permits suspension geometry that takes full advantage of the performance potential of the
wide, low aspect ratio tires. The double wishbone design also allows the use of aerodynamically-efficient and
aesthetically pleasing low fender lines.
The knuckles and the suspension arms are manufactured from lightweight, high-strength aluminum alloys. This gives a
notable reduction in unsprung weight which results in increased traction and improved ride. It also allows the individual
suspension components to be designed in detail for maximum strength and rigidity.
FRONT
UPPER
CONTROL
ARM
KNUCKLE
STABILIZER
REAR
UPPER
CONTROL
ARM
STABILIZER
KNUCKLE
LOWER CONTROL ARM
LOWER CONTROL ARM
To further increase suspension link rigidity, and to obtain optimum knuckle geometry, the knuckles and ball joints are
contained within the wheel profile. At each corner of the car, the individual suspension system is attached to the alumi-
num stressed skin chassis by a cast aluminum sub-frame. This design further reduces overall weight, and ensures that
suspension loads are fed into the chassis at the most efficient points, and in the most efficient directions.
A large front caster angle combined with small trail distance improves straight-line stability and response without caus-
ing heavy steering effort.
FRONT
REAR
SUB-FRAME
SUB-FRAMEProCarManuals.com
Page 450 of 1640
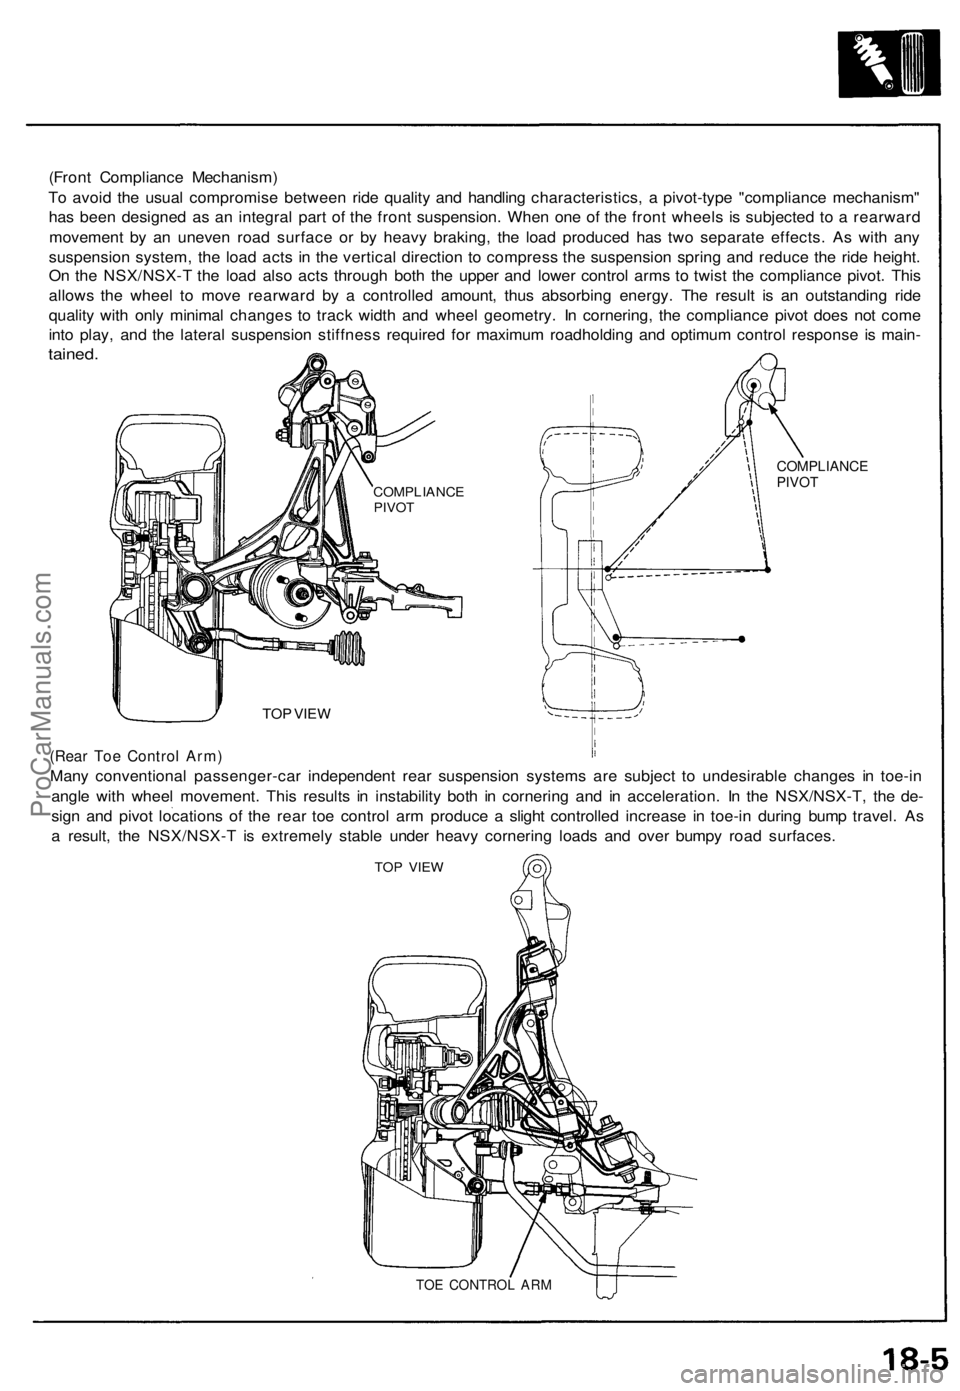
(Front Compliance Mechanism)
To avoid the usual compromise between ride quality and handling characteristics, a pivot-type "compliance mechanism"
has been designed as an integral part of the front suspension. When one of the front wheels is subjected to a rearward
movement by an uneven road surface or by heavy braking, the load produced has two separate effects. As with any
suspension system, the load acts in the vertical direction to compress the suspension spring and reduce the ride height.
On the NSX/NSX-T the load also acts through both the upper and lower control arms to twist the compliance pivot. This
allows the wheel to move rearward by a controlled amount, thus absorbing energy. The result is an outstanding ride
quality with only minimal changes to track width and wheel geometry. In cornering, the compliance pivot does not come
into play, and the lateral suspension stiffness required for maximum roadholding and optimum control response is main-
tained.
COMPLIANCE
PIVOT
TOP VIEW
(Rear Toe Control Arm)
Many conventional passenger-car independent rear suspension systems are subject to undesirable changes in toe-in
angle with wheel movement. This results in instability both in cornering and in acceleration. In the NSX/NSX-T, the de-
sign and pivot locations of the rear toe control arm produce a slight controlled increase in toe-in during bump travel. As
a result, the NSX/NSX-T is extremely stable under heavy cornering loads and over bumpy road surfaces.
TOP VIEW
TOE CONTROL ARM
COMPLIANCE
PIVOTProCarManuals.com
Page 461 of 1640
Front Suspensio n
Hub Replacemen t
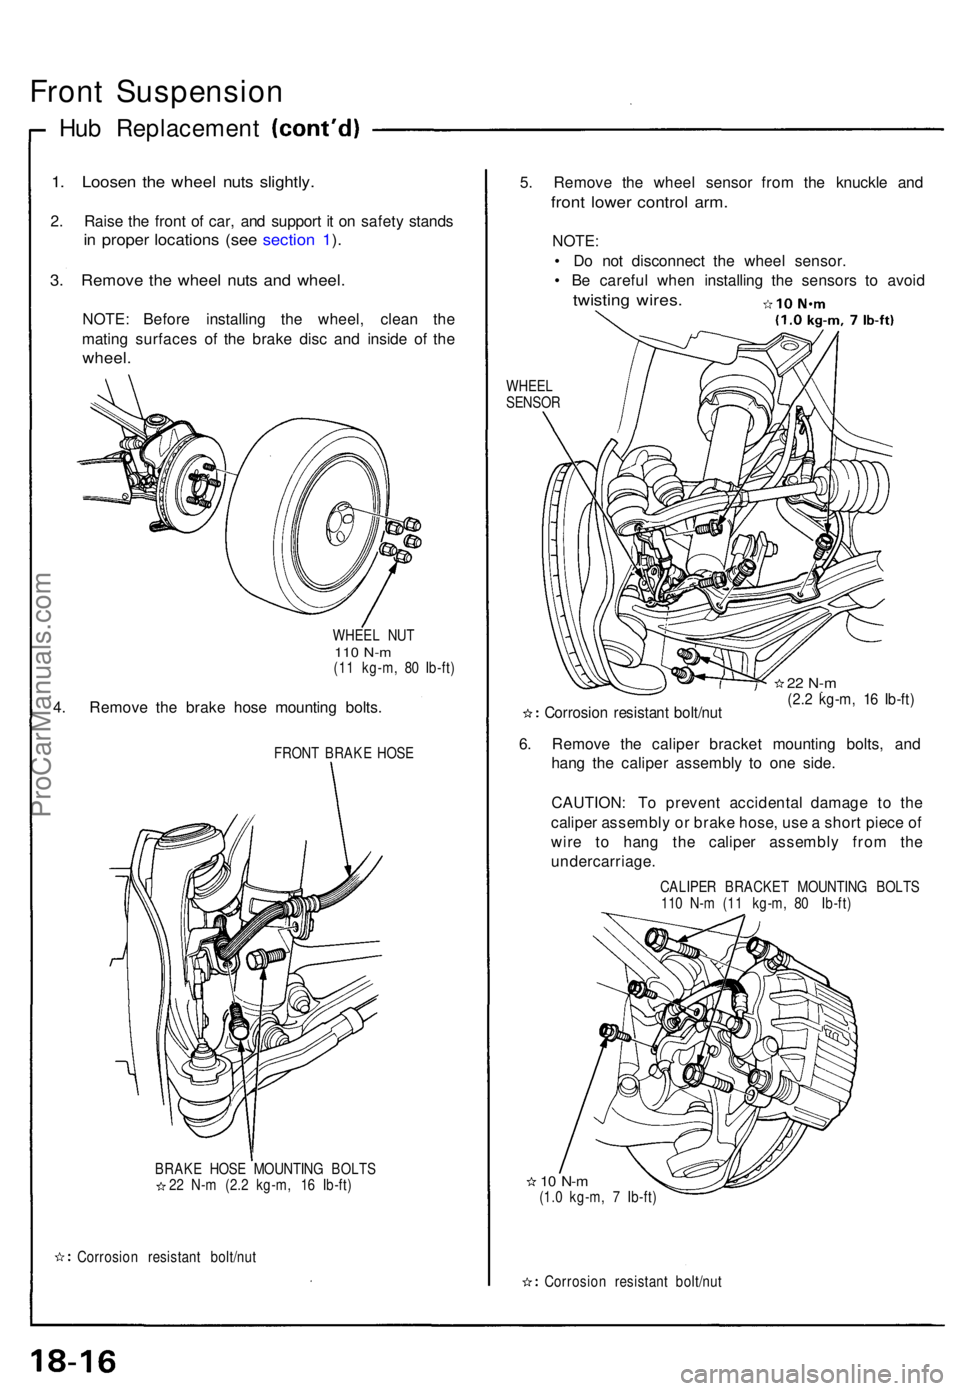
1. Loose n th e whee l nut s slightly .
2. Rais e th e fron t o f car , an d suppor t i t o n safet y stand s
in prope r location s (se e sectio n 1 ).
3 . Remov e th e whee l nut s an d wheel .
NOTE: Befor e installin g th e wheel , clea n th e
matin g surface s o f th e brak e dis c an d insid e o f th e
wheel .
WHEE L NU T110 N- m(11 kg-m , 8 0 Ib-ft )
4. Remov e th e brak e hos e mountin g bolts .
FRON T BRAK E HOS E
BRAK E HOS E MOUNTIN G BOLT S
2 2 N- m (2. 2 kg-m , 1 6 Ib-ft )
Corrosio n resistan t bolt/nu t
5. Remov e th e whee l senso r fro m th e knuckl e an d
fron t lowe r contro l arm .
NOTE :
• D o no t disconnec t th e whee l sensor .
• B e carefu l whe n installin g th e sensor s t o avoi d
twistin g wires .
WHEE L
SENSO R
Corrosio n resistan t bolt/nu t
22 N- m(2.2 kg-m , 1 6 Ib-ft )
6. Remov e th e calipe r bracke t mountin g bolts , an d
han g th e calipe r assembl y t o on e side .
CAUTION : T o preven t accidenta l damag e t o th e
calipe r assembl y o r brak e hose , us e a shor t piec e o f
wir e t o han g th e calipe r assembl y fro m th e
undercarriage .
CALIPER BRACKE T MOUNTIN G BOLT S
11 0 N- m (1 1 kg-m , 8 0 Ib-ft )
10 N- m(1.0 kg-m , 7 Ib-ft )
Corrosio n resistan t bolt/nu t
ProCarManuals.com