Page 184 of 2103

ENGINE Engine
ENGINE ASSEMBLY
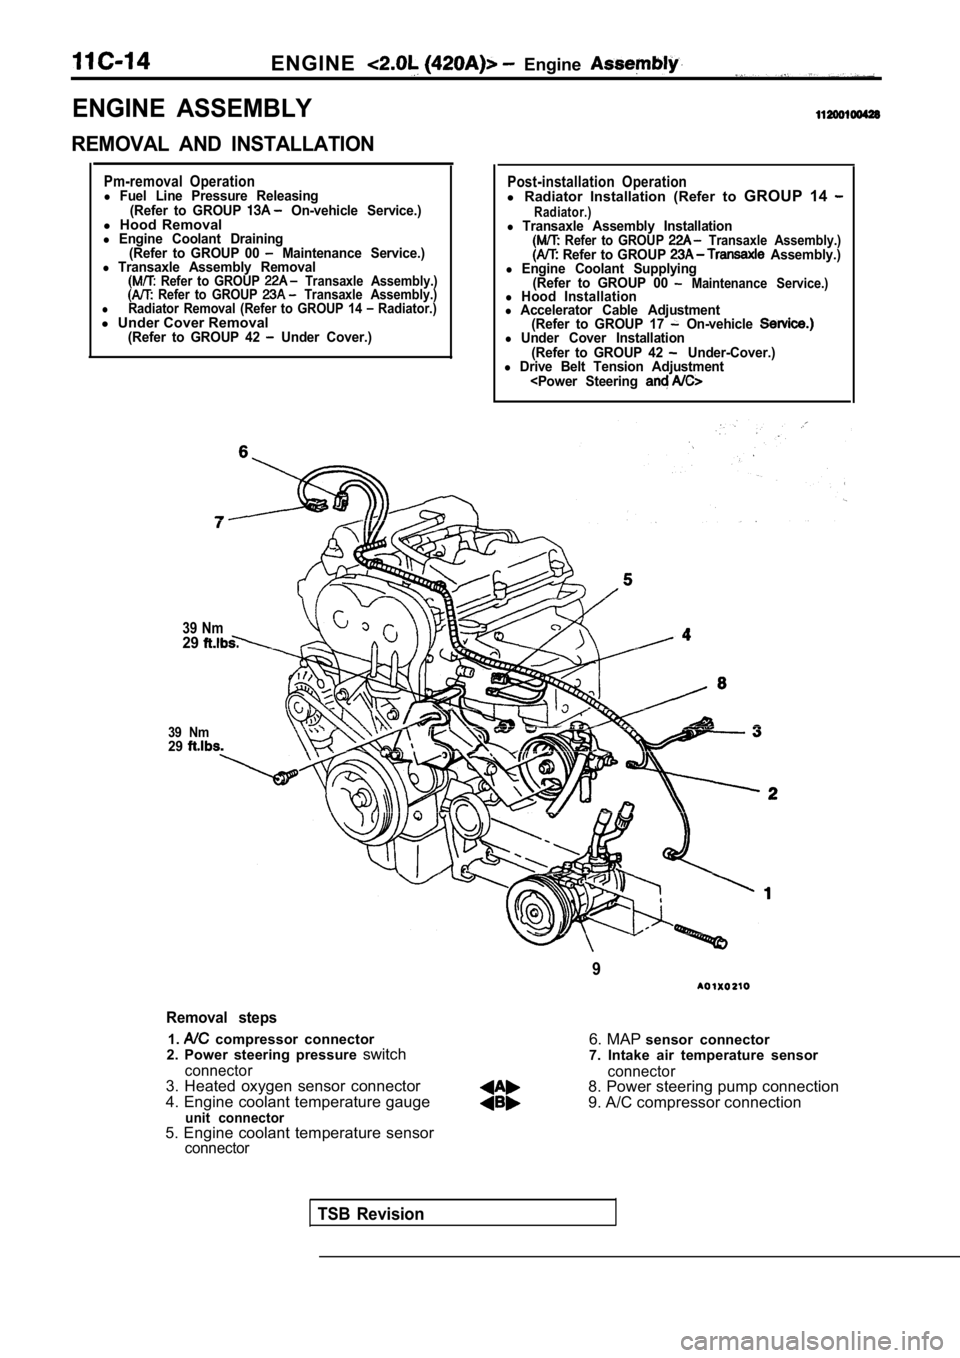
REMOVAL AND INSTALLATION
Pm-removal Operationl Fuel Line Pressure Releasing(Refer to GROUP On-vehicle Service.)l Hood Removall Engine Coolant Draining
(Refer to GROUP 00 Maintenance Service.)l Transaxle Assembly Removal Refer to GROUP Transaxle Assembly.) Refer to GROUP Transaxle Assembly.)lRadiator Removal (Refer to GROUP 14 Radiator.)l Under Cover Removal(Refer to GROUP 42 Under Cover.)
39 Nm29
39 Nm29
Post-installation Operationl Radiator Installation (Refer to GROUP 14 Radiator.)l Transaxle Assembly Installation Refer to GROUP Transaxle Assembly.) Refer to GROUP Assembly.)l Engine Coolant Supplying
(Refer to GROUP 00 Maintenance Service.)l Hood Installationl Accelerator Cable Adjustment(Refer to GROUP 17 On-vehicle l Under Cover Installation
(Refer to GROUP 42 Under-Cover.)l Drive Belt Tension Adjustment
9
Removal steps
1. compressor connector
2. Power steering pressure switch
connector3. Heated oxygen sensor connector
4. Engine coolant temperature gauge
unit connector
6. MAP sensor connector
7. Intake air temperature sensor
connector8. Power steering pump connection
9. A/C compressor connection
5. Engine coolant temperature sensor
connector
TSB Revision
Page 186 of 2103
E N G I N E ,
66 Nm 64
Nm72-67
27. Vapor hose connection
28. Front exhaust pipe connection
29. Gasket
30. Engine mount bracket assembly 31. Engine assembly
REMOVAL SERVICE POINTS
POWER STEERING
Remove the power pump from the bracket with the
hose attached.
NOTE
Place the removed power. steering pump in where
it will not be a hindrance when’ installing the
engine assembly, and ‘tie it with
TSB Revision1
Page 188 of 2103
ENGINE Enaine
Engine side
bracketEngine
Notch
INSTALLATION SERVICE POINTS
ENGINE ASSEMBLY INSTALLATION
Install the engine assembly while checking that the cables,
hoses, and harness connectors are not clamped.
ENGINE MOUNT BRACKET ASSEMBLY
INSTALLATION
(1) Place a garage jack against the engine oil pan with a
piece of wood in between, and install the engine mo unt
bracket while adjusting the position of the engine.
(2) Support the engine with the garage jack.
(3)Removethechain block and support the engine assembly
with the special tool.
(4) Align the notches on the
the
bracket with the arrow facing shown
direction. Then install the
HIGH-PRESSURE FUEL HOSE CONNECTION
When connecting the high-pressure fuel hose to the fuel rail,
apply a small amount of clean engine oil to the hose union,
and then insert, being careful not to damage the O- ring.
Caution
Do not let the engine oil get into the fuel rail.
TSB Revision
Page 189 of 2103
ENGINE Crankshaft
CRANKSHAFT PULLEY
REMOVAL AND INSTALLATION
Operationl Under Cover Removal(Refer to GROUP 42 Under Cover.)
Post-installationl D r i v e B e l t T e n s i o n l U n d e r C o v e r I n s t a l l a t i o n (Refer to GROUP 42 Under Cover.),
Removal steps
1. Drive belt (Power steering and
2. Drive belt (Generator)
3. Crankshaft bolt 4. Crankshaft pulley
REMOVAL SERVICE POINTS
CRANKSHAFT BOLT REMOVAL
Page 190 of 2103
E N G I N E
I
INSTALLATION SERVICE POINTS
CRANKSHAFT PULLEY INSTALLATION
CRANKSHAFT BOLT
TSB Revision
Page 192 of 2103
ENGINECamshaft and
554
.
INTAKE CAMSHAFT SPROCKET/EXHAUST
CAMSHAFT
Use the special tool not to let the. camshaft sprockets
CAMSHAFT BEARING
Loosen the camshaft bearing cap attaching fasteners in
sequence shown in the figure (one
at a time).
INTAKE CAMSHAFT/EXHAUST CAMSHAFT REMOVAL
Identify the camshafts before removing from the hea d. The
camshafts are not interchangeable.
INSTALLATION SERVICE POINTS
CAMSHAFT OIL SEAL
(1) a piece of wood between a garage jack and the
engine oil pan, and jack up the engine to set the special .
(2) Install the camshaft seal into the cylinder hea d using’
the special tool until it is flush with the head.
CAMSHAFT BEARING CAP INSTALLATION
Install the camshaft bearing caps in the
shown in the
illustration.
TSB Revision
Page 195 of 2103
ENGINE Crankshaft Front
.
CRANKSHAFT FRONT OIL SEAL
REMOVAL AND INSTALLATION
and Post-installation Operatidnl Timing Belt Removal and Installation(Refer to
Removal steps
1. Crankshaft sprocket2. Crankshaft front oil seal
REMOVAL SERVICE POINTS
CRANKSHAFT SPROCKET REMOVAL
Caution
Do not nick the shaft seal surface or seal bore.
FRONT OIL SEAL
Use the special tool to remove the crankshaft front oil seal.
Be careful not to damage the seal surface of cover.
TSB Revision
Page 196 of 2103
ENGINE Crankshaft Front Oil Seal
I
INSTALLATION SERVICE
CRANKSHAFT FRONT OIL SEAL
Use the special tool to align the oil seal witti the’
. .
CRANKSHAFT SPROCKET INSTALLATION
TSB