Page 1656 of 2103

BASIC BRAKE SYSTEM On-vehicle Service
FRONT DISC RUN-OUT’
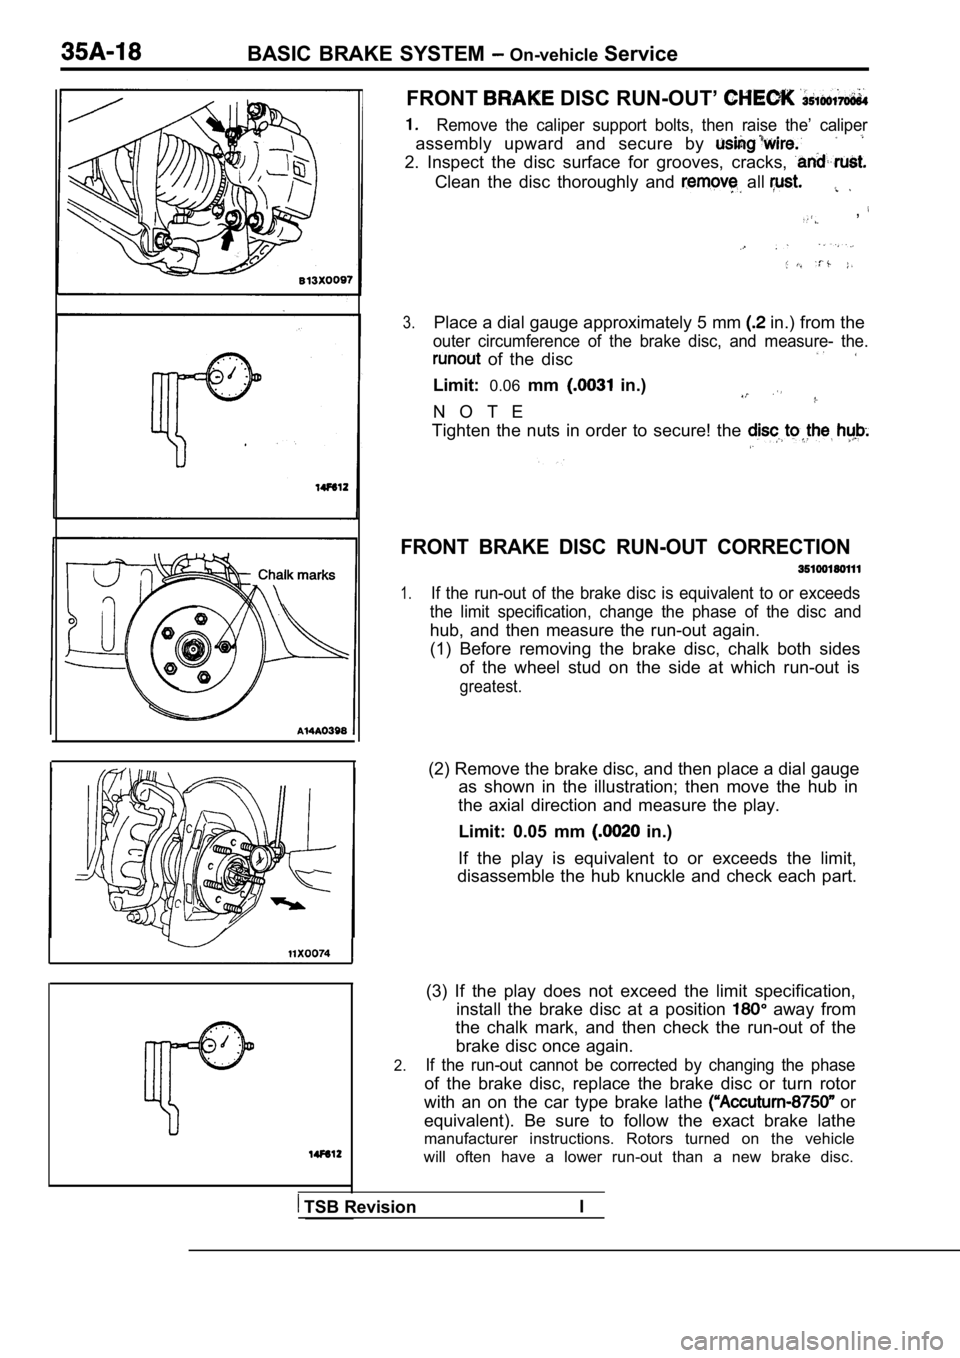
Remove the caliper support bolts, then raise the’ c aliper
assembly upward and secure by
2. Inspect the disc surface for grooves, cracks,
Clean the disc thoroughly and all
,
3.Place a dial gauge approximately 5 mm in.) from the
outer circumference of the brake disc, and measure- the.
of the disc
Limit:0.06mm in.)
N O T E
Tighten the nuts in order to secure! the
FRONT BRAKE DISC RUN-OUT CORRECTION
1.If the run-out of the brake disc is equivalent to o r exceeds
the limit specification, change the phase of the di sc and
hub, and then measure the run-out again.
(1) Before removing the brake disc, chalk both side s
of the wheel stud on the side at which run-out is
greatest.
(2) Remove the brake disc, and then place a dial ga uge
as shown in the illustration; then move the hub in
the axial direction and measure the play.
Limit: 0.05 mm
in.)
If the play is equivalent to or exceeds the limit,
disassemble the hub knuckle and check each part.
2.
(3) If the play does not exceed the limit specifica tion,
install the brake disc at a position
away from
the chalk mark, and then check the run-out of the
brake disc once again.
If the run-out cannot be corrected by changing the phase
of the brake disc, replace the brake disc or turn rotor
with an on the car type brake lathe
or
equivalent). Be sure to follow the exact brake lath e
manufacturer instructions. Rotors turned on the veh icle
will often have a lower run-out than a new brake di sc.
TSB RevisionI
Page 1657 of 2103

BASIC On-vehicle Service
BRAKE DISC THICKNESS CHECK
35100160122
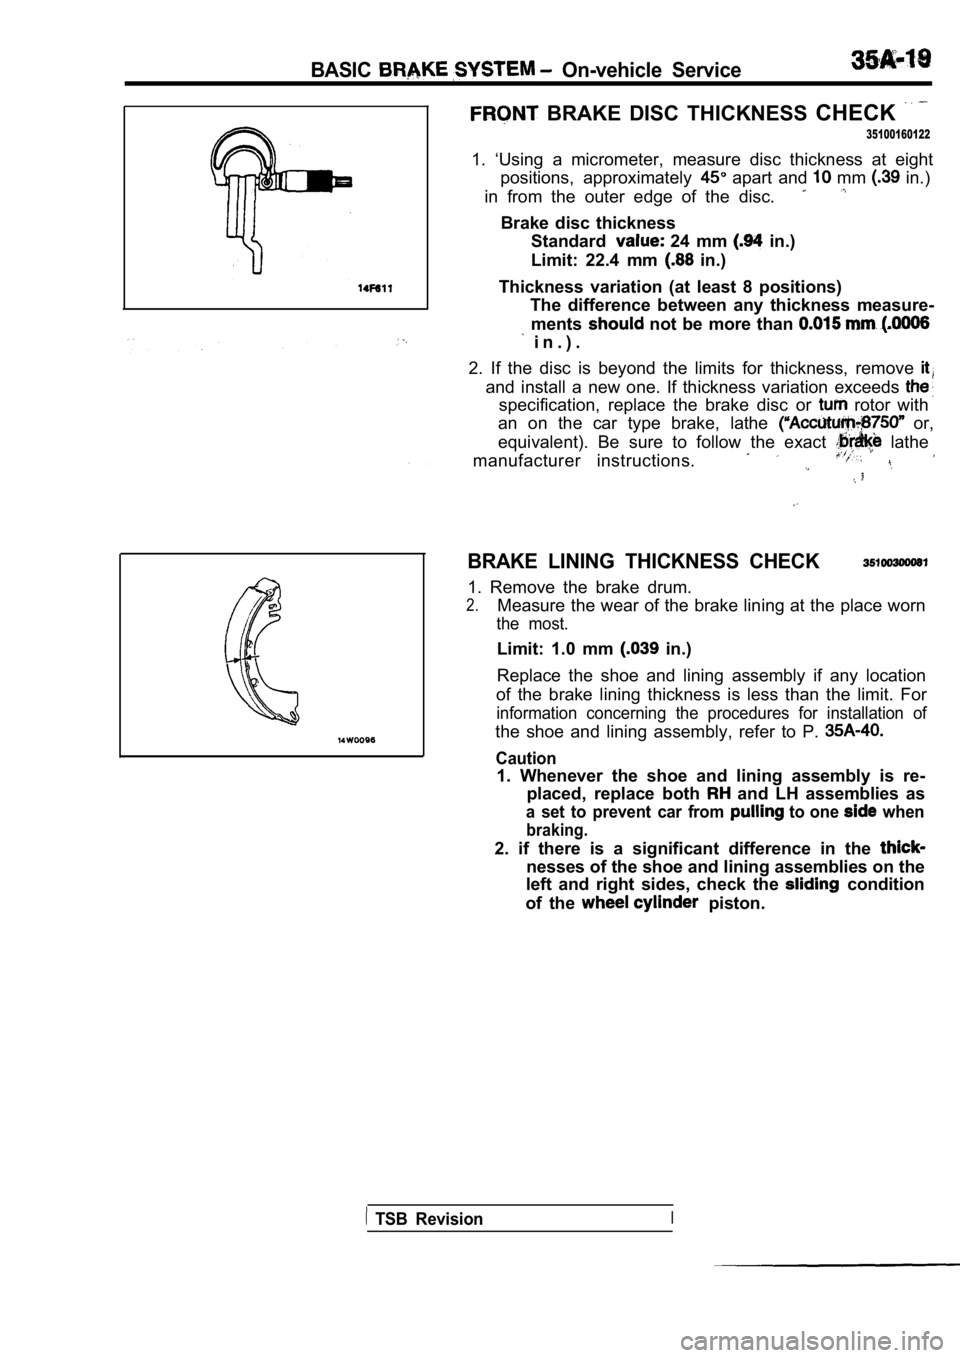
1. ‘Using a micrometer, measure disc thickness at e ight
positions, approximately
apart and mm in.)
in from the outer edge of the disc.
Brake disc thickness Standard
24 mm in.)
Limit: 22.4 mm
in.)
Thickness variation (at least 8 positions) The difference between any thickness measure-
ments
not be more than
i n . ) .
2. If the disc is beyond the limits for thickness, remove
and install a new one. If thickness variation excee ds
specification, replace the brake disc or rotor with
an on the car type brake, lathe
or,
equivalent). Be sure to follow the exact
lathe
manufacturer instructions.
BRAKE LINING THICKNESS CHECK
1. Remove the brake drum.
2.Measure the wear of the brake lining at the place w orn
the most.
Limit: 1.0 mm in.)
Replace the shoe and lining assembly if any locatio n
of the brake lining thickness is less than the limi t. For
information concerning the procedures for installat ion of
the shoe and lining assembly, refer to P.
Caution
1. Whenever the shoe and lining assembly is re-
placed, replace both
and LH assemblies as
a set to prevent car from to one when
braking.
2. if there is a significant difference in the
nesses of the shoe and lining assemblies on the
left and right sides, check the
condition
of the
piston.
TSB RevisionI
Page 1660 of 2103

BASIC BRAKE SYSTEM On-vehicle Service
TSB Revision
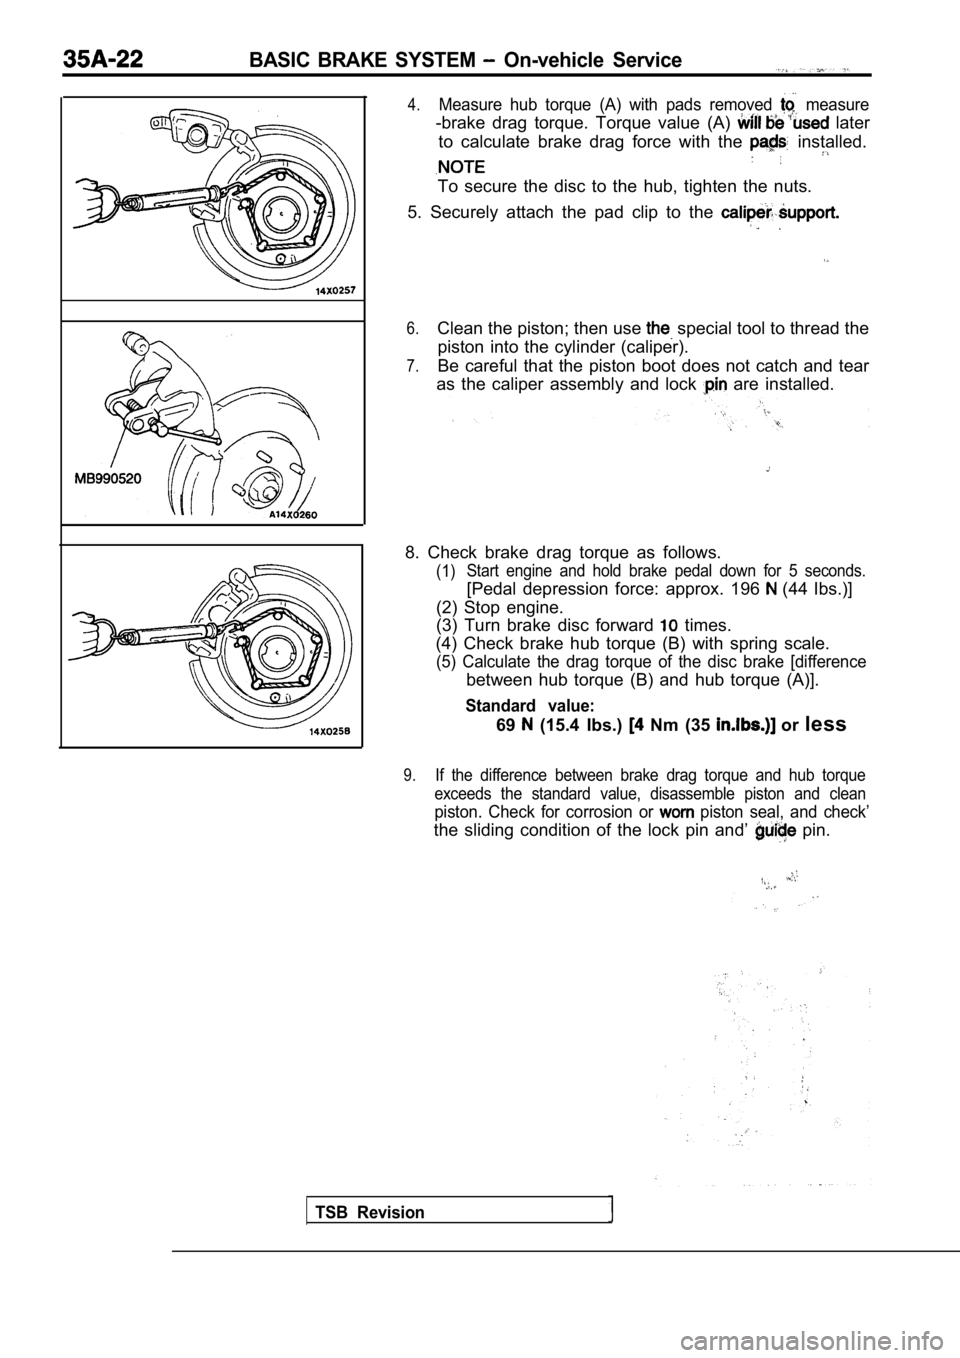
4.Measure hub torque (A) with pads removed measure
-brake drag torque. Torque value (A) later
to calculate brake drag force with the
installed.
To secure the disc to the hub, tighten the nuts.
5. Securely attach the pad clip to the
6.Clean the piston; then use special tool to thread the
piston into the cylinder (caliper).
7.Be careful that the piston boot does not catch and tear
as the caliper assembly and lock
are installed.
8. Check brake drag torque as follows.
(1) Start engine and hold brake pedal down for 5 second
s.
[Pedal depression force: approx. 196 (44 Ibs.)]
(2) Stop engine.
(3) Turn brake disc forward
times.
(4) Check brake hub torque (B) with spring scale.
(5) Calculate the drag torque of the disc brake [di fference
between hub torque (B) and hub torque (A)].
Standard value:
69 (15.4 Ibs.) Nm (35 or less
9.If the difference between brake drag torque and hub torque
exceeds the standard value, disassemble piston and clean
piston. Check for corrosion or piston seal, and check’
the sliding condition of the lock pin and’ pin.
Page 1661 of 2103

BASIC BRAKE SYSTEM On-vehicle Service
REAR BRAKE DISC THICKNESS CHECK
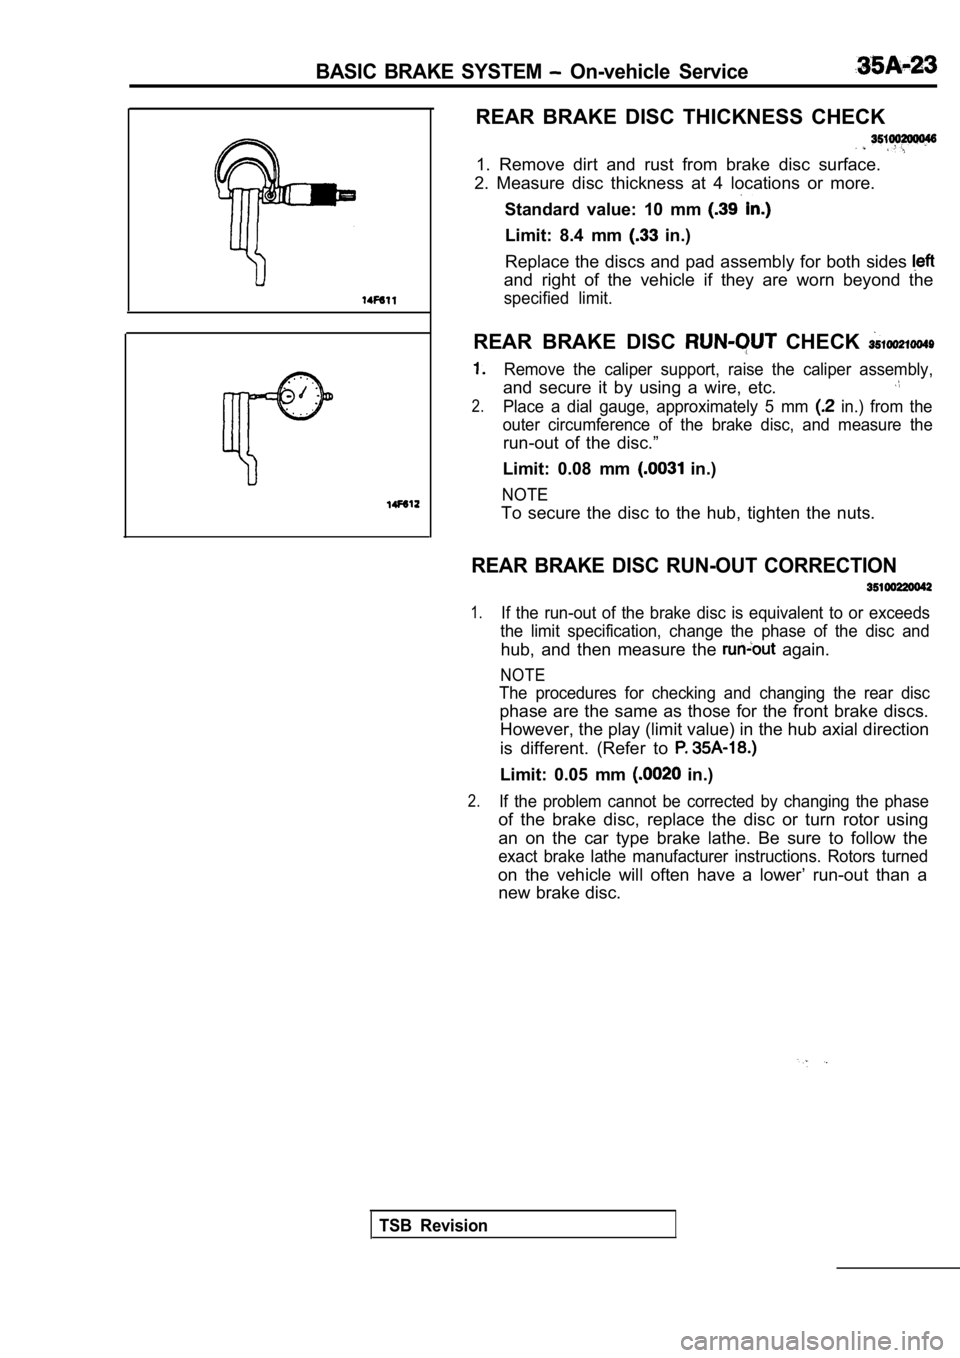
1. Remove dirt and rust from brake disc surface.
2. Measure disc thickness at 4 locations or more.
Standard value: 10 mm
Limit: 8.4 mm in.)
Replace the discs and pad assembly for both sides
and right of the vehicle if they are worn beyond th e
specified limit.
REAR BRAKE DISC CHECK
Remove the caliper support, raise the caliper assem bly,
and secure it by using a wire, etc.
2.Place a dial gauge, approximately 5 mm in.) from the
outer circumference of the brake disc, and measure the
run-out of the disc.”
Limit: 0.08 mm
in.)
NOTE
To secure the disc to the hub, tighten the nuts.
REAR BRAKE DISC RUN-OUT CORRECTION
1.If the run-out of the brake disc is equivalent to o r exceeds
the limit specification, change the phase of the di sc and
hub, and then measure the again.
NOTE
The procedures for checking and changing the rear d isc
phase are the same as those for the front brake discs.
However, the play (limit value) in the hub axial di rection
is different. (Refer to
Limit: 0.05 mm in.)
2.If the problem cannot be corrected by changing the phase
of the brake disc, replace the disc or turn rotor using
an on the car type brake lathe. Be sure to follow t he
exact brake lathe manufacturer instructions. Rotors turned
on the vehicle will often have a lower’ run-out tha n a
new brake disc.
TSB Revision
Page 1664 of 2103
BASIC BRAKE SYSTEM, Master Cvlinder Brake Booster”
Grease points
Fitting
ATD Part No. 8861
o r e q u i v a l e n t
1 4 1 0 2 4 9
SERVICE POINT
BOOSTER REMOVAL Engine
(Turbo) and
Engine>
Slide the engine forward and remove the brake boost er from
,
TSB Revision
Page 1665 of 2103
BASIC BRAKE SYSTEM Master Cylinder arid Brake
m m
Marking
Prima
piston Push rod
Straight scale
- -
INSTALLATION SERVICE POINTS
HOSE CONNECTION
(1) Install the vacuum hose to the brake
nipple
shown in the figure. Secure the hose with the hose clip.
Caution
1. The check valve and the pipe part of
booster must not contact each other.
2. Connect so that the marking faces upwards.
(2) Install the other end of the vacuum hose fully onto its
port on the engine. Secure the hose using the hose clip.
CLEARANCE ADJUSTMENT BETWEEN BRAKE
BOOSTER PUSH ROD AND PRIMARY PISTON
Adjust the clearance (A) between the brake booster push
rod and
piston as follows:
Calculate clearance A from the
and measurements.
Standard value: mm in.)
NOTE
When brake booster negative pressure 67 (9.7 psi) is applied,
clearance value will become mm in.)
Straight scale
Page 1667 of 2103
BASIC BRAKE SYSTEM Master and ‘Brake
MASTER CYLINDER
DISASSEMBLY AND REASSEMBLY
Disassembly steps
1.Reservoir bracket2.Reservoir hoses3. Reservoir cap assembly4.Diaphragm5.Reservoir cap6. Brake fluid level sensor
7.Float8.Reservoir9.Pin10.Retainer
Master cylinder kit
Brake fluid:
or
11.Connector12.Grommet13. Piston stopper ring14. Primary piston assembly15. Secondary piston assembly16. Master cylinder body
CautionDo not disassemble the and secondaryassemblies.
DISASSEMBLY SERVICE POINT
(A, PISTON STOPPER RING DISASSEMBLY
Remove thepiston stopper ring, while depressing the piston.
TSB Revision
Page 1669 of 2103
BASIC SYSTEM Front
FRONT DISC BRAKE
REMOVAL AND ,
I1I Operation
l Brake Fluid DrainingPost-installation Operationl Brake Fluid Supplying
lBrake Line Bleeding (Refer to
I
88Nm6 5
Removal steps
1. Brake hose connection
2.Gasket assembly
INSTALLATION SERVICE
FRONT BRAKE ASSEMBLY INSTALLATION
Install the front brake assembly and measure the disc brake
drag torque. (Refer to
INSPECTION
Check the brake disc for damage.
TSB Revision