1988 PONTIAC FIERO belt
[x] Cancel search: beltPage 1167 of 1825
Page
Air Conditioning
Air Delivery
Electronic
.................... 68-0
Manual
....................... 65-0
Blower Controls
Electronic
.................... 66-0
Manual
....................... 63-0
Compressor Controls Electronic
.................... 67-0
Manual
....................... 64-0
................... System Check 62-0
Alarms (Audible)
Chime
......................... 77-0
Antenna(Power) ................... 151-0
Brakes
................. Warning System 41-0
................... Charging system 30-7
...................... Cigar Lighter 114-0
Circuit Breaker Details
PWR ACC Circuit
.......... Breaker 10.1.10.3.10.5.1 1.3
WDO Circuit Breaker
10.1. 10.3. 10.5. 11-4
.......... Component Location Views 201-0
Connectors (Harness Connector Faces) 202-0
el00 .......................... 202-0
............... Junction Block ((2238) 202-2
Coolant Fan
....................... 31-0
Cruise Control
..................... 34-0
Defogger
......................... 61-0
Digital Clock
...................... 150-0
Displays Digital Cluster
.................. 82-0
Coolant Temperature
........... 82-2
Page
......................... Fuel 82-3
................... Oil Pressure 82-2
.................. Speedometer 82-3
................. Door Locks (Power) 130-0
...... Driver Information Center (DIC) 86-0
Engines
... Multi-Port Fuel Injection (VIN S) 20-0
.... Multi-Port Fuel Injection (VIN 8) 23-0
.... Throttle
Body Injection (VIN E) 22-0
...... Tuned
Port Injection (VIN F) 21-0
................. Fuse Block Details 11-0
Fuse Details
........... INST LP 10.0.10.2.10.4.1 1.1
.............. TAIL 10.0.10.2.10.4.1 1.2
................ CRANK 10.0.10.2.1 0.4
.............. CTSY 10~0.10.2.10.4.1 1.2
......... STOP HAZ 10.1.10.3.10.5.1 1.3
............ RADIO 10.1.10.3.10.5.1 1.4
............ WIPER 10.1.10.3.10.5.1 1.4
.................... HATCH 10.2.1 0.4
........... HTR AlC 10.1.10.3.10.5.1 1.4
........... CIH.FAN 10.1.10.3.10.5.1 1.4
......... TURN BIU 10.1.10.3.10.5.1 1.4
............ GAGES 10.1.10.3.10.5.1 1.4
ECM-IGN
(V6 VIN S. V8 VIN F.
........ V8 VIN 8. V8 VIN E) 10.1.1 1.7
............ INJ 1 (V6 VIN S) 10.1.1 1.10
......... FPIINJ 2 (V6 VIN S) 10.1.1 1.10
... INJ 1 (V8 VIN F. V8 VIN 8) 10.3.1 1.11
FPIINJ 2 (V8 VIN F. V8 VIN 8) 10.3.1 1.11
............ CLSTR 10.1.10.3.10.5.1 1.13
............. FPIINJ 2 (V8 VIN E) 11-12
Page
Gages
................... Gages Cluster 81-0
........... Coolant Temperature 81-2
......................... Fuel 81-3
................... Oil Pressure 81-2
.................. Speedometer 81-3
................ Ground Distribution 14-0
Harness Routing Views
............. 203-0
........................... Heater 60-0
............................ Horns 40-0
Indicators
.................. Digital Cluster 82-0
................ Brake Warning 82-4
.................. Fasten Belts 82-1
...................... Hi Beam 82-1
...................... Security 82-1
............ Service Engine Soon 82-4
......................... Shift 82-5
......................... Turn 82-1
................... Gages Cluster 81-0
................ Brake Warning 81-0
.................. Fasten Belts 81-0
...................... Hi Beam 81-0
............ Service Engine Soon 81-0
......................... Shift 81-1
......................... Turn 81-0
Instrument Panel
Digital Cluster
.................. 82-0
Gages Cluster
................... 81-0
............ Interior Lights Dimming 117-0
...................... Introduction 2-0
Lights (Exterior)
........................ Back Up 112-0
...................... Fog 100.3,10 3.0
Page 1303 of 1825
STARTER AND CHARGING SYSTEM
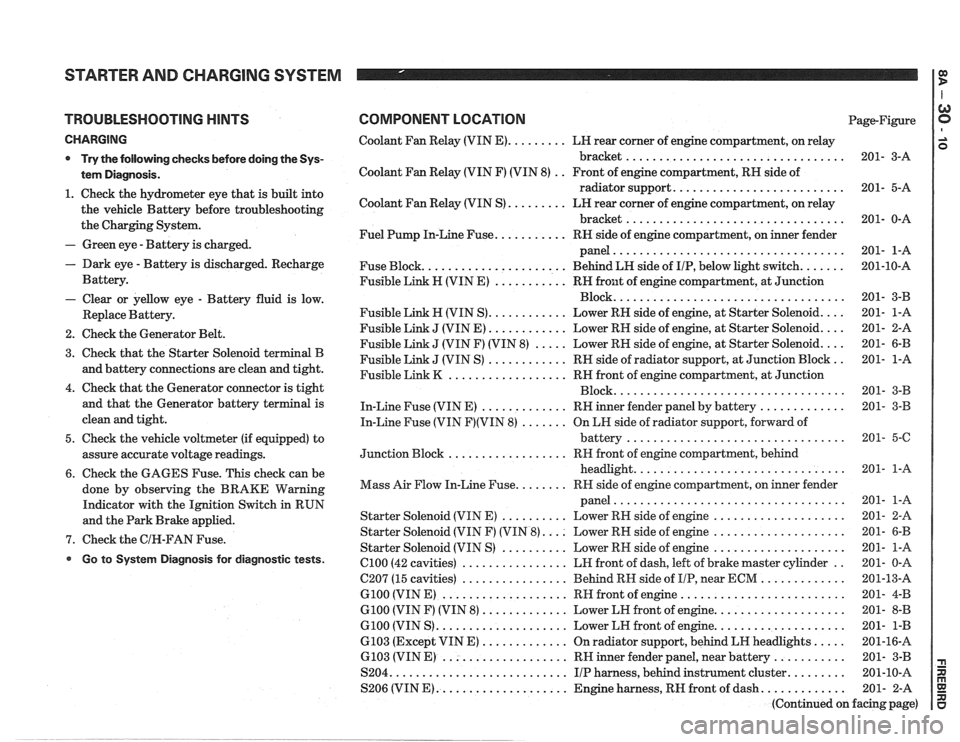
TROUBLESHOOTING HINTS
CHARGING
* Try the following checks before doing the Sys-
tem Diagnosis
.
1 . Check the hydrometer eye that is built into
the vehicle Battery before troubleshooting
the Charging System
.
- Green eye . Battery is charged .
. Dark eye . Battery is discharged . Recharge
Battery
.
- Clear or yellow eye . Battery fluid is low .
Replace Battery .
2 . Check the Generator Belt .
3 . Check that the Starter Solenoid terminal B
and battery connections are clean and tight
.
4 . Check that the Generator connector is tight
and that the Generator battery terminal is
clean and tight
.
5 . Check the vehicle voltmeter (if equipped) to
assure accurate voltage readings
.
6 . Check the GAGES Fuse . This check can be
done by observing the BRAKE Warning
Indicator with the Ignition Switch in RUN
and the Park Brake applied
.
7 . Check the GIN-FAN Fuse .
Go to System Diagnosis for diagnostic tests .
COMPONENT LOCATION Page-Figure
Coolant Fan Relay (VIN
E) ......... LH rear corner of engine compartment. on relay
bracket
................................. 201- 3-A
Coolant Fan Relay (VIN F) (VIN 8)
. . Front of engine compartment. RH side of
radiator support
.......................... 201- 5-A
Coolant Fan Relay (VIN S)
......... LN rear corner of engine compartment. on relay
bracket
................................. 201- 0-A
Fuel Pump In-Line Fuse
........... RH side of engine compartment. on inner fender
panel
................................... 201- 1-A
Fuse Block
...................... Behind LN side of IIP. below light switch ....... 201-10-A
Fusible Link H (VIN E)
........... RH front of engine compartment. at Junction
................................... Block 201- 3-B
Fusible Link
H (VIN S) ............ Lower RN side of engine. at Starter Solenoid .... 201- 1-A
Fusible Link
J (VIN E) ............ Lower RH side of engine. at Starter Solenoid .... 201- 2-A
Fusible Link
J (VIN F) (VIN 8) ..... Lower RH side of engine. at Starter Solenoid .... 201- 6-B
Fusible Link
J (VIN S) ............ RH side of radiator support. at Junction Block .. 201- 1-A
Fusible Link
K .................. RH front of engine compartment. at Junction
................................... Block 201- 3-B
In-Line Fuse (VIN E)
............. RH inner fender panel by battery ............. 201- 3-B
In-Line Fuse (VIN
F)(VIN 8) ....... On LH side of radiator support. forward of
................................. battery 201- 5-6
.................. Junction Block RH
front of engine compartment. behind
................................ headlight 201- 1-A
........ Mass Air Flow In-Line Fuse RR side of engine compartment. on inner fender
................................... panel 201- 1-A
Starter Solenoid (VIN E)
.......... Lower RH side of engine .................... 201- 2-A
Starter Solenoid (VIN F) (VIN
8) .... Lower RH side of engine .................... 201- 6-B
Starter Solenoid (VIN S)
.......... Lower RN side of engine .................... 201- 1-A
el00 (42 cavities) ................ LH front of dash. left of brake master cylinder .. 201- 0-A
C207 (15 cavities)
................ Behind RH side of IIP. near ECM ............. 201-13-A
G100 (VIN E) ................... RH front of engine ......................... 201- 4-B
G100 (VIN F) (VIN 8) ............. Lower LH front of engine .................... 201- 8-B
G100 (VIN S) .................... Lower LH front of engine .................... 201- 1-B
6103 (Except VIN E) ............. On radiator support. behind LH headlights ..... 201-16-A
6.103 (VIN E) ................... RH inner fender panel. near battery ........... 201- 3-B
S204
........................... IIP harness. behind instrument cluster ......... 201-10-A
S206 (VIN
E) .................... Engine harness. RH front of dash ............. 201- 2-A
(Continued on facing page)
Page 1363 of 1825
AIR CONDITIONING: COMPRESSOR CONTROLS
C60, MANUAL
(Continued from previous page)
lSOLATlON TEST (TABLE 2)
Connect: JUMPER
At: PRESSURE CYCLING SWITCH
CONNECTOR (Disconnected)
Conditions:
lgnition Switch: RUN
(Engine need not be running)
0 AIC Mode: NORM
r Temperamre Outside Car: Above 60°F
Jumper I Correct Action I For Diagnosis I Between
B (LT GRN) & Clutch
A (LT BLU) engages Do
Test A
0 If action is correct but AIC Compressor
Clutch does not engage under normal
operating conditions, refer to Section
1B
for procedure to check refrigerant pres-
sure.
0 If refrigerant pressure is normal, replace
the Pressure Cycling Switch.
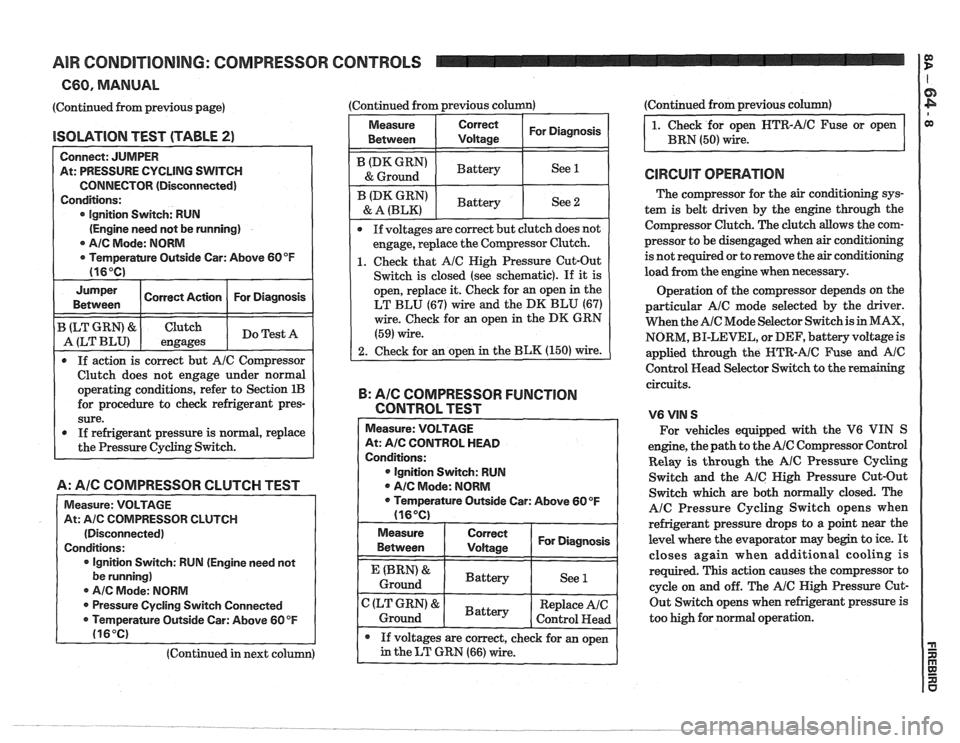
A: A/C COMPRESSOR CLUTCH TEST
Measure: VOLTAGE
At:
Ale COlVlPRESSOR CLUTCH
(Disconnected)
Conditions:
lgnition Switch:
RUN (Engine need not
be running)
0 A/C Mode: NORM
@ Pressure Cycling Switch Connected
0 Temperature Outside Car: Above 60 OF
(16°C)
(Continued in next column) (Continued
from previous column) (Continued
from previous column)
Measure
Between Correct I For Diagnosis I 1. Check for open HTR-AIC Fuse or open
BRN
(50) wire.
I (DK GRN' I Battery I See 1 I & Ground
@ If voltages are correct but clutch does not
engage, replace the Compressor Clutch.
1. Check that Ale Nigh Pressure Cut-Out
Switch is closed (see schematic).
If it is
open, replace it. Check for an open in the
LT BLU (67) wire and the DK BLU (67)
wire. Check for an open in the DK GRN
(59) wire.
2. Check for an open in the BLK (150) wire.
ID* GRN)
& A (BLK)
B: AIG COMPRESSOR FUNCTION
CONTROL TEST - -
Measure: VOLTAGE
At:
A/C CONTROL HEAD
Conditions:
@ Ignition Switch: RUN
@ AIC Mode: NORM
0 Temperature Outside Car: Above 60OF
(16OC)
Battery
Measure
Between
I ~~~~~~ I For Diagnosis I
See 2
(BRN' &
Ground
If voltages are correct, check for an open
in the LT GRN (66) wire.
C (LT GRN) &
Ground The
compressor for the
air conditioning sys-
tem is belt driven by the engine through the
Compressor Clutch. The clutch allows the com-
pressor to be disengaged when
air conditioning
is not required or to remove the
air conditioning
load from the engine when necessary.
-
Battery Operation
of the compressor depends on the
particular
AIC mode selected by the driver.
When the
AIC Mode Selector Switch is in MAX,
NORM, BI-LEVEL, or DEF, battery voltage is
applied through the
HTR-AIC Fuse and Ale
Control Head Selector Switch to the remaining
circuits.
See
1
Battery
V6VIN S
For vehicles equipped with the V6 VIN S
engine, the path to the
AIC Compressor Control
Relay
is through the AIC Pressure Cycling
Switch and the
AIC Nigh Pressure Cut-Out
Switch which are both normally closed. The
AlC Pressure Cycling Switch opens when
refrigerant pressure drops to a point near the
level where the evaporator may begin to ice.
It
closes again when additional cooling is
required. This action causes the compressor to
cycle on and off. The
AIC High Pressure Cut-
Out Switch opens when refrigerant pressure is
too high for normal operation.
Replace AIC
Control
Head
Page 1386 of 1825
AIR CONDITIONING: COMPRESSOR CONTROLS
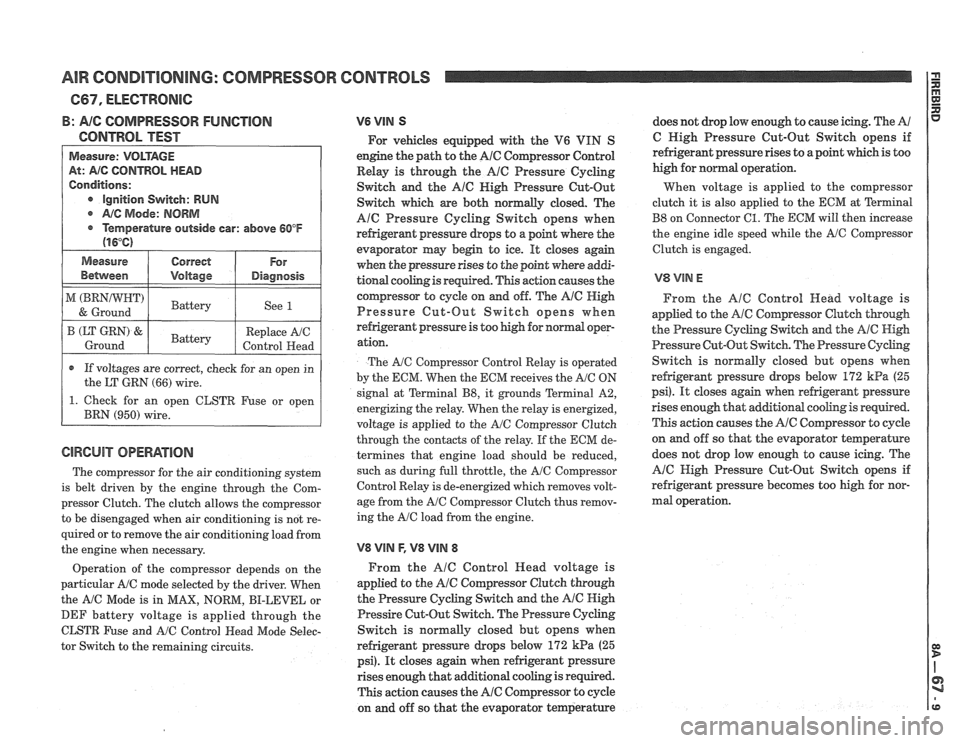
B: AIG COMPRESSOR FUNGTlON
CONTROL TEST
Measure: VOLTAGE
At: AIG CONTROL HEAD
Conditions:
e Ignition Switch: RUN
@ A/C Mode: NORM
@ Temperature outside car: above 60°F
(16°C)
1 Measure I Correct 1 For 1
Between I Voltage I Diagnosis I
1 ) 1 Battery 1 See 1 I
r If voltages are correct, check for an open in
the LT
GRN (66) wire.
B (LT GRN) &.
Ground
1. Check for an open CLSTR Fuse or open
BRN
(950) wire.
The compressor for the air conditioning system
is belt driven by the engine through the Com-
pressor Clutch. The clutch allows the compressor
to be disengaged when air conditioning is not re-
Battery
quired or to remove the air conditioning load from
the engine when necessary. Replace
A/C
Control Head
Operation of the compressor depends on the
particular A/C mode selected by the driver. When
the
A/C Mode is in MAX, NORM, BI-LEVEL or
DEF battery voltage is applied through the
CLSTR Fuse and
A/C Control Head Mode Selec-
tor Switch to the remaining circuits.
V6 VIN S
For vehicles equipped with the V6 VIN S
engine the path to the
A/C Compressor Control
Relay is through the
AlC Pressure Cycling
Switch and the
A16 Nigh Pressure Cut-Out
Switch which are both normally closed. The
Ale Pressure Cycling Switch opens when
refrigerant pressure drops to a point where the
evaporator may begin to ice.
It closes again
when the pressure rises to the point where
addi-
tional cooling is required. This action causes the
compressor to cycle on and off. The
Ale High
Pressure Cut-Out Switch opens when
refrigerant pressure is too high for
nomd oopr-
ation.
The AIC Compressor Control Relay is operated
by the EGM. When the ECM receives the
A/C ON
signal at Terminal
B8, it grounds Terminal A2,
energizing the relay. When the relay is energized,
voltage is applied to the
A/C Compressor Clutch
through the contacts of the relay. If the ECM de-
termines that engine load should be reduced,
such as during full throttle, the
A/C Compressor
Control Relay is de-energized which removes volt-
age from the
A/C Compressor Clutch thus remov-
ing the
A/C load from the engine.
V8 VlN F, V8 VllU 8
From the AlC Control Head voltage is
applied to the
A/@ Cornpressor Clutch through
the Pressure Cycling Switch and the
A/@ High
Pressire Cut-Out Switch. The Pressure Cycling
Switch is normally closed but opens when
refrigerant pressure drops below
172 kPa (25
psi). It closes again when refrigerant pressure
rises enough that additional cooling is required.
This action causes the
A/C Compressor to cycle
on and off so that the evaporator temperature does
not drop low enough to cause icing. The
A/
C High Pressure Cut-Out Switch opens if
refrigerant pressure rises to a point which is too
high for normal operation.
When voltage is applied to the compressor
clutch it is also applied to the ECM at
Terminal
B8 on Connector 61. The ECM will then increase
the engine idle speed while the
A/G Compressor
Clutch is engaged.
From the
AlC Control Head voltage is
applied to the
A/C Compressor Clutch though
the Pressure Cycling Switch and the AIC High
Pressure Cut-Out Switch. The Pressure
Cychg
Switch is normally closed but opens when
refrigerant pressure
drops below 172 kPa (25
psi). It closes again when refrigerant pressure
rises enough that
additional cooling is required.
This action causes the
A/C Compressor to cyde
on and off so that the evaporator teqerature
does not drop low enough to cause icing. The
A/C High Pressure Cut-Out Switch opens if
refrigerant pressure becomes too high for nor-
mal operation.
Page 1394 of 1825
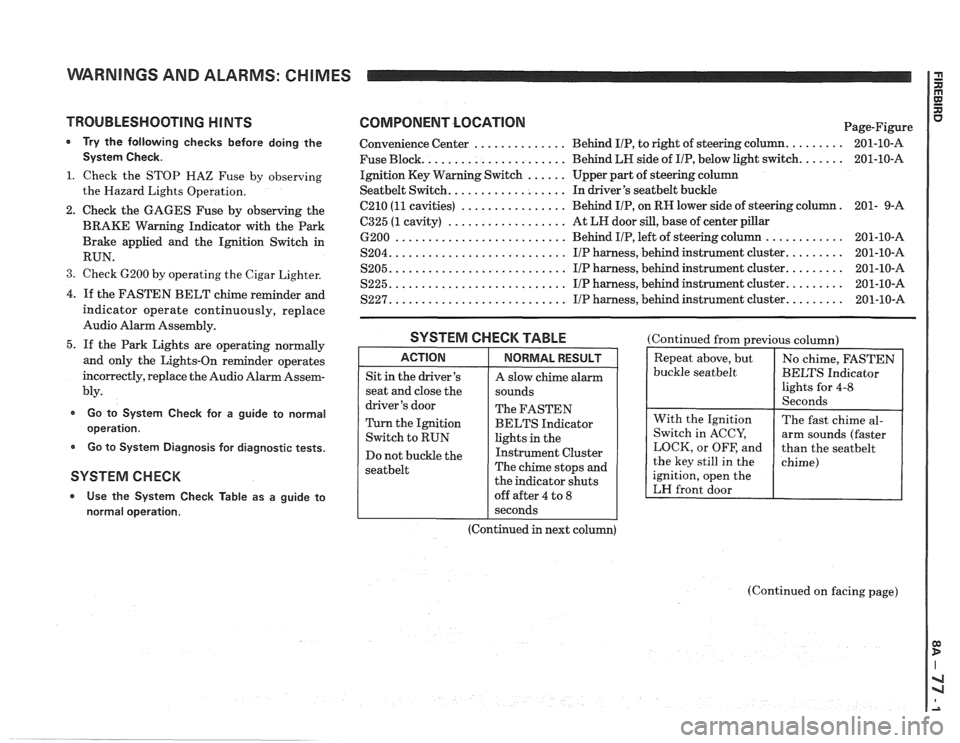
WARNINGS AND ALARMS: CHIMES
TROUBLESHOOTING H lNTS
* Try the following checks before doing the
System Check.
1. Check the STOP HAZ Fuse by observing
the Hazard Lights Operation.
2. Check the GAGES Fuse by observing the
BRAKE Warning Indicator with the Park
Brake applied and the Ignition Switch in
RUN.
3. Check 6200 by operating the Cigar Lighter.
4. If the FASTEN BELT chime reminder and
indicator operate continuously, replace
Audio Alarm Assembly.
5. If the Park Lights are operating normally
and only the Lights-On reminder operates
incorrectly, replace the Audio Alarm Assem-
bly.
Go to System Check for a guide to normal
operation.
Go to System Diagnosis for diagnostic tests.
SYSTEM CHECK
* Use the System Check Table as a guide to
normal operation.
COMPONENT LOCATlON Page-Figure
Convenience Center
.............. Behind IIP, to right of steering column. ........ 201-10-A
Fuse Block.
..................... Behind LH side of IIP, below light switch. ...... 201-10-A
Ignition Key Warning Switch
...... Upper part of steering column
Seatbelt Switch. ................. In driver's seatbelt buckle
C210
(11 cavities) ................ Behind IIP, on RH lower side of steering column. 201-
9-A
6325 (1 cavity) .................. At LH door sill, base of center pillar
6200 .......................... Behind IIP, left of steering column ............ 201-10-A
S204. .......................... IIP harness, behind instrument cluster. ........ 201-10-A
S205. .......................... IIP harness, behind instrument cluster. ........ 201-10-A
S225. .......................... I/P harness, behind instrument cluster. ........ 201-10-A
S227. .......................... IIP harness, behind instrument cluster. ........ 201-10-A
SYSTEM CHECK TABLE
ACTION
Sit in the driver's
seat and close the
driver's door
Turn the Ignition
Switch to RUN
Do not buckle the
seatbelt
NORMAL RESULT
A slow chime alarm
sounds
The FASTEN
BELTS Indicator
lights in the
Instrument Cluster
The chime stops and
the indicator shuts
off after 4 to
8
(Continued from previous column)
buckle
seatbelt
ignition, open the
LH front door
I seconds
(Continued in next column)
(Continued on facing page)
Page 1395 of 1825
WARNINGS AND ALARMS: CHIMES I
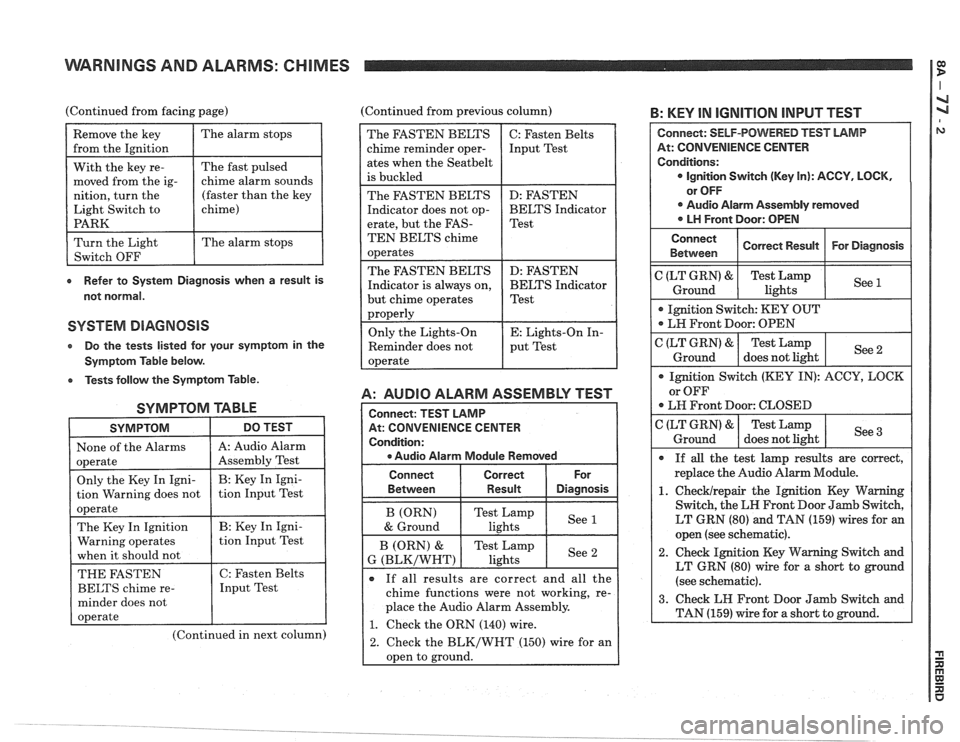
(Continued from facing page) (Continued from previous column) B: KEY IN IGNITION INPUT TEST
e Refer to System Diagnosis when a result is
not normal.
SYSTEM DIAGNOSIS
Do the tests listed lor your symptom in the
Symptom Table below.
e Tests follow the Symptom Table.
SYMPTOM TABLE
SYMPTOM DO TEST I
1 None of the Alarms 1 A: Audio Alarm I
(Continued in next column)
A: AUDIO ALARM ASSEMBLY TEST
At: CONVENIENCE CENTER
e Audio Alarm Module Removed
The FASTEN BELTS
chime reminder oper-
ates when the
Seatbelt
is buckled
The FASTEN BELTS
Indicator does not op-
erate, but the
FAS-
TEN BELTS chime
operates
The FASTEN BELTS
Indicator is always on,
but chime operates
properly
Only the Lights-On
Reminder does not
operate
Connect Correct
Between
I Result Diasnosis
C: Fasten Belts
Input Test
D: FASTEN
BELTS Indicator
Test
D: FASTEN
BELTS Indicator
Test
E: Lights-On In-
put Test
If all results are correct and all the
chime functions were not working, re-
place the Audio Alarm Assembly.
1. Check the ORN (140) wire.
2. Check the BLK/WHT (150) wire for an
oDen to ground.
At: CONVENIENCE CENTER
LT GRN (80) and TAN (159) wires for an
open (see schematic).
2. Check Ignition Key Warning Switch and
LT GRN (80) wire for a short to ground
(see schematic).
Page 1396 of 1825
WARNINGS AND ALARMS: CHIMES
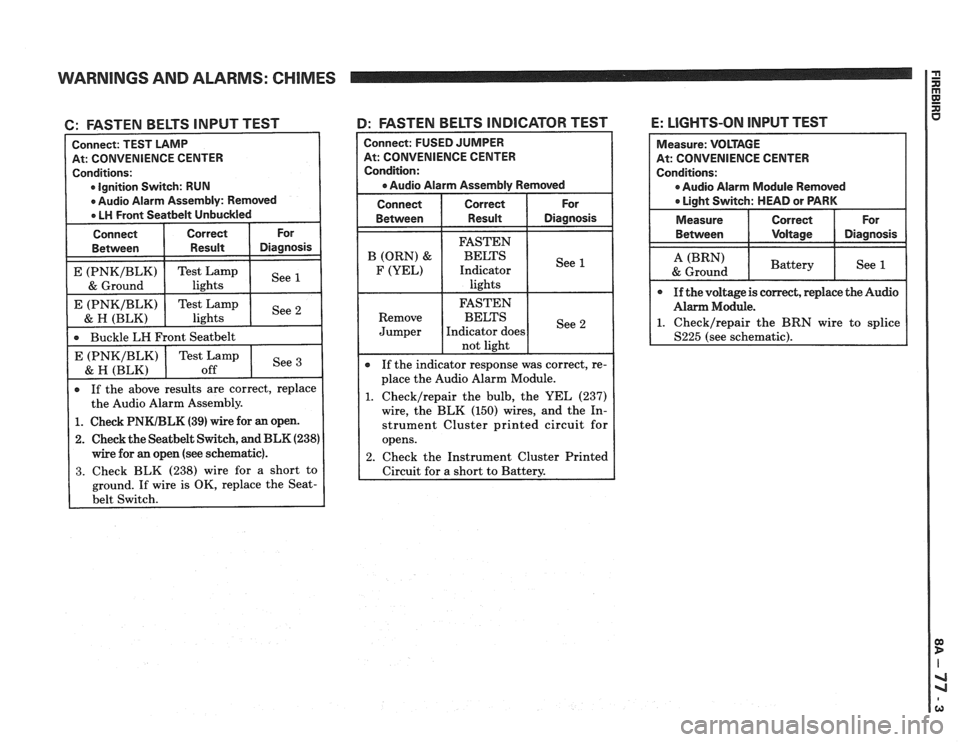
6: FASTEN BELTS INPUT TEST
At: CONVENIENCE CENTER
Ignition Switch: RUN
If the above results are correct, replace
the Audio Alarm Assembly.
Buckle
LH Front
Seatbelt
1. Check PNKIBLK (39) wire for an open.
2. Check the Seatbelt Switch, and BLK (238)
wire for an open (see schematic).
3. Check BLK (238) wire for a short to
ground. If wire is OK, replace the
Seat-
4: FASTEN BELTS INDICATOR TEST
See E (PNKIBLK)
& H (BLK)
Connect: FUSED JUMPER
At: CONVENIENCE CENTER
Condition:
a Audio Alarm Assembly Removed
Connect Correct For
Between Result Diagnosis
Test Lamp
off If
the indicator response was correct, re-
place the Audio Alarm Module.
1. Checklrepair the bulb, the YEL (237)
wire, the BLK (150) wires, and the In-
strument Cluster printed circuit for
opens.
2. Check the Instrument Cluster Printed
Circuit for
a short to Battery.
E: LIGHTS-ON INPUT TEST
At: CONVENIENCE CENTER
0 Audio Alarm Module Removed
Page 1397 of 1825
WARNINGS AND ALARMS: CHIMES
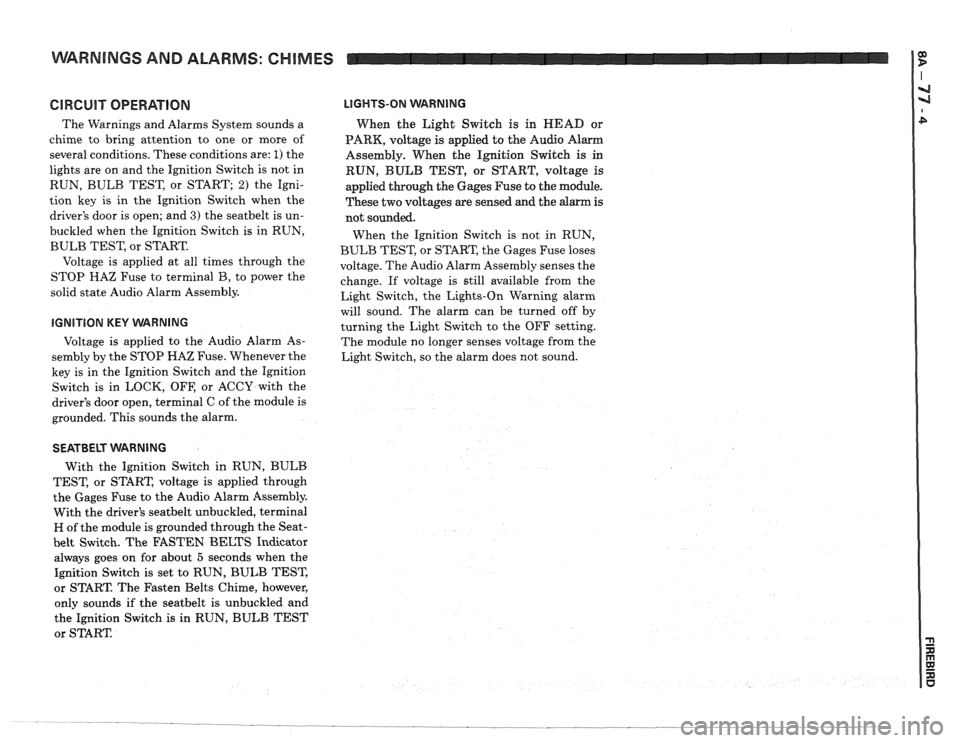
GlRGUlT OPERATION
The Warnings and Alarms System sounds a
chime to bring attention to one or more of
several conditions. These conditions are:
1) the
lights are on and the Ignition Switch is not in
RUN, BULB TEST, or START;
2) the Igni-
tion key is in the Ignition Switch when the
driver's door is open; and
3) the seatbelt is un-
buckled when the Ignition Switch is in RUN,
BULB TEST, or START.
Voltage is applied at all times through the
STOP
HAZ Fuse to terminal B, to power the
solid state Audio Alarm Assembly.
IGNITION KEY VVARNING
Voltage is applied to the Audio Alarm As-
sembly by the STOP HAZ Fuse. Whenever the
key is in the Ignition Switch and the Ignition
Switch is in LOCK, OFF, or ACCY with the
driver's door open, terminal C of the module is
grounded. This sounds the alarm.
LIGHTS-ON WARNING
When the Light Switch is in HEAD or
PARK, voltage
is applied to the Audio Alarm
Assembly. When the Ignition Switch
is in
RUN, BULB TEST, or START, voltage is
applied through the Gages Fuse to the module.
These two voltages are sensed and the alarm is
not sounded.
When the Ignition Switch is not in RUN,
BULB TEST, or START, the Gages Fuse loses
voltage. The Audio Alarm Assembly senses the
change. If voltage is still available from the
Light Switch, the Lights-On Warning alarm
will sound. The alarm can be turned off by
turning the Light Switch to the OFF setting.
The module no longer senses voltage from the
Light Switch, so the alarm does not sound.
SEATBELT WARNING
With the Ignition Switch in RUN, BULB
TEST, or START, voltage is applied through
the Gages Fuse to the Audio Alarm Assembly.
With the driver's
seatbelt unbuckled, terminal
H of the module is grounded through the Seat-
belt Switch. The FASTEN BELTS Indicator
always goes on for about
5 seconds when the
Ignition Switch is set to RUN, BULB TEST,
or START. The Fasten Belts Chime, however,
only sounds if the
seatbelt is unbuckled and
the Ignition Switch
is in RUN, BULB TEST
or START