Page 832 of 2389

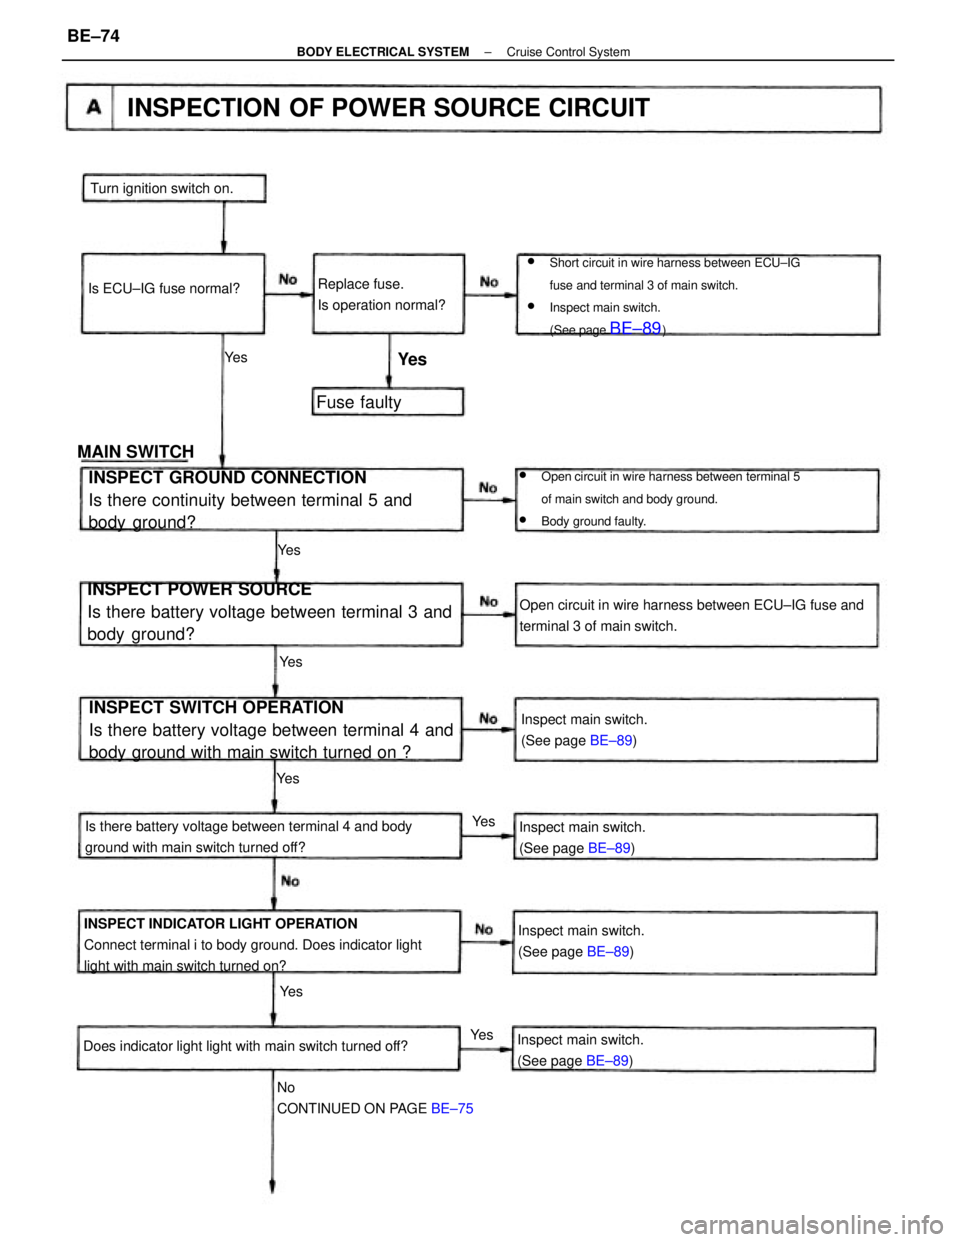
wShort circuit in wire harness between ECU±IG
fuse and terminal 3 of main switch.
wInspect main switch.
(See page
BE±89)
INSPECT SWITCH OPERATION
Is there battery voltage between terminal 4 and
body ground with main switch turned on ? INSPECT POWER SOURCE
Is there battery voltage between terminal 3 and
body ground?
INSPECT INDICATOR LIGHT OPERATION
Connect terminal i to body ground. Does indicator light
light with main switch turned on?
wOpen circuit in wire harness between terminal 5
of main switch and body ground.
wBody ground faulty.
INSPECT GROUND CONNECTION
Is there continuity between terminal 5 and
body ground?
Is there battery voltage between terminal 4 and body
ground with main switch turned off?Open circuit in wire harness between ECU±IG fuse and
terminal 3 of main switch.
INSPECTION OF POWER SOURCE CIRCUIT
No
CONTINUED ON PAGE BE±75 Does indicator light light with main switch turned off?Inspect main switch.
(See page BE±89) Inspect main switch.
(See page BE±89)
Inspect main switch.
(See page BE±89)
Inspect main switch.
(See page BE±89) Replace fuse.
Is operation normal? Turn ignition switch on.
Is ECU±IG fuse normal?
MAIN SWITCHFuse faulty
Ye s Ye s
Ye s Ye s
Ye s
Ye s
Ye s
Ye s
± BODY ELECTRICAL SYSTEMCruise Control SystemBE±74
Page 833 of 2389

wOpen circuit in wire harness betweeh terminal 13 and body
ground.
wBody ground faulty.
INSPECT INDICATOR LIGHT CIRCUIT
Connect terminal 3 to body ground.
Does indicator light light with main switch turned on?
INSPECT GROUND CONNECTION.
Is there continuity between terminal 13 and
body ground?
INSPECT POWER SOURCE
Is there battery voltage between terminal 10 and body
ground with main switch turned on?
Disconnect connector from control switch.
Is there continuity between terminal 3 and body
ground?Open circuit in wire harness between terminal 3
of computer and terminal 1 of main switch. Open circuit in wire harness between terminal 10
of computer and terminal 4 of main switch.
Short circuit in wire harness between terminal 3
of computer and terminal 1 of main switch. Disconnect connector from computer and inspect
connector on wire harness side as follows.
CONTINUED ON PAGE BE±74
Replace computer.
COMPUTER
Ye s Ye s Ye s
Ye s
± BODY ELECTRICAL SYSTEMCruise Control SystemBE±75
Page 839 of 2389

INSPECT GROUND CONNECTION
Disconnect connector from stop light switch.
Is there continuity between terminal 3 of wire
harness side connector and body ground?wOpen circuit in wire harness between terminal 3
and body ground.
wBody ground faulty.
INSPECT STOP LIGHT SWITCH OPERATION
Is stop light switch operation normal?
(See page BE±89)
INSPECT STOP FUSE CIRCUIT
Is there battery voltage between terminal 16 and body
ground with brake pedal released?
INSPECT STOP LIGHT SWITCH CIRCUIT
Is there battery voltage between terminal 15 and body
ground with brake pedal depressed?Short circuit in wire harness between terminal
16 of computer or terminal 1 of stop light
switch and fuse.
Open circuit in wire harness between terminal 16 of
computer and STOP fuse.
Open circuit in wire harness between terminal 15 of
computer and terminal 3 of stop light switch. Disconnect connector from computer and inspect
connector on wire harness side as follows.
INSPECTION OF STOP LIGHT SWITCH CIRCUIT
Connect connector to stop light switch.Replace fuse.
Is operation normal?
Replace stop light switch. Turn ignition switch off.
Is STOP fuse normal?
Replace computer.
STOP LIGHT SW
COMPUTER
Fuse faulty. Ye s
Ye sYe s Ye s
Ye sYe s
± BODY ELECTRICAL SYSTEMCruise Control SystemBE±81
Page 840 of 2389

INSPECT PARKING BRAKE SWITCH OPERATION
Disconnect connector from parking brake switch.
Is parking brake switch operation normal? (See page
BE±90) INSPECT GROUND CONNECTION
Disconnect connector from brake level warning switch.
Is there continuity between terminal 2 of wire harness side
connector and body gronud?
Short circuit in wire harness between terminal 12 of
computer and terminal 1 of parking brake switch,
terminal 1 of brake fluid level warning switch or terminal
2 of alternator. INSPECT BRAKE WARNING SWITCH
Is brake fluid level warning switch operation nomal?
(See page BE±38)
wOpen circuit in wire harness between terminal 2
and body ground.
wBody ground faulty.
INSPECTION OF PARKING BRAKE SWITCH CIRCUIT
Is there no voltage between terminal 12 and body ground
with parking brake pulled up?
!s there battery voltage between terminal 12 and body
ground with parking brake released? Disconnect connector from computer and inspect connector
on wire harness side as follows.
Open circuit in wire harness between terminal 12 of
computer and terminal of parking brake switch. INSPECT ALTERNATOR OPERATION
is alternator operation normal? (See page CH±4)
Remove CHARGE fuse and ignition switch tuned on. Connect the connector to brake warning switch.
Connect connector to parking brake switch.
BRAKE FLUID LEVEL
WARNING SWITCH
Replace brake warning switch.
Replace parking brake switch.
PARKING BRAKE SWITCH
Turn ignition switch off.
Replace computer.Replace alternator.
ALTERNATOR
COMPUTER
Ye s
Ye s Ye s
Ye s Ye sYe s
± BODY ELECTRICAL SYSTEMCruise Control SystemBE±82
Page 846 of 2389

Cruise Control Computer Circuit
INSPECTION OF COMPUTER CIRCUIT
Disconnect the computer and inspect the connector on
wire harness side as shown in the below.
Remove CHARGE fuse and
ignition switch turned on with
parking brake lever released. Clutch pedal released or shifted
into only range except
ºNº and ºPº range
Remove CHARGE fuse and
ignition switch turned on with
parking brake lever pulled up.
Apply vacuum approx. 170
mmHg (fi.69 in.Hg, 22.7 kPa)Turn ignition switch and main
switch on
Turn ignition switch and main
switch off
Turn ignition switch and main
switch off Turn ignition switch and main
switch on
Clutch pedal depressed or
shifted into ºNº range Clutch Switch
(M/T) or Neutral
Start Switch (A/T)1 pulse each 44 cm
(15.75 in.) Stop Light Switch
and Release Valve
Turn resume/accel switch offTurn resume/accel switch on Control Switch
(indicator circuit)
Connection or
measure rtem
Turn set/coast switch off Turn set/coast switch on
Control Switch
(resunne/accel)Control Switch
(set/coast)
Vehicle moving slowlyBrake pedal depressed
Parking Brake
SwitchBrake pedal releasedBrake pedal released
10 ± Body ground
13 ± Body ground16 ± Body ground
17 ± Body ground
12 ± Body ground11 ± Body ground15 ± Body ground Tester connection
Stop Light Switch
3 ± Body ground
5 ± Body ground
7 ± Body ground
1 ± Body ground 9 ± Body groundBattery voltageSpecified value
Battery voltage
Battery voltageBattery voltage
Battery voltage No continuity
Vacuum SwitchControl Switch
Vacuum PumpNo continuity Approx. 68�
Speed Sensor
No continuity Approx. 30�
No continuity
Body GroundControl Valve
No voltageNo voltage
Continuity
Continuity ContinuityContinuity Resistance
ContinuityContinuity
Continuity Continuity
ContinuityNo voltage
No vacuum
ContinuityContinuityContinuity
ContinuityNo vohage
Condition
Resistance Stop FuseCheck for
VoltageVoltage Voltage
Voltage
Voltage4±142±14
± BODY ELECTRICAL SYSTEMCruise Control SystemBE±88
Page 847 of 2389
Main Switch
INSPECTION OF MAIN SWITCH
INSPECT SWITCH CONTINUITY
(a) Connect the positive (+) lead from the battery to
terminal 3 and the negative () lead to terminal 5.
(b) Check that there is continuity b¿¿ween terminals 3
and 4 with the main switch pushed on.
Stop Light Switch
INSPECTION OF SWITCH
INSPECT SWITCH CONTINUITY
Inspect the switch continuity between terminals.
Control Switch
INSPECTION OF SWITCH
INSPECT SWITCH CONTINUITY
Inspect the switch continuity between terminals.(c) Check that there is no continuity between terminals 3
and 4 with the main switch pushed off.
If continuity is not as specified, replace the switch.
If continuity is not as specified, replace the switch.
If continuity is not as specified, replace the switch.
Switch free
(Brake pedal depressed)
Switch pin pushed
(Brake pedal released)RESUME/ACCEL Switch position
Switch positionSET/COAST
Terminal Terminal
OFF
± BODY ELECTRICAL SYSTEMCruise Control SystemBE±89
Page 849 of 2389

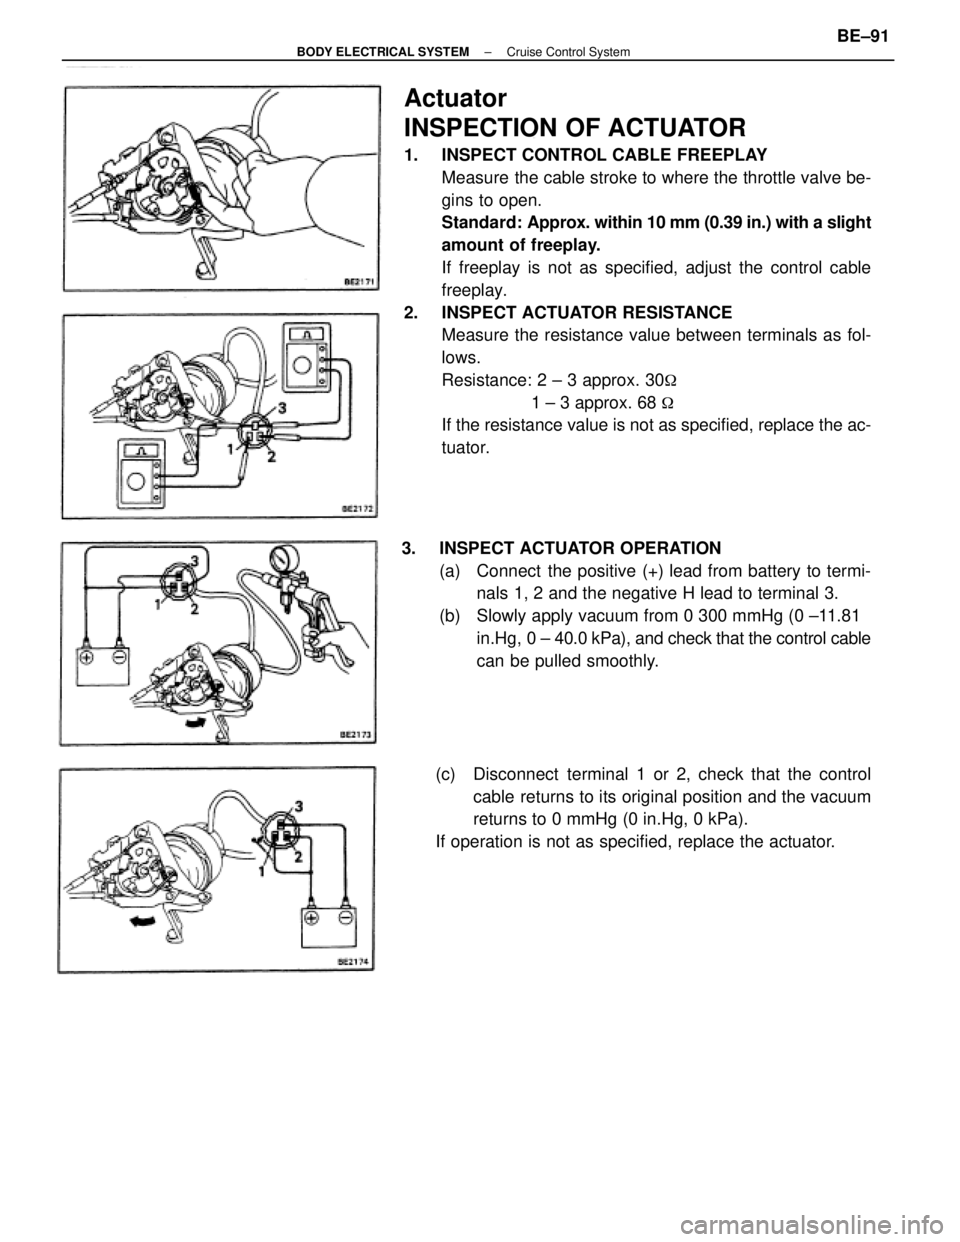
Actuator
INSPECTION OF ACTUATOR
1. INSPECT CONTROL CABLE FREEPLAY
Measure the cable stroke to where the throttle valve be-
gins to open.
Standard: Approx. within 10 mm (0.39 in.) with a slight
amount of freeplay.
If freeplay is not as specified, adjust the control cable
freeplay.
2. INSPECT ACTUATOR RESISTANCE
Measure the resistance value between terminals as fol-
lows.
Resistance: 2 ± 3 approx. 30
�
1 ± 3 approx. 68 �
If the resistance value is not as specified, replace the ac-
tuator.
3. INSPECT ACTUATOR OPERATION
(a) Connect the positive (+) lead from battery to termi-
nals 1, 2 and the negative H lead to terminal 3.
(b) Slowly apply vacuum from 0 300 mmHg (0 ±11.81
in.Hg, 0 ± 40.0 kPa), and check that the control cable
can be pulled smoothly.
(c) Disconnect terminal 1 or 2, check that the control
cable returns to its original position and the vacuum
returns to 0 mmHg (0 in.Hg, 0 kPa).
If operation is not as specified, replace the actuator.
± BODY ELECTRICAL SYSTEMCruise Control SystemBE±91
Page 850 of 2389

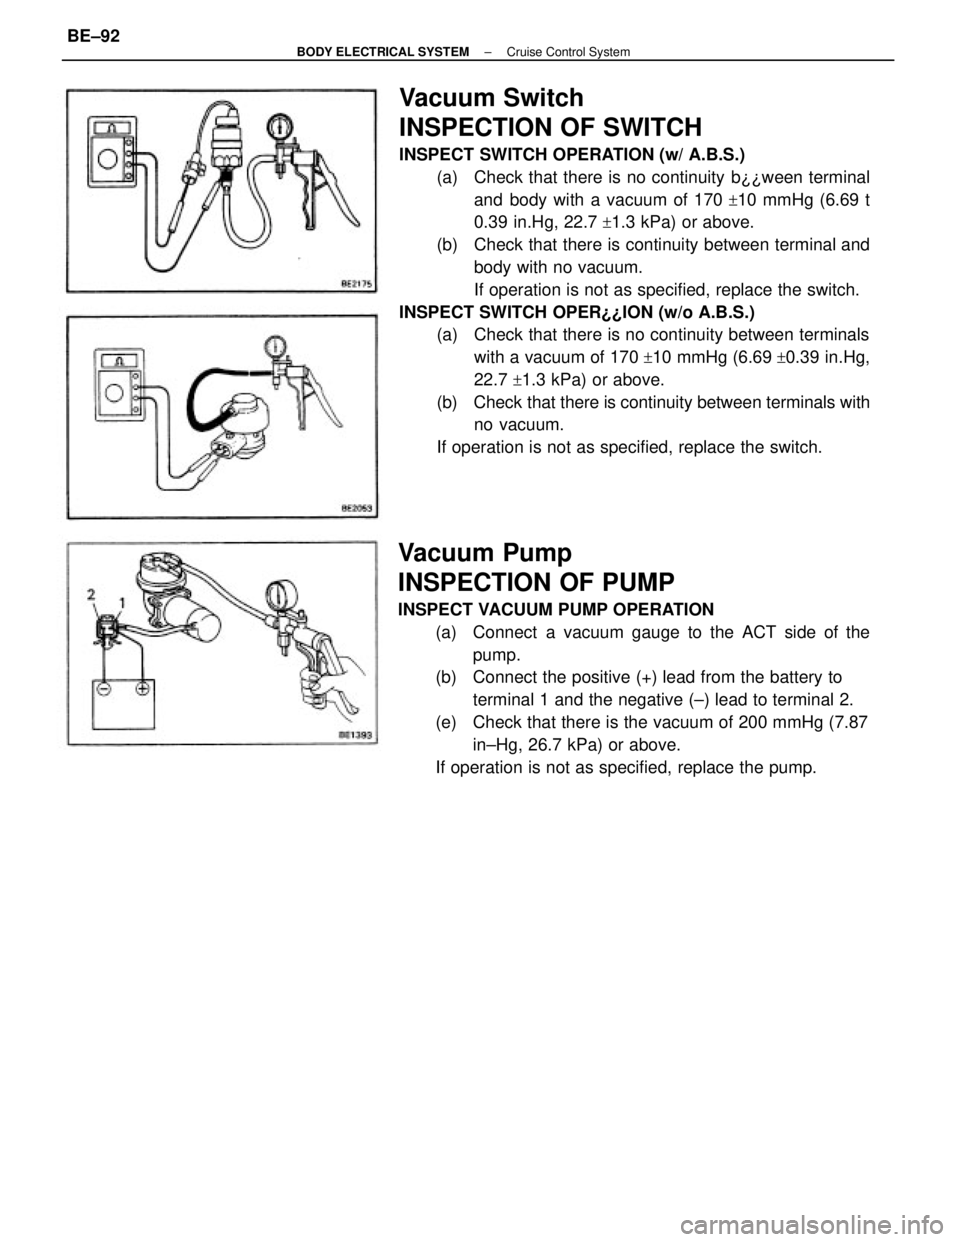
Vacuum Switch
INSPECTION OF SWITCH
INSPECT SWITCH OPERATION (w/ A.B.S.)
(a) Check that there is no continuity b¿¿ween terminal
and body with a vacuum of 170
+10 mmHg (6.69 t
0.39 in.Hg, 22.7
+1.3 kPa) or above.
(b) Check that there is continuity between terminal and
body with no vacuum.
If operation is not as specified, replace the switch.
INSPECT SWITCH OPER¿¿ION (w/o A.B.S.)
(a) Check that there is no continuity between terminals
with a vacuum of 170
+10 mmHg (6.69 +0.39 in.Hg,
22.7
+1.3 kPa) or above.
(b) Check that there is continuity between terminals with
no vacuum.
If operation is not as specified, replace the switch.
Vacuum Pump
INSPECTION OF PUMP
INSPECT VACUUM PUMP OPERATION
(a) Connect a vacuum gauge to the ACT side of the
pump.
(b) Connect the positive (+) lead from the battery to
terminal 1 and the negative (±) lead to terminal 2.
(e) Check that there is the vacuum of 200 mmHg (7.87
in±Hg, 26.7 kPa) or above.
If operation is not as specified, replace the pump.
± BODY ELECTRICAL SYSTEMCruise Control SystemBE±92