1986 TOYOTA CAMRY V20 power steering fluid
[x] Cancel search: power steering fluidPage 1915 of 2389
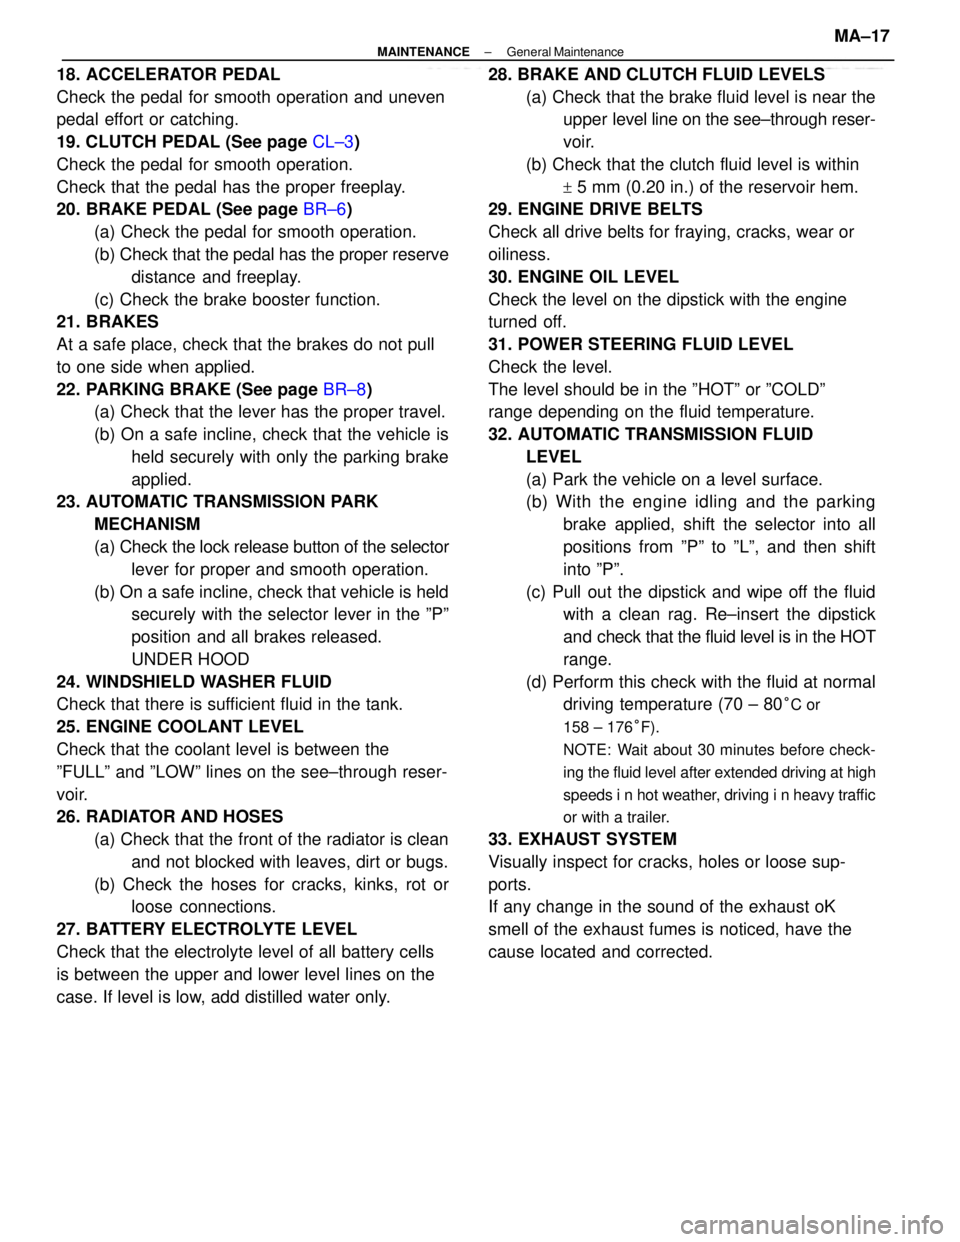
18. ACCELERATOR PEDAL
Check the pedal for smooth operation and uneven
pedal effort or catching.
19. CLUTCH PEDAL (See page CL±3)
Check the pedal for smooth operation.
Check that the pedal has the proper freeplay.
20. BRAKE PEDAL (See page BR±6)
(a) Check the pedal for smooth operation.
(b) Check that the pedal has the proper reserve
distance and freeplay.
(c) Check the brake booster function.
21. BRAKES
At a safe place, check that the brakes do not pull
to one side when applied.
22. PARKING BRAKE (See page BR±8)
(a) Check that the lever has the proper travel.
(b) On a safe incline, check that the vehicle is
held securely with only the parking brake
applied.
23. AUTOMATIC TRANSMISSION PARK
MECHANISM
(a) Check the lock release button of the selector
lever for proper and smooth operation.
(b) On a safe incline, check that vehicle is held
securely with the selector lever in the ºPº
position and all brakes released.
UNDER HOOD
24. WINDSHIELD WASHER FLUID
Check that there is sufficient fluid in the tank.
25. ENGINE COOLANT LEVEL
Check that the coolant level is between the
ºFULLº and ºLOWº lines on the see±through reser-
voir.
26. RADIATOR AND HOSES
(a) Check that the front of the radiator is clean
and not blocked with leaves, dirt or bugs.
(b) Check the hoses for cracks, kinks, rot or
loose connections.
27. BATTERY ELECTROLYTE LEVEL
Check that the electrolyte level of all battery cells
is between the upper and lower level lines on the
case. If level is low, add distilled water only.28. BRAKE AND CLUTCH FLUID LEVELS
(a) Check that the brake fluid level is near the
upper level line on the see±through reser-
voir.
(b) Check that the clutch fluid level is within
+ 5 mm (0.20 in.) of the reservoir hem.
29. ENGINE DRIVE BELTS
Check all drive belts for fraying, cracks, wear or
oiliness.
30. ENGINE OIL LEVEL
Check the level on the dipstick with the engine
turned off.
31. POWER STEERING FLUID LEVEL
Check the level.
The level should be in the ºHOTº or ºCOLDº
range depending on the fluid temperature.
32. AUTOMATIC TRANSMISSION FLUID
LEVEL
(a) Park the vehicle on a level surface.
(b) With the engine idling and the parking
brake applied, shift the selector into all
positions from ºPº to ºLº, and then shift
into ºPº.
(c) Pull out the dipstick and wipe off the fluid
with a clean rag. Re±insert the dipstick
and check that the fluid level is in the HOT
range.
(d) Perform this check with the fluid at normal
driving temperature (70 ± 80
°C or
158 ± 176°F).
NOTE: Wait about 30 minutes before check-
ing the fluid level after extended driving at high
speeds i n hot weather, driving i n heavy traffic
or with a trailer.
33. EXHAUST SYSTEM
Visually inspect for cracks, holes or loose sup-
ports.
If any change in the sound of the exhaust oK
smell of the exhaust fumes is noticed, have the
cause located and corrected.
± MAINTENANCEGeneral MaintenanceMA±17
Page 2280 of 2389
![TOYOTA CAMRY V20 1986 Service Information Transaxle oil E50 (08885±80206) or
equivalent
Recommended oil
Oil grade: AN GL±5
Viscosity : SAE 75W±90 or 80W±90
SA E 90W
[above ±18°C (0°F)]
SAE 80W
[below ±18°C (0°F)]
Transaxle oil E50 ( TOYOTA CAMRY V20 1986 Service Information Transaxle oil E50 (08885±80206) or
equivalent
Recommended oil
Oil grade: AN GL±5
Viscosity : SAE 75W±90 or 80W±90
SA E 90W
[above ±18°C (0°F)]
SAE 80W
[below ±18°C (0°F)]
Transaxle oil E50 (](/manual-img/14/57449/w960_57449-2279.png)
Transaxle oil E50 (08885±80206) or
equivalent
Recommended oil
Oil grade: AN GL±5
Viscosity : SAE 75W±90 or 80W±90
SA E 90W
[above ±18°C (0°F)]
SAE 80W
[below ±18°C (0°F)]
Transaxle oil E50 (08885±80206) or
equivalent
Recommended oil
Oil grade: API GL±5
Viscosity : SAE 75W±90 or 80W±90
SAE 90W
[above ±18°C (0°F)]
SAE 80W
[below ±18°C (0°F)]
API grade GL±5
Hypoid gear oil
Viscosity: Above ±18°C (0°F) SAE 90
Below ±18°C (0°F) SAE 80W±90 Differential oil
(w/ Automatic transaxle)
SV21 series
VZV21 series
Molybdenum disulphide lithium base,
NLGI No. 2 Automatic transaxle
fluid
(w/o Differential oil)
ATF type T (08886±00405) or equivalent Al 40E
Dry fill
Drain and refill Al 40L
Dry fill
Drain and refill
A540H
Dry fill
Drain and refillA540E
Dry fill
Drain and refill E56F5
(w/ Differential and
transfer)
API GL±4 or GL±5
SAE 75W±90 or 80W±90
Lithium base multipurpose, NLGI No. 2
SAE J 1703 or FMVSS No. 116, DQT3 S51
(w/ Differential oil)
Steering gear housing grease
Manual
transaxle oil
Wheel bearing greaseTransfer oil (A540H)
Power steering fluid
LUBRICANT
800cc 48.8 cu in. Rear differential oilATF DEXRON II ATF DEXRON
11Classification
Brake fluidCapacity
Imp. qts
US qts Liters
Item
E52
ATF DEXRON II
ATF DEXRON II
± SERVICE SPECIFICATIONSLubricantA±42
Page 2327 of 2389
Inflate tires to proper pressure
lubricate suspension and steering
linkage
Check front wheel alignment
Replace steering system joints
Replace lower arm ball joints
Inspect steering column
Adjust or repair steering gear
Adjust belt
Check reservoir
Check power steering unit
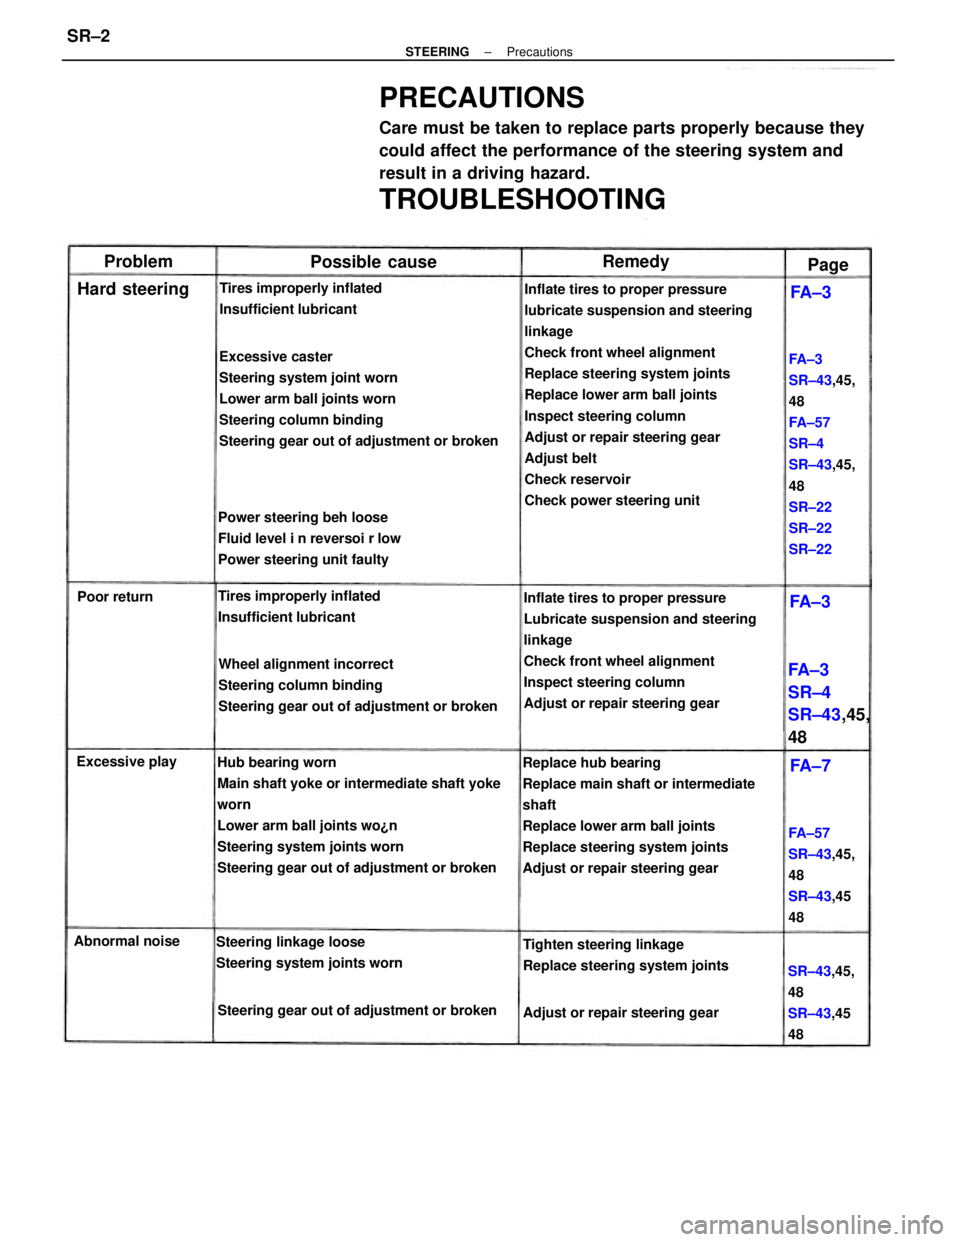
PRECAUTIONS
Care must be taken to replace parts properly because they
could affect the performance of the steering system and
result in a driving hazard.
TROUBLESHOOTING
Hub bearing worn
Main shaft yoke or intermediate shaft yoke
worn
Lower arm ball joints wo¿n
Steering system joints worn
Steering gear out of adjustment or brokenExcessive caster
Steering system joint worn
Lower arm ball joints worn
Steering column binding
Steering gear out of adjustment or broken
Replace hub bearing
Replace main shaft or intermediate
shaft
Replace lower arm ball joints
Replace steering system joints
Adjust or repair steering gearInflate tires to proper pressure
Lubricate suspension and steering
linkage
Check front wheel alignment
Inspect steering column
Adjust or repair steering gear Wheel alignment incorrect
Steering column binding
Steering gear out of adjustment or brokenFA±3
SR±43,45,
48
FA±57
SR±4
SR±43,45,
48
SR±22
SR±22
SR±22 Power steering beh loose
Fluid level i n reversoi r low
Power steering unit faulty
Tighten steering linkage
Replace steering system joints Steering linkage loose
Steering system joints wornFA±57
SR±43,45,
48
SR±43,45
48 Tires improperly inflated
Insufficient lubricantTires improperly inflated
Insufficient lubricant
Steering gear out of adjustment or broken
FA ± 3
SR±4
SR±43,45,
48
SR±43,45,
48
SR±43,45
48 Adjust or repair steering gear Abnormal noiseExcessive play
Possible cause
Hard steering
Poor return
Remedy Problem
Page
FA ± 7FA ± 3
FA ± 3
± STEERINGPrecautionsSR±2
Page 2328 of 2389
Inflate tires to proper pressure
lubricate suspension and steering
linkage
Check front wheel alignment
Replace steering system joints
Replace lower arm ball joints
Inspect steering column
Adjust or repair steering gear
Adjust belt
Check reservoir
Check power steering unit
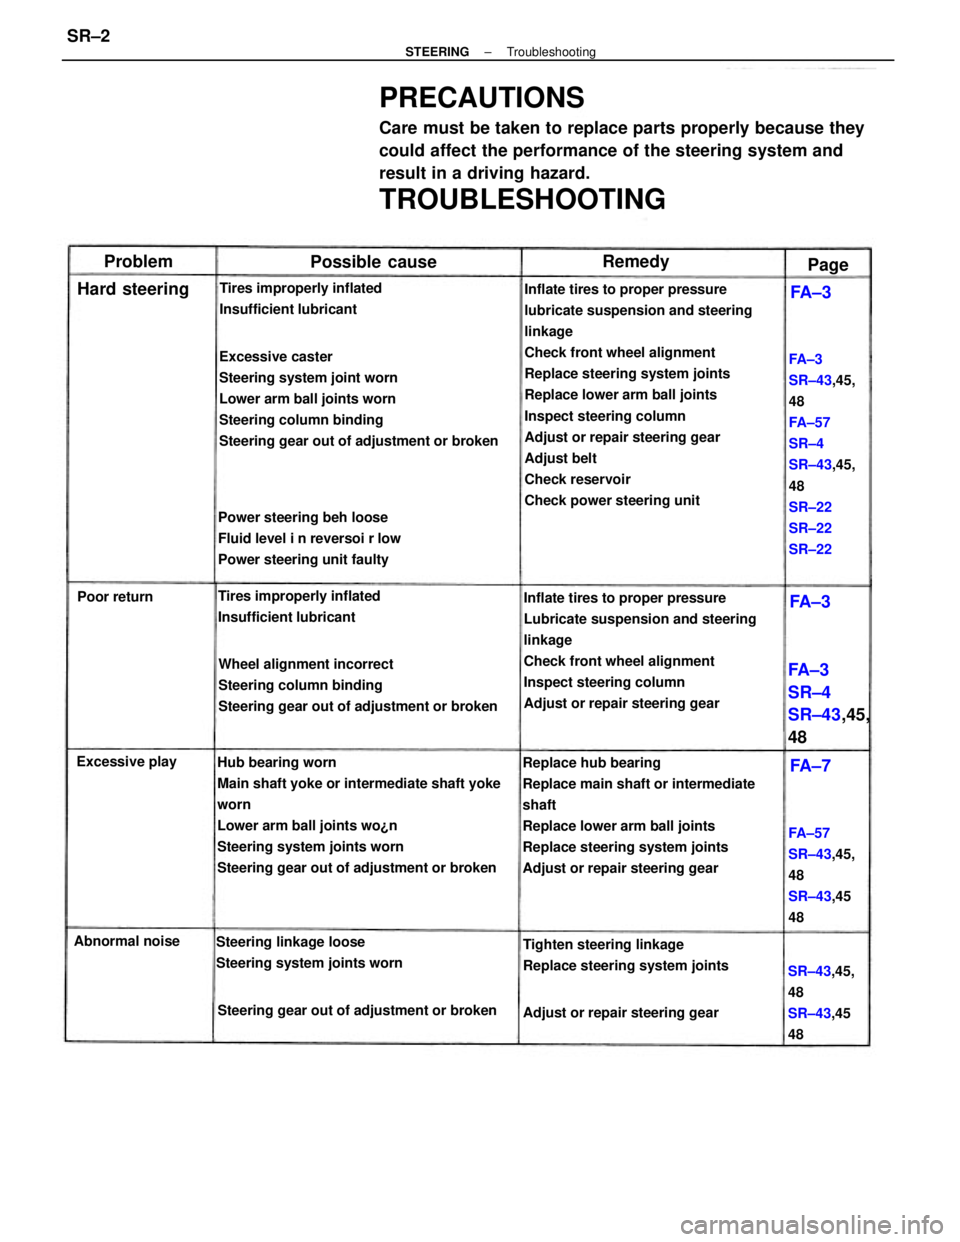
PRECAUTIONS
Care must be taken to replace parts properly because they
could affect the performance of the steering system and
result in a driving hazard.
TROUBLESHOOTING
Hub bearing worn
Main shaft yoke or intermediate shaft yoke
worn
Lower arm ball joints wo¿n
Steering system joints worn
Steering gear out of adjustment or brokenExcessive caster
Steering system joint worn
Lower arm ball joints worn
Steering column binding
Steering gear out of adjustment or broken
Replace hub bearing
Replace main shaft or intermediate
shaft
Replace lower arm ball joints
Replace steering system joints
Adjust or repair steering gearInflate tires to proper pressure
Lubricate suspension and steering
linkage
Check front wheel alignment
Inspect steering column
Adjust or repair steering gear Wheel alignment incorrect
Steering column binding
Steering gear out of adjustment or brokenFA±3
SR±43,45,
48
FA±57
SR±4
SR±43,45,
48
SR±22
SR±22
SR±22 Power steering beh loose
Fluid level i n reversoi r low
Power steering unit faulty
Tighten steering linkage
Replace steering system joints Steering linkage loose
Steering system joints wornFA±57
SR±43,45,
48
SR±43,45
48 Tires improperly inflated
Insufficient lubricantTires improperly inflated
Insufficient lubricant
Steering gear out of adjustment or broken
FA ± 3
SR±4
SR±43,45,
48
SR±43,45,
48
SR±43,45
48 Adjust or repair steering gear Abnormal noiseExcessive play
Possible cause
Hard steering
Poor return
Remedy Problem
Page
FA ± 7FA ± 3
FA ± 3
± STEERINGTroubleshootingSR±2
Page 2335 of 2389
POWER STEERING
Description
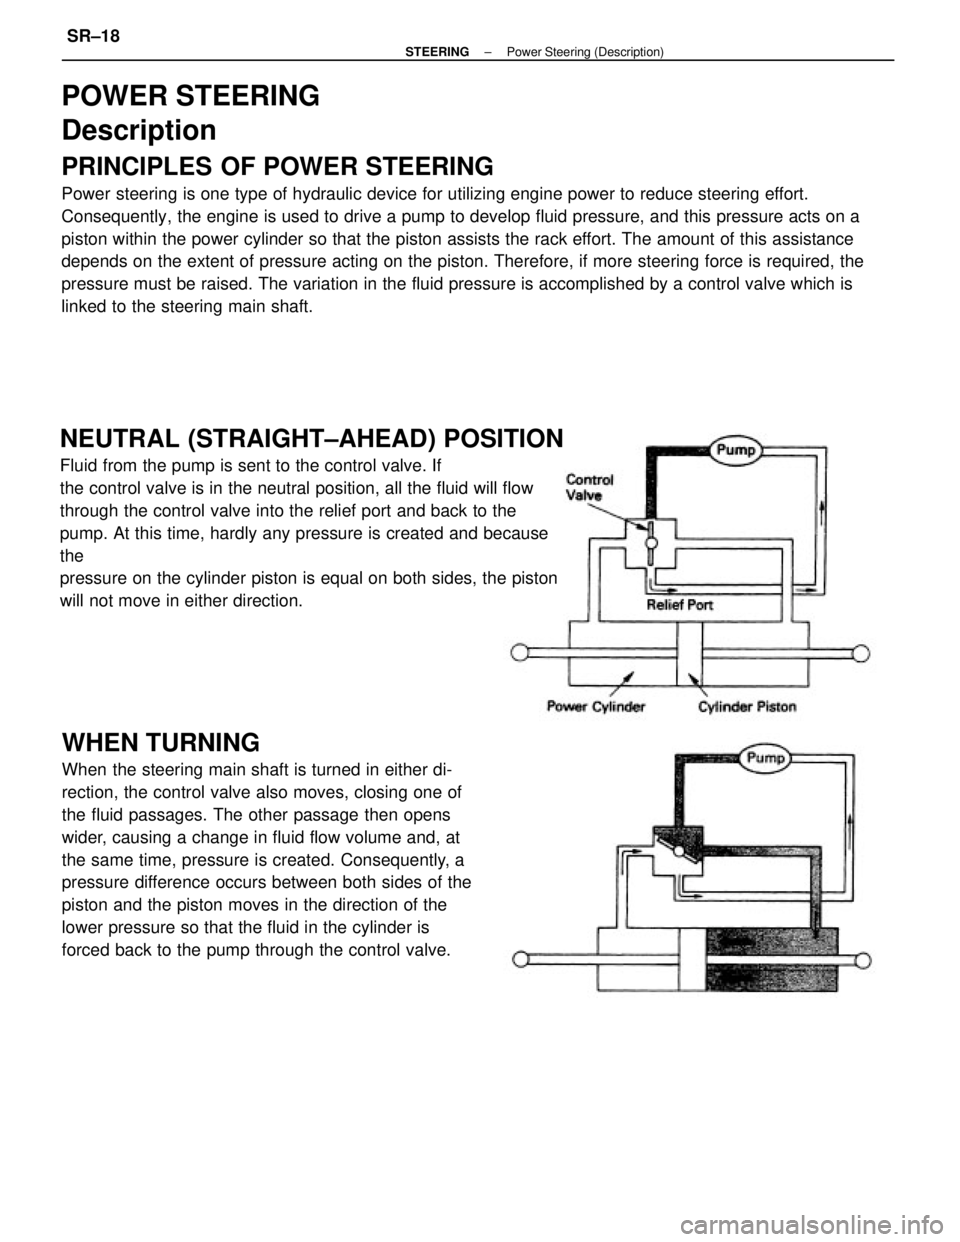
PRINCIPLES OF POWER STEERING
Power steering is one type of hydraulic device for utilizing engine power to reduce steering effort.
Consequently, the engine is used to drive a pump to develop fluid pressure, and this pressure acts on a
piston within the power cylinder so that the piston assists the rack effort. The amount of this assistance
depends on the extent of pressure acting on the piston. Therefore, if more steering force is required, the
pressure must be raised. The variation in the fluid pressure is accomplished by a control valve which is
linked to the steering main shaft.
WHEN TURNING
When the steering main shaft is turned in either di-
rection, the control valve also moves, closing one of
the fluid passages. The other passage then opens
wider, causing a change in fluid flow volume and, at
the same time, pressure is created. Consequently, a
pressure difference occurs between both sides of the
piston and the piston moves in the direction of the
lower pressure so that the fluid in the cylinder is
forced back to the pump through the control valve.
NEUTRAL (STRAIGHT±AHEAD) POSITION
Fluid from the pump is sent to the control valve. If
the control valve is in the neutral position, all the fluid will flow
through the control valve into the relief port and back to the
pump. At this time, hardly any pressure is created and because
the
pressure on the cylinder piston is equal on both sides, the piston
will not move in either direction.
± STEERINGPower Steering (Description)SR±18
Page 2336 of 2389
SERVICE HINT
Troubles with the power steering system are usually
concerned with hard steering due to the fact that
there is no assist. In such cases, before attempting
to make repairs, it is necessary to determine wheth-
er the trouble lies with the pump or with the gear
housing. To do this, an on±vehicle inspection can be
made by using a pressure gauge.
ON±VEHICLE INSPECTION
Power steering is a hydraulic device and problems
are normally due to insufficient fluid pressure acting
on the piston. This could be caused by either the
pump not producing the specified fluid pressure or
the control valve in the gear housing not functioning
properly so that the proper fluid pressure can not be
obtained.
If the fault lies with the pump, the same symptoms
will generally occur whether the steering wheel is
turned fully to the right or left. On the other hand, if
the fault lies with the control valve, there will gener-
ally be difference between the amount of assist
when the steering wheel is turned to the left and
right, causing harder steering. However, if the piston
seal of the power cylinder is worn, there will be a
loss of fluid pressure whether the steering wheel is
turned to the right or left and the symptoms will be
the same for both.
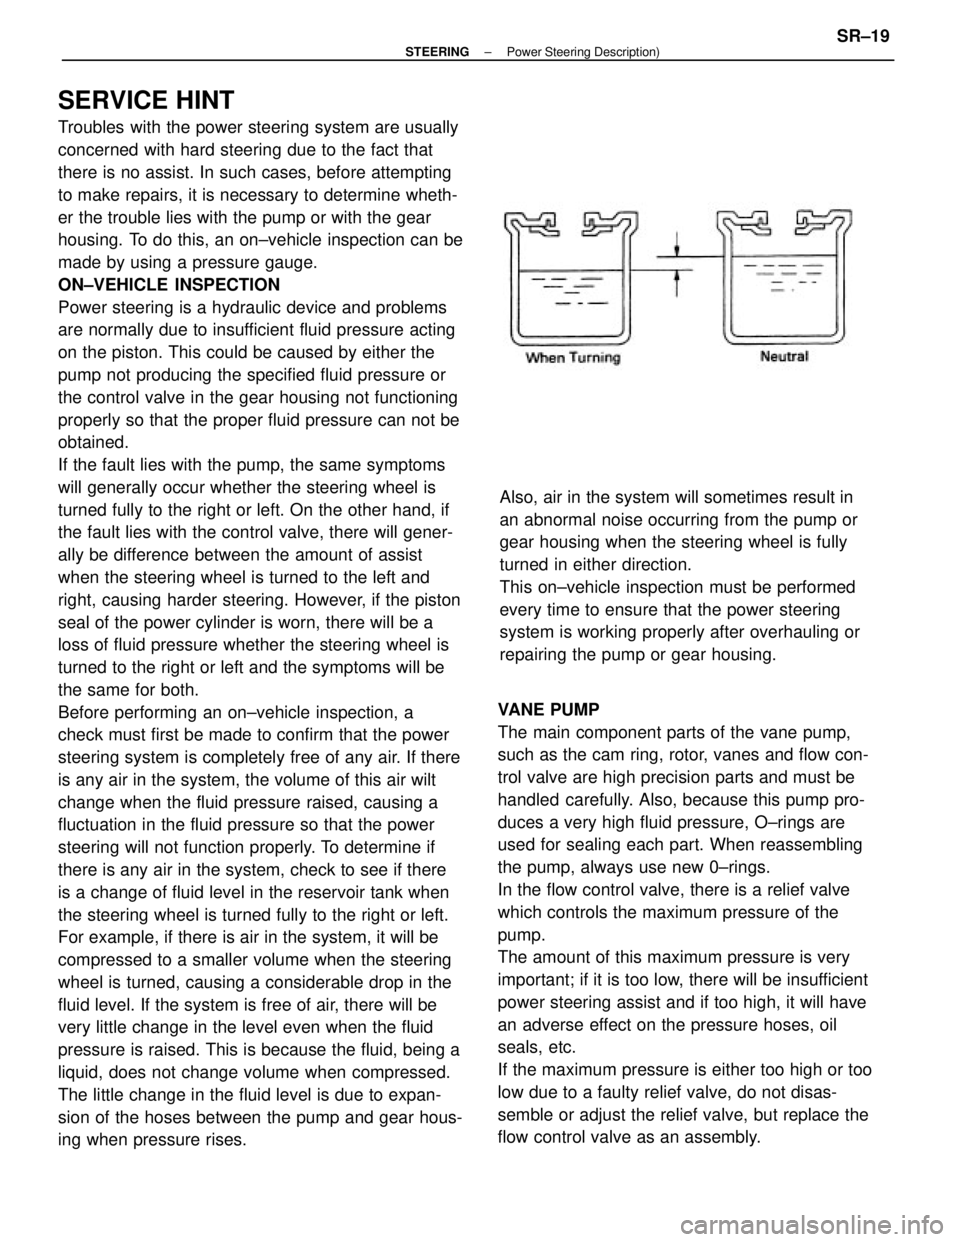
Before performing an on±vehicle inspection, a
check must first be made to confirm that the power
steering system is completely free of any air. If there
is any air in the system, the volume of this air wilt
change when the fluid pressure raised, causing a
fluctuation in the fluid pressure so that the power
steering will not function properly. To determine if
there is any air in the system, check to see if there
is a change of fluid level in the reservoir tank when
the steering wheel is turned fully to the right or left.
For example, if there is air in the system, it will be
compressed to a smaller volume when the steering
wheel is turned, causing a considerable drop in the
fluid level. If the system is free of air, there will be
very little change in the level even when the fluid
pressure is raised. This is because the fluid, being a
liquid, does not change volume when compressed.
The little change in the fluid level is due to expan-
sion of the hoses between the pump and gear hous-
ing when pressure rises.VANE PUMP
The main component parts of the vane pump,
such as the cam ring, rotor, vanes and flow con-
trol valve are high precision parts and must be
handled carefully. Also, because this pump pro-
duces a very high fluid pressure, O±rings are
used for sealing each part. When reassembling
the pump, always use new 0±rings.
In the flow control valve, there is a relief valve
which controls the maximum pressure of the
pump.
The amount of this maximum pressure is very
important; if it is too low, there will be insufficient
power steering assist and if too high, it will have
an adverse effect on the pressure hoses, oil
seals, etc.
If the maximum pressure is either too high or too
low due to a faulty relief valve, do not disas-
semble or adjust the relief valve, but replace the
flow control valve as an assembly.Also, air in the system will sometimes result in
an abnormal noise occurring from the pump or
gear housing when the steering wheel is fully
turned in either direction.
This on±vehicle inspection must be performed
every time to ensure that the power steering
system is working properly after overhauling or
repairing the pump or gear housing.
± STEERINGPower Steering Description)SR±19
Page 2337 of 2389
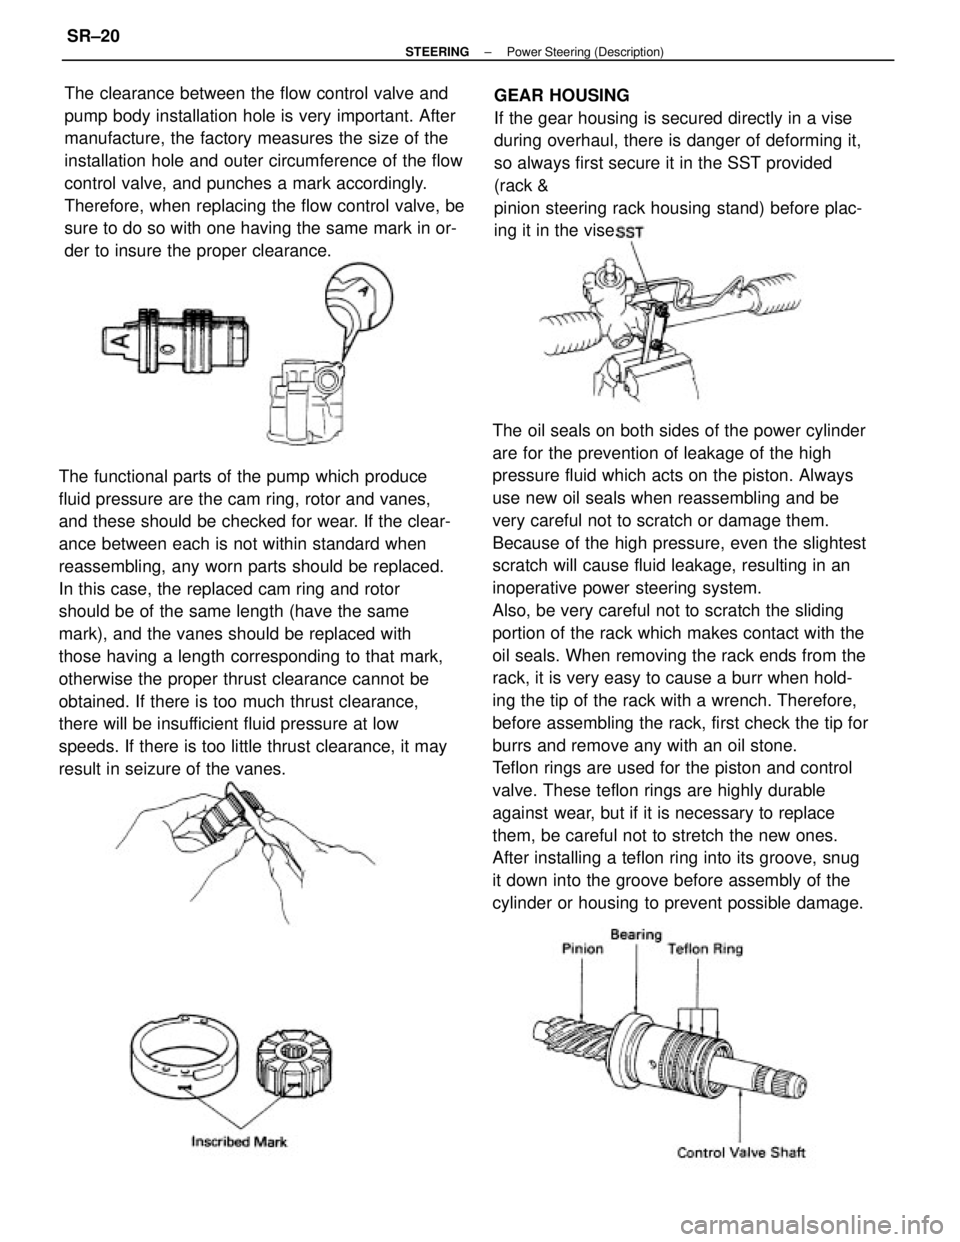
The oil seals on both sides of the power cylinder
are for the prevention of leakage of the high
pressure fluid which acts on the piston. Always
use new oil seals when reassembling and be
very careful not to scratch or damage them.
Because of the high pressure, even the slightest
scratch will cause fluid leakage, resulting in an
inoperative power steering system.
Also, be very careful not to scratch the sliding
portion of the rack which makes contact with the
oil seals. When removing the rack ends from the
rack, it is very easy to cause a burr when hold-
ing the tip of the rack with a wrench. Therefore,
before assembling the rack, first check the tip for
burrs and remove any with an oil stone.
Teflon rings are used for the piston and control
valve. These teflon rings are highly durable
against wear, but if it is necessary to replace
them, be careful not to stretch the new ones.
After installing a teflon ring into its groove, snug
it down into the groove before assembly of the
cylinder or housing to prevent possible damage. The functional parts of the pump which produce
fluid pressure are the cam ring, rotor and vanes,
and these should be checked for wear. If the clear-
ance between each is not within standard when
reassembling, any worn parts should be replaced.
In this case, the replaced cam ring and rotor
should be of the same length (have the same
mark), and the vanes should be replaced with
those having a length corresponding to that mark,
otherwise the proper thrust clearance cannot be
obtained. If there is too much thrust clearance,
there will be insufficient fluid pressure at low
speeds. If there is too little thrust clearance, it may
result in seizure of the vanes.The clearance between the flow control valve and
pump body installation hole is very important. After
manufacture, the factory measures the size of the
installation hole and outer circumference of the flow
control valve, and punches a mark accordingly.
Therefore, when replacing the flow control valve, be
sure to do so with one having the same mark in or-
der to insure the proper clearance.GEAR HOUSING
If the gear housing is secured directly in a vise
during overhaul, there is danger of deforming it,
so always first secure it in the SST provided
(rack &
pinion steering rack housing stand) before plac-
ing it in the vise.
± STEERINGPower Steering (Description)SR±20
Page 2338 of 2389
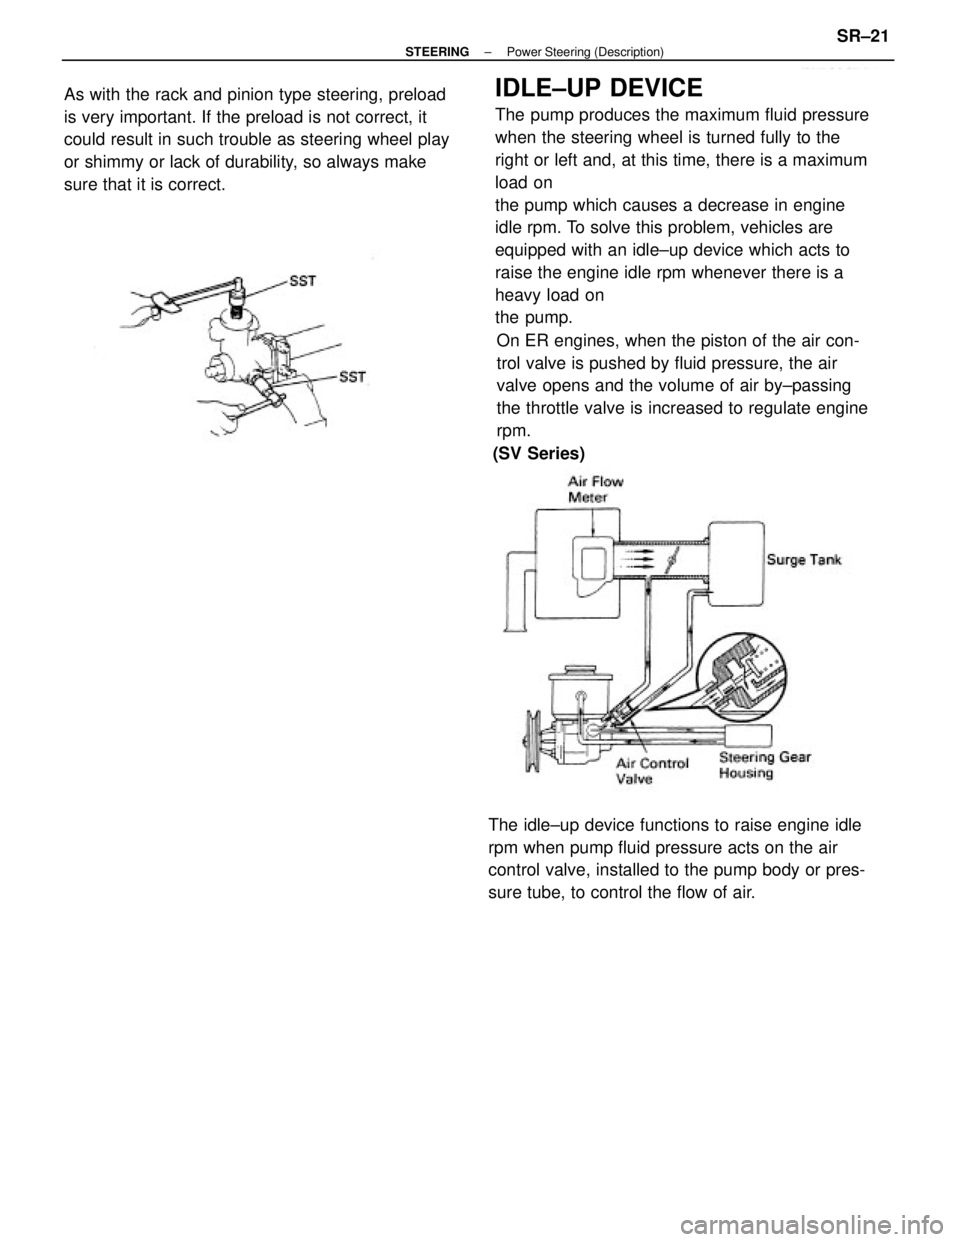
IDLE±UP DEVICE
The pump produces the maximum fluid pressure
when the steering wheel is turned fully to the
right or left and, at this time, there is a maximum
load on
the pump which causes a decrease in engine
idle rpm. To solve this problem, vehicles are
equipped with an idle±up device which acts to
raise the engine idle rpm whenever there is a
heavy load on
the pump. As with the rack and pinion type steering, preload
is very important. If the preload is not correct, it
could result in such trouble as steering wheel play
or shimmy or lack of durability, so always make
sure that it is correct.
On ER engines, when the piston of the air con-
trol valve is pushed by fluid pressure, the air
valve opens and the volume of air by±passing
the throttle valve is increased to regulate engine
rpm.
The idle±up device functions to raise engine idle
rpm when pump fluid pressure acts on the air
control valve, installed to the pump body or pres-
sure tube, to control the flow of air.(SV Series)
± STEERINGPower Steering (Description)SR±21