1986 TOYOTA CAMRY V20 coolant reservoir
[x] Cancel search: coolant reservoirPage 989 of 2389

The cooling system is composed of the water jacket (inside the cylinder block and cylinder head), radiator,
water pump, thermostat, electric fan, hoses and other components.
Coolant which is heated in the water jacket is pumped to the radiator, through which an electric fan blows air
to cool the coolant as it passes through. Coolant which has been cooled is then sent back to the engine by
the water pump, where it cools the engine.
The water jacket is a network of channels in the shell of the cylinder block and cylinder head through which
coolant passes. It is designed to provide adequate cooling of the cylinders and combustion chambers which
become heated during engine operation.
RADIATOR
The radiator performs the function of cooling the coolant which has passed through the water jacket and be-
come hot, and it is mounted in the front of the vehicle. The radiator consists of an upper tank and lower tank,
and a core which connects the two tanks. The upper tank contains the inlet for coolant from the water jacket
and the filler inlet. It also has a hose attached through which excess coolant or steam can flow. The lower
tank has an outlet and drain cock for the coolant. The core contains many tubes through which coolant flows
from the upper tank to the lower tank as well as cooling fins which radiate heat away from the coolant in the
tubes.
The air sucked through the radiator by the electric fan, as well as the wind generated by the vehicle's travel,
passes through the radiator, cooling the coolant. Models with automatic transmission include an automatic
transmission fluid cooler built into the lower tank of the radiator. A fan with an electric motor is mounted be-
hind the radiator to assist the flow of air through the radiator. The fan operates when the coolant tempera-
ture becomes high in order to prevent it from becoming too high.
RADIATOR CAP
The radiator cap is a pressure type cap which seals the radiator, resulting in pressurization of the radiator as
the coolant expands. The pressurization prevents the coolant from boiling even when the coolant tempera-
ture exceeds 100°C (212°F). A relief valve (pressurization valve) and a vacuum valve (negative pressure
valve) are built into the radiator cap. The relief valve opens and lets steam escape through the overflow pipe
when the pressure generated inside the cooling system exceeds the limit (coolant temperature: 110 ±
120°C, 230 ± 248°F, pressure; 0.3 ±1.0 kg/cm
2, 4.3 ±14.2 psi, 29.4 ± 98.1 kPa). The vacuum valve opens to
alleviate the vacuum which develops in the coolant system after the engine is stopped and the coolant tem-
perature drops.
The valves's opening allows the coolant in the reservoir tank to return to the cooling system.
RESERVOIR TANK
The reservoir tank is used to catch coolant which overflows the cooling system as a result of volumetric ex-
pansion when the coolant is heated. The coolant in the reservoir rank returns to the radiator when the cool-
ant temperature drops, thus keeping the radiator full at all times and avoiding needless coolant loss. Check
the reservoir tank level to find out if the coolant needs to be replenished.
WATER PUMP
The water pump is used for forced circulation of coolant through the cooling system. It is mounted on the
front of the cylinder block and driven by a timing belt.
THERMOSTAT
The thermostat has a wax type by±pass valve and is mounted in the water inlet housing. The thermostat in-
cludes a type of automatic valve operated by fluctuations in the coolant temperature. This valve closes when
the coolant temperature drops, preventing the circulation of coolant through the engine and thus permitting
the engine to warm up rapidly. The valve opens when the coolant temperature has risen, allowing the cir-
culation of coolant. Wax inside the thermostat expands when heated and contracts when cooled. Heating
the wax thus generates pressure which overpowers the force of the spring which keeps±the valve closed,
thus opening the valve. When the wax cools, its contraction causes the force of the spring to take effect
once more, closing the valve. The thermostat in this engine operates at a temperature of 82°C (180°F).
± COOLING SYSTEMDescriptionCO±3
Page 1003 of 2389
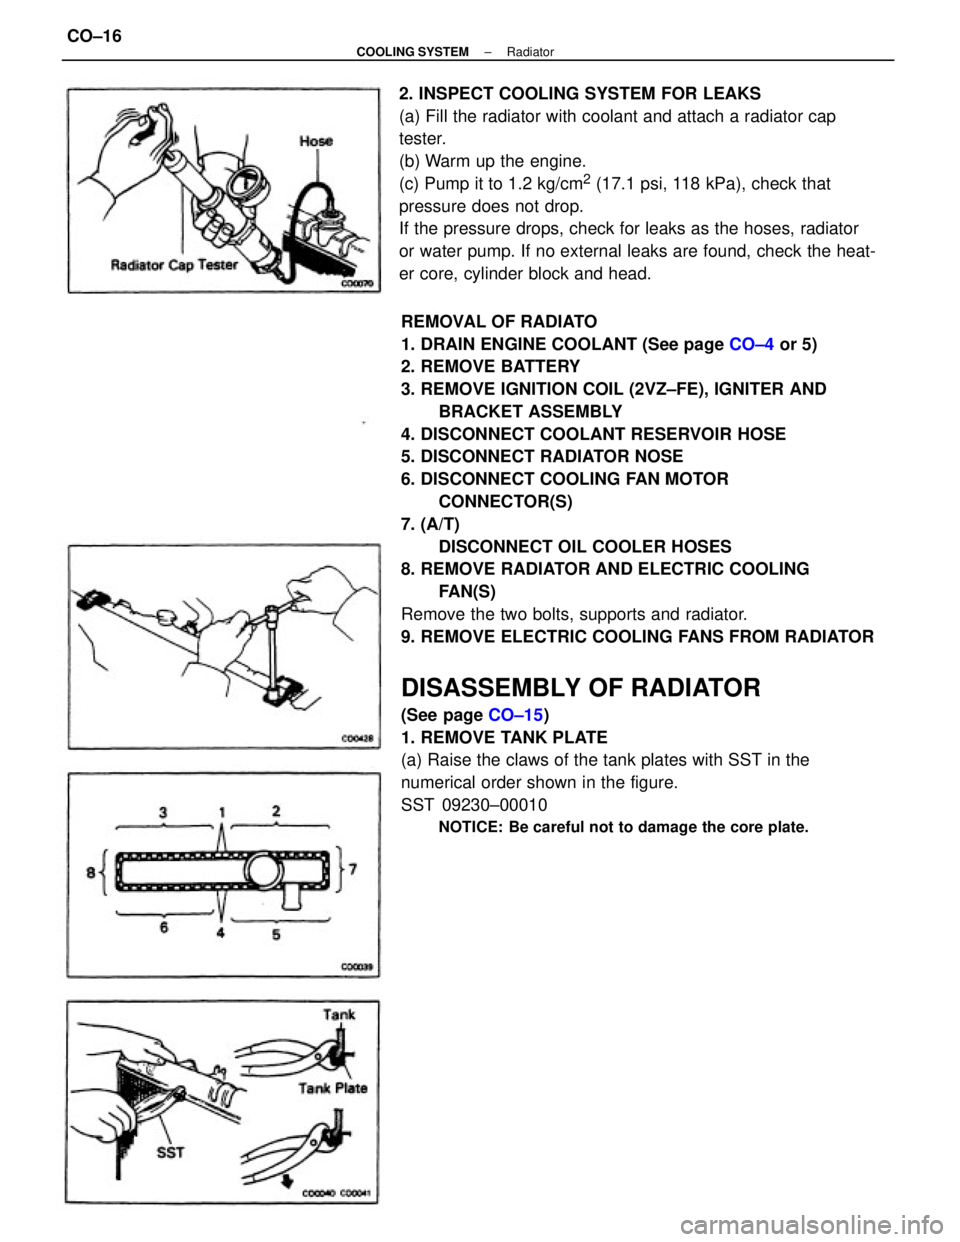
REMOVAL OF RADIATO
1. DRAIN ENGINE COOLANT (See page CO±4 or 5)
2. REMOVE BATTERY
3. REMOVE IGNITION COIL (2VZ±FE), IGNITER AND
BRACKET ASSEMBLY
4. DISCONNECT COOLANT RESERVOIR HOSE
5. DISCONNECT RADIATOR NOSE
6. DISCONNECT COOLING FAN MOTOR
CONNECTOR(S)
7. (A/T)
DISCONNECT OIL COOLER HOSES
8. REMOVE RADIATOR AND ELECTRIC COOLING
FAN(S)
Remove the two bolts, supports and radiator.
9. REMOVE ELECTRIC COOLING FANS FROM RADIATOR
DISASSEMBLY OF RADIATOR
(See page CO±15)
1. REMOVE TANK PLATE
(a) Raise the claws of the tank plates with SST in the
numerical order shown in the figure.
SST 09230±00010
NOTICE: Be careful not to damage the core plate.
2. INSPECT COOLING SYSTEM FOR LEAKS
(a) Fill the radiator with coolant and attach a radiator cap
tester.
(b) Warm up the engine.
(c) Pump it to 1.2 kg/cm
2 (17.1 psi, 118 kPa), check that
pressure does not drop.
If the pressure drops, check for leaks as the hoses, radiator
or water pump. If no external leaks are found, check the heat-
er core, cylinder block and head.
± COOLING SYSTEMRadiatorCO±16
Page 1007 of 2389
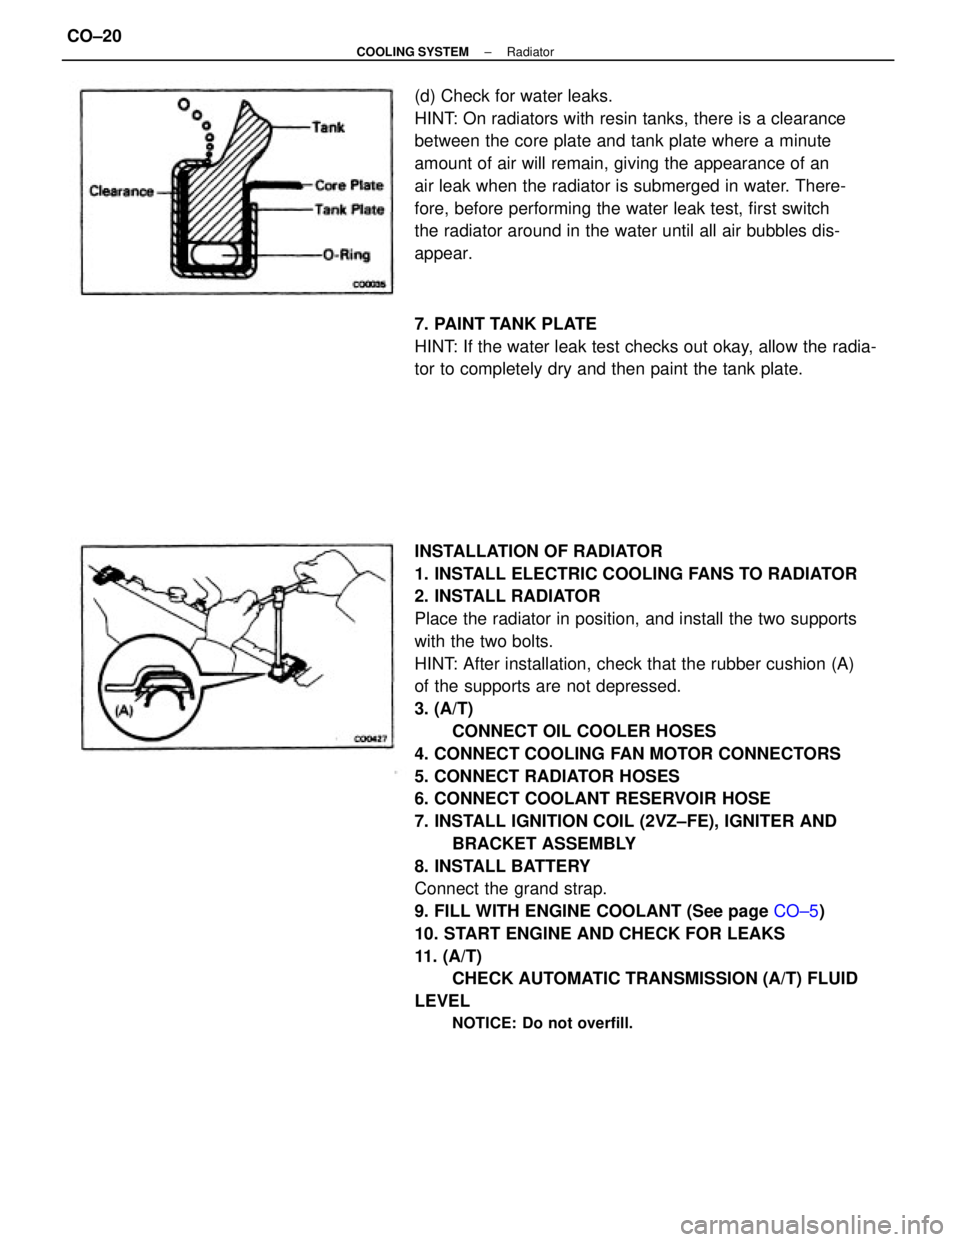
INSTALLATION OF RADIATOR
1. INSTALL ELECTRIC COOLING FANS TO RADIATOR
2. INSTALL RADIATOR
Place the radiator in position, and install the two supports
with the two bolts.
HINT: After installation, check that the rubber cushion (A)
of the supports are not depressed.
3. (A/T)
CONNECT OIL COOLER HOSES
4. CONNECT COOLING FAN MOTOR CONNECTORS
5. CONNECT RADIATOR HOSES
6. CONNECT COOLANT RESERVOIR HOSE
7. INSTALL IGNITION COIL (2VZ±FE), IGNITER AND
BRACKET ASSEMBLY
8. INSTALL BATTERY
Connect the grand strap.
9. FILL WITH ENGINE COOLANT (See page CO±5)
10. START ENGINE AND CHECK FOR LEAKS
11. (A/T)
CHECK AUTOMATIC TRANSMISSION (A/T) FLUID
LEVEL
NOTICE: Do not overfill.
(d) Check for water leaks.
HINT: On radiators with resin tanks, there is a clearance
between the core plate and tank plate where a minute
amount of air will remain, giving the appearance of an
air leak when the radiator is submerged in water. There-
fore, before performing the water leak test, first switch
the radiator around in the water until all air bubbles dis-
appear.
7. PAINT TANK PLATE
HINT: If the water leak test checks out okay, allow the radia-
tor to completely dry and then paint the tank plate.
± COOLING SYSTEMRadiatorCO±20
Page 1180 of 2389
The 3S±FE engine is an in±line 4±cylinder engine with the cylinders numbered 1 ± 2 ± 3 ± 4 from the
front.
The crankshaft is supported by 5 bearing inside the crankcase. These bearing are made of aluminum
alloy.
The crankshaft is integrated with 8 weights for balance. Oil holes are placed in the center of the crank-
shaft to supply oil to the connecting rods, bearing, pistons and other components.
This engine's ignition order is 1 ± 3 ± 4 ± 2. The cylinder head is made of aluminum alloy, with a cross
flow type intake and exhaust layout and with pent±roof type combustion chambers. The spark plugs are
located in the center of the combustion chamber.
The intake manifold has 8 independent long ports and utilizes the inertial supercharging effect to im-
prove engine torque at low and medium speeds.
Exhaust and intake valves are equipped with irregular pitch springs made of special valve spring carbon
steel which are capable of functioning no matter what the engine speed.
The intake side camshaft is driven by a timing belt, and a gear on the intake side camshaft engages with
a gear on the exhaust side camshaft to drive it. The cam journal is supported at 5 places between the
valve lifters of each cylinder and on the front end of the cylinder head. Lubrication of the cam journal and
gear is accomplished by oil being supplied through the oiler port in the center of the camshaft.
Adjustment of the valve clearance is done by means of outer shim type system, in which valve adjusting
shims are located above the valve lifters. This permits replacement of the shims without removal of the
camshafts.
The resin timing belt cover is made of 2 pieces. A service hole is provided in the No. 1 belt cover for ad-
justing the timing belt tension.
Piston are made of high temperature±resistant aluminum alloy, and a depression is built into the piston
head to prevent interference with the valves.
Piston pins are the semi±floating type, with the pins fastened to the connecting rods by pressure fitting,
allowing the pistons and pins to float.
The No. 1 compression ring is made of steel and the No. 2 compression ring is made of cast iron. The oil
ring is made of a combination of steel and stainless steel. The outer diameter of each piston ring is
slightly larger than the diameter of the piston and the flexibility of the rings allows them to hug the cylin-
der walls when they are mounted on the piston rings No. 1 and No. 2 work to prevent gas leakage from
the cylinder and oil ring works to clear oil off the cylinder walls to prevent it from entering the combustion
chambers.
The cylinder block is made of cast iron. It has 4 cylinders which are approximately 2 times the length of
the piston stroke. The top of the cylinders is closed off by the cylinder head and the lower end of the cyl-
inders becomes the crankcase, in which the crankshaft is installed. In .addition, the cylinder block con-
tains a water jacket, through which coolant is pumped to cool the cylinders.
The oil pan is bolted onto the bottom of the cylinder block. The oil pan is an oil reservoir made of
pressed steel shoot. A dividing plate is included inside the oil pan to keep sufficient oil in the bottom of
the pan even when the vehicle is tilted. This dividing plate also prevents the oil from making waves when
the vehicle is topped suddenly and thus shifting the oil away from the oil pump suction pipe.
± ENGINE MECHANICALDescription (3S±FE)EM±3
Page 1182 of 2389
The 2VZ±FE engine has 6 cylinder in a V arrangement at bank of 60°. From the front of the RH bank cylin-
ders are numbered 1 ± 3 ± 5, and from the front of the LH bank cylinders are numbered 2 ± 4 ±r 6. The crankshaft is
supported by 4 bearings inside the crankcase. These bearing are made of copper and lead alloy.
The crankshaft is integrated with 5 weights for balance. Oil holes are placed in the center of the crankshaft for sup-
plying oil to the connecting rods, pistons and other components.
This engine's ignition order is 1 ± 2 ± 3 ± 4 ± 5 ± 6. The cylinder head is made of aluminum alloy, with a cross flow
type intake and exhaust layout and with pent±roof type combustion chambers. The spark plugs are located in the
center of the combustion chambers.
At,the front and rear of the intake port of the intake manifold, a water passage has been provided which connects
the RH and LH cylinder heads.
Exhaust and intake valves are equipped with irregular pitch springs made of special valve spring carbon steel which
are capable of functioning no matter what the engine speed.
The RH and LH intake camshaft are driven by a single timing belt, and a gear on the intake side camshaft engages
with a gear on the exhaust side camshaft to drive it. The cam journal is supported at 5 (intake) or 4
(exhaust) places between the valve liters of each cylinder and on the front end of the cylinder head. Lubrication of
the cam journals and gears is accomplished by oil being supplied through the oiler port in the center of the camshaft.
Adjustment of the valve clearance is done by means of outer shim type system, in which valve adjusting shims are
located above the valve lifters. The permits replacement of the shims without removal of the camshafts.
The timing belt cover is composed of resin type No. 2 and No. 1 above and below the RH mounting bracket.
Piston are made high temperature±resistant aluminum alloy, and a depression is built into the piston head to prevent
interference with the valves.
Piston pins are the semi±floating type, with the pins fastened to the connecting rods by pressure fitting, allowing the
pistons and pins to float.
The No. 1 compression ring is made of steel and the No. 2 compression ring is made±of cast iron. The oil ring is
made of a combination of steel and stainless steel. The outer diameter of each piston ring is slightly larger than the
diameter of the piston and the flexibility of the rings allows them to hug the cylinder walls when they are mounted on
the piston. Compression rings No. 1 and No. 2 work to prevent gas leakage from the cylinder and oil ring works to
clear oil off the cylinder walls to prevent it from entering the combustion chambers.
The cylinder block is made of cast iron with a bank angle of 60°. It has 6 cylinders which are approximately 2
times the length of the piston stroke. The top of the cylinders is closed off by the cylinder heads and the lower end of
the cylinders becomes the crankcase, in which the crankshaft is installed. In addition, the cylinder block contains a
water jacket, through which coolant is pumped to cool the cylinders.
The oil pan is bolted onto the bottom of the cylinder block. The oil pan is an oil reservoir made of pressed steel
sheet. A dividing plate is included inside the oil pan to keep sufficient oil in the bottom of the pan even when the ve-
hicle is tilted. This dividing plate also prevents the oil from making waves when the vehicle is stopped suddenly and
thus shifting the oil away from the oil pump suction pipe.
± ENGINE MECHANICALDescription (2VZ±FE)EM±5
Page 1251 of 2389
26. INSTALL OIL PRESSURE SWITCH, ENGINE HANGERS
AND ALTERNATOR BRACKET
Torque the bolts.
Torque: 500 kg±cm (37 ft±Ib, 48 N±m)
27. INSTALL ALTERNATOR (See page CH±14)
28. INSTALL AIR CLEANER HOSE
29. INSTALL CRUISE CONTROL ACTUATOR
(See step 26 on page EM±137)
30. INSTALL RADIATOR RESERVOIR TANK
31. INSTALL ACCELERATOR CABLE, AND ADJUST IT
32. (A/T)
CONNECT THROTTLE CABLE, AND ADJUST IT
33. FILL WITH ENGINE COOLANT (See page CO±5)
Capacity (w/ Heater):
M/T 6.4 liters (6.8 US qts, 5.6 Imp. qts)
A/T (2WD) 6.3 liters (6.7 US qts, 5.5 Imp. qts)
A/T (4WD) 6.8 liters (7.2 US qts, 6.0 Imp. qts)
34. CONNECT CABLE TO NEGATIVE TERMINAL OF
BATTERY
35. START ENGINE AND CHECK FOR LEAKS
36. PERFORM ENGINE ADJUSTMENT
(a) Adjust the valve clearance. (See page EM±11)
Valve clearance (Cold):
Intake 0.19 ± 0.29 mm (0.007 ± 0.011 in.)
Exhaust 0.28 ± 0.38 mm (0.011 ± 0.015 in.)
(b) Adjust the ignition timing.
(See steps 7 to 10 on pages IG±16 and 17)
Ignition timing:
10° BTDC @ idle
(w/ Terminals TE 1 and E 1 connected)
37. CHECK TOE±IN (See page FA±5)
38. PERFORM ROAD TEST
Check for abnormal noise, shock, slippage, correct shift
points and smooth operation.
39. RECHECK ENGINE COOLANT LEVEL AND OIL LEVEL
± ENGINE MECHANICALCylinder Head (3S±FE)EM±74
Page 1285 of 2389
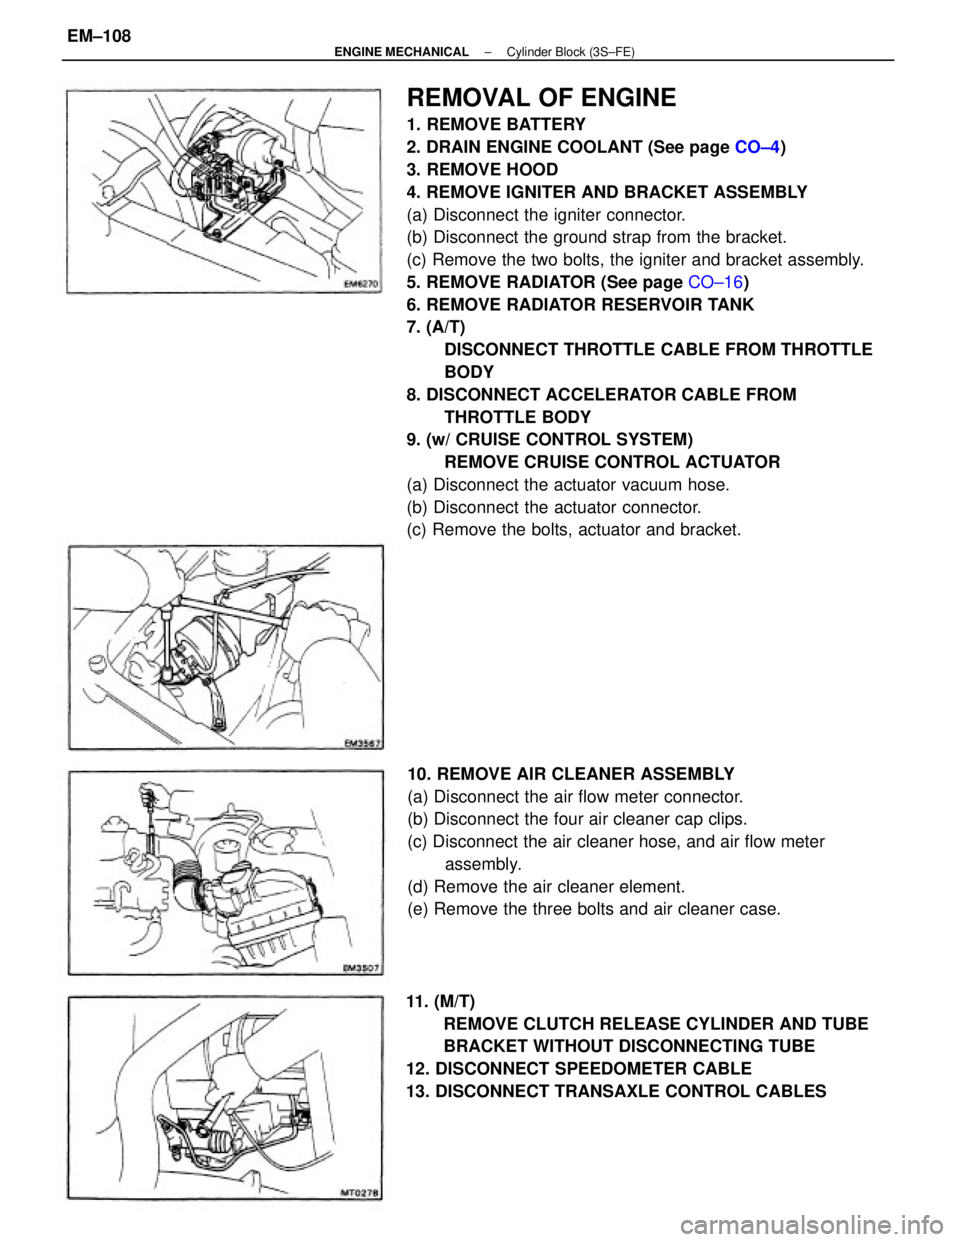
REMOVAL OF ENGINE
1. REMOVE BATTERY
2. DRAIN ENGINE COOLANT (See page CO±4)
3. REMOVE HOOD
4. REMOVE IGNITER AND BRACKET ASSEMBLY
(a) Disconnect the igniter connector.
(b) Disconnect the ground strap from the bracket.
(c) Remove the two bolts, the igniter and bracket assembly.
5. REMOVE RADIATOR (See page CO±16)
6. REMOVE RADIATOR RESERVOIR TANK
7. (A/T)
DISCONNECT THROTTLE CABLE FROM THROTTLE
BODY
8. DISCONNECT ACCELERATOR CABLE FROM
THROTTLE BODY
9. (w/ CRUISE CONTROL SYSTEM)
REMOVE CRUISE CONTROL ACTUATOR
(a) Disconnect the actuator vacuum hose.
(b) Disconnect the actuator connector.
(c) Remove the bolts, actuator and bracket.
10. REMOVE AIR CLEANER ASSEMBLY
(a) Disconnect the air flow meter connector.
(b) Disconnect the four air cleaner cap clips.
(c) Disconnect the air cleaner hose, and air flow meter
assembly.
(d) Remove the air cleaner element.
(e) Remove the three bolts and air cleaner case.
11. (M/T)
REMOVE CLUTCH RELEASE CYLINDER AND TUBE
BRACKET WITHOUT DISCONNECTING TUBE
12. DISCONNECT SPEEDOMETER CABLE
13. DISCONNECT TRANSAXLE CONTROL CABLES
± ENGINE MECHANICALCylinder Block (3S±FE)EM±108
Page 1317 of 2389
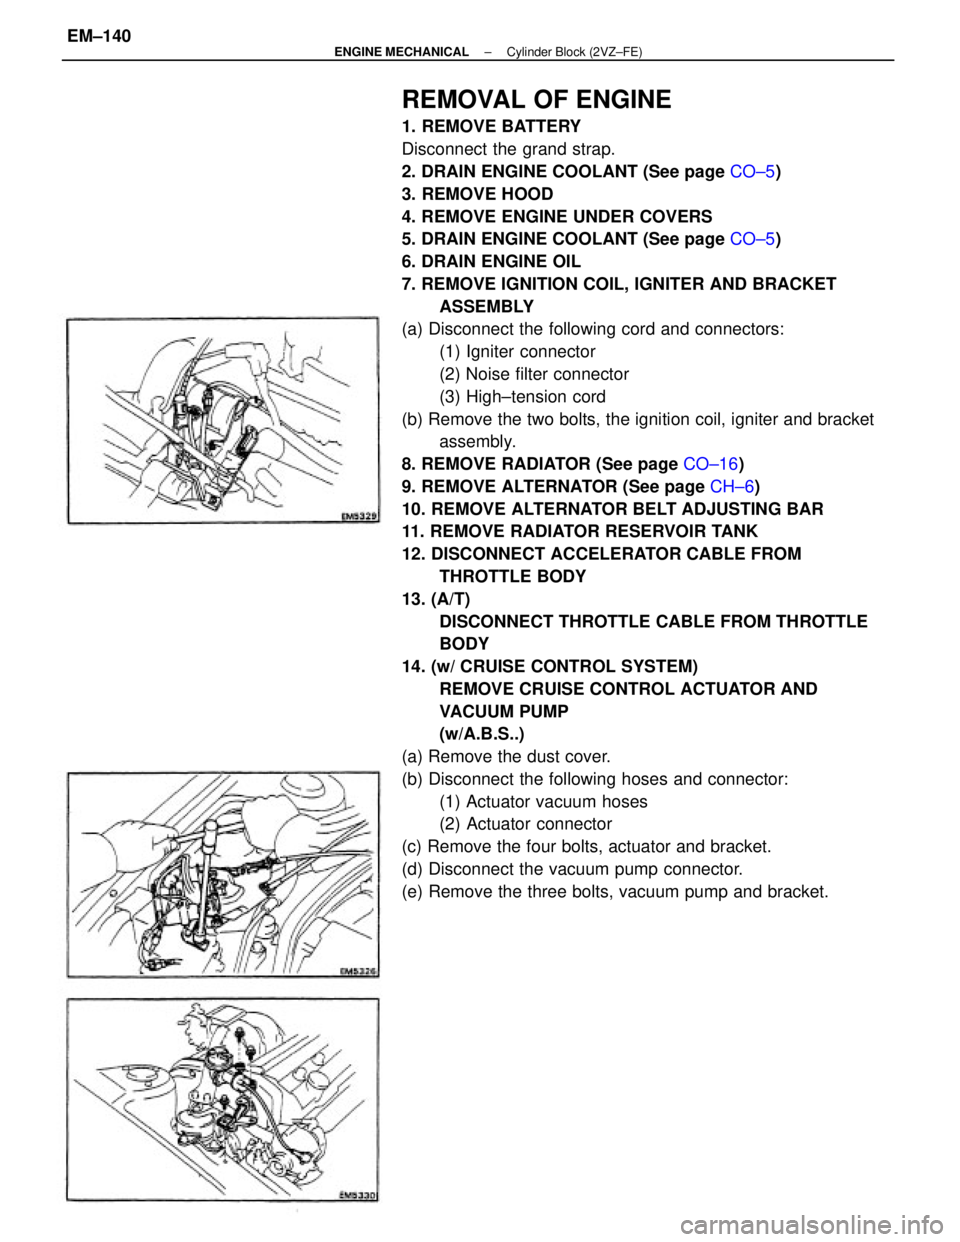
REMOVAL OF ENGINE
1. REMOVE BATTERY
Disconnect the grand strap.
2. DRAIN ENGINE COOLANT (See page CO±5)
3. REMOVE HOOD
4. REMOVE ENGINE UNDER COVERS
5. DRAIN ENGINE COOLANT (See page CO±5)
6. DRAIN ENGINE OIL
7. REMOVE IGNITION COIL, IGNITER AND BRACKET
ASSEMBLY
(a) Disconnect the following cord and connectors:
(1) Igniter connector
(2) Noise filter connector
(3) High±tension cord
(b) Remove the two bolts, the ignition coil, igniter and bracket
assembly.
8. REMOVE RADIATOR (See page CO±16)
9. REMOVE ALTERNATOR (See page CH±6)
10. REMOVE ALTERNATOR BELT ADJUSTING BAR
11. REMOVE RADIATOR RESERVOIR TANK
12. DISCONNECT ACCELERATOR CABLE FROM
THROTTLE BODY
13. (A/T)
DISCONNECT THROTTLE CABLE FROM THROTTLE
BODY
14. (w/ CRUISE CONTROL SYSTEM)
REMOVE CRUISE CONTROL ACTUATOR AND
VACUUM PUMP
(w/A.B.S..)
(a) Remove the dust cover.
(b) Disconnect the following hoses and connector:
(1) Actuator vacuum hoses
(2) Actuator connector
(c) Remove the four bolts, actuator and bracket.
(d) Disconnect the vacuum pump connector.
(e) Remove the three bolts, vacuum pump and bracket.
± ENGINE MECHANICALCylinder Block (2VZ±FE)EM±140