Page 1012 of 2389
5. INSPECT NO±2 COOLING FAN RELAY
(ºAC FAN NO.2º)
A. Inspect relay continuity
(a) Using an ohmmeter, check that there is continuity between
terminals 2 and 6.
(b) Check that there is continuity between terminals 1 and 3.
(c) Check that there is no continuity between terminals 1
and 4.
If continuity is not as specified, replace the relay. 2. INSPECT WATER TEMPERATURE SENSOR
Using an ohmmeter, measure the resistance between the
terminals.
Resistance:
Approx. 1.53 k� at 80°C (176° F)
Approx. 1.18 k� at 90°C (194° F)
Approx. 1.03 k� at 95°C (203°F)
If resistance is not as specified, replace the sensor.
3. INSPECT ENGINE MAIN RELAY (See page CH±16)
4. INSPECT NO.1 COOLING FAN RELAY (ºFAN NO.1 º)
(See page CO±22)
Ignition switch ON Ignition switch ON Tester connectionSpecified valve Condition
Battery voltageBattery voltage
Coolant temp.
Continuity
ContinuityContinuity ResistanceContinuity Check for
Voltage
Voltage
± COOLING SYSTEMElectric Cooling Fans (2VZ±FE)CO±25
Page 1013 of 2389
B. Inspect relay operation
(a) Apply battery voltage across terminal 2 and 6.
(b) Using an ohmmeter, check that there is no continuity be-
tween terminals 1 and 3.
(c) Check that there is continuity between terminals 1 and 4.
If operation is not as specified, replace the relay.
6. INSPECT No.3 COOLING FAN RELAY
(ºAC FAN NO.3º)
(See procedure EFI Main Relay on page FI±122)
7. INSPECT COOLING FAN MOTORS
(a) Connect battery and ammeter to the fan motor connector.
(b) Check that the fan motor rotates smoothly, and check the
reading on the ammeter.
Standard amperage: No. 1 12.1 ±15.1A
No.2 6.0±7.4A
± COOLING SYSTEMElectric Cooling Fans (2VZ±FE)CO±26
Page 1018 of 2389
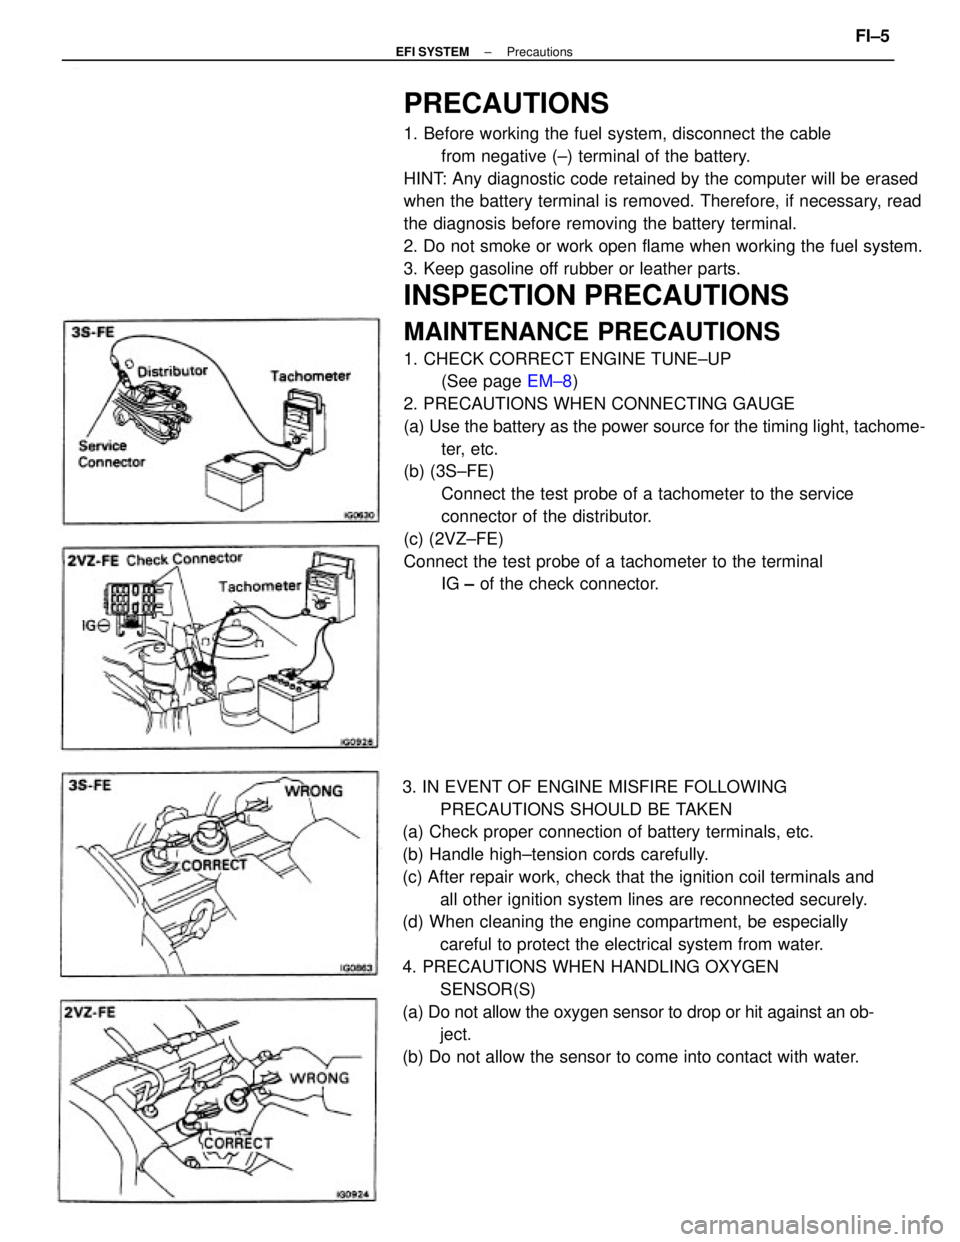
PRECAUTIONS
1. Before working the fuel system, disconnect the cable
from negative (±) terminal of the battery.
HINT: Any diagnostic code retained by the computer will be erased
when the battery terminal is removed. Therefore, if necessary, read
the diagnosis before removing the battery terminal.
2. Do not smoke or work open flame when working the fuel system.
3. Keep gasoline off rubber or leather parts.
INSPECTION PRECAUTIONS
MAINTENANCE PRECAUTIONS
1. CHECK CORRECT ENGINE TUNE±UP
(See page EM±8)
2. PRECAUTIONS WHEN CONNECTING GAUGE
(a) Use the battery as the power source for the timing light, tachome-
ter, etc.
(b) (3S±FE)
Connect the test probe of a tachometer to the service
connector of the distributor.
(c) (2VZ±FE)
Connect the test probe of a tachometer to the terminal
IG ± of the check connector.
3. IN EVENT OF ENGINE MISFIRE FOLLOWING
PRECAUTIONS SHOULD BE TAKEN
(a) Check proper connection of battery terminals, etc.
(b) Handle high±tension cords carefully.
(c) After repair work, check that the ignition coil terminals and
all other ignition system lines are reconnected securely.
(d) When cleaning the engine compartment, be especially
careful to protect the electrical system from water.
4. PRECAUTIONS WHEN HANDLING OXYGEN
SENSOR(S)
(a) Do not allow the oxygen sensor to drop or hit against an ob-
ject.
(b) Do not allow the sensor to come into contact with water.
± EFI SYSTEMPrecautionsFI±5
Page 1019 of 2389
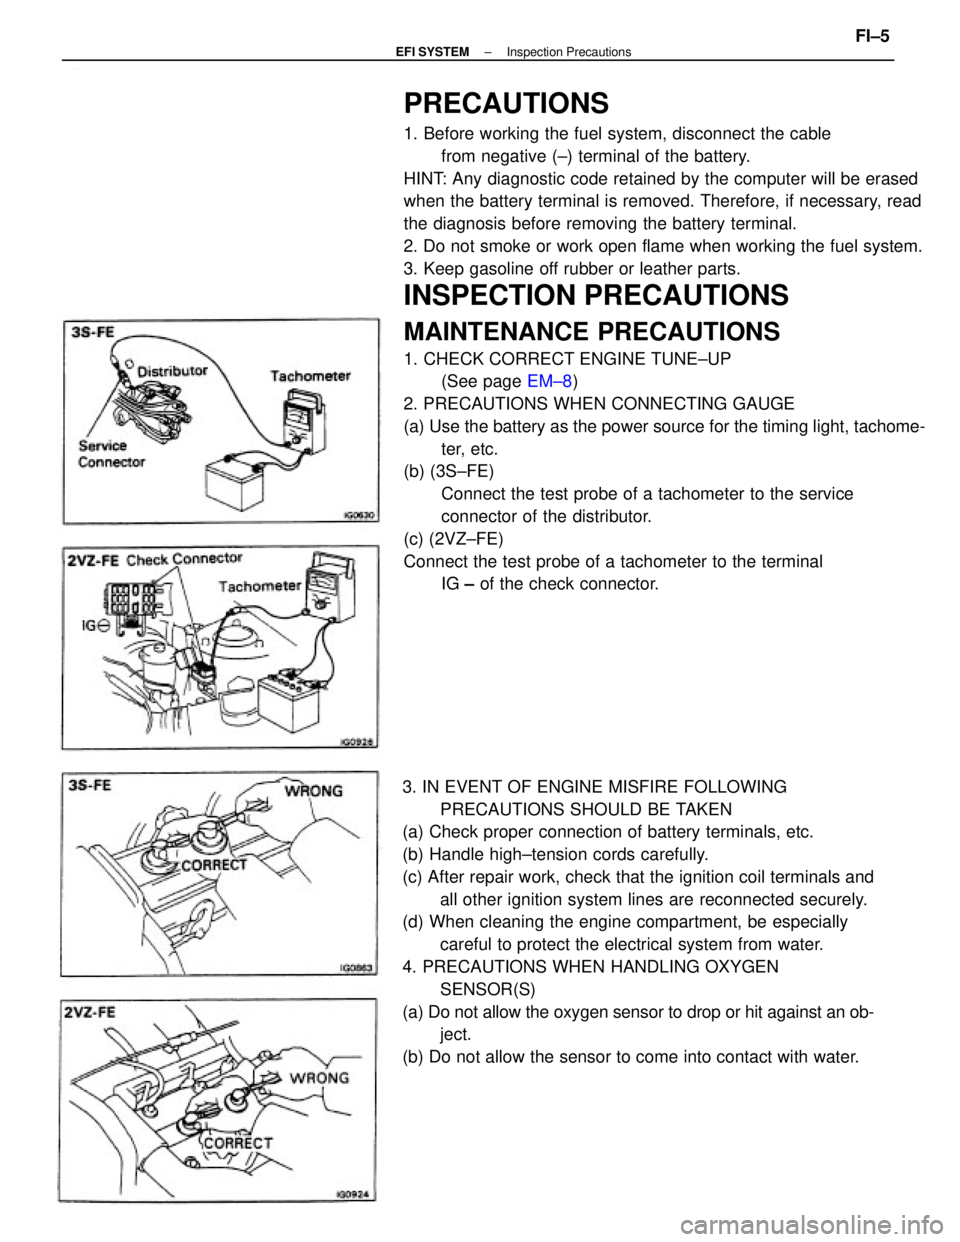
PRECAUTIONS
1. Before working the fuel system, disconnect the cable
from negative (±) terminal of the battery.
HINT: Any diagnostic code retained by the computer will be erased
when the battery terminal is removed. Therefore, if necessary, read
the diagnosis before removing the battery terminal.
2. Do not smoke or work open flame when working the fuel system.
3. Keep gasoline off rubber or leather parts.
INSPECTION PRECAUTIONS
MAINTENANCE PRECAUTIONS
1. CHECK CORRECT ENGINE TUNE±UP
(See page EM±8)
2. PRECAUTIONS WHEN CONNECTING GAUGE
(a) Use the battery as the power source for the timing light, tachome-
ter, etc.
(b) (3S±FE)
Connect the test probe of a tachometer to the service
connector of the distributor.
(c) (2VZ±FE)
Connect the test probe of a tachometer to the terminal
IG ± of the check connector.
3. IN EVENT OF ENGINE MISFIRE FOLLOWING
PRECAUTIONS SHOULD BE TAKEN
(a) Check proper connection of battery terminals, etc.
(b) Handle high±tension cords carefully.
(c) After repair work, check that the ignition coil terminals and
all other ignition system lines are reconnected securely.
(d) When cleaning the engine compartment, be especially
careful to protect the electrical system from water.
4. PRECAUTIONS WHEN HANDLING OXYGEN
SENSOR(S)
(a) Do not allow the oxygen sensor to drop or hit against an ob-
ject.
(b) Do not allow the sensor to come into contact with water.
± EFI SYSTEMInspection PrecautionsFI±5
Page 1020 of 2389
IF VEHICLE IS EQUIPPED WITH MOBILE
RADIO SYSTEM (HAM, CB, ETC.)
The ECU has been designed so that it will not be affected ±by out-
side interference.
However, if your vehicle is equipped with a CB radio transceiver,
etc. (even one with about 10 W output), it may, at times, have an
affect upon ECU operation, especially if the antenna and feeder are
installed nearby.
Therefore, observe the following precautions:
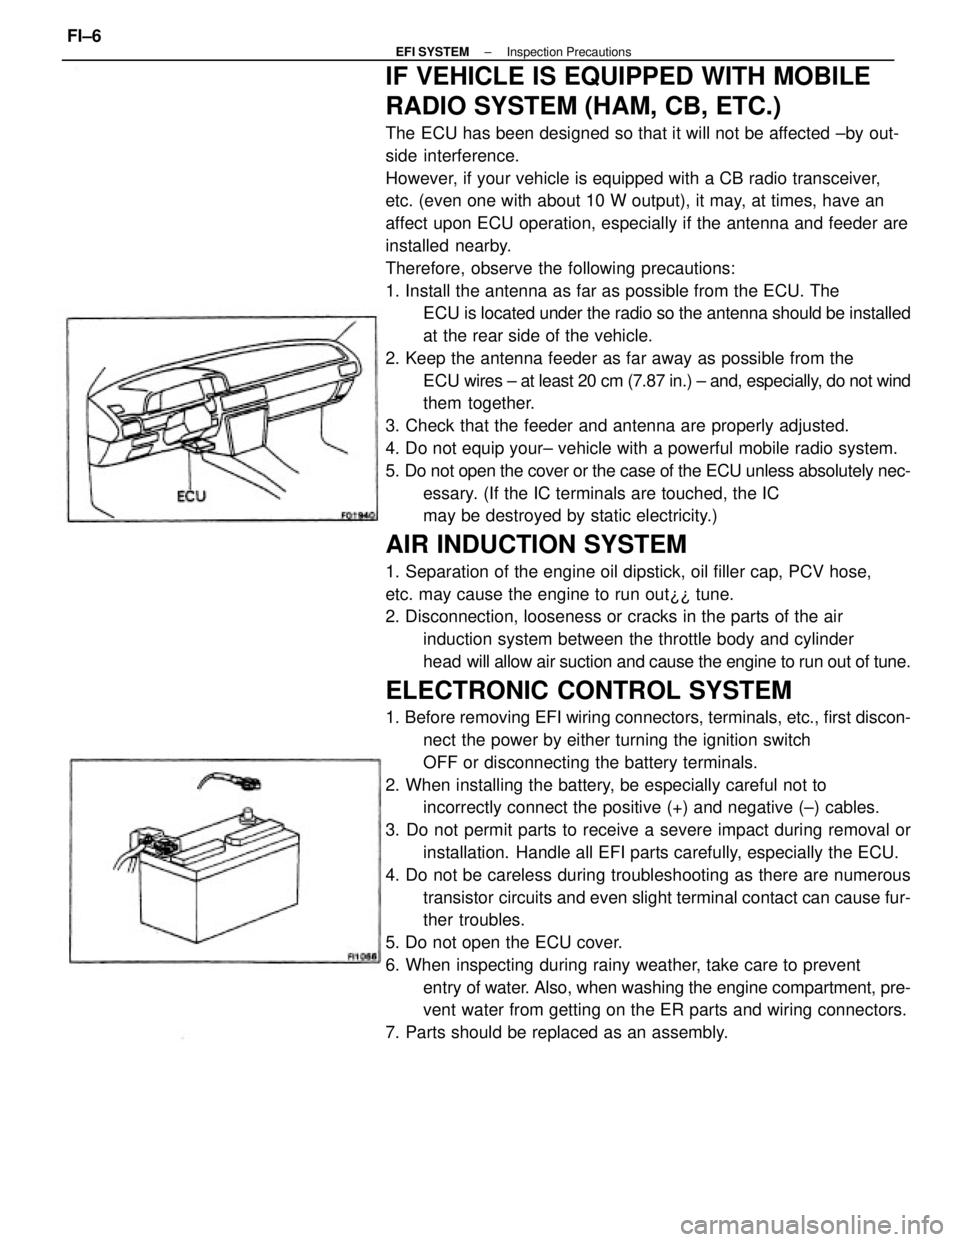
1. Install the antenna as far as possible from the ECU. The
ECU is located under the radio so the antenna should be installed
at the rear side of the vehicle.
2. Keep the antenna feeder as far away as possible from the
ECU wires ± at least 20 cm (7.87 in.) ± and, especially, do not wind
them together.
3. Check that the feeder and antenna are properly adjusted.
4. Do not equip your± vehicle with a powerful mobile radio system.
5. Do not open the cover or the case of the ECU unless absolutely nec-
essary. (If the IC terminals are touched, the IC
may be destroyed by static electricity.)
AIR INDUCTION SYSTEM
1. Separation of the engine oil dipstick, oil filler cap, PCV hose,
etc. may cause the engine to run out¿¿ tune.
2. Disconnection, looseness or cracks in the parts of the air
induction system between the throttle body and cylinder
head will allow air suction and cause the engine to run out of tune.
ELECTRONIC CONTROL SYSTEM
1. Before removing EFI wiring connectors, terminals, etc., first discon-
nect the power by either turning the ignition switch
OFF or disconnecting the battery terminals.
2. When installing the battery, be especially careful not to
incorrectly connect the positive (+) and negative (±) cables.
3. Do not permit parts to receive a severe impact during removal or
installation. Handle all EFI parts carefully, especially the ECU.
4. Do not be careless during troubleshooting as there are numerous
transistor circuits and even slight terminal contact can cause fur-
ther troubles.
5. Do not open the ECU cover.
6. When inspecting during rainy weather, take care to prevent
entry of water. Also, when washing the engine compartment, pre-
vent water from getting on the ER parts and wiring connectors.
7. Parts should be replaced as an assembly.
± EFI SYSTEMInspection PrecautionsFI±6
Page 1024 of 2389
TROUBLESHOOTING
TROUBLESHOOTING HINTS
1. Engine troubles is usually not caused by the EFI system.
When troubleshooting, always first check the condition of
the other systems.
(a) Electronic source
wBattery
wFusible links
wFuses
(b) Body ground
(e) Fuel supply
wFuel leakage
wFuel filter
wFuel pump
(d) Ignition system
wSpark plugs
wHigh±tension cords
wDistributor
wIgnition coil
wIgniter
(e) Air induction system
wVacuum leaks
(f) Emission control system
wPCV system
wEGR system
(g) Others
wIgnition timing (ESA system)
wdle speed (ISC system)
wetc.
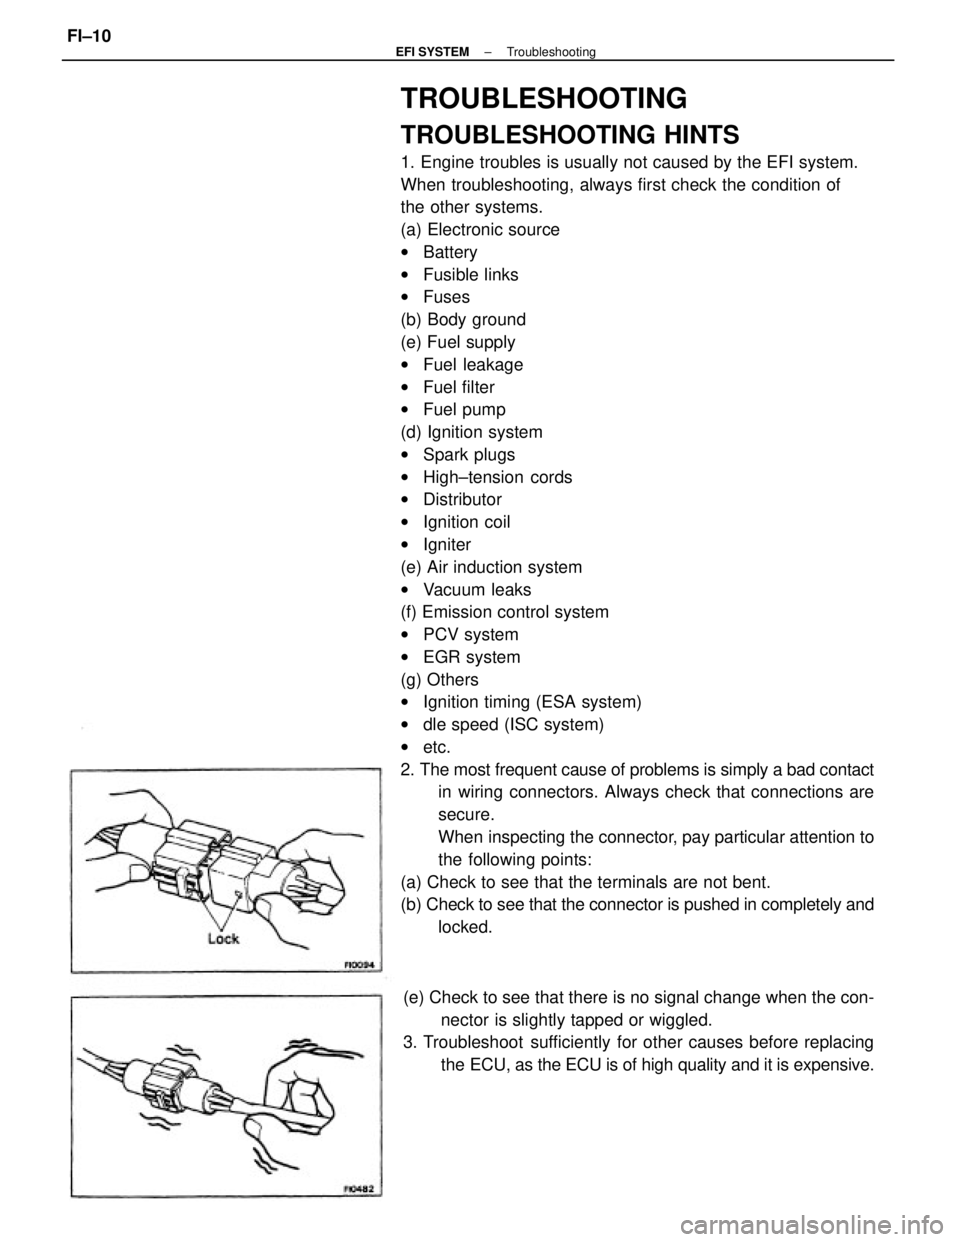
2. The most frequent cause of problems is simply a bad contact
in wiring connectors. Always check that connections are
secure.
When inspecting the connector, pay particular attention to
the following points:
(a) Check to see that the terminals are not bent.
(b) Check to see that the connector is pushed in completely and
locked.
(e) Check to see that there is no signal change when the con-
nector is slightly tapped or wiggled.
3. Troubleshoot sufficiently for other causes before replacing
the ECU, as the ECU is of high quality and it is expensive.
± EFI SYSTEMTroubleshootingFI±10
Page 1025 of 2389
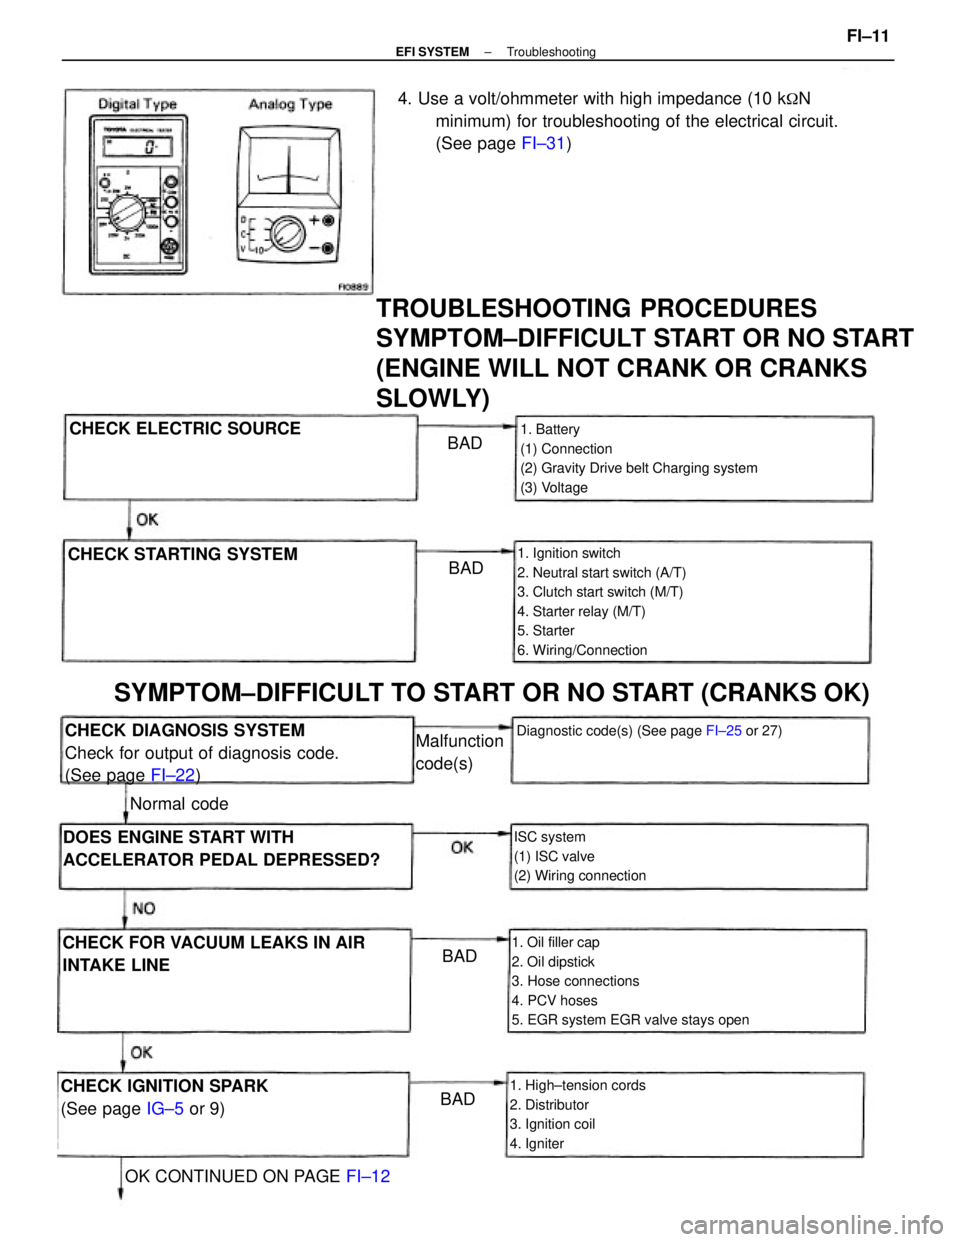
TROUBLESHOOTING PROCEDURES
SYMPTOM±DIFFICULT START OR NO START
(ENGINE WILL NOT CRANK OR CRANKS
SLOWLY)
4. Use a volt/ohmmeter with high impedance (10 k�N
minimum) for troubleshooting of the electrical circuit.
(See page FI±31)
1. Oil filler cap
2. Oil dipstick
3. Hose connections
4. PCV hoses
5. EGR system EGR valve stays open1. Battery
(1) Connection
(2) Gravity Drive belt Charging system
(3) Voltage
1. Ignition switch
2. Neutral start switch (A/T)
3. Clutch start switch (M/T)
4. Starter relay (M/T)
5. Starter
6. Wiring/Connection
SYMPTOM±DIFFICULT TO START OR NO START (CRANKS OK)
CHECK DIAGNOSIS SYSTEM
Check for output of diagnosis code.
(See page FI±22)
1. High±tension cords
2. Distributor
3. Ignition coil
4. Igniter
DOES ENGINE START WITH
ACCELERATOR PEDAL DEPRESSED?
CHECK FOR VACUUM LEAKS IN AIR
INTAKE LINEISC system
(1) ISC valve
(2) Wiring connection
CHECK IGNITION SPARK
(See page IG±5 or 9)
Diagnostic code(s) (See page FI±25 or 27)
OK CONTINUED ON PAGE FI±12 CHECK STARTING SYSTEMCHECK ELECTRIC SOURCE
Malfunction
code(s)
Normal codeBAD BAD
BAD
BAD
± EFI SYSTEMTroubleshootingFI±11
Page 1030 of 2389
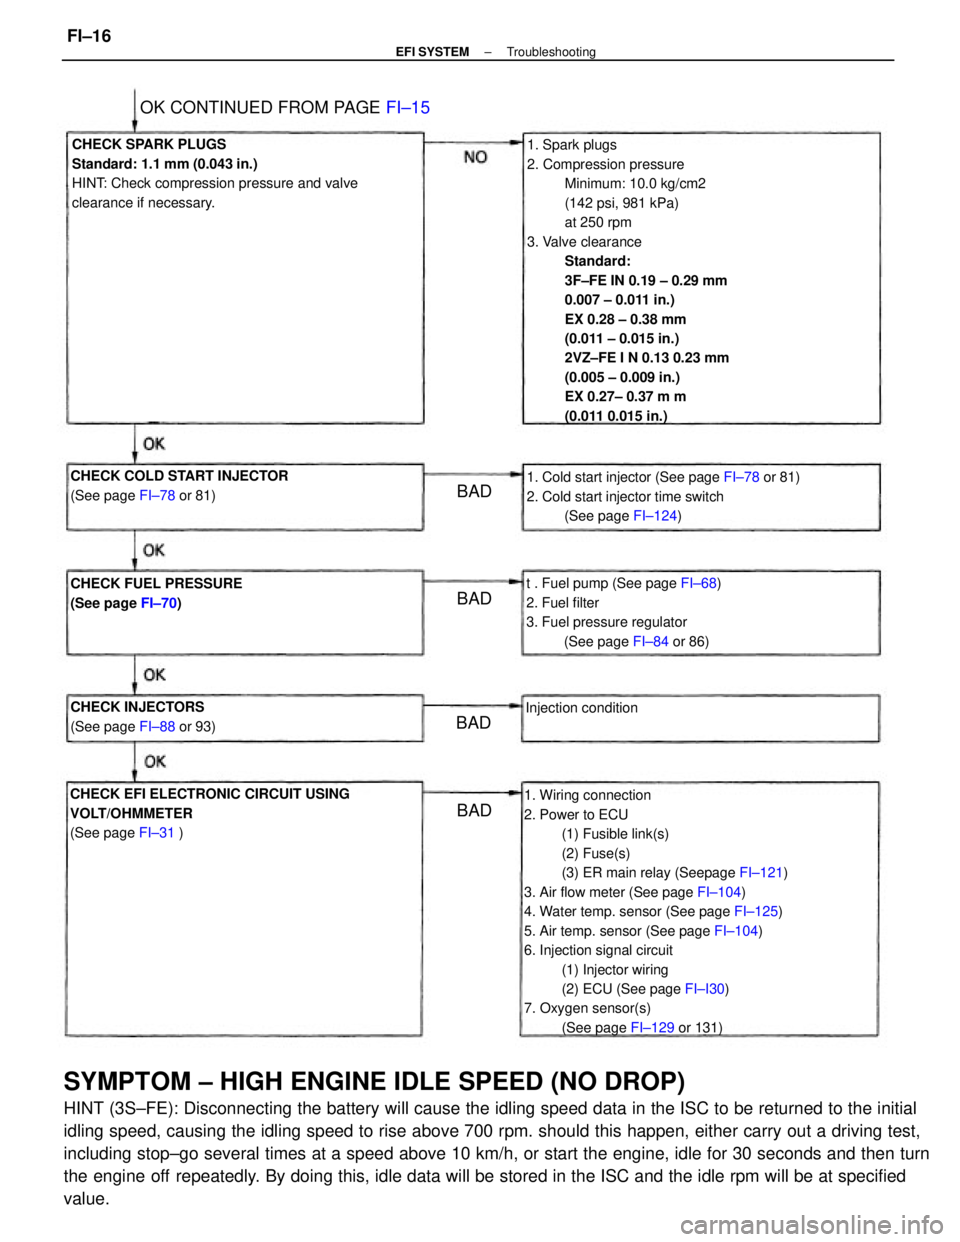
SYMPTOM ± HIGH ENGINE IDLE SPEED (NO DROP)
HINT (3S±FE): Disconnecting the battery will cause the idling speed data in the ISC to be returned to the initial
idling speed, causing the idling speed to rise above 700 rpm. should this happen, either carry out a driving test,
including stop±go several times at a speed above 10 km/h, or start the engine, idle for 30 seconds and then turn
the engine off repeatedly. By doing this, idle data will be stored in the ISC and the idle rpm will be at specified
value.
1. Spark plugs
2. Compression pressure
Minimum: 10.0 kg/cm2
(142 psi, 981 kPa)
at 250 rpm
3. Valve clearance
Standard:
3F±FE IN 0.19 ± 0.29 mm
0.007 ± 0.011 in.)
EX 0.28 ± 0.38 mm
(0.011 ± 0.015 in.)
2VZ±FE I N 0.13 0.23 mm
(0.005 ± 0.009 in.)
EX 0.27± 0.37 m m
(0.011 0.015 in.)
1. Wiring connection
2. Power to ECU
(1) Fusible link(s)
(2) Fuse(s)
(3) ER main relay (Seepage FI±121)
3. Air flow meter (See page FI±104)
4. Water temp. sensor (See page FI±125)
5. Air temp. sensor (See page FI±104)
6. Injection signal circuit
(1) Injector wiring
(2) ECU (See page FI±I30)
7. Oxygen sensor(s)
(See page FI±129 or 131) CHECK SPARK PLUGS
Standard: 1.1 mm (0.043 in.)
HINT: Check compression pressure and valve
clearance if necessary.
CHECK EFI ELECTRONIC CIRCUIT USING
VOLT/OHMMETER
(See page FI±31 )1. Cold start injector (See page FI±78 or 81)
2. Cold start injector time switch
(See page FI±124)
t . Fuel pump (See page FI±68)
2. Fuel filter
3. Fuel pressure regulator
(See page FI±84 or 86) CHECK COLD START INJECTOR
(See page FI±78 or 81)
CHECK FUEL PRESSURE
(See page FI±70)
OK CONTINUED FROM PAGE FI±15
CHECK INJECTORS
(See page FI±88 or 93)Injection condition
BADBAD
BAD
BAD
± EFI SYSTEMTroubleshootingFI±16