Page 49 of 105
 until it locks. When the tape reaches the end, the EJECT but")
Downloaded from www.Manualslib.com manuals search engine To listen to an earlier selection, slide EJECT button to the right ("REV") until it locks. When the tape reaches the end, the EJECT button will automatically
return to center position and the tape will resume playing.
To stop reverse at any time, return the EJECT button to its center position.
NOTE: Belore turning off ignition, eject the cassette tape. Insertion 01 the
cassette tape cartridge overrides the radio and the time-ol-day
will be
displayed continuously.
For best results, use only cassettes which are 30 to 60 minutes in length.
ETR AM-FM Stereo (Seek/Scan) with Cassette 5-Band
Equalizer and Clock
VDL+BAL
~o ~ PAOG·ACL
TUNE --Y-FADE
~O
~ AM-FM
o,~ -, 'M ST
".f AM.
SCAN 1 2 3 4 SEEK
-IlIIIIIIlIIIII IIDIDI IBIIIIII IIDDID IDIDID DIIIIIII!IIIII
PWR LOUD
DIb! AUTO REVERSE
DNIl .Cr02
CD
To operate the ETR AM-FM Stereo radio:
• Power Button ("PWR") -press to turn radio on. Press again to turn radio
off.
• Upper Knob -rotate knob to control volume. Press knob ti:> recall station
frequency when listening to the radio with the ignition on, or to display time-ol-day with ignition off. Depress knob to select the other side 01 the
tape when the cassette
is playing.
•
Loudness Button ("LOUD") - Press to boost bass frequencies when the
radio is
playing at low volume.
• Balance Control (located behind upper knob) -turn to adjust left/right
speaker balance.
• Lower Knob -rotate knob to manually tune radio stations. Frequency will
be displayed during tuning. Press knob to alternately select AM or FM
band.
• Front/Rear Speaker Control (located behind lower knob) -rotate control
to adjust the sound between the lront and rear speakers.
• 5-Band Graphic Equalizl!i' -allows you to adjust bass, midrange, and treble to suit personal taste. Move control up to increase that frequency
range, or down to decrease that frequency range. When a control is in the
center (detent) position, that
Irequency range will not be processed by the
graphic equalizer. When all 5 controls are in the center (detent) position,
the system has a flat frequency response:
NOTE: 60 and 250 denote bass; 1 K denotes midrange; 3.5k and 10k
denote treble.
2-33
Page 50 of 105

Downloaded from www.Manualslib.com manuals search engine • Pushbuttons
The radio has four pushbuttons
you can use to easily select your favorite
stations. You may select four AM and four FM stations for a total of eight
selections.
To set push buttons:
1. Make sure the bandswitch is on the band you want. Then, tune in the desired station.
2. Gently pull one of the four station pushbuttons and release.
The radio will then tune to the selected station whenever you press the station button.
• SEEK and SCAN
Use the SEEK and SCAN buttons for automatic station tuning.
Press
SCAN button to automatically sample each station being received. To
stop SCAN, press SCAN button again.
The SCAN indicator light on the frequency dial will be lit during SCAN operation.
Press the SEEK button to automatically locate and retain the next listenable
station on the band.
• Time Set:
To set the hour, gently pull and hold the
SCAN button untif the correct hour
appears.
To set the minutes, gently pull and hold the
SEEK button untif the correct
minute appears.
The
FM stereo indicator will light up whenever an FM station is broadcasting in
stereo. "Stereo" operation means the radio is separating a stereo broadcast
back into the original two channels, called "left" and "right". Stereo sound is
noticeably realistic to the ear.
To operate tape player:
Insert the cassette squarely through the door. This automatically
sw~ches the
unit from radio to tape operation. Ii the sound is garbled (or there is no sound),
eject the tape and reinsert it squarely.
After the cassette has snapped into position, adjust the volume and fader
controls to your preference.
To quickly advance to the next selection, press the button next to the lighted
indicator. To listen to
an earlier selection, press the button next to the
unlighted indicator. To stop the forward or reverse. movement, press the
EJECT button to eject the tape.
When the left indicator light is lit. the top side of the tape is playing. When the
right indicator light is lit. the bottom side of the tape is playing.
NOTE:
When end-of-tape is reached in one direction, the unit will automatically
play
in the opposite direction, and will play the other side of the tape.
When ignition is turned off, the pinch roller automatically releases the tape.
2-34
Page 51 of 105

Downloaded from www.Manualslib.com manuals search engine Insertion of the cassette tape cartridge overrides the radio and the time-of-day will be displayed continuously .
Press the Dynamic Noise Reduction (DNRTM) button to rerrove high
frequency background
hiss on AM. FM. FM stereo. and tape.
Select the setting
fO( proper tape equalization(CrO .)as follows:
1. Select 70 usec (push button in).
2. Select 120 usec (button is out).
The
equalization setting which is desired will vary according to the type of tape
being used. Chrome and metal tapes have 70 usec equalization. while Iron tapes have 120 usec equalization .
The tape bias is often indicated on the cassette label or case .
For best
resu~s. use only tapes which are 30 to 60 minutes in length.
MOBILE RADIO SYSTEMS
Mobile two-way radiO units and mobile telephone equipment are subject to federal rules and must be installed by trained personnel. Certain such
equipment or the manner of its installation may
possibly adversely affect
vehicle operation. Expenses incurred to protect the vehicle systems from the interaclion of these added mobile communication systems are not the
responsibiWty of Chevrolet Motor Division.
Citizen Band (CB)
racios and garage door openers normally will not affect
vehicle
operation.
Fixed Mast Antenna
The fixed mast antenna is designed to withstand most car washes without
damage .
It cannot be adjusted up or down. If the mast becomes slightly bent.
you can straighten it by hand . The mast antenna can be replaced
if severely
bent (by vandalism . etc .) . Mast antennas must be kept clean for good
performance .
OTHER CONTROLS AND FEATURES
HATCHBACK LID
To open the hatchback lid. use the oval-head key in the lock at the rear of the
car .
Close the lid firmly to be sure it locks.
LlFTGATE OPERATION (STATION WAGONS)
To open the liftgate. use the oval-head key in the outside . lock. (Two gas
support struts. one at
each side of the glass . are designed to help hold the
gate open.)
CAUTION: TIle Ilftg" or hatchback lid should be claed while driving to help avoid
drawing dangerous exhaust S .... Into the eIIr. (8M "Engine Extulust GuCautlon (Carbon Monoxide)" at the 'beginning of "Starting and Operating," Section 2 of thl, manual.)
If you have to drive with the liftgate or hatchback lid open. these precautions
should be observed :
• Close all other windows .
2-35
Page 52 of 105

Downloaded from www.Manualslib.com manuals search engine • Adjust the heating or cooWng system to force outside air into the cal as
follows :
1. On cars not equipped with air conditioning , set the fan to high speed
and the upper control lever to any position except "Off."
2 . On cars equipped with air condition ing, set the fan to high speed and
the
upper control lever to any position except "Off" or "Max."
• On cars that have outside air vents in or under the instrument panel, open
vents
fully .
"Gate Ajar" Ught
Station wagons have a "GATE AJAR" warning light located in the instrument
cluster . It is designed to come on ~ the liftgate is not lully closed and the
ignition is on , thus warning against driving with the liftgate even partially open.
See "Engine Exhaust Gas Caution (Carbon Monoxide)" at the beginning 01
"Starting and Operating ," Section 2 of this manual . To test that the ight circuit
is working correctly , start the car and check that the light comes on when the liftgate is open or only partially latched.
Electric Trunk, Hatchback , Or Tailgate Release
An electric release permits opening the trunk, hatchback or station wagon tailgate from inside the car by pressing a release bunon in the instrument panel
glove box. The release lor the hatchback and the station wagon tailgate will
function only II the automatic transaxle is in "P" (Park) or "N" (Neutral) or, on
manual transaxle cars, ~ the parking brake is applied .
SUNSHADE (OPTIONAL)
n your hatchback model is equipped with the optional louvered rear window
sunshade, the
sunshade·is hinged at the top and heid down at the boUom by a
one-quarter tum fastener on each end of the sunshade. This method of
attachment
allows you to raise the sunshade lor cleaning the exterior of the
hatchback glass :
To clean the hatchback lid exterior glass:
1. Using a coin or screwdriver , rotate each lastener one-quarter turn until they pop up; the sunshade is now unlocked .
2. Grasp the lower edge 01 the sunshade approximately in the middle and lift
the sunshade away Irom the hatchback lid.
3. Clean the hatchback glass as desired while holding the sunshade in the
open position.
4 . Lower the sunshade to
its original position and locate the one-quarter turn
fasteners over the holes in the lower bracket assemblies; using a coin or
screwdriver, push the one-quarter turn stud downward
until it engages the
wire bail on the bracket and rotate one-quarter turn to lock. (Make sure the
lastener is
locked to the bracket by. lifting each corner 01 the sunshade.)
NOnCE: DO NOT DRIVE when sunshade is not lOcked in position.
To remove the sunshade from the car, ~ desired , release the sunshade as you would lor cleaning. Then, remove the four nuts which secure the sunshade
hinges to the hinge base
plate on the hatchback lid. Wft the sunshade assembly from the car.
2-36
Page 53 of 105

Downloaded from www.Manualslib.com manuals search engine To store the sunshield when rennoved from the car, always select a place
where the sunshade can lay flat without anything stored on top of it or leaned against it. Hanging the sunshade flat on a wall by its hinges is an excellent way
to store it.
As with any decorative surface. washing with a mild soap and water solution is
recommended . Abrasive materials or chemical solvents may adversely affect
the finish of the sunshade.
FOLDING SEATBACK OPERATION
Station wagon and hatchback models are equipped with either a one-piece or split folding rear seatback which is not designed to lie flat, but does provide
additional load floor area when lowered .
To lower the one-piece second seatback, pull the lever at the right side of the
second seatback and fold down. Styles equipped with split folding rear
seatbacks have a
lever on both the right and left sides which allows either side
to be folded down separately . Stops on the load floor hold the seatback folding
panels. locking
the seatbacks down. To lock a seatback in place, push down on the front of the seatback and slip the filler panel over its stop on the load
floor .
To raise a seat back. push down on seatback to release it from its stop. lift the folding panel slightly to clear the stop, then raise the seatback.
Keep the seat
belt webbing and hardware clear of seat hinging and latching
mechanisms when you @ the folding seat. This helps prevent damage to the
belt system.
Check now and then
to see if the latch or latches, if so equipped, on the folding rear seat or seats work properly. To do this, push forward and pull
rearward on the top of the seatback or each seatback, if so equipped.
seatback(s) that
do not latch properly in the upright position. must be repaired
because
in a sudden stop rt could cause injury.
VISTA·VENT
The Vista-Vent is a hinged glass panel. The panel can be opened by moving
the
latch release handle forward and up to lock the glass in place. The glass
will
stay open only in the fully up position -when the rear of the glass is raised
about 38 mimmeters (1-1/ 2 inches) . As an added feature, an air deflector will
pop up when the glass panel is opened to help assure a smooth flow of air
over the roof.
2·37
Page 54 of 105

Downloaded from www.Manualslib.com manuals search engine >1;' l ' "0'
VENT GLASS ~C"rl I / iT'--.... /.1 TO AEMOVE GLASS I,~ATCH ASSEMBlY
PUSH HERE TO ~ / SEPARATE THE @ ':ATCH ASSEM81. Y TRIM LACE~ i VISTA VENT GLASS STOWAGE BAG
/, ---~\~ ~STOWAGEBAG
\~ . ~~ ESCUTCHEON ASSEMBLY S', I I '
" I .,'
OPEN VISTA VENT INTERIOR VIEW VIEWA RETAINER
The glass panel can also be removed completely , First, open the Vista-Vent as described , Then, press the glass release tab (in the latch release handle) and
lift the panel
l.P and out to disengage the front hinges, Store the glass panel in
the protective storage bag in the trunk or rear area.
CAUTION: To hetp avoid perso ..... ·injUIY and/or equipment damage :
• 00 not try to remove the panel while the car is moving. Otherwise, the PMWI may become a hazard by, f.ling into or flying off the car.
• After removing the roof panel, place It in the protective beg provided. Stow the root panel In the trunk, 11 the vehicle 18 so equipped. If your car Is • hatchbKk, stow the roof panel on the re ... ·k)ad floor behind the second seat and secure the straps on the beg to the anchor brackets as shown. This will he&p keep the panel from being thrown about and Injuring people during a collision or sudden maneuver, AND will
help protect the panel.
• The protective stor-ve ~ and the brackets mounted in the rear of hatchbacks are designed to eecur. ONLY the removab. root panel
• After putting the roof panel back In piaee, alway. check that it I. flrmlylatehed by pushing up on the underside of the panel.
ROLL-UP CARGO COVER (HATCHBACKS)
Hidclen stowage in the rear area of hatchbacks is provided by the optional roll
up cargo cover. The cover is mounted behind the rear . seat and can be
extended over the rear area by grasping the handle and pulling the cover
rearward like a window shade.
Eyelets at each corner of the cover can be
placed on hooks at the baCk corners of the rear area to hold the cover in place.
To carry larger items the cargo cover can be removed and the rear seat folded
down, To remove the cover, grasp one end of the roller and push it toward the
opposite end. This
will shorten it so you can s~de ~ out of the bracket on the
trim
panel. Stow the rolled cover on the floor behind the front seat
When installing the cover be sure the handle is on top. Standing at either side,
grasp one end of the roller and place the
opPOSite end into the mounting
bracket on the far side . Push the roller toward the inserted end to shorten it
and slide the near
end into the slot of the other bracket so it snaps in place,
Pull on each end of the cover to be sure it is fully seated . The cover can be left
rolled up when not needed.
2-38
Page 55 of 105

Downloaded from www.Manualslib.com manuals search engine CAUTION: To help keep the cargo . cover from being thrown about and injuring people during a collision or sudden maneuver:
• Be SW"8 the COYW is Installed IICCOf'dfng to theM Instructions.
• When not installed, stow the cover behind the front seets (see ilustration).
Your vehicle may be equipped with optional rear seat shoulder belts in addition
to the roll-up cargo cover, or you may wish to install a child restraint system
thai requires use of a top strap in the rear seat of the vehicle.
In either case,
be sure to route the shoulder belts or top strap ABOVE the cargo cover roller. Hold the shoulder belts out to the side if it is necessary to extend or retract the
cargo cover
while the shoulder belts are in use.
CAUTION: When using rew' sea. shoulder bette or • chikt rnfrainC system that requires a top .trap, alwaY' route the shoulder bett$ or top strap ABOVE the cargo cover roller. If a shoulder belt or top strap is routed under the roller, it could dislodge the roller during a coIIiaion and increne the risk of personal injury.
ROLL-UP CARGO COVER (STATION WAGONS)
Hidden stowage in the rear area of station wagons is provided by the optional
cargo cover . The cover is mounted behind the rear seat and can be extended
over the rear area by grasping Ihe handle and pullinglhe cover rearward like a
window shade. Pins at each corner of Ihe cover can be placed in retainers at
the back corners of the rear area to hold the
cover in place.
To carry larger items, the cargo cover can be removed
and the rear seat folded
down. To remove the cover. grasp one end of the roller and push it toward the oppos~e end. This will shorten it so you can slide ~ out of the bracket on the
trim panel. Slow the rolled
cover on the floor behind the front seat.
2-39
Page 56 of 105

Downloaded from www.Manualslib.com manuals search engine When installing the cover,oo sure the handle is on top. Standing at either side, grasp one end of the roller and place the opposite end into the mounting
bracket on
the far side . Push the roller toward the inserted end to shorten it
and slide the near end into the slot of the other bracket so it snaps in place.
Pull on each end of the cover to 00 sure it is fully seated. The cover can be left
rolled
up when not needed .
CAUTION: To help keep u.., cargo cover from being thrown .,.a,oot and jnjlM'ing people during a collision or sudden maneuver:
• Be sure _the cover is installed according to these Instructions.
• WMn not-instalted, stow, the cover behind the front seats as shown.
• Remove and stow the roiler when a top-strap equipped child restraint is placed In the rear seat.
ROOF CARRIER (STAnON WAGON ONLY)
The optional roof luggage carrier is designed to allow loading of items onto the
roof
' of your car. The carrier does not increase the total Ioad-carrying capacity
of the car, shown oppoSite "Max Load " on the TIre Placard on the driver's
door. Be sure the
total weight of the cargo on the roof, plus the weight of the
cargo and passengers inside
the car, plus the tongue load of any trailer you
are towing, does not exceed this· "Max Load" vehicle capacity weight. See "Tires" in "Service and Maintenance," Section 5 for more information on
vehicle loading. If needed, see "Trailer Towing" in "Starting and. Operating,"
Section 2 .
NOnce: To hetp avOid damage to the car, do not exceect 70 kilograms (150 pounds) cargo weight on the roof. Position the cargo on the luggage carrier as evenly as possible. If carrying long items , never exceed car length emUasten loads eacurely at the front and rear of the car, as well as to the luggage ~rier.
The carrier consists of: five roof slats attached to the top of the car, two
crossrails with knobs at each end that allow the crossrails to 00 adjusted or removed, and six adjustable tie-downs.
2-40
 1
1 2
2 3
3 4
4 5
5 6
6 7
7 8
8 9
9 10
10 11
11 12
12 13
13 14
14 15
15 16
16 17
17 18
18 19
19 20
20 21
21 22
22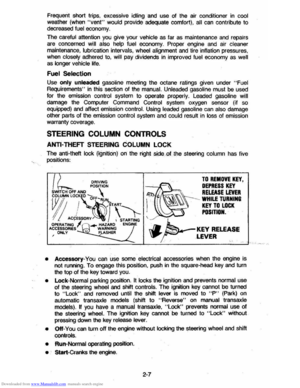 23
23 24
24 25
25 26
26 27
27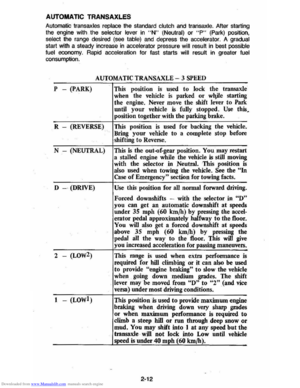 28
28 29
29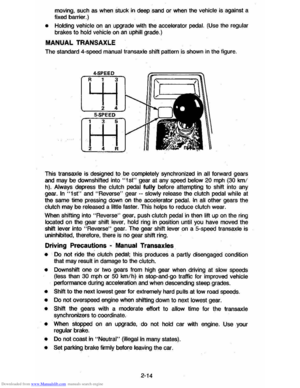 30
30 31
31 32
32 33
33 34
34 35
35 36
36 37
37 38
38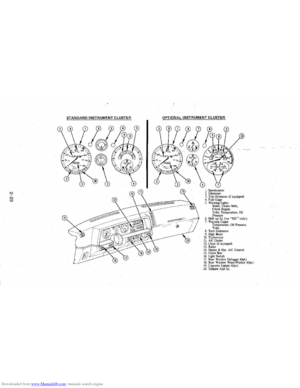 39
39 40
40 41
41 42
42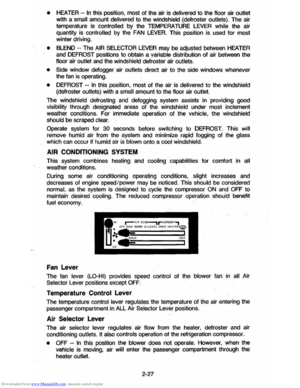 43
43 44
44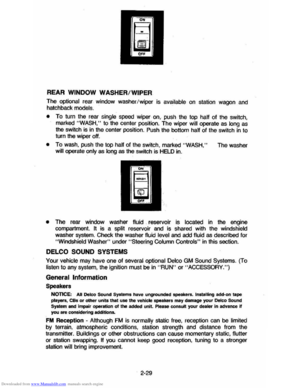 45
45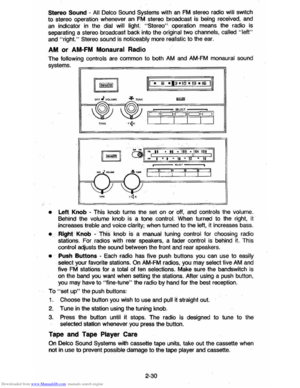 46
46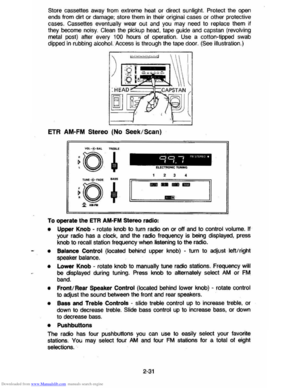 47
47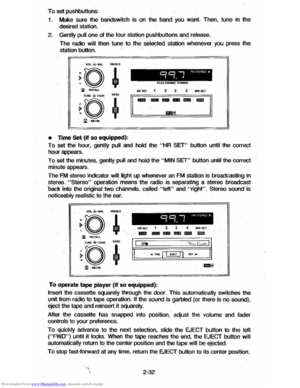 48
48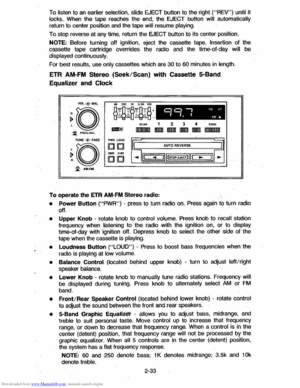 49
49 50
50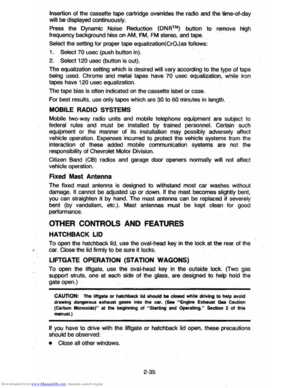 51
51 52
52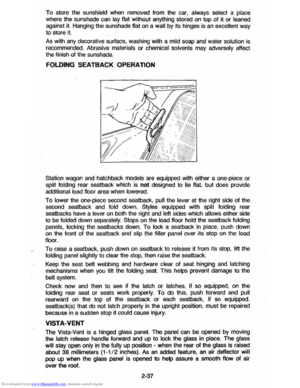 53
53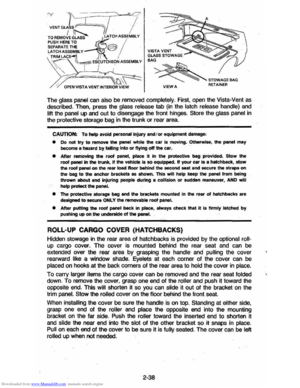 54
54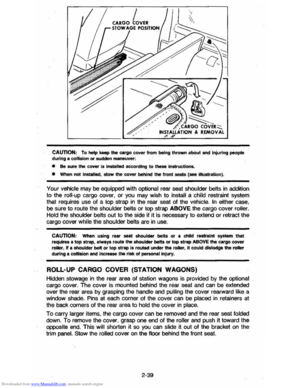 55
55 56
56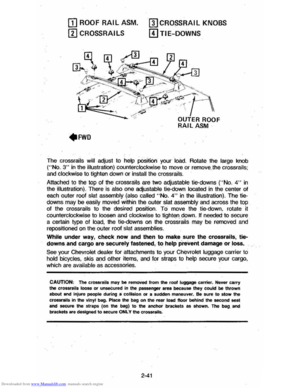 57
57 58
58 59
59 60
60 61
61 62
62 63
63 64
64 65
65 66
66 67
67 68
68 69
69 70
70 71
71 72
72 73
73 74
74 75
75 76
76 77
77 78
78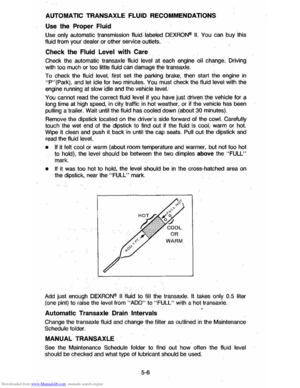 79
79 80
80 81
81 82
82 83
83 84
84 85
85 86
86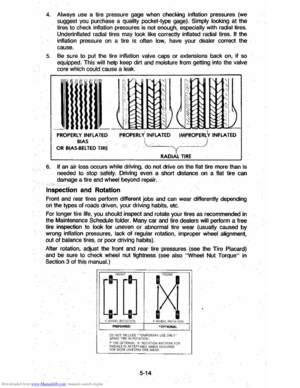 87
87 88
88 89
89 90
90 91
91 92
92 93
93 94
94 95
95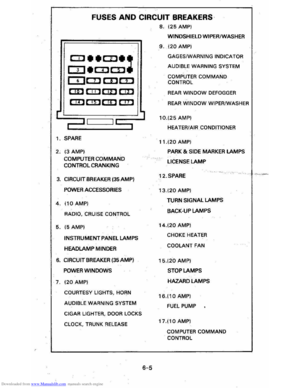 96
96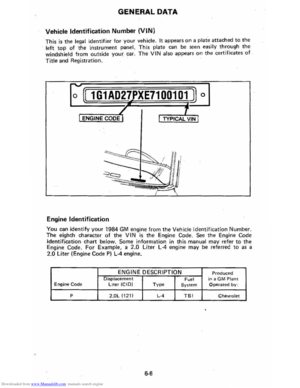 97
97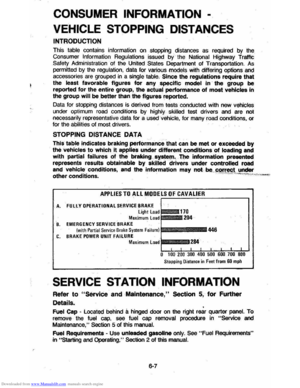 98
98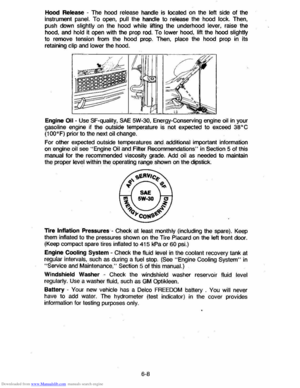 99
99 100
100 101
101 102
102 103
103 104
104