1984 CHEVROLET CAVALIER clutch
[x] Cancel search: clutchPage 26 of 105
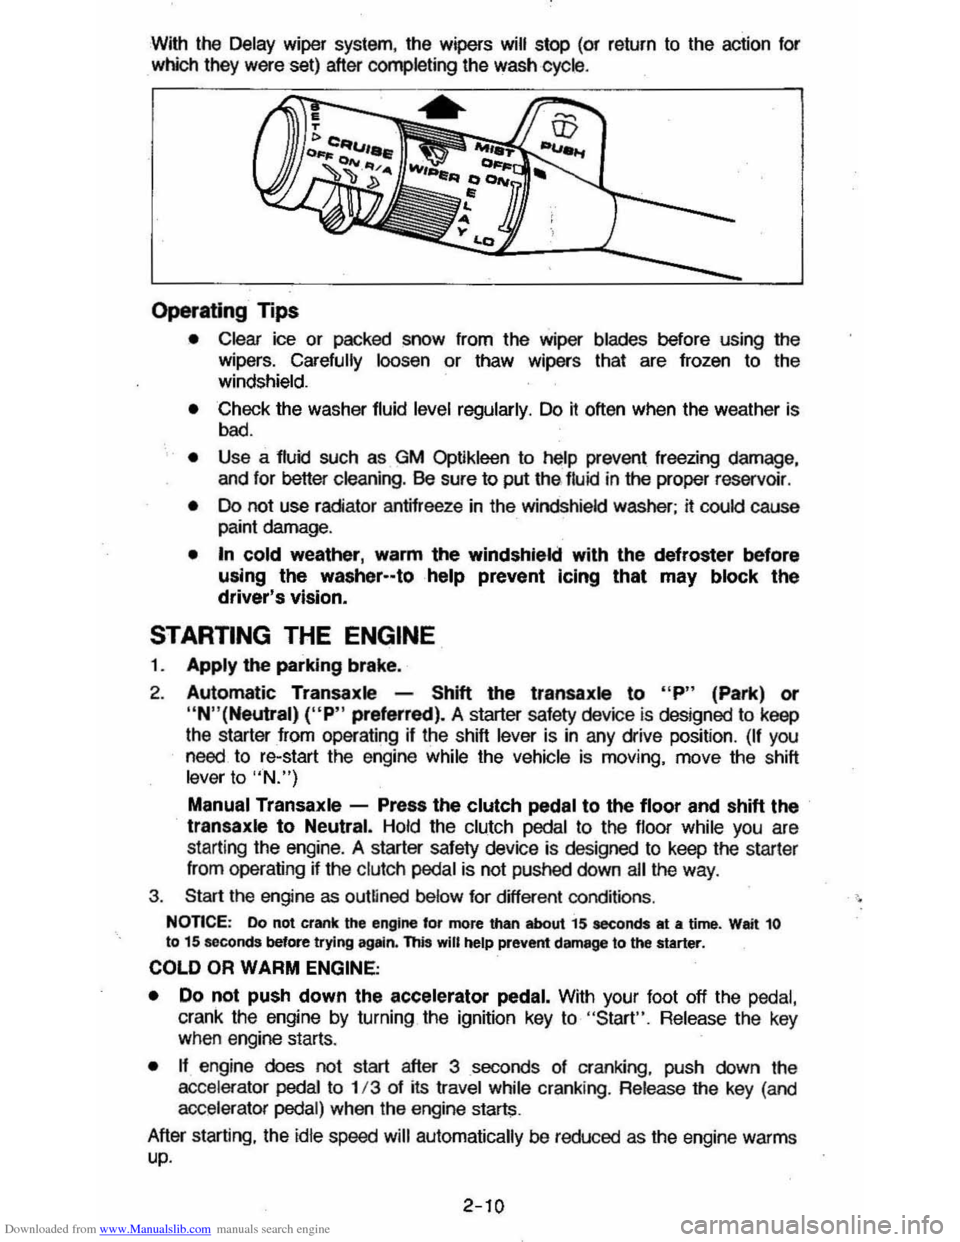
Downloaded from www.Manualslib.com manuals search engine With the Delay wiper system, the wipers will stop (or return to the action for
which they were set) after completing the wash cycle .
Operating Tips
• Clear ice or packed snow from the wiper blades before using the
wipers. Carefully loosen or thaw wipers that are frozen to the
windshield.
• Check the washer fluid level regularly. Do it often when the weather is
bad.
• Use a fluid such as GM Optikleen to help prevent freezing damage,
and lor better cleaning. Be sure to put thE> lIuid in the proper reservoir .
• Do not use radiator antifreeze in the windshield washer; it could cause paint damage.
• In cold weather, warm the windshield with the defroster before
using the washer--tohelp prevent Icing that may block the driver's vision.
STARTING THE ENGINE
1. Apply the parking brake.
2. Automatic Transaxle -Shift the transaxls to "P" (Park) or
"N"(Neutral) ("P" preferred). A starter safety device is designed to keep
the starter
from operating if the shift lever is in any drive position. (If you need. to re-start the engine while the vehicle is moving. move the shift lever to "N.")
Manual Transaxle -Press the clutch pedal to the floor and shift the transaxle to Neutral. Hold the clutch pedal to the lIoor while you are
starting the engine. A starter safety device is designed to keep the starler
Irom operating ~ the clutch pedal is not pushed down ail the way .
3. Start the engine as outlined below for different conditions .
NonCE: Do not crank the engine for more than about 15 seconds at a time. Wait 10 to 15 seconds before trying agltin. this will help prevent damage to the starter.
COLD OR WARM ENGINE;
•
Do not push down the accelerator pedal. With your foot off the pedal,
crank the engine by turning the ignition key to "Start". Release the key when engine starts.
• n engine does not start after 3 seconds 01 cranking. push down the
accelerator pedai to 1/3 of its travel while cranking . Release the key (and
accelerator pedal) when the engine starts.
After starting. the
idle speed will automatically be reduced as the engine warms up.
2-10
Page 28 of 105
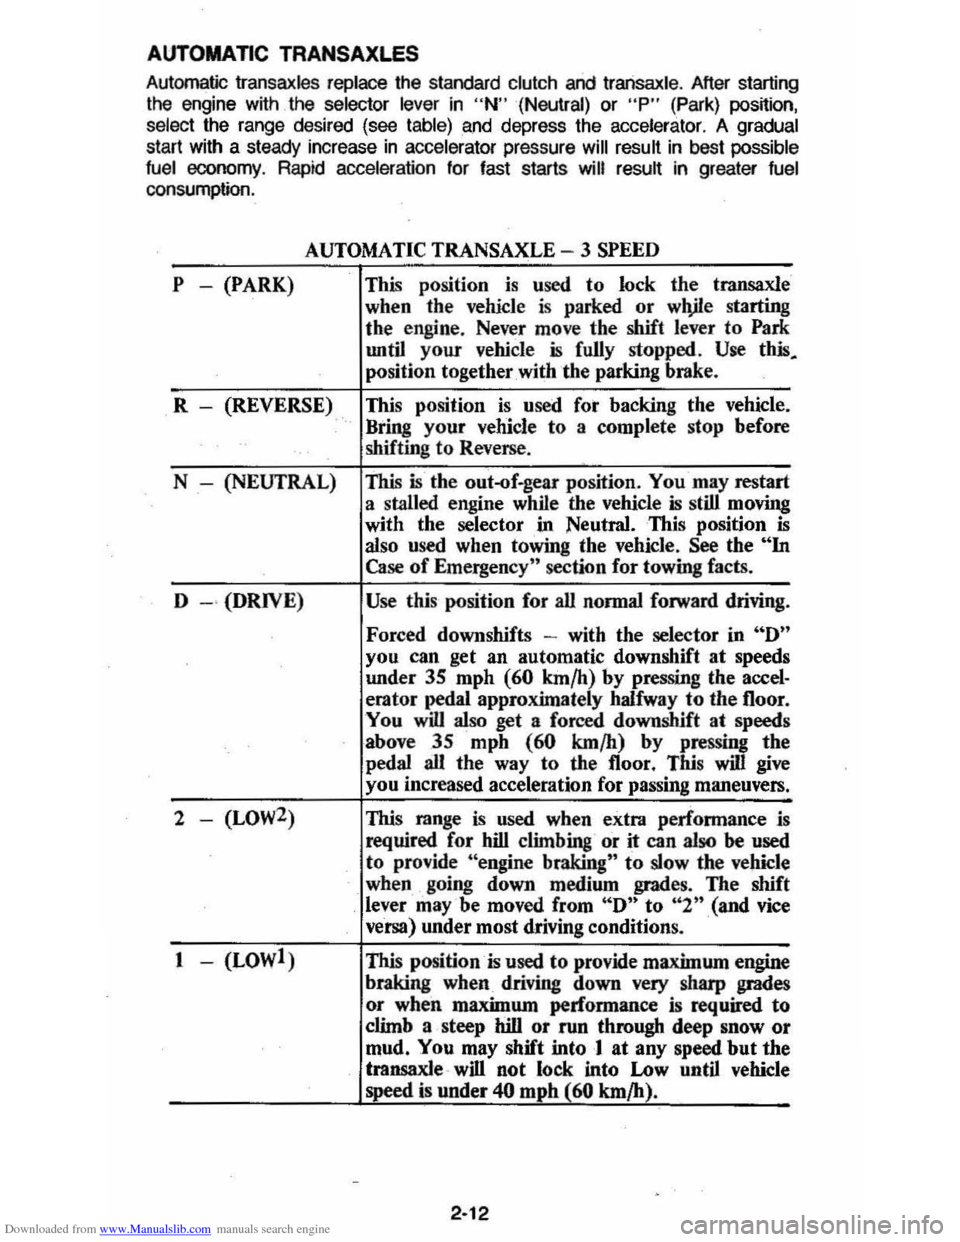
Downloaded from www.Manualslib.com manuals search engine AUTOMATIC TRANSAXLES
Automatic Iransaxles replace the standard clutch and Iransaxle . After starting
the engine with the selector lever in "N" (Neutral) or "P" (Park) posnion,
select the range desired (see table) and depress the accelerator. A gradual start with a steady increase in ac ce lerator pressure will result in best possible
fuel economy. Rapid acceleration for fast starts will result in greater fuel consumption.
P -(PARK)
AUTOMATIC TRANSAXLE - 3 SPEED
This position is used to lock the transaxle
when the vehicle
is parked or wlVle starting
the engine. Never move the shift
lever to Park
until your vehicle is fully stopped . Use this.
position together with the parking brake.
R - (REVERSE) This position
is used fot backing the vehicle.
" Bring your vehicle to a complete stop before
shifting to Reverse .
N - (NEUTRAL)
This is the out-of.gear position. You may restart
a stalled engine while the vehicle
is still moving
with the selector
"in Neutral. This position is also used when towing the vehicle. See the "In Case of Emergency" section for towing facts.
D
- " (DRIVE) Use this position for all normal forward driving.
Forced downshifts -with the selector in "D"
you can get an automatic downshift at speeds
under
3S mph (60 km/h) by pressing Ihe accel· erator pedal approximately halfway to the 1I00r.
You
will also get a forced downshift at speeds
above 35 mph
(60 km/h) by pressing the
pedal all the way to the 1I00r . This will give
you increased acceleration for passing maneuvers.
2 - (LOW2) This range is used when extra performance is
required for hill climbing or it can also be used to provide "engine braking" to slow the vehicle
when going down medium grades. The shift lever may'be moved from "D" to "2n(and vice
versa) under most driving conditions.
1 - (LOWl) This position
is used to provide maximum engine
braking
when driving down very sharp grades
or when maximum performance is required
to
climb a steep hill or run through deep snow or
mud. You may shift into 1 at any speed but the
transaxle " will not lock into Low until vehicle
speed
is under 40 mphl.60 km/h).
2-12
Page 29 of 105
Downloaded from www.Manualslib.com manuals search engine ....rr -~
II'!
I~ ,
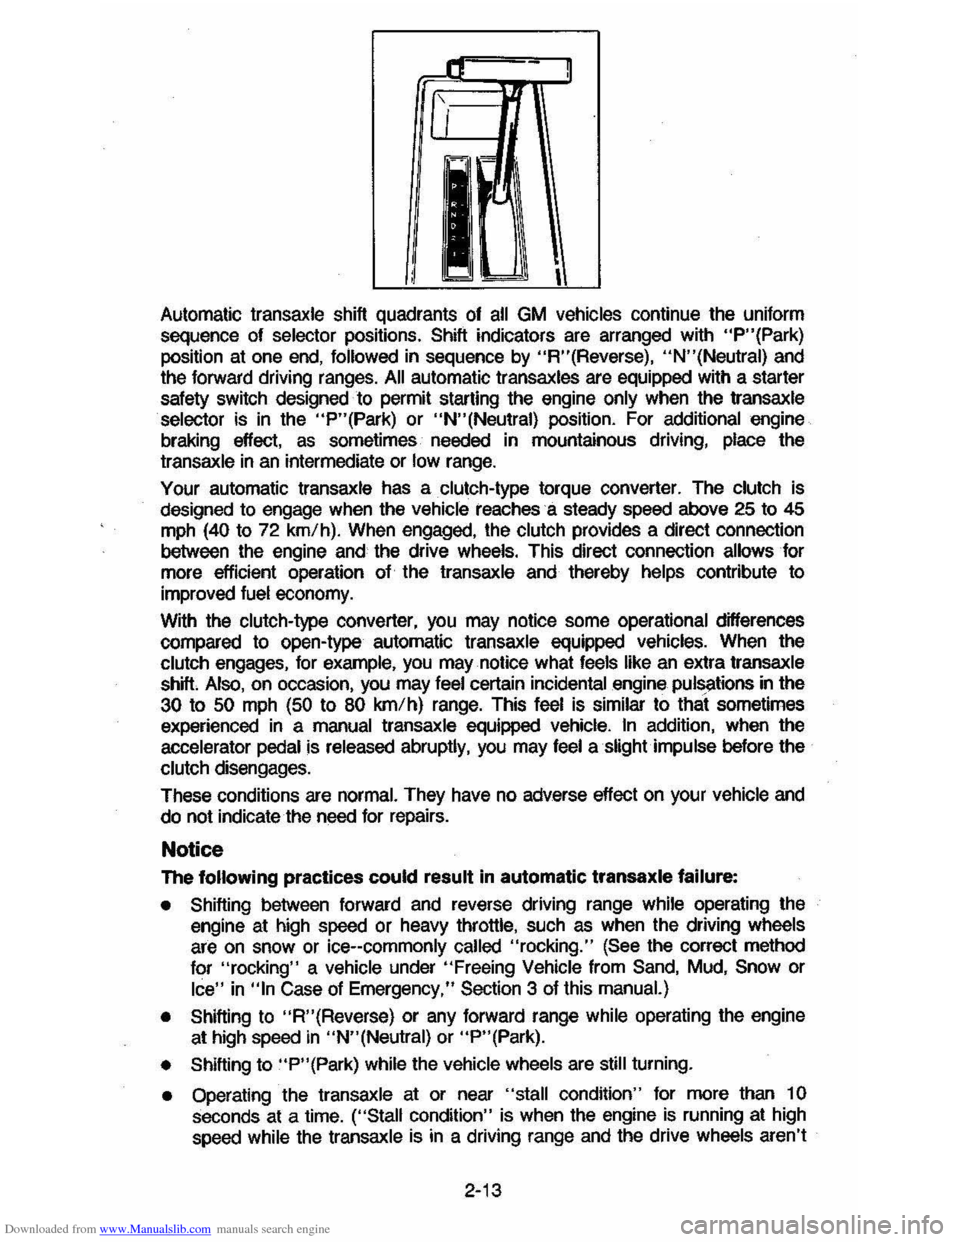
Automatic transaxle shift quadrants of all GM vehicles continue the uniform
sequence of
selector positions. Shift indicators are arranged with "P"(Park) position at one end, followed in sequence by "R"(Reverse), "N"(Neutral) and
the forward driving ranges. All automatic transaxles are equipped with a starter
safety switch designed to permit starting the engine
only when the transaxle selector is in the "P"(Park) or "N"(Neutral) position. For additional engine
braking eftect,
as sometimes needed in mountainous driving, place the
transaxle in an intermediate or low range.
Your automatic transaxle has a clutch-type torque converter. The clutch is
designed to engage when the
vehicle reaches a steady speed aibove 25 to 45 mph (40 to 72 km/h). When engaged, the clutch provides a direct connection
between the engine and the drive wheels. This direct connection allows for
more efticient operation of the transaxle and thereby
helps contribute to
improved
fuel economy.
With the clutch-type converter,
you may notice some operational differences
compared to open-type automatic transaxle equipped vehicles. When the
clutch engages, for example, you may notice what feels like an extra transaxle
shift Also, on occasion, you may feel certain incidental engine pulSi'tions in the
30 to 50 mph (50 to 80 km/h) range. This feel is similar to that sometimes
experienced in a manual transaxle equipped vehicle. In addition, when the
accelerator
pedal is released abruptly, you may feel a slight impulse before the
clutch disengages.
These conditions
are normal. They have no adverse effect on your vehicle and
do not indicate the need for repairs.
Notice
The following practices could result in automatic transaxle failure:
• Shifting between forward and reverse driving range while operating the
engine at high speed or heavy throttle, such as when the driving wheels
are on snow or ice--commonly called "rocking." (See the correct method
for
"rocking" a vehicle under "Freeing Vehicle from Sand, Mud, Snow or
Ice" in "In Case of Emergency," Section 3 of this manual.)
•
Shifting to "R"(Reverse) or any forward range while operating the engine
at high speed in "N"(Neutral) or "P"(Park).
•
Shifting to "P"(Park) while the vehicle wheels are still turning.
• Operating the transaxle at or near "stall condition" for more than 1 0 seconds at a time. ("Stall condition" is when the engine is running at high speed while the transaxle is in a driving range and the drive wheels aren't
2-13
Page 30 of 105
Downloaded from www.Manualslib.com manuals search engine moving, such as when stuck in deep sand or when the vehicle is against a
fixed barrier.)
• Holding vehicle on an upgrade with the accelerator pedal. (Use the regular brakes to hold vehicle on an uphill grade.)
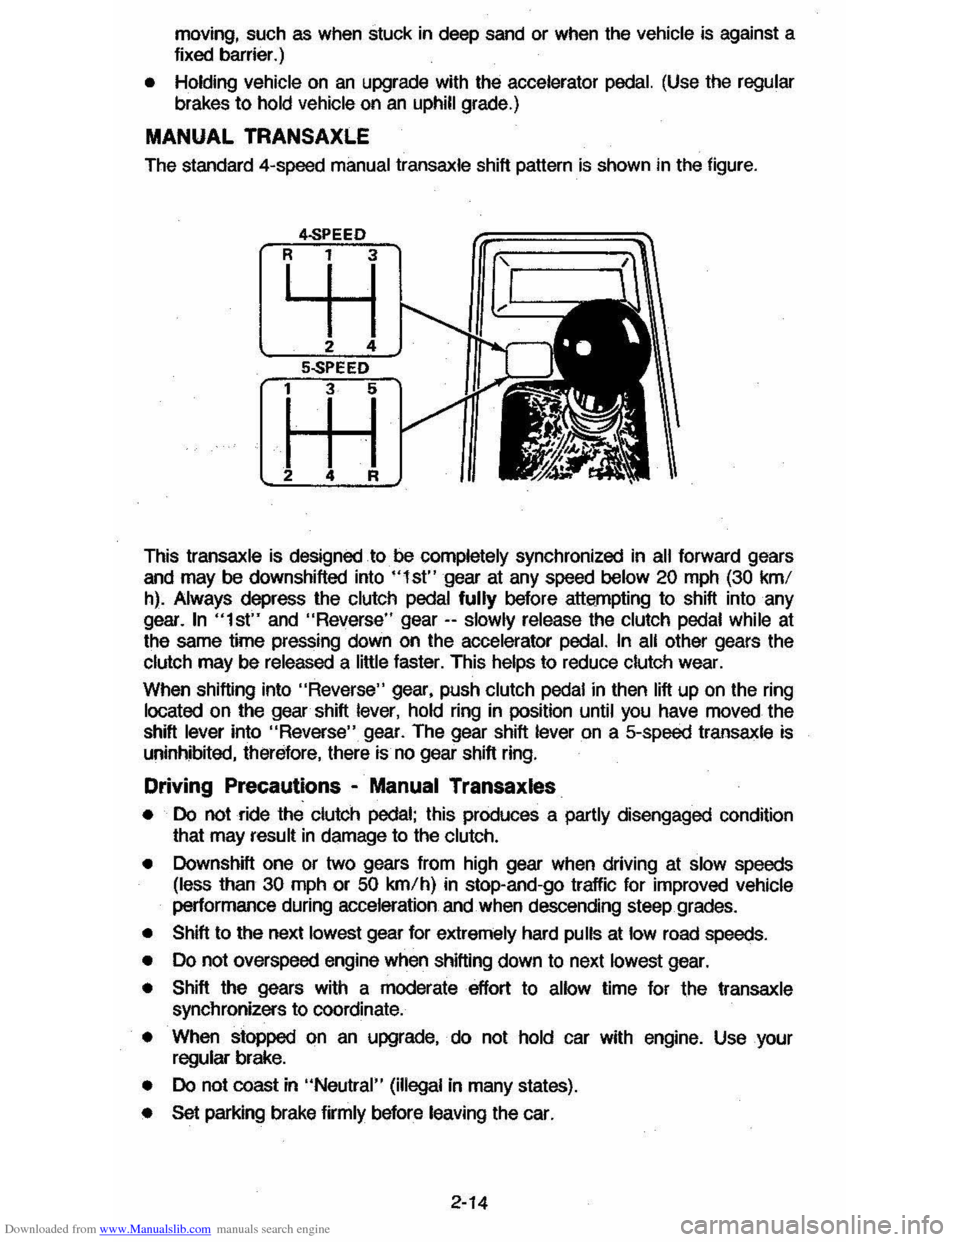
MANUAL TRANSAXLE
The standard 4-speed manual transaxle shift pattern is shown in the figure.
This
transaxle is designed to be completely synchronized in all forward gears
and may be downshifted into "I st" gear at any speed below 20 mph (30 kmf
h). Always depress the clutch pedal fully before attempting to shift into any
gear.
In "1st" and "Reverse" gear -- slowly release the clutch pedal while at
the same time pressing down on the accelerator pedal. In all other gears the
clutch may be released a little faster. This helps to reduce clutch wear.
When shifting into
"Reverse" gear, push clutch pedal in then lift up on the ring located on the gear shift lever, hold ring in position until you have moved the
shift
lever into "Reverse" gear. The gear shift lever on a 5-speed transaxle is
uninhibited, therefore, there is no gear shift ring.
Driving Precautions -Manual Transaxles
• Do not ride the clutch pedal; this produces a partly disengaged condition
that may result in damage to the clutch.
•
Downshift one or two gears from high gear when driving at slow speeds (less than 30 mph or 50 kmfh) in stop-and-go traffic for improved vehicle
performance during acceleration and when descending steep grades.
• Shift to the next lowest gear for extremely hard pulls at low road speeds.
• Do not overspeed engine when shifting down to next lowest gear.
• Shift the gears with a moderate effort to allow time for the transaxle synchronizers to coordinate.
• When stopped on an upgrade, do not hold car with engine. Use your regular brake.
• Do not coast in "Neutral" (illegal in many states).
• Set parking brake firmly before leaving the car.
2-14
Page 32 of 105
Downloaded from www.Manualslib.com manuals search engine CRUISE CONTROL WITH RESUME/ACCEL FEATURE
Cruise Control is an optional speed control system. The system allows the vehicle· to keep a constant forward speed during most normal driving without
keeping your foot on the accelerator pedal, thus increasing driver comfort on
long trips. The system
can hold a speed of about 30 mph (50 km/h) or higher
within the limits of your engine.
The
system is also designed to resume a pre-set cruising speed after:
• Braking. clutching with manual transaxle vehicles, without using the
accelerator pedal.
•
Accelerating from a given set speed to a higher control speed.
The system also allows the driver to "Tap-up" and increase speed or "Tap
down" to decrease vehicle speed in increments of about 1 mph (1.6 km/h)
when needed. This feature is useful when traffic conditions warrant a small
adjustment in speed. The controls are part of the turn signal lever. The
"Cruise" switch must be moved to "On" before the system will work. The "Set/Coast" button is in the end of the turn signal lever.
To Engage at Cruising Speed
Accelerate to the desired speed, push in the "Sel/Coast" button all the way
and release it (or use the "Resume/ Accel" (R/ A) switch during first
engagement only). Take your foot off the accelerator pedal and the set speed
will be maintained up Qr down hill. The Cruise Control is designed to disengage
when you apply the brakes and also with the clutch on manual transaxle
vehicles.
It will also disengage by moving the "Resume/ Accel" (R/ A) switch to
off or by turning the ignition off. (To disengage the system without coming to a
complete
stop, push the brake pedal or clutch lightly; use just enough force to
disengage the system, witi)out stopping the vehicle:)
To Change Cruising Speed
To reset the Cruise Control to a faster speed, accelerate to the speed you wish. Push in the "Set/Coast" button all the way, (for less than a second) then release it.
Or, use the "Resume/ Aceel" switch to accelerate and reset to the speed you
wish. The "Resume/ Accel" (R/ A) switch must be held (over a second) in
order to engage the accel mode. Speed may also be increased by tapping the
"Resume/
Accel" switch for less than a second while cruising. The set speed
will
be increased by about 1 mph (1.6 km/h) for every tap. "Tap-ups" are
limited to 10 mph (16 km/h) above vehicle speed.
To reset to a
slower speed, push in the "Set/Coast" button all the way and hold it there. Wait until the vehicle slows to the desired speed, then release the
button.
Speed may also be decreased by tapping the "Sel/Coast" button for less than a second while cruising and the memory speed will be decreased
about 1
mph (1.6 km/h) for every tap, "Tap-downs" are limited to a minimum
cruising speed of 23 mph (37 km/h).
To "Resume" a Pre-Set Speed
After braking or stopping the vehicle without turning off the ignition, you can "resume" to your last set cruising speed by accelerating to 30 mph (50 km/h)
or more
and sliding the cruise switch momentarily to "Resume/ Accel"; when
you release the "Resume/ Accel" switch, your vehicle will accelerate to the
cruising speed set before braking or stopping.
2-16
Page 33 of 105
Downloaded from www.Manualslib.com manuals search engine Sliding cruise switch to "Resume/ Accel" position and holding the switch in
longer than 1 second will accelerate the vehicle until the switch is released. The speed at which the switch is released will become the new cruising speed.
To Disengage
Disengage the Cruise Control by pushing the brake pedal or the clutch pedal on manual transaxle vehicles. Though not usually necessary, you can also turn
off the system by moving the
"Cruise" switch to "Off." Holding in the
engagement button until vehicle speed falls below 30 mph (50 km/h), will also
disengage the system.
To Pass A Vehicle
Use the accelerator pedal for more speed when passing. When you take your
foot off the
pedal, the vehicle will slow down to the speed set before passing.
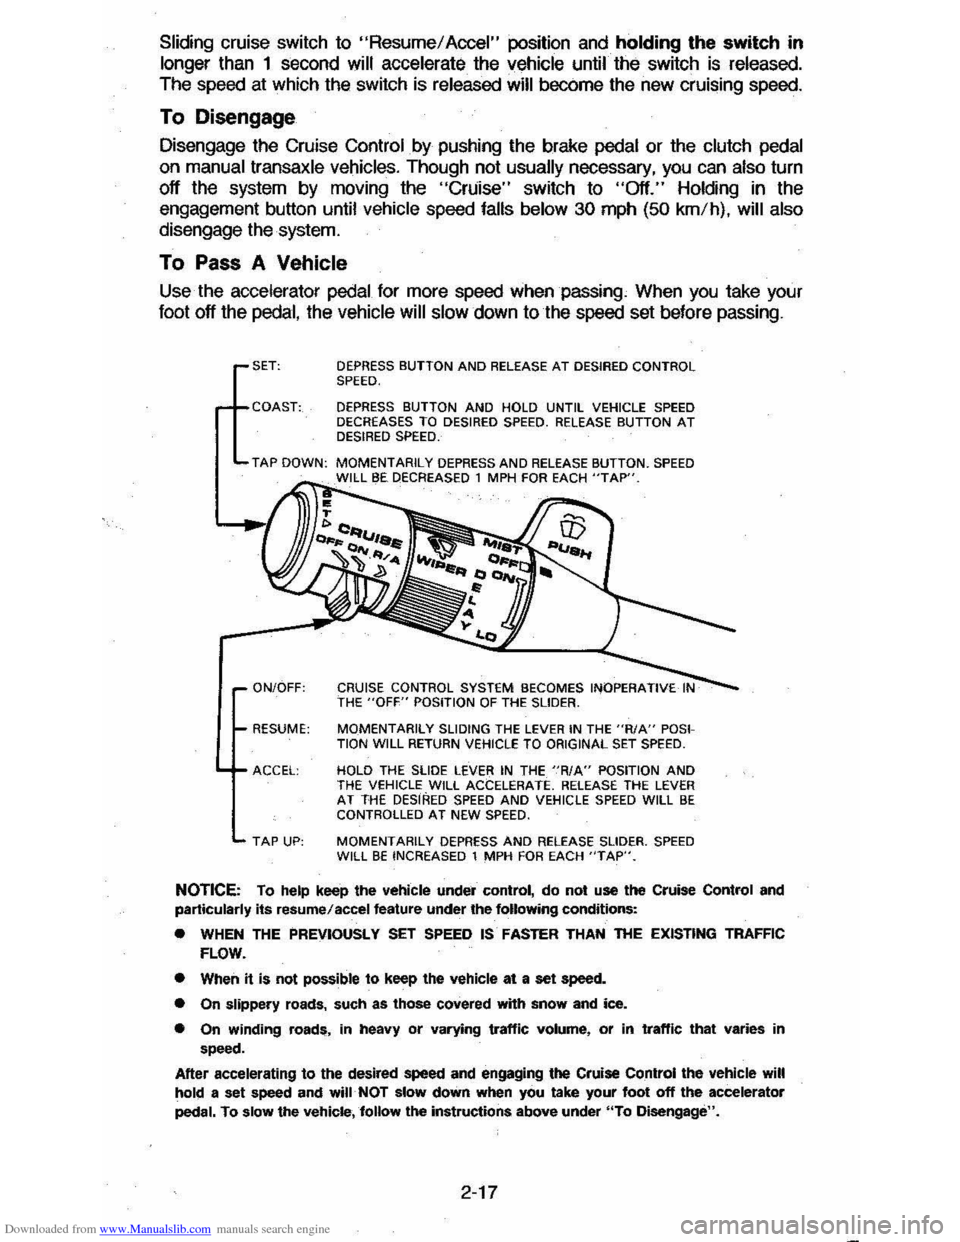
SET: DEPRESS BUTTON AND RELEASE AT DESIRED CONTROL SPEED.
DEPRESS BUTTON AND HOLD UNTIL VEHICLE SPEED
DECREASES TO DESIRED SPEED. RELEASE BUTTON AT DESIRED SPEED.
TAP DOWN: MOMENTARILY DEPRESS AND RELEASE BUTTON. SPEED I BE DECREASED 1 MPH FDA EACH "TAP".
ON/OFF: CRUISE CONTROL SYSTEM BECOMES INOPERATIVE THE "OFF" POSITION OF THE SLIDER.
RESUME:
MOMENTARilY SLIDING THE LEVER IN THE "R/A" POSI
TION WILL RETURN VEHICLE TO ORIGINAL SET SPEED.
ACCEl: HOLD THE SLIDE LEVER IN THE "RIA" POSITION AND THE veHICLE WILL ACCELERATE. RELEAse THE LEVER AT THE DESIRED SPEED AND VEHICLE SPEED WILL BE CONTROLLED AT NEW SPEED.
TAP UP: MOMENTARILY DEPRESS AND RELEASE SLIDER. SPEED WILL BE INCREASED 1 MPH FOR EACH "TAP".
NOTICE: To help keep the vehicle under control, do not use the Cruise Control and
particularly its resume/accel feature under the following conditions:
• WHEN THE PREVIOUSLY SET SPEED IS· FASTER THAN THE EXISTING TRAFFIC
FLOW.
• When
it is not possible to keep the vehicle at a set speed.
• On slippery roads, such as those covered with snow and ice.
• On winding roads, in heavy or varying traffic volume, or in traffic that varies in speed.
After accelerating
to the desired speed and engaging the Cruise Control the vehicle will hold a set speed and will· NOT slow down when you take your foot off the accelerator
pedal. To slow the vehicle,follow the instructions above under "To Disengage".
2-17
Page 35 of 105
Downloaded from www.Manualslib.com manuals search engine PARKING BRAKE
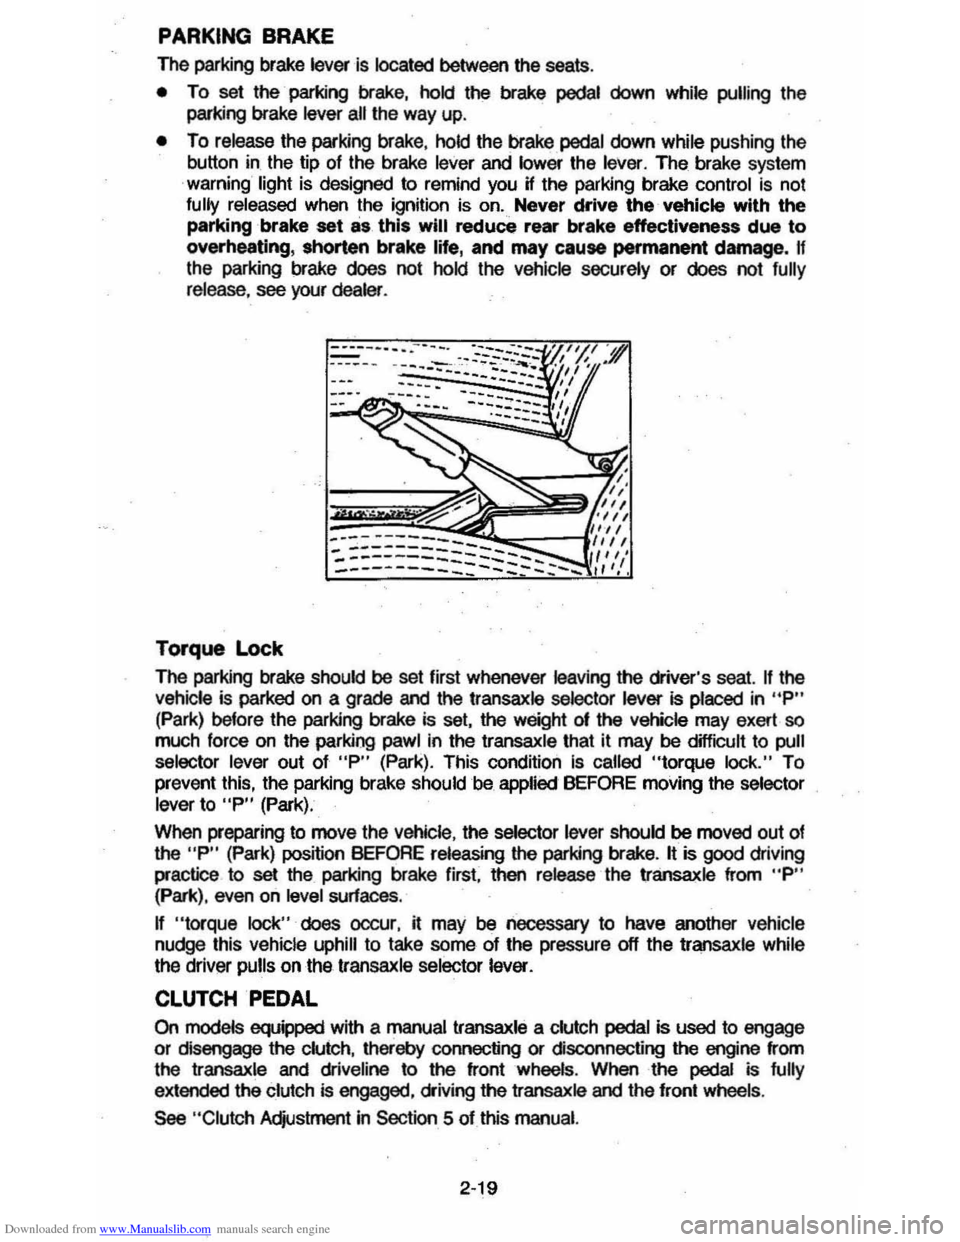
The parking brake lever is located between the seats .
• To set the parking brake, hold the brake pedal down while pulling the
parking brake
lever all the way up.
• To release the parking brake, hold the brake pedal down while pushing the
button in the tip of the brake
lever and lower the lever. The brake system
warning light is designed to remind you H the parking brake control is not fully released when the ignition is on. Never drive the vehicle with the
parking brake set as this will reduce rear brake effectiveness due to
overheating, shorten brake life, and may cause permanent damege, If
the parking brake does not hold the vehicle securely or does not fully release , see your dealer .
Torque Lock
The perking brake should be set first whenever leaving the driver's seat. If the vehicle is parked on a grade and the transaxle selector lever is placed in "P"
(Park) before the parking brake is set, the weight 01 the vehicle may exert so
much force on the parking pawl in the transaxle that it may be difficult to pull
selector lever out of "P" (Park). This condition Is called "torque lock." To
prevent this, the parking brake should be applied BEFORE moving the selector lever to "P" (Park).
When preparing to move the
Vehicle , the selector lever should be moved out of the "P" (Park) position BEFORE releasing the parking brake. It is good driving
practice to
set the parking brake first. then release the transaxle from "P" (Park), even on level surfaces .
n "torque lock" does oocur, it may be necessary to have another vehicle
nudge this vehicle uphill to take some of the pressure off the transaxle while
the driver pulls on the transaxle selector lever.
CLUTCH PEDAL
On models equipped with a manual transaxle a clutch pedal is used to engage
or disengage the clutch, thereby connecting or disconnecting the engine from
the transaxle and dliveline to the front wheels . When the pedal is fully
extended the clutch is engaged, driving the transaxle and the front wheels .
See "Clutch Adjustment in Section 5 of this manual.
2·19
Page 80 of 105
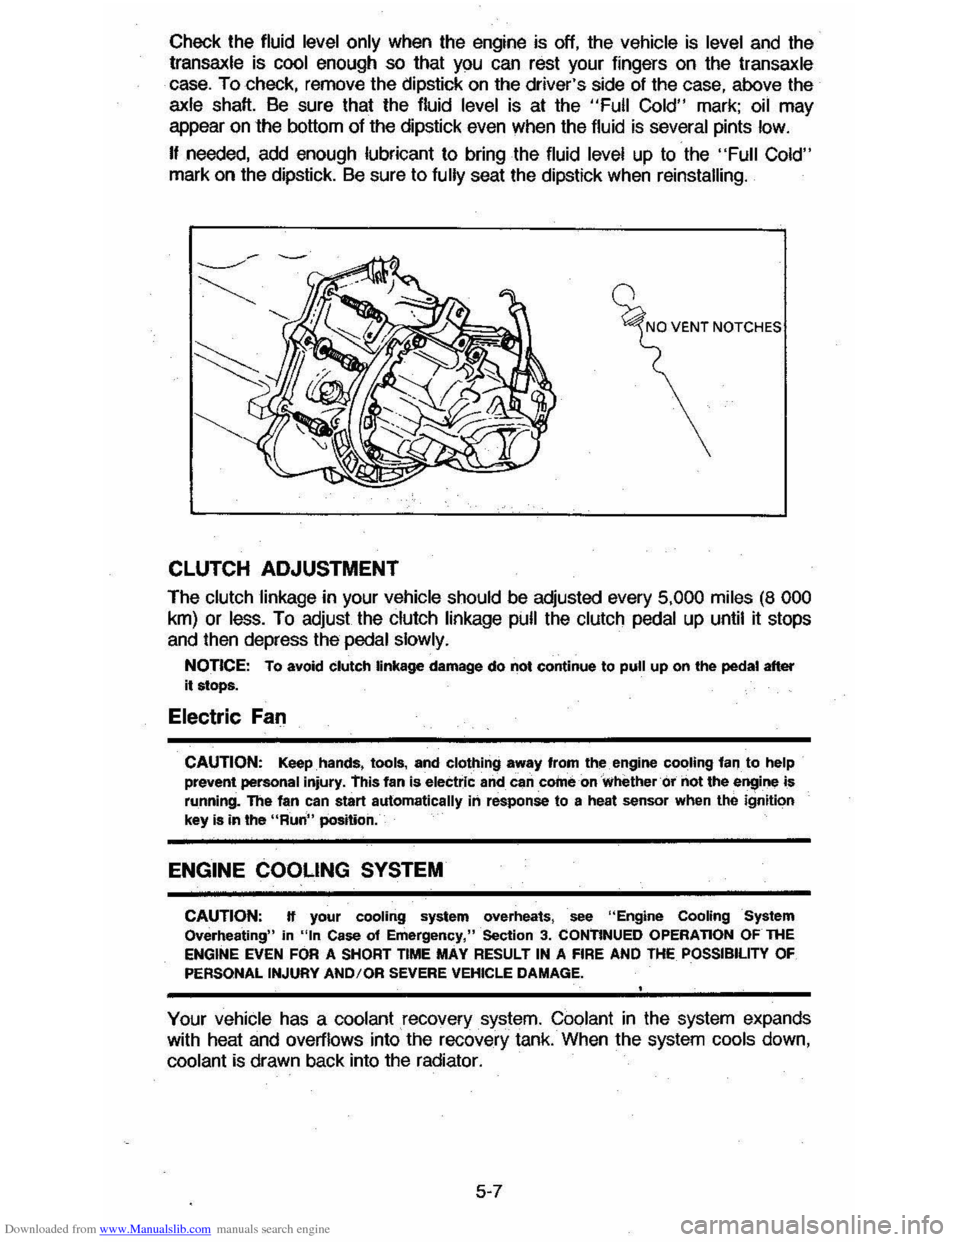
Downloaded from www.Manualslib.com manuals search engine Check the fluid level only when the engine is off, the vehicle is level and the transaxle is cool enough so that you can rest your fingers on the transaxle
case. To check, remove the dipstick on the driver's side of the case, above the
axle shaft, Be sure that the fluid level is at the "Full Cold" mark; oil may
appear on the bottom of the dipstick even when the fluid is several pints low.
I! needed, add enough lubricant to bring the fluid level up to the "Full Cold" mark on the dipstick. Be sure to fully seat the dipstick when reinstalling.
CLUTCH ADJUSTMENT
The clutch linkage in your vehicle should be adjusted every 5,000 miles (8 000
km) or less. To adjust the clutch linkage pull the clutch pedal up until it stops
and then depress the
pedal slowly.
NOTICE: To avoid clutch linkage damage do not continue to pull up on the pedal after
it stops.
Electric Fan
CAUTION: Keep hands, tools, and clothing away fr,om th~engine cooUng lanto help prevent personal injury. this fan is electric and can corne on whether or not the engine is
running. The fan can start automatically in response to a heat sensor when the ignition
key is in the "Run" position.
ENGINE COOLING SYSTEM
CAUTION: H your cooling system overheats, see "Engine Cooling System Overheating" in "In Case of Emergency," Section 3. CONTINUED OPERATION OFTHE ENGINE EVEN FOR A SHORT TIME MAY RESULT IN A FIRE AND THE POSSIBILITY OF
PERSONAL INJURY ANDIOR SEVERE VEHICLE DAMAGE.
Your vehicle has a coolant recovery.system. Coolant in the system expands with heat and overflows into the recovery tank. When the system cools down,
coolant is drawn back into the radiator.
5-7