Page 47 of 105

Downloaded from www.Manualslib.com manuals search engine Store cassettes away from extreme heat or direct sunlight. Protect the open ends from dirt or damage; store them in their original cases or other protective
cases. Cassettes eventually wear out and you may need to replace them if
they become noisy. Clean the pickup head, tape guide and capstan (revolving
metal
post) after every 100 hours of operation . Use a colton-tipped swab
dippec in rubbing
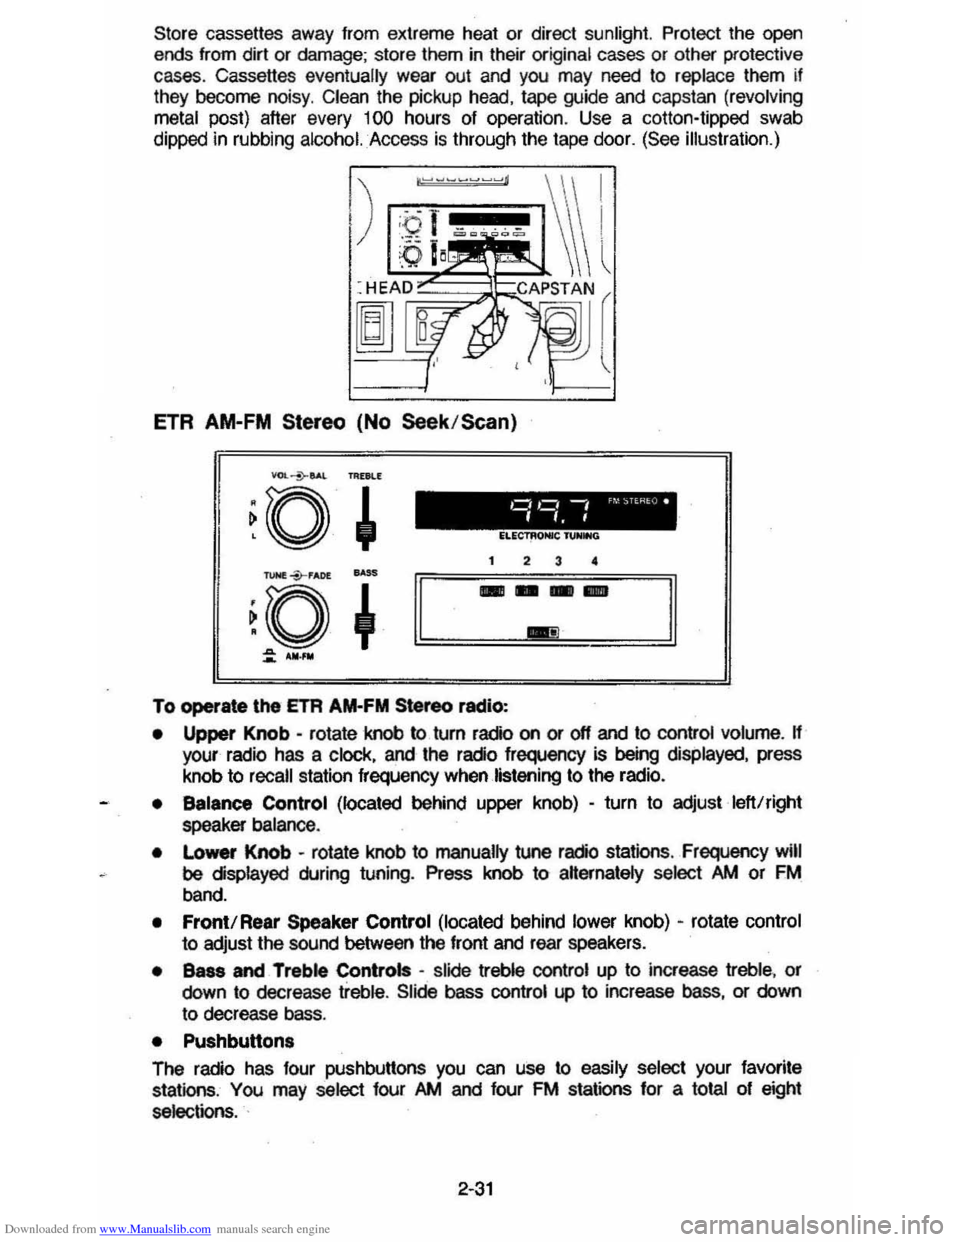
alcohol. Access is through the tape door. (See illustration.)
ETR AM-FM Stereo (No Seek /Scan)
To operate \he ETA AM-FM Stereo radio:
• Upper Knob -rotate knob to turn radio on or off and to control volume. H your radio has a clock, and the radio frequency is being displayed, press
knob to
recall station frequency when listening to the radio.
• Balance Control (located behind upper knob) -turn to adjust left!right
speaker balance .
•
Lo_ Knob -rotate knob to manually tune radio stations , Frequency will
be displayed during tuning. Press knob to aHernately select />M or FM
band.
• Front! Rear Speaker Control (located behind lower knob) -rotate control
to adjust the sound between the front and rear speakers.
• Bass and Treble Controls -slide treble control up to increase treble, or
down to decrease treble. Slide bass control up to increase bass, or down
to decrease bass.
• Pushbutton.
The radio has four pushbuttons you can use to easily select your favorite
stations , You may select four />M and four FM stations for a total of eight
selections. .
2-31
Page 49 of 105

Downloaded from www.Manualslib.com manuals search engine To listen to an earlier selection, slide EJECT button to the right ("REV") until it locks. When the tape reaches the end, the EJECT button will automatically
return to center position and the tape will resume playing.
To stop reverse at any time, return the EJECT button to its center position.
NOTE: Belore turning off ignition, eject the cassette tape. Insertion 01 the
cassette tape cartridge overrides the radio and the time-ol-day
will be
displayed continuously.
For best results, use only cassettes which are 30 to 60 minutes in length.
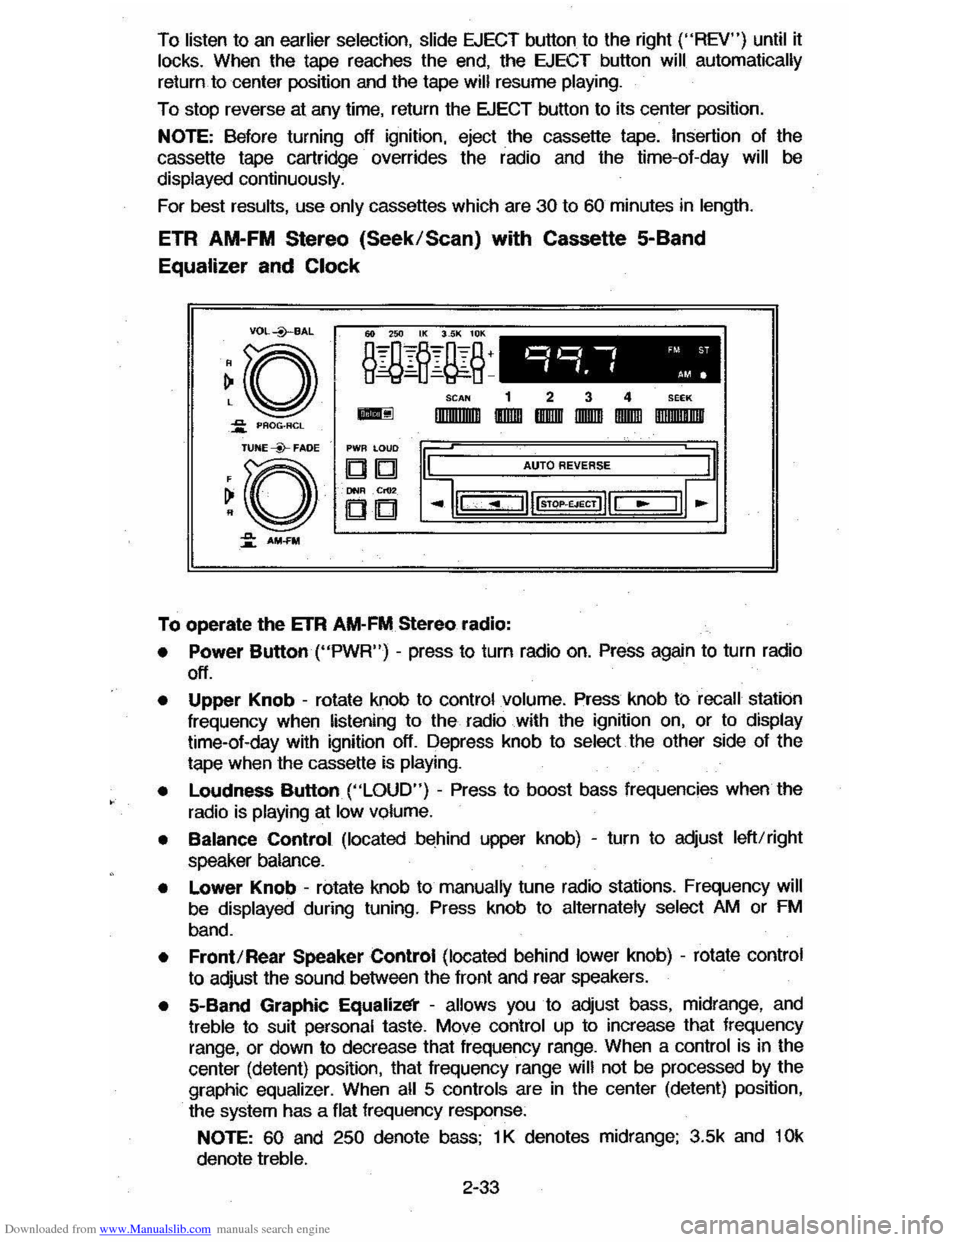
ETR AM-FM Stereo (Seek/Scan) with Cassette 5-Band
Equalizer and Clock
VDL+BAL
~o ~ PAOG·ACL
TUNE --Y-FADE
~O
~ AM-FM
o,~ -, 'M ST
".f AM.
SCAN 1 2 3 4 SEEK
-IlIIIIIIlIIIII IIDIDI IBIIIIII IIDDID IDIDID DIIIIIII!IIIII
PWR LOUD
DIb! AUTO REVERSE
DNIl .Cr02
CD
To operate the ETR AM-FM Stereo radio:
• Power Button ("PWR") -press to turn radio on. Press again to turn radio
off.
• Upper Knob -rotate knob to control volume. Press knob ti:> recall station
frequency when listening to the radio with the ignition on, or to display time-ol-day with ignition off. Depress knob to select the other side 01 the
tape when the cassette
is playing.
•
Loudness Button ("LOUD") - Press to boost bass frequencies when the
radio is
playing at low volume.
• Balance Control (located behind upper knob) -turn to adjust left/right
speaker balance.
• Lower Knob -rotate knob to manually tune radio stations. Frequency will
be displayed during tuning. Press knob to alternately select AM or FM
band.
• Front/Rear Speaker Control (located behind lower knob) -rotate control
to adjust the sound between the lront and rear speakers.
• 5-Band Graphic Equalizl!i' -allows you to adjust bass, midrange, and treble to suit personal taste. Move control up to increase that frequency
range, or down to decrease that frequency range. When a control is in the
center (detent) position, that
Irequency range will not be processed by the
graphic equalizer. When all 5 controls are in the center (detent) position,
the system has a flat frequency response:
NOTE: 60 and 250 denote bass; 1 K denotes midrange; 3.5k and 10k
denote treble.
2-33
Page 63 of 105

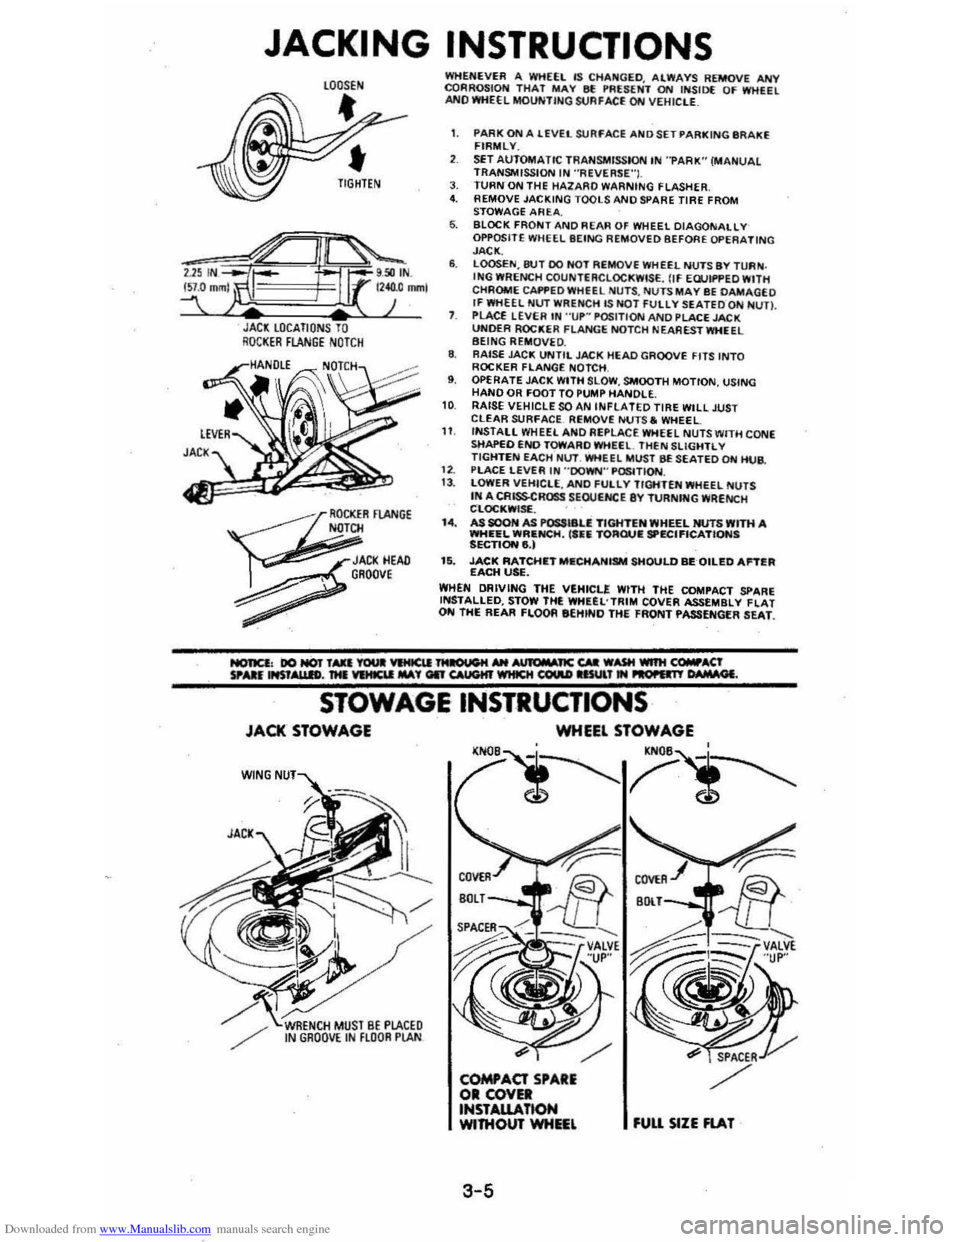
Downloaded from www.Manualslib.com manuals search engine JACKING INSTRUCTIONS
JACl LOCATIONS TO RQCI(ER FLANGE NOTCH
~
OCKER FlANGE N
~
JACI(HEAD , GROOve
~
WHENEVER A WHEEL IS CHA~GED. ALWAYS REMOVE ANY CQRROSIOH THAT MAY 8f !'RUENT ON INSID( OF WHEEL ANO WHEEL MOUNTING StJAFACE ON VEHIClE_
1. PARK ON A lEVEL SURFACE AND SET PARKING IIR AKE FIRMLY.
SET AUTOMATIC TRANSMISSION IN "PARK" (MANUAL TRANSMISSION IN ·'ReVERSE"I. J. TURN ON THE HAlARO WARNING FLASHER 4. REMOVE JACKING TOOLS AND SPARE TIRE FROM
STOWAGE AREA. 6. BLOCK FRONT AND REAR OF WHEEL DIAGONALLY OPPOSITE WHEEL BEING REMOVED BEFORE OPERATING JACK. 6. LOOSEN,8tH DO HOT REMOVE WHEEL NUTS BY TURN . ING WRENCH COUNTERCLOCKWISE. flf EWIf'PED WITH
CHROME CAI'f'EDWHfEL NU TS , NUTS MAY BE DAMAGEO If WHEEL NUT WRENCH lS NOT FUllY SEATEDQN NUn. PLACE LEVER IN "UP~ POSITION AND PLACE JACK UNOER ROCKER FLANGE NOTCH NEA REST WHEEL BEING REMOVE D. 8. RAISE JAC!!; UNTIL JACK HEAD GROOVE FITS INTO ROCKER FLANGE NOTCH , 9. OPERATE JACK WITH SLOW , SMOOTH MOTION, USING HAND OR FOOT TO PUMP HANDLE. 10 RAISE VEHICLE SOAN INfLATED TIRE WILL JUST CLEAR SURfACE. Ri;MOVE NUTS. WHEEL 11 INSTALL WHEEL ANO Ai;PLACE WHEEL NUTS WITH CONE sttAPEO END TOWARO WHEEl. THEN SLiGHTL V TIGHTEN EACH Nl.IT. WHEEL MUST BE SEATED ON HUB.
1 2. PlACE LEVER IN "'DOWN'" P~TION. 13 . lOWER VEHICLE, ANO fULlY TIGHTEN WHEEL NUTS IN A CRISSCROSS SEOUtNCE 8Y TURNfNG WRENCH CLOC!!;WISf. . I.. AS SOON AS POSSI8U TIGHTEN WHEEL NUTS WITH A WHEEL WRIlNCH, ('fiIi TORQUIE SPECIFICATIONS SECTIONe,) 15. JACK RATCHIETMIlCHANISM SHOULD BEQILED Antill EACH USE. WHEN DRIVING THE VEHICLE WITH THE COMPACT SPARE INSTALLED, STOW THE WHUL'TRIM COVER ASSEMBLY flAT ON THE REAR FLOOR eEHINO THE FRONT PASSENGER SEAT.
STOWAGE INSTRUCTIONS
JACK STOWAGE
W(NG
WHEEL STOWAGE
'N
COMPACT SPAll 01 COVEl INSTAlLATtON WITHOUT WHIEL
3-5
fUU SIZE FlAT