Page 25 of 105

Downloaded from www.Manualslib.com manuals search engine • Lane Change Signal -In some turns, such as changing lanes, the steering wheel tS not turned far enough to cancel the turn signal. For convenience, you can flash the turn signal by moving the lever part way (to the first stop)
and holding it there. The lever will return to horizontal when you release it.
A green light on the instrument panel is designed to flash to tell you that the
front
and rear turn signal lights are working. If the light stays on, but does not flash, check for burned-out turn signal bulbs. If the green light does not come
on when
you move the lever, check the fuse and indicator bulb.
However, if you ordered a trailertowing·optiOil.·in which extra wiring was added to attach the trailer lighting, a different type of flasher was installed. In this
case, the green light will continue to flash even if a turn signal bulb burns out.
Therefore, you must regularly look at the front
and rear turn signal lights to be
sure they are working.
• Headlight Beam Changer -With the headlights on, pull the lever toward you until you hear a click, then release it. The lights will change from Iow
beam to high-beam or from high-beam to low-beam. When the high-beams
are
on, a light will appear on the instrument panel.
HEADLIGHT BEAM CHANGER
(HEADLIGHTS ON)
PULL LEVER
TOWARD YOU
• Standard Windshield Wiper -The standard Windshield wiper system
con
ols are on the band marked "WIPER" on the turn signal lever.
• For a single wiping cycle, turn the band toward you. Hold it there until
the wipers begin
Wiping, then release.it. The wipers will stop after one
cycle. For several cycles, hold the band in place as long as needed.
• For steady wiping at low speed, turn the band away from you to the
first stop. For high-speed wiping, turn the band to the next stop. Turn
the band back to
"OFF" to turn off the wipers.
• Delay Windshield Wiper -The optional delay windshield wiper system lets you vary the wiper speed from a 16-second delay between sweeps up to
the normal
low and high speeds of the standard wiper.
• The Delay wipers work the same as the standard wipers, except for the
delay feature. To use the wipers with a delay between sweeps, turn the
band on the turn signal lever to
"ON."
• Turn the "Delay" band away from you to control the amount of delay. The
wipers will move more often the closer the band is to "LO." Turn it fully to
the first stop for steady wiping at
low speed.
• Windshield Washer -To spray washer fluid on the windshield, pUSh the "paddle" on top of the turn signal lever. (This will also turn on the low~ speed wipers.) The spray will continue as long as you hold in the paddle.
After using the windshield washer
on the standard wiper system, turn the band
back to "OFF" to turn off the wipers.
2-9
Page 26 of 105
 after completing the wash cycle .")
Downloaded from www.Manualslib.com manuals search engine With the Delay wiper system, the wipers will stop (or return to the action for
which they were set) after completing the wash cycle .
Operating Tips
• Clear ice or packed snow from the wiper blades before using the
wipers. Carefully loosen or thaw wipers that are frozen to the
windshield.
• Check the washer fluid level regularly. Do it often when the weather is
bad.
• Use a fluid such as GM Optikleen to help prevent freezing damage,
and lor better cleaning. Be sure to put thE> lIuid in the proper reservoir .
• Do not use radiator antifreeze in the windshield washer; it could cause paint damage.
• In cold weather, warm the windshield with the defroster before
using the washer--tohelp prevent Icing that may block the driver's vision.
STARTING THE ENGINE
1. Apply the parking brake.
2. Automatic Transaxle -Shift the transaxls to "P" (Park) or
"N"(Neutral) ("P" preferred). A starter safety device is designed to keep
the starter
from operating if the shift lever is in any drive position. (If you need. to re-start the engine while the vehicle is moving. move the shift lever to "N.")
Manual Transaxle -Press the clutch pedal to the floor and shift the transaxle to Neutral. Hold the clutch pedal to the lIoor while you are
starting the engine. A starter safety device is designed to keep the starler
Irom operating ~ the clutch pedal is not pushed down ail the way .
3. Start the engine as outlined below for different conditions .
NonCE: Do not crank the engine for more than about 15 seconds at a time. Wait 10 to 15 seconds before trying agltin. this will help prevent damage to the starter.
COLD OR WARM ENGINE;
•
Do not push down the accelerator pedal. With your foot off the pedal,
crank the engine by turning the ignition key to "Start". Release the key when engine starts.
• n engine does not start after 3 seconds 01 cranking. push down the
accelerator pedai to 1/3 of its travel while cranking . Release the key (and
accelerator pedal) when the engine starts.
After starting. the
idle speed will automatically be reduced as the engine warms up.
2-10
Page 27 of 105

Downloaded from www.Manualslib.com manuals search engine 4. Apply the regular brakes and shift into the proper gear. Release the
parking brake and drive oft.
IF ENGINE FAILS TO START AFTER NORMAL STARTING
PROCEDURE
1. If you tried the Cold or Warm Engine starting procedure and the engine still
does not start, push down the accelerator pedal to the floor and hold it
there while cranking the engine. This should clear the engine
~ II is flooded.
2. If the engine has been flooded with too much fuel, it may start to run but
not have enough power to keep running .
In that case, continue cranking
with the
accelerator pedal all the way to the floor until the engine clears itseW of excess gasoline and runs smoothly . (But, do not crank more than
15 seconds at a time or you could damage the starter .)
GaSOline Engine Block Heater
The optional gasoline engine block heater is designed to warm the block area
for improved cold weather starting.
II can also help reduce fuel consumption
when a cold engine is warming up.
To use
the block heater:
1 . Open the
hood. '~".
2. Unwrap the electrical cord which is stowed In the engine compartment.
(After using the block heater, be SUre to properly restow the cord , to help
keep it away from moving engine parts.)
3. Plug the cord into any three-prong, 11 O-voll outlet (normal household
current).
NOTICE: • the cord i, too ahort, use a ~avy·duty, three-prong extension corel Do not use an extension cord such .. you would uae for • t.np because the cord rnIIY
--Outside temperature, oil viscosity, etc. will affect how tong the block~ heater should remain plugged .in . Contact your authorized dealer for advice 'jot the
conditions in your area.
TRANSAXLE
DESCENDING A GRADE
CAunON: To reduce the risk of personaJ injUry. before going down 8 .steep or long Wade reduce speed and shift the transaxte -into second or low gear to help control your speed. (00 this with EITHER an automatic or manual transax)e.) Do not hold the brake ~I down too Iorig or too otten white going down • steep or long grade. This COUld ceu" the brakes to get hot and not work as well. As • result, the vehicle will not slow down at the usual r.t.~ Failure to u.ke these steps could r8l,,1t in. Iou of vehicle control.
DRIVING ON. SUPPERY SURFACES
While driving on a slippery surface avoid sudden acceleration, or engine
braking actions (due to shifting to a lower gear), which could cause the wheels
to skid . Skid correction is called for at these times.
2-11
Page 28 of 105

Downloaded from www.Manualslib.com manuals search engine AUTOMATIC TRANSAXLES
Automatic Iransaxles replace the standard clutch and Iransaxle . After starting
the engine with the selector lever in "N" (Neutral) or "P" (Park) posnion,
select the range desired (see table) and depress the accelerator. A gradual start with a steady increase in ac ce lerator pressure will result in best possible
fuel economy. Rapid acceleration for fast starts will result in greater fuel consumption.
P -(PARK)
AUTOMATIC TRANSAXLE - 3 SPEED
This position is used to lock the transaxle
when the vehicle
is parked or wlVle starting
the engine. Never move the shift
lever to Park
until your vehicle is fully stopped . Use this.
position together with the parking brake.
R - (REVERSE) This position
is used fot backing the vehicle.
" Bring your vehicle to a complete stop before
shifting to Reverse .
N - (NEUTRAL)
This is the out-of.gear position. You may restart
a stalled engine while the vehicle
is still moving
with the selector
"in Neutral. This position is also used when towing the vehicle. See the "In Case of Emergency" section for towing facts.
D
- " (DRIVE) Use this position for all normal forward driving.
Forced downshifts -with the selector in "D"
you can get an automatic downshift at speeds
under
3S mph (60 km/h) by pressing Ihe accel· erator pedal approximately halfway to the 1I00r.
You
will also get a forced downshift at speeds
above 35 mph
(60 km/h) by pressing the
pedal all the way to the 1I00r . This will give
you increased acceleration for passing maneuvers.
2 - (LOW2) This range is used when extra performance is
required for hill climbing or it can also be used to provide "engine braking" to slow the vehicle
when going down medium grades. The shift lever may'be moved from "D" to "2n(and vice
versa) under most driving conditions.
1 - (LOWl) This position
is used to provide maximum engine
braking
when driving down very sharp grades
or when maximum performance is required
to
climb a steep hill or run through deep snow or
mud. You may shift into 1 at any speed but the
transaxle " will not lock into Low until vehicle
speed
is under 40 mphl.60 km/h).
2-12
Page 29 of 105

Downloaded from www.Manualslib.com manuals search engine ....rr -~
II'!
I~ ,
Automatic transaxle shift quadrants of all GM vehicles continue the uniform
sequence of
selector positions. Shift indicators are arranged with "P"(Park) position at one end, followed in sequence by "R"(Reverse), "N"(Neutral) and
the forward driving ranges. All automatic transaxles are equipped with a starter
safety switch designed to permit starting the engine
only when the transaxle selector is in the "P"(Park) or "N"(Neutral) position. For additional engine
braking eftect,
as sometimes needed in mountainous driving, place the
transaxle in an intermediate or low range.
Your automatic transaxle has a clutch-type torque converter. The clutch is
designed to engage when the
vehicle reaches a steady speed aibove 25 to 45 mph (40 to 72 km/h). When engaged, the clutch provides a direct connection
between the engine and the drive wheels. This direct connection allows for
more efticient operation of the transaxle and thereby
helps contribute to
improved
fuel economy.
With the clutch-type converter,
you may notice some operational differences
compared to open-type automatic transaxle equipped vehicles. When the
clutch engages, for example, you may notice what feels like an extra transaxle
shift Also, on occasion, you may feel certain incidental engine pulSi'tions in the
30 to 50 mph (50 to 80 km/h) range. This feel is similar to that sometimes
experienced in a manual transaxle equipped vehicle. In addition, when the
accelerator
pedal is released abruptly, you may feel a slight impulse before the
clutch disengages.
These conditions
are normal. They have no adverse effect on your vehicle and
do not indicate the need for repairs.
Notice
The following practices could result in automatic transaxle failure:
• Shifting between forward and reverse driving range while operating the
engine at high speed or heavy throttle, such as when the driving wheels
are on snow or ice--commonly called "rocking." (See the correct method
for
"rocking" a vehicle under "Freeing Vehicle from Sand, Mud, Snow or
Ice" in "In Case of Emergency," Section 3 of this manual.)
•
Shifting to "R"(Reverse) or any forward range while operating the engine
at high speed in "N"(Neutral) or "P"(Park).
•
Shifting to "P"(Park) while the vehicle wheels are still turning.
• Operating the transaxle at or near "stall condition" for more than 1 0 seconds at a time. ("Stall condition" is when the engine is running at high speed while the transaxle is in a driving range and the drive wheels aren't
2-13
Page 30 of 105

• Holding vehicle on an upgrade with the ac")
Downloaded from www.Manualslib.com manuals search engine moving, such as when stuck in deep sand or when the vehicle is against a
fixed barrier.)
• Holding vehicle on an upgrade with the accelerator pedal. (Use the regular brakes to hold vehicle on an uphill grade.)
MANUAL TRANSAXLE
The standard 4-speed manual transaxle shift pattern is shown in the figure.
This
transaxle is designed to be completely synchronized in all forward gears
and may be downshifted into "I st" gear at any speed below 20 mph (30 kmf
h). Always depress the clutch pedal fully before attempting to shift into any
gear.
In "1st" and "Reverse" gear -- slowly release the clutch pedal while at
the same time pressing down on the accelerator pedal. In all other gears the
clutch may be released a little faster. This helps to reduce clutch wear.
When shifting into
"Reverse" gear, push clutch pedal in then lift up on the ring located on the gear shift lever, hold ring in position until you have moved the
shift
lever into "Reverse" gear. The gear shift lever on a 5-speed transaxle is
uninhibited, therefore, there is no gear shift ring.
Driving Precautions -Manual Transaxles
• Do not ride the clutch pedal; this produces a partly disengaged condition
that may result in damage to the clutch.
•
Downshift one or two gears from high gear when driving at slow speeds (less than 30 mph or 50 kmfh) in stop-and-go traffic for improved vehicle
performance during acceleration and when descending steep grades.
• Shift to the next lowest gear for extremely hard pulls at low road speeds.
• Do not overspeed engine when shifting down to next lowest gear.
• Shift the gears with a moderate effort to allow time for the transaxle synchronizers to coordinate.
• When stopped on an upgrade, do not hold car with engine. Use your regular brake.
• Do not coast in "Neutral" (illegal in many states).
• Set parking brake firmly before leaving the car.
2-14
Page 31 of 105

Downloaded from www.Manualslib.com manuals search engine For the best compromise between vehicle pertormance and fuel economy ,
upshift the transaxle as recommended in the chart.
Shift at the highest vehicle speed listed unless you have reached cruising
speed. (Cruising speed is a relatively steady speed whi ch includes slight variations in speed to allow for road andtrattic conditions.) For cruise , use the
highest gear for that speed.
MANUAL TRANSAXLE RECOMMENDED SH IFT SPEEDS IN MPH (Km/h) Engine$ & Accelera tion Shift S lllee! Crl.liM Shift S eed Trltn$ilxles 1 to 2 2to 3 3 to 4 4to 5 1102 2103 3104 4105 2 .0LUI E ng. Code P IS ,S 4. 20 ·25 "40 4-",,,", 124) (40) 164) (32401 (43.64) (M I9 ) 4.tOAxle 2.0L L4 EI1Q. Code P IS 26 4. 4S 20·25 27-40 35-45 5-Speed (24) (40) (64)
(72) 132·40) 143-64) (56-12) (MY7) 3.83 Axle
If vehicle speed drops below 20 mph (30 km/h) , or if the engine is not running .
smoothly , you should downshift to thE. next lowest gear. You may need to
downshift two or more gears to keep the engine running smoolhly or for
satisfactory performance .
Upshift Indicator Ught
H your vehicle has a manual transaxle. there may or may not be a "SHIFr" light · on the instrument panel. After the engine is warmed up, this light Will
corne on if you can get better fuel economy by shifting to the next higher gear
H conditions permit. !)est fuel economy can be achieved by acceleratingslQwly .
and shifting to the next higher gear when the "SHFT" light comes on.
Sale operation 01 the vehicle mayrsquire shifting differently lhan indicated by
the
"SHFT" light to adept to weather. rDild . or
affle conditions .. The ·"SHIFT '·
light should be ignored when downshifting or when hardaccelerallon Is required for satisfactory performance.
Downshifting one or more gears may be required to keep the engine .running
smoothly or
to maintain satisfactory performance ;
POWER STEERING
N the power steering assist system goes out because the engine has stopped
or the assist system has failed. the vehicle.can still be steered . However ; much greater effort Is needed . especially in sharp turns or at low speeds;
nL T STEERING WHEEL
The optional lilt steering wheel can be tilted up above normal position to
provide additional roorn for entrance and exit as
well as selected driving
positions
below normai height. The tilt control lever is located on the left side
of the steering column just behind the turn signal lever. To operate pull the
lever towards you and move the steering wheel to your· desired position then release the lever. This permits individual selection of Ihe mostcornfortable
positions for all driving cond itions . On longer trips the steering wheel position may be changed to help minimize tension and fatigue.
2-15
Page 32 of 105

Downloaded from www.Manualslib.com manuals search engine CRUISE CONTROL WITH RESUME/ACCEL FEATURE
Cruise Control is an optional speed control system. The system allows the vehicle· to keep a constant forward speed during most normal driving without
keeping your foot on the accelerator pedal, thus increasing driver comfort on
long trips. The system
can hold a speed of about 30 mph (50 km/h) or higher
within the limits of your engine.
The
system is also designed to resume a pre-set cruising speed after:
• Braking. clutching with manual transaxle vehicles, without using the
accelerator pedal.
•
Accelerating from a given set speed to a higher control speed.
The system also allows the driver to "Tap-up" and increase speed or "Tap
down" to decrease vehicle speed in increments of about 1 mph (1.6 km/h)
when needed. This feature is useful when traffic conditions warrant a small
adjustment in speed. The controls are part of the turn signal lever. The
"Cruise" switch must be moved to "On" before the system will work. The "Set/Coast" button is in the end of the turn signal lever.
To Engage at Cruising Speed
Accelerate to the desired speed, push in the "Sel/Coast" button all the way
and release it (or use the "Resume/ Accel" (R/ A) switch during first
engagement only). Take your foot off the accelerator pedal and the set speed
will be maintained up Qr down hill. The Cruise Control is designed to disengage
when you apply the brakes and also with the clutch on manual transaxle
vehicles.
It will also disengage by moving the "Resume/ Accel" (R/ A) switch to
off or by turning the ignition off. (To disengage the system without coming to a
complete
stop, push the brake pedal or clutch lightly; use just enough force to
disengage the system, witi)out stopping the vehicle:)
To Change Cruising Speed
To reset the Cruise Control to a faster speed, accelerate to the speed you wish. Push in the "Set/Coast" button all the way, (for less than a second) then release it.
Or, use the "Resume/ Aceel" switch to accelerate and reset to the speed you
wish. The "Resume/ Accel" (R/ A) switch must be held (over a second) in
order to engage the accel mode. Speed may also be increased by tapping the
"Resume/
Accel" switch for less than a second while cruising. The set speed
will
be increased by about 1 mph (1.6 km/h) for every tap. "Tap-ups" are
limited to 10 mph (16 km/h) above vehicle speed.
To reset to a
slower speed, push in the "Set/Coast" button all the way and hold it there. Wait until the vehicle slows to the desired speed, then release the
button.
Speed may also be decreased by tapping the "Sel/Coast" button for less than a second while cruising and the memory speed will be decreased
about 1
mph (1.6 km/h) for every tap, "Tap-downs" are limited to a minimum
cruising speed of 23 mph (37 km/h).
To "Resume" a Pre-Set Speed
After braking or stopping the vehicle without turning off the ignition, you can "resume" to your last set cruising speed by accelerating to 30 mph (50 km/h)
or more
and sliding the cruise switch momentarily to "Resume/ Accel"; when
you release the "Resume/ Accel" switch, your vehicle will accelerate to the
cruising speed set before braking or stopping.
2-16
 1
1 2
2 3
3 4
4 5
5 6
6 7
7 8
8 9
9 10
10 11
11 12
12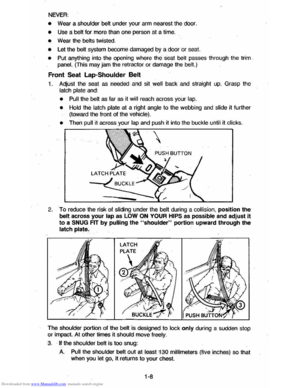 13
13 14
14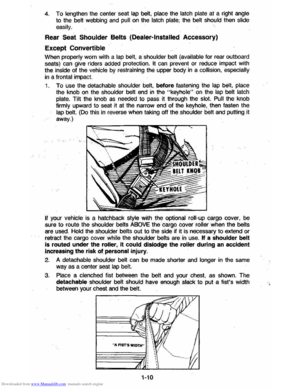 15
15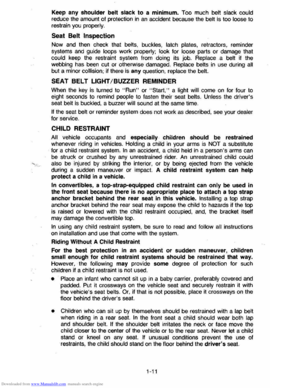 16
16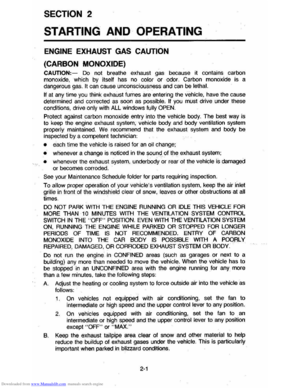 17
17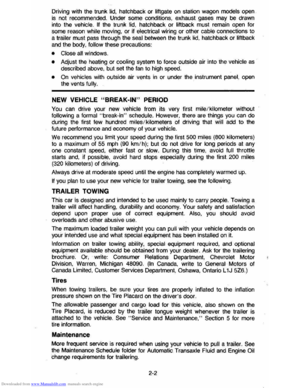 18
18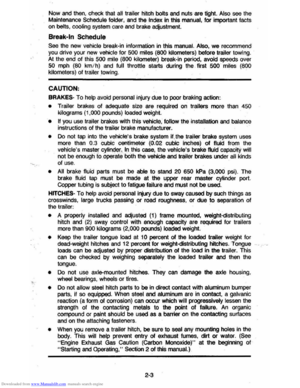 19
19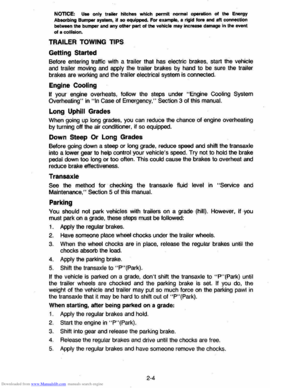 20
20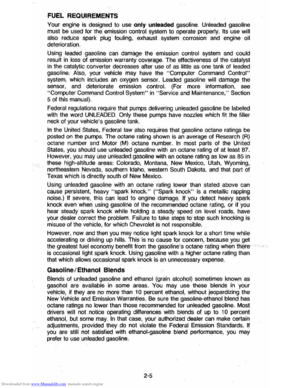 21
21 22
22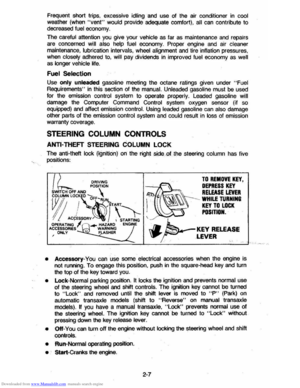 23
23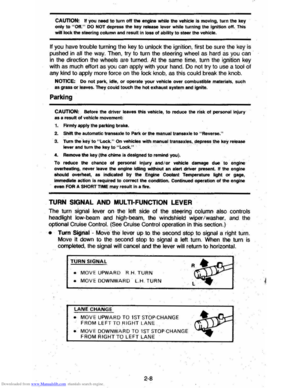 24
24 25
25 26
26 27
27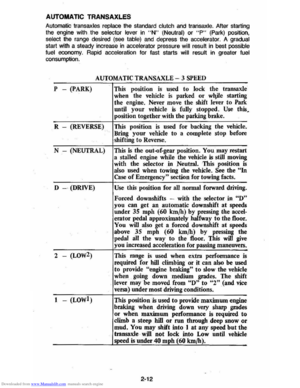 28
28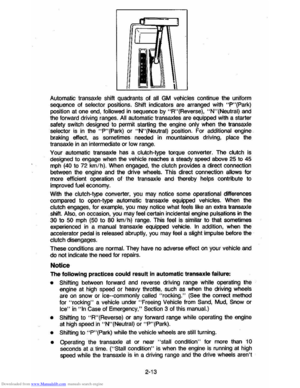 29
29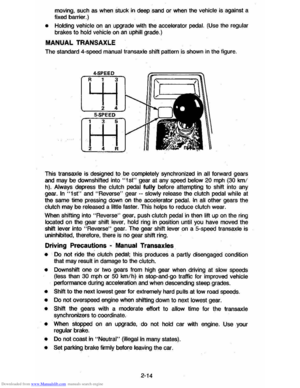 30
30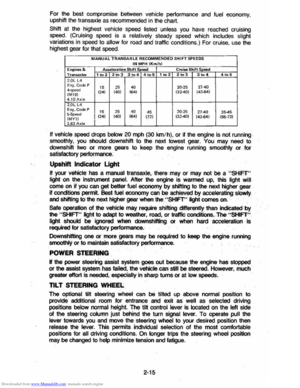 31
31 32
32 33
33 34
34 35
35 36
36 37
37 38
38 39
39 40
40 41
41 42
42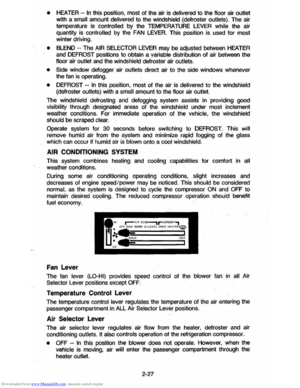 43
43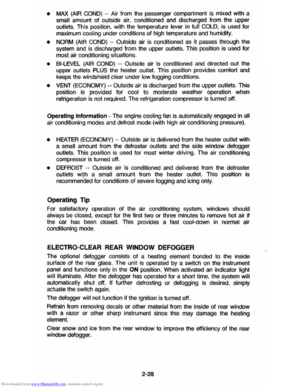 44
44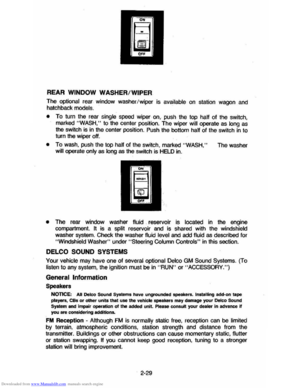 45
45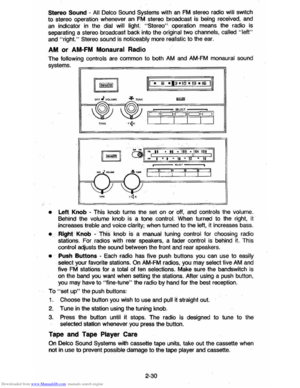 46
46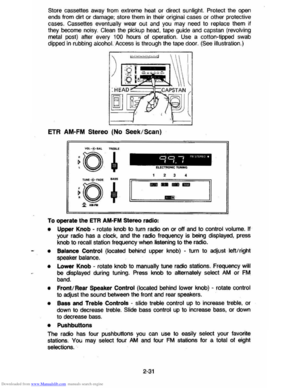 47
47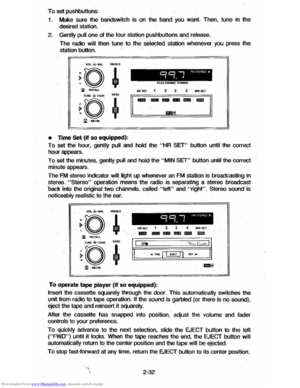 48
48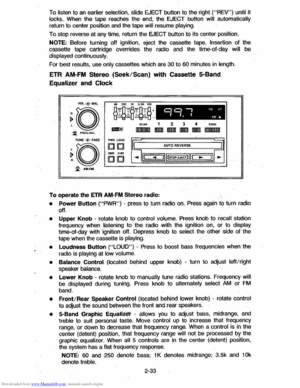 49
49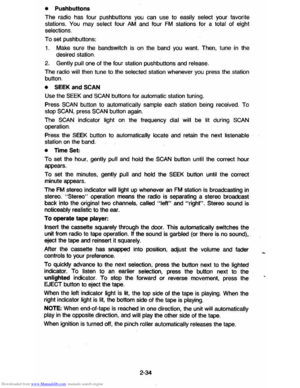 50
50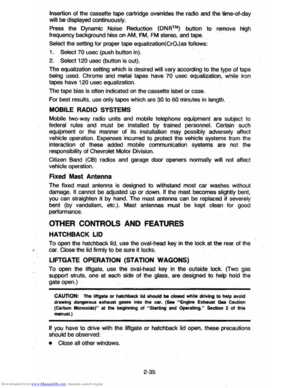 51
51 52
52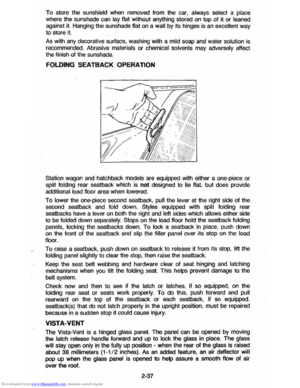 53
53 54
54 55
55 56
56 57
57 58
58 59
59 60
60 61
61 62
62 63
63 64
64 65
65 66
66 67
67 68
68 69
69 70
70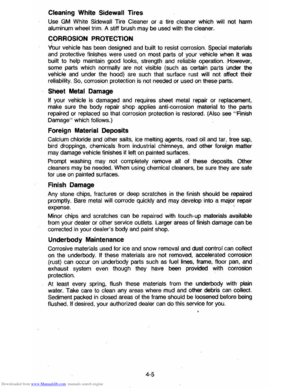 71
71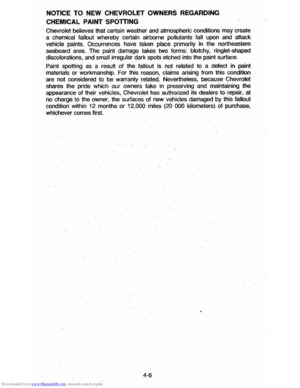 72
72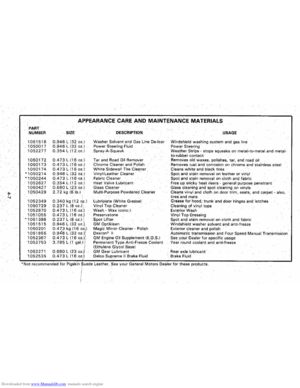 73
73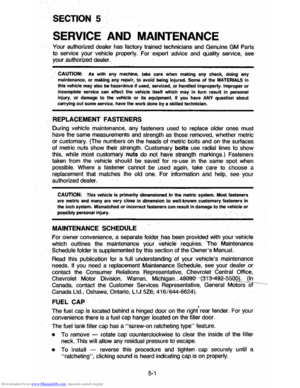 74
74 75
75 76
76 77
77 78
78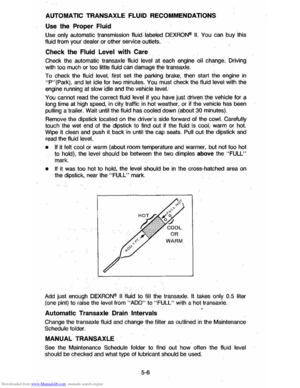 79
79 80
80 81
81 82
82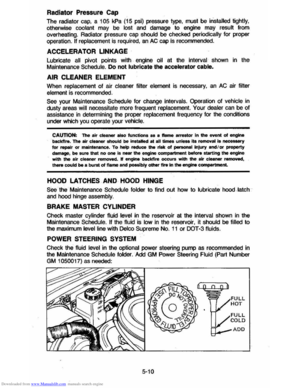 83
83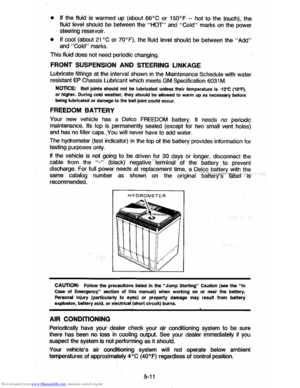 84
84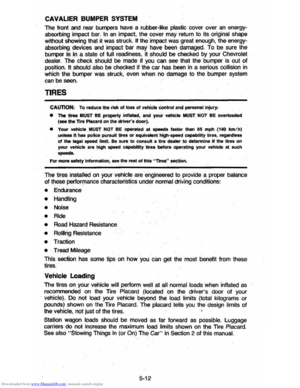 85
85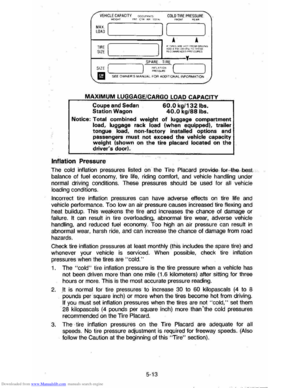 86
86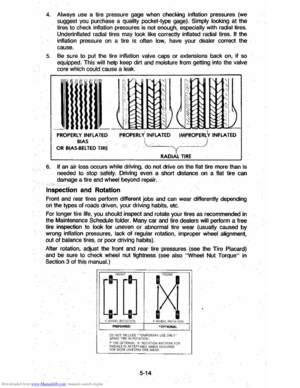 87
87 88
88 89
89 90
90 91
91 92
92 93
93 94
94 95
95 96
96 97
97 98
98 99
99 100
100 101
101 102
102 103
103 104
104