1973 DATSUN B110 ignition
[x] Cancel search: ignitionPage 449 of 513
ENGINE
ElECTRICAL
SYSTEM
IGNITION
CIRCUIT
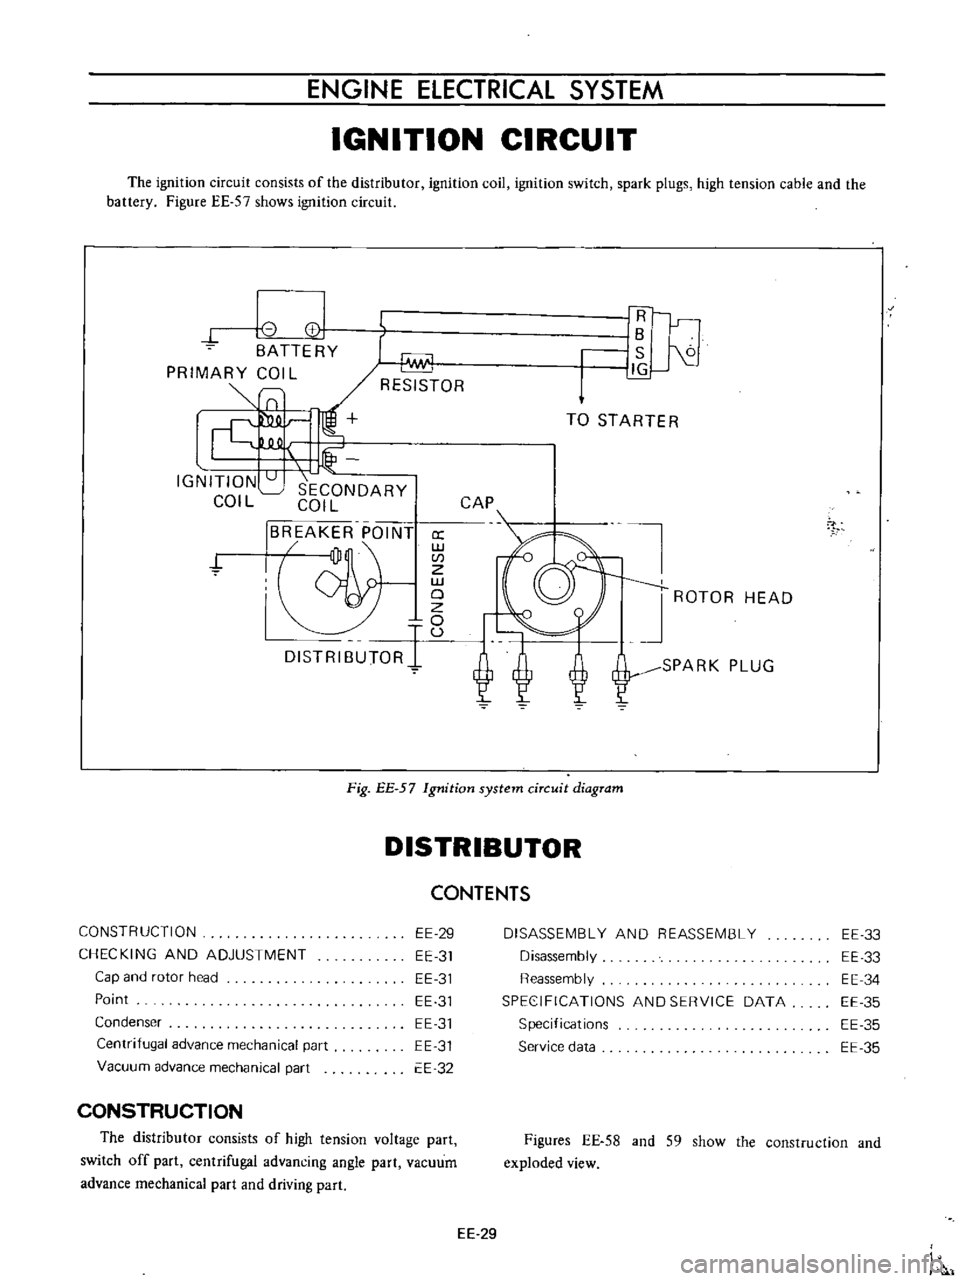
The
ignition
circuit
consists
of
the
distributor
ignition
coil
ignition
switch
spark
plugs
high
tension
cable
and
the
battery
Figure
EE
57
shows
ignition
circuit
8
I
CC
BATTERY
PRIMARY
COIL
SlO
Lf
IGNITION
SECONDARY
COIL
COIL
BREAKER
POINT
jJ
a
w
CI
Z
w
19
DISTRIBUTORI
U
1Fl
r
lB
S
J1G
TO
STARTER
CAP
ROTOR
HEAD
SPARK
PLUG
7
Fig
EE
57
Ignition
system
circuit
diagram
DISTRIBUTOR
CONSTRUCTION
CHECKING
AND
ADJUSTMENT
Cap
and
rotor
head
Point
Condenser
Centrifugal
advance
mechanical
part
Vacuum
advance
mechanical
part
EE
29
EE
31
EE
31
EE
31
EE
31
EE
31
EE
32
CONSTRUCTION
The
distributor
consists
of
high
tension
voltage
part
switch
off
part
centrifugal
advancing
angle
part
vacuum
advance
mechanical
part
and
driving
part
CONTENTS
DISASSEMBLY
AND
REASSEMBLY
Disassembly
Reassembly
SPEC
IFICATIONS
AND
SERVICE
DATA
Specifications
Service
data
EE
33
EE
33
EE
34
EE
35
EE
35
EE
35
Figures
EE
58
and
S9
show
the
construction
and
exploded
view
EE
29
Page 451 of 513
ENGINE
ElECTRICAL
SYSTEM
CHECKING
AND
ADJUSTMENT
Cap
and
rotor
head
Cap
and
rotor
head
must
always
be
kept
clean
to
maintain
good
insulation
durability
since
high
tension
voltage
from
ignition
coil
is
imposed
on
them
Sometimes
inside
of
the
cap
and
rotor
head
is
covered
with
fine
carbon
particles
and
dust
Whenever
crack
or
trace
of
leakage
is
found
on
the
cap
replace
with
a
new
one
Recommend
the
rotor
head
also
be
replaced
with
a
new
one
if
excessively
damaged
Point
When
point
surface
is
roughened
due
to
burning
polish
with
a
fine
emery
paper
No
500
or
600
or
oil
stone
When
the
point
is
worn
excessively
replace
When
the
point
is
replaced
with
a
new
one
apply
grease
to
the
arm
pivot
receiver
and
earn
surface
For
causes
of
damaged
burnt
point
improper
point
contact
insufficient
point
gap
and
defective
condenser
are
considered
The
standard
point
gap
is
0
45
to
0
55
mm
0
0177
to
0
0217
in
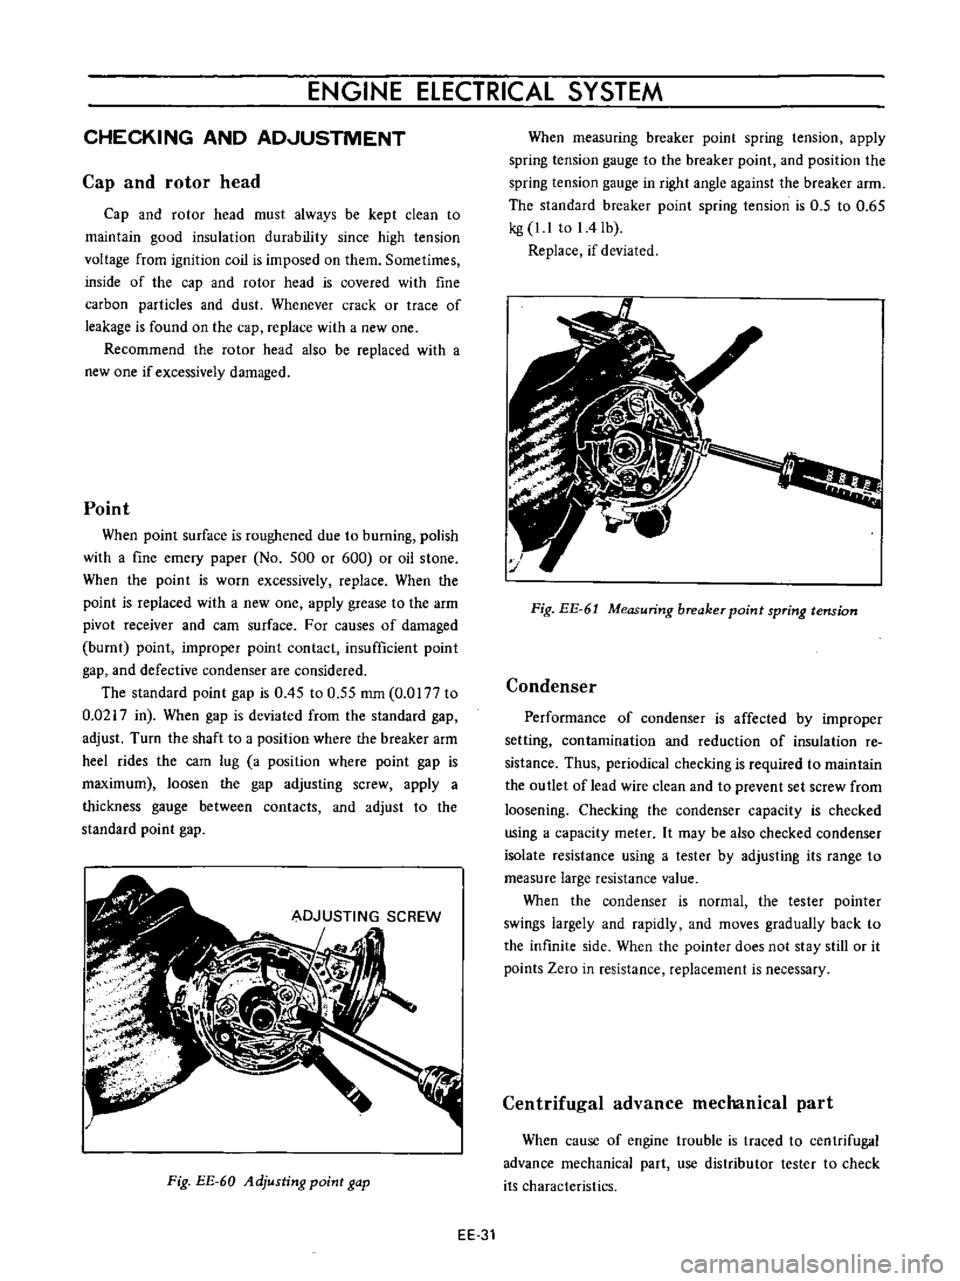
When
gap
is
deviated
from
the
standard
gap
adjust
Turn
the
shaft
to
a
position
where
the
breaker
arm
heel
rides
the
com
lug
a
position
where
point
gap
is
maximum
loosen
the
gap
adjusting
screw
apply
a
thickness
gauge
between
contacts
and
adjust
to
the
standard
point
gap
Fig
EE
60
Adjusting
point
gap
When
measuring
breaker
point
spring
tension
apply
spring
tension
gauge
to
the
breaker
point
and
position
the
spring
tension
gauge
in
right
angle
against
the
breaker
arm
The
standard
breaker
point
spring
tension
is
0
5
to
0
65
kg
1
1
to
I
4Ib
Replace
if
deviated
Fig
EE
61
Measuring
breaker
point
spring
tension
Condenser
Performance
of
condenser
is
affected
by
improper
setting
contamination
and
reduction
of
insulation
re
sistance
Thus
periodical
checking
is
required
to
maintain
the
outlet
of
lead
wire
clean
and
to
prevent
set
screw
from
loosening
Checking
the
condenser
capacity
is
checked
using
a
capacity
meter
It
may
be
also
checked
condenser
isolate
resistance
using
a
tester
by
adjusting
its
range
to
measure
large
resistance
value
When
the
condenser
is
normal
the
tester
pointer
swings
largely
and
rapidly
and
moves
gradually
back
to
the
infinite
side
When
the
pointer
does
not
stay
still
or
it
points
Zero
in
resistance
replacement
is
necessary
Centrifugal
advance
mechanical
part
When
cause
of
engine
trouble
is
traced
to
centrifugal
advance
mechanical
part
use
distributor
tester
to
check
its
characteristics
EE
31
Page 456 of 513
ENGINE
Weight
pivot
diameter
mm
in
Weight
hole
diameter
mm
in
Clearance
between
pivot
and
hole
mmOn
5
0
028
0
9
9
1
0011
1
005
1
6
1
0002
5
1
018
0
1969
0
0007
o
0
0
005
to
0
046
0
0002
to
0
0018
IGNITION
COIL
CONTENTS
DESCRIPTION
EE
36
DESCRIPTION
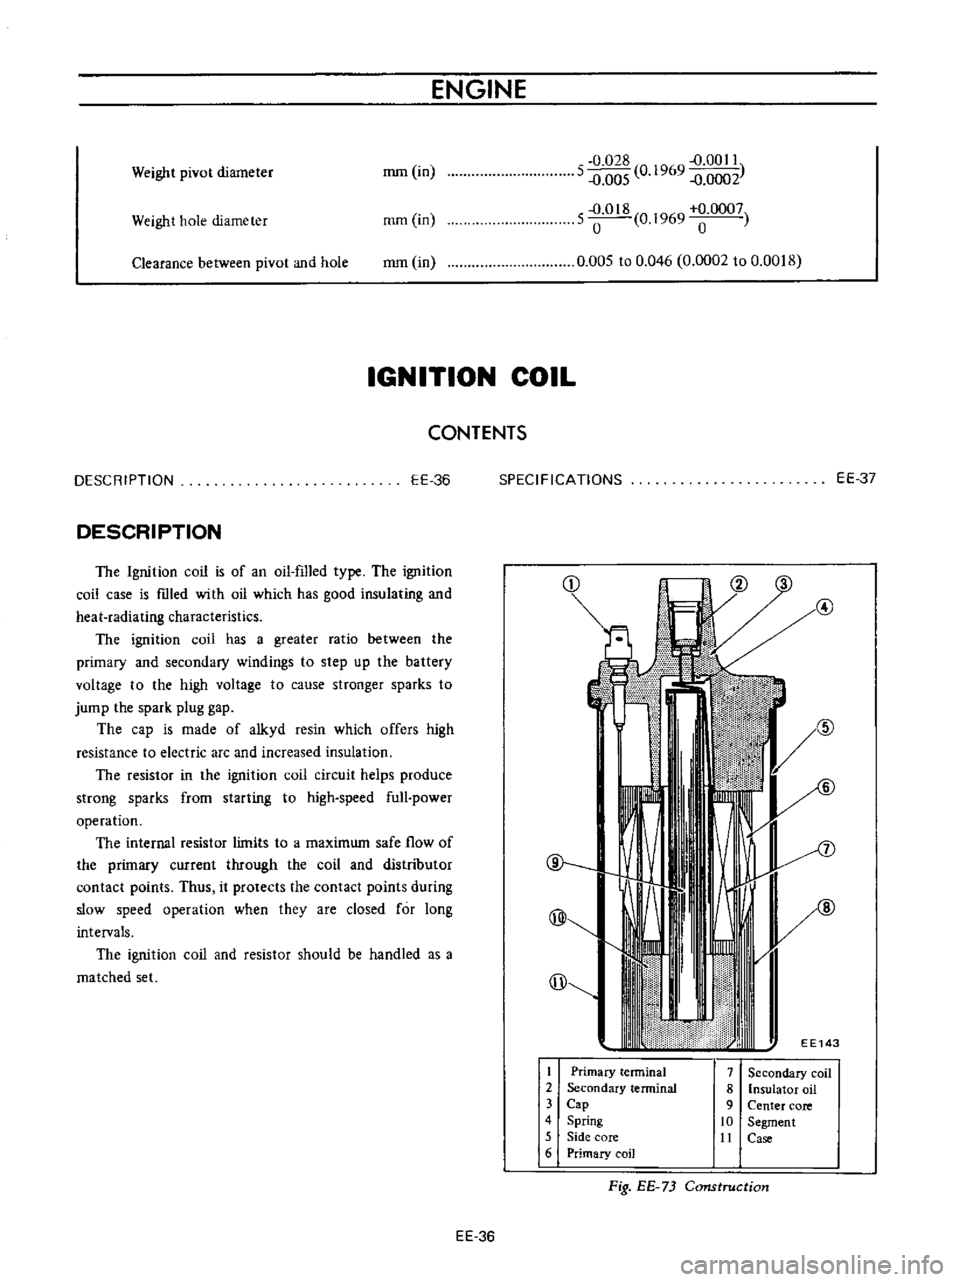
The
Ignition
coil
is
of
an
oil
filled
type
The
ignition
coil
case
is
mted
with
oil
which
has
good
insulating
and
heat
radiating
characteristics
The
ignition
coil
has
a
greater
ratio
between
the
primary
and
secondary
windings
to
step
up
the
battery
voltage
to
the
high
voltage
to
cause
stronger
sparks
to
jump
the
spark
plug
gap
The
cap
is
made
of
alkyd
resin
which
offers
high
resistance
to
electric
arc
and
increased
insulation
The
resistor
in
the
ignition
coil
circuit
helps
produce
strong
sparks
from
starting
to
high
speed
full
power
operation
The
internal
resistor
limits
to
a
maximum
safe
flow
of
the
primary
current
through
the
coil
and
distributor
contact
points
Thus
it
protects
the
contact
points
during
slow
speed
operation
when
they
are
closed
for
long
intervals
The
ignition
coil
and
resistor
should
be
handled
as
a
matched
set
EE
36
SPECIFICATIONS
EE
37
@
@
@l
@
EE143
I
Primary
terminal
2
Secondary
terminal
3
Cap
4
Spring
5
Side
core
6
Primary
coil
7
Secondary
coil
8
insulator
oil
9
Center
core
10
Segment
tt
Case
Fig
EE
73
Construction
Page 457 of 513
ENGINE
ElECTRICAL
SYSTEM
SPECIFICATIONS
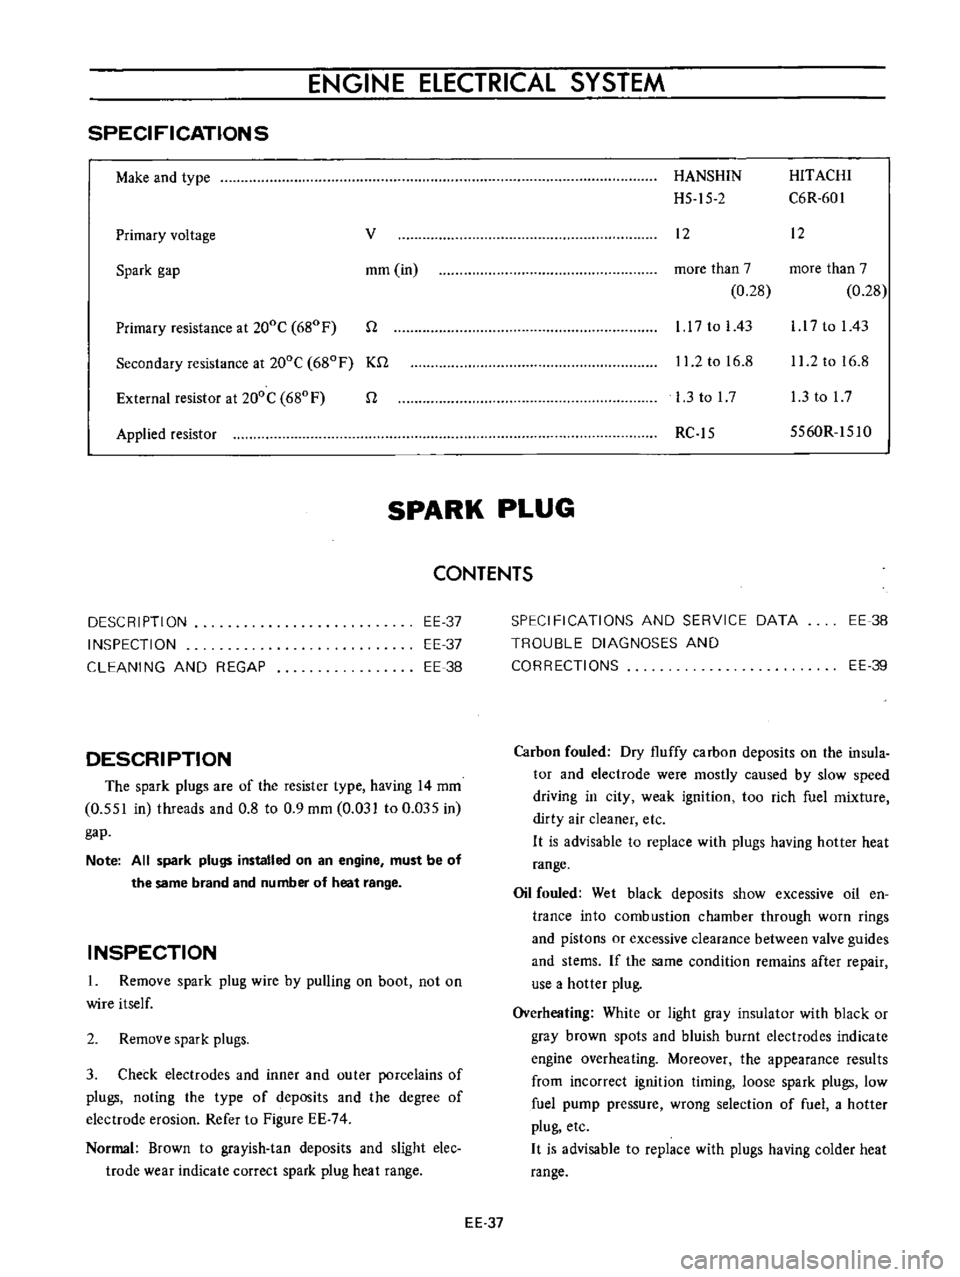
Make
and
type
Primary
voltage
v
Spark
gap
mm
in
Primary
resistance
at
200C
680
F
n
Secondary
resistance
at
200C
680F
Kn
External
resistor
at
200C
680
F
n
Applied
resistor
HANSHIN
HITACHI
H5
15
2
C6R
601
12
12
more
than
7
more
than
7
0
28
0
28
1
17
to
I
43
l
l
7
to
I
43
11
2
to
16
8
11
2
to
16
8
l
3tol7
l
3tol7
RC
15
5560R
151O
SPARK
PLUG
CONTENTS
DESCRIPTION
INSPECTION
CLEANING
AND
REGAP
EE
37
EE
37
EE
38
DESCRIPTION
The
spark
plugs
are
of
the
resister
type
having
14
mm
0
551
in
threads
and
0
8
to
0
9
mm
0
031
to
0
Q35
in
gap
Note
All
spark
plugs
installed
on
an
engine
must
be
of
the
same
brand
and
number
of
heat
range
INSPECTION
1
Remove
spark
plug
wire
by
pulling
on
boot
not
on
wire
itself
2
Remove
spark
plugs
3
Check
electrodes
and
inner
and
outer
porcelains
of
plugs
noting
the
type
of
deposits
and
the
degree
of
electrode
erosion
Refer
to
Figure
EE
74
Normal
Brown
to
grayish
tan
deposits
and
slight
elec
trode
wear
indicate
correct
spark
plug
heat
range
SPECIFICATIONS
AND
SERVICE
DATA
TROUBLE
DIAGNOSES
AND
CORRECTIONS
EE
38
EE
39
Carbon
fouled
Dry
fluffy
carbon
deposits
on
the
insula
tor
and
electrode
were
mostly
caused
by
slow
speed
driving
in
city
weak
ignition
too
rich
fuel
mixture
dirty
air
cleaner
etc
H
is
advisable
to
replace
with
plugs
having
hotter
heat
range
Oil
fouled
Wet
black
deposits
show
excessive
oil
en
trance
into
combustion
chamber
through
worn
rings
and
pistons
or
excessive
clearance
between
valve
guides
and
stems
If
the
same
condition
remains
after
repair
use
a
hotter
plug
Overheating
White
or
light
gray
insulator
with
black
or
gray
brown
spots
and
bluish
burnt
electrodes
indicate
engine
overheating
Moreover
the
appearance
results
from
incorrect
ignition
timing
loose
spark
plugs
low
fuel
pump
pressure
wrong
selection
of
fuel
a
hotter
plug
etc
H
is
advisable
to
replace
with
plugs
having
colder
heat
range
EE
37
Page 459 of 513

ENGINE
ELECTRICAL
SYSTEM
TROUBLE
DIAGNOSES
AND
CORRECTIONS
When
engine
does
not
start
If
there
is
no
trouble
in
fuel
system
ignition
system
should
be
checked
This
can
be
easily
done
by
detaching
a
high
tension
cable
from
spark
plug
starting
engine
and
observing
condition
of
spark
that
occurs
between
high
tension
cable
and
spark
plug
terminal
After
checking
this
repair
as
necessary
Length
of
Trouble
location
Cause
Remedies
spark
gap
No
sparks
at
all
Distributor
Defective
insulation
of
condenser
Replace
Breakage
of
lead
wire
on
low
tension
side
Repair
Defective
insulation
of
cap
and
rotor
head
Replace
Point
does
not
open
or
close
Repair
Ignition
coil
Wire
breakage
or
short
circuit
of
coil
Replace
with
new
one
High
tension
cable
Wire
coming
off
Repair
Defective
insulation
Replace
I
to
2
mm
0
0394
Distributor
Point
gap
too
wide
Correct
to
0
0787
in
or
Oil
sticking
on
point
Clean
irregular
Point
burnt
too
much
Replace
Less
than
6
mm
Spark
plugs
Electrode
gap
too
wide
Correct
or
replace
0
2362
in
Too
much
carbon
Clean
or
replace
Broken
neck
of
insulator
Replace
Expiry
of
plug
life
Replace
2
When
engine
rotates
but
does
not
run
smoothly
In
this
case
there
are
many
causes
resulting
from
the
ignition
system
and
other
engine
conditions
not
related
to
ignition
Therefore
first
complete
inspection
of
ignition
system
should
be
carried
out
EE
39
Page 460 of 513
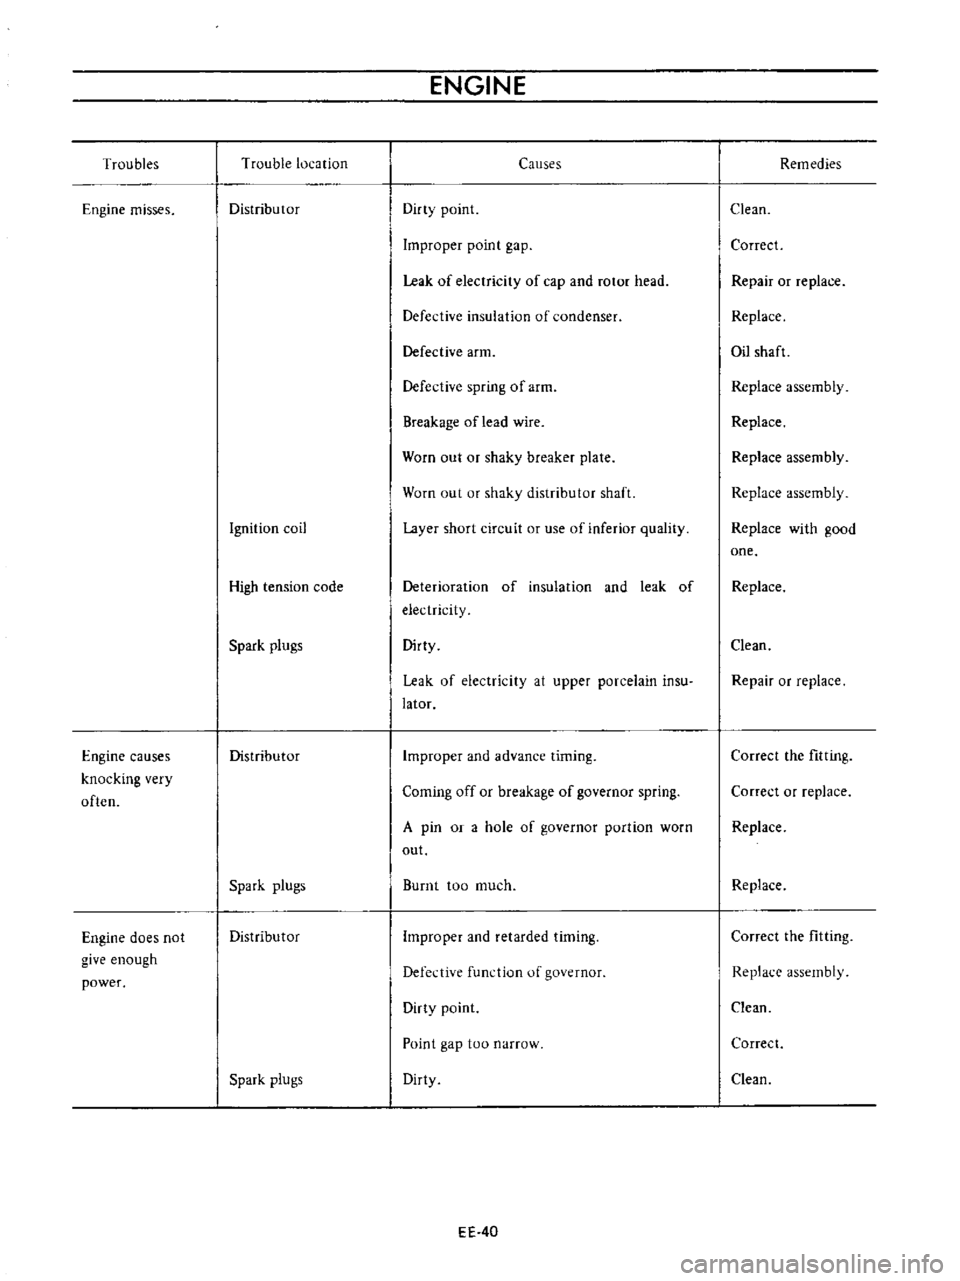
Troubles
Engine
misses
Engine
causes
knocking
very
often
Engine
does
not
give
enough
power
Trouble
location
Distributor
Ignition
coil
High
tension
code
Spark
plugs
Distributor
Spark
plugs
Distributor
Spark
plugs
ENGINE
Causes
Dirty
point
Improper
point
gap
Leak
of
electricity
of
cap
and
rotor
head
Defective
insulation
of
condenser
Defective
arm
Defective
spring
of
arm
Breakage
oflead
wire
Worn
out
or
shaky
breaker
plate
Worn
out
or
shaky
distributor
shaft
Layer
short
circuit
or
use
of
inferior
quality
Deterioration
of
insulation
and
leak
of
electricity
Dirty
Leak
of
electricity
at
upper
porcelain
insu
lator
Improper
and
advance
timing
Coming
off
or
breakage
of
governor
spring
A
pin
or
a
hole
of
governor
portion
worn
out
Burnt
too
much
Improper
and
retarded
timing
Defedive
function
of
governor
Dirty
point
Point
gap
too
narrow
Dirty
EE
40
Remedies
Clean
Correct
Repair
or
replace
Replace
Oil
shaft
Replace
assembly
Replace
Replace
assembly
Replace
assembly
Replace
with
good
one
Replace
Clean
Repair
or
replace
Correct
the
fitting
Correct
or
replace
Replace
Replace
Correct
the
fitting
Replace
assembly
Clean
Correct
Clean
Page 467 of 513

CHASSIS
ENGINE
REMOVAL
AND
INSTALLATION
CONTENTS
PR
ECAUTIONS
REMOVAL
ERA
ERA
PRECAUTIONS
Be
sure
to
use
fender
cover
so
that
the
body
is
not
damaged
2
When
lifting
the
engine
or
when
jacking
up
the
engine
pay
attention
for
safety
and
carry
out
operation
correctly
so
that
the
parts
are
not
damaged
REMOVAL
I
Removing
hood
Open
the
hood
remove
four
installation
bolts
and
remove
the
hood
2
Disconnect
the
battery
cable
from
the
terminal
3
Removing
radiator
Drain
water
from
the
radiator
disconnect
two
radiator
hoses
remove
four
radiator
installation
bolts
and
remove
the
radiator
Fig
ER
8
Removin
radiator
4
Removing
cables
and
hoses
Disconnect
the
following
cables
hoses
and
wires
High
voltage
cable
between
ignition
coil
and
distribu
INSTAllATION
ER
6
tor
Cable
to
the
thermal
transmitter
Cable
to
the
oil
pressure
switch
Cable
to
the
primary
side
of
the
distributor
Cable
to
the
starting
motor
Fuel
hose
Cable
to
the
alternator
Heater
hose
for
model
with
heater
only
Wires
for
accelerator
and
choke
The
operation
will
be
carried
out
more
easily
by
removing
the
air
cleaner
Fig
ER
9
Right
side
of
engine
compartment
Fig
ER
10
Left
side
of
engine
compartment
ERA