1900 MITSUBISHI DIAMANTE steering
[x] Cancel search: steeringPage 292 of 408
DRIVETRAIN 7-13
27. Shde the transaxle rearward and carefully
lower it from the vehicle.
To install: 28. After the torque converter has been mounted
on the transaxle, install the transaxle assembly to the
engine. Install the mounting bolts and tighten to 35
ft. Ibs. (48 Nm).
29. Install the transaxle lower coupling bolt and
tighten to 21-25 ft Ibs. (29-34 Nm).
30. Connect the torque converter to the flexplate
and tighten the bolts to 33-38 ft. Ibs. (45-52 Nm).
31. Install the cover to the transaxle bellhous-
ing and tighten the mounting bolts to 7 ft. Ibs. (9
Nm).
32 Install the crossmember and tighten the front
mounting bolts to 65 ft. Ibs (88 Nm) and the rear
bolt to 54 ft. Ibs. (73 Nm) Install the front engine roll
stopper through-bolt and lightly tighten. Once the full
weight of the engine is on the mounts, tighten the ’
bolt to 42 ft. Ibs. (57 Nm),
33. Install the triangular stay bracket and tighten
the mounting bolts to 65 ft. Ibs. (88 Nm).
34. Install the halfshafts, using new circlips on
the axle ends.
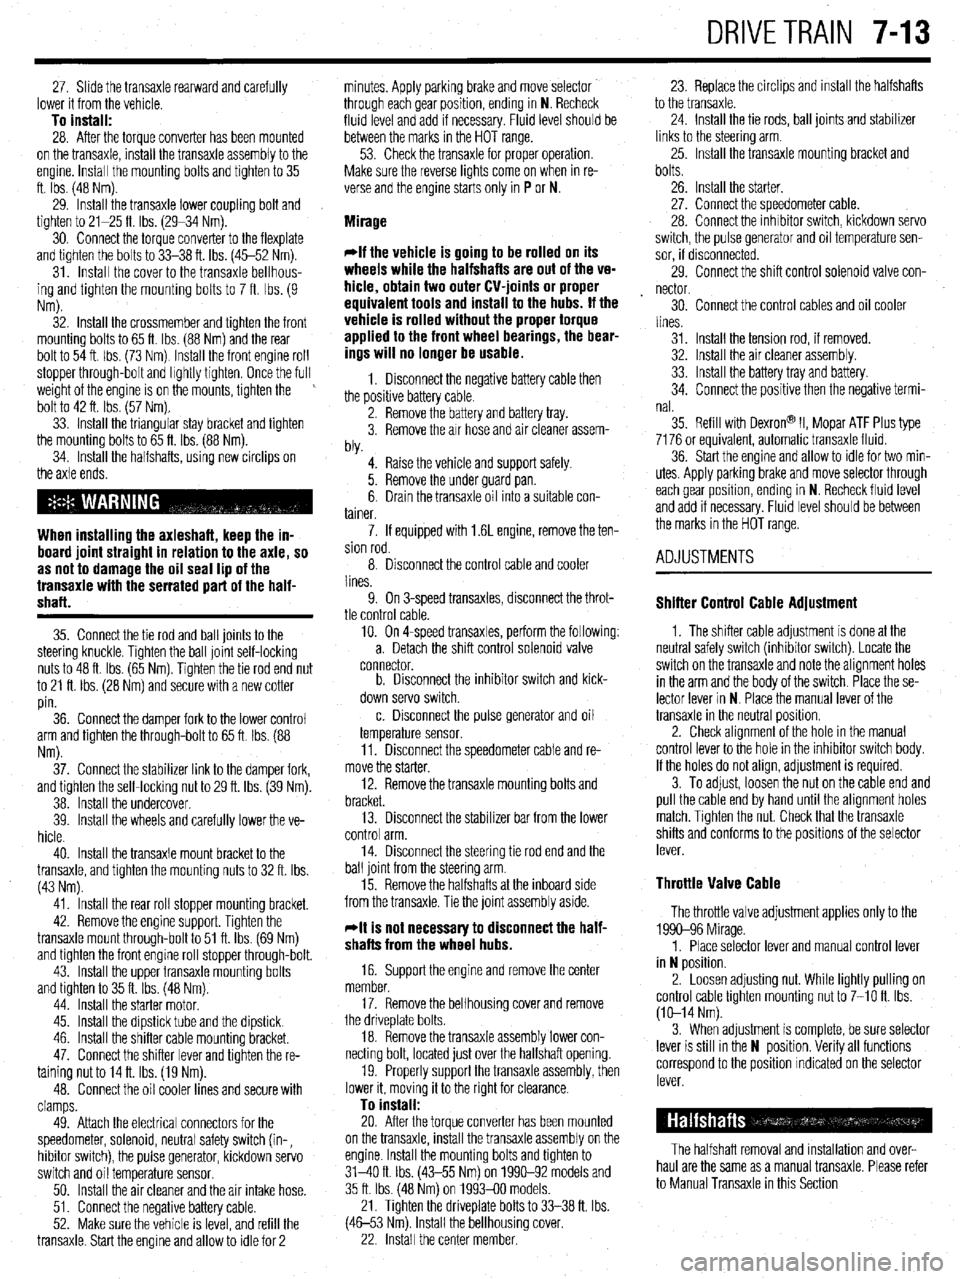
When installing the axleshaft, keep the in-
board joint straight in relation to the axle, so
as not to damage the oil seal lip of the
transaxle with the serrated part of the half-
shaft.
35. Connect the tie rod and ball joints to the
steering knuckle. Tighten the ball joint self-locking
nuts to 48 ft. Ibs. (65 Nm). Tighten the tie rod end nut
to 21 ft. Ibs. (28 Nm) and secure with a new cotter
pin.
36. Connect the damper fork to the lower control
arm and tighten the through-bolt to 65 ft Ibs. (88
Nm).
37. Connect the stabilizer link to the damper fork,
and tighten the self-locking nut to 29 ft. Ibs. (39 Nm).
38. Install the undercover.
39. Install the wheels and carefully lower the ve-
hicle
40. Install the transaxle mount bracket to the
transaxle, and tighten the mounting nuts to 32 ft. Ibs.
(43 Nm).
41. Install the rear roll stopper mounting bracket.
42. Remove the engine support. Tighten the
transaxle mount through-bolt to 51 ft. Ibs. (69 Nm)
and tighten the front engine roll stopper through-bolt.
43. Install the upper transaxle mounting bolts
and tighten to 35 fl. Ibs. (48 Nm).
44. Install the starter motor.
45. Install the dipstick tube and the dipstick
46. Install the shifter cable mounting bracket.
47. Connect the shifter lever and tighten the re-
taining nut to 14 ft. Ibs. (19 Nm).
48. Connect the oil cooler lines and secure with
clamps.
49. Attach the electrical connectors for the
speedometer, solenoid, neutral safety switch (in-,
hibitor switch), the pulse generator, kickdown servo
switch and oil temperature sensor.
50. Install the air cleaner and the air intake hose.
51. Connect the negative battery cable.
52. Make sure the vehicle is level, and refill the
transaxle. Start the engine and allow to idle for 2 minutes. Apply parking brake and move selector
through each gear position, ending in N. Recheck
fluid level and add if necessary. Fluid level should be
between the marks in the HOT range.
53. Check the transaxle for proper operation.
Make sure the reverse lights come on when in re-
verse and the engine starts only in
P or N.
Mirage
*If the vehicle is going to be rolled on its
wheels while the halfshafts are out of the ve-
hicle, obtain two outer CV-joints or proper
equivalent tools and install to the hubs. If the
vehicle is rolled without the proper torque
applied to the front wheel bearings, the bear-
ings will no longer be usable.
1. Disconnect the negative battery cable then
the positive battery cable.
2. Remove the battery and battery tray.
3. Remove the air hose and air cleaner assem-
bly.
4. Raise the vehicle and support safely.
5. Remove the under guard pan.
6. Drain the transaxle oil into a suitable con-
tainer.
7. If equipped with 1.6L engine, remove the ten-
sion rod.
8. Disconnect the control cable and cooler
lines.
9. On 3-speed transaxles, disconnect the throt-
tle control cable.
10. On 4-speed transaxles, perform the following:
a. Detach the shift control solenoid valve
connector.
b. Disconnect the inhibitor switch and kick-
down servo switch.
c. Disconnect the pulse generator and oil
temperature sensor.
11. Disconnect the speedometer cable and re-
move the starter.
12. Remove the transaxle mounting bolts and
bracket.
13. Disconnect the stabilizer bar from the lower
control arm.
14. Disconnect the steering tie rod end and the
ball joint from the steering arm.
15. Remove the halfshafts at the inboard side
from the transaxle. Tie the joint assembly aside.
*It is not necessary to disconnect the half-
shafts from the wheel hubs.
16. Support the engine and remove the center
member.
17. Remove the bellhousing cover and remove
the driveplate bolts.
18 Remove the transaxle assembly lower con-
necting bolt, located just over the halfshaft opening.
19. Properly support the transaxle assembly, then
lower it, moving it to the right for clearance.
To install: 20. After the torque converter has been mounted
on the transaxle, install the transaxle assembly on the
engine. Install the mounting bolts and tighten to
31-40 ft. Ibs. (43-55 Nm) on 1990-92 models and
35 ft. Ibs. (48 Nm) on 1993-00 models.
21. Tighten the driveplate bolts to 33-38 ft. Ibs.
(46-53 Nm). Install the bellhousing cover.
22. Install the center member. 23. Replace the circlips and install the halfshafts
to the transaxle.
24. Install the tie rods, ball joints and stabilizer
links to the steering arm
25. Install the transaxle mounting bracket and
bolts.
26. Install the starter.
27. Connect the speedometer cable.
28. Connect the inhibitor switch, kickdown servo
switch, the pulse generator and oil temperature sen-
sor, if disconnected.
29. Connect the shift control solenoid valve con-
nector.
30. Connect the control cables and oil cooler
lines.
31. Install the tension rod, if removed.
32. Install the air cleaner assembly.
33. Install the battery tray and battery.
34. Connect the positive then the negative termi-
nal.
35. Refill with Dexron@ II, Mopar ATF Plus type
7176 or equivalent, automatic transaxle fluid.
36. Start the engine and allow to idle for two min-
utes. Apply parking brake and move selector through
each gear position, ending in N. Recheck fluid level
and add if necessary. Fluid level should be between
the marks in the HOT range.
ADJUSTMENTS
Shifter Control Cable Adjustment
1. The shifter cable adjustment is done at the
neutral safety switch (inhibitor switch). Locate the
switch on the transaxle and note the alignment holes
in the arm and the body of the switch. Place the se-
lector lever in N. Place the manual lever of the
transaxle in the neutral position.
2. Check alignment of the hole in the manual
control lever to the hole in the inhibitor switch body.
If the holes do not align, adjustment is required.
3. To adjust, loosen the nut on the cable end and
pull the cable end by hand until the alignment holes
match. Tighten the nut. Check that the transaxle
shifts and conforms to the positions of the selector
lever.
Throttle Valve Cable
The throttle valve adjustment applies only to the
1990-96 Mirage.
1. Place selector lever and manual control lever
in N position.
2. Loosen adjusting nut. While lightly pulling on
control cable tighten mounting nut to 7-10 ft. Ibs.
(X-14 Nm).
3. When adjustment is complete, be sure selector
lever is still in the N position. Verify all functions
correspond to the position indicated on the selector
lever.
The halfshaft removal and installation and over-
haul are the same as a manual transaxle Please refer
to Manual Transaxle in this Section
Page 295 of 408
.
7-16 DRIVETRAIN
11. Using puller, remove the oil seal and inner 18. While holding the rear axle shaft in positron
bearing from the trailing arm. using holding fixture tool MB9g67-01 or equivalent,
12. Inspect the companion flange and axle shaft tighten a new self-locking nut to 159 ft. Ibs. (220 Nm).
for wear or damage. Inspect the dust cover for defor- 19. Install the drive shaft nuts, washers and bolts.
mation or damage. Inspect the bearings for burning Tighten to 40-47 ft. Ibs. (55-65 Nm).
or declaration. Replace components as required 20. Install the rear brake disc, caliper assembly
To install: and parking brake.
13. Using the proper driver, press fit the inner
bearing onto the trailing arm. Press fit the oil seal
onto the trailing arm with the depression in the oil
seal facing upward, and until it contacts the shoulder
on the inner arm. 21. Install the tire and wheel assembly and lower
the vehrcle. Check the parking brake stroke and ad-
just as required.
22. Before moving the vehicle, pump the brakes
until a firm pedal is achieved.
*When tapping the oil seal in, use a plastic
hammer to lightly tap the top and circumfer-
ence of the seal installation tool, press fitting
gradually and evenly.
14. Press fit the dust covers onto the axle until it
contacts the axle shaft shoulder. Install the innermost
cover so the deDression is facino
UDWard.
REMOVAL &INSTALLATION
1. Raise the vehicle and support safely.
2. Matchmark the driveshaft and comoanion . ,
*When tapping the oil seal in, use a plastic
hammer to lightly tap the top and circumfer-
ence of the seal installation tool, press fitting
gradually and evenly. flange and remove the shaft. Don’t let it hang from the
transaxle. Tie It up to the underbody.
3. Hold the companion flange stationary and re-
move the large self-locking nut in the center of the
comoanion flanoe.
15. Apply multi-purpose grease around the entire 4: Using a Gller, remove the flange. Pry the old
circumference of the Inner side of the outer bearing seal out.
seal lip. Press fit the outer bearing to the axle shaft so
To install: that the bearrng seal lip surface is facing towards the 5. Apply a thin coat of multi-purpose grease to the
axle shaft flange. seal lip and the companion flange seal contacting sur-
16. Press fit the rear rotor to the axle shaft with face. Install the new seal with an appropriate driver.
the rear rotor groove surface towards the axle shaft 6. Install the companion flange. Install a new lock-
flange. nut and torque to 116-159 fl Ibs. (157-220 Nm). The
17. Install the rear axle shaft to the trailing arm rotation torque of the drive pinion should be about 4
temporarily. Install the companion flange to the rear inch Ibs. for new or reused, oiled bearings
axle shaft, then install a new self-locking nut. 7. Install the driveshaft.
REMOVAL &INSTALLATION
1. Raise the vehicle and support safely.
2. Drain the differential gear oil and remove the
center exhaust pipe.
3. Matchmark and remove the rear driveshaft.
4. Remove the rear halfshafts.
5. Remove the center exhaust pipe and muffler
assembly, as required.
6. Remove or disconnect the 4 wheel steering
oil pump.
7. The large mounting bolts that hold the differ-
ential carrier support plate to the underbody may use
self-locking nuts. Before removing them, support the
rear axle assembly in the middle with a transaxle
jack. Remove the nuts, then remove the support
plate(s) and the square dynamic damper from the rear
of the carrier.
8 Lower the differential carrier and remove from
the vehicle.
To install: 9. Raise the rear differential carrier into position
and install support member bolts. Install new lock-
nuts on all support bolts.
10. Install the 4 wheel steering oil pump.
11. Install new circlips on both rear driveshafts
and install.
12. Install the propeller shaft.
13. Install the center exhaust pipe and muffler.
14. Lower the vehicle.
15. With the vehicle level, fill the rear differential.
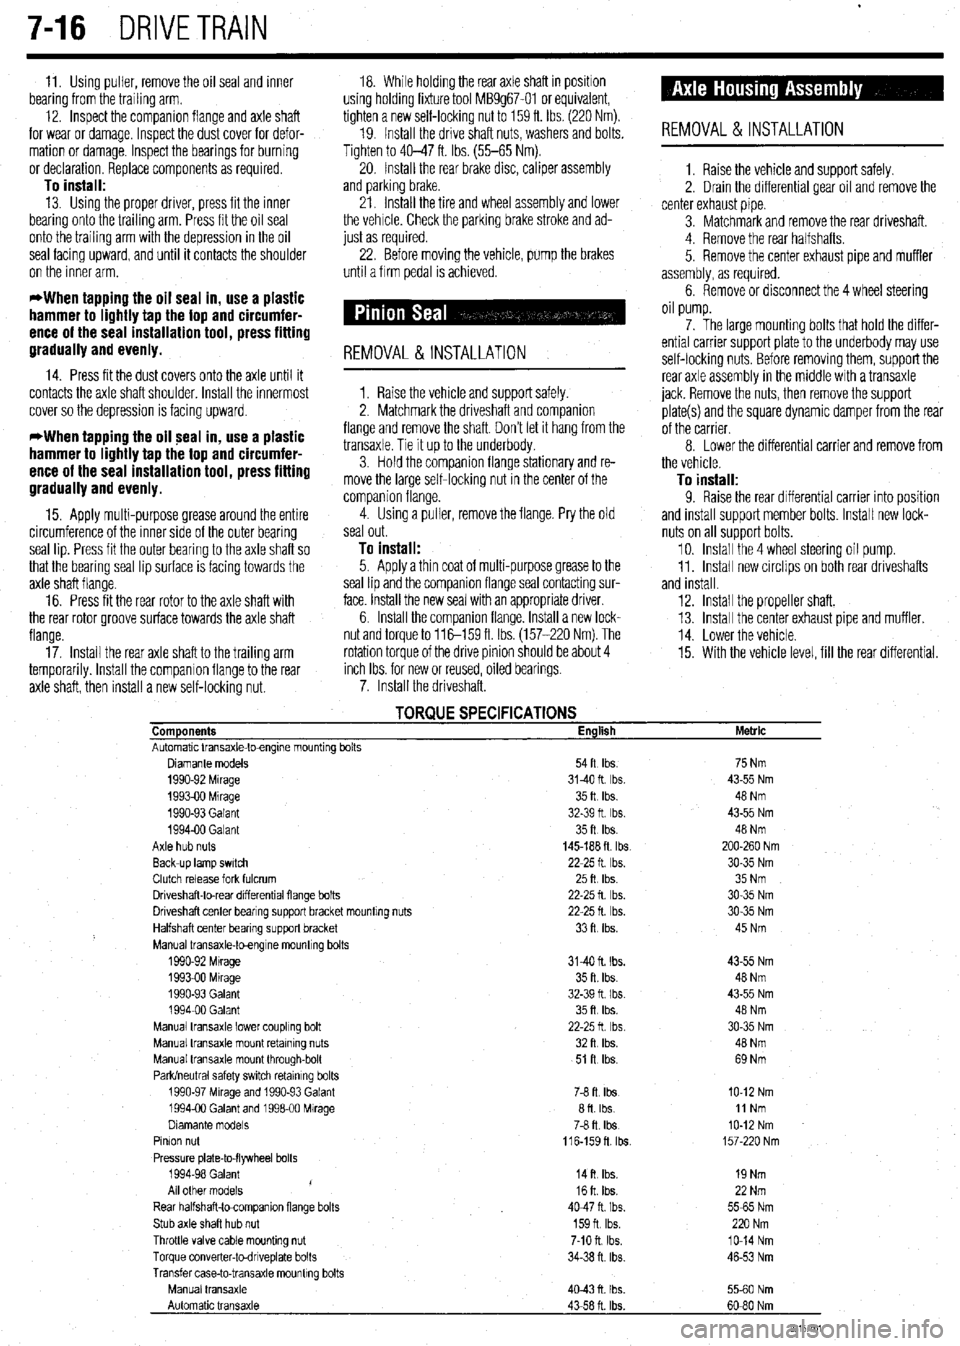
TORQUE SPECIFICATIONS Components English
Automatic Vansaxle-toengme mountrng bolts
Diamante models 54ft Ibs.
1990-92 Mrrage 3140ft Ibs.
199390 Mrrage 35ft Ibs.
1990-93 Galant 32-39 ft Ibs.
199400 Galant 35ft Ibs.
Axle hub nuts 145-188 ft tbs
Back-up lamp swatch 22-25 ft Ibs.
Clutch release fork fulcrum 25ft Ibs
Driveshaft-to-rear drfferentral flange bolts 22-25 fl lb?..
Driveshaft center bearrng support bracket mountrng nuts 22-25 fl. Ibs.
Halfshaft center bearing support bracket 33ft Ibs.
Manual transaxle-toengrne mountrng bolts
1990-92 Mtrage 3140 ft. Ibs.
1993-00 Mrrage 35 ft. Ibs.
1990-93 Galant 32-39 fl I bs.
199400 Galant 35ft Ibs.
Manual transaxle lower coupling bolt 22-25ft Ibs
Manual transaxle mount retaining nuts 32ft Ibs.
Manual transaxle mount through-bolt 51 R Ibs.
Park/neutral safety swatch retainrng bolts
1990-97 Mrrage and 1990-93 Galant 76 ft. Ibs
1994-00 Galant and 199600 Mirage afl Ibs
Dramante models
78 fl. Ibs
Pinion nut
116-159fl lb?..
Pressure plate-to-flywheel bolts
1994-98 Galant
14ft Ibs.
/
All other models 16ft Ibs.
Rear halfshaft-tocompanron flange bolts 4047ft Ibs.
Stub axle shaft hub nut 159n Ibs.
Throttle valve cable mounting nut 7-10 ft. Ibs.
Torque converter-todnveplate bolts 34-38 n. ibs
Transfer case-to-transaxle mounttng bolts
Manual transaxle
4043n Ibs.
Automatic transaxle
43-58 ft. Ibs. Metric
75 Nm
43-55 Nm
48 Nm
43-55 Nm
48 Nm
200-260 Nm
30-35 Nm
35 Nm
30-35 Nm
30-35 Nm
45 Nm
43-55 Nm
48 Nm
43-55 Nm
48 Nm
30-35 Nm
40 Nm
69 Nm
IO-12 Nm
11 Nm
IO-12 Nm
157-220 Nm
19 Nm
22 Nm
5565 Nm
220 Nm
lo-14 Nm
46-53 Nm
5560 Nm
60-80 Nm
93157co1
Page 296 of 408
WHEELS 8-2
WHEEL ASSEMBLY 8-2
REMOVAL & INSTALLATION 8-2
INSPECTION 8-2
WHEELLUG STUDS 8-2
REMOVAL & INSTALLATION 8-2
FRONT SUSPENSION 8-4
MACPHERSONSTRUTAND COIL
SPRING 8-7
REMOVAL & INSTALLATION 8-7
OVERHAUL 8-7
SHOCKABSORBERAND COIL
SPRING 8-8
REMOVAL &INSTALLATION 8-8
OVERHAUL 8-9
UPPER BALLJOINT 8-9
REMOVAL & INSTALLATION 8-9
INSPECTION 8-9
UPPER CONTROLARM 8-10
REMOVAL &INSTALLATION 8-10
LOWER BALLJOINT 8-10
REMOVAL &INSTALLATION 8-10
INSPECTION 8-10
LOWER CONTROL ARM 8-10
REMOVAL&INSTALLATION 8-10
SWAY BAR 8-12
REMOVAL & INSTALLATION 8-12
KNUCKLE, HUB, AND BEARING 8-13
REMOVAL & INSTALLATION 8-13
WHEEL ALIGNMENT 8-16
CASTER 8-16
CAMBER 8-17
TOE 8-17
REAR SUSPENSION 8-18
STRUT AND COIL SPRING 8-21
REMOVAL & INSTALLATION 8-21
OVERHAUL 8-22
UPPER CONTROLARMS 8-22
REMOVAL & INSTALLATION 8-22
LOWER CONTROL ARMS 8-23
REMOVAL &INSTALLATION 8-23
TRAINING ARM 8-24
REMOVAL & INSTALLATION 8-24
SWAY BAR 8-25
REMOVAL &INSTALLATION 8-25
HUB & BEARINGS 8-25
ADJUSTMENT 8-25
REMOVAL & INSTALLATION 8-25
STEERING 8-27
STEERING WHEEL 8-27
REMOVAL &INSTALLATION 8-27
COMBINATION SWITCH 8-29
REMOVAL &INSTALLATION 8-29
WINDSHIELD WIPER SWITCH 8-29
REMOVAL&INSTALLATION 8-29
IGNITION LOCK CYLINDER 8-29 '
REMOVAL &INSTALLATION 8-29
IGNITION SWITCH 8-30
REMOVAL &INSTALLATION 8-30
STEERING LINKAGE 8-30
REMOVAL&INSTALLATION 8-30
MANUAL RACK AND PINION STEERING
GEAR 8-31 REMOVAL & INSTALLATION 8-31
POWER RACK AND PINION STEERING
GEAR 8-32
REMOVAL &INSTALLATION 8-32
POWERSTEERING PUMP 8-34
REMOVAL &INSTALLATION 8-34
SYSTEM BLEEDING 8-36
COMPONENT LOCATIONS
FRONTSUSPENSION COMPONENT
LOCATIONS 8-4
REARSUSPENSION COMPONENT
LOCATIONS 8-18
SPECIFICATIONS CHARTS ’
TORQUE SPECIFICATIONS 8-39
Page 297 of 408
.
8-2 SUSPENSION AND STEERING
b
REMOVAL &INSTALLATION
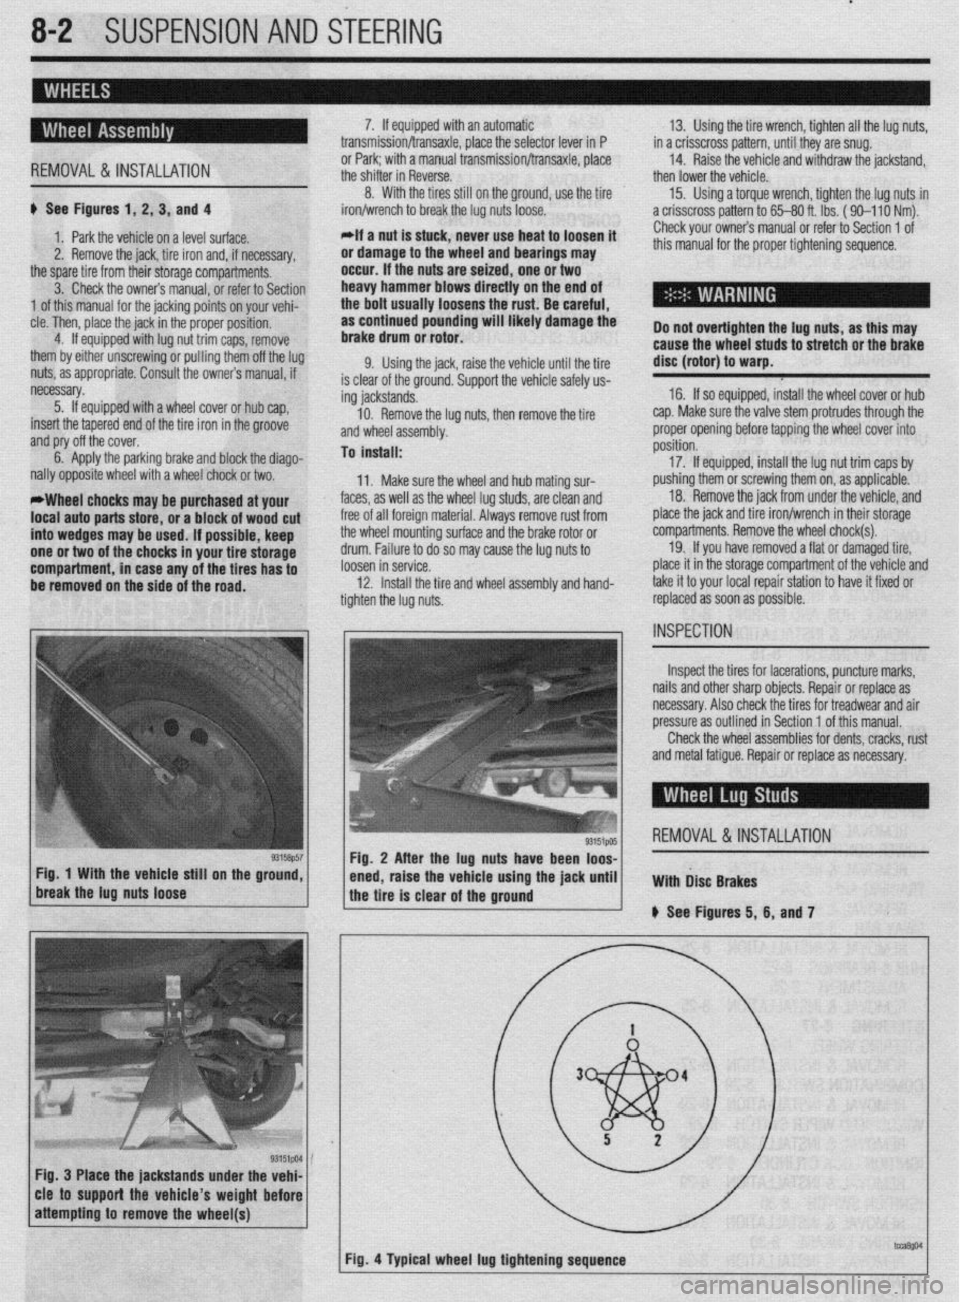
# See Figures 1, 2, 3, and 4
1. Park the vehicle on a level surface.
2. Remove the jack, tire iron and, if necessary,
the spare tire from their storage compartments.
3. Check the owners manual, or refer to Section
1 of this manual for the jacking points on your vehi-
cle. Then, place the jack in the proper position,
4. If equipped with lug nut trim caps, remove
them by either unscrewing or pulling them off the lug
nuts, as appropriate. Consult the owners manual, if
necessary.
5. If equipped with a wheel cover or hub cap,
insert the tapered end of the tire iron in the groove
and pry off the cover.
6. Apply the parking brake and block the diago-
nally opposite wheel with a wheel chock or two.
*Wheel chocks may be purchased at your
local auto parts store, or a block of wood cut
into wedges may be used. If possible, keep
one or two of the chocks in your tire storage
compartment, in case any of the tires has to
be removed on the side of the road. 7. If equipped with an automatic
transmission/transaxle, place the selector lever in P
or Park; with a manual transmission/transaxle, place
the shifter in Reverse.
8. With the tires still on the ground, use the tire
iron/wrench to break the lug nuts loose.
*If a nut is stuck, never use heat to loosen it
or damage to the wheel and bearings may
occur. If the nuts are seized, one or two
heavy hammer blows directly on the end of
the bolt usually loosens the rust. Be careful,
as continued pounding will likely damage the
brake drum or rotor.
9. Using the jack, raise the vehicle until the tire
is clear of the ground. Support the vehicle safely us-
ing jackstands.
10. Remove the lug nuts, then remove the tire
and wheel assembly.
To install:
11. Make sure the wheel and hub mating sur-
faces, as well as the wheel lug studs, are clean and
free of all foreign material. Always remove rust from
the wheel mounting surface and the brake rotor or
drum. Failure to do so may cause the lug nuts to
loosen in service.
12. Install the tire and wheel assembly and hand-
tighten the lug nuts. 13. Using the tire wrench, tighten all the lug nuts,
in a crisscross pattern, until they are snug.
14. Raise the vehicle and withdraw the jackstand,
then lower the vehicle.
15. Using a torque wrench, tighten the lug nuts in
a crisscross pattern to 65-80 ft. lbs. ( 90-l 10 Nm).
Check your owners manual or refer to Section 1 of
this manual for the proper tightening sequence.
Do not overtighten the lug nuts, as this may
cause the wheel studs to stretch or the brake
disc (rotor) to warp.
16. If so equipped, install the wheel cover or hub
cap. Make sure the valve stem protrudes through the
proper opening before tapping the wheel cover into
position.
17. If equipped, install the lug nut trim caps by
pushing them or screwing them on, as applicable.
18. Remove the jack from under the vehicle, and
place the jack and tire iron/wrench in their storage
compartments. Remove the wheel chock(s).
19. If you have removed a flat or damaged tire,
place it in the storage compartment of the vehicle and
take it to your local repair station to have it fixed or
replaced as soon as possible.
Inspect the tires for lacerations, puncture marks,
nails and other sharp objects. Repair or replace as
necessary. Also check the tires for treadwear and air
pressure as outlined in Section 1 of this manual.
Check the wheel assemblies for dents, cracks, rust
and metal fatigue. Repair or replace as necessary.
REMOVAL&INSTALLATION
Fig. 3 Place the jackstands under the vehi-
cle to support the vehicle’s weight before
Page 298 of 408
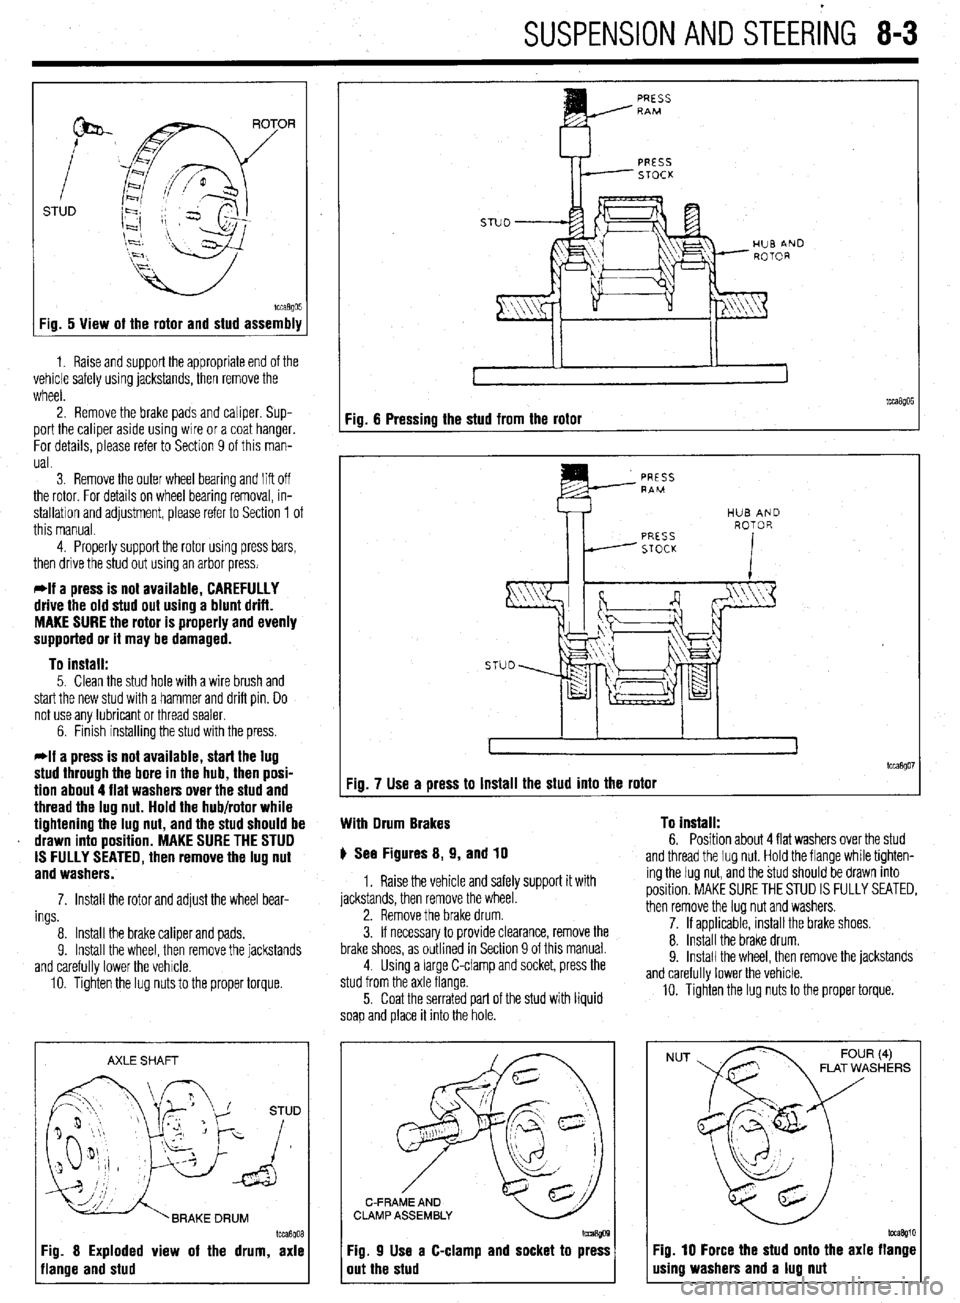
SUSPENSION AND STEERiNG 8-3
STUD
Fig. 5 View of the rotor and stud assembly
1. Raise and support the appropriate end of the
vehicle safely using jackstands, then remove the
wheel.
2. Remove the brake pads and caliper. Sup-
port the caliper aside using wire or a coat hanger.
For details, please refer to Section 9 of this man-
ual.
3 Remove the outer wheel bearing
and liff off
the rotor. For details on wheel bearing removal, in-
stallation and adjustment, please refer to Section 1 of
this manual.
4. Properly support the rotor using press bars,
then drive the stud out using an arbor press.
*If a press is not available, CAREFULLY
drive the old stud out using a blunt drift.
MAKE SURE the rotor is properly and evenly
supported or it may be damaged.
To install:
5. Clean the stud hole with a wire brush and
start the new stud with a hammer and drift pin. Do
not use any lubricant or thread sealer.
6. Finish installing the stud with the press.
*If a press is not available, start the lug
stud through the bore in the hub, then posi-
tion about 4 flat washers over the stud and
thread the lug nut. Hold the hub/rotor while
tightening the lug nut, and the stud should be
drawn into position. MAKE SURE THE STUD
IS FULLY SEATED, then remove the lug nut
and washers.
7. Install the rotor and adjust the wheel bear-
ings
8. Install the brake caliper and pads.
9. Install the wheel, then remove the jackstands
and carefully lower the vehicle.
10. Tighten the lug nuts to the proper torque.
AXLE SHAFT
Im3goa
3g. 8 Exploded view of the drum, axle
lange and stud
PRESS RAM
PRESS
STOCK
Fig. 6 Pressing the stud from the rotor
tcca$Oi Fig. 7 Use a press to install the stud into the rotor
With Drum Brakes To install:
6. Position about 4 flat washers over the stud p See Figures 8, 9, and 10
1. Raise the vehicle and safely support it with
jackstands, then remove the wheel.
2. Remove the brake drum.
3. If necessary to provide clearance, remove the
brake shoes, as outlined in Section 9 of this manual.
4. Using a large C-clamp and socket, press the
stud from the axle flange.
5. Coat the serrated part of the stud with liquid
soap and place it into the hole. and thread the lug nut. Hold the flange while tighten-
ing the lug nut, and the stud should be drawn into
position. MAKE SURE THE STUD IS FULLY SEATED,
then remove the lug nut and washers.
7. If applicable, install the brake shoes.
8. Install the brake drum.
9. Install the wheel. then remove the iackstands
and carefully lower the vehicle.
10. Tighten the lug nuts to the proper torque.
C-FRAME AND
CLAMP ASSEMBLY
Fig. 9 Use a C-clamp and socket to press
out the stud
NUT FLAT WASHERS
Fig. 10 Force the stud onto the axle flange
using washers and a lug nut
Page 300 of 408
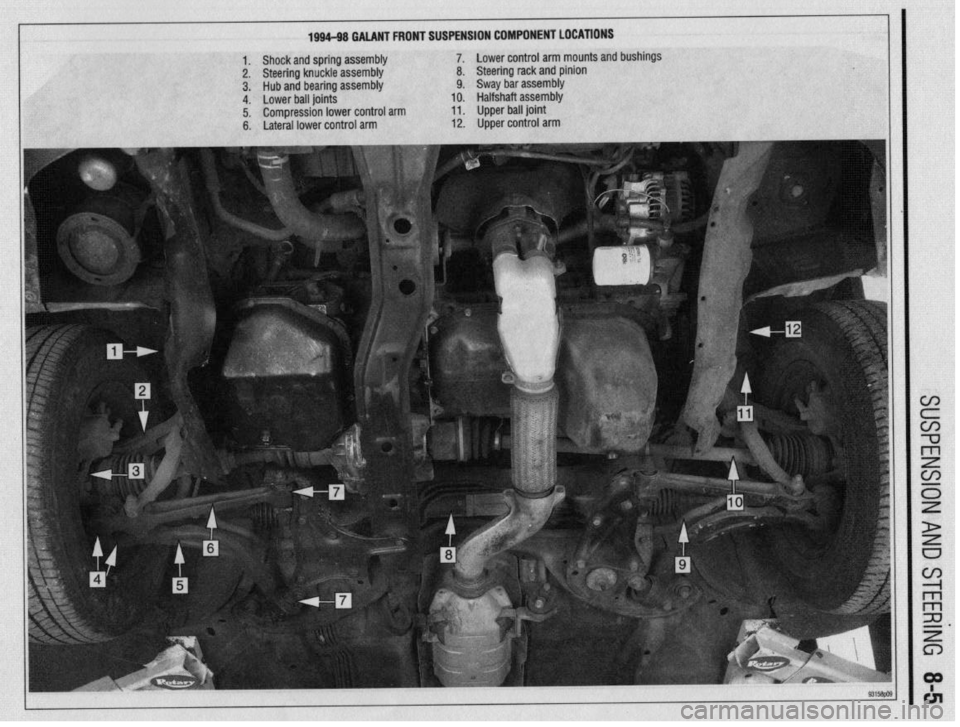
1994-98 GAIANT FRONT SUSPENSION COMPONENT LOCATIONS
1. Shock and spring assembly
2. Steering knuckle assembly
3. Hub and bearing assembly
4. Lower ball joints
5. Compression lower control arm
6. Lateral lower control arm 7.
Lower control arm mounts and bushings
8.
Steering rack and pinion
9. Sway bar assembly
10. Halfshaft assembly
11. Upper ball joint
12. Upper control arm
Page 302 of 408
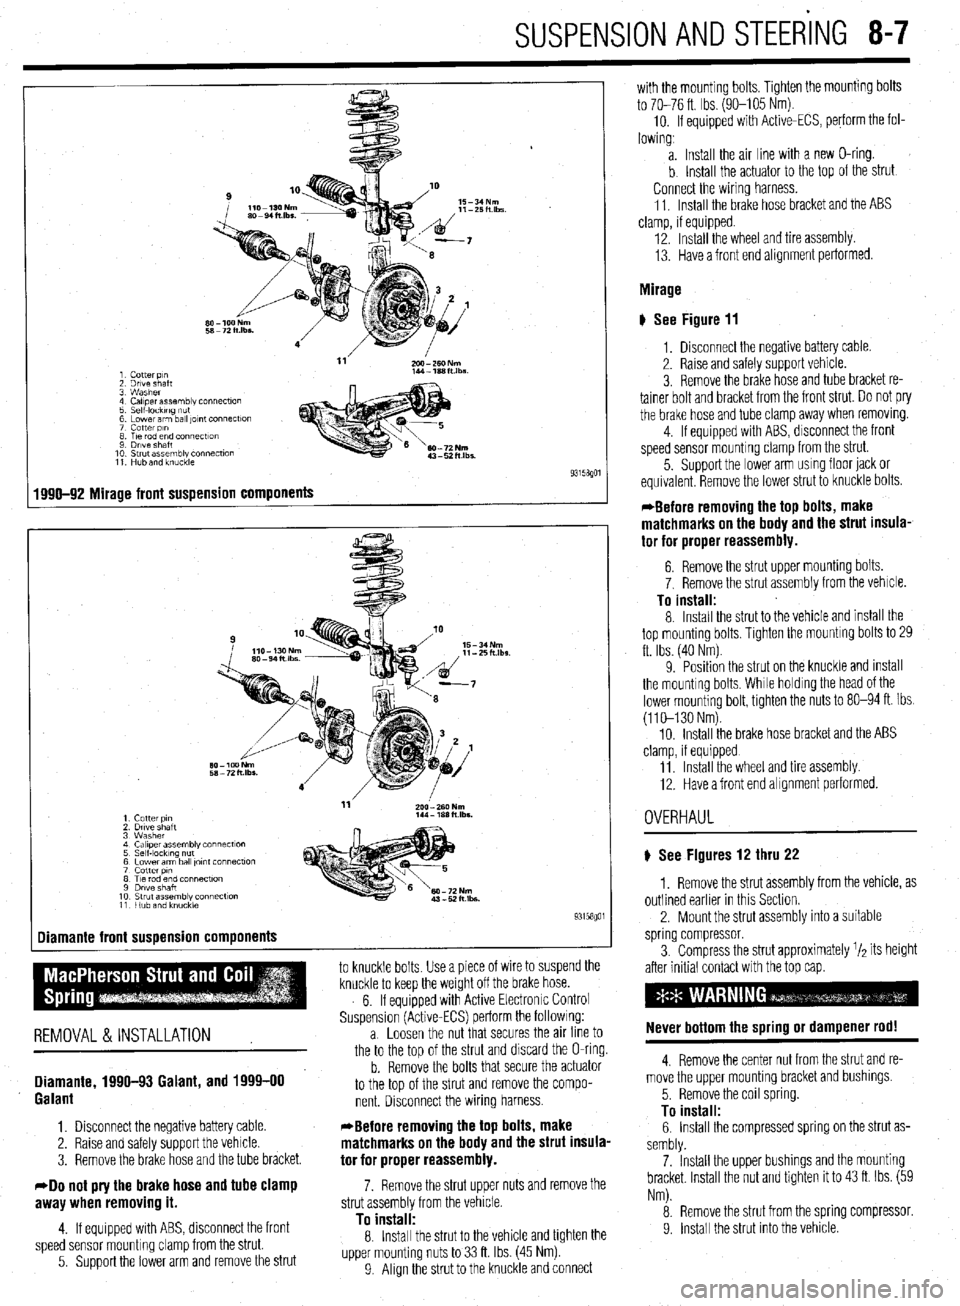
SUSPENSION AND STEERING 8-7
1 Cotter p,n
2 Drive shaft
3 Washer
4 Caliper assembly connecf~on
5 Self-IockIng ““f
6 Lower arm ball ,Ol”f Connectlo”
7 cotter PI”
8 T,e rod end connectton
9 Drive Shaft
10 Strut assembly connection
11 Hub and knuckle
1990-92 Mirage front suspension components
-
1 Cutter PI”
2 Drtve shaft
3 Washer
4 Ca,,perassembly connect~o”
5 Self-locking nut
6 Lower arm ball ,o,nt connection
7 cotter PI”
8 Tie rod end connection
9 Dwe shaft
10 Strut assembly connection
11 Hub and knuckie
Diamante front suspension components
1
to knuckle bolts Use a piece of wire to suspend the
knuckle to keep the weight off the brake hose.
6. If equipped with Active Electronrc Control
Suspension (Active-ECS) perform the followrng:
REMOVAL &INSTALLATION a. Loosen the nut that secures the an line to
the to the too of the strut and discard the O-ring.
Diamante, 1990-93 Galant, and 1999-00
Galant
1. Disconnect the negative battery cable.
2. Raise and safely support the vehicle.
3. Remove the brake hose and the tube bracket.
40 not pry the brake hose and tube clamp
awav when removino it.
b. Remove the bolts that secure the actuator
to the top of the strut and remove the compo-
nent. Disconnect the wiring harness.
*Before removing the top bolts, make
matchmarks on the body and the strut insula-
tor for proper reassembly.
7. Remove the strut upper nuts and remove the
strut assemblv from the vehicle.
4. If equipped with ABS, disconnect the front
speed sensor mounting clamp from the strut.
5. Support the lower arm and remove the strut
To instalf: 8. Install the strut to the vehicle and tighten the
upper mounting nuts to 33 ft. Ibs. (45 Nm)
9 Align the strut to the knuckle and connect with the mounting bolts. Tighten the mounting bolts
to 70-76 ft. Ibs. (90-105 Nm).
10. If equipped with Active-ECS, perform the fol-
lowing,
a. Install the air line with a new O-ring.
b Install the actuator to the top of the strut
Connect the wiring harness.
11. Install the brake hose bracket and the ABS
clamp, if equipped.
12. Install the wheel and tire assembly.
13. Have a front end alignment performed.
Mirage
# See Figure 11
1, Disconnect the negative battery cable.
2. Raise and safely support vehicle.
3. Remove the brake hose and tube bracket re-
tainer bolt and bracket from the front strut. Do not pry
the brake hose and tube clamp away when removrng.
4. If equipped with ABS, disconnect the front
speed sensor mounting clamp from the strut.
5. Support the lower arm usmg floor jack or
equivalent Remove the lower strut to knuckle bolts.
*Before removing the top bolts, make
matchmarks on the body and the strut insula-
tor for proper reassembly.
6. Remove the strut upper mounting bolts.
7. Remove the strut assembly from the vehicle.
To install: 8. Install the strut to the vehicle and install the
top mounting bolts, Tighten the mountrng bolts to 29
ft. Ibs. (40 Nm)
9. Position the strut on the knuckle and mstall
the mounting bolts, While holdrng the head of the
lower mounting bolt, tighten the nuts to 80-94 ft. Ibs.
(110-130 Nm).
10. Install the brake hose bracket and the ABS
clamp, if equipped
11 Install the wheel and tire assembly
12. Have a front end alignment performed.
OVERHAUL
) See Figures 12 thru 22
1. Remove the strut assembly from the vehicle, as
outlined earlier in this Section.
2. Mount the strut assembly into a suitable
spring compressor.
3. Compress the strut approximately r/a its height
after initial contact with the top cap.
Never bottom the spring or dampener rod!
4. Remove the center nut from the strut and re-
move the upper mounting bracket and bushings.
5. Remove the coil spring.
To install: 6. Install the compressed spring on the strut as-
sembly.
7. Install the upper bushings and the mounting
bracket Install the nut and tighten it to 43 ft. Ibs. (59
Nm).
8. Remove the strut from the spring compressor.
9. Install the strut into the vehrcle
Page 303 of 408
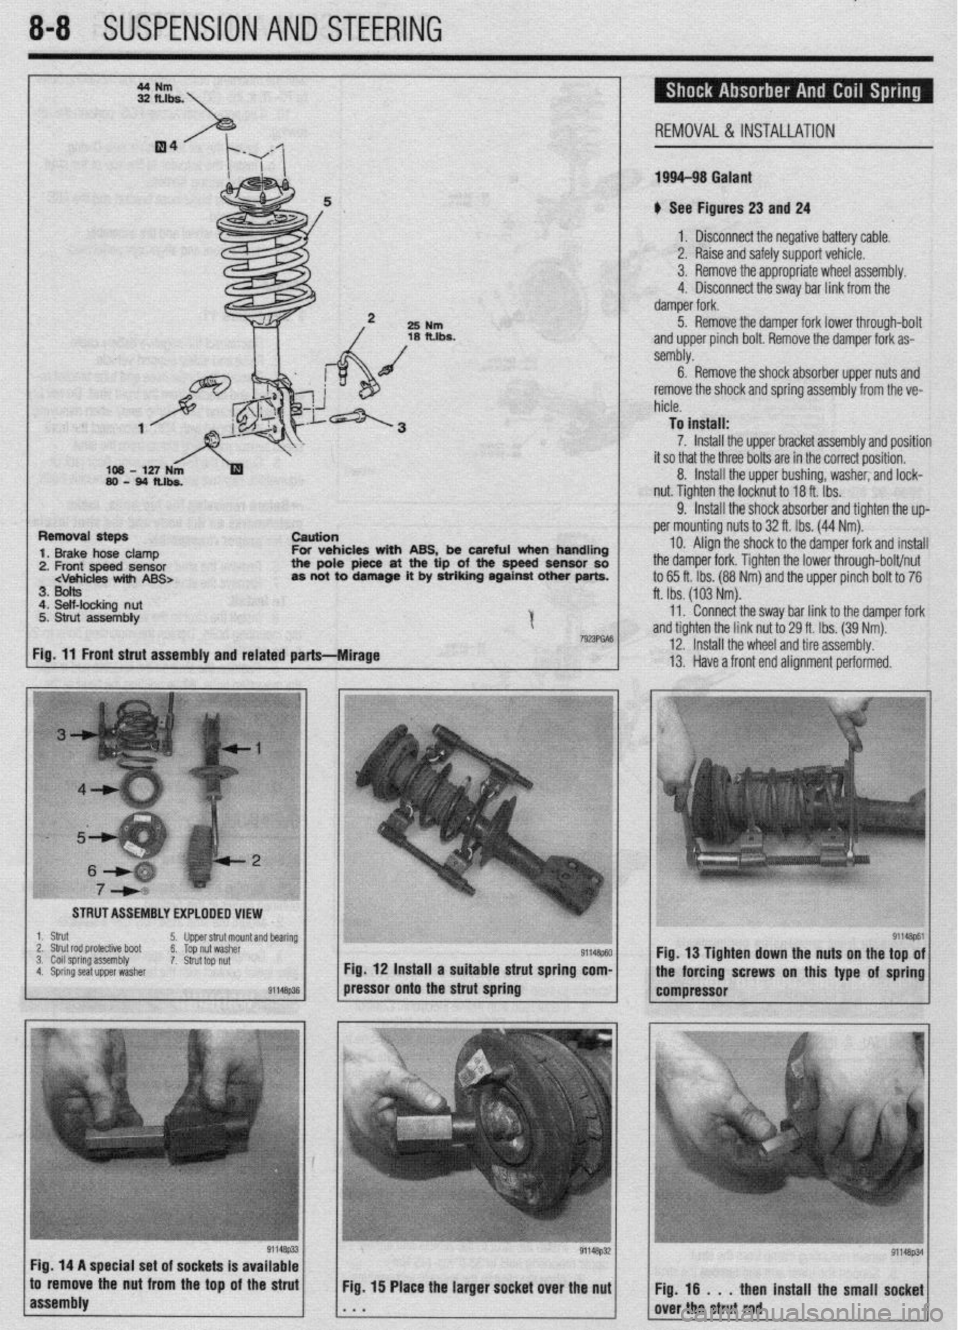
8-8 SUSPENSION AND STEERING
REMOVAL &INSTALLATION
199443 Galant
u See Figures 23 and 24
1 a Disconnect the neaative batterv cable.
I 3. Remove the appronnate wheel assembly.
25
Nm
18 fths.
I 2. Raise and safelv su~oort vehicle.
I I ,I 4. Disconnect the sway bar link from the
oamper rork.
5. Remove the damper fork lower through-bolt
and upper pinch bolt. Remove the damper fork as-
sembly.
6. Remove the shock absorber upper nuts and
remove the shock and spring assembly from the ve-
hicle.
To install:
7. Install the upper bracket assembly and position
it so that the three bolts are in the correct position.
8. Install the upper bushing, washer, and lock-
nut. Tighten the locknut to 18 ft.-lbs.
9. Install the shock absorber and tighten the up-
Removal steps
csution
1. Brake hose clamp For vehicles with ABS, be careful when handling
2. Front speed sensor the pole piece at the tip of the spaed sensor so
3. Bolts
4. Self-locking nut
5. Strut assembly
I
7wmA6
Fig. 11 Front strut assembly and related parts---Mirage ft. Ibs. (103 Nm).
11. Connect the sway bar link to the damoer fork per mounting nuts to 32 ft. Ibs. (44 Nm).
IO. Align the shock to the damper fork and install
the damper fork. Tighten the lower through-bolt/nut
to 65 ft. Ibs. (88 Nm) and the upper pinch bolt to 76
and tighten the link nut tb 29 ft. Ibs. (39 Nm):
12. Install the wheel and tire assembly.
13. Have a front end alignment performed.
I STRUT ASSEMBLY EXPLODED VIEW
I ,-
:-, : ;i
,\,.^ -_ I~.’ :“:;rL~~<
-_ cy -.:;;yp;:,
91146p?Jl Fig. 12 Install a suitable strut spring com-
91146p61 Fig. 13 Tighten down the nuts on the top of
the forcing screws on this type of spring
pressor onto the strut spring
compressor
Fig. 14 A special set of sockets Is available
to remove the nut from the top of the strut
Fig. 15 Place the larger socket over the nut
1 ;ir ;;ostrut;;; install the small soi8oet