2018 MERCEDES-BENZ CLA COUPE light
[x] Cancel search: lightPage 109 of 326

XPress retainingclips :at the same time in
the direction of the arrows.
XCarefully remove the bulb holder together
with the connected plug and the bulbs.
Bulb holder
;
Brake lamp
=Brake lamp
?Rear fog lamp
ABackup lamp
BTurn signals
XBrake lamp and backup lamp: remove the
corresponding bulb from the bulb holder.
XInsert the new bulb into the bulb holder.
XRear fog lamp and turns ignal:press the
bulb gently into the bulb holder, turn it coun-
ter-clockwise and remove it from the bulb
holder.
XInsert the new bulb into the bulb holder and
turn it clockwise.
XReinsert the bulb holder and engage on
retainin gclips :.
XClose the side trim panel (Ypage 106).
Windshield wipers
Switching the windshield wipers
on/off
!
Do not operate the windshield wipers when
the windshield is dry, as this could damage
the wiper blades. Moreover, dust that has col-
lected on the windshield can scratch the glass
if wiping takes place when the windshield is
dry.
If it is necessary to switch on the windshield
wipers in dry weather conditions, alwaysu se
washer fluid when operating the windshield
wipers.
!If the windshield wipers leave smears on the
windshield after the vehicle has been washed
in an automatic car wash, wax or other resi-
dues may be the reason for this. Clean the
windshield using washer fluid after washing
the vehicle in an automatic car wash.
Combination switch
1
$ Windshield wiper off
2ÄIntermittent wipe, low (rain sensor set
to low sensitivity)
3Å Intermittent wipe, high (rain sensor
set to high sensitivity)
4° Continuous wipe, slow
5¯Continuous wipe, fast
BíSingle wipe/î Wipes the wind-
shield using washer fluid
XSwitc hont he ignition.
XTurn the combination switch to the corre-
sponding position.
!Vehicles with arain sensor: if the windshield
becomes dirty in dry weather conditions, the
windshield wipers may be activated inadver-
tently. This could then damage the windshield
wiper blades or scratch the windshield.
For this reason, you should alwayss witch off
the windshield wipers in dry weather.
Vehicles with arain sensor: in the ÄorÅ
position, the appropriate wiping frequency is
automatically set accordingtot he intensity of
the rain. In the Åposition, the rain sensor is
more sensitive than in the Äposition, caus-
ing the windshield wiper to wipe more fre-
quently.
If the wiper blades are worn, the windshield will
no longer be wiped properly. This could prevent
you from observing the traffic conditions.
Windshield wipers107
Lights and windshield wipers
Z
Page 110 of 326

Replacing the wiper blades
Important safety notes
GWARNING
If the windshield wiper sbegin to move while
yo ua re changing the wiper blades, yo ucould
be trapped by the wiper arm .There is arisko f
injury.
Alway sswitch off the windshield wiper sand
ignition before changing the wiper blades.
!To avoid damaging the wiper blades, make
sure that yo utouch only the wiper arm of the
wiper.
!Nevero pent he hoodifaw indshield wiper
arm hasb eenf olded away from the wind-
shield.
Neverf oldawindshield wiper arm withouta
wiper blad ebacko nto the windshield.
Holdt he windshield wiper arm firmly when
yo uc hange the wiper blade. If yo urelease the
windshield wiper arm withoutaw iper blade
and it falls onto the windshield ,the windshield
may be damaged by the force of the impact.
Mercedes-Benz recommendst hat youhave
the wiper blades changed at aquali fied spe-
cialist workshop.
Changin gthe windshield wiper blades
Removin gthe wiper blades
XVehicles without KEYLESS-GO or KEY-
LESS-GOs tart function: remove the Smart-
Key from the ignition lock.
XVehicles with KEYLESS-GO or KEYLESS-
GO start function: switch off the engine.
XFoldthe wiper arm away from the windshield.
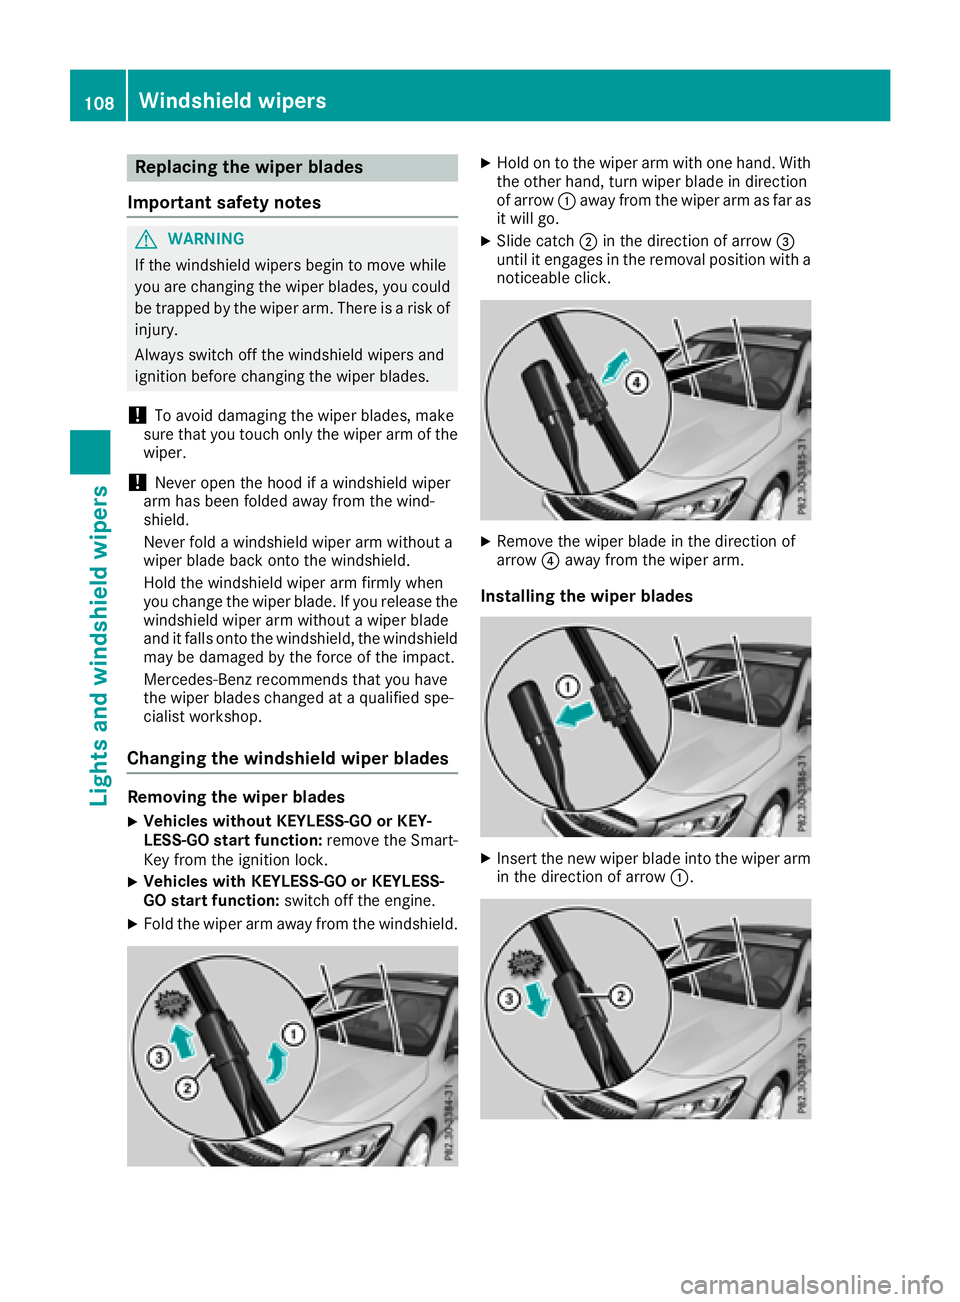
XHoldontot he wiper arm with one hand. With
the otherh and, turn wiper blad eindirection
of arrow :away from the wiper arm as far as
it will go.
XSlide catch ;in the direction of arrow =
unti lite ngages in the removal position with a
noticeable click.
XRemove the wiper blad einthe direction of
arrow ?away from the wiper arm.
Installing the wiper blades
XInsert the new wiper blad einto the wiper arm
in the direction of arrow :.
108Windshieldwipers
Lights and windshield wipers
Page 111 of 326

XSlide catch;in the direction of arrow =
unti lite ngages in the locking position with a
noticeable click.
XMake sure that the wiper blad eisseated cor-
rectly.
XFoldt he wiper arm back onto the windshield.
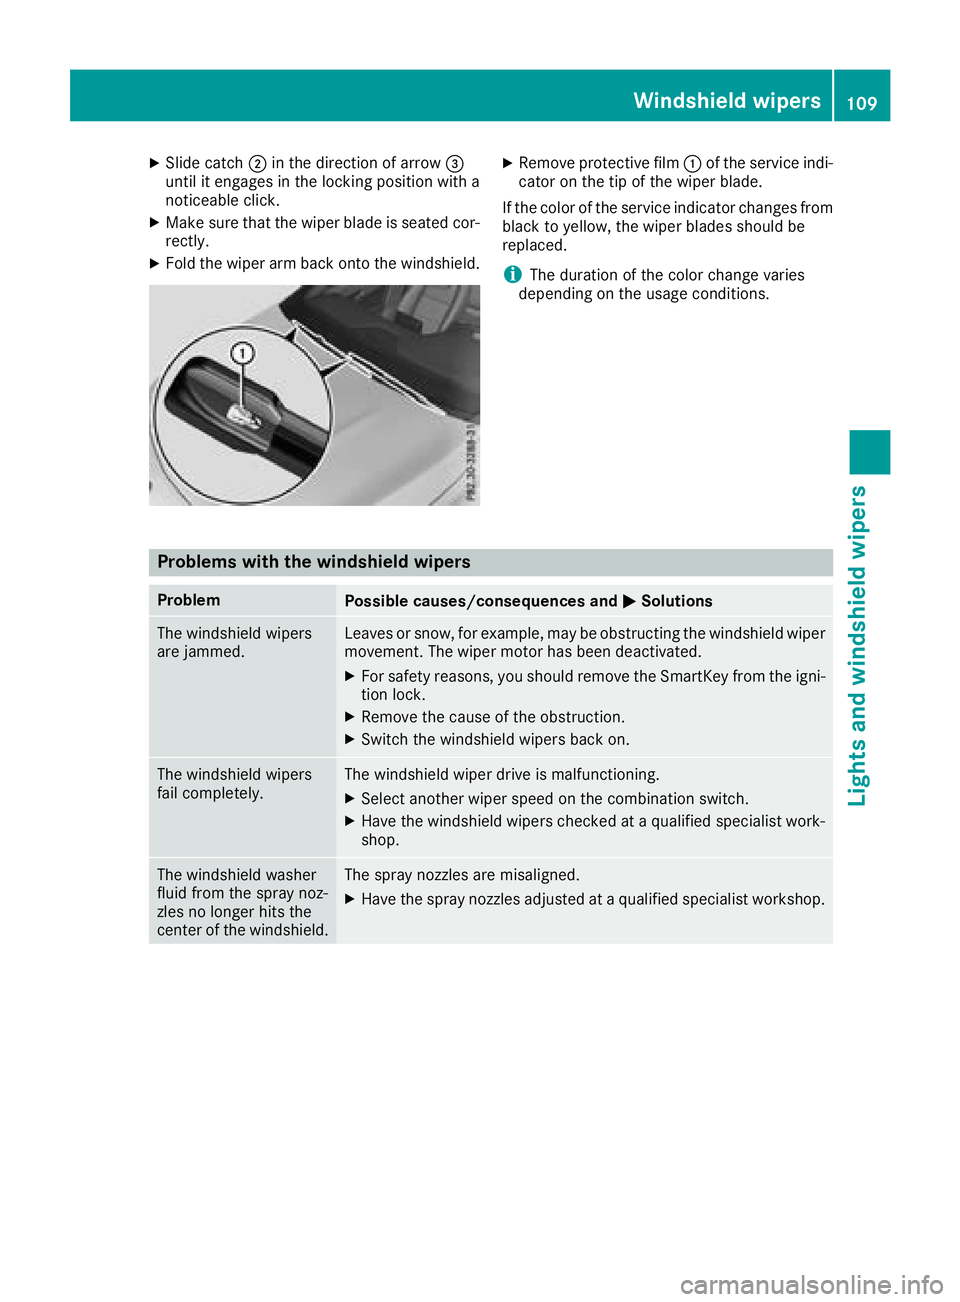
XRemove protectiv efilm :of the service indi-
cato ront he tip of the wiper blade.
If the color of the service indicator changes from
black to yellow,t he wiper blades shoul dbe
replaced.
iThe duration of the color change varies
depending on the usag econditions.
Problems with the windshield wipers
ProblemPossiblec auses/consequence sand MSolutions
The windshield wipers
are jammed.Leaves or snow,f or example, may be obstructing the windshield wiper
movement. The wiper motor hasb eend eactivated.
XFor safety reasons,y oushoul dremove the SmartKey from the igni-
tion lock.
XRemove the cause of the obstruction.
XSwitch the windshield wiper sbacko n.
The windshield wipers
failcompletely.The windshield wiper drive is malfunctioning.
XSelect another wiper speed on the combination switch.
XHave the windshield wiper scheckedataq ualified specialist work-
shop.
The windshield washer
fluid from the spray noz-
zles no longer hits the
center of the windshield.The spray nozzle sare misaligned.
XHave the spray nozzle sadjuste dataq ualified specialist workshop.
Windshiel dwipers109
Lights and windshield wipers
Z
Page 117 of 326

instructions.You will see the current settings
of the various climat econtrol functions.
DYNAMIC SELECT button (except
Mercedes-AM Gvehicles)
You can choose betwee nvarious drive programs
with the DYNAMI CSELEC Tbutton
(
Ypage 128).
If you have selected drive program E:
Rwhen heating, the electrical heaterbooster is
deactivate dand in the warming-up phase
heat output is reduced
Rthe rear window defroster running tim eis
reduced
Dependin gonthe configuration, climat eset-
tings may also be influenced in the drive pro-
gram I.
If you have selected drive program Cor S,c li-
mate settings are not influenced.
ECO start/stop function
Durin gautomatic engin eswitch-off, the climate
control system only operates at areduced capa-
city. If you require the full climat econtrol output,
you can switc hoff the ECO start/sto pfunction
by pressing the ECO button (
Ypage 127).
Operating th eclimate control sys-
tems
Activating/deactivating climate con-
trol
General notes
When the climat econtrol is switched off,t he air
supply and air circulation are also switched off.
The windows could fog up. Therefore, switc hoff
climat econtrol only briefly
Air-conditioning system
XTurn the SmartKey to position 2in the igni-
tion lock (Ypage 122).
XTo switch on: turn controlAclockwise to
the desiredp osition (except position 0)
(
Ypage 111).
XTo switch off: turn controlAcounter-clock-
wise to position 0(Ypage 111).
Dual-zone automatic climate control
XTurn the SmartKey to position 2in the igni-
tion lock (Ypage 122).
XTo activate: press theÃbutton.
The indicator lamp in the Ãbutton lights
up. Airflow and air distribution are set to auto-
matic mode.
or
XPress the ^button.
The indicator lamp in the ^button goes
out. The previously selected settings are
restored.
XTo deactivate: press the^button.
The indicator lamp in the ^button lights
up.
iDual-zon eautomatic climat econtrol: switch
on climat econtrol primarily using the Ã
button.
Switchin gcooling with air dehumidi-
fication on/off
General notes
If you deactivatet he "Cooling with air-dehumid-
ification" function ,the air insid ethe vehicle will
not be cooled. The air insid ethe vehicle will also
not be dehumidified. The windows can fog up
more quickly. Therefore, only deactivatet he
"Cooling with air-dehumidification" function
briefly.
The "Cooling with air dehumidification" function is only available when the engin eisrunning. The
air insid ethe vehicle is coole dand dehumidified
accordingtot he temperature selected.
Condensatio nmay drip fromt he underside of
the vehicle when it is in coolin gmode. This is
normal and not asign that there is amalfunc-
tion.
Activating/deactivating
XPress the ¿button.
The indicator lamp in the ¿button lights
up or goes out.
The indicator lamp in the button indicates that
the respective function is activated. The
"Cooling with air dehumidification" function
has adelayed switch-off feature.
Operating th eclimate control systems115
Climate control
Page 118 of 326

Problems with the "Cooling with air dehumidification" function
ProblemPossible causes/consequences andMSolutions
The indicator lamp in the
¿button flashes
three times or remains
off. The "Cooling with air
dehumidification" func-
tion cannot be switched
on.Cooling with air dehumidification has been deactivated due to amal-
function.
XVisit aqualified specialist workshop.
Setting climate control to automatic
General notes
The automatic climate control function is only
available in conjunction with dual-zone auto-
matic climate control.
In automatic mode, the set temperature is main-
tained automatically at aconstant level. The
system automatically regulates the temperature
of the dispensed air, the airflow and the air dis-
tribution.
The "Cooling with air dehumidification" function
is activated automatically in automatic mode.
Setting climate control to automatic
XTurn the SmartKey to position 2in the ignition
lock (Ypage 122).
XSet the desired temperature.
XTo activate: press theÃbutton.
The indicator lamp in the Ãbutton lights
up. Automatic air distribution and airflow are
activated.
XTo switch to manualm ode:press the É
or Ë button.
or
XPress the KorI button.
The indicator lamp in the Ãbutton goes
out. Automatic air distribution and airflow are
deactivated.
Setting the temperature
Air-conditioning system
You can set the temperature for the entire vehi- cle. The set temperature is automatically main-
tained at aconstant level.
XTurn the SmartKey to position 2in the ignition
lock (Ypage 122).
XTo increase or reduce: turn control:coun-
ter-clockwise or clockwise (Ypage 111). Only
change the temperature settingins mall
increments. Start at 72 ‡(22 †).
Dual-zone automatic climate control
Differentt emperatures can be set for the driv-
er's and front-passenger sides. The set temper-
ature is automatically maintained at aconstant
level.
XTurn the SmartKey to position 2in the ignition
lock (Ypage 122).
XTo increase or decrease: turn control:or
E counter-clockwise or clockwise
(
Ypage 113). Only change the temperature
settingins mall increments. Start at 72 ‡
(22 †).
Setting the air distribution
Air-conditioning system
Air distribution settings
¯ Directsa ir through the defroster vents
P Directsa ir through the center and side air
vents
O Directsa ir through the footwell air vents
116Operating the climate control systems
Climatec ontrol
Page 119 of 326

iYou can also activate several air distribution
settings simultaneously. To do this ,press
multiple air distribution buttons .The air is
the ndirected through various vents.
iRegardless of the air distribution setting,
airflow is always directed through the side air
vents. The side air vents can only be close dif
the adjusters are turned clockwise until they
engage.
Setting th eair distribution
XTurn the SmartKey to position 2in the igni-
tion lock (Ypage 122).
XPress one or more of the P,O, ¯
buttons.
The corresponding indicator lamp lightsu p
briefly.
Dual-zone automatic climate control
Air distribution settings
¯ Directsair through the defroste rvents
P Directsair through the center and side air
vents
O Directsair through the footwell air vents
S Directsair through the center ,side and
footwell vents
b Directsair through the defroster, center
and side air vents
a Directsair through the defroste rand
footwell vents
_ Directsair through the defroster, center,
side and footwell vents
iRegardless of the air distribution setting,
airflow is always directed through the side air
vents. The side air vents can only be close dif
the adjusters are turned clockwise until they
engage.
Setting th eair distribution
XTurn the SmartKey to position 2in the igni-
tion lock (Ypage 122).
XPress the ÉorË button repeatedly
until the desired symbol appears in the dis-
play.
Setting th eairflow
Air-conditioning system
XTurn the SmartKey to position 2in the igni-
tion lock (Ypage 122).
XTo increase or reduce: turn controlAcoun-
ter-clockwise or clockwise (Ypage 111).
Dual-zone automatic climate control
XTurn the SmartKey to position 2in the igni-
tion lock (Ypage 122).
XTo increase or reduce: press theKor
I button.
Switching th eZONEf unction on/off
This function is only available with dual-zone
automatic climat econtrol.
XTo activate: press theábutton.
The indicator lamp in the ábutton lights
up.
The temperature settin gfor the driver's side
is not adopte dfor the front-passenger side.
XTo deactivate: press theábutton.
The indicator lamp in the ábutton goes
out.
The temperature settin gfor the driver's side
is adopte dfor the front-passenger side.
Defrosting th ewindshield
Genera lnotes
You can use this function to defrost the wind-
shield or to clear afoggedupw indshield and
side windows.
iYou should only selectt he "Windshield
defrosting" function until the windshield is
clear again.
Switching th e"Windshield defrosting"
function on or off
XTurn the SmartKey to position 2in the igni-
tion lock (Ypage 122).
XTo activate: press the¬button.
The indicator lamp in the ¬button lights
up.
Operating th eclimat econtrol systems117
Climat econtrol
Page 120 of 326

The climate control system switches to the
following functions:
Rhigh airflow
Rhigh temperature
Rair distribution to the windshield and front
side windows
Rair-recirculation mode off
iThe "Windshield defrosting" function auto-
matically sets the blower level to the optimum
defrosting effect.Asar esult, the airflow may
increase or decrease automatically after the
¬ button is pressed.
iYou can adjust the blower level manually
while the "Windshield defrosting" function is
in operation:
RAir-conditioning system: turn airflow con-
trol Acounter-clockwise or clockwise
(
Ypage 111).
RDual-zon eautomatic climate control: press
the ó orô button.
XTo deactivate: press the¬button.
The indicator lamp in the ¬button goes
out. The previously selected settings are
restored. Air-recirculation mode remains
deactivated.
or
XDual-zon eclimate control: press the Ã
button.
The indicator lamp in the ¬button goes
out. Airflow and air distribution are set to
automatic mode.
or
XAir-conditioning system: turn temperature
control :counter-clockwise or clockwise
(
Ypage 111).
Dual-zon eautomatic climate control: turn
temperature control :orE counter-clock-
wise or clockwise (
Ypage 113).
MAX COOL maximum cooling
The MAX COOL function is only availableinv ehi-
cles for the USA.
MAX COOL is only operational when the engine
is running.
XTo activate: press theÙbutton.
The indicator lamp in the button lights up.
XTo deactivate: press theÙbutton.
The indicator lamp goes out. The previously
selected settings are restored.
When you activate MAX COOL, climate control
switches to the following functions:
Rmaximum cooling
Rmaximum airflow
Rair-recirculation mode on
Defrosting the windows
Windows fogged up on the inside
Air-conditioning system
XActivate the ¿"Cooling with air dehumid-
ification" function.
XIf the windows continue to fog up, activate the
¬ "Windshield defrosting" function.
iYou should only select this setting until the
windshield is clear again.
Dual-zone automatic climate control
XActivate the ¿"Cooling with air dehumid-
ification" function.
XActivate automatic mode Ã.
XIf the windows continue to fog up, activate the
¬ "Windshield defrosting" function.
iYou should only select this setting until the
windshield is clear again.
Windows fogged up on the outside
XActivate the windshield wipers.
XSet the air distribution to PorO.
iYou should only select this setting until the
windshield is clear again.
Rear window defroster
General notes
The rear window defroster has ahigh current
draw. You should therefor eswitch it off as soon
as the rear window is clear. Otherwise, the rear window defroster switches off automatically
after several minutes.
118Operating the climate control systems
Climate control
Page 121 of 326

If the battery voltage is too low, the rear window
defroster may switch off.Activating/deactivating
XTurn the SmartKey to position2in the igni-
tion lock (Ypage 122).
XPress the ¤button.
The indicator lamp in the ¤button lights
up or goes out.
Problems with the rear window defroster
ProblemPossible causes/consequences and MSolutions
The rear window
defroster has deactiva-
ted prematurely or can-
not be activated.The battery has not been sufficiently charged.
XSwitch off any consumers that are not required, e.g. reading lamps,
interior lighting or the seat heating.
When the battery is sufficiently charged, the rear window defroster
can be activated again.
Switching air-recirculationmode
on/off
General notes
You can deactivate the flow of fresh air if
unpleasant odors are entering the vehicle from
outside. The air already inside the vehicle will
then be recirculated.
If you switch on air-recirculation mode, the win-
dows can fog up more quickly, in particular at
low temperatures. Only use air-recirculation
mode brieflytop revent the windowsf rom fog-
ging up.
The operation of air-recirculation mode is the
same for all control panels.
Activating/deactivating
XTurn the SmartKey to position 2in the igni-
tion lock (Ypage 122).
XTo activate: press theebutton.
The indicator lamp in the ebutton lights
up.
Air-recirculation mode switches on automati-
cally:
Rat high outsidet emperatures
Rat high levelsofp ollution
When air-recirculation mode is activated auto-
matically, the indicator lamp in the ebutton
is not lit. Outside air is addeda fter about
30 minutes.
XTo deactivate: press theebutton.
The indicator lamp in the ebutton goes
out.
iAir-recirculation mode deactivates auto-
matically:
Rafter approximately five minutes at outside
temperature sbelowa pproximately 45 ‡
(7 †)
Rafter approximately five minutes if the
"Cooling with air dehumidification" func-
tion is deactivated
Rafter approximately 30 minutes at outside
temperature sabove approximately 45 ‡
(7 †) if the "Cooling with dehumidification"
function is activated
Switching the residual heat on or off
General notes
The residual heat function is only available in
vehiclesf or Canada with dual-zone automatic
climate control.
It is possible to make use of the residual heat of
the engine to continue heating the vehicle for
approximately 30 minutes after the engine has
been switched off. The heating time depends on
the set interior temperature.
iThe blower willr un atalow speed regardless
of the airflow setting.
Operating the climatec ontrol systems119
Climate control