Page 113 of 274
 <I
-For objects t hat do not touch t he gro und,
such as th e bumper of a parked vehicle, a
tra ile r hitch or the rear of a truck. Do not")
a co ,...,
N
" N ,...,
0 00 <.,;) '
-For objects t hat do not touch t he gro und,
such as th e bumper of a parked vehicle, a
tra ile r hitch or the rear of a truck. Do not
us e the orientation lines in this case.
- If driven from a level surface onto an in
clin e, or a downward slope.
- If driven toward protrud ing objects.
- If the vehicle is carrying too much load in
the rear.
- Applies to: vehicles with air s uspension: the
accuracy of the orientation lines and blue
surfaces decreases when the vehicle is raised/lowered
<=)page 105.
(D Note
- Always read and follow the applicable warn
ings
Q 0 in General information on
page 108.
- The orange-colored or ientation lines in the
Infotainment display show the vehicle path
based on the steering wheel angle. The
front of the vehicle swings out more than
the rear of the veh icle . Ma inta in plenty of
distance so that an exterio r mirror or a cor
ner of the ve hicle does not co llide wit h any
obstacles.
Switching on /off
App lies to : vehicles wit h rearv iew camera
Switching on
.,. S hift i nto reve rse, or
.,. Press t he P' #A button in the cente r console
Qpage 109, fig. 116 . A short confirmat io n
tone sounds and the LED in the button turns
on .
Switching between the rearview camera and
optical di splay
.,. Press the Graphic control button ®
Qpage 111, fig. 121 to see the optica l display.
.,. Press the Rear view contro l button to see the
rearview camera image.
Switching off
.,. Drive faster than 6 mph ( 10 km/h), or
.,. Press the p,,,A button, or
.,. Switch the ignition off.
Parking systems
(D Tips
- The visua l display in the left part of the d is
play sho uld he lp you detect the critical veh i-
cle areas.
- You ca n change the vol ume and pitch of the
signa ls as well as the d isplay
Q page 118.
· Perpendicular parking
Applies to : veh icles w it h rearv iew camera
This view may be used when parking in a garage
or in a parking space .
Fig. 1 21 Infotainme nt system: aim ing at a park in g space
Fi g. 122 In fotainment system: al ig nin g the ve hicle
.,. Tu rn the Infotainment system on and shift into
reverse gear.
.,. The orange orientation lines © show the vehi
cle 's direction o f travel. Turn the stee ring wheel
until the orang e orientation lines appear in th e
pa rk ing space
Q fig. 121. Use the ma rkings @
t o he lp you estima te the distance to an obst a
cle. Each ma rking represents approximately 3
ft (1 m) . The b lue area represents an extension
of t he vehicle's outline by approximate ly 16 ft
(S meters) to the rear .
.,. Wh ile driving in reverse gear, ad just the steer-
ing wheel angle to fit the park ing space using
..,_
111
Page 114 of 274

Parking systems
the orange orientation lines for assistance
¢ A in General information on page 110, ¢@
in General information on page 111 . @ repre
sents the rear bumper. At the very latest, stop
the vehicle when the red orientation
line ©
borders an object .
Parallel parking
Applies to: veh icles w ith rearview camera
This view may be used when parallel parking
along the side of
a street.
F ig. 123 Infotainment : blue surfaces aligned in the park·
i ng space
F ig . 124 In fo tainme nt: contact of the blue curved line w ith
the curb
Parking on the right is described here. It is identi
cal when park ing on the left .
If there is an obstacle next to the parking space (such as a wall), refer to "Information for parking
next to obstacles"
¢ page 112 .
.. Activate the turn signal.
.. Position your vehicle next to a parked vehicle in
front of the desired parking space. The distance
to this vehicle should be approximately 3 ft . (1
m) .
112
.. Turn the Infotainment system on and shift into
reverse gear. The parking system is turned on
and the
Cross parking view is displayed .
.. Press the control button on the Infotainment
unit
(D ¢ fig. 123. The Parallel parking view is
displayed .
.,. Back up and align your veh icle so the blue area
@ borders on the rear end of the vehicle be
hind you o r on the parking space
line¢,&. in
General information on page 110,
¢Q) in Gen
eral information on page 111.
The blue area
represents an extension of the vehicle's outline
by approximate ly 16 ft (5 meters) to the rear.
The long side of the blue area should be on the
curb. The ent ire blue area must fit into the
parking space .
.,. With the vehicle stopped, turn the steering
wheel to the right as far as it will go .
.,. Back up into the parking spot . When the blue
curve¢ fig. 124 is near the curb ¢ A in Gener
al information on page 110,
stop the vehicle
¢ (i) in General information on page 111 .
.. With the vehicle stopped, turn the steering
wheel to the left as far as it will go .
.. Continue to back into the parking space until
the vehicle is parked parallel to the
curb ¢ A
in General information on page 110, ¢Q) in
General information on page 111 .
@ repre
sents the rear bumper. At the very latest, stop
the vehicle when the red orientation
line ©
borders an object. Keep an eye on the front of
your veh icle wh ile doing this .
Parking next to obstacles
If there is an obstacle (such as a wall) next to the
parking space, posit ion the vehicle so there is
more space on that side. Position the long side of
the blue surface so that there is sufficient space
from the obstacle. The surface must not be
touching . You will a lso need to sta rt turning the
steering wheel earlier . The blue
curve ¢ fig. 124
must not touch the obstacle, but rather there
shou ld be enough distance .
(D Note
Keep enough distance from the curb to re
d uce the risk of damage to the rims.
Page 115 of 274
 <I
(D Tips
The left or right orientation lines and surfaces
w ill be displayed, depending on the turn sig
nal being used.
Peripheral camera")
a co ,...,
N
" N ,...,
0 00 <.,;) '
(D Tips
The left or right orientation lines and surfaces
w ill be displayed, depending on the turn sig
nal being used.
Peripheral cameras
Introduction
Appl ies to : vehicles wit h peripheral cameras
With this equipmen t, the parking system p lus*
¢ page 109 is supplemented with various pe riph
e ral cameras .
Depending on vehicle equipment, you are prov id
ed wit h the following views: area around the
ve
hicle, front co rner view and rea r corner view, view
in front of the vehicle and behind the vehicle .
General information
Applies to: vehicles with pe ripheral came ras
F ig . 1 25 Loca tion of periphe ral came ras
The per ipheral came ras are located in the rad ia
tor gr ille and in the luggage compartment lid
¢ fig. 125 .
Make sure that the lenses are not cove red by de
posits or any other obstructions as it may impa ir
the system . Fo r information on cleaning, see
¢ page 228.
The accuracy of the orientation lines and the blue
surfaces is reduced if the adapt ive a ir suspen
sion * is fau lty, if the vehicle is lifted or if the
Dy
namic mode is act ivated ¢ page 105.
Parking systems
A WARNING
- Always read and follow the applicab le warn
in gs¢ &. in General information on
page 108 .
-If the position or the installat io n angle of a
camera was changed, for example afte r a
coll is ion, do not cont inue to use the system
for safety reaso ns. Have it c hec ked by a n
au
thorized A udi dealer or authori zed A udi
Serv ice Faci lity .
- Use the
Rear mode and the Corner view
( rear )
mode only whe n the l uggage com
p ar tme nt lid is completely closed. O ther
wise the image in the disp lay wi ll be incor
rect.
- T he vehicle surroundings are shown using
the camera images . The vehi cle image is
shown by the system. Objects and obstacles
above the camera are not disp layed.
- Camera lenses enlarge and distort the field
of vision. The objects appear both a ltered
and inaccurate on the screen.
(D Note
- Always read and fo llow the applicable warn
ings
~ CD in General information on
page 108.
- The Infotainment d isplay shows the direc
tion in which t he rear of the ve hicle is travel
ing based on the steering wheel ang le. The
front of the veh icle swings out more than
the rear of the vehicle. Maintain plenty of
dis tance so that a n exte rior m irror or a cor
ner of the vehicle does not coll ide with any
obsta cles.
(0 Tips
The dr iver's door/front passenger's door/lug
gage compartment li d is open when the
Ci;lJ or
c::::5 symbol appears and the co rrespo nding
a re a of t he d isp lay is gr ayed out .
113
Page 116 of 274

Parking systems
Switching on or off
Applies to: ve hicles w ith per ip heral cameras
Fig. 126 Center console: button P.A
Fig. 127 Infotainment system: select the mode
Switch ing on
.. Shift into reverse, or
.. Press the Pw .A button in the center console
c> fig. 126. A short confirmation tone sounds
and the LED in the button turns on.
Selecting the mode
.. Turn the cont rol knob to the symbol for the de
sired mode @through @<=>
fig. 127 and press
the control knob.
Switching between optical view and camera
image
.. Press the Graphic contro l button to see the op
tical display .
.. To display the camera image, press the Camera
control button.
Switching off
.. Drive faster than 6 mph (10 km/h), or
.. Press the Pw.6-button, or
.. Switch the ignition off.
You may select from the following modes:
114
@ -Surrounding c>page 114
@ -Corner view (front) c> page 115
© -Front c> page 115
@ -Rear c>page 115
® -Corner view (rear) c> page 115
Surrounding
Applies to: vehicles wi th per ipheral ca meras
Fig. 128 Infotainment system: Surround ing mo de
The visual indicator is displayed <=> page 109 in
th is view .
.. Select the @symbol with the control knob and
press the control knob .
Page 117 of 274
/corner view (rear)
Applies to: vehicles with peripheral cameras
Fig . 129 Infotainment system: Corner view (front)
Fig .")
a co ,...,
N
" N ,...,
0 00 <..:l '
Corner view (front)/corner view (rear)
Applies to: vehicles with peripheral cameras
Fig . 129 Infotainment system: Corner view (front)
Fig . 130 Infotainment system: Corner view (rear)
This view can assist you for examp le, when you
are exiting from an area w ith poor visibility. The
area at the front and rear s ides of the vehicles is
d isplayed .
.. To show the side view toward the front, select
the
symbo l® ¢ fig. 129 with the contro l knob
and press the control knob .
.. To show the side view toward the rear, select
the symbol ®
q fig. 130 with the control knob
and press the control knob .
Parking systems
Front
Applies to: vehicles with peripheral cameras
Fig. 131 Infotainme nt system: front mode
This view assists you for example, in using the
full maneuvering range in front of the vehicle.
The area in front of the vehicle is displayed. The
vehicle surround ings are shown in the left area of
the display. You can switch between the optical
display and camera image¢
page 114 .
.,. Select the © symbo l with the control knob. The
orange orientation lines mark the expected
path of the vehicle. Stop the vehicle when the
red orientation line* borders an object
q &. in
General information on page 113.
Rear
Appl ies to: vehicles with peripheral cameras
Fig. 132 Infot ainme nt system: rear mode
This view assists you for example, in us ing the
full maneuvering range behind the vehicle. The
area be hind the vehicle is displayed. The vehicle
s ur rou ndings are shown in the left area of the
display. You can switch between the optical dis
play and camera image
9page 114.
.,. Select the symbol @with the contro l knob. ..,_
115
Page 118 of 274

Parking systems
You can choose between three different views in
this mode.
~ To cross park, parallel park or position the veh i
cle in front of a trai ler*, press the control but
ton ® on the control panel repeatedly until the
symbol for the desired mode is selected .
Perpendicular parking
Applies to: ve hicles w ith peripheral cameras
This view may be used when parking in a garage
or in a parking space .
Fig. 133 In fotainme nt system : aimin g at a park ing space
Fig. 134 Infota inme nt system : aligning the veh icle
Requirement: cross park ing must be selected
qpage 115 .
~ The orange orientation lines (D show the vehi
cle's direction of travel. Turn the steering wheel
until the orange or ientat ion lines appear in the
parking space
q fig . 133 . Use the mark ings @
to help you estimate the distance to an obsta
cle. Each marking represents approximately 3
ft (1 m) . The blue area represents an extension
of the vehicle's outline by approx imately 16 ft
(5 meters) to the rear.
~ While driv ing in reverse gear, adjust the steer
ing wheel angle to fit the parking space using
116
the orange orientation lines for assistance
q A in General information on page 113, q(D
in General information on page 113. @repre
sents the rear bumper. You should stop revers
ing at the latest when the red orientation line
© borders an object<=>.&. in General informa
tion on page
110 .
Parallel parking
Applies to: vehicles with peripheral cameras
This view may be used when parallel parking
along the side of a street.
Fig. 135 Infota inment: blue s urfaces alig ned in the park ·
ing space
Fig. 136 Infota inm ent: con tac t o f th e blue cur ved line wi th
the cu rb
Parking on the right is described here. It is identi
cal when parking on the left.
If there is an obstacle next to the parking space (such as a wall), refer to Information for parking
next to obstacles
q page 117 .
~ Activate the turn signal.
~ Position your vehicle next to a parked vehicle in
front of the desired parking space . The distance
to this vehicle should be approximately 3 ft . (1
m). .,.
Page 119 of 274

a co ,...,
N
" N ,...,
0 00 <..:l '
• Turn the Infotainment system on and shift into
reverse gear. The parking system must be
turned on and the
Cross parking view must be
displayed.
• Press the control button on the Infotainment
unit (D c')page 112, fig . 123 . The Parallel park
ing
view is displayed.
•B ackup and align your vehicle so the blue area
@ borders on the rear end of the vehicle be
hind yo u or on the parking space line
c') A in
General information on page 113,
c')(D in Gen
eral information on page 113.
The blue area
represents an extension of the vehicle's out line
by approximately 16 ft (5 meters) to the rear .
The long side of the blue area should be on the
curb. The entire blue area must f it into the
parking space.
• With the ve hicle stopped, turn the steer ing
wheel to the right as far as it will go.
• Back into the park ing space until the blue curve
¢ page 112, fig. 124 touches the curb c') A in
Gen eral information on page 113,
c')(D in Gen
eral information on page 113 .
Stop the vehicle.
• With the vehicle stopped, turn the steering
whee l to the left as far as it will go .
• Continue to back into the parking space until
the vehicle is parked parallel to the
curb¢ &
in General information on page 113, ¢ (D in
General information on page 113. @ repre
sents the rear bumper. At the very latest, stop
the vehicle when the red orientation
line©
borders an object. Keep an eye on the front of
your vehicle while doing this .
Parking next to obstacles
If there is an obstacle (such as a wall) next to the
parking space, position the vehicle so th ere is
more space on that side. Position the long side of
the blue area so that there is sufficient space
from the object. The area must not be on the
curb . You will also need to start turning the
steering whee l earlier. The blue curve
¢ page 112, fig. 124 must not touch the obsta
cle, but rather there should be enough distance.
Parking systems
(D Tips
The left or right orientation lines and surfaces
will be d isp layed, depending on the turn sig
nal be ing used.
Trailer mode
App lies to : vehicles wit h peripheral c ameras a nd tra ile r hi tch
This view assists you in positioning the vehicle in
front of a trailer.
Fig. 137 Infot ainment system: rear mode
Requirement: the trailer mode must be selected
¢page 115.
• Now you can posit ion your ve hicle in front of
the trailer
¢ &. in General information on
page 113,
¢ (D in General information on
page 113.
The orange orientat ion line indicates
the expected path toward the trailer hitch. Use
t he blue lines to help you estimate the distance
to the trailer hitch.
Setting the mode
Appl ies to : vehicles wi th pe riph eral ca meras
• Select: !CAR ! function button> (Car)* Systems
control button > Driver assistance > Parking
aid
> Change to front/rear > Auto or Manual.
Auto
-this view behind the vehicle (Rear mode) is
displayed automatically when yo u shift into re
verse. This view in front of the vehicle
(Front
mode) is displayed automatically when you shift
into the forward gears.
Manual -When you switch the system on, the
view behind the ve hicle
(Rear mode) is always
displayed and it does not switch to the
Front
mode when a forward gear is se lected.
117
Page 120 of 274

Parking systems
Adjusting the display and the warning tones
Applies to: vehicles with parking system plus/rearview cam
era/peripheral camera
The display and warning tones can be adjusted in
the Infotainment.
~ Se lect: the ICARI function button > (Car)* Sys
tems
cont rol b utton > Driver assistance > Park
ing aid .
Display
On* -
an op tical d isp lay is shown for the parki ng
system plus, a rearview camera image is s hown
for the rea rview camera *.
Off -when the p arking syste m is sw itche d off,
only audib le s ign als a re give n.
Signal tones
Front volume -
volume for the front a rea
Rear volume -volume fo r the rear area
Front frequency -frequency for the front a rea
Rear frequen cy -freq uen cy fo r the rear area
Music volume during nav . prompts -the volume
of the a udio/video so urce is lowe red when t he
pa rking system is tur ned on
The new value is g iven briefly during the adjust
ment.
(D Tips
- The wa rning tones ca n also be ad justed di
r ect ly by the v is u al d isp lay or the picture
from the camera. Sim ply p ress the
Settings
contro l bu tton.
- Changed set tings a re act ivated whe n the
p arking sys tem is swi tched o n aga in.
- The settings for volume a nd frequency are
a utomat ica lly saved and assigned to the re
mote con trol key be ing used .
Error messages
Applies to: vehicles with parking system plus/rearview cam
era/peripheral camera
There is an erro r in the system if the LED in the
Pw Jl. button is b link ing and yo u hear a continuous
118
ala rm for a few seconds after sw itch ing on the
par kin g system or when the pa rking system is al
r eady activated . If the erro r is not cor rected be
fo re yo u switch off the ignition, the LED in the
Pw Jl.
button will blink the next time you switch on the
parki ng system by shifting into reverse.
Parking system plus*
If a sensor is fa ulty, th e~ symbol will appear i n
front of/be hind the veh icle in the Infotainment
display. If a rear sensor is faulty, on ly obstacles
that are in areas @and @ are shown
¢ page 109, fig . 115 . If a front sensor is faulty,
o nly obs tacles tha t are in a reas © and @are
shown . T he re i s also a system ma lf u nction if all
segme nts aroun d the vehicle are red or if no seg
men ts a re disp laye d.
Peripheral cameras*
There is a system malfunction if the -(l!:) , symbol
appears and the co rresponding disp lay area is
s h own in bl ue. The c amera is no t wo rking in this
a re a .
Drive to an authorized A udi dealer or authorized
Audi Se rvice Fac il ity i mme diate ly to have the
malfunction cor rec ted .
Trailer hitch
Applies to: vehicles with parking system plus/rearview cam
era/peripheral cameras and trailer hitch
When the trailer soc ket is i n use, the pa rking sys
tem rear sensors are not act ivated when you sh ift
i nto reverse gear or when yo u press the
P •11A b ut
ton. This res ults in the following restrict io ns.
Parking system plus*
There is no distance warning for the rear. The
front senso rs rema in activated. T he visua l display
switches to trailer mode.
Rearview camera* /peripheral cameras*
The re is no distance warning for the rear . The
front senso rs remain activated . The visua l display
switches to trailer mode. The rearview came ra
i mage w ill not show the orie ntation lines and the
bl ue sur faces.
..,
 1
1 2
2 3
3 4
4 5
5 6
6 7
7 8
8 9
9 10
10 11
11 12
12 13
13 14
14 15
15 16
16 17
17 18
18 19
19 20
20 21
21 22
22 23
23 24
24 25
25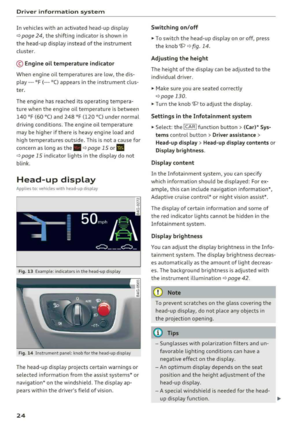 26
26 27
27 28
28 29
29 30
30 31
31 32
32 33
33 34
34 35
35 36
36 37
37 38
38 39
39 40
40 41
41 42
42 43
43 44
44 45
45 46
46 47
47 48
48 49
49 50
50 51
51 52
52 53
53 54
54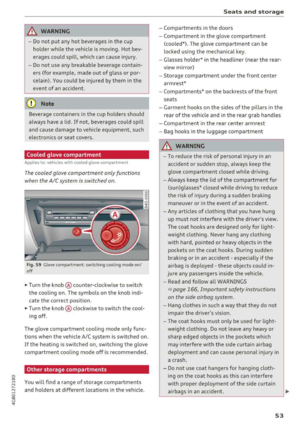 55
55 56
56 57
57 58
58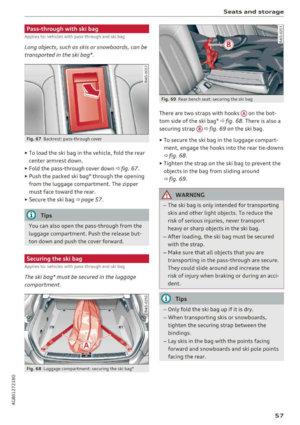 59
59 60
60 61
61 62
62 63
63 64
64 65
65 66
66 67
67 68
68 69
69 70
70 71
71 72
72 73
73 74
74 75
75 76
76 77
77 78
78 79
79 80
80 81
81 82
82 83
83 84
84 85
85 86
86 87
87 88
88 89
89 90
90 91
91 92
92 93
93 94
94 95
95 96
96 97
97 98
98 99
99 100
100 101
101 102
102 103
103 104
104 105
105 106
106 107
107 108
108 109
109 110
110 111
111 112
112 113
113 114
114 115
115 116
116 117
117 118
118 119
119 120
120 121
121 122
122 123
123 124
124 125
125 126
126 127
127 128
128 129
129 130
130 131
131 132
132 133
133 134
134 135
135 136
136 137
137 138
138 139
139 140
140 141
141 142
142 143
143 144
144 145
145 146
146 147
147 148
148 149
149 150
150 151
151 152
152 153
153 154
154 155
155 156
156 157
157 158
158 159
159 160
160 161
161 162
162 163
163 164
164 165
165 166
166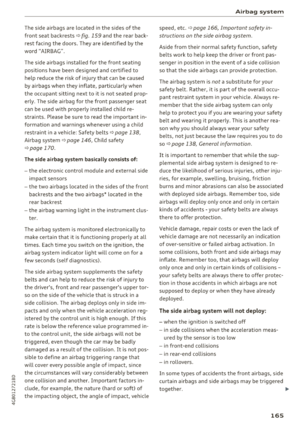 167
167 168
168 169
169 170
170 171
171 172
172 173
173 174
174 175
175 176
176 177
177 178
178 179
179 180
180 181
181 182
182 183
183 184
184 185
185 186
186 187
187 188
188 189
189 190
190 191
191 192
192 193
193 194
194 195
195 196
196 197
197 198
198 199
199 200
200 201
201 202
202 203
203 204
204 205
205 206
206 207
207 208
208 209
209 210
210 211
211 212
212 213
213 214
214 215
215 216
216 217
217 218
218 219
219 220
220 221
221 222
222 223
223 224
224 225
225 226
226 227
227 228
228 229
229 230
230 231
231 232
232 233
233 234
234 235
235 236
236 237
237 238
238 239
239 240
240 241
241 242
242 243
243 244
244 245
245 246
246 247
247 248
248 249
249 250
250 251
251 252
252 253
253 254
254 255
255 256
256 257
257 258
258 259
259 260
260 261
261 262
262 263
263 264
264 265
265 266
266 267
267 268
268 269
269 270
270 271
271 272
272 273
273