Page 105 of 274
 <I\"
that are between appro ximately 32 ft (10 m) and
295
ft (90 m) in front of the vehicle and within
the detection zone . Within the limit")
a co ,...,
N
" N ,...,
0 00 <.,;) '
that are between appro ximately 32 ft (10 m) and
295
ft (90 m) in front of the vehicle and within
the detection zone . Within the limits of the sys
tem¢ page 103 , a pedestrian or w ild animal de
tected when the low beams are sw itched on is
h ighlighted in
yellow ¢ fig. 109 . Animal recogni
tion is not active w it hi n highly developed areas .
The system on ly de tects large wild anima ls such
as deer.
(D Tips
If another display such as navigation replaces
t he image from the night v is ion assist
the~ .,
symbo l appea rs in a tab ¢ fig. 110. You can
a ccess nigh t vision assist using the mul tifunc
t ion stee ring w heel
buttons ¢ page 21.
Pedestrian and wild animal warning
Applies to: vehicles with night vision assist
Fig . 111 In stru ment clust er: @ pede stri an warn ing ,@
wi ld ani mal warnin g
Fig. 112 In str ument clus te r: @ pedest ria n warn ing /@
wi ld an imal warning, when t he nigh t vis ion a ssis t image is
n ot se lec ted in the instrument clust er dis p lay
Image in the instrument cluster /head -up
di splay*
If there are pedestrians or wild animals in an
area in front of your veh icle that is class ified as
A ssi st a nce systems
critica l, the system will d irect your atten tion to
t h is:
- Pedestr ians or wild anima ls are h ighlighted in
red and the cor responding
symbo l. or.
turns on ¢fig. 111 .
-There is also an audib le sign al.
T he area classified as critical is based on the vehi
cle speed and the steering wheel angle . Pedes
t rian and w ild an imal warning encourages you to
pay more atten tion.
If the night vision assist image is replaced by an
othe r display (such as the on-board comp ute r) ,
t h e
red . or. in d ic ator lig ht ¢ fig . 112 will
appea r if the re is a pedestrian o r wild animal
war ning .
If the head-up display* is sw itched on and the
night v ision assist content is activated, .
or.
will appear i n the head-up displ ay *.
Marking light*
T o direct the driver's attention to a pedestr ian ,
the headlights can flash on the pedest rian three
tim es in a row whe n there is a pedestr ian war n
ing .
This occurs at speeds above approximately
35 mph (60 km/h) if yo u are outside of illuminat
ed a reas and no de tected ve hicles are shown. Th e
high be am assistant* con trols the m arking ligh t*
¢ page 40, High beam assis tant.
T he ma rking light is not used for wild anima ls .
General information
Applies to: vehicles with night vision assist
Fig . 11 3 Front of t he ve hicle : n ig h t v is io n ass ist camer a
103
Page 106 of 274

Assistance systems
The following situations may affect the function
of t he night vision assist system:
- Poor visibility such as snow, rain , fog or heavy
spray
- Dirty lens on the night vision assist camera
Make sure the night vision ass ist camera
¢ fig. 113 is not covered by stickers, deposits or
any other obstructions because that can affect
the camera function. For information on clean
ing, see
¢ page 228.
The pedestrian and wild animal recognition de
pends on the temperature difference between
the person/wild animal and the background. Peo ple/wild animals may not be detected if the dif
ference is too small. The pedestrian/wild animal
marking and the marking light* deactivate at
temperatures above approximately 77 °F
(25 °()
and during daylight. If the night vision assist
im
age is selected in the instrument cluster display,
then the
II symbol appears at the top on the
right side.
..&_ WARNING
Pay attention to traffic and the area around
your vehicle when night vision assist is switch
ed on. The driver is always responsible for as
sessing the traffic situation.
- Night vision assist can only warn about peo
ple and wild animals located within the visu
al range of the infrared camera. The visual
range corresponds to the image in the in
strument cluster display.
- Night vision assist may not detect people or
wild animals and mark them if
- they are not in an upright position, for ex
ample if they are sitting or lying down
and/or
- the silhouette in the display appears in
complete or interrupted, for example be
cause the person is partially covered by a
vehicle or the animal is partially covered
by tall grass. This could increase the risk
of an accident.
- Never try to swerve around animals if doing
so will endanger you or other road users, be
cause this increases the risk of an accident.
104
@ Tips
- Even though the system evaluates the
shape and heat given off by all detected ob
jects, there are limits to the system. There
may be false warnings.
- For technical reasons, the image pauses in
split second intervals.
Switching on /off
Applies to: vehicles with night vision assist
Fig. 114 Area around the ligh t switc h: ni gh t vis ion assist
button
Requirement: switch the ignition on and turn the
light switch to the
AUTO position.
.,. Press the~ button ¢ fig. 114. The heat image
from the night vision camera appears in the in
strument cluster display .
.,. Press the~ button again to switch the night
vision assist off .
If conditions are bright enough, night vision as
sist can be switched on without moving the light
switch to the
AUTO position. Pedestrian and wild
animal highlighting and warnings are only active
when it is dark outside and the headlights are
switched on.
Adjusting the contra st
Applies to: vehicles with night vision assist
.,. Select: the I CARI function button > (Car)* Sys
tems
contro l button > Driver assistance >
Night vision assist contrast.
When the night vision assist is switched on and
the image is visible in the instrument cluster dis
play, you can adjust the contrast in the image
from
Min to Max .
Page 107 of 274

a co .... N
" N .... 0 00 \.J '
Messages
Applies to: vehicles with night vision assist
Night vi sion assist : S ys te m fault
The system cannot guarantee correct function
and is sw itched off . See an author ized Audi deal
er or authorized Audi Service Facility for ass is
tance.
Night vision a ssist : Currently una vailabl e
The system cannot guarantee correct function at
this t ime and is switched off.
Night vis ion assi st: Onl y av ailable at night with
light s turned on
Nig ht vision ass ist only wo rks when it is dar k out
side and the head lights are on.
Night vision a ssist : Pede strian marking curr ent
l y unavail abl e
The pedestrian and wild animal marking was
sw itched off by the system .
Audi drive select (drive
settings)
Introduction
Drive select makes it possible to experience dif
ferent types of veh icle settings in one vehicle .
The dr iver can se lect
Comf ort , Auto a nd D ynamic
modes in the I nfota inme nt system to switch be
tween , fo r example , a sporty and a comfo rtable
driving mode .
I n the
Indi vidual mode, the sett ings can be ad
justed to your perso nal preferences . This makes
it poss ible to comb ine settings such as a sporty
engine setting with light steering.
Description
The fo llowing systems, among other things, are
infl uenc ed by drive select:
Engine and automatic transmission
D epending on the mode, the e ng in e and auto
mat ic transmission respond more q uickl y o r in a
more balanced manner to accelerator pedal
A ss istance systems
movements . In the sporty dynamic mode, the
transmission shifts at higher speed ranges .
Adaptive air suspension*
The adapt ive a ir suspens ion* is an e lectron ica lly
contro lled air suspens io n and dampi ng sys tem.
T he adjustment depends o n the dr iving mode se
l ected, steering movements, the driver's braking
and acce leration, and as the road surface, ve hicle
speed and load.
T he vehi cle ground clearance depends on t he
mode selected and the speed . When you are in
the
a uto mode, the highway setting is activated
when you dr ive above 75 mph (120 km/h) for
more than 30 seconds. The ground clearance is
increased automatically if the speed drops below
44 mph (70 km/h) for more than 120 seconds .
Suspension control*
With the Audi Dynamic Ride Contro l damping
contro l, dampening characteristics of the vehicle
can be individually adjusted us ing drive select.
This makes it possib le to satisfy the des ire for
sporty suspens ion (DYNAMIC) and comfortable
suspension (COMFOR T) without g iv ing up bal
anced tu ning (AUTO) .
Steering
The power steering adapts. Indirect steering that
moves easily as in comfort mode is espec ially
su ited to long drives on a highway . The dynamic
mode provides sporty, direct steeri ng .
Applies to: vehicles with dynamic steering
The steering ratio changes based on veh icle
speed in order to maintain optimum steering ef
fort for the driver at all times . Th is sets the steer
i ng to be less sensitive at h igher speeds i n orde r
to prov ide improved ve hicl e cont rol. At red uced
speeds, stee ring is more d irect in orde r to keep
the steering effort as minimal as possible when
the driver is maneuvering the ve hicle. At low and
average speeds, dynamic steering * additionally
provides more responsive steering performance.
Sport differential *
As a compone nt o f the all whee l dr ive sys tem
(qua ttro)
q page 124, the sport different ia l dis -
tributes the driving power to the rear axle
.,.
105
Page 108 of 274
 to sporty
(dynamic) depending on the selected mode. The
goal is a")
Ass is tanc e system s
depending on the situation. The distribution of
power varies from balanced (comfort) to sporty
(dynamic) depending on the selected mode. The
goal is a high leve l of agility and ab ility to accel
erate on curves. The ve hicle is very respons ive to
steer ing .
Co rne ring light *
The cornering light adapts the high beams to the
direction of the curve depending on the speed.
The pivot ing action and the light ing also adapt to
the mode.
Adapti ve c ruise control *
The behavior when acce lerating can be adjusted
from comfortable to sporty, depending on the
drive select mode. Adaptive cruise control a lso
responds to the driving behavior of the veh icle
ahead in a more conservative or sporty manner.
Engine sound *
The engine sound adapts to the current mode
and can be subtle to sporty .
@ Note
Applies to: vehicles with adaptive air suspension
-Make sure there is enough clearance above
and below t he ve hicle when parking. The
height of the vehicle (ground clearance) can
change once it is parked due to temperature
fl uctuations, changes to t he load condit ions
and c hanges to the d rivi ng modes.
- When transporting the veh icle on a car car
r ier, tra in, sh ip or by other means, only t ie
the ve hicle dow n at t he ru nning surface of
the tires, w hich is the outer circ umfe rence.
Securing t he vehi cle at t he axle compo
nents, suspension struts or towing eyes is
not permitted because the pressu re in t he
a ir s uspension struts can change dur ing
Adjusting the Individual mode
transport . The vehicle may not be secured
sufficiently if this happens.
(D Tips
- In some models, the max imum ve hicle
speed can on ly be reached in t he auto and
dynamic modes.
- Th e S se lector lever position a utomat ica lly
engages if the dynamic mode is selected.
- Applies to: vehicles with dynamic steering:
operating noise is heard when sta rting o r
stopping the engine. This does not indicate
a problem .
Selecting the driving mode
.,. To select the mode, select the follow ing in the
Infotainment:
! CAR ! function button> Comfort ,
Auto , Dynamic or Individual.
.,. Applies to: vehicles with a ti:~ button on the
steering wheel: press the button repeatedly u n
til the desired mode appea rs in the instrument
cl uste r d isplay.
You
can change the driv ing mode whe n the vehi
cle is stationary or while d riv in g. If traff ic per
mits, afte r changing modes, briefly t ake your
foot o ff t he accelerator pedal so t hat the recently
selected mode is also activated for t he engine.
Comfort -provides a comfort-or iented vehicle
setup a nd is s uited fo r long d rives o n highways.
Auto -provides a n overall comfortable yet dy
nam ic dr iv ing feel and is suited for everyday use .
Dynamic -gives the driver a sporty driving fee l
and is suited to a sporty driving style .
Individu al -¢ page 106 .
A WARNING
Pay attention to traffic when ope rating the
drive select to reduce the r isk of an accident.
-
You can adjust the vehicle settings to your personal preferences .
.,. Select: the !CAR! function button > S et individ
ual
control b utton . Once you select the men u,
106
you will a utomatica lly drive in the Indi vidual
mode .
Page 109 of 274

a co .... N
" N .... 0 00 \.J '
After you have closed the settings, you will a uto
matica lly drive in the
Ind ividual mode .
Systems comfort
Engine/transmission
ba lanced
Air suspension* comfortab le
Steering comfortab le
Assistance systems
The equipment in yo ur vehicle will determine
which settings you can adjust . The fo llowing ta
ble gives a n overview of the characteristics .
auto dynamic
ba
lanced sporty
ba lanced sporty
ba lanced sporty
Dynamic steering
* comfortable/indirect ba lanced/d irect sporty/direct
Suspension control* comfortab le
Sport differential * balanc ed
Adaptive cruise control* comfortable
Engine sound* subtle
a) Subtle in the selector lever posit ion D and sporty in S.
(D Tips
Your Individual mode settings are automati
cally stored and assigned to the remo te con
trol key being used .
Raising/lowering the vehicle
Applies to: vehicles with adaptive air suspension
You can raise your vehicle temporarily, for exam
ple to drive over a tall curb.
Raising the vehicle
~ Select the following in the In fotainm ent sys
tem: the
ICARI function button > Raise control
button.
~ Wait for the arrows or segments in the Info
ta inment system display to stop blinking and
the vehicle to reach its fina l posit ion.
Lowering the vehicle
~ To lower the vehicle, select the following in the
Infotainment system: the
! CARI function button
> Lower control button.
~ Wait for the arrows or segments in the Info
ta inment system display to stop blinking and
the vehicle to lower completely .
@ Note
-Remember that your vehicle is not suitable
for driv ing offroad even when it is raised.
There is not enough ground clearance . ba
lanced sporty
ag ile sporty
ba lanced sporty
subtle/sportyal sporty
- If the vehicle is raised, it will lower auto
matically when driving 62 mph (100 km/h)
or faster.
Messages
Applies to: vehicles with adaptive air suspension
Air suspension : Vehicle is too high . Controlling
level. ..
Air suspension: Vehicle is too low. Controlling
level. ..
Th e driver message switches off when the leve l
control process is complete.
107
Page 110 of 274

Parking syste m s
Parking systems
General information
A pplies to: ve hicles w ith pa rk in g system plus/rearview cam
era/peripheral camera
Depending on your vehicle 's equipment , various
parking aids will help you when parking and ma
ne uvering.
The
p ark in g sys tem plu s assists you when park
ing by aud ibly and visua lly indicating objects de
tected
in front of and behind the veh icle
Q page 109.
The rea rv iew c am era shows the area beh ind the
veh icle in the Infotainment system d isp lay. The
lines in the rearv iew came ra image he lp you to
pa rk or maneuve r
Qpage 110.
The peripher al c am era s assist you with parking
and maneuvering . You are aided by var ious cam
eras depend ing on the vehicle equipment leve l
Qpage 113. The pa rk ing system pl us functions
are also available
Q page 109 .
& WARNING
-Always look for traffic and check the area
around your vehicle by looking at it direct ly
as well. The parking system cannot replace
the driver's attent ion. The driver is always
respons ible when enter ing or leav ing a park
ing space and dur ing s imilar maneuvers.
- Please note that some surfaces, such as
clothing, are not detected by the system .
-
-Sensors and cameras have blind spots in
wh ich people and objects cannot be detect
ed . Be especially caut ious of small children
and animals .
- The sensors can be displaced by impacts or
damage to the radiator gr ille, bumper,
wheel housing and the underbody . The park
ing system may be impa ired as a result.
Have a n author ized A udi dealer or au thor
ized Audi Service Facility check their func
tion .
- Make s ure the senso rs ar e not obst ructed by
stickers, deposits or other materia ls. If they
are, the sensor function could be impaired.
For additiona l information on cleaning, see
Q page 228.
108
@ Note
-Some objects are not detected or disp layed
by t he system under certain c ircumstances:
- objects such as barrier cha ins, tra iler draw
ba rs, ve rtical po les o r fences
- objects above the sensors such as wall ex
tensions
- objects with certain s urfaces or structures
such as cha in li nk fe nces or powder snow
- If you continue driving closer to a low ob
ject, it may disappear from the sensor range . Note that you will no lo nger be
wa rned about th is obstacle.
- Keep enough distance from the curb to re
duce the risk of damage to the rims .
(D Tips
-The system may prov ide a war ning even
though there are no obstacles in the cover
age area in some situations, such as :
- certain road surfaces or when there is tall
grass
- exte rna l ul trasonic sources such as from
cleaning vehicles
- in heavy rain, snow, o r th ick vehicle ex
h a u st
- We recommend th at you practice p arki ng in
a traffic -free loca tion or parking lot to be
come fami liar with the system . When doing
this, there s hou ld be good light and weath
er conditions.
- You can change the vo lume and pitch of the
signa ls as well as the d isp lay
Q page 118.
- Please refer to the instructions for towing a
trai ler located in
Q page 118.
-What appea rs in the infotainment d isplay is
somewhat time -de layed.
- Th e sensors m ust be ke pt clean and free of
snow and ice for the parking aid to operate .
Page 111 of 274

a co ,...,
N
" N ,...,
0 00 <..:l '
Parking system plus
Description
Applies to: vehicles with parking system plus
Parking system plus provides audio and visual
signals when parking .
Fig . 115 D is p lay field
Sensors are located in the front and rear bump
ers . If t hese detect an obstacle , audible and visu
al signa ls warn you.
Make sure the sensors are not covered by stick
ers, deposits or any other obstructions as it may
impair the sensor function. Fo r information on
cleaning, see
¢ page 228.
The display field begins approximate ly at:
® 4 ft (1.20 m)
® 3 ft (0.90 m)
© 5 .2 ft (1.60 m)
@ 3 ft (0.90 m)
The closer you get to the obstacle, the sho rter
the interval between the audible signals. A co n
tinuous tone so unds whe n the obstacle is less
than approximately 1 foot (0.30 meters) away .
D o not cont inue driving forwa rd o r in reverse
¢ .&. in General information on page 108, ¢Q) in
General information on page
108!
If the d ista nce to an obstacle remains constant,
the vol ume of the distance wa rning gradually
d rops afte r abo ut four seconds (th is does not
ap
p ly in the continuous tone range) .
Parking systems
Switching on/off
Applies to: vehicles with parking system plus
Fig. 116 Center co nsole : p arkin g aid b utto n
Switching on
.,. Shift into reverse, or
.,. Press the PwA button in the center conso le
¢ fig . 116 . A short confirmation tone sounds
and the LED in the b utton turns on .
Switching off
.,. Drive faster than 6 mph (10 km/h), or
.,. Press the PwA button, or
.,. Switch the ignit ion off.
Vi sual d isplay
T he segments in front of and behind the veh icle
help you to determine the distance betwee n you
and an obstacle .
T he red lines mark the expected direction of trav
el according to the steer ing angle. A white seg
ment indicates an identified obstacle that is out
side of the vehicle 's path. Red segments show
identified obs tacles that are in your vehicle's
path. As your vehicle comes closer to the obsta
cle, the segments move closer to the veh icle . The
collision a rea has been reached whe n the next to
last segment is displayed . Obstacles in the co lli
s ion area, including those outs ide of the vehicle's
pa th , are shown in red. Do not cont in ue driving
f orward or in reverse
¢ .&. in General information
on page 108 ,
¢@ in General information on
page
108!
109
Page 112 of 274

Parking systems
Rearview camera
Introduction
Applies to: vehicles with rearview camera
I ' I
....
F ig. 117 Illustration: cross parking
Fig. 118 Illustration: parallel parking
The rearview camera gives you two views: you can
use
Cross parking to park in a parking space or a
garage, for example¢
fig. 117 . You can use par
allel parking
if you would like to park on the side
of the road
¢fig. 118.
General information
Applies to: ve hicles with rearview camera
F ig. 119 Area
covered (!) and area not covered@by the
re arv iew camera .
110
Fig. 120 Luggage compartmen t lid : location of the rear
v iew camera
The rearview camera is located above the rear li
cense plate bracket. Make sure that the lens for
the parking system
¢ fig. 120 is not covered by
deposits or any other obstructions because this
can affect the function of the parking system . For
information on cleaning, see ¢
page 228.
The rearview camera coverage area includes (D
¢ fig. 119. Only this area is shown in the Info
ta inment display . Objects that are in
area @,
which is not covered, are not displayed .
.&, WARNING
-Always read and follow the applicable warn
ings¢.&. in General information on
page 108.
- If the position and the installation angle of
the rearview camera was changed, for ex
ample after a collision, do not continue to
use the system for safety reasons. Have it
checked by an authorized Audi dea ler or au
thorized Audi Service Facility.
- Only use the rearv iew camera to assist you if
it shows a good, clear picture. For example,
the image may be affected by the sun shin ing into the lens, dirt on the lens, or if there
is a malfunction.
- Use the rearview camera only if the luggage
compartment lid is completely closed. Make
sure any objects you may have mounted on
the luggage compartment lid do not block
the rearview camera.
- The camera lens enlarges and distorts the field of vision . The object appears both al
tered and inaccurate on the screen.
- In certain situations, people or objects in
the display appear closer or farther away :
 1
1 2
2 3
3 4
4 5
5 6
6 7
7 8
8 9
9 10
10 11
11 12
12 13
13 14
14 15
15 16
16 17
17 18
18 19
19 20
20 21
21 22
22 23
23 24
24 25
25 26
26 27
27 28
28 29
29 30
30 31
31 32
32 33
33 34
34 35
35 36
36 37
37 38
38 39
39 40
40 41
41 42
42 43
43 44
44 45
45 46
46 47
47 48
48 49
49 50
50 51
51 52
52 53
53 54
54 55
55 56
56 57
57 58
58 59
59 60
60 61
61 62
62 63
63 64
64 65
65 66
66 67
67 68
68 69
69 70
70 71
71 72
72 73
73 74
74 75
75 76
76 77
77 78
78 79
79 80
80 81
81 82
82 83
83 84
84 85
85 86
86 87
87 88
88 89
89 90
90 91
91 92
92 93
93 94
94 95
95 96
96 97
97 98
98 99
99 100
100 101
101 102
102 103
103 104
104 105
105 106
106 107
107 108
108 109
109 110
110 111
111 112
112 113
113 114
114 115
115 116
116 117
117 118
118 119
119 120
120 121
121 122
122 123
123 124
124 125
125 126
126 127
127 128
128 129
129 130
130 131
131 132
132 133
133 134
134 135
135 136
136 137
137 138
138 139
139 140
140 141
141 142
142 143
143 144
144 145
145 146
146 147
147 148
148 149
149 150
150 151
151 152
152 153
153 154
154 155
155 156
156 157
157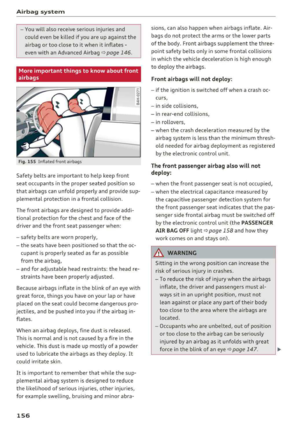 158
158 159
159 160
160 161
161 162
162 163
163 164
164 165
165 166
166 167
167 168
168 169
169 170
170 171
171 172
172 173
173 174
174 175
175 176
176 177
177 178
178 179
179 180
180 181
181 182
182 183
183 184
184 185
185 186
186 187
187 188
188 189
189 190
190 191
191 192
192 193
193 194
194 195
195 196
196 197
197 198
198 199
199 200
200 201
201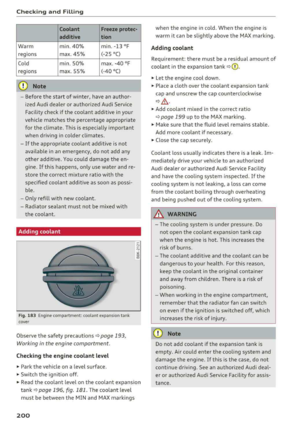 202
202 203
203 204
204 205
205 206
206 207
207 208
208 209
209 210
210 211
211 212
212 213
213 214
214 215
215 216
216 217
217 218
218 219
219 220
220 221
221 222
222 223
223 224
224 225
225 226
226 227
227 228
228 229
229 230
230 231
231 232
232 233
233 234
234 235
235 236
236 237
237 238
238 239
239 240
240 241
241 242
242 243
243 244
244 245
245 246
246 247
247 248
248 249
249 250
250 251
251 252
252 253
253 254
254 255
255 256
256 257
257 258
258 259
259 260
260 261
261 262
262 263
263 264
264 265
265 266
266 267
267 268
268 269
269 270
270 271
271 272
272 273
273