Page 185 of 274

a co .... N
" N .... 0 00 \,;J '
-Always make sure the forward-facing seat
has been designed and certified by its man
ufacturer for use on a fr ont seat with a
passenger front and s ide airbag.
- Never put the forward-facing child restraint
up, against or v ery near the instrument pan
el.
- Always move the front passenger seat to
the highest position in the up an d down ad
justment range and move it back to the
rea rmost position in the seat's fore and aft
adjustment range, as fa r away from the air
bag as possib le, before insta lling the for
wa rd- facing child restr aint.
- Always ma ke sure that the safety bel t upper
anchor age is beh ind the child res train t and
not next to or in front o f the chi ld restrain t
so that the safety belt will be properly posi
tioned.
- Make sure that the
PASSENGER AIR BAG
OFF
light comes on and stays on all the time
whenever the ignition is switched on .
A WARNING
Rearward-facing child restraints:
- A ch ild in a rearward-facing child safety seat
installed on the front passenger seat will be
seriously injured and can be killed if the
front airbag inflates - even with an Ad
vanced Airbag System.
- The inflating a irbag w ill hit the child safety
seat or infant carrier with great force and
will smash the ch ild safety seat and chi ld
against the backrest, cen ter armrest, door
o r roof.
- Always be especially careful if you must in
stall a rearward facing child safety seat on
the fron t passenger sea t in exceptional c ir
c u ms tan ces.
- Make sure tha t the
PASSENGER AIR BAG
OFF
light comes on and s tays on all t he ti me
whenever the ignition is switched on.
- If the PASSENGER AIR BAG OFF light does
not come on and st ay on, immedia tely in
st al l the re a r-fa cing ch ild saf ety se at in a
rear seat ing pos ition and have the airbag
system inspected by your Aud i dealer .
Child saf ety
Activating the convertible locking retractor
Use the convertible locking retractor to secure a
child restraint.
Always heed the c hild safety seat manufacturer's
i nstruct io ns when instal ling a child restra int i n
your vehicle. To activate the convertib le locking
r etractor:
.,. Place the child restraint on a seat, preferably
on the rear seat .
.,. Slowly pull the belt all the way out .
.,. Route it arou nd or through the child restra int
be lt
path~ ,&..
.,. Push the c hild safety sea t down with yo ur full
weigh t to ge t the safe ty belt really tight.
.,. Insert t he be lt tong ue into the b uckl e for tha t
seating position .
.,. Guide the safety be lt back into t he ret ractor un
til the be lt lies flat and sn ug on the c hild safety
seat .
.,. You s hou ld hea r a "cl icking" noise as the belt
w inds bac k into the ine rtia reel. Test the con
vert ib le lock ing retractor by pull ing on the bel t.
You s hou ld no lo nger be able to pull the belt
ou t of the re tra cto r. T he convertib le lo ckin g re
t ra cto r is now activated.
.,. Ma ke sure that t he red release bu tton is facing
away from the c hild rest raint so that it can be
unb uc kled quickly .
.,. Pull on the belt to make sure the safety belt is
properly t ight and fastened so that the seat
cannot move forward or sideways more t han
one inch (2 .5 cm) .
A WARNING
Using the wro ng ch ild rest raint o r an impro p
e rly instal led child restr aint can cause se rious
person al injury or de ath in a crash.
- Always make sure th at t he s afety be lt re
tr act or is locked when installing a c hild
safety sea t. An un locked safe ty be lt retra c
tor cannot hold the ch ild safety seat in p lace
du ring norma l drivin g or in a c rash.
- Always buckle the child safety seat fi rm ly in
p lace even if a ch ild is not sitt ing in it . A
loose child safety seat can fly around dur ing
a sudden stop or in a crash.
~
183
Page 186 of 274

Child sa fety
- Always make sure the seat backrest to which
t h e chi ld restraint is installed is in an up
rig ht p osition and s ecurely latched into
plac e and can not f old forward. O therwise,
t he se atback with t he ch ild safe ty seat at
tached to it could fly forward in the event of
an accident or other emergency situation.
- Always read and heed all WARNINGS when
ever using a child restrained in a veh icle is
being used
¢ page 170. Specia l preca utions
apply when installing a child safety seat on
the front passenger
seat¢ page 147, Child
restraints on the front seat -some impor
tant things to know.
Deactivating the convertible locking
retractor
The convertible locking retractor for child re
straints will be deactivated automatically when
the belt is wound all the way back into the re
tractor .
~ Press the red button on the safety belt b uckle.
Th@ belt tongue w ill pop out of the buckle.
~ Gu ide the safety belt a ll the way back into its
stowed position .
Always let the safety belt retract complete ly into
its stowed position . The safety belt can now be
used as an ordinary safety belt without the con
vert ible lock ing retractor for child restra ints .
If the convert ible lock ing retractor should be ac
tivated inadve rtently, the safety belt must be un
fastened and gu ided completely back into its
stowed position to deact ivate this feature.
If the
convertib le lock ing retractor is not deact ivated,
the safety belt w ill gradually become tighte r and
uncomfo rtable to wea r.
A WARNING
-
Improperly installe d child safety seats in
crease the risk of serio us pe rsonal injury and
death in a collision .
- Never unfasten the safe ty belt to deactiva te
the convert ible locking retractor for child re
straints while the vehicle is moving . You
184 wou
ld not be rest rained and could be seri
ously in jured in an acc ident.
- Always read and heed all WARNINGS when
ever us ing a child restrained in a vehicle is
be ing
used¢ page 170. Special p recautions
apply when installing a child safety seat on
the front passenge r
seat¢ page 147, Child
restraints on the front seat -some impor
tant things to know.
LATCH system (lower
anchorages and tethers
for children)
Child Restraint System anchors and how
are they related to child safety
To p rovide a simp ler and mo re practicab le way to
attach the ch ild restraint on the vehicle seat,
Federal regulations require spec ia l lower ancho
rages in vehicles and devices on new ch ild re
straints to attach to the vehicle anchorages .
In the United States, the combination of the
tethe r ancho rages and the lower anchorages is
now generally called t he LATCH system for
" Lower Anchorages and Tethers for Children" . In
Canada, the terms
" top tet her" wi th "lower u ni
versa l anchorages" (o r "lowe r universa l anchor
age bars") a re used to des cribe the system .
In other co untries the term
"ISOFIX" is used to
desc ribe the lower anchorages .
Fo rward-facing chi ld restraints manufactured af
ter September
1, 1999, are required by U.S . fed
era l regulations to comply with new child head
movement performance req uir ements . These
new performance requ irements make a tether
necessary on most new ch ild sea ts.
Installing a ch ild restraint that requires a top
tether wi thout one can se riously impair the per
fo rmance of the c hild rest raint and its ab ility to
pro tect the ch ild in a co ll ision. I nstalling a ch ild
r es trai nt th at r equi res a top te ther wi tho ut the
top tether may be a vio lation o f st ate law.
Child restra int manufactu rers offe r LATCH lowe r
ancho rages on t heir child seats w ith hook-on or
...
Page 187 of 274
 <I\"
push-on connectors attached to adjustable
straps .
I n addi tion to the LATCH lower anchorages, these
chi ld restrain t systems usually requ")
a co ,...,
N
" N ,...,
0 00 <.,;) '
push-on connectors attached to adjustable
straps .
I n addi tion to the LATCH lower anchorages, these
chi ld restrain t systems usually require the use of
tether straps to he lp keep the child restraint
firm ly in plac e.
A WARNING
Improper installation of c hild restraints will
increase the risk of injury and death in a
crash.
- Always follow the instructions provided by the manufacturer of the child restra int you
intend to install in your veh icle.
- Never install a child restra int w ithout a
properly attached top tether strap if the
child restraint ma nufacturer's instruct ions
requ ire the top tether strap to be used .
- Improper use of child restra int LATC H lower
anchorage po ints can lead to injury in a colli
sion . The LATCH lower anchorage points a re
designed to withstand only those loads im
posed by correc tly fi tted child res traints .
- N ever mount two chi ld restraint systems on
one LATCH lower a nchorage poin t.
- Never secure or attach a ny luggage or other
item to the LA TCH lower anc horages .
Location
Fig. 1 68 Sche matic overvie w: LA TCH an ch orag e po int loc a
t ions
The illustration shows the seat ing locations i n
your ve hicle whi ch a re equipped with the lower
ancho rages system.
Ch ild s afe ty
Description
The lower anchorage positions are marked for
quick locating .
Fig . 1 69 Lower an cho ra g es , covers marked
F ig . 170 Rear s eats: lowe r an chorag e bra cket lo ca tions
Lower anchorages
T he circular markings on the rear seat help you to
identify the location of lower anchorages for the
two outboard seating positions
c:!;> fig . 169. The
LATCH lower universal anchorage attachment
points are between the rear seatback and rear
seat cushion.
Remove the covers
c:!;> fig . 169 to access the lower
anchorage attachment points.
T he lower anc horage attac hment po in ts a re v is i
ble
c:!;> fig . 170.
Lower anchorages secure the child restra int in
the seat withou t using the veh icle's safety bel ts.
Anchorages provide a secure and easy-to-use at
tachment and minimize the possibi lity of improp
er child restraint installation .
All child res tra ints manufac tured after Septem
ber 1, 2002, must have lower anchorage attach-
ments for t he
LATCH system. ..,_
185
Page 188 of 274

Child sa fety
Please remember that the lower anchorage
points are only intended for installation and at
tachment of child restraints specifically cert ified
for use w ith LATCH lower anchorages. Ch ild re
stra ints that are not equipped with the lower an
chorage attachments can st ill be installed i n
compl iance with the child restra int manufactur
er 's instructions on using vehicle safety belts .
.&_ WARNING
Improper use of LA TC H l ower anchorages ca n
cause se rious pe rsonal injury in an acc ident.
- Always ca ref ull y follow the child restra ints
ma nufactu rer's inst ru ct io ns for p roper in
st all ation of the child res tra int and p roper
use of the lower anchorages or safety be lts
in your vehicle .
- Never secure or a ttac h any luggage or o ther
items to the LATCH lower anchorages.
- Always re ad a nd heed t he important infor
mation about child restraints in this c hapter
and WA RNINGS
¢page 170, Child safety .
Installing a child restraint with LATCH
lower anchorages
Whenever you install a child restraint always fol
low the child restraint manufacturer's instruc
tions.
F ig . 1 71 Lower anchorages: proper mounting
Mounting
.,. Make sure the seatback of the rear seat bench
is i n the upr ight position and securely latched
i n place .
.,. Attach both hook-on connectors with the sp ring
catch re lease on the chi ld safety seat onto the
186
LA TCH lower anchorage so that the connectors
lock into place
¢fig. 171.
.,. Pull on the connector attachments to make
sure they are properly attached to the LATCH
lower anchorage.
.. Pull straps tight following the ch ild restraint
manufacturer 's instruct ions .
Relea sing
.,. Loosen the tension on the straps fo llowing the
child restra int manufacturer's instructions.
.. Depress the spring catches to release the an
chorage hooks from the lower anchorages.
Remember: Use tether straps to help keep the
c hi ld restraint firmly in p lace.
.&_ WARNING
-
Improper use of the LATC H system can in
crease the r isk of serious persona l injury a nd
death in a n accident .
- These anchors were developed only for child
safety seats using the "LATCH" system .
- Never attach other ch ild safety seats, be lts
or other objects to these anchors.
- Always make sure that you hear a click when
latching the seat in place. If you do not hear
a cl ick the seat is not sec ure and co uld fly
forward and hit the inter ior of the vehicle,
or be ejec ted from the veh icle .
.&_ WARNING
Imp roper i nstalla tion of child restra ints w ill
in cre ase t he risk of inju ry in a n accident.
- Always follow the ch ild restraint system
manufact ure r's ins truc tions fo r prope r in
s tallat ion of t he ch ild restrain t sys tem an d
proper use of te ther straps as we ll as the
lower anchorages or safety belts in you r ve
hicle.
- Always read and heed the important infor
mation and WARNINGS about chi ld safety
and the installation of c hild restraint sys
tems
¢ page 170, Child safety.
-
Page 189 of 274

a co ,...,
N
" N ,...,
0 00 <..:l '
Tether anchors and tether straps
Fig. 172 Te the r ancho rs: att achm ent hook locatio ns be
hi nd t he rea r seatbacks
The tether anchors for the two/three* rear seat
ing positions are located on the backside of the
rear seatbacks
¢ fig. 172. Vehicles with two rear
seating positions are equipped with two tether
anchors.
A tether is a straight or V-shaped strap that at
taches the top part of a child restraint to specia l
anchorage points in the vehicle.
The purpose of the te ther is to red uce the for
ward movement of the child restraint in a c rash,
in order to he lp red uce the risk of head injury
that could be caused by striking the vehicle inte rior .
F orward facing child restraints manufactured af
ter September 1, 1999, are required by U .S . fed
eral regulations to comply with new child head movement performance requirements . These
new performance requirements make a tether
necessary on most new child safety seats .
A WARNING
Improper installation of child restraints will
increase the risk of injury and death in a
crash.
- Always follow the instructions provided by
the manufacturer of the child restra int you
intend to install in your Aud i.
- Improper use of child restra int anchors (in
cl uding tethe r anchors) ca n l ead to inj ury in
a collision. The anchors are designed to
withstand only those lo ads imposed by cor
rectly f itted child restraints .
Child s afe ty
-Never mount two child restraint systems on
one LATCH lower anchor point.
- Never attach two child restraint systems to
one tether strap or tether anchorage.
- Never attach a tether strap to a tie-down
hook in the luggage compa rtment.
- Never use child restraint tether anchorages to secure safety be lts or other kinds of occu
pant restraints.
- Never secure or attach any luggage or other
items to the LATCH lower anchorages or to
the tether anchors.
- If you must install a rearward facing child
safety seat on the front passenger seat be
cause of exceptional circumstances and the
PA SSENGER AIR BAG OFF light does not
come on and stay on, immediately insta ll
the rea r-facing child safety seat in a rear
seating position and have the a irbag system
i n spe cted by your Audi dea ler.
Installing the upper tether strap on the
anchorage
Fig . 1 73 Tet her st rap: proper rout ing and mount ing
Installing the tether strap
.,. Re lease or deploy the tether strap on the ch ild
restraint according to the ch ild rest raint manu
facture r's instr uctions .
.,. Guide the upper tether s trap under o r sideways
of the rear head restraint
I':!.> fig . 173 (dependi ng
on the chi ld restraint).
.,. Attach the tether strap anchorage hook into
the tether anchorage.
.,. Pull on the tether strap hook so that the spring
catch of the hook engages.
.,. T ighten the tether strap firmly following the
child restra int manufacture r's instruc tions .
.,.
187
Page 190 of 274

Child sa fety
Relea sing th e te th er strap
.,. Loosen the tension following the c hild rest raint
manufacturer's instructions .
.,. Depress the spring catch on the hook and re
lease it from the anchorage.
@ Note
I f you leave the chi ld restraint with t he tether
strap firm ly insta lled for several days, this
cou ld leave a mark on the upholstery on the
seat cush ion and backrest in the area where
the tether strap was installed. The upholstery
would also be permanently stretched around the tethe r strap . This applies especially to
leather seats .
Using tether straps on rearward-facing
child restraints
Current ly, few rear-facing chi ld restraint systems
come with a tether. Please read and heed the
child restraint system manufacturer's instruc
tions carefully to determine how to properly in
stall the tether.
A WARNING
A ch ild in a rearward-facing ch ild safety seat
installed on the front passenger seat w ill be
ser iously injured and can be killed if t he front
airbag inflates
-even w ith an Adva nced A irbag
System.
- T he inflati ng a irbag w ill hit the child safety
seat or infant carrie r with great fo rce and
wi ll smash the chi ld safety seat and chi ld
against the backrest, center armrest, or
door.
- If you must insta ll a rearward facing chi ld
safety seat on the front passenger seat be
cause of exceptiona l circumstances and the
PA SSEN GER AIR BAG OFF light does not
come on and stay on, immed iate ly install
the rear-fac ing ch ild safety seat in a rear
seat ing pos it ion and have the airbag system
inspected by your A udi dealer.
18 8
Additional information
Sources of information about child
restraints and their use
There are a number of sources of additional in
formation about c hild restraint se lection, instal
l ation and use :
N HT SA advises that the best chi ld safety seat is
t h e one that fits your child and fits in your vehi
cle, and that you will use correct ly and consis
tent ly.
Try befo re yo u buy!
U.S . N ation al High way Traffic S afet y A dmini s
tr ation
Tel.: 1 -888-327-4 236 ( TTY: 1-800-424-9153)
http:/ /www.nhtsa.gov
http:/ /www .saferca r.gov
Nati onal SAFE KID S Camp aig n
Tel.: (202) 662-0600
http:/ /www.safekids .org
S afe ty BeltSaf e U.S .A.
Tel.: (800) 745-SAFE (English)
Tel.: (800) 747-SANO (Spanish)
http://www.ca rsea t.o rg
Tran sport Canada Informati on Centre
Tel.: 1-800-333-0371 or ca ll 1-613-998-86 16 if
yo u are in the Ottawa area
http://www.tc.gc.ca/ eng/ roadsafety/menu. htm
A udi Cu stomer Re lat ion s
Tel.: (800) 822-2834
Page 191 of 274

a co .... N
" N .... 0 00 \,;J '
Checking and Filling Fuel
Gasoline grade
A pplies to: ve hicles with gasoline engines
The correct gasoline grade is stated on the inside
of the fuel filler door .
The vehicle is equipped with a catalytic converter
and must only be driven with
unleaded gasoline .
Audi recommends using TOP TIER Detergent Gas
oline. Additiona l information on TOP TIER Deter
gent Gasoline can be found on the official web
site (www .topt iergas.com).
The individual gasoline grades are differentiated
by
octane ratings. T his value is given with (R +M)/
2 equating to AKI or in RON.
The following headings match the corresponding
sticker in the fuel fi ller door.
UNLEADED FUEL ONLY MIN. (R+M)/2 87
Regular/ MIN. RON 91 Regular
Use regu lar gasoline with minimum 87 AKI/
91 RON
i::> (@ .
The maximum engine power is only reached if
premium gasoline 91 AKI/ 95 RON is used.
UNLEADED FUEL ONLY PREMIUM MIN . (R
+M)/2 91 / SUPER MIN. RON 95
Using premium gasoline with minimum 91 AKI/
95 RON is recommended.
If premium gasoline is not available, you can also
use regular gasoline 87 AKI/ 91 RON . However
this does reduce the engine power slightly.
({D) Note
-Fill in g the tank just one time with leaded
fuel or other metallic additives will cause
permanent deterioration to the catalytic
converter function.
- When gasoline with an octane rating that is
too low is used, high speeds or heavy engine
load can lead to eng ine damage.
Checking and Filling
(D Tips
The vehicle may be filled with fuel that has a
higher octane rating than what is required by
the engine .
Blended gasoline
Applies to : vehicles wi th gasoli ne e ngi ne
Use of gasoline containing alcohol or MTBE
(methyl tertiary butyl ether)
You may use unleaded gasoline blended with al
coho l or MTBE (commonly referred to as oxygen
ates) if the blended mixture meets the following
criteria:
Blend of gasoline methanol (wood alcohol or
methyl alcohol)
-Anti-knock index must be 87 AKI or higher.
- Blend must contain no more than
3% metha-
nol.
- Blend must contain more than
2% co-solvents.
Blend of gasoline and ethanol (grain alcohol or
ethyl alcohol)
-Anti-knock index must be 87 AKI or higher.
- Blend must not conta in more than
15% etha-
nol.
Blend of gasoline and MTBE
- Anti -knock index must be 87 AKI or higher.
- Blend must contain not more than
15% MTBE.
Seasonally adjusted gasoline
Many gasoline grades are blended to perform es
pecially well for winter or summer dr iving . Dur
ing seasonal change-over, we suggest that you
fill up at busy gas stat ions where the seasonal
adjustment is more likely to be made in time .
@ Note
-Methanol fuels which do not meet these re
quirements may cause corrosion and dam
age to plast ic and rubbe r components in the
fuel system.
- Do not u se fuels that fail to meet the speci-
fied criteria in this chapter.
.,.
189
Page 192 of 274

Checking and Filling
-If you a re unable to determine whether or
not a particular fuel blend meets the speci
fications, ask your service station or its fuel
supplier.
- Do not use fuel for which the contents can
not be identified.
- Fuel system damage and performance prob
lems resulting from the use of fuels differ
ent from those specified a re not the respon
sibility of Audi and are not covered under
the New Vehicle or the Emission Control System Warranties.
- If you experience a loss of fuel economy or
driveability and performance problems due
to the use of one of these fuel blends , we
recommend that you switch to unblended
fuel.
Gasoline additives
A major concern among many auto manufactur
ers is carbon deposit build-up caused by the type
of gasoline you use.
Although gasoline grades differ from one manu
facturer to another, they have certain things in
common. All gasoline grades contain substances
that can cause deposits to collect on vital engin e
parts, such as fuel injectors and intake valves. Al
though most gasoline brands include additives to keep engine and fuel systems clean, they are not
equally effective .
Audi recommends using TOP TI ER Dete rgent Gas
oline. For more information on TOP TIER Deter
gent Gasoline , please go to the official website
(www .toptiergas .com) .
After an extended per iod of us ing inadequate
fuels, carbon deposit build-ups can rob your
en
gine of peak performance.
(D Note
Damage or malfunction due to poor fuel qual
ity is not covered by the Audi New Vehicle Limited Warranty.
190
Refueling
Fueling procedure
Fig. 17 4 R ig ht re ar sid e o f th e ve hicle: o penin g th e fu el
filler door
Fig. 175 F uel fille r doo r with at tached fuel cap
The fuel filler door is unlocked or locked by the
central locking system.
.,. Press on the left side of the fuel filler door to
open
~ fig. 174.
.,. Unscrew the tank cap counterclockwise .
.,. Place the cap from above on the open fuel filler
door
~ fig.175.
.,. Insert the fuel pump nozzle all the way into the
fuel filler neck .
.,. Begin fueling. Once the fuel pump nozzle turns
off the first time, the fuel tank is full. Do not
continue fueling, or else the expansion space in
the tank will be filled with fuel.
.,. After the fuel pump has switched off, wait five
seconds before removing it to allow the rest of
the fuel to finish dripping into the fue l tank.
.,. Turn the fuel cap clockwise until you hear it
lock.
.,. Close the fuel filler door and then press on the
left side until it latches.
The correct fuel type for your vehicle can be
found on a label located on the inside of the fuel
.,.
 1
1 2
2 3
3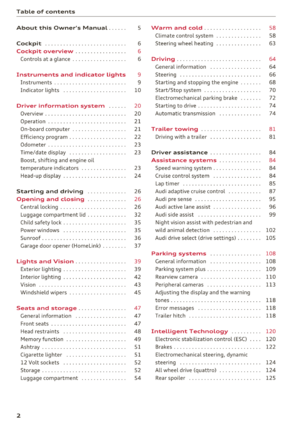 4
4 5
5 6
6 7
7 8
8 9
9 10
10 11
11 12
12 13
13 14
14 15
15 16
16 17
17 18
18 19
19 20
20 21
21 22
22 23
23 24
24 25
25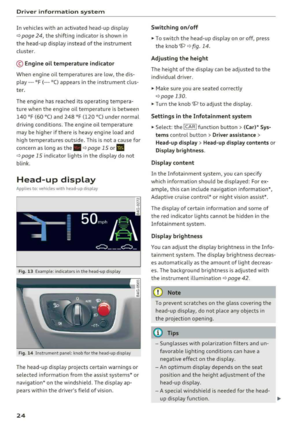 26
26 27
27 28
28 29
29 30
30 31
31 32
32 33
33 34
34 35
35 36
36 37
37 38
38 39
39 40
40 41
41 42
42 43
43 44
44 45
45 46
46 47
47 48
48 49
49 50
50 51
51 52
52 53
53 54
54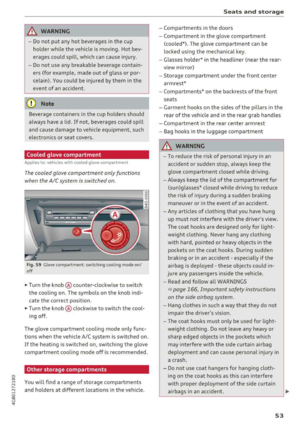 55
55 56
56 57
57 58
58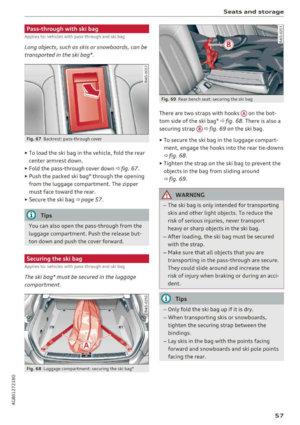 59
59 60
60 61
61 62
62 63
63 64
64 65
65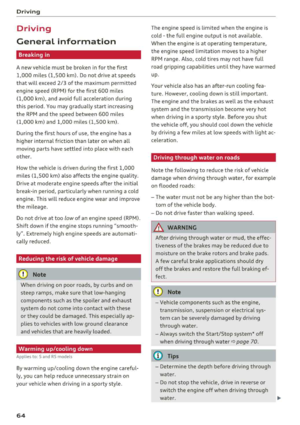 66
66 67
67 68
68 69
69 70
70 71
71 72
72 73
73 74
74 75
75 76
76 77
77 78
78 79
79 80
80 81
81 82
82 83
83 84
84 85
85 86
86 87
87 88
88 89
89 90
90 91
91 92
92 93
93 94
94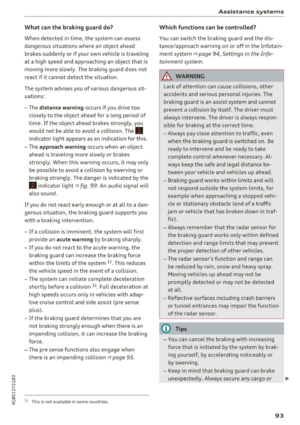 95
95 96
96 97
97 98
98 99
99 100
100 101
101 102
102 103
103 104
104 105
105 106
106 107
107 108
108 109
109 110
110 111
111 112
112 113
113 114
114 115
115 116
116 117
117 118
118 119
119 120
120 121
121 122
122 123
123 124
124 125
125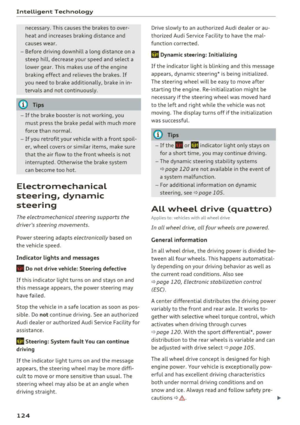 126
126 127
127 128
128 129
129 130
130 131
131 132
132 133
133 134
134 135
135 136
136 137
137 138
138 139
139 140
140 141
141 142
142 143
143 144
144 145
145 146
146 147
147 148
148 149
149 150
150 151
151 152
152 153
153 154
154 155
155 156
156 157
157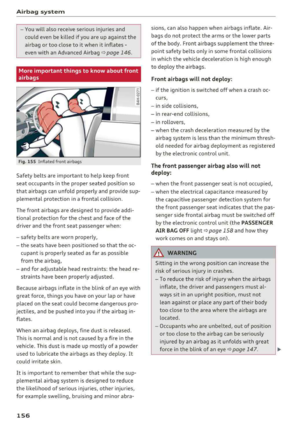 158
158 159
159 160
160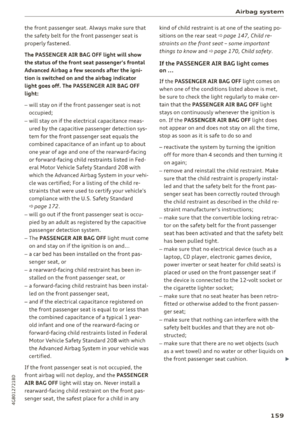 161
161 162
162 163
163 164
164 165
165 166
166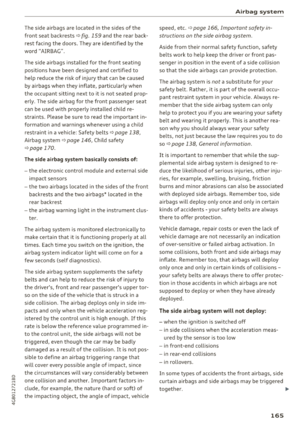 167
167 168
168 169
169 170
170 171
171 172
172 173
173 174
174 175
175 176
176 177
177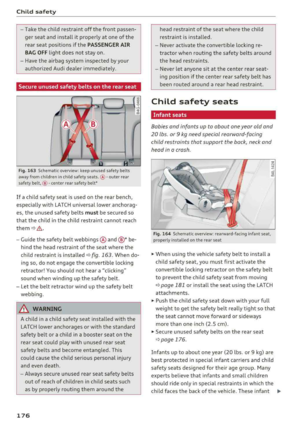 178
178 179
179 180
180 181
181 182
182 183
183 184
184 185
185 186
186 187
187 188
188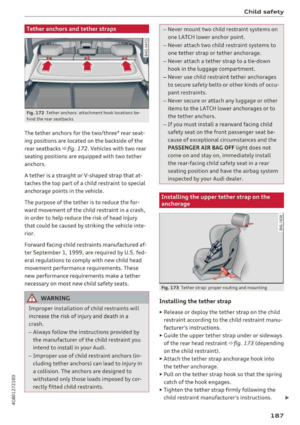 189
189 190
190 191
191 192
192 193
193 194
194 195
195 196
196 197
197 198
198 199
199 200
200 201
201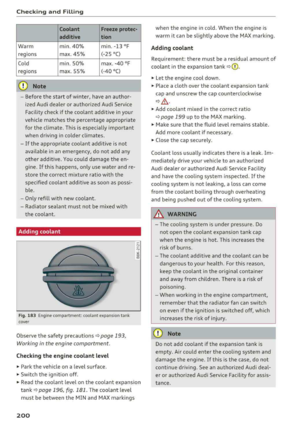 202
202 203
203 204
204 205
205 206
206 207
207 208
208 209
209 210
210 211
211 212
212 213
213 214
214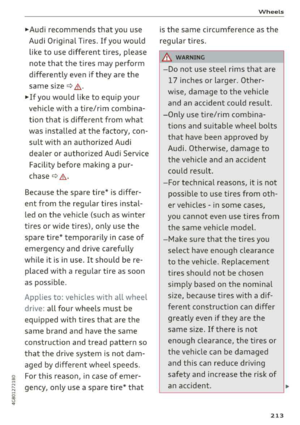 215
215 216
216 217
217 218
218 219
219 220
220 221
221 222
222 223
223 224
224 225
225 226
226 227
227 228
228 229
229 230
230 231
231 232
232 233
233 234
234 235
235 236
236 237
237 238
238 239
239 240
240 241
241 242
242 243
243 244
244 245
245 246
246 247
247 248
248 249
249 250
250 251
251 252
252 253
253 254
254 255
255 256
256 257
257 258
258 259
259 260
260 261
261 262
262 263
263 264
264 265
265 266
266 267
267 268
268 269
269 270
270 271
271 272
272 273
273