Page 41 of 274
 <I\"
Lights and Vision
Exterior Lighting
Switching lights on and off
F ig. 33 Instrument panel: l ig ht switc h w ith all-weather
lights
Light s")
a co ,...,
N
" N ,...,
0 00 <.,;) '
Lights and Vision
Exterior Lighting
Switching lights on and off
F ig. 33 Instrument panel: l ig ht switc h w ith all-weather
lights
Light switch -t;..-
T u rn the switch to the co rresponding posi tion.
When t he lig hts are sw itched on, the
:oo: symbo l
turns on.
0 - The lights a re off or the daytime running
l ights are on:
- USA models: The daytime runn ing lig hts will
come on automatically when the ignition is on
and the light sw itch
q fig . 33 is in the O posi
t ion or the
AUTO pos ition (only i n day light con
di tions). The
Daytime running lights func tion
ca n be turned on and off in the MM I
qpage41, q _& .
-Canada models : The daytime runn ing lights
will come on au toma tically when t he ignit ion is
on a nd the light swi tch
q fig . 33 is in the O po
sition, the
: oo: position or the AUTO position
(only in daylig ht conditions)
q ,& .
AUTO -automa tic headligh ts sw itc h on and off
depending on brigh tness, fo r example in tw ilight,
d uring rain or in tunne ls.
:oo : -Parking lights
~D -Low beam headlights
~ -All-weather lights
@il -Rea r fo g lights
Lights and V ision
All-weather lights
T he front lig hts a re adjus ted au toma tic a lly so
t h at there is less glare fo r th e driver from his o r
her own lights, fo r example when roads are wet.
Automatic dynamic headlight range control
system
Yo ur vehicle is equipped with a headlight ra nge
contro l system so that there is less g lare for on
coming traff ic if the vehicle load changes . The
headlig ht range also adjusts automatically when
braking and accelerat ing .
Light functions
The following light funct ions may be ava ila ble
depending on vehicle eq uipment and only f unc
tio n when the lig ht switch is in the AUTO posi
t ion.
Static cornering light* -the corne ring light
switches on automatically at speeds up to ap
prox imately 44 mph (70 km) when the steering
whee l is at a certain ang le. The area to t he side of
the vehicle is illuminated better when turning.
A WARNING
-- Automatic headlights are only intended to
assist the driver. They do not relieve the
driver of respons ibi lity to check the head
lights and to t urn them on manu ally b ased
on the curre nt ligh t and v is ib ility conditions .
For examp le, fog canno t be detected by the
light sensors. So always switch on the low
beams under these weather conditions and
when driving in the dark
~D.
- To prevent glare fo r traffic be hind yo ur vehi
cle, the rear fog lights should only be turned
on in accordance with traff ic regulat ions.
- Always observe legal regulations when us
ing the lighting systems desc ribed.
(D Tips
- T he lig ht sensor for the automat ic he ad
lights is located in the rea rview mirror
mount. Do not p lace a ny st icke rs in this area
on the windshie ld.
- Some exter io r l ight ing funct io ns can be ad
justed
q page 41.
39
Page 42 of 274

Lights and Vi sion
-If you turn off the ignition wh ile the exter ior
li ghts are on and open the door, a wa rning
tone so unds.
-In cool or damp weather, the inside of the
headlights, turn signals and tai l lights can
fog over d ue to the temperature d ifference
between the inside and outs ide. They will
clear s hort ly after sw itch ing them o n. This
does not affect the serv ice life of the light
ing .
Turn signal and high beam lever
The turn signal lever operates the turn signals,
the high beams and the headlight flasher .
Fig. 34 Turn s ig nal an d hig h bea m lev er
Turn signals ¢ c:::>
N 0 ,.._ 0 ±
" a,
The tu rn s ignals activa te when you move the lev
er into a tu rn s ignal position w hen the ign ition is
switched on.
(D -Right turn signa l
@-Left turn signal
The turn s ignal b links three times if you tap the
lever (conven ience turn signal).
High b eams and headlight flasher ~D
M ove the lever to the corresponding pos it ion :
@ -High beams on (vehicles w ith High beam as
sis tant*
9 page 40)
© -High beams off or headlight flasher
The
ii indicator light in the instrument cluster
turns on .
40
A WARNING
High beams can cause gla re for other dr ivers,
which inc reases the risk of an acc ident . For
this reason, only use the high beams or the
h eadligh t flasher when t hey will no t crea te
g la re fo r ot her dr ive rs.
High beam assistant
App lies to : vehicles wi th high beam ass istan t
A camer a on t he rearv iew mirror mou nt can de
tec t light sources from o ther road use rs. The high
beams switch on or off automatically depending
on the position of vehicles driving ahead and on
coming v ehicl es, the vehicle speed and oth er en
v ironmental and traffic cond itions.
Activating high beam assistant
Requireme nt: the light sw itch mus t be set to the
A UTO posit ion and the hig h beam ass istant must
be switched on in the Infotai nment system
9 page 41 .
.,. To act ivate the hig h be am ass ista nt, t ap the
lever forwa rd @ . Th e
El indicator light ap
pea rs in the instrument cluster disp lay and the
high beam headlights are sw itched on/off auto
matically . The
ii indicator lig ht also turns on if
the high beams are switched on.
Switching the high beams on/off manually
If the high beams did not switch on/off automat
ica lly as expected, yo u may switc h them on o r off
manua lly instead :
.,. To switch t he hi gh beams on manua lly, tap the
lever fo rwa rd @ . Th e
ii indicator light turns
on.
.,. To switch t he hi gh beams off manua lly, pull the
lever
back @. The high beam assistant is deac
tivated .
Operating the headlight flasher
.,. To operate the headlig ht flashe r when the high
beam assistant is activated and hig h beams a re
sw itched off, pull the lever
bac k@ . The high
beam ass istant remains active.
Page 43 of 274

Messages in the instrument cluster display
Headlight a ssist: Sy stem fault
Drive to an authorized Aud i dealer or a uthorized
Aud i Serv ice Fac ility immediately to have the
malfunc tion cor rected. You can still switc h the
hi gh beams on or off manu ally.
Headlight as sis t: Unavailable No camera view
The camera view is b locked, for example by a
sticker or debris.
The sensor is located between the interior rear
view mir ror and the windshield . Do not p lace any
stickers in this area on the windshield.
A WARNING
H igh beam assistant is only intended to assist
the drive r. The dr iver is still responsible for
con troll ing the headligh ts a nd switch ing
t hem manually depend ing on light and v is ibil
i t y cond itions .
It may be neces sary to operate
t hem manually in si tu at ions such as:
- In adve rse we athe r co nd itions s uch as fog,
heavy r ain, b low ing snow o r sp raying wa ter.
- On roads whe re oncoming t raffic may be
partia lly obs cured, su ch as exp ressways .
- Whe n there are road users t hat do no t have
s uff icient lighting, s uch as bi cycler s or
vehicles wi th dirty t ail lamps .
- In tight cu rv es and on st eep hills.
- In poor ly l it areas.
- With strong reflecto rs, such as s igns.
- If the area of the windsh ield near the sensor
is fogged over, dirty, icy or covered w ith a
st icker.
Adjusting the exterior lighting
The functions ore adjusted in the Infotainment
system.
.,. Se lect: I CARI function button> (Car)* Systems
co ntro l button > Vehicle settings > Exterior
lighting .
a Automatic headlights co ,...,
~ You can adjust the fo ll ow ing settings in the Au-N
8 tomatic headlights menu: 00 <.,;) '
Lights and V ision
Headlights activation time -you can adjust if the
headlig hts switch on
Early , Medium or Late ac
cording to the sensitivity of the light sensor .
Auto-dimming high beams * -you ca n sw itch the
high be am assistant*
On an d Off .
Daytime running lights*
USA models:
the daytime running lights can be
swi tched on/off. Sele ct
On or Off .
Canada models:
this f unction cannot be switched
off . They act ivate automatically eac h time the ig
ni tion is switched on .
Coming home, Leaving home
The coming home function illuminates the area
outside the vehicle when you turn the ignit ion off
and open t he driver 's doo r. To turn the function
o n, select
Light s when leaving car > On .
The leaving home illum inates the area outside
the vehicle when you unlock the vehicle . To turn
the function on, se lect
Lights when unlocking
car > On .
The coming home and leav ing home functions
o nly operate when it is dark and the light switc h
is in the
AUTO pos ition .
Emergency flashers
~ -~---------
Fig . 35 Cente r console : emergency f las her b utton
The emergency flashe rs makes other drivers
aware of your vehicle in dangerous situations .
.,. Press the~ button to switch t he emergency
flashe rs on or off.
You can indica te a lane change or a tur n w hen the
eme rgency flashers are switched o n by using the
.,..
41
Page 44 of 274

Lights and Vision
turn signal lever. The emergency flashers stop
temporarily .
The emergency flashers also wo rk when the igni
tion is turned off.
Interior lighting
Front and rear interior lighting
F ig . 36 Fro nt headli ner: inter io r lig hting co ntro ls
F ig. 37 Rear headliner: Read ing light
Press the corresponding button ~ fig . 36:
El-Interior lighting on/off
Jjj -Door contact sw itch on/off. The interior light
i n g is co ntro lled automatically.
~ -Read ing lights on/off
~ *·Switching the rear reading lights on/off
from the cockpit.
Ambient lighting
A ppl ies to: ve hicles w ith interio r lighting
You can adjust the brightness of the interior
lighting .
.,. In the Infotainment system , select: ICAR lfunc
tion button
> ( Ca r)* Sy stems cont rol button >
42
Vehicle settings > Interior lighting > Bright
ne ss .
.,. To increase or reduce the brightness, turn the
knob and press it.
The inter io r l ighting turns on when yo u sw itch
the headlights on w hile the ignition is on .
(D Tips
The setting is automa tically stored and a s
signed to the remote contro l key that is being
u sed .
Instrument illumination
The brightness of the illumination for the instru
ments , display and head-up display* con be ad
justed.
F ig. 38 In strument illuminat ion
.,. Press the knob to release it .
.,. T ur n the knob toward"." or"+" to re duce or in
c rease the br igh tness.
.,. Press the knob again to return it to i ts or iginal
position .
(D Tips
The ins trumen t illum ina tion f or the nee dles
and dials turns on when the ign ition is turned
on and the lights are turned off. The illum ina
tion for the gauges reduces automatically and
eventually turns o ff as b rightness outside in
creases. This funct ion reminds the dr iver to
turn the low beams on at the appropriate
time.
Page 45 of 274

a co ,...,
N
" N ,...,
0 00 <..:l '
Vision
Adjusting the exterior mirrors
Fig. 39 Driver's door : kn ob for the exte rior mirro rs
Turn the knob to the desired position:
Q/ P -adjusts the left/right exterior mirror.
Move the knob in the desired direction.
Ciiil -Heat the mirror glass depending on the out
side temperature .
8 -Folds the exterior mirrors* . In the Infotain
ment system, you can select if the mirrors fold in
automatically when you lock the vehicle
¢page 31.
Front passenger's exterior mirror tilt
function*
To he lp you see the curb when backing into a
parking space, the surface of the mirror tilts
slightly. For th is to happen, the knob must be in
the position for the front passenger 's exterior
mirror.
You can adjust the tilted mirror surface by turn ing the knob in the desired direction. When you
move out of reverse and into another gear , the
new mirror position is stored and assigned to the
key you are using .
The mirror goes back into its original position
once you drive forward faster than 9 mph
(15 km/h) or turn the ignition off.
A WARNING
Curved mirror surfaces (convex or aspheric*)
enlarge the field of vision . However, they
make objects in the mirror appear smaller
and farther away. You may estimate incor-
Lights and Vision
rectly when you use these mirrors to gauge
your distance from the vehicles behind you
when changing lanes, which increases the risk
of an accident.
({I) Note
- If the mirror housing was moved by force
(for example, by running into an object
when maneuvering the vehicle), the mirror must be folded all the way in using the pow
er folding function. The mirror hous ing
must not be moved back into place by hand
because this would impair the function of
the mirror mechanism.
- If you wash the vehicle in an automatic car
wash, you must fold the exter ior mirrors in
to reduce the risk of damage to the mirro rs.
Never fold power fo lding exterior mirrors*
by hand. On ly fold them in and out using
the power controls .
(D Tips
-If the power adjusting function malfunc
tions, the glass in both mirrors can be
ad
justed by pressing on the edge of it by hand.
- The exterior m irror settings are stored w ith
the memory function *
~ page 49.
Dimming the mirrors
Your vehicl e is equipped with a manual or auto
matic* dimming rearview mirror.
Fig. 40 Auto matic dimmin g rearv iew mirro r*
Manual dimming rearview mirror
.,. Pull the lever on the bottom of the mirror back. Ill>
43
Page 46 of 274

Lights and Vision
Automatic dimming rearview mirror*
~ Press the button@~ fig. 40. The indicator
light @ turns on . Int erior and exterior mirrors*
will dim when there is incoming light (such as
headlights from the rear).
A WARNING
If the glass on an automatic d imm ing mirror
breaks, electrolyte can leak out. This liquid
can irritate the skin, eyes and respiratory sys
tem.
If there is contact with the flu id, flush
immediately with plenty of water . Consu lt a
physician if necessary.
- Repeated or long-term exposure to electro
lyte fluid can lead to irritation of the air
ways, especially in peop le with asthma or
other respiratory conditions. Take deep
breaths immediate ly after leaving the vehi
cle or, if this is not possible, open all of the
doors and windows as wide as possible.
- If electrolyte f luid enters the eyes, flush
them thoroughly with a large amount of
clean water for at least 15 minutes and then
seek medical attention.
- If electrolyte f luid comes into contact w ith
the skin, flush the affected area with clean
water for at least 15 minutes and then clean
with soap and water and seek med ical at
tention. Clean affected cloth ing and shoes
thoroughly before wearing again .
- If the fluid was swallowed and the person is
conscious, flush the mouth with water for at
least 15 minutes. Do not induce vomiting
unless this is recommended by medical pro
fessionals. Seek medical attention immedi
ately .
(D Note
If the glass on an automatic dimming mirror
breaks, elec trolyte can leak out. This liquid
damages plastic surfaces and paint. Clean
this liquid as quickly as possible, for example
with a wet sponge.
44
@ Tips
-If the light reaching the rearview mirror is
obstructed, the automatic dimming mirror
will not function correctly,
- The automatic dimming mirrors do not dim
when the interior lighting is turned on or
the reverse gear is selected.
Sun visors
[ ..._ _ ____,}
Fig. 41 Front passenger's side: sun visor
The sun visors for the driver and front passenger
can be released from their mounts and turned to
ward the doors
(I).
The mirror light switches on when the cover over
the van ity m irror @opens.
Sunshade
App lies to: vehicles wi th sunshade
The sunshade is located on the luggage com
partment shelf.
Fig. 42 Su nsh ade in lowered pos itio n
When the sunshade is in the lowered position, it
i s secured in the reta iner @ .
~ To raise ® the sunshade , remove it from the
retainer.
Page 47 of 274
 <I\"
_& WARNING
Do not use the sunshade to secure cargo. The
luggage compartment cover is not a surface
for storing objects. Objects placed on the")
a co ,...,
N
" N ,...,
0 00 <.,;) '
_& WARNING
Do not use the sunshade to secure cargo. The
luggage compartment cover is not a surface
for storing objects. Objects placed on the cov er could endanger all veh icle occupants dur
ing sudden braking maneuvers or in a crash .
Windshield wipers
Switching the windshield wipers on
Fig. 43 W indshie ld wiper lever
Move the windshield wiper lever to the corre
sponding position:
@ -Windshield wipers off
~ M 0 ± ..,. CD
(D -Rain sensor mode . The windshield wiper s
switch on once the vehicle speed exceeds approx imately 2 mph (4 km/h) and it is raining . The
higher the sensitivity of the rain sensor that is set
(switch
@ to the right) , the earl ier the wind
shield wipers react to moisture on the wind
shie ld. You can deactivate the rain sensor mode
in the Infotainment system , which switches the
intermittent mode on . Select:
!CAR I function but
ton
> (Car)* systems control button > Dr ive r as
sistance > Rain sensor> Off.
In intermittent
mode, you can adjust the interval time using the
switch @.
@· Slow wiping
@ -Fast wiping
@·Single wipe. If you hold the lever in th is posi
tion longer, the wipers switch from s low wiping
to fast w iping .
® -Clean the windshield . The wipers wipe one
time after several seconds of dr iving to remove
Lights and Vision
water droplets. You can switch this function off
by moving the lever to position ® within 10 sec
onds of the afterwipe. The afterwipe function is
reactivated the next time you switch the ignition
on.
Clean the headlights*. The headlight washer sys
tem* operates only when the low beam head lights are on. If you move the lever to position
@, the headlights and the night vision assist
camera* are cleaned at intervals.
_& WARNING
--The rain sensor is only intended to ass ist the
driver . The driver may sti ll be responsible
for manually switching the wipers on based
on visibility cond itions .
- The windsh ield may not be treated w ith wa
ter-repelling w indshield coating agents. Un
favorable conditions, such as wetness, dark
ness or low sun, can result in increased
g lare , which increases the risk of an acci
dent. Wiper blade chatter is also possible.
- Properly functioning windshield wiper
b lades are required for a clear view and safe
driving
¢ page 46, Replacing windshield
wiper blades.
(D Note
- If there is frost, make sure the windshield
wiper blades are not frozen to the wind
shield. Switching on the windshield wipers
when the blades are frozen to the wind
shield can damage the wiper blades.
- The windshield wiper system must be switched off (lever in position 0) before us
ing a car wash. Th is prevents the wipers
from switching on un intentionally and caus
ing damage to the windsh ield wiper system .
(D Tips
-The windshield wipers switch off when the
ign ition is switched off. You can activate the
windshield wipers after the ignition is
switched back on by moving the w indshield
w iper lever to any position.
""
45
Page 48 of 274

Lights and Vi sion
-Worn or dirty windshield wipe r blades result
in streaking. This can affect the rain sensor
funct ion . Check your winds hield wiper
blades regularly.
-The washer fluid nozzles for the windshie ld
washer system are heated at low tempera
tures when the ignition is on .
-When stopping temporarily, such as at a
traffic light, the speed of the windshie ld
wipers automatically reduces by one level.
Cleaning windshield wiper blades
Clea n the w iper blades when you see wiper
streaks . Use a soft cloth and a glass cleaner .
.. Place the windshield wiper arms in the service
pos ition
¢ page 46.
.. Fold the windshield wiper arms away from the
windsh ield .
.&_ WARNING
Dirty w indshield wipe r blades can impair v i
sion , which increases the risk of a n accident .
Replacing windshield wiper blades
Fig . 44 Re mov ing w indshi eld w iper blades
Windshield wiper service position /blade
replacement po sition
-
:::
9 J: ... a,
.. Switch the ign ition off and move the winds hield
wipe r leve r to posit ion @
briefly ¢ page 45,
fig. 43. The w indshie ld w ipers move in to the
service pos ition .
.. To bring the windshield wipers back to the nor
mal position, switch the ignition on and hold
the windshie ld wiper lever in position @ until
the windshie ld w ipers go back to the normal
pos ition, or dr ive faster than 8 mph (12 km/h) .
46
You can also turn the service pos ition on or off in
the Infotainment system:
.. Switch the windshie ld w ipers off (posit ion @
¢ page 45, fig. 43).
.. Select: the I CAR I funct ion button > ( Car) * Sys
t e m s
control button > Servic e & control > Wip·
er change po sition.
> On /Off
Remo ving th e wipe r blade
.. Fold the windshie ld wiper arm away from the
w indshield .
.. Press the locking knob (D ¢ fig. 44 on the w iper
blade . Hold the wiper blade firmly .
.. Remove the wiper blade in the d irection of the
ar row .
Installing the w ipe r blade
.. Insert the new wiper blade into the mount on
the wiper arm @until it clicks into place.
.. Place the w iper arm back on the windsh ield .
.. Turn the service pos ition off .
.&_ WARNING -
Fo r safety reasons, the wi ndshield wipe r
b la des should be rep laced once o r twice eac h
year .
(Llj) Note
-Only fold the w indshie ld w ipers away when
they a re in the se rvice pos ition. Otherwise,
yo u r isk damag ing the pa int on the hood o r
the winds hield wiper motor .
-You should not move your ve hicle or operate
the winds hield wipe r leve r whe n the w iper
arms are folded away from t he windshie ld .
Th e windshie ld wipers would move back in
to their original position and co uld damage
the hood and w indshie ld.
(D Tips
-You can also use the service position, for ex
ample, if you want to protect the windshield
from icing by using a cover .
-You cannot activate the service position
when the hood is open.
 1
1 2
2 3
3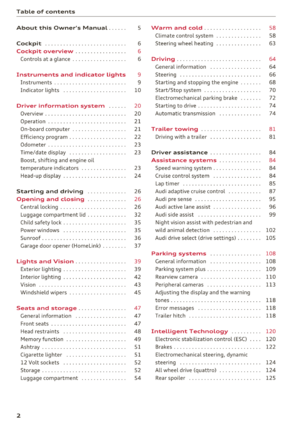 4
4 5
5 6
6 7
7 8
8 9
9 10
10 11
11 12
12 13
13 14
14 15
15 16
16 17
17 18
18 19
19 20
20 21
21 22
22 23
23 24
24 25
25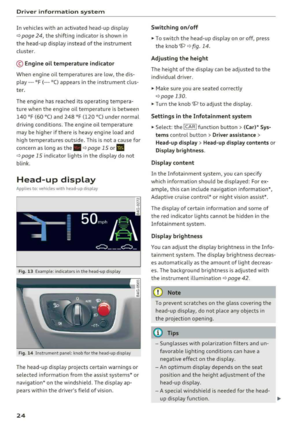 26
26 27
27 28
28 29
29 30
30 31
31 32
32 33
33 34
34 35
35 36
36 37
37 38
38 39
39 40
40 41
41 42
42 43
43 44
44 45
45 46
46 47
47 48
48 49
49 50
50 51
51 52
52 53
53 54
54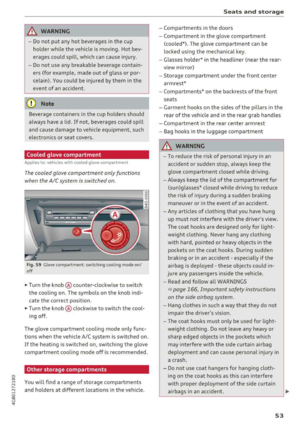 55
55 56
56 57
57 58
58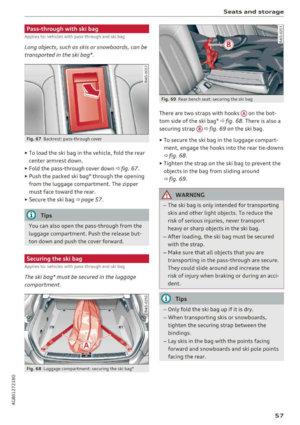 59
59 60
60 61
61 62
62 63
63 64
64 65
65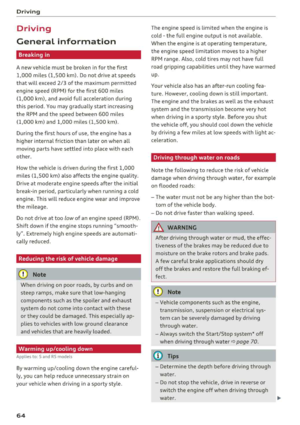 66
66 67
67 68
68 69
69 70
70 71
71 72
72 73
73 74
74 75
75 76
76 77
77 78
78 79
79 80
80 81
81 82
82 83
83 84
84 85
85 86
86 87
87 88
88 89
89 90
90 91
91 92
92 93
93 94
94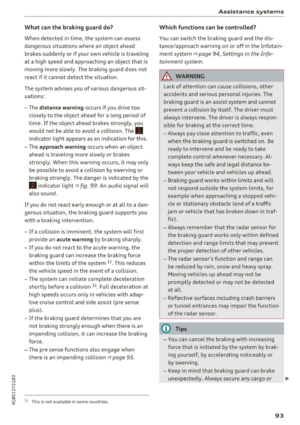 95
95 96
96 97
97 98
98 99
99 100
100 101
101 102
102 103
103 104
104 105
105 106
106 107
107 108
108 109
109 110
110 111
111 112
112 113
113 114
114 115
115 116
116 117
117 118
118 119
119 120
120 121
121 122
122 123
123 124
124 125
125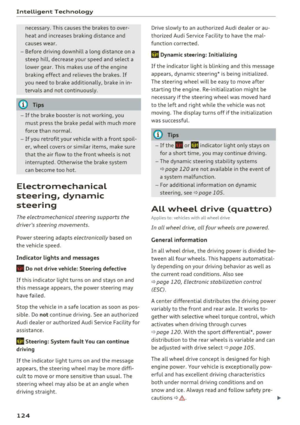 126
126 127
127 128
128 129
129 130
130 131
131 132
132 133
133 134
134 135
135 136
136 137
137 138
138 139
139 140
140 141
141 142
142 143
143 144
144 145
145 146
146 147
147 148
148 149
149 150
150 151
151 152
152 153
153 154
154 155
155 156
156 157
157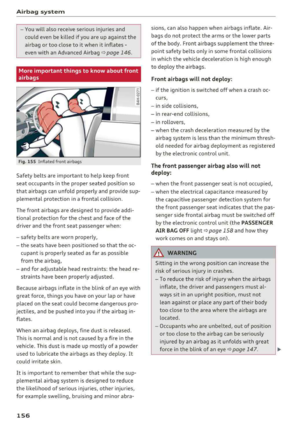 158
158 159
159 160
160 161
161 162
162 163
163 164
164 165
165 166
166 167
167 168
168 169
169 170
170 171
171 172
172 173
173 174
174 175
175 176
176 177
177 178
178 179
179 180
180 181
181 182
182 183
183 184
184 185
185 186
186 187
187 188
188 189
189 190
190 191
191 192
192 193
193 194
194 195
195 196
196 197
197 198
198 199
199 200
200 201
201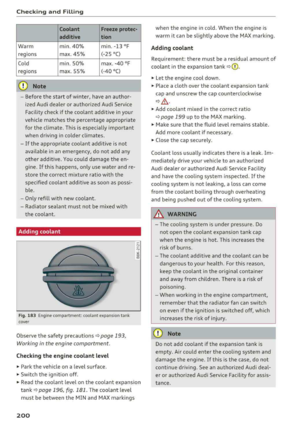 202
202 203
203 204
204 205
205 206
206 207
207 208
208 209
209 210
210 211
211 212
212 213
213 214
214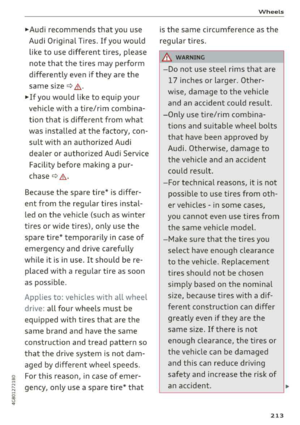 215
215 216
216 217
217 218
218 219
219 220
220 221
221 222
222 223
223 224
224 225
225 226
226 227
227 228
228 229
229 230
230 231
231 232
232 233
233 234
234 235
235 236
236 237
237 238
238 239
239 240
240 241
241 242
242 243
243 244
244 245
245 246
246 247
247 248
248 249
249 250
250 251
251 252
252 253
253 254
254 255
255 256
256 257
257 258
258 259
259 260
260 261
261 262
262 263
263 264
264 265
265 266
266 267
267 268
268 269
269 270
270 271
271 272
272 273
273