Page 81 of 274

a co .... N
" N .... 0 00 \,;J '
The bars in the boost pressure indicator are red
¢page 23.
A WARNING
Please note that the wheels could spin on
slick or slippery roads when overboost is ac
tive.
Launch control program
A ppl ies to: ve hicles with S tro nic
-
The launch control program provides the best
possible acceleration when starting from a stop.
Requirement: the engine must be at operating
temperature and the steering wheel must not be
turned.
.. Deactivate the Start/Stop system*¢ page 72.
The LED in the 10 ,r- l button turns on.
.. Switch the electronic stabilization control (ESC)
sport mode on
¢ page 121. The II indicator
light turns on.
.. Pull the selector lever b ack out of the D/S posi
tion briefly to select the S position or select the
DYNAMIC driving mode in drive select
¢ page 106 .
.,. Press the brake pedal firmly with your left foot
and hold it all the way down for at least one
second.
.. At the same time, press the gas pedal all the
way down w ith your right foot until the engine
reaches and stays at a high RPM level.
.. Remove your foot from the brake pedal within
five seconds
¢ & ..
A WARNING
- Always adapt your driv ing to the traffic flow.
- Only use the Launch control program when
road and traffic conditions allow it and oth
er drivers will not be endangered or both
ered by your driving and the vehicle's accel
eration.
- Please note that the drive whee ls can sp in
and the vehicle can break away when sport
mode is switched on, especially when the
road is s lippery.
Driving
-Once the vehicle has started moving, press
the
I ~ OFFI button briefly to turn the sport
mode
off.
(D Tips
- Th e transmission temperature may increase
significantly after using the launch control
program. If that happens, the program may
not be available for a few minutes. It will be
available again after a cool-down period.
- When accelerating using the launch control
program, all vehicle parts are subject to
heavy loads . This can lead to increased
wear .
Transmission malfunction
[i'J Transmission: Pres s brake pedal and select
gear again .
Press the brake pedal and select the desired se
lector lever position again . You can then continue
driv ing .
[O] Transmission overheating: Please drive con
servatively.
The transmission temperature has increased sig
nificantly due to the sporty d riving manner. Drive
in a less sporty manner until the temperature re
turns to the normal range and the indicator light
switches of .
[O] Transmission malfunction: You can continue
driving
There is a system malfunction in the transmis
sion. You may continue driving. Drive to an au
thori zed Audi dealer or authori zed Audi Service
Facility soon to have the malfunction corrected .
[O] Transmission malfunction: You can continue
driving with limited functionality
T here is a system malfunction in the transmis
sion . The transmission is switching to emergency
mode. This mode only shifts into certain gears or
will no longer shift at a ll. The engine may sta ll.
Drive to an au thorized Audi dealer or authorized
Audi Service Facility immediately to have the malfunction corrected .
..,.
79
Page 82 of 274
 10 Tran sm issio n m alfunctio n: N o reve rse
ge ar. You c an c ontinue d riv ing
There is a system malfunct io n in")
Driving
App lies to: ve hicles w ith S tro nic t ra n smi ssio n
Ii) 10 Tran sm issio n m alfunctio n: N o reve rse
ge ar. You c an c ontinue d riv ing
There is a system malfunct io n in the t ransm is
sion . T he transmission is switching to emergency
mode. This mode only shifts into certain gears or
will no longer shift at all. The engine may stall.
You cannot engage the r everse gear. Drive to an
author ized Audi dealer or author ized Audi Service
Facility immediately to have the malfunction cor
rected .
[!l Transmi ssio n m alfun cti on : Sto p vehicl e and
s hift t o park .
Do not cont inue drivi ng. Select the P se lector lev
er position and see an authorized Audi dea le r or
author ized Audi Service Facility for assistance.
(D Note
If the transmission has switched to emergen
cy mode, drive to an author ized Audi dealer or
author ized A udi Se rvice Facility immediate ly
to have the ma lfunction corrected.
Selector lever emergency release
If the vehicle's power supply foils, the selector
lever con be released in on emergency.
F ig. 85 Fro nt ce nter console: emergency release for t hese
l ector lever
.,. T o reach the emergency release mechanism, re
move t he ashtray insert * .
.,. Loosen and remove the sma ll cap in the ashtray
mount ~ fig. 85 .
.,. You now have access to a pin . Using a screw
driver or s imilar object, press the pin down and
hold it in that posit ion.
80
.,. Press the release button in the selector lever
and move it into the N position .
Only move the selec tor lever o ut of the P posit ion
when the ignition is switched on. If the vehicle
must be pushed or towed due to a power failure
(for example, the vehicle battery is drained), the
selector lever must first be moved to the N posi
tion using the emergency release mechanism.
A WARNING
- Only activate the emergency release while
on a level surface or a slight slope .
- Only move the selector lever out of the P po
sition when the parking brake is set. If it is
not funct ioning, secure the veh icle from
ro lling using the brake pedal or other suita
ble means, such as b locking a front and a
rear wheel. An unsecured vehicle may roll
away, which increases the risk of an acci
dent .
Page 83 of 274

a co .... N
" N .... 0 00 \.J -
Trailer towing Driving with a trailer
General information
Your veh icle is primar ily intended for transport
ing people and luggage. However, if you dr ive
with a trailer , follow the technical requirements,
the operation and driving tips, and the legal reg
u lations.
Driving with a trailer affects the vehicle 's fuel
consumption, performance and wear. It also re
quires highe r concentration from the driver.
A WARNING
Do not transport any people in a trailer due to
the risk of fatal injury.
Technical requirements
Certain requirements must be met when towing
a trailer.
Trailer hitch
Only use a trailer hitch with a removab le ball
hitch mount and ball hitch. The trailer hitch must
be perm itted for the vehicle, the trailer and the
permitted total weight of the trailer being
pu lled. Above all, it must be secure ly and safe ly
attached to the vehicle trailer.
Never mount a trailer hitch on the bumper. The
trailer hitch must be mounted in a way that does
not impair the function of the bumper. Do not
make any changes to the exhaust system and the
brake system.
Check regularly if the trailer hitch is securely
mounted. A lways follow the instructions given by
the trai ler hitch manufacturer .
Trailer brakes
If the tra iler has its own brake system, then fol
l ow the manufacturer specifications. However,
the brake system on the trailer must never be
connected to the vehicle brake system.
Trailer towing
Engine cooling system
Driving with a trailer means a higher load on the
engine and the cooling system. The coo ling sys
tem must be designed for additiona l load and
contain enough coo lant
i::> @ .
@ Note
Longer inclines cannot be driven without a
suitab le cooling system, especia lly if t he out
side temperatures are high . otherwise, this
increases the risk of engine damage.
Operating instructions
Several things must be noted when towing a
trailer.
Towing capacity
Your vehicle can only be operated with class 1 or
class 2 trailers.
Load distribution
Poor cargo load and distribut ion can negatively
impact vehicle handling.
- Store objects preferably in the vehicle luggage
compartment . The vehicle should always carry
the heaviest poss ible load and the trailer
should have the lightest possible load.
- Distribute the load in the trailer so that the
heavy objects are as close to the axle as poss i
b le.
- Secure objects from sl iding out of place .
- Ut ilize the maximum permitted tongue weight
if possible .
Tires
Set the tire pressure on your vehicle for a "full
load"; see the tire pressure sticker
c::>page 215.
If necessary, also adjust the tire pressure on the
trailer according to the manufacturer's recom mendat ion .
Winter tires should be mounted on the vehicle and on the trailer during winter temperatures.
Outside mirrors
If you cannot see the tra ffic behind the trailer
with the standard exterior mirrors, then you
81
Page 84 of 274

Trail er to wing
must attach additiona l exterior mirrors . Adjust
them so you have a sufficient visibility behind
you .
Exterior lighting
Follow the lega l regulat ions regard ing the light
ing eq uipment on your trailer . Conta ct an author
ized Audi dealer or authorized Audi Service Facili
ty for more information.
Before start ing to drive, check a ll l ight ing equip
men t on the hitc hed trailer.
The headlig ht range contro l adjusts automatical
ly to the light range of the headl ights.
Safe ty chain s
Make sure the safety chains are correctly applied
when pulling a trailer . The chains should hang
enough so t hat the trailer can dr ive around
curves. However, they must not touch the
g round .
Air su spension
Applies to: vehicles with air suspension
The air suspension must be at the standard vehi
cle height before you set the tongue weight on
the trailer a nd h itch the trailer ¢@ ,
¢page 107,
Raising/lowering the vehicle.
For ve hicles w ith a factory-installed tra iler hitch,
the air suspension trailer mode will automat ically
sw itch on if you connect the trailer cable to the
socket.
For ve hicles w ith a retrof itted trailer hitch, you
must switch on the air suspension trailer mode
manually . Select in the Infota inment system:
ICARI function button > ( Car )* s yste m s contro l
button
> V ehicle setting s > Air su spen sion : trail
e r > On .
Switch it off again after tow ing a tra ile r.
You can also switch off tra iler mode ma nually
while driving, for example, when using a bicycle rac k system .
If you have to drive through difficult road condi
tions, you can raise the vehicle aga in after hitch
ing the t rai ler or after adjust ing the tongue
weight .
82
@ Note
Applies to: vehicles with air suspension
-Changes i n temperature or load can affect
the height of the vehicle .
- Set the air suspension to the standard veh i
cle he ight, otherwise the applicable tongue
we ight no longer appl ies to your veh icle.
(D Tips
- Use chocks when park ing on inclines if the
trai ler is loaded.
- We recommend also hav ing the vehicle in
spected between the inspection intervals if
you are towing a trailer frequently.
- Avoid driv ing with a trai ler dur ing the veh i
cle break-in per iod.
Driving with a trailer
Driving with a trailer requires extra caution.
Sp eed
Adhere to t he lega l speed lim its . Fo llow the legal
regu lations
specific to the country.
As the speed increases, the dr iv ing stab il ity of
t h e tra ile r decreases. Therefore you should not
exceed the max imum lega l speed lim it w hen
t h ere are unfavorab le road, weather and/or wind
conditions. This especia lly applies when driving
downh ill.
Yo u m ust always red uce your speed as soon as
you notice even the slightest swinging motion o f
the trai ler . Never try to "straighten out" the trai l
er by acce lerating.
The we ight d istr ibution is very poor if the vehicle
is empty and the trai ler is loaded. However if you
must drive under these circumstances, then drive
especially slowly .
Brakes
B rake in a time ly manner. Downs hift befo re dr iv
i ng down hill so that the engine can assist with
braking ¢&. .
When using a trailer w it h over run bra kes, fi rst
bra ke gently t hen q uick ly. This red uces the r isk of
j erking while braking if the trailer wheels lock up .
IIJJ,,
Page 85 of 274
a co .... N
" N .... 0 00 \.J '
Engine coolant temperature
Pay att ention specifica lly to the coolan t tempera
t ure d isp lay when t here are high outside tempe r
atures, an d when dr iv ing on long inclines
~ page 9 . Shift to a highe r gear in a timely man
ne r.
A WARNING
Constant b raking causes the brakes to ove r
heat and substant ially reduces b raking per
formance, increases brak ing distance or caus
es complete fa ilu re of the brake system.
-
Trailer towing
83
Page 86 of 274

Ass is tance sy stem s
Assistance systems
Speed warning system
Description
Applies to: veh icles with speed warning system
The speed warning system helps you to stay un
der a specified maximum speed.
The speed warning system warns you if you are
exceeding the maximum speed that you have set.
A warning tone will sound as soon as your speed
exceeds the sto red value slightly.
The . (USA models) I. (Canada models) indi
cator light and a message appear in the instru
ment cluster display at the same time.
The.
• indicator light and the message turn off if the
speed falls back below the stored maximum
speed.
Sett ing a threshold is recommended if you would
like to be reminded when you reach a certa in
maximum speed. S ituations where you may want
to do so i nclude driving in a country wit h a ge ne r
a l speed limit o r if the re is a specified maximum
speed for winter tires.
Setting the warning threshold
The warning threshold is set in the Infotainment
system.
• Se lect: the ICARI function button> (Car )* Sys
tems
control button > Driver assistan ce >
Spe ed warning .
(D Tips
Regardless of the speed warning system, you
should always monitor your speed using the
speedometer and make sure you are following
the legal speed limit.
84
Cruise control system
Switching on
Applies to: vehicles with cruise control system
The cruise control system makes it possible to
drive at a constant speed starting at 20 mph (30
km/h).
0
f
~
0
F ig . 86 Operat ing lever: c ruise control system
• To switch t he cru ise control o n, pull the lever
into position
(D ~ fig. 86 .
• Drive at the speed to be maintained.
• To store the speed, press the button @.
The stored speed and the
( ij;\1)~14 (USA models) /
l'I (Canada models) ind icator lig ht are disp layed
in the instrument cluster.
This information is also shown briefly in the
head -up display* .
The speed is mainta ined by modifying engine
power or through a n active br ake interven tion.
~ WARNING
-Always pay at tentio n to the traffic around
you when the cruise contro l system is in op
eration . You are always respons ible for your
speed and the distance between your ve hi
cle and other vehicles.
-For safety reasons, cruise control should not
be used in the city, in stop-and-go traff ic, on
winding roads and when road conditions are poor (such as ice, fog, gravel, heavy rai n and
hyd roplaning), because this inc reases the
r is k of an accident.
-Switch the cr uise control off temporarily
when dr iv ing in turning lanes, highway exits
or in constr uction zones.
-
Page 87 of 274

a co .... N
" N .... 0 00 \.J '
-Please note that unconsciously "resting"
yo ur foot on the accelerator pedal prevents
the cruise control from braking. Th is is be
cause pressing the acce lerator pedal over
rides the cruise control system .
- If a brake system ma lf u nction such as over
heating occu rs when the c ruise contro l sys
tem is switched on, the braking function in
the system may be switched off . The rest of
t h e cruise control system f unction s remain
ac tive as long as
the @;(IM~ (USA model s) /
l'I (C anada models) indi cator light is on .
(D Tips
The brake lights turn on when the brakes a re
ap plied a utomat ica lly .
Changing speed
Applies to: vehicles with cruise control system
.. T o inc rease o r decrease the speed in incre
ments, tap the lever toward
0 10 <=> page 84 ,
fig . 86 .
.. To inc rease o r decrease the speed qu ickly, ho ld
the leve r in the
010 direction until the de
s ired speed is displayed.
You can a lso press the acce lerator pedal down to
increase yo ur speed, for example i f you want to
pass someone. The speed you set earlier w ill re
sume as soo n as you release t he accelerator ped
al.
However, if you exceed your saved speed by S
mph (10 km/h) for longe r th an 6 mi nutes, the
cru ise control system tur ns off temporar ily .
The
green @;(i)~i~ (USA models) !l'I (Canada mod
e ls) indicator light in the speedometer tu rns off
and the stored speed is maintained.
Preselecting the speed
Applies to: vehicles with cruise control system
You can pre-select your desired speed when the
vehicle is stationary.
.. Switch the ign ition on.
.. Pull the lever into position @<=> page 84,
fig. 86 .
A ss istance systems
.. To increase or decrease the speed, tap the lever
toward
0 10 .
.. To store t he speed d isp layed, release the leve r.
T his func tion makes it possible , fo r example, to
save the spee d you want before driving on the
highway. Once on the highway, activate the
c ruise contro l by pull ing the leve r
towa rd @ .
Switching off
Applies to : vehicles with cruise control system
Deactivating temporarily
.. Press the brake pedal, or
.. Press the lever into position @(not clicked into
p lace) <=>
page 84, fig . 86, or
.. Dr ive fo r longer t han S m inutes faster than S
mph (10 km/h) above the stored speed .
Switching off completely
.. Press the lever into position@(clicked into
p lace), or
.. Switch the ignit ion off .
The speed you stored will be ma intained if the
cruise contro l has been switched off temporari ly .
To resume the stored speed, re lease the brake
peda l and pull the lever to
position @.
Switching the ignition off wi ll erase the stored
speed.
A WARNING "---
You should only resume the sto red speed if it
i s no t too high fo r existing t raff ic conditions .
Otherw ise you can inc rease the risk of an acci
d ent .
Lap timer
Introduction
Applies to: vehicles with lap timer
Yo u can record and eva luate lap t imes with the
l ap timer <=>
page 86, fig. 87. The time is meas
ur ed in m inutes, seconds and 1/10 seconds. The
ho urs are also shown when the lap time exceeds
60 m inutes . T he maxim um indiv id ual measure
me nt is 99 ho urs. A maxim um of SO laps can be
r ecorded.
.,.
85
Page 88 of 274

Ass is tance sy stem s
~ WARNING
Your focus should always be on driving your
vehicle safely. As the driver, you have com
plete responsibility for safety in traffic. Only
use the functions in such a way that you al
ways maintain complete control over your ve hicle in all traff ic situat ions.
(D) Tips
You can retrieve information from the trip
computer while the lap ti mer stopwatch is
running.
Opening the lap timer and record ing times
A pp lies to: ve hicles w ith la p timer
F ig . 87 D isplay: lap timer
Opening the lap t im er
.. Turn the menu thumbwheel on the steering
whee l until
Lap time r appears in the instru
ment cluster display.
T iming laps
.. To start timing, p ress the thumbwhee l.
-
.. To stop timing for this round, press the thumb
whee l aga in . This starts t iming the next lap at
the same time. The last recorded t ime wi ll
move up one line. The lap number is displayed
in front of the time measurement.
Displaying intermediate tim e an d pau sing
t imin g
.. To display a split time, press the thumbwheel.
The timing continues to run in the background .
.. To interrupt the t iming, for example to insert a
pause, press the thumbwheel.
.. T o resume tim ing, press the thumbwheel
again.
86
If timing is paused, you can continue it later even
if you switch the ignition off .
Evaluating, resuming or resetting timing
Applies to: vehicles with lap t imer
You can evaluate the fastest, slowest and aver
age lap times.
F ig. 88 D isp lay: evaluating a recorded time
.. To evaluate a recorded time (view the statis
tics), press the thumbwheel. The number
of
laps dr iven, the fastest lap"+", the slowest lap
"-", and the ave rage lap time "0" appea r in the
disp lay .
.. To continue timing for additional laps, press
the thumbwheel.
.. To reset the timing to zero, press the thumb
wheel again . The lap t imer switches off.
(D Tips
- Saved lap times cannot be individua lly de
leted from the total results .
- The saved lap timer va lues w ill remain after
switching the ignition off .
 1
1 2
2 3
3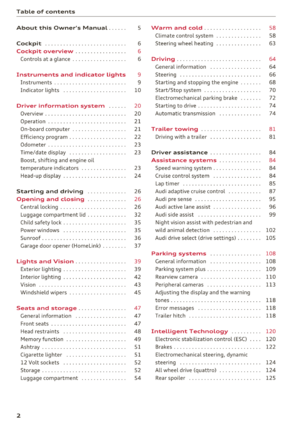 4
4 5
5 6
6 7
7 8
8 9
9 10
10 11
11 12
12 13
13 14
14 15
15 16
16 17
17 18
18 19
19 20
20 21
21 22
22 23
23 24
24 25
25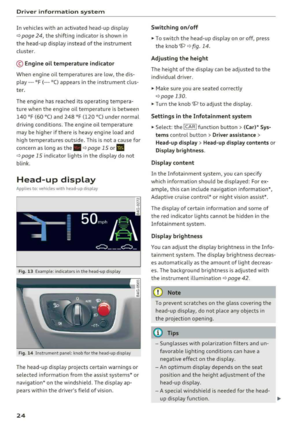 26
26 27
27 28
28 29
29 30
30 31
31 32
32 33
33 34
34 35
35 36
36 37
37 38
38 39
39 40
40 41
41 42
42 43
43 44
44 45
45 46
46 47
47 48
48 49
49 50
50 51
51 52
52 53
53 54
54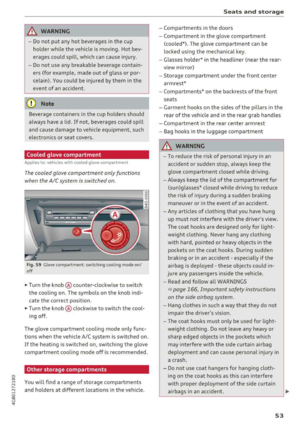 55
55 56
56 57
57 58
58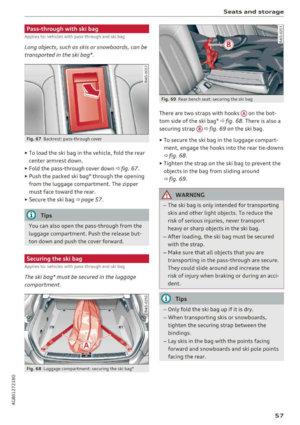 59
59 60
60 61
61 62
62 63
63 64
64 65
65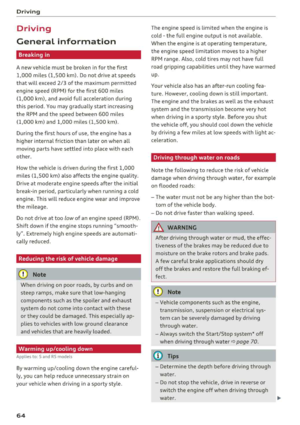 66
66 67
67 68
68 69
69 70
70 71
71 72
72 73
73 74
74 75
75 76
76 77
77 78
78 79
79 80
80 81
81 82
82 83
83 84
84 85
85 86
86 87
87 88
88 89
89 90
90 91
91 92
92 93
93 94
94 95
95 96
96 97
97 98
98 99
99 100
100 101
101 102
102 103
103 104
104 105
105 106
106 107
107 108
108 109
109 110
110 111
111 112
112 113
113 114
114 115
115 116
116 117
117 118
118 119
119 120
120 121
121 122
122 123
123 124
124 125
125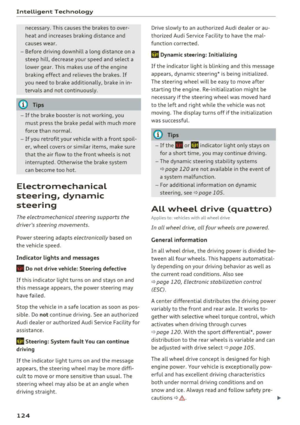 126
126 127
127 128
128 129
129 130
130 131
131 132
132 133
133 134
134 135
135 136
136 137
137 138
138 139
139 140
140 141
141 142
142 143
143 144
144 145
145 146
146 147
147 148
148 149
149 150
150 151
151 152
152 153
153 154
154 155
155 156
156 157
157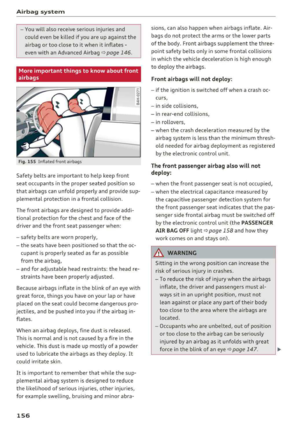 158
158 159
159 160
160 161
161 162
162 163
163 164
164 165
165 166
166 167
167 168
168 169
169 170
170 171
171 172
172 173
173 174
174 175
175 176
176 177
177 178
178 179
179 180
180 181
181 182
182 183
183 184
184 185
185 186
186 187
187 188
188 189
189 190
190 191
191 192
192 193
193 194
194 195
195 196
196 197
197 198
198 199
199 200
200 201
201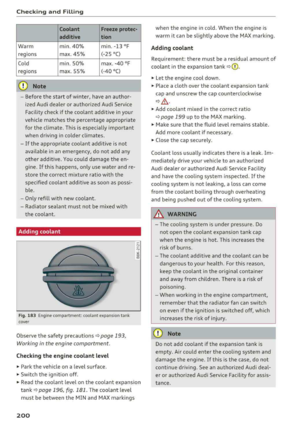 202
202 203
203 204
204 205
205 206
206 207
207 208
208 209
209 210
210 211
211 212
212 213
213 214
214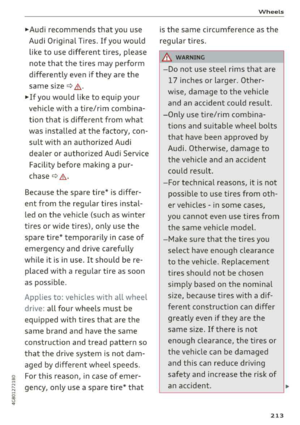 215
215 216
216 217
217 218
218 219
219 220
220 221
221 222
222 223
223 224
224 225
225 226
226 227
227 228
228 229
229 230
230 231
231 232
232 233
233 234
234 235
235 236
236 237
237 238
238 239
239 240
240 241
241 242
242 243
243 244
244 245
245 246
246 247
247 248
248 249
249 250
250 251
251 252
252 253
253 254
254 255
255 256
256 257
257 258
258 259
259 260
260 261
261 262
262 263
263 264
264 265
265 266
266 267
267 268
268 269
269 270
270 271
271 272
272 273
273