Page 65 of 296

a,
a,
..... N r--N ..... 0 0
0:
co
Activating remote control key memory
Applies to: vehicles with seat memory
To assig n the drive r's seat settings to the remote
con trol key when locking the vehicle , the function
must be act ivated in the ra dio or M MI* .
• Se lect :
I CARI funct ion button > Seat adjust
ment > Driver's seat > Key mem. profile > On .
Or
• Se lect :
I CARI funct ion but ton> Car sy stem s*
contro l bu tton > V ehicle setting s > Seat s>
Dri ver' s seat > Remote control key > On .
(D Tips
If you do not wa nt ano ther d river's settings to
be assigned to the remote control key, sw itch
off the memory funct ion using the rad io or
M MI* or the
!OF F! button 9 page 62 .
Rear seat
General information
Safe transportation of passengers on the rear
seats requires proper safety precautions .
All passengers on the rear seats must be sea ted
in comp lia nce w it h the safety guidelines ex
p la ined in
<=;> page 140 and .:;,page 148. The co r
r ect seating posit ion is critical for the safety of
fron t
and rear seat passenge rs al ik e r::!;> page 134 .
A WARNING
- Occupan ts in the fro nt and rear sea ts m ust
always be properly res trai ned.
- Do not let anyone ri de in t he vehicle with ou t
th e head restra ints prov ided. He ad re
st raints help to reduce injuries.
- L oose i tems inside the passenger compa rt
ment, can f ly forwa rd in a cras h or sudden
maneuver and injure occupants. Always
store articles in the luggage compartment
and use the fasten ing eyes , especia lly when
the rear seatbacks have been folded down.
- Read and heed a ll WARNINGS
¢ page 134,
Proper seating positions for passengers in
rear s eats .
Seats and storag e
Adjusting seat
The fore-and-aft adjustment of the seat cushion
and the seatback angle con be adjusted .
Fig . 65 Adjust ing seatbac k angle
Fig. 66 Fo re -a n d-a ft a dju stm ent
Adjusting seatback angle
• Pull the lever up and pus h the seat back t oward
the rear to the des ired position
r::!;> fig . 65 . Re
lease the lever.
• Pull the lever up so that the seatback pivots
forward. Release the lever and push the seat
back to the rear to ret urn the seatback to the
normal pos ition .
Fore-and-aft adju stment
• Pull the handle up and pus h the seat forward or
back
<=;> fig. 66 .
• Release the handle and continue to push the
sea t unt il the seat latch engages .
A WARNING
- For safety reasons, the seat m ust only be
ad juste d when t he vehicle is st ationary -
da nger of acc iden t!
63
Page 66 of 296

Seats and storage
-Exercise caution when adjusting the seat .
Adjusting the seat without checking or pay
ing attention can pinch fingers or limbs -
danger of injury!
Head restraints
Front head restraints
Fig. 67 Fro nt seats head restrai nts: adj ust ing the he ig h t
The head restra ints on the front seats can be ad
justed to provide safe suppo rt to head and neck
at the optimum height . When optimally adjust
ed, the top of the restraint should be level wi th
the top of the head. If that is not possible, try to
adjust the head restraint so that it is as close to
this position as possibler::!;>
page 134, Proper ad
justment of head restraints.
• Grasp the sid es of the head restraint with both
hands and slide it upward/downward until you
feel it click into place r::!;>
fig. 67.
Refer to
r::!;> page 134, Proper adjustment of head
restraints
for guidelines on how to adjust the
height of the front head restra ints to suit the oc
cupant 's body size.
_&. WARNING
- Driving without head restraints or with head
restraints that are not properly adjusted in
creases the risk of ser ious or fatal neck in
jury dramatically .
- Read and heed all WARNINGS
c:> page 134,
Proper adjustment of head restraints.
64
@ Tips
Correctly adjusted head restraints and safety
belts are an extreme ly effective combinat ion
of safety features.
Rear head restraints
Fig. 68 Rear seat : head rest raints
Fig. 69 Rear sea t: ou ter head restrain t
If there is a passenger on the rear center seating
position, slide the center head restraint upward
at least to the next notch
c:> .&_ .
Adjusting the head restraints
• To move the head restraint up, hold it at the
sides with both hands and slide it upward until
you feel it click into place.
• To move the head restraint down, press the
button @and slide the head restraint down
ward .
Removing the outer head restraints
• Fold the backrest forward r::!;> page 66.
• Move the head restra int upward as far as it can
go .
.,. Press the release@<=>
fig. 69 with the mechan
ical key
c:> page 34 and the button@<=> fig. 68. Iii>-
Page 67 of 296

Pull the head restraint out of the backrest at
the same time¢.&_ .
Installing the outer head restraints
~ Slide the posts on the head restra int down into
t h e g uides until yo u feel the posts cl ick into
pla ce .
~ Press the button @c::> fig. 68 and slide the head
restraint all the way down. You should not be
able to pull the head rest raint out of the back
rest.
Removing the center head restra int
~ Move the head res traint upwa rd as far as it can
go .
~ Press t he button @¢ fig. 68 and pull the head
restra int out of the backrest¢.&_ .
Installing the center head restraint
~ Slid e the pos ts on the head res train t dow n into
the gu ides unt il you feel the posts cli ck into
place .
~ Press the button @¢ fig. 68 and slide the head
restra int all the way down . You should not be
able to pull the head restraint out of the back
rest .
So that the driver can have a better view to the rear, the head restra ints should be pushed down
comp letely when the rea r seats are not occup ied.
A WARNING
- Only remove the rear sea t head res trai nts
when necessa ry in ord er to install a chi ld
s e at. Insta ll the head restra int aga in imm e
di ately on ce the c hild seat is re m ove d.
D riv
ing without head re st rai nts or with he ad re
str aints that are no t properly adju ste d in
c reases the risk of ser ious o r fatal neck in
jury dramatically .
- Read and hee d all W AR NIN GS c::>
pa ge 134,
Proper adjustment of head restraints .
(j) Tips
Correc tly adj us ted he ad rest raints and safety
-
~ be lts ar e an ex tremely e ffective combin ation .....
~ of sa fe ty feat ures. N ..... 0 0
0:
co
Seats and storag e
Center armrest
The armrest is adjustable in several stages and
can be moved forward and back.
Fig . 70 A rm rest betwee n dr ive r's and passenger 's sea t
Adjusting the armrest
~ To adjust the armrest ang le, pivot the armrest
fully down .
~ Lift the armrest detent by deten t until t he de
sired position is re ache d.
Moving the armrest
~ You ca n move the armrest forward or back
¢fig. 70.
There is a storage compartment under the arm
rest .
65
Page 68 of 296

Sea ts and stor age
Luggage compartment
Expanding the passenger compartment
The rear seat backrests can be folded forward
separately or together .
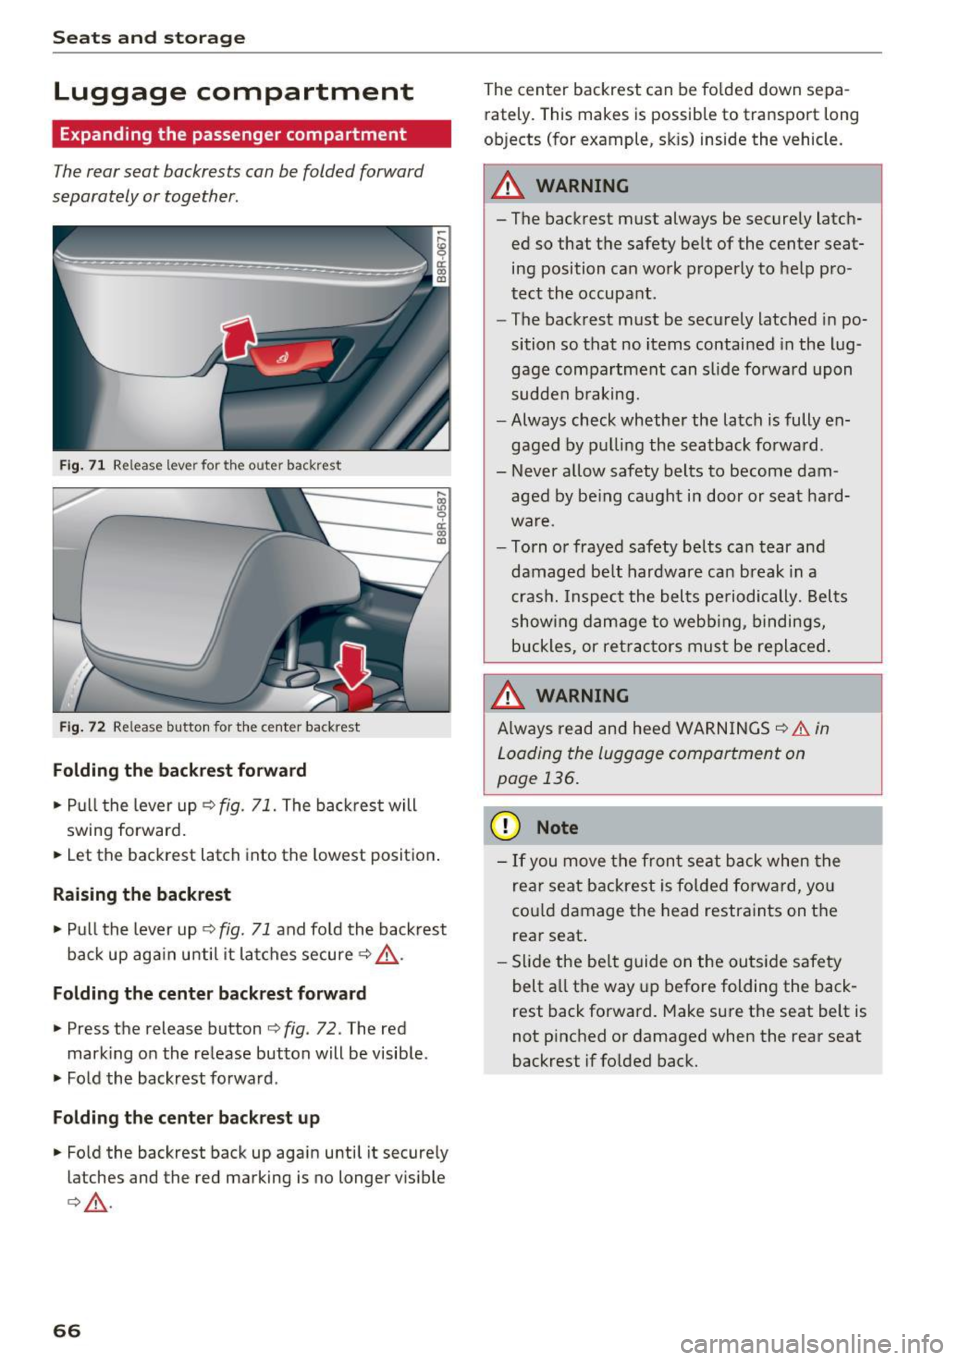
Fig. 71 Re lease lever for the outer back rest
~
~----i m
Fig . 72 Re lease button for the center backrest
Folding the ba ckrest forward
• Pull the lever up c:::> fig. 71. The backrest will
swing forward.
• Let the backrest latch into the lowest position .
Raising the backrest
• Pull the lever up c:::> fig. 71 and fo ld the backrest
back up aga in until it la tches secure
c:::> ,&. .
Folding the center ba ck rest f orward
• Press the release button c:::> fig . 72. The red
mark ing on the release button will be visib le .
• Fold the backrest forward .
Folding th e ce nter back re st up
• Fo ld the backrest back up again until it securely
latches and the red marking is no longer v isible
c:::> ,&. .
66
The center backrest can be fo lded down sepa
rately. This makes is possible to transport long
ob jects (for example, skis) inside the vehicle.
_& WARNING
-The backrest must always be securely latch
ed so that the safety belt of the center seat
ing position can work properly to help pro
tect the occupant .
- The backrest must be securely latched in po
sition so that no items contained in the lug
gage compartment can sl ide forwa rd upon
sudden b raking.
- Always check whether the latch is fully en
gaged by pu lling the seatback forward .
- Never allow safety belts to become dam
aged by be ing caught in door or seat hard
ware.
- Torn or frayed safety belts can tear and
damaged be lt hardware ca n break in a
cras h. Inspect the belts pe riodically. Bel ts
show ing damage to webb ing, bindings,
buckles, or ret rac tors must be replaced.
_& WARNING
A lways read and heed WARNINGS c:::> &. in
Loading the luggage compartment on
page 136.
(D Note
- If you move the fron t seat back when the
rea r seat b ackrest is fo lded forward, you
cou ld damage the head restraints on t he
rear seat.
-
- Slide the be lt guide on the outside safety
belt a ll the way up before folding the back
rest back forward. Make sure the seat belt is
not p inched or damaged when the rear seat
backrest if folded back.
Page 69 of 296

a,
a,
..... N r-N ..... 0 0
0:
co
Expanding the luggage compartment
The rear seat backrests can be folded forward
separately or together.
Fi g. 73 Luggage compartment : release leve r
Folding the backrest forward
... Pull the release lever c::> fig. 73 in direction of
the arrow . The back rest will sw ing forward .
... Let the back rest latch into the lowest position .
Folding the backrest up
... Pull the lever up c::> page 66, fig. 71 and fold the
backrest back up again until it sec ure ly latches
¢ _&. .
& WARNING ,-
- The backrest must always be secu rely latch-
ed so that the safety belt of the center seat
ing position can work proper ly to help pro
tect the occupant.
- The backrest must be securely latched in po
sit ion so that no items contained in the l ug
gage compartment can slide forward upon
sudden braking.
- Always check whether the latch is fully en
gaged by pulling the seatback forward.
- Never allow safety belts to become dam
aged by being caught in door or seat hard
wa re.
- Torn or frayed safety belts can tear and
damaged belt hardware can break in a
c rash. Inspect the belts periodically . Belts
showing damage to webbing, bi ndings,
buckles, or retractors must be rep lac ed .
Seats and storag e
(D Note
-If you move the front seat back when the
rear seat backrest is fo lded forward, you
cou ld damage the head restraints on t he
rear seat.
- Slide the be lt guide on the outside safety
belt a ll the way up before folding the back
rest back forward . Make sure the seat belt is
not p inched o r damaged when the rea r seat
backrest if folded back. Other objects
should be removed from the rear seat b ench
t o p rotect the seatback from d amage.
Tie-down rings
There are four tie-down rings in the luggage
compartment for se curing luggage items .
F ig . 74 Locat io n of the tie-dow n rings in the luggage com
pa rt me nt
.,. Secure the c argo to the tie-down rings
c::> fig. 74 .
.,. Observe the safety notes <=:> page 13 7.
... Rea d and heed a ll WARN INGS c::> page 136 ,
Storing cargo correctly .
A WARNING
Weak, damaged or improper straps used to
secure items to tie-downs can fai l dur ing hard
braking or in a collision and cause ser ious per
sona l injury .
- Always use suitable retaining straps and
properly secure items to the tie-downs in
the l uggage compartment to help prevent
ite ms from shi ft ing or flying forward.
- When the rear seat backrest is folded down,
always use suitable re taini ng straps and
proper ly secure i tems to the tie-downs in
-
67
Page 70 of 296

Seats and storage
the luggage compartment to help prevent
items from flying forward into the passen
ger compartment.
- Never attach a child safety seat tether strap
to a tie-down.
Luggage compartment cover
Fig. 75 Luggage compartment: cover attached
Fig. 76 Luggage compartment: storing the cover
Removing
• Unhook the straps@ c::> fig. 75.
• Pull the cover @out of the retainers @ in the
direction of the arrow.
Installing
• Slide the cover into the retainers @.
• Attach the straps
(D c::> & .
Storing
• Slide the rear seat forward <=> page 63.
• Fold the cover together and store it behind the
rear seat
c::> fig. 76 .
_&. WARNING
-To prevent accidents, never install the lug
gage compartment cover unsecured.
68
-
-Whenever driving, never place any hard or
heavy objects on the luggage compartment
or allow pets to sit on the luggage compart
ment cover. They could become a hazard to
vehicle occupants in the event of sudden braking or in an accident.
(D Note
You could damaged a stored luggage com
partment cover when you move the rear seat
or rear seat backrest.
@ Tips
- You can use the luggage compartment cov
er to store light weight clothing or articles
but do not leave any heavy or sharp objects
in the pockets of the clothing.
- Remember that placing clothing or articles on the luggage compartment cover can
block the driver's vision in the rear view mir
ror. This also applies especially when you
have to transport large objects.
- So that stale air can escape from the vehicle
be sure not to cover the ventilation slot be
tween the rear lid and the luggage compart
ment cover.
Double cargo floor
You can store dirty or wet objects under the car
go floor.
Fig. 77 Luggage compartment: cargo floor folded toget her
wit h protective tray
Folding the cargo floor together
• Lift the cargo floor by the handle c::> fig. 77 (D
and fold it up.
• Place your item in the protective tray.
Page 71 of 296

a,
a,
..... N r-N ..... 0 0
0:
co
Removing the cargo floor , installing
• To remove, lift t he cargo floor folded together
and pull it toward the rear lid .
• To install, place the folded cargo floor into
both retainers and unfold it.
Grab the protective tray on the ha ndles and pu ll
it out. You can also install a divider to divide @
the storage area. Depending on the vehicle
equipment level, the protective tray can have dif
ferent sizes and shapes .
Cargo net and storage hooks
Fig. 78 Luggage compartment:
F ig . 79 Luggage compartment: Storage hooks
Storage net
The storage net on the right side trim can be
moved lower on the side guides, if needed
c:>fig. 78.
Storage hook s
The storage hooks can be used to secure shop
ping bags from falling over
c:> fig. 79.
A WARNING
Do not use the storage hooks to secure heavy
objects. Heavier objects are not adequately
secured. There is risk of pe rsonal injury.
Seats and storag e
Roof rack
Description
Additional cargo can be carried with a roof lug
gage rack .
If luggage or cargo is to be carried on the roof,
you must observe the following:
- On ly a specially designed roof rack may be used
on your vehicle roof. This is provided with your
veh icle .
- These roof racks are the basis for a complete
roof rack system . Additional attachments are
necessary if you want to transport luggage, bi
cycles, surf boards and skis. All these compo
nents are ava ilable at your a uthorized Aud i
dea le r.
(D Note
If you use other roof luggage rack systems or
do not install the racks as intended, any dam
age to the vehicle is not covered by the war
r anty. Always read the ma nufactu rer installa
tion ins tructions that came with yo ur roof
rack system when yo u install the atta ch
ments.
(D Tips
When ins tall ing a factory-supp lied roof rac k
system on the roof railing, the ESC will adapt
i tself to a differe nt center of gravity .
Attachment points
The roof rack can only be attached at the
marked locations .
Fig . 80 Roof rack attachment points
69
Page 72 of 296

Seats and storage
Attach the roof rack only at the attachment
points on the roof railing. On the inside of the
roof railing there are two holes for attaching the
rear end of the roof rack. To prevent confusing
the front and rear roof rack attachments, there
are three holes on the left and two holes on the
right for mounting the front part of the roof rack
~ fig . 80.
The roof racks have a sticker on the left side un
derneath to identify front and rear .
A WARNING
When installing the roof rack, make sure the
sticker is on the left side of the vehicle and
faces the stamped arrow in the drive direc
tion.
Installing a roof rack
Fig . 81 Roof ra iling : pos ition ing the roof rack
Fig . 82 Roof railing : installing a roof rack
The roof rack set consists of a front and rear roof
rack, the
cover profile and a socket wrench.
~ Open the cap (D c:> fig. 82.
~ Before mounting the roof rack, use the socket
wrench @and loosen the left and right screw
in the direction of@ .
70
~ Clean the attachment points on the roof railing
as well as the roof rack rubber washers@.
~ Carefully place the roof rack over the holes in
the roof railing
c:> fig. 81.
~ Place the pins@ into the holes. The claw®
must engage into the edge of the roof railing .
~ Make sure the rubber washer© lays flat on the
roof railing .
~ Tighten the left and right screws using the
socket wrench @ in direction @.
~ To reach the 4 ft lb (6 Nm) tightening specifi
cation needed, both arrows on the socket
wrench must align .
~ Repeat this procedure on the second roof rack.
A WARNING
Check all the roof rack connections each time
before each trip and re-tighten or re-adjust if
necessary .
If you are going to be driving or
rough terrain, you will have to check the at
tachments more often. If you do not do this,
the risk of your luggage coming loose and
falling off is greater.
(D Note
The pins and the roof rack claws must engage
securely into the holes and into the edge of
the roof railing when you tighten the screws!
(D Tips
You can adjust the width of the roof rack by
using a hexagon wrench and turning the
screws on the top. Let your authorized Audi
dealer help you with this.
Installing the attachments
Fig. 83 Roof railing: installing cove r profile into the roof
rack
co
"' ~ er co a,