Page 129 of 296

Switching on and off
Applies to: vehicl es wit h Aud i parking system p lus w ith rear
view came ra
The rearview camera switches an automatically
together with the acoustic and visual park assist
when you put the vehicle in reverse.
Fig. 144 Center console: Park ing system switch
Fig . 1 45 MMI display: visual distance display
Switching on
.. Switch the MMI on and select reverse gear .
.. To use the front park ing system, press the
switch
p,, 1A in the center console c::> fig . 144. A
sho rt confirmation tone sounds and the indica
tor light in the switc h lights up.
Switching between th e re arview came ra and
vi sual displa y
.. Press the Graphi c co ntrol button c::>page 128,
fig. 146
® to see the visual d isplay .
.. Press the
Rear view contro l butto n to see the
rearview camera image
¢fig. 145.
Switching off
.. Drive faster than 6 mph ( 10 km/h), or
~ .. press the switch P'#A or .....
~ .. switch off the ign ition. N ..... 0 0
0:
co
P ark ing aid
Segments in the visual di splay
T he red segments in front of and behind the vehi
cle
c:::> fig. 145 help you to determine the distance
between you and an obstacle. As your vehicle
comes closer to the obstacle, the segments move
closer to the vehicle. The collision area has been
reached when the next to last segment is dis
played . Do not continue dr iving farther
c:::> .&. in
General Information on page
126!
A WARNING
-- The MM I display cannot show, o r cannot ad-
equate ly show, certain objects (such as
smal l posts or grating), recesses i n the
g ro und and protruding parts on another car.
- On ly use the rearv iew camera to ass ist yo u if
it shows a good, clea r pi ctu re. For example,
the image may be affected by the sun shin
ing into the lens, dirt on the lens or if there
is a defect.
- Use the rearv iew camera on ly w ith the rea r
lid completely closed. Make sure any objects
you may have mounted on the rear lid do
not block the rearv iew camera.
(D Tips
- The sensors must be kept clean and free of
snow and ice for t he park ass ist to operate .
- The visua l display is shown in the illust ra
tion of the rearview camera. This display shows where the sensors have detected an
obstacle.
- You can change the volume and pitch of the
signa ls as well as the display
c:::> page 130.
- Please fol low the instructions for tow ing a
trailer
c:::> page 130.
- What appears in the display is time -de
layed.
127
Page 130 of 296

Parking aid
Reverse Parking
Applies to: vehicles w ith Aud i park ing system p lus w ith rear
view c amera
Parking mode 1 con be used when parking in a
garage or into a parking space.
Fig. 146 MMI disp lay: a iming at a parking spot
Fig. 147 MMI disp lay: align ing the vehicle
.,. Switch the MMI on and se lect reverse gear .
.,. Turn the steering wheel until the orange orien
tation lines
(D appear in the parking spot
¢ fig . 146. Use the markings @to help you es
timate the distance from an obstacle. Each
marking represents 3 ft (1 meter). The blue
area represents an extension of the vehicle's
outline by approximately 16
ft (S meters) to
the rear .
.,. While driving in reverse gear, adjust the steer
ing wheel angle to fit the parking space with
the a id of the orange orientation lines ¢(D.
®
marks the rear bumper . Stop the vehicle when
the red orientation line© borders an object
¢,&. .
.&_ WARNING
- The rearview camera does not show the en
tire area behind the vehicle¢
page 125,
128
fig. 142. Watch out especially for small chil
dren and animals. The rearview camera can
not always detect them, posing risk of an
accident!
- Please note that objects not touching the
ground can appear to be further away than
they really are (for example, the bumper of
a parked vehicle, a trailer hitch, or the rear
of a truck). In this case, you should not use
the help lines to help with parking, which
poses danger of an accident!
(D Note
In the MMI display, the direction of travel of
the vehicle rear is represented depending on
the steering wheel angle. The vehicle front
swings out more than the vehicle rear. Main
tain plenty of distance so that your outside
mirror or a corner of your vehicle does not col
lid e with any obstacles. This can damage to
your vehicle.
Page 131 of 296

a,
a,
..... N ,....
N ..... 0 0
0:
co
Parallel Parking
Applies to: vehicles with Aud i parking system plus with rear
view camera
Use parking mode 2 to help you porollel pork
along the side of a street.
Fig. 148 MMI display: blue surface in the parking spot
Fig. 1 49 MMI display : Blue curve on the curb
The following steps apply only when there is no
obstacle such as a wall near the parking spot.
Otherwise, please read the information prov ided
in the "Parking Next to Obstacles" sect ion.
.,. Activate the turn signal.
.,. Pos ition your vehicle paralle l to the edge of the
street, approx imately 3 ft (1 meter) from a
parked veh icle.
.,. Swi tch the M MI on and se lect reverse gear. The
park ing a id turns on and park ing mode 1 ap
pears on the d isplay .
.,. Press the control button
(D ¢ fig. 148 on the
MMI control console. Parking mode 2 appears.
.,. Back up and align yo ur vehicle so the b lue area
@ borders on the rear end of the vehicle or on
the parking spot line. The blue area represents
an extension of the vehicle's outline by approxi
mately 16 ft (S meters) to the rear. The long
s ide of the blue area should be on the curb. The
en tire blue area must fit into the parki ng spot.
P ark ing aid
.,. With the vehicle stopped, turn the steering
wheel to the right as far as it will go.
.,. Back into the parking spot until the b lue curve
touches the curb¢
fig. 149. Stop the vehicle.
.,. With the vehicle stopped, turn the steering
wheel to the left as far as it will go .
.,. Continue to back into the parki ng spot unt il the
veh icle is parked parallel to the c urb. @ marks
the rear bumpe r. Stop the ve hicle when the red
orientat ion line @ borders an object¢
&
Keep an eye on the front of yo ur vehicle while
doing this ¢(D.
Parking next to obstacles
When there is an obstacle (such as a wall) next to
th e parking spot, choose a spot with mo re space
o n t he sides. Pos ition the long side of the b lue
area so that there is sufficient space from the
curb. The area must not be on the curb. You wi ll
also need to start turning the steering wheel
much earlier. There should be a sufficient
amount of space between the curb and the blue
curve, and the blue curve¢
fig. 149 must not
touch the curb.
A WARNING
-The rearview camera does not show the en
tire area behind the vehicle¢
page 125 ,
fig. 142.
Watch o ut especially fo r small ch il
d ren and animals. The rearview came ra can
not a lways detect them, posing risk of an
accide nt!
- P lease note that o bjects no t touching the
g ro und can appear to be further away tha n
they rea lly are (for e xamp le, the bumper of
a parked vehicle, a trailer h itch, or the rear
of a truck). In this case, you shou ld not use
the help lines to help with parking, which poses danger of an accident!
(D Note
In the M Ml d is play, the direction o f travel of
the veh icle rear is represented depend ing on
the steer ing whee l ang le. The ve hicle front
swings o ut more tha n the vehicle rea r. Main
ta in plenty of distance so that your o utside
129
Page 132 of 296

Parking aid
mirror or a corne r of your veh icle does not col
lide with any obstacles. This can damage to
your vehicle.
(D Tips
The left or right orientation lines and surfaces
will be displayed, depending on the turn sig
nal being used .
Adjusting the display
and warning tones
A pp lies to : ve hicles w ith Audi park ing system plus w ith rea r
view ca mera
The display and warning tones can be adjusted in
the MMI.
~ Select: ICARlfunction button> Parking system.
Or
~ Select: I CARI funct ion button > Car systems*
control button > Driver assist> Parking aid .
Display
-Off -when the parking system is switched on,
only audible signals are g iven.
- On -when the parking system is switched on,
either the visual disp lay or the picture from the
rearview camera is displayed .
Warning tones
-Front volume -front sensor volume
-Front frequency -front sensor frequency
- Rear volume -rear sensor volume
-Rear frequency -rear sensor frequency
-In -car entertainment fader/Music volume
while parking -
when the parking system is
switched on, the volume of the active audio
source is lowered .
The newly adjusted value is briefly heard from
the signal generator.
(D Tips
- The warning tones can also be adjusted di
rectly by the v isual disp lay or the picture
from the rearview camera. S imply press the
Settings control button.
- Changed settings are act ivated when park
in g system is switched on again .
130
-Th e settings are automatically stored and
assigned to the remote control key.
Trailer hitch
Applies to : vehicles wi th Audi parking sys te m plus wi th rear
v iew camera an d tra il er hitc h
For vehicles with a factory installed trailer hitch,
o r a trailer hitch installed according to factory
spec ifications, the parking system rear sensors
do not come on whenever you shift into reverse
gear or when you press the
p, qA switch. Remem
ber, there is no warning for distances to the rear.
The front sensors remain activated. The visual
display switches to the trailer tow ing mode. The
picture from the rearview camera w ill not show
the or ientat ion lines nor the blue surfaces .
If you install a hitch yourself, this function may
not work.
Error messages
App lies to: vehicles wi th Audi parking sys te m plus with rear
v iew camera
There is an error in the system if the LED on the
PJJJA switch is blinking and you hear a continuous
alarm for a few seconds after switching on the parking system or when the parking system is al
ready activated . Have your authorized Audi dealer
correct the error.
(D Tips
If the error is not corrected before you switch
off the ign ition, when you switch on the park
ing system again, the LED in the
Pw.o. switch
will blink.
Page 133 of 296

CD
CD
.... N ,-... N ,....,
0 0 C<'. 00
Driving safety
Basics
Safe driving habits
Please remember -safety first!
This chapter contains important information,
tips, instructions and warnings that you need to
read and observe for your own safety, the safety
of your passengers and others . We have summar
ized here what you need to know about safety
belts, airbags, child restraints as well as child
safety. Your safety is for us
priority number 1. Al
ways observe the information and warnings in
this section - for your own safety as well as that
of your passengers.
The information in this section applies to all
model versions of your vehicle. Some of the fea
tures descr ibed in this sections may be standard
equipment on some models, or may be optional
equipment on others. If you are not sure, ask
your authorized Audi dealer.
A WARNING
- Always make sure that you follow the in
structions and heed the WARNINGS in this
Manual. It is in your interest and in the in
terest of your passengers .
-
-Always keep the complete Owner's Litera
ture in your Audi when you lend or sell your
vehicle so that this important information
will always be available to the driver and
passengers.
- Always keep the Owner's literature handy so
that you can find it easily if you have ques
tions.
Safety equipment
The safety features are part of the occupant re
straint system and work together to help reduce
the risk of injury in a wide variety of accident sit
uations.
Your safety and the safety of your passengers
should not be left to chance. Advances in tech
nology have made a var iety of features available
to help reduce the risk of injury in an accident.
Driving safety
The following is a list of just a few of the safety
features in your Audi:
- sophisticated safety belts for driver and all pas-
senger seat ing pos itions,
- be lt force limiters for the front seats,
- belt pretensioners for the seats,
- belt height adjustment for the front seats,
- head restraints for each seating position,
- front airbags,
- side airbags in the front seats and outer rear
seats *,
- side curtain airbags,
- special LATCH anchorages for child restraints,
- adjustab le steering column.
These individual safety features, can work to gether as a system to help protect you and your
passengers in a wide range of accidents . These
features cannot work as a system if they are not
always correctly adjusted and correctly used.
Safety is everybody's responsibility!
Important things to do before driving
Safety is everybody 's job! Vehicle and occupant
safety always depends on the informed and care
ful driver .
For your safety and the safety of your passen
gers,
before driving always:
.,. Make sure that all lights and signals are operat
ing correctly.
.,. Make sure that the tire pressure is correct .
.,. Make sure that all windows are clean and afford
good visibility to the outside .
.,. Secure all luggage and other items carefully
~page 74 .
.,. Make sure that nothing can interfere with the
pedals.
.,. Adjust front seat, head restraint and mirrors
correctly for your height.
.,. Instruct passengers to adjust the head re
straints according to their height.
.,. Make sure to use the right child restraint cor
rectly to protect children
¢ page 168, Child
safety. ..,.
131
Page 134 of 296

Driving safety
• Sit properly in your seat and make sure that
your passengers do the same
c:> page 60,
General information.
• Fasten your safety belt and wear it properly . Al
so instruct your passengers to fasten their safe
ty belts properly
c:> page 140 .
What impairs driving safety?
Safe driving is directly related to the condition of
the vehicle, the driver as well as the driver 's abili
ty to concentrate on the road without being dis
tracted .
The driver is responsible for the safety of the ve
hicle and all of its occupants. If your ability to
drive is impaired, safety risks for everybody in the
vehicle increase and you also become a hazard to
everyone else on the road
c:> Li').. Therefore :
• Do not let yourself be distracted by passengers
or by using a cellular telephone .
• NEVER drive when your driving ability is im
paired (by medications, alcohol, drugs, etc.).
• Observe all traffic laws, rules of the road and
speed limits and plain common sense.
• ALWAYS adjust your speed to road, traffic and
weather conditions.
• Take frequent breaks on long trips. Do not drive
for more than two hours at a stretch.
• Do NOT drive when you are tired, under pres
sure or when you are stressed.
A WARNING
Impaired driving safety increases the risk of
ser ious personal injury and death whenever a
vehicle is being used.
132
Correct passenger
seating positions
Proper seating position for the driver
The proper driver seating position is important
for safe, relaxed driving.
Fig. 150 Correct seating posit ion
For your own safety and to reduce the risk of in
jury in the event of an accident, we recommend
that you adjust the driver's seat to the following position:
• Adjust the driver's seat so that you can easily
push the pedals all the way to the floor while
keeping your knee(s) slightly bent
c:> .&_ .
• Adjust the angle of the seatback so that it is in
an upright position so that your back comes in
full contact with it when you drive.
• Adjust the steering wheel so that there is a d is
tance of at least 10 inches (25 cm) between the
steering wheel and your breast boner::!)
fig. 150.
If not possible, see your authorized Audi dealer
about adaptive equipment.
• Adjust the steering wheel so that the steering
wheel and airbag cover points at your chest and
not at your face.
• Grasp the top of the steering wheel with your
elbow(s) slightly bent.
• Adjust the head restraint so the upper edge is
as even as possible with the top of your head .
If
that is not possible, try to adjust the head re
straint so that it is as close to this position as
possible.
• Fasten and wear safety belts correctly
c:> page 143.
• Always keep both feet in the footwell so that
you are in control of the veh icle at all times .
Page 135 of 296

CD
CD
.... N ,-... N .... 0 0 C<'. 00
For detailed information on how to adjust the
driver's seat, see
¢ page 61.
A WARNING
Drivers who are unbelted, out of position or
too close to the airbag can be seriously in
jured by an airbag as it unfolds. To help re
duce the risk of serious personal injury:
- Always adjust the driver's seat and the
steering wheel so that there are at least 10 inches (25 cm) between your breastbone
and the steering wheel.
- Always hold the steer ing wheel on the out
side of the steering wheel rim with your
hands at the 9 o'clock and 3 o'clock posi
tions to help reduce the r isk of persona l in
jury if the driver's airbag inflates.
- Never hold the steer ing whee l at the
12 o'clock position or w ith your hands at
other pos it ions inside the steering wheel
rim or on the steering wheel hub. Holding
the steering wheel the wrong way can cause
serious injuries to the hands, arms and head if the driver's airbag deploys.
- Pointing the steering wheel toward your
face decreases the ability of the supplemen
tal driver's airbag to protect you in a colli sion.
- Always sit in an upright position and never lean against or place any part of your body
too close to the area where the airbags are
located .
- Before driving, always adjust the front seats
and head restraints properly and make sure
that all passengers are properly restrained.
- Never adjust the seats while the vehicle is
moving . Your seat may move unexpectedly
and you could lose control of the vehicle .
- Never drive with the backrest reclined or
t il ted far back! The farther the backrests are
tilted back, the greater the risk of injury due
to incorrect positioning of the safety belt
and improper seating position.
- Children must always ride in child safety
seats¢
page 168. Spec ial precaut ions ap
ply when installing a ch ild safety seat on the
front passenger seat
c:::;, page 148.
Driving safety
Proper seating position for the front
passenger
The proper front passenger seating position is
important for safe, relaxed driving.
For your own safety and to reduce the risk of in
jury in the event of an acc ident, we recommend
that you adjust the seat for the front passenger
to the follow ing position:
"' Adjust the angle of the seatback so that it is in
an upright position and your back comes in full
contact with it whenever the vehicle is moving.
"' Adjust the head restraint so the upper edge is
as even as possible with the top of your head. If
that is not possible, try to adjust the head re
straint so that it is as close to this position as
possible
¢ page 134.
"' Keep both feet flat on the floor in front of the
front passenger seat.
"' Fasten and wear safety belts correctly
c:::;, page 143.
For detailed information on how to adjust the
front passenger's seat, see
c:::;, page 60.
A WARNING
--
Front seat passengers who are unbelted, out
of position or too close to the airbag can be
seriously injured or killed by the airbag as it
unfolds. To help reduce the risk of serious
personal injury:
- Passengers must always s it in an upright po
sition and never lean against or place any
part of their body too close to the area
where the airbags are located.
- Passengers who are unbelted, out of posi
tion or too close to the airbag can be seri
ously injured by an airbag as it unfolds with
great force in the blink of an eye.
- Always make sure that there are at least
10 inches (25 cm) between the front pas
senger's breastbone and the instrument
panel.
- E ach passenger must always sit on a seat of
their own and properly fasten and wear the
safety belt belonging to that seat .
- Before driving, always adjust the front pas
senger seat and head restraint properly.
133
Page 136 of 296

Driving sa fe ty
-Always keep your feet on the floor in front
of the seat. Never rest them on the seat, in
strument pane l, out of the window, etc. The
airbag system and safety belt will not be
able to protect you properly and can even in
c rease the risk of injury in a crash .
- Never dr ive with the backrest reclined or
t il ted far bac k! The farther the backrests are
t il ted back, the greater the risk of in ju ry due
to incorrect positioning of the safety belt and imp roper seating position.
- Children must always ride in child safety
seats r=;,
page 168 . Special pre caut ions ap
ply when installing a ch ild safety seat on the
front passenger seat r=;,
page 148.
Proper seating positions for passengers in
rear seats
Rear seat passengers must sit upright wi th both
feet on the floor consistent with their physical
size and be properly restrained whenever the ve
hicle is in use.
To reduce the risk of injury caused by an inco rrect
seating position in the event of a sudden braking maneuver or an accident, your passengers on the
rear bench seat must always observe the follow
ing :
~ If there is a passenger on the rear center seat
ing pos it ion, slide the center head restra int up
ward at least to the next notch r=;,
page 64.
~ Make sure that the seatback is securely latched
in the upright pos ition r=;,
page 66.
~ Keep both feet flat in the footwell i n front of
the rear seat.
~ Fasten and wea r safety be lts p roperly
r:=;, page 143.
~ Make s ure that children are always properly re
strained in a c hild rest raint t hat is appropriate
f or their size and age r=;,
page 168.
A WARNING
Passengers who are improperly seated on the
rear seat can be seriously injured in a crash.
- Each passenger must always sit on a seat of their own and properly fasten and wear the
safety belt belonging to that seat.
134
- Safety belts only offer maximum protect ion
when the seatback is securely latched in the upright pos ition and the safety belts are
properly posit ioned on the body . By not sit
ting upright, a rear seat passenger increases
the risk of personal injury from imprope rly
posi tioned safety belts!
- Always ad just the head restra int properly so
that it can give maximum p rotection.
Proper adjustment of head restraints
Correctly adjusted head restraints are an impor
tant part of your vehicle's occupant restraint sys
tem and can help to reduce the risk of injuries in
accident situations.
Fi g. 1 51 Head restra int: v iewed from t he front
The head restraints must be correctly adjusted to
achieve the best protection.
~ Adjust the head rest raints so the upper edge is
as even as possib le w ith the top of you r head. If
that is not possible, t ry to adjust the head re
straint so that it is as close to this pos it ion as
possible r=;,
fig. 151.
~ If there is a passenger on the rear center seat
ing position, slide the center head restraint up
wa rd at least to the nex t notch .
Adjust ing head restraints r=;,
page 64.
A WARNING -
All seats are equipped w ith head restraints.
Driving w ithout head restraints or w ith head
rest raints tha t are not prope rly adjusted in
creases the r isk of se rious or fata l neck injury
d ra mat ic al ly. To help reduce t he risk of injury:
Ill-
 1
1 2
2 3
3 4
4 5
5 6
6 7
7 8
8 9
9 10
10 11
11 12
12 13
13 14
14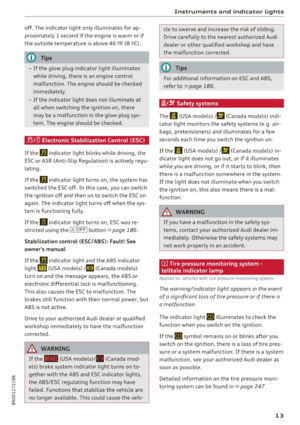 15
15 16
16 17
17 18
18 19
19 20
20 21
21 22
22 23
23 24
24 25
25 26
26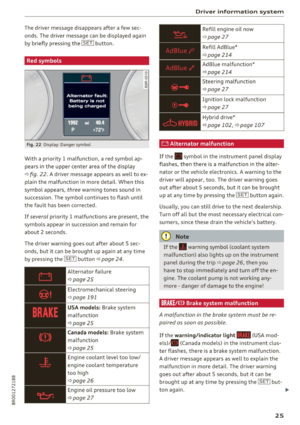 27
27 28
28 29
29 30
30 31
31 32
32 33
33 34
34 35
35 36
36 37
37 38
38 39
39 40
40 41
41 42
42 43
43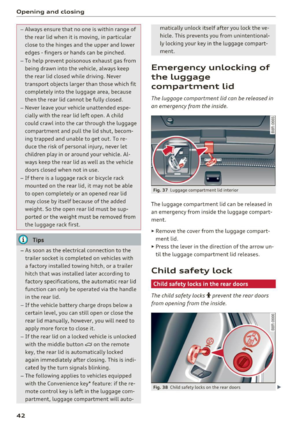 44
44 45
45 46
46 47
47 48
48 49
49 50
50 51
51 52
52 53
53 54
54 55
55 56
56 57
57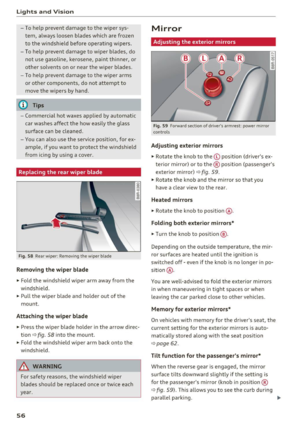 58
58 59
59 60
60 61
61 62
62 63
63 64
64 65
65 66
66 67
67 68
68 69
69 70
70 71
71 72
72 73
73 74
74 75
75 76
76 77
77 78
78 79
79 80
80 81
81 82
82 83
83 84
84 85
85 86
86 87
87 88
88 89
89 90
90 91
91 92
92 93
93 94
94 95
95 96
96 97
97 98
98 99
99 100
100 101
101 102
102 103
103 104
104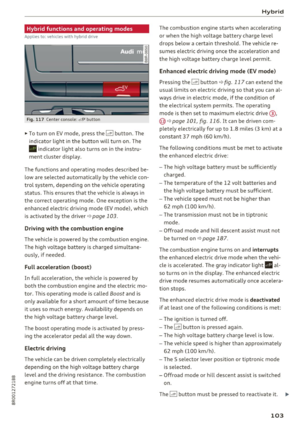 105
105 106
106 107
107 108
108 109
109 110
110 111
111 112
112 113
113 114
114 115
115 116
116 117
117 118
118 119
119 120
120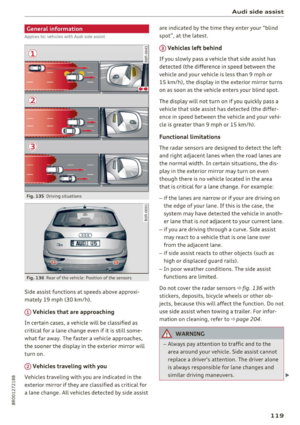 121
121 122
122 123
123 124
124 125
125 126
126 127
127 128
128 129
129 130
130 131
131 132
132 133
133 134
134 135
135 136
136 137
137 138
138 139
139 140
140 141
141 142
142 143
143 144
144 145
145 146
146 147
147 148
148 149
149 150
150 151
151 152
152 153
153 154
154 155
155 156
156 157
157 158
158 159
159 160
160 161
161 162
162 163
163 164
164 165
165 166
166 167
167 168
168 169
169 170
170 171
171 172
172 173
173 174
174 175
175 176
176 177
177 178
178 179
179 180
180 181
181 182
182 183
183 184
184 185
185 186
186 187
187 188
188 189
189 190
190 191
191 192
192 193
193 194
194 195
195 196
196 197
197 198
198 199
199 200
200 201
201 202
202 203
203 204
204 205
205 206
206 207
207 208
208 209
209 210
210 211
211 212
212 213
213 214
214 215
215 216
216 217
217 218
218 219
219 220
220 221
221 222
222 223
223 224
224 225
225 226
226 227
227 228
228 229
229 230
230 231
231 232
232 233
233 234
234 235
235 236
236 237
237 238
238 239
239 240
240 241
241 242
242 243
243 244
244 245
245 246
246 247
247 248
248 249
249 250
250 251
251 252
252 253
253 254
254 255
255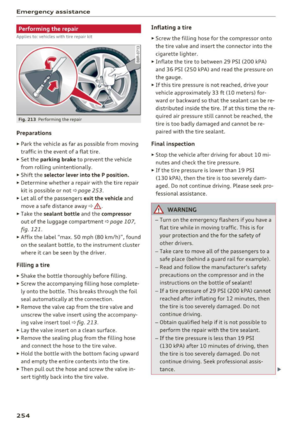 256
256 257
257 258
258 259
259 260
260 261
261 262
262 263
263 264
264 265
265 266
266 267
267 268
268 269
269 270
270 271
271 272
272 273
273 274
274 275
275 276
276 277
277 278
278 279
279 280
280 281
281 282
282 283
283 284
284 285
285 286
286 287
287 288
288 289
289 290
290 291
291 292
292 293
293 294
294 295
295