Page 233 of 284

co
co
.... N
" N .... 0
00
\.J -
Check/correct the pressures of all four tires and
store the pressure again in the Infotainment sys
tem
¢page 231.
ffim (T ire Pressure Monitoring System) T ire
pressu re : S ys tem malfunction !. If ffim
appears
after switching the ignition on or whi le driving
and the
[I] indicator light in the instrument clus
ter blinks for approximate ly one minute and then
stays on, there is system malfunction. Try to
store the correct tire pressures¢
page 231. If
the ind icator light does turn off or turns on again
after a short period of time, dr ive to an author
i zed A udi dealer o r authorized Audi Service Fac ili
ty immediately to have the malfunc tion correct
ed .
& WARNING ,___ -
-If the tire pressure indicator appea rs in the
display, reduce your speed immed iate ly and
avoid any hard steer ing or braking maneu
vers. Stop as soon as possib le and check the
t ires and their pressure.
- The driver is responsib le for maintaining the
correct tire pressure. You must check the
t ire pressure regu larly.
- Under certa in conditions (such as a sporty
driv ing style, winter cond itions or unpaved
roads), the tire p ressure monitoring system
indicator may be delayed.
{D) Tips
- The t ire pressure monitoring system can al
so stop work ing when there is an ESC mal
funct ion.
- Using snow chains may result in a system
malfunction .
- The t ire pressure monitoring system in your
Audi was calibrated with "Audi Orig inal
Tires"
¢ page 218. We recommend that you
use these t ires .
Wh eel s
Storing tire pressures
Applies to: vehicles with Tire Pressure Monitor ing System in
dicator
If the tire pressure changes or a tire is replaced,
it must be confirmed in the Infotainment sys tem.
.,. Make sure before storing that the tire pressures
of all four tires meet the specified values and
are adapted to the load
¢ page 221.
.,. Switch the ignit ion on.
.,. Select: the
I CAR ! funct ion button > ( C ar) * Sys
tem s
contro l button > S ervic e & ch eck s> Tire
pres sure monitor > Store tire pre ssure > Yes,
s tore now .
(D Tips
Do not store the tire pressures if snow chains
a re installed.
Tire pressure monitoring
system
ill General notes
Each tire, including the spare (if provided),
shou ld be checked monthly whe n cold and inflat
ed to the i nflat io n press ure recommended by the
vehicle manufacturer on the veh icle placard or
t ir e inflation pressure labe l. (If your ve hicle has
tires of a different size than the size indicated on
the vehicle placard or tire inflation pressure la
bel, you should determ ine the proper tire infla
t ion pressure for those tires).
As an added safety feature, yo ur vehicle has been
equipped with a tire pressure mon itor ing system
(TPMS) that illuminates a low tire pressure tell
ta le when one or more of your tires is signif icant
ly under-inflated. According ly, when the low t ire
pressure te lltale illum inates, you sho uld stop and
chec k your tires as soon as possib le, and inflate
t h em to the prope r pressure. Dr iving on a sig nifi
ca nt ly unde r-inflated t ire causes the t ire to over
hea t and can lead to tire fa il ur e. Under-inflat ion
also reduces fue l effic iency and tire tread life,
and may affect the vehicle's handling and stop -
ping ability .
liJJ,-
231
Page 234 of 284

Wheels
Please note that the TPMS is not a substitute for
proper tire maintenance, and it is the driver's re
sponsib ility to ma intain correct tire pressure,
even if under-inflation has not reached the level
to trigger illumination of the TPMS low tire pres
sure telltale.
Your veh icle has also been equ ipped with a TPMS
malfunction indicator to indicate when the sys
tem is not operating properly. The TPMS mal
function indicator is combined with the low tire
pressure telltale . When the system detects a
malfunction, the telltale will flash for approxi mately one minute and then remain cont inuously
illum inated. This sequence will continue upon
subsequent vehicle start-ups as long as the mal
function exists.
When the malfunct ion indicator is illuminated,
the system may not be able to detect or signal
low tire pressure as intended. TPMS ma lfunctions
may occur for a variety of reasons, including the
installation of replacement or alternate tires or
wheels on the vehicle that prevent the TPMS
from functioning properly . Always check the
TPMS malfunction telltale after replacing one or
more tires or wheels on your vehicle to ensure
that the replacement or alternate t ires and
wheels a llow the TPMS to continue to function
properly.
Description
A pp lies to: ve hicles w ith tire p ressure monitoring system
The tire pressure monitoring system monitors
the pressure in the four tires when driving.
The system uses sensors that measure the tem
perature and pressure in the tires . The data is
sent from these sensors to the contro l module by
radio frequency.
The Tire Pressure Monitoring System shows the current pressures and temperatures of the tir es
in the Infota inment system
c:> page 232. It also
compares the current t ire pressures with the
stored tire pressu res and gives a warning in the
d river information system if the tire pressure is
different from what is stored
r:';> page 233.
232
The system does not detect if the stored tire
pressures match the recommended tire pres
sures. You must store the tire pressures again
c:> page 233:
-every time the tire pressures change, for exam
ple when the load in the vehicle changes,
- after replacing a tire, or
- if wheels with new whee l sensors are used.
_&. WARNING
- The tire pressure monitoring system assists
the driver in monitoring tire pressures. The
driver is responsib le for having the tires in
flated to the correct pressure.
- Do not change the tire pressure when the
temperature of the tire is high. This could
result in serious damage to the tire and
even cause the tire to burst, increasing the
risk of an accident.
-A tire with low pressure flexes more. This heats the tire up too much. This could cause
the tread to separate and even cause the
tire to burst, increasing the risk of an acc i
dent.
- The tire pressure monitoring system does
not warn about damage or defects in the
tire construct ion that could cause the tire to
burst, for examp le. Inspect your tires reg u
larly.
(D Tips
- If tires are replaced, the sensors/valves do
not need to be removed or replaced. Just re
placed the va lve stem and, if necessary, the
valve and the wheel electronics.
If you have
questions, see your authorized Audi dealer
or authorized Audi Service Facility.
- An incorrect display or a malfunction in the
tire pressure monitoring system can occur
after using the tire mobility kit. Have the
sensors rep laced by an authorized Audi
dealer or author ized Audi Service Facility.
Displaying tire pressures/temperatures
App lies to: vehicles wit h tire pressure monitoring syste m
Requirement: the ignition must be switched on . ...,
Page 235 of 284
 SI\"
.. Se lect: the I CAR I function button > Car syst ems
> Se rvice & checks > Tire pres sure monitor >
Di splay ti re pres sure s.
The cu rrent tire")
co
co
.... N
" N .... 0
00
<.,;) 'SI"
.. Se lect: the I CAR I function button > Car syst ems
> Se rvice & checks > Tire pres sure monitor >
Di splay ti re pres sure s.
The cu rrent tire press ures are shown in green and
ye llow numbers in the Infotainment system:
- Green : the cur ren t tire pressure and the speci
fied tire press ure are app roxima tely the same.
- Yellow : the cu rrent tire pressu re is too low
comp ared to the specified ti re pressure.
The spec ified tire pressure is the last tire pres
sure that was stored
c> page 233 .
Note that the tire pressure also depends on the
temperature of the t ire . The tire press ure in
creases as the engine becomes warmer wh ile
d riving.
..&, WARNING
Read and follow the important inform ation
an d no tes
c> page 232.
@ Tips
The tire pressure or temperature a re not dis
played in adaptation mode. Dashes --.-- are
show n in place of the press ure and tempe ra
ture.
CD Tire pressure loss
A pp lies to: ve hicles with tire p ressu re m oni toring sys tem
F ig . 19 5 Display : indicato r lig ht wit h a me ssage
If t he RI) indicato r light turns on, t he p ressure in
at least one t ire is too low o r new sensors were
n o t adapted :
Wheels
II] indicator light s turns on after turning the
ignition on
T he tire press ure is too low compared to the
specified press ure .
.. Check and store the tire pressure(s) the next
time it is possible
<:!> page 233 .
HE indicator light turns on while driving
Wheels with new sensors we re not adapted or
t h e tire p ressure h as reac hed a cr itica l level com
pared to the specified p ressure.
.,. Avoid unnecessary steer ing and brak ing mane u-
vers.
.. Adapt your dr iving sty le to the sit uation.
.. Stop as soon as poss ible and check the tire(s).
.. If i t is possib le to continue dr iving , see an au-
thorized A udi dealer or authorized Audi Service
Facility immediately and have your tire(s) re
paired or rep laced.
..&, WARNING
--
Read and follow the important info rmation
and notes
r=> page232 .
Storing new tire pressures
Applies to: vehicles wit h tire pressure monito rin g system
Correctly stored t ire pressure specifications are
necessary for reliable tire pressure monitoring.
.. Check the tire pressures in all whee ls .
.. Correct the t ire pressure if necessary . Refer to
the ti re pressure label for the recommended
tire pressure for your vehicle
c> page 221,
fig . 193.
On ly co rrect the pressure i n tires
whose temperature is app roximately the same
as the a mbient tempe ra tu re.
If the tempe ra
t ure of t he tire is higher than t he ambien t air
t em pe rature, the t ire press ure must be in
creased approximately 3 PSI (0, 2 bar) above
the value on the sticker .
.. Switch t he ignit ion on.
.. Select:
!CAR I function button> Car systems >
T ire pressure monitoring > Store tire pressu re.
After stori ng, the t ire pressure monitori ng sys
tem meas ures t he curre nt t ire pressures and
sto res them as the new specified pressures .
233
Page 236 of 284

Wheels
"'If the changed tire pressures are not displayed
in the Infotainment system, drive the vehicle
for approximately 10 minutes so that the sen
sor signal from the wheels is received again.
During this adaptation phase, --.--is displayed
for the pressure and temperature and the tire
pressure monitoring system is only partially
available. It only provides a warning if one or
more t ire pressures is below the minimum per
mitted specified pressure. If this is the case, the
Rt] indicator light appears with a message.
_& WARNING
Read and follow the important information
and notes
r::!;>page 232.
Malfunctions
Appl ies to : vehicles wi th tire pressure mo nito rin g system
If the Tire Pressure Monitoring System is not
avai lable, the
mm indicator light appears in the
driver information system. The
Rt] indicator light
also blinks for approximately one minutes each
time the ignition is switched on. The tire pressure
monitoring system cannot be selected in the In
fotainment system. The following are examples
of situations that could cause a malfunction:
- If the message appears at the end of the adap
tation phase, the system cannot detect the
wheels installed on the vehicle. This may result
from one or more wheels being installed with out wheel sensors or with incompatible wheel
sensors.
- A wheel sensor or another component has
failed.
- Using snow chains can affect the function of
the system because of the shield ing effect of
the cha ins.
- The tire pressure monitoring system is not
available due to a malfunction .
- Transmitters with the same frequency, such as
headphones or remote-controlled devices, may
cause a temporary system malfunction due to
the strong electromagnetic field.
The
mm indicator light turns off once the Tire
Pressure Monitoring System is available again.
If
you cannot correct the malfunction and the mm
234
indicator light stays on, drive immediately to an
authorized Audi dealer or authorized Audi Service Facility to have the malfunction repaired.
Page 237 of 284

co
co
.... N
" N .... 0
00
\.J '
Care and cleaning
General information
Regular, proper care helps to maintain your vehi
cle's value.
It can a lso be a requirement when
submitting warranty claims for corrosion damage
and paint defects on the body.
The necessary care products can be obtained
from an authorized Audi dealer or authorized
Audi Service Facility . Read and follow the instruc
tions for use on the packaging.
A WARNING
- Us ing clean ing and care products incorrectly
can be dangerous to your health.
- Always store clean ing and care products out
of reach of children to reduce the r isk of po i
soning .
@ For the sake of the environment
- Preferably purchase env ironmenta lly-friend
l y cleaning products.
- Do not d ispose of leftover cleaning and care
products with household trash.
Car washes
T he longer that deposits remain on the vehicle,
the more the surface may be damaged. High
temperatures such as those caused by sunlight
increase the damag ing effect.
Befor e washing, rinse
off heavy depos its with
p lenty of water.
S tubborn depos its such as bird droppings or tree
sap are best removed with plenty of water and a
microfiber cloth.
A lso, wash t he un derside of yo ur vehicle once
road sa lt stops being used for the season .
Pressure washers
When washing your ve hicles w ith a pressure
washer, always follow t he ope rating inst ructions
p rovided w ith the pressure washe r. This is espe
cially important in regard to the pressu re and
sp raying distance. Do not a im the spray directly
at the sea ls on the side w indows, doors, lids or
Ca re and cleaning
the sun roof * or at tires, rubber hoses, ins ulating
material, sensors* or camera lenses* . Keep a dis
tance of at least 16 in (40 cm).
Do not remove snow and ice with a pressure
washer.
Never use cone noz zles o r high pressu re noz zles .
The water temperature must not be above 140 °F
(60 °C).
Automat ic car washe s
Spray off the vehicle befo re washing .
Make s ure that the wi ndows and roo f* are closed
and the windsh ie ld wipers are
off . Follow instruc
tions from the car wash operator, especially if
there are accessories attached to your vehicle .
If possible, use car washes that do not have
brushes .
Applies to: RS models: only use car washes where
t h e vehi cle rema ins s ta ti onary and the washi ng
equipmen t moves around the veh icle when wash
ing and drying. Car washes that move the ve hicle
th rough the car wash using a chain are not rec
ommended.
Washing by hand
Clean the ve hicl e s tarting from the top and wor k
ing down using a soft sponge or cleaning br ush .
Use solvent -free cleaning products.
Washing vehicles with matte finish paint by
hand
T o avo id damag ing the pa int when washing, firs t
remove dust and large pa rticles from your vehi
cle . Insects, grease spots and fingerprints are
best removed w ith a special cleaner for matte
finish paint.
Apply the product using a microfiber cloth . To
avo id damaging the pa int surface, do not use too
much pressure .
Rinse the ve hicl e thorough ly w ith wate r. Then
clean using a neutra l shampoo and a so ft micro
fiber cloth .
Rinse the ve hicl e thoroug hly aga in and let it air
dry . Remove any water residue using a chamois. ..,.
235
Page 238 of 284

Care and cleaning
A WARNING
- Only wash the vehicle when the ignition is
off and follow the instructions from the car
wash operator to reduce the risk of acci
dents.
- To reduce the risk of cuts, protect yourself
from sharp metal components when wash
ing the underbody or the inside of the wheel
housings.
-After washing the vehicle, the braking effect
may be delayed due to mo isture on the
brake rotors or ice in the winter . This in
creases the risk of an acc ident. The brakes
must be d ried first w ith a few careful b rake
applications.
(D Note
- If yo u wash the ve hicle in an automatic car
wash, yo u m ust retract the rear spoiler if
necessary, and fold the exte rior mi rrors in
to reduce the risk of da mage. Power fo ld ing
ex ter ior mirro rs* m ust only be folded in and
out using the power folding func tion.
-
- To red uce the risk of pa int damage, do not
wash the vehicle in direct sun light .
- T o reduce the risk of damage to the s urface,
do not use insect removing sponges, kitchen
sponges o r similar items .
- Matte finish painted vehicle components:
-To reduce the risk of damage to the sur-
face, do not use polis hing agents or hard
wax .
- Never use protective wax. It can destroy
the matte finish effect .
- Do not place any stickers or magnetic
signs on vehicle parts painted with matte
finish paint. The paint could be damaged
when the stickers or magnets are re
moved.
@ For the sake of the environment
Only wash the veh icle in facili ties spec ially de
s igned for that pu rpose . This will reduce the
r isk of dirty wate r contam inated with o il from
ente ring the sewe r system.
Cleaning and care information
W hen clean ing and ca ring for ind ividua l vehicle
components, refer to the fo llow ing tables. The
i n formation conta ined there is s imply recom
mendations. For quest ions or for components t
h at are not listed, cons ult an autho rize d Aud i
dealer or au thor ized Aud i Servi ce Fac ility. Also
fo llow the informa tion found in <=> & .
Ext erior cleaning
Component Situation Solution
Windshield wiper
Deposits ¢ page 47, Cleaning windshield wiper blades
blades
Headlights /
Deposits Soft sponge wi th a m ild soap solution3>
Tail light s
Sensors /
Deposits Sensors: soft cloth with solvent-free cleaning solution
camera lens es Camera lenses: soft cloth w ith alcohol -free cleaning solu -
tion
Snow/ice Hand br ush/solvent-free de-icing spray
Wheels Road salt Water
Bra ke dust Acid-free special cleaning solution
Exhaust tail pipes Road salt Water, clea ning solution su itab le for s tainl ess stee l, if nee-
essa ry
236
Page 239 of 284

co
co
.... N
" N .... 0
00
\.J '
Care and cleaning
Component Situation Solution
Decorati ve parts /
Deposits Mild
soap solution al, a cleaning so lution suitable for stain-
less stee l, if necessary
trim
Paint
P aint damage Refer to the paint number on the vehicle data label, repair
with touch up paint
q page 260
Spilled fuel Rinse with water immediately
Surface rust Rust
remover, then protect with hard wax; for questions,
consult an authorized Audi dealer or authorized Audi Serv-
ice Facility.
Corrosion Have it removed by an authorized Aud i dealer or author-
ized Audi Se rvice Facility.
Water no longer Protect with hard wax (at least twice per year)
beads on the surface
of clean paint
No shine even though Treat with suitable polish; then app ly paint protectant if
paint has been pro -the polish that was used does not contain any protectant
tected/paint looks
poor
Deposits such as in - Dampen with water immediately and remove with a m icro-
sects, bird droppings,
fiber cloth
tree sap and road salt
Grease-based con- Remove immediately with a m ild soap solution al and a
taminants such as soft cloth
cosmetics or sunb lock
Carbon parts Deposits clean the same way as painted parts q page 235
a} Mi
ld soap solution: maximum two tab lespoons of neutral soap in 1 quart (1 lite r) of water
Interior cleaning
Component Situation Solution
Windows
Deposits Glass cleaner, then wipe dry
Decorative parts/ Deposits Mild
soap solutional
trim
Plastic parts
Deposits Damp cloth
Heavier deposits Mild soap solution al, detergent-free plastic cleaning solu-
tion, if necessary
Display s Deposits Soft cloth with LCD cleaner
Controls Deposits Soft brush, then a soft cloth with a m ild soap solutional
Safety belts Deposits Mild
soap so lution al, allow to dry before letting them re-
tract
237
Page 240 of 284

Care and cleaning
Component Situation Solution
Te xtil es
Deposits adhering to Vacuum cleaner
a rt ifici al le ather , the surface
Alcant ara Water-based deposits Absorben
t cloth and mild soap solutiona>
such as coffee, tea,
blood, etc.
O il-based deposits Apply a m ild soap solution a), blot away the dissolved oil or
such as oil, make-up, dye, treat afterward with water, if necessary
etc.
Special deposits such Special stain remover, b lot with absorbent material, treat
as ink, na il polish, la- afterward with mild soap solution, if necessary a)
tex paint, shoe pol-
ish, etc.
Natural leather Fresh stains Cotton cloth with a mi
ld soap solutiona>
Water-based deposits Fresh sta ins : absorbent cloth
such as coffee, tea, Dried sta ins: stain remover suitable fo r leather
blood, etc.
Oil-based deposits Fresh stains: absorbent cloth and stain remover suitable
such as oil, make-up, for leather
etc. Dried sta ins : grease dissolv ing spray
Special deposits such Spot remover suitab le for leather
as ink, nai l polish, la -
tex paint, shoe pol-
ish, etc.
Ca re Regularly apply cond ition ing cream that protects from
light and penet rates into the materia l. Use specia lly-co l-
ored conditioning cream, if necessary.
Carbon parts Deposits clean the same way as plastic parts
a) Mild soap solution: maximum two tablesp oons of neutral soap in 1 quart (l liter) of water
_& WARNING
The windshie ld may not be trea ted with wa
ter-repelling windshield coating agents. Un
favorable conditions s uch as wetness, dark
ness, or low sun can result in increased glare .
Wiper blade chatter is also possible.
(D Note
- Headlights /tail light s
-Never clean headlights or tail lights with a
dry cloth or sponge.
- Do not use any cleaning product that con
tains alcohol, because they could cause
cracks to form.
- Wheels
238
-
- Never use any paint polish or other abra
sive materials.
- Damage to the protect ive layer on the
rims such as stone chips or scratches must
be repaired immediately.
- Sensors /camera l enses
- Neve r use wa rm or ho t water to remove
snow or ice from the camera lens . This
could cause the lens to crack .
- Neve r use ab rasive cleaning materials or
a lcohol to clea n the camera lens . This
could cause scratches and cracks .
-Doo r window s
-Remove snow and ice on windows and ex-
terior mirrors with a plast ic scraper. To
 1
1 2
2 3
3 4
4 5
5 6
6 7
7 8
8 9
9 10
10 11
11 12
12 13
13 14
14 15
15 16
16 17
17 18
18 19
19 20
20 21
21 22
22 23
23 24
24 25
25 26
26 27
27 28
28 29
29 30
30 31
31 32
32 33
33 34
34 35
35 36
36 37
37 38
38 39
39 40
40 41
41 42
42 43
43 44
44 45
45 46
46 47
47 48
48 49
49 50
50 51
51 52
52 53
53 54
54 55
55 56
56 57
57 58
58 59
59 60
60 61
61 62
62 63
63 64
64 65
65 66
66 67
67 68
68 69
69 70
70 71
71 72
72 73
73 74
74 75
75 76
76 77
77 78
78 79
79 80
80 81
81 82
82 83
83 84
84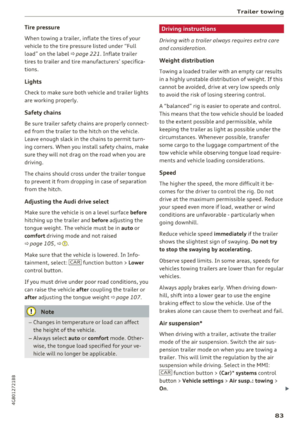 85
85 86
86 87
87 88
88 89
89 90
90 91
91 92
92 93
93 94
94 95
95 96
96 97
97 98
98 99
99 100
100 101
101 102
102 103
103 104
104 105
105 106
106 107
107 108
108 109
109 110
110 111
111 112
112 113
113 114
114 115
115 116
116 117
117 118
118 119
119 120
120 121
121 122
122 123
123 124
124 125
125 126
126 127
127 128
128 129
129 130
130 131
131 132
132 133
133 134
134 135
135 136
136 137
137 138
138 139
139 140
140 141
141 142
142 143
143 144
144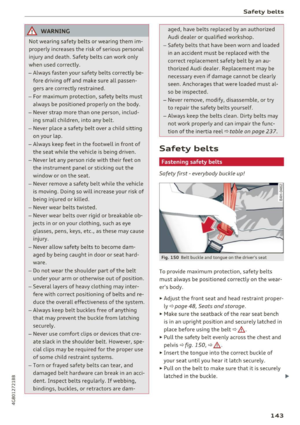 145
145 146
146 147
147 148
148 149
149 150
150 151
151 152
152 153
153 154
154 155
155 156
156 157
157 158
158 159
159 160
160 161
161 162
162 163
163 164
164 165
165 166
166 167
167 168
168 169
169 170
170 171
171 172
172 173
173 174
174 175
175 176
176 177
177 178
178 179
179 180
180 181
181 182
182 183
183 184
184 185
185 186
186 187
187 188
188 189
189 190
190 191
191 192
192 193
193 194
194 195
195 196
196 197
197 198
198 199
199 200
200 201
201 202
202 203
203 204
204 205
205 206
206 207
207 208
208 209
209 210
210 211
211 212
212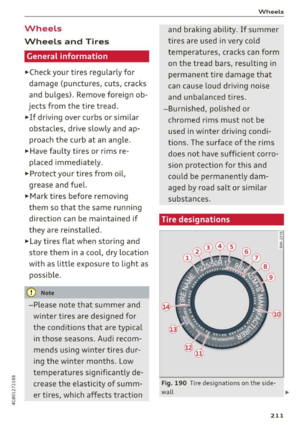 213
213 214
214 215
215 216
216 217
217 218
218 219
219 220
220 221
221 222
222 223
223 224
224 225
225 226
226 227
227 228
228 229
229 230
230 231
231 232
232 233
233 234
234 235
235 236
236 237
237 238
238 239
239 240
240 241
241 242
242 243
243 244
244 245
245 246
246 247
247 248
248 249
249 250
250 251
251 252
252 253
253 254
254 255
255 256
256 257
257 258
258 259
259 260
260 261
261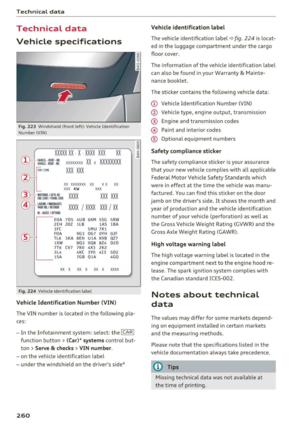 262
262 263
263 264
264 265
265 266
266 267
267 268
268 269
269 270
270 271
271 272
272 273
273 274
274 275
275 276
276 277
277 278
278 279
279 280
280 281
281 282
282 283
283