Page 57 of 284

co
co
.... N
" N .... 0
00
<.,;) 'SI'
-Do not hang heavy objects on the coat
hooks, as they could cause personal injury in
a sudden stop.
(D Note
Objects on the rear shelf that rub against the
rear w indow can damage the rear window
heating wires.
Roof rack
App lies to: ve hicles with roof rac k
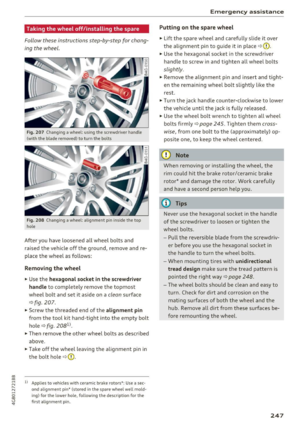
Fig. 60 Attac hm ent po int s for t he roof rack
If luggage or cargo is to be carried on the roof,
you must observe the following: :,;
0
0
Cl
"' a,
-
Only a special ly desig ned roof ra ck may be used
on your ve hicle . These roof rac ks are the basis
for a complete roof rack system. Additional at
tachm ents/carrier systems are necessary to
transport luggage and sports equipment . We
recommend roof racks and attachments from
the Audi Ge nuine Accessor ies program .
- When installing the roof rack, make sure that it
i s mounted only at the designated points on
the roof
c> fig . 60 .
- The permissib le roof load for your vehicle is
220 l bs (100 kg) . The roof load is the total of
the weight of the roof rack, the attachments and the cargo you are carrying . However, you
must a lso note the permit ted load of the car ri
er system being used. For the perm itted axle
l oad and the permit ted total vehicle weight , re
f er to
c> page 260.
A WARNING
- Follow the installation instructions provided
with the roof rack system. If you do not se-
Seats and storag e
cure the roof rack system and objects o n the
roof correct ly, t hey could come loose from
the vehicle and cause an accident.
- Using a roof rack system increases the r isk
of an accident , because it changes the driv
ing characte ristics by shifting the center of
gravity and/o r the increas ing t he surface
area exposed to w ind . Adapt your drivi ng
an d speed to the cur rent con ditions .
(D Note
Make sure t hat the luggage compartment lid
and t he sunroof* do not come into contact
with ob jects on the roof when they are open .
@ For the sake of the environment
Your vehicle will require more fuel due to the
increased w ind resis tance . So remove the roof
r ack afte r using it.
Luggage compartment
General information
A WARNING
-Read and follow the important safety preca u-
tions in ¢
pag e 135, Storing cargo correctly .
Increasing the size of the luggage
compartment
Applies to: vehicles with folding backrests
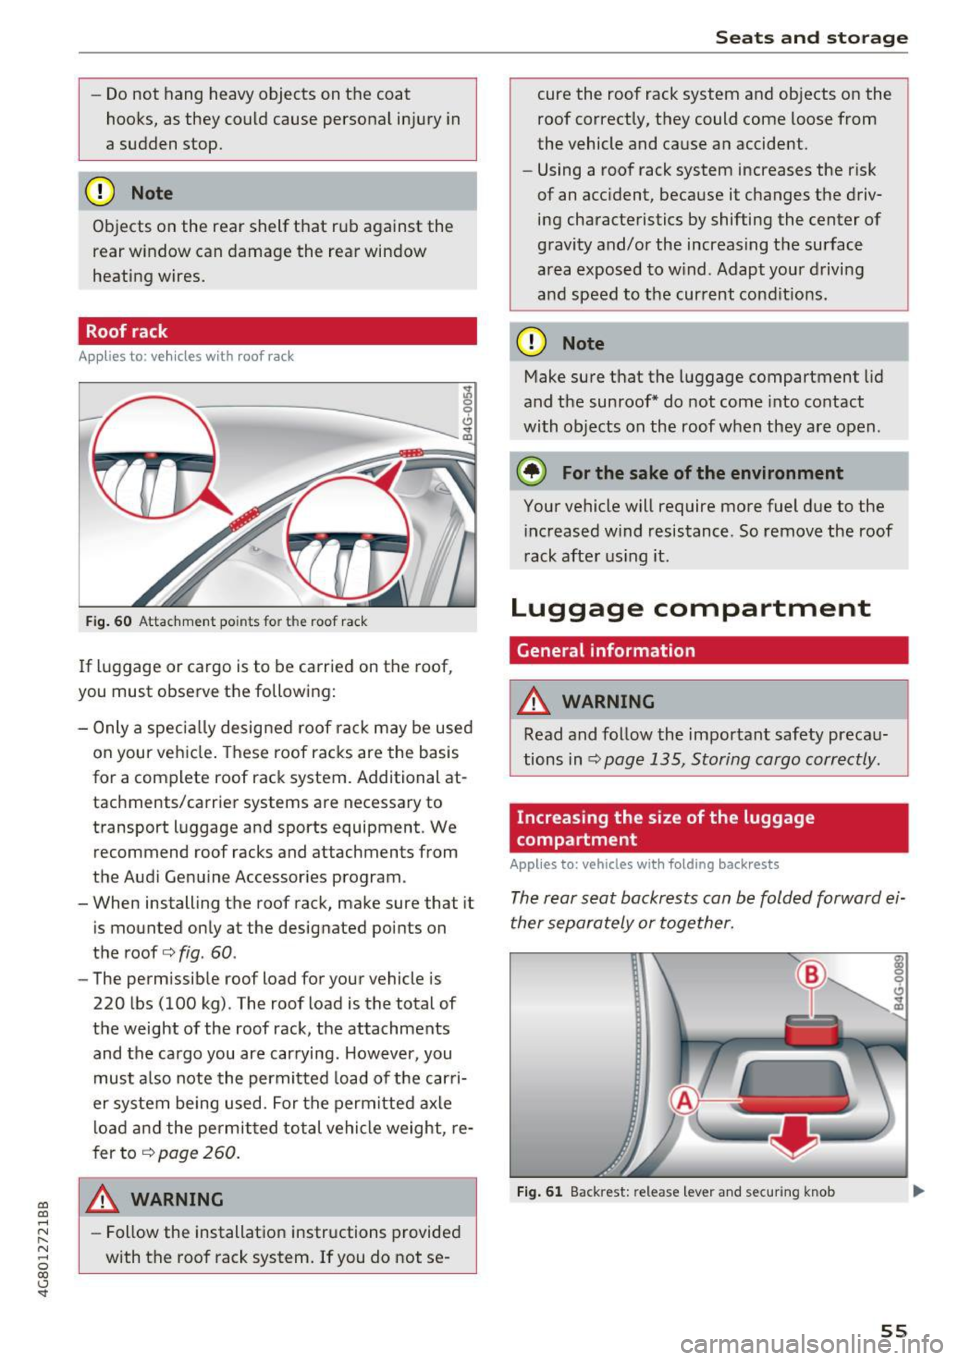
The re ar seat backrests can b e folded forward ei
ther separately or toge ther.
Fi g. 61 Backr est: re lease leve r and se cur ing knob
55
Page 58 of 284

Sea ts and stor age
Folding the ba ckrest forward
.. Pull the release lever@~ fig. 61 in the direc-
tion of the arrow to fold the backrest fo rward.
Folding the backrest back into the upr ight
po sit ion
.. Fol d the backrest back up aga in until it latches
and the red marking @ is no longer vis ible
9 _&. .
A WARNING
-Be careful when folding the backrests for
ward! Not paying attention and not check
ing when fo ld ing the backrests can lead to
pinching injuries.
- The backrest must be latched secure ly to
ensure that the safety belt is protecting the
center seating pos it ion.
- The backrest must be securely latched so
objects cannot slide forward out of the lug
gage compartment during sudden braking.
(D Note
- If you move the front seat back when the
rear seat backrest is folded forward, you
could damage the head restraints on the r ear seat.
- If the Rear Seat Entertainment (RSE) * is in
stalled, move the rear head restraints down before folding the backrests forward
9 page 50 to reduce the risk of damage.
- When folding the backrest forward, make
sure the outer safety belts are in the belt
g uide recess so that they do not get pinched
i n the backrest lock and damaged. O ther ob
j ects sho uld be removed from the rear
bench seat to protect the backrest from
damage .
56
Tie-downs
Applies to : vehicles wit h tie-d owns
Fig. 62 Luggage compartment: locat io n of the t ie-downs
.. To secure objects, for example using the lug
gage compartment net, fold the t ie -down re
tainer upward.
Luggage compartment net
App lies to : vehicles wit h lu ggage compartment net
The cargo net prevents small objects from slid
ing.
F ig . 63 Luggage compartment: cargo net stretched out
.. Attach the hooks for the luggage compa rtment
net in the tie-downs .
A WARNING
For strength reasons, on ly objects wit h a max
imum we ight of 10 lb (5 kg) shou ld be se
cured in the luggage compartment net. Heavi
er objects are not adequately secured . There
is risk of personal injury.
Page 59 of 284

co
co
.... N
" N .... 0
00
<.,;) 'SI"
Luggage compartment cover
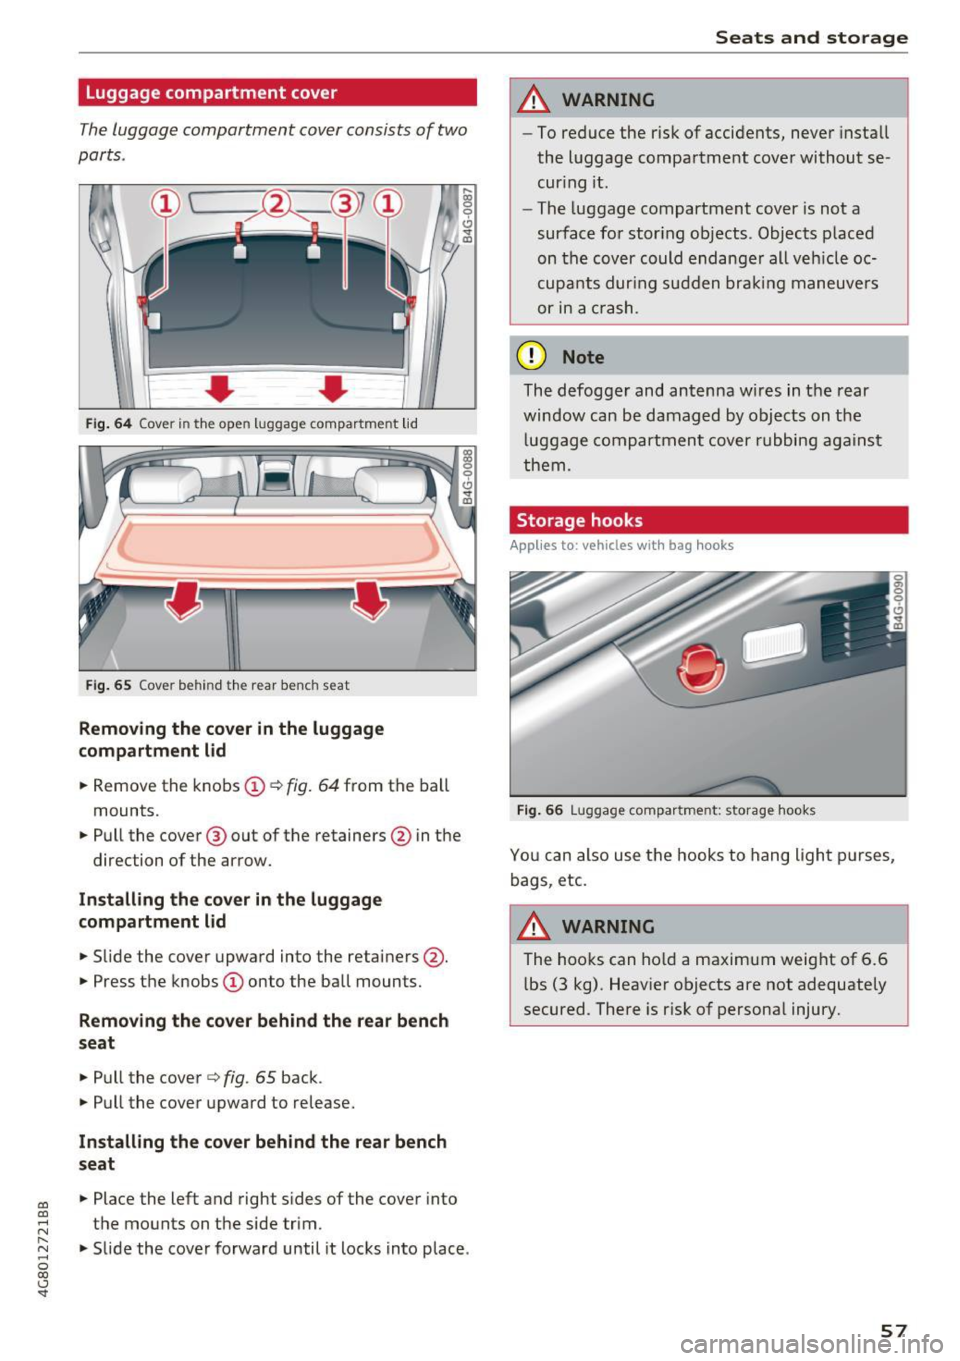
The luggage compartment cover con sists of two
parts .
..... 0:, 0
'
0
CJ
0 d~
Fi g. 64 Co ver in t he ope n luggag e compar tme nt lid
Fi g. 65 Cov er behin d th e rear ben ch seat
Removing the cover in the luggage
compartment lid
~ Remove the knobs CD¢ fig. 64 from the ball
mounts.
~ Pull the cover @ out of the retainers @in the
direction of the arrow.
In stall ing th e co ver in the luggag e
compartment lid
~ Slide the cover upward into the retainers @.
~ Press the knobs CD onto the ball mounts.
Removing th e cover behind the rear bench
seat
~ Pull the cover ¢ fig. 65 back.
~ Pull the cover upward to release.
In stall ing th e cover behind the r ear bench
s eat
~ Place the left and righ t sides of the cover into
the mounts on the s ide trim .
~ Slide the cover forward until it locks into place .
Seats and storag e
A WARNING
--To reduce the r isk of accidents, never install
the luggage compartment cover without se
cur ing it .
- The luggage compartment cover is not a
surface for stor ing ob jects . Objects p laced
on the cover could endange r all ve hicle oc
cupa nts dur ing sudden bra kin g maneuve rs
or in a crash.
(D Note
The defogger and antenna w ires in the rear
window can be damaged by objects on the
l uggage compartment cover rubbing against
them .
Storage hooks
Applies to: vehicles with bag hooks
Fig. 66 Lugg ag e compar tment: st orage hooks
Yo u can also use the hooks to hang light p urses,
bags , etc.
A WARNING
-
The hooks can ho ld a maximum weight of 6.6
l bs (3 kg) . Heav ier objects are not adequate ly
secured . There is r isk of persona l injury.
57
Page 60 of 284

Sea ts and stor age
Pass-through with ski bag
Applies to: vehicles with pass-through and sk i bag
Long objects, such as skis or snowboards, can be
transported in the ski bag*.
F ig. 67 Backrest: pass-throug h cover
.,. To load the s ki sack in the vehicle, fo ld the rea r
center armrest down.
.,. Fo ld the pass-through cover down ¢ fig. 67.
.,. Push the packed bag* through the opening
from the luggage compartment. The zipper
must face toward the rear.
.,. Secure the bag ¢ page 58 .
(0 Tips
You can also open the pass-through from the
luggage compartment. Push the release but
ton down and push the cover forward.
Securing the ski bag
Applies to: vehicles with pass-through and ski bag
The ski bag* must be secured in the luggage
compartment.
F ig. 6 8 Luggage compartment: securing the bag•
58
Fig. 69 Rear bench seat: securing the bag
There are two straps with hooks @on the bot
tom side of the bag* ¢ fig. 68. There is also a se
curing strap @¢ fig.
69 on the bag .
.,. To secure the bag in the luggage compartment,
engage the hooks into the rear tie-downs
~fig. 68.
.,. Tighten the s trap on the bag to prevent the ob
jects in the bag from sliding around~ fig.
69 .
A WARNING
-The bag is only intended for transporting
skis and other light objects . To reduce the
risk of serious injur ies, never transport
heavy or sharp objects in the bag.
- After loading, the bag must be secured with
the strap.
- Make sure that a ll objects that you are
transporting in the pass-through are secure.
They could slide around and increase the
risk of injury when braking or during an acci
dent.
(D Tips
- Only fold the bag up if it is dry .
- When transporting skis or snowboards,
tighten the securing strap between the
bind ings.
- Lay skis in the bag with the points facing
forward and snowboards and ski po le points
facing the rear.
-
Page 61 of 284

co
co
.... N
" N .... 0
00
\.J '
Warm and cold Climate control system
Description
The climate control system warms, cools and re
moves humidity from the air in the vehicle interi
or. It is the most effective when the w indows and
sunroof* are closed. If there is a build-up of heat
inside the vehicle, ventilation can help to speed
up the cooling process.
I n all heating mode functions, except for defrost,
the blower on ly switches to a higher speed once
the engine coolant has reached a sufficient tem
perature .
Pollutant filter
The pollutant filter removes pollutants such as
dust and pollen from the air.
Key recognition
Appl ies to: ve hicles with de luxe a utoma tic clima te co ntro l
The blower setting and air distribution are stored
automatically and assigned to the remote control
key that you are using.
Appl ies to: ve hicles with 4 -zo ne del uxe automat ic cl imate
co ntrol
The climate control settings are automatically
stored and assigned to the remote control key
that is in use.
A WARNING
Poor visibility can lead to accidents.
- For safer driving, keep all windows free of
ice, snow and fog .
- Become familiar as quickly as possible with
the correct use and function of the climate
contro l system, especially with the defrost
ing and defogging function.
- When the temperature is below freezing,
only use the windshield washer system after
Warm and cold
the windshield has been warmed by the cli
mate control system. The washer fluid could
freeze on the windshield and impair visibili ty .
(D Note
-If you suspect that the climate control sys
tem is damaged, switch the system off to
prevent further damage and have it checked
by an authorized Audi dealer or authorized
Aud i Service Facility.
- Repairs to the Audi climate control system
require special technical knowledge and
special tools . See an authorized Aud i dealer
or authorized Audi Service Facility.
@ For the sake of the environment
-To save fuel, turn off cooling mode by press
ing the
IAJCI button . This will also reduce
em iss ions.
- In vehicles w ith a diesel engine, you can
switch the auto supplementary heater off in
the Infotai nment system.
(D Tips
- To prevent interference with the heat ing
and cooling output and to prevent the win
dows from fogging over, the air intake in
front of the windshie ld must be free of ice,
snow or leaves.
- Condensation from the cooling system can
dr ip and form a puddle of water under the
vehicle. This is normal and does not mean
there is a leak.
- The energy management system may tem
porarily switch off certain functions, such as
the seat heating* or rear window defogger .
These systems are avai lable aga in as soon
as the energy supply has been restored.
59
Page 62 of 284

Warm and cold
Automatic climate control
Applies to: vehicles w ith de luxe a utomat ic cl imate contro l
We recommend pressing the !AUTOI button and setting the temperature to 72 °F (22 °C) .
Fig . 70 De luxe automatic cl imate control: cont ro ls
Press the buttons to turn the functions on or off.
The dial adjusts the temperature and the blower .
The LED in a button will light up when the func
tion is sw itched on .
!AUTO I Switching automatic mode on
Automatic mode maintains a constant tempera
ture inside the vehicle . Air temperature, airflow
and a ir distribution are controlled automatically .
Adjusting the temperature
The temperat ure can be adjusted individually for
the dr iver and front passenger using the dials
(I)
and @.
Adjusting the blower c9e
Using the dial@, you can manually adjust the
amo unt of air generated by the blower to suit
your preferences. The blower should always run at a low sett ing to prevent the windows from
fogging and to ensure a cont inuous exchange of
air inside the vehicle. To have the blower regulat
ed automatically, p ress the
!AUTO I button.
~. ~ . (2) Adjusting air distribution
You can manua lly se lect the vents where the air
will flow. To have the a ir distribution regu lated
automatically, press the
IAUTO I button.
60
1- 1 Switching recirculation mode on/off
In recirculat ion mode, the air inside the vehicle is
c irculated and filtered. Th is prevents the unf il
te red air outs ide the veh icle from entering the
vehicle interior. We recommend sw itching recir
cu lation mode on when driving through a tunnel
o r when sitt ing in traffic ~.&, .
The
! AUTOI button or l FRONT ! button switches
recirculation mode off.
I OFF I Switching the climate control system
on/off
The ! O FF ! button switches the climate control
system on or off .
It also switches on when you
press the blower control. Airflow from outside is
blocked when the climate control system is
swi tch ed off.
IA/C l Switching cooling mode on/off
The air is not cooled and humidity is not removed
when cool ing mode is sw itched off . This can
cause fog on the w indows. The cooling mode
switches off automatically when there are cold
outside temperatures.
l FRO NT I Switching the defroster on/off
The w indshield and side windows are defrosted
or cleared of condensat ion as quick ly as poss ible . ..,.
Page 63 of 284

co
co
.... N
" N .... 0
00
<..:l 'SI"
The maximum amount of air flows mainly from
the vents below the windshield . Recirculation
mode switches off. The temperature shou ld be
set to approximately 72
°F (22 °().
The IAUTOI button switches the defroster off .
l(li) REAR I Switching the rear window defogger
on/off
The rear window heater o nly operates when the
engine is running . It switches off automatically
after a few minutes, depend ing on the outside
temperature.
To prevent t he rear w indow heater from switch
ing off automatically, p ress and ho ld the
llliil REARI
button for more than 2 seconds . This is stored
until the ignition is switched off.
~ Adjusting seat heating*
Pressing the button switches the seat heating on
at t he hig hest setting (level 3) . The LEDs indicate
the temperature level. To reduce the tempera
ture, press the button again. To switch the seat heating off, press the button repeated ly until the
LED turns off.
After 10 minutes, the seat heating automatically
switches from level 3 to level 2.
4-zone deluxe automatic climate control
App lies to: ve hicles with 4-zo ne deluxe automatic cl imate cont rol
Warm and cold
Air vents
You can open or close the center and rear vents in
the cockpit and the vents in the rear center con
sole using the ridged thumbwheels . The levers
adjust the direction of the airflow from the vents.
A WARNING
-
- You shou ld not use the recircu lation mode
for an extended period of time since no
fresh air is drawn in. With the air-condition
ing sw itched off, the windows can fog up,
which inc reases the risk of an acc ident.
- Individuals w ith reduced sens it ivity to pain
or temperature could develop burns when
using the seat heating function. To red uce
the risk of injury, these individua ls should
not use seat heating.
(D Note
To avoid damage to the heating elements in
the seats, do not knee l on the seats or place
heavy loads on a small area of the seat.
We recommend pressing the IAU TO I button and setting the temperature to 72 °F (22 °C).
Fig. 71 4 -zone deluxe a utomat ic cl imate contro l: cont rols
61
Page 64 of 284

Warm and cold
Fig. 72 4-zone deluxe automat ic climate control system:
r ear con tro ls
Press the buttons to turn the functions on or off.
Use the controls to adjust the temperature, the
blower speed and the air distribution. The LED in
a button will light up when the function is
sw itched on . The front settings are shown in the
climate control system display and in the Info
tainment system disp lay for a few seconds . T he
driver and front passenger settings can be ad
justed separately.
The settings can also be adjusted in the rear
~ fig. 72.
IO FF ! Switchin g the clim ate con trol s ystem
on /off
The I O FF I button switches the climate control
system on or off. It also switches on whe n you
p ress the cont rol. Airflow from outside is b locked
when the climate control system is switched off .
The
IO FF I button in the rear only switches the A/C
system on/off in the rear of the vehicle.
IA/C l Switching cooling mode on /off
The air is not cooled and humidity is not removed
when cooling mode is switched off . T his can
cause fog on the windows. The cooling mode
switches off automatically when there are cold
outside temperatures.
l """ I Switch ing recirculation mode on /off
In recircu lation mode, the a ir inside the vehicle is
circu lated and fi ltered. This prevents the unfil
tered a ir outside the vehicle from entering the
vehicle inter ior. We recommend switching recir
culation mode on when driving through a tunne l
or when sitting in traffic~.&. .
62
The !AU TOI button o r I@ FRON TI button switches
recircu lation mode off .
IAUTO I Switching automatic mode on
Automatic mode maintains a constant tempera
ture inside the vehi cle. Air temperature , a ir flow
and air distrib ution are controlled automatica lly.
If press and hold the button longer,
72 °F (22 °C)
will be set.
Adjusting the temperatu re
Temperatures between 60 °F (+ 16 °() and 84 °F
(+28 °() can be set . Outside of this range, LO or
HI w ill appear in the climate control system dis
play. In both settings, the climate control runs
constantly at the max imum coo ling or heat ing
l evel. The temperature is not regu lated .
Adjusting the blower~
You can adjust the volume of air generated by the
blower to your preference . The blower should al
ways run at a low setting to prevent the windows
from fogg ing and to ensure a cont inuo us ex
change of air inside the vehicle . To have the blow
er regulated automatically, p ress the
IAU TO I but
ton.
~ Adjusting air distribution
You can man ua lly select the vents where the air
will flow. To have the air distr ibut ion regulated
a utomat ica lly, press the
IAU TO I button.
~ Adjusting seat heat ing* /seat ventilation*
Pressing the button switches the seat heating/
seat ventilation on at the h ighest setting (level
3). The LEDs ind icate the temperature level. To
reduce the temperat ure, press the b utton again.
To switc h the seat heat ing/seat ventila tion off,
press the button repeatedly until the LED turns
off.
After
1 0 m inutes, the seat heating automatically
switches from level 3 to level 2.
l FRON T I Switching the defroster on /off
The w indshield and side windows are defrosted
o r cleared of condensat ion as quick ly as poss ible.
The maxim um amount of ai r flows mainly from
t h e vents below the windsh ield. Recirc ulation ..,.