Page 249 of 284

co
co
.... N
" N .... 0
00
<.,;) 'SI"
Taking the wheel off/installing the spare
Follow these instructions step-by-step for chang
ing the wheel.
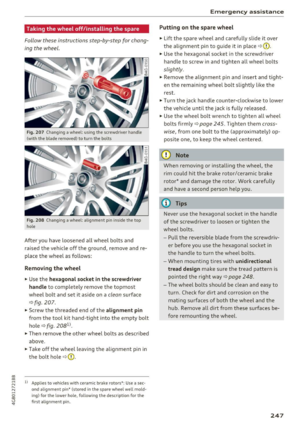
Fig. 207 Changing a wheel: using the screwdriver hahd le
(with the blade removed} to turn the bolts
F ig. 208 Changing a wheel: alignment pin ins ide the top
hole
After you have loosened all wheel bo lts and
raised the vehicle
off the ground, remove and re
p lace the whee l as follows:
Removing th e wheel
" Use the hexagon al so cket in the screwdri ver
handle to completely remove the topmost
wheel bolt and set it aside on a
clean surface
¢fig. 207.
.. Screw the threaded end of the alignment pi n
from the tool kit hand-tight into the empty bolt
hole
¢ fig. 2oa1>.
" Then remove the other wheel bolts as described
above .
" Take
off the wheel leaving the a lignment pin in
the bolt ho le
¢ 0 .
l) Applies to vehicles with ceram ic brake rotors•: Use a sec
ond alignme nt pin• (stored in t he spa re wheel well mold
ing} for the lower hole , fo llow ing the descript ion for the
first alignment pin.
Em ergen cy a ssis tanc e
Putting on th e spar e wheel
" Lift the spare whee l and caref ully slide it over
the alignment pin to guide it in place¢(!).
.. Use the hexagona l socket in the screwdriver
handle to screw in and tighten all wheel bolts
slightly .
"Remove the alignment pin and insert and tight
en the remaining wheel bo lt slightly like the
rest .
.. Turn the jack hand le counter-clockw ise to lower
the vehicle unt il the ja ck is fully released.
" Use the wheel bo lt wrench to t ighten a ll wheel
bolts firmly¢
page 245. Tighten them cross
wise,
from one bo lt to the (approx imately) op
posite one, to keep the wheel centered.
(D Note
When removing or installing the wheel, the
rim could hit the brake rotor/ceramic brake
rotor* and damage the rotor . Work carefully
and have a second person he lp you.
(D Tips
Never use the hexagonal socket in the hand le
of the screwdriver to loosen or tighten the
whee l bolts.
- Pull the reversible blade from the screwdr iv
er before you use the hexagona l socket in
the handle to turn the wheel bolts.
- When mounting tires with unidirectional
t read de sign make sure the tread pattern is
pointed the right way
¢ page 248.
- The wheel bolts sho uld be clean and easy to
turn. Check for dirt and corrosion on the
mating surfaces of both the wheel and the
hub. Remove all dirt from these surfaces be
fore remounting the wheel.
247
Page 250 of 284

Emergency assistance
Tires with unidirectional tread design
Tires with unidirectional tread design must be
mounted with their tread pattern pointed in the
right direction .
Using a spare tire with a tread pattern
intended for use in a specific direction
When using a spare t ire with a tread pattern in
tended for use in a specific direction, please note
the following:
- The direction of rotation is marked by an arrow
on the side of the tire.
- If the spare tire has to be installed in the incor
rect direction, use the spare tire only tempora
rily since the tire will not be able to achieve its
optimum performance characteristics with re
gard to aquaplaning, noise and wear.
- We recommend that you pay particular atten
tion to this fact during wet weather and that
you adjust your speed to match road condi
tions.
- Replace the flat tire with a new one and have it
installed on your vehicle as soon as possible to
restore the handling advantages of a unidirec
tional tire.
Notes on wheel changing
Please read the information q page 218, New
tires or wheels
if you are going to use a spare tire
which is different from the tires on your vehicle.
After you change a tire:
- Check the tire pressure on the spare tire im
mediately after installation.
- Have the wheel bolt tightening torque
checked with a torque wrench as soon as pos
sible by your authorized Audi dealer or a
qualified service station.
- With steel and alloy wheel rims, the wheel
bolts are correctly tightened at a torque of 90
ft lb
(120 Nm).
- If you notice that the wheel bolts are corroded
and difficult to turn while changing a tire ,
they should be replaced before you check the
tightening torque.
248
- Replace the flat tire with a new one and have
it installed on your vehicle as soon as possi
ble. Remount the wheel cover.
Until then , drive with extra care and at reduced
speeds.
~ WARNING
- If you are going to equip yo ur vehicle with
tires or rims which differ from those which
were factory installed, then be sure to read
the information
q page 218, New tires or
wheels.
- Always make sure the damaged wheel or
even a flat tire and the jack and tool kit are
properly secured in the luggage compart
ment and are not loose in the passenger
compartment.
- In an accident or sudden maneuver they
could fly forward, injuring anyone in the ve
hicle.
- Always stor e damaged wheel, jack and tools
secure ly in the luggage compartment. Oth
erwise, in an accident or sudden maneuver
they could fly forward, causing injury to pas
sengers in the vehicle.
Spare tire
Space-saving spare tire
App lies to: vehicles wit h spare tire
Fig. 209 Luggage compartment: space -saving spare t ire
The spare tire is intended for short-term use on-
-
ly. Have the damaged tire checked and, if neces
sary, replaced by an authorized Audi dealer or au
thorized Audi Service Facility as soon as possible . .,..
Page 251 of 284

co
co
.... N
" N .... 0
00
\.J -
There are some restrictions on the use of the
spare tire. The spare tire has been designed spe
cifically for your type of vehicle. Do not replace it
with the spare tire from another type of vehicle.
Spac e-sav ing spar e tir e*
The tire pressure must be 61 PSI (4.2 bar).
Remo ving the spar e tire
~ Fold the cargo floor up to the rear bench seat .
~ Turn the handwheel counter-clockw ise and re-
move it.
~ Remove the spare tire.
Snow cha ins
Using snow chains on the spare tire is not perm it
ted due to technical reasons .
If you have to drive with snow chains and a front
tire fails, mount the spare tire in place of a rear
tire . Install the snow chains on the rear tire that
you removed, and install that in place of the
front tire that failed.
A WARNING
-
- After installing a spare t ire, the tire pres
s u re must be checked as quickly as poss ible.
- Do not drive faster than 50 mph (80 km/h)
with a spare tire. Dr iv ing faster than that in
creases the risk of an acc ident.
- Avoid full-throttle accelerat ion, heavy b rak
ing, and fast cornering, beca use this in
creases the risk of an accident.
- Never drive us ing more than one spare t ire,
because th is increases the risk of an acci
dent.
- Norma l t ires o r winter tires must not be
mounted on the spare tire rim .
- Only use the co llaps ible spa re ti re in emer
gencies and dr ive very carefu lly, especially if
it is more than 6 years o ld .
Em ergenc y ass is tanc e
249
Page 252 of 284

Fuses
Fuses
Replacing fuses
A fuse that has blown will have metal strips that have burned through.
F ig . 21 0 Driver 's side cockpit: cove r
The fuses are located on front left and r ight of
t he cockpit and behind the trim on the rig ht s ide
of the luggage compartmen t.
"' Switch the ignition and all e lectr ica l equipment
off.
"' Che ck the following table to see which fuse be
l o ngs to the equipment.
... Remove the correspond ing cover or remove the
right side trim panel in the l uggage compart
ment
¢ poge 195 .
... Remove the colored plastic clip from the fuse
panel, if necessary
¢page 251, fig. 211. You
can d ispose of the p lastic clip .
... Remove the clamp from the rea r side of the
cove r
¢fig. 210 .
... Remove the fuse usi ng the clamp.
"' Replace t he blow n fu se only wi th an identical
new one.
"' Install the cover.
Fuse color identification
Color Current rating
in amp s
Black 1
Purp le 3
L ight brown 5
B rown 7.5
Red 10
B lue 15
250
Color Current rating
in amps
Yellow 20
Wh ite or transpa rent 25
Green 30
O range 4 0
A WARNING
Do not repair fuses and neve r replace a blown
f u se with one that has a higher amp rat ing.
This can cause damage to the e lectr ica l sys
tem and a fire.
(D Note
If a new fuse burns out again shortly after you
h ave insta lled it, have the e lectrical system
checked as soon as possible by an authorized
Audi dealer or authorized Aud i Service Fac ili
ty.
(D Tips
- The following table does not list fuse loca
t ions that are not used .
- Some of the equipment listed in the fo llow
ing tables applies on ly to certain model ver
sions or certa in optional equipment .
Page 253 of 284

co
co
.... N
" N .... 0
00
<.,;) 'SI"
Driver side cockpit fuse
assignment
Fig. 2 11 Driver side cockp it: fuse panel wit h plastic bracket
Fuse panel @ (black)
No . Equipment
Electromecha nica l powe r steering, trailer
1 hitch, ionizer, switch st
rip, seat heating
(rear), electromechan ica l park ing brake
Ho rn, climate con trol system, Gateway,
2 automati
c dimm ing in ter ior rearv iew m ir-
ro r, On -Board Un it
4 Park ing aid, headlight ra nge adjustment
5
Dynamic steering, E lectron ic Stabilization
Control (ESC)
6 Headlights
7 Adapt ive cruise control
8 Front passenger's seat senso rs, a irbag
9 Gateway
10 Engine sound, night vision ass
ist, garage
door opene r (H ome link), parki ng aid
11 Video camera image processing
1 2 Headlights
13 Steering column sw
itch module
Fuses
Fuse panel @ (black)
14 Termina l 15 (luggage compartment)
15 S tarte r
Fuse panel @ (brown)
No . Equipment
1 Infotainment system
2 Infotainment system
3 Front passenger's seat
5
A
irbag, Elect ronic S tabilization Con trol
( E SC)
6 Ant
i-theft alarm system
7 Electromec hanical pa rking brake
8 Inter io r li ghts
9
Windshie ld video came ra heating, light/
rain sensor
10 Lumbar support (dr iver's seat)
11 Driver
's seat
12 Electronic st abilization con trol
13 Horn
1 4 Head lights
15 Front seat heating
16 Dynam ic steering
Fuse panel © (red)
No . Equipment
1 Clutch peda l
2 Fuel p ump
3 Brake
light sensor
4 AdB lue (diese l engine)/engine aco ustics
5 Rear door
6 Fr
ont door
7 Electronic stab ilization control
8 Windshie ld w iper motor
9 Head light washer system
10 Interio
r lighting, climate control system
1 1 Head lights
12 Sunroof
251
Page 254 of 284

Fuses
Front passenger side
cockpit fuse assignment
Fig. 212 Front passenger side cockpit: fuse panel wit h
plastic bracket
Fuse panel @ (red)
No. Equipm ent
1 Infotainment, CD changer
2 Inf
ota inment (display)
3 Emergency call
Fuse panel @ (brown)
No. Equipment
1 Climate control system
2 Climate control
system (blower)
3 Diagnostic interface
4 Electrical ignit ion lock
5 Electronic steering column lock
6 Steering column switch module
7 Power steering column adjustment
8 Light switch
9 Head-up display
10 Instrument cl uster
11 Infotainment, DVD
changer
252
Luggage compartment
fuse assignment
Fig. 213 Luggage compa rtme nt: fuse panel with plast ic
bracket
Fuse panel @ (black)
No . Equipment
1 Tra
iler hitch/220 volt socket
2 Trailer hitch/climatized cup holder
3
Trailer hitch/adjusting front passenger's
seat from the rear
4 El ec trom echan ical parking brake
5 Electromechanical parking brake
6 Front door (front passenger's side)
7 Rear exterior lighting
8 Central locking, closing aid
9 Seat heating (fro nt)
11 Seat heating
(rear), climate control system
12 Trailer hitch
Fuse panel @ (red)
No. Equipment
1 L
eft safety belt tensioner
2 Right safety belt tensioner
3 Ad Blue tank (diesel engine)/fuel pump
4 Ad Blue tank (diesel engine)/engi ne mount
(gaso lin e eng ine)
5
Se nsor-controlled luggage compartment
lid
6 Air suspension, adaptive dampers
7 Rear door (front passenger's side)
8 Tail lights
9 Luggage compartment lid
Page 255 of 284

co
co
.... N
" N .... 0
00
\.J '
Fuse panel @ (red)
10 Rea r seat enterta inment
12 Rear spo ile r (Sportbac k), s unroof
Fuse panel © (brown)
No . Equipment
1 Infotainment system
2 I nfot ainme nt sys tem
3
Infotainment, automatic d imm ing interior
rearview mirror
4 Rearview camer a/peripheral cameras
5 TV tuner
6 Tank leak detect io n system
7 Sockets
8 Pa rk ing heater
1 0 Lumba r su pport (fro nt passenger 's seat)
1 2 Infotainment system
Fuse panel @ (black)
No. Equipment
Ai r suspe nsion , adaptive d ampe rs , sport
1 d ifferent ia l, elec tromec hanical p arking
b rake
2 Clutch pedal
position sensor/a utomat ic
t ra nsmission
3 Seats
4 Re ar wipe r (Avan t)
5 Side assist
6 Eng ine sound
7 Infotainment/so und amplif ier
8 G ateway
9 Sport diffe rential
1 0 Climate con trol sys te m
1 1 T
ire pressure m onito ring system, park ing
heater
12 Start/S top sys tem
Fuse panel ® (black)
No . Equipment
1 Special purpose vehicles/ rear seats
Fuses
Fuse panel ® (black)
No . Equipment
1 Rear w indow defogge r
253
Page 256 of 284

Emergency situations
General
This chapter is intended for trained emergency
crews and working personnel who have the nec
essary tools and equipment to perform these
operations.
Starting by pushing or
towing
(D Note
Vehicles with an automat ic transmission can
not be started by pushi ng or towing.
Starting with jumper
cables
If necessary, the engine con be started by con
necting it to the battery of another vehicle .
If the engine should fail to start because of a dis
charged or weak battery, the battery can be con
nected to the battery of
another vehicle, using a
pair of jumper cables to start the engine.
Jumper cables
Use only jumper cables of suffic iently large cross
section
to carry the starter current safely. Refer
to the manufacturer's specifications.
Use on ly jumper cables with
insulated term inal
clamps which are distinct ly marked :
plus(+ ) cable in most cases co lored red
minus (-) cable
in most cases colored black .
A WARNING
Batteries contain electricity, acid, and gas.
Any of these can cause very serious or fatal in
jury. Follow the instructions below for safe hand Ling of your veh icle's batte ry .
- Always shield your eyes and avo id leaning
over the battery whenever possible.
- A dead battery can freeze at temperatures
around 32 °F (0 °C). If the vehicle battery is
frozen, you must thaw it before connecting
the jump start cables.
If you do not, this in-
254
creases the risk of an explosion and chemi
cal burns. After jump starting the vehicle,
drive to an authorized Audi dealer or author
ized Audi Service Fac ility immediately to
have the vehicle battery checked.
- Do not allow battery acid to contact eyes or
skin . Flush any contacted area with water
immed iately.
- Improper use of a booster battery to start a
veh icle may cause an explosion .
- Vehicle batteries generate explosive gases.
Keep sparks, flame and lighted cigarettes
away from batter ies .
- Do not try to jump start any vehicle with a
low acid level in the battery .
- The voltage of the booster battery must also
have a 12-volt rat ing. The capacity (Ah) of
the booster battery should not be lower
than that of the discharged battery. Use of
batter ies of different voltage or substantial
ly different "Ah" rating may cause an exp lo
sion and persona l injury.
- Never cha rge a frozen battery. Gas trapped
in the ice may cause an explosion.
- Never cha rge o r use a battery that has been
frozen . The battery case may have be weak
ened.
- Use of batter ies of different voltage or sub
stantially diff erent capacity (Ah) rating may
cause an explosion and injury . The capacity
(Ah) of the booster battery should not be
lower than that of the discharged battery.
- Before you check anything in the engine
compartment, always read and heed all
WARNINGS
r=:> poge 199.
([) Note
-Applying a higher voltage booster battery
will cause expensive damage to sensitive electronic components, such as control
units, relays, radio, etc.
- Th ere must be no electrical contact between
the vehicles as otherwise current could al
ready start to flow as soon as the positive
(+) terminals are connected .