2016 NISSAN NOTE stop start
[x] Cancel search: stop startPage 1786 of 3641

SQUEAK AND RATTLE TROUBLE DIAGNOSESEXT-19
< SYMPTOM DIAGNOSIS >
C
DE
F
G H
I
J
L
M A
B
EXT
N
O P
INSTRUMENT PANEL
Most incidents are caused by contact and movement between:
1. Cluster lid A and the instrument panel
2. Acrylic lens and combination meter housing
3. Instrument panel to front pillar finisher
4. Instrument panel to windshield
5. Instrument panel pins
6. Wiring harnesses behind the combination meter
7. A/C defroster duct and duct joint
These incidents can usually be located by tapping or moving the components to duplicate the noise or by
pressing on the components while driving to stop the noi se. Most of these incidents can be repaired by apply-
ing felt cloth tape or silicone spray (in hard to reach areas). Urethane pads can be used to insulate wiring har-
ness.
CAUTION:
Do not use silicone spray to isolate a squeak or ra ttle. If you saturate the area with silicone, you will
not be able to recheck the repair.
CENTER CONSOLE
Components to pay attention to include:
1. Shift selector assembly cover to finisher
2. A/C control unit and cluster lid C
3. Wiring harnesses behind audio and A/C control unit
The instrument panel repair and isolation pr ocedures also apply to the center console.
DOORS
Pay attention to the:
1. Finisher and inner panel making a slapping noise
2. Inside handle escutcheon to door finisher
3. Wiring harnesses tapping
4. Door striker out of alignment causing a popping noise on starts and stops
Tapping or moving the components or pressing on them while driving to duplicate the conditions can isolate
many of these incidents. You can usually insulate the ar eas with felt cloth tape or insulator foam blocks from
the NISSAN Squeak and Rattle Kit (J-50397) to repair the noise.
TRUNK
Trunk noises are often caused by a loose jack or loose items put into the trunk by the owner.
In addition look for:
1. Trunk lid bumpers out of adjustment
2. Trunk lid striker out of adjustment
3. The trunk lid torsion bars knocking together
4. A loose license plate or bracket
Most of these incidents can be repaired by adjusting, se curing or insulating the item(s) or component(s) caus-
ing the noise.
SUNROOF/HEADLINING
Noises in the sunroof/headlining area can often be traced to one of the following:
1. Sunroof lid, rail, linkage or seals making a rattle or light knocking noise
2. Sun visor shaft shaking in the holder
3. Front or rear windshield touching headlining and squeaking
Again, pressing on the components to stop the noise while duplicating the conditions can isolate most of these
incidents. Repairs usually consist of insulating with felt cloth tape.
OVERHEAD CONSOLE (FRONT AND REAR)
Overhead console noises are often caused by the cons ole panel clips not being engaged correctly. Most of
these incidents are repaired by pushing up on the c onsole at the clip locations until the clips engage.
In addition look for:
Revision: August 2015 2016 Versa Note
cardiagn.com
Page 1875 of 3641

FUEL LEVEL SENSOR UNIT, FUEL FILTER AND FUEL PUMP ASSEMBLYFL-9
< REMOVAL AND INSTALLATION >
C
DE
F
G H
I
J
K L
M A
FL
NP
O
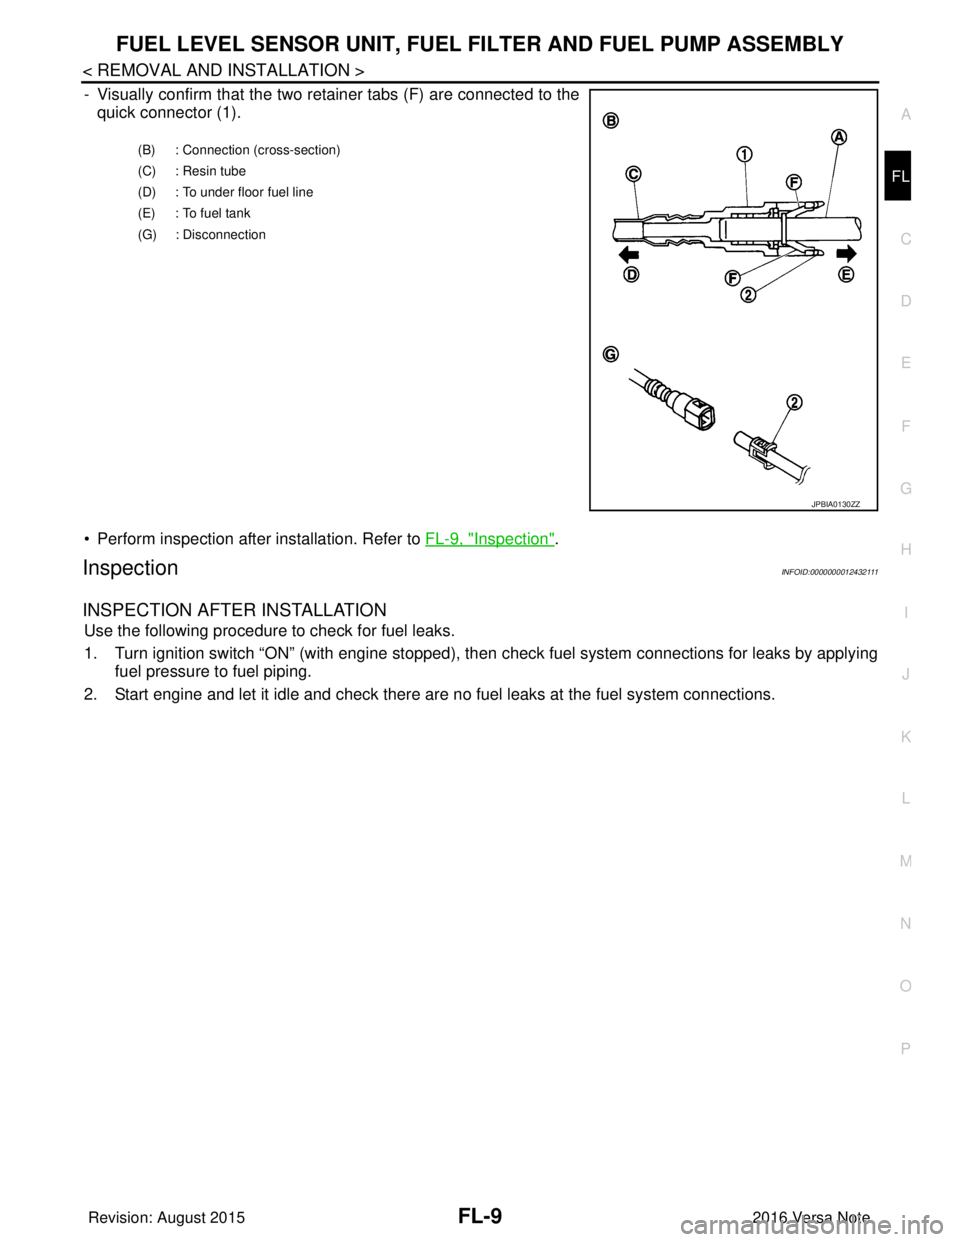
- Visually confirm that the two retainer tabs (F) are connected to the
quick connector (1).
• Perform inspection after installation. Refer to FL-9, "
Inspection".
InspectionINFOID:0000000012432111
INSPECTION AFTER INSTALLATION
Use the following procedure to check for fuel leaks.
1. Turn ignition switch “ON” (with engine stopped), then check fuel system connections for leaks by applying
fuel pressure to fuel piping.
2. Start engine and let it idle and check there are no fuel leaks at the fuel system connections.
(B) : Connection (cross-section)
(C) : Resin tube
(D) : To under floor fuel line
(E) : To fuel tank
(G) : Disconnection
JPBIA0130ZZ
Revision: August 2015 2016 Versa Note
cardiagn.com
Page 1879 of 3641

FUEL TANKFL-13
< REMOVAL AND INSTALLATION >
C
DE
F
G H
I
J
K L
M A
FL
NP
O
17. If replacing the fuel tank, remove the fuel level sensor unit, fuel filter and fuel pump assembly to transfer to
the new fuel tank.
CAUTION:
Do not reuse O-ring.
INSTALLATION
Installation is in the reverse order of removal.
Fuel Filler Hose
• Insert fuel filler hose to the length below.
• Be sure hose clamp is not placed on swelled area of fuel filler tube.
• Install fuel filler hose to fuel t ank, paying attention to install mark.
EVAP Hose
1. Check connections for damage or foreign material.
2. Align the matching side connection part with the center of shaft, and insert connector straight until a "click"
sound is heard.
InspectionINFOID:0000000012432114
INSPECTION AFTER INSTALLATION
Use the following procedure to check for fuel leaks.
1. Turn ignition switch “ON” (with engine stopped), then check fuel system connections for leaks by applying
fuel pressure to fuel piping.
2. Start engine and let it idle and check there are no fuel leaks at the fuel system connections.
Fuel filler hose : 35 mm (1.38 in)
Vent hose : 25 mm (0.98 in)
Revision: August 2015
2016 Versa Note
cardiagn.com
Page 1887 of 3641

FUEL LEVEL SENSOR UNITFL-21
< DISASSEMBLY AND ASSEMBLY >
C
DE
F
G H
I
J
K L
M A
FL
NP
O
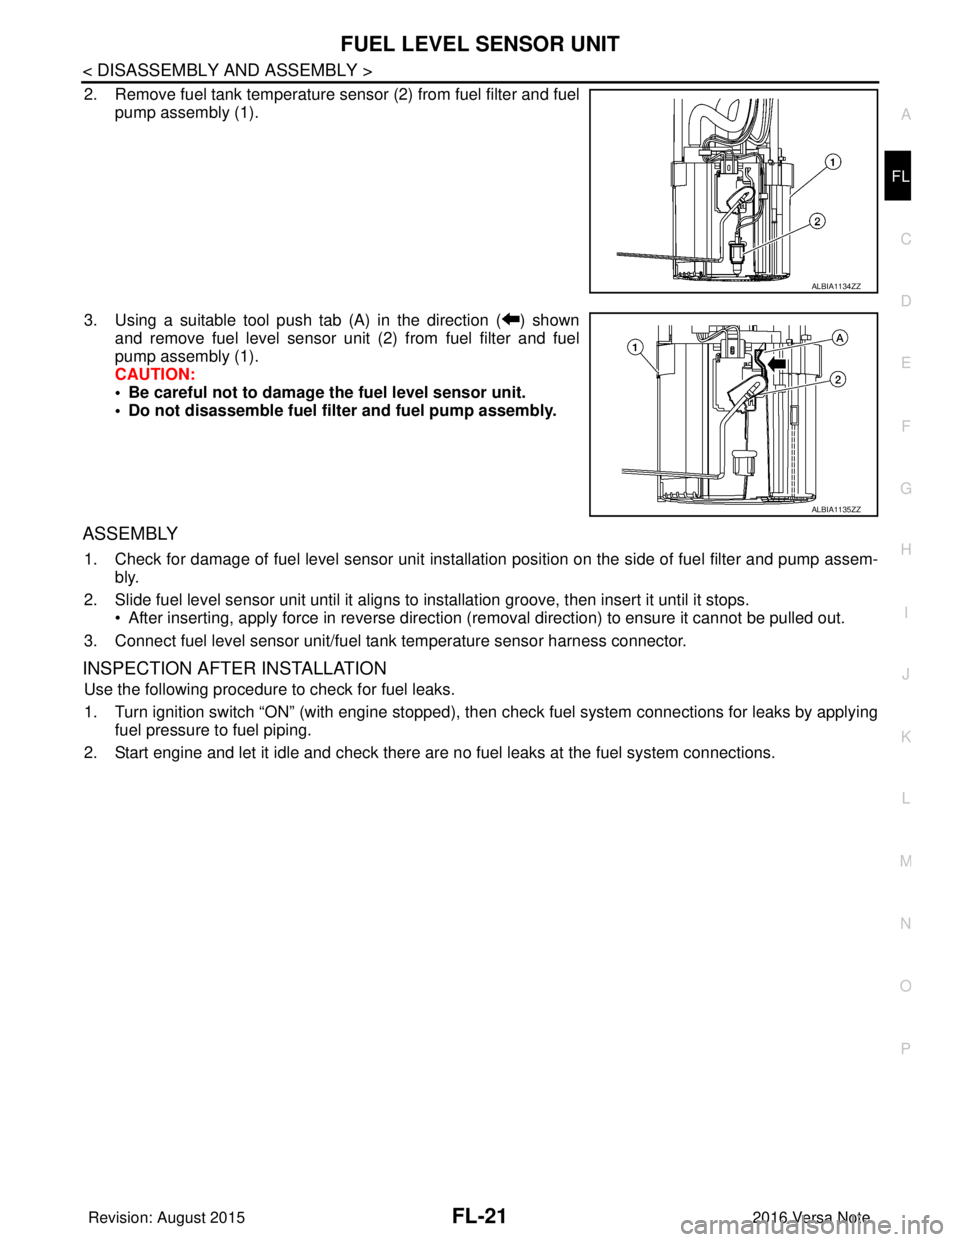
2. Remove fuel tank temperature s
ensor (2) from fuel filter and fuel
pump assembly (1).
3. Using a suitable tool push tab (A) in the direction ( ) shown and remove fuel level sensor unit (2) from fuel filter and fuel
pump assembly (1).
CAUTION:
• Be careful not to damage the fuel level sensor unit.
• Do not disassemble fuel filter and fuel pump assembly.
ASSEMBLY
1. Check for damage of fuel level sensor unit installation position on the side of fuel filter and pump assem- bly.
2. Slide fuel level sensor unit until it aligns to installation groove, then insert it until it stops. • After inserting, apply force in reverse direction (removal direction) to ensure it cannot be pulled out.
3. Connect fuel level sensor unit/fuel t ank temperature sensor harness connector.
INSPECTION AFTER INSTALLATION
Use the following procedure to check for fuel leaks.
1. Turn ignition switch “ON” (with engine stopped), then check fuel system connections for leaks by applying
fuel pressure to fuel piping.
2. Start engine and let it idle and check there are no fuel leaks at the fuel system connections.
ALBIA1134ZZ
ALBIA1135ZZ
Revision: August 2015 2016 Versa Note
cardiagn.com
Page 1947 of 3641

SQUEAK AND RATTLE TROUBLE DIAGNOSESGW-7
< SYMPTOM DIAGNOSIS >
C
DE
F
G H
I
J
L
M A
B
GW
N
O P
INSTRUMENT PANEL
Most incidents are caused by contact and movement between:
1. Cluster lid A and the instrument panel
2. Acrylic lens and combination meter housing
3. Instrument panel to front pillar finisher
4. Instrument panel to windshield
5. Instrument panel pins
6. Wiring harnesses behind the combination meter
7. A/C defroster duct and duct joint
These incidents can usually be located by tapping or moving the components to duplicate the noise or by
pressing on the components while driving to stop the noi se. Most of these incidents can be repaired by apply-
ing felt cloth tape or silicone spray (in hard to reach areas). Urethane pads can be used to insulate wiring har-
ness.
CAUTION:
Do not use silicone spray to isolate a squeak or ra ttle. If you saturate the area with silicone, you will
not be able to recheck the repair.
CENTER CONSOLE
Components to pay attention to include:
1. Shift selector assembly cover to finisher
2. A/C control unit and cluster lid C
3. Wiring harnesses behind audio and A/C control unit
The instrument panel repair and isolation pr ocedures also apply to the center console.
DOORS
Pay attention to the:
1. Finisher and inner panel making a slapping noise
2. Inside handle escutcheon to door finisher
3. Wiring harnesses tapping
4. Door striker out of alignment causing a popping noise on starts and stops
Tapping or moving the components or pressing on them while driving to duplicate the conditions can isolate
many of these incidents. You can usually insulate the ar eas with felt cloth tape or insulator foam blocks from
the NISSAN Squeak and Rattle Kit (J-50397) to repair the noise.
TRUNK
Trunk noises are often caused by a loose jack or loose items put into the trunk by the owner.
In addition look for:
1. Trunk lid bumpers out of adjustment
2. Trunk lid striker out of adjustment
3. The trunk lid torsion bars knocking together
4. A loose license plate or bracket
Most of these incidents can be repaired by adjusting, se curing or insulating the item(s) or component(s) caus-
ing the noise.
SUNROOF/HEADLINING
Noises in the sunroof/headlining area can often be traced to one of the following:
1. Sunroof lid, rail, linkage or seals making a rattle or light knocking noise
2. Sun visor shaft shaking in the holder
3. Front or rear windshield touching headlining and squeaking
Again, pressing on the components to stop the noise while duplicating the conditions can isolate most of these
incidents. Repairs usually consist of insulating with felt cloth tape.
OVERHEAD CONSOLE (FRONT AND REAR)
Overhead console noises are often caused by the cons ole panel clips not being engaged correctly. Most of
these incidents are repaired by pushing up on the c onsole at the clip locations until the clips engage.
In addition look for:
Revision: August 2015 2016 Versa Note
cardiagn.com
Page 1955 of 3641

OPERA WINDOWGW-15
< REMOVAL AND INSTALLATION >
C
DE
F
G H
I
J
L
M A
B
GW
N
O P
When cutting glass from the vehicle, always wear safety glasses and heavy gloves to prevent
glass splinters from entering your eyes or cutting your hands.
CAUTION:
• Be careful not to scratch the glass when removing.
• Do not set or stand the glass on its ed ge. Small chips may develop into cracks.
• Apply protective tape around the opera windo w glass to protect the painted surface from dam-
age.
INSTALLATION
• Use a Genuine NISSAN Urethane Adhesive Kit (if avail able) or equivalent and follow the instructions fur-
nished with it.
• Adhesive shall be continuously applied to assure watert ightness. Glass installation shall be finished within
five minutes after applying the adhesive.
• The start and finisher of the urethane adhesive applicati on should be located at the bottom to assure water-
tightness.
• While the urethane adhesive is curing, open a door window . This will prevent the glass from being forced out
by passenger compartment air pressure when a door is closed.
• Inform the customer that the vehicle should rema in stationary until the urethane adhesive has completely
cured (preferably 24 hours). Curing time varies with temperature and humidity.
WARNING:
• Keep heat and open flames away as primers and adhesive are flammable.
• The materials contained in the kit are harmful if swallowed, and may irritate skin and eyes. Avoid
contact with skin and eyes.
• Use in an open, well ventilated lo cation. Avoid breathing the vapors. They can be harmful if inhaled.
If affected by vapor inhalation, imme diately move to an area with fresh air.
• Driving the vehicle before the urethane adhesive is completely cured may affect the performance of
the opera window glass in case of an accident.
CAUTION:
• Do not use an adhesive which is past its usable te rm. Shelf life of this product is limited to six
months after the date of manufacture. Carefully ad here to the expiration or manufacture date printed
on the box.
• Keep primers and adhesive in a cool, dry place. Id eally, they should be stored in a refrigerator.
• Do not leave primers or adhesive cartridge unattended with their caps open or off.
• The vehicle should not be driven for at least 24 hours or until the urethane adhesive is completely
cured. Curing time varies depe nding on temperature and humidity. The curing time increases under
lower temperature and lower humidity.
REPAIRING WATER LEAKS FOR OPERA WINDOW GLASS
• Leaks can be repaired without removing and reinstalling opera window glass.
• If water is leaking between the urethane adhesive materi al and body or glass, determine the extent of the
leak.
• This can be done by applying water to the opera window glass area while pushing glass outward.
• To stop the leak, apply primer (if necessary ) and then urethane adhesive to the leak point.
Revision: August 2015 2016 Versa Note
cardiagn.com
Page 1978 of 3641
![NISSAN NOTE 2016 Service Repair Manual HAC-10
< SYSTEM DESCRIPTION >[MANUAL AIR CONDITIONING]
COMPONENT PARTS
A. LH side of instrument panel B. Behind center of instrument panel C. Center of instrument panel
No. Component Description
1. BC NISSAN NOTE 2016 Service Repair Manual HAC-10
< SYSTEM DESCRIPTION >[MANUAL AIR CONDITIONING]
COMPONENT PARTS
A. LH side of instrument panel B. Behind center of instrument panel C. Center of instrument panel
No. Component Description
1. BC](/manual-img/5/57363/w960_57363-1977.png)
HAC-10
< SYSTEM DESCRIPTION >[MANUAL AIR CONDITIONING]
COMPONENT PARTS
A. LH side of instrument panel B. Behind center of instrument panel C. Center of instrument panel
No. Component Description
1. BCM The BCM receives the fan ON and A/C ON signals from the front air control and sends a com-
pressor ON request to the ECM.
2. Fuse Block (J/B) Located in the passenger compartment, behind the left lower IP, the Fuse Block (J/B) con-
tains the front blower motor relay and several fuses required for the air conditioner control
system.
3. Blower relay The blower relay controls the flow of current to fuse 20, 21 and 22 in the Fuse Block (J/B).
The relay is connected directly to ground, and is energized when the ignition switch is in the
ON or START position.
4. Front blower motor The front blower motor varies the speed at which the air flows through the ventilation system.
5. Front blower motor resistor Ground for the blower is supplied through blower resistor and the blower speed switch. As
the switch is moved from position 1 through 4, more current is allowed to flow through the
motor, for a higher speed. This is because less resistors are in the path as the switch is
moved to a higher position. When the switch is on the highest position, all resistors are by-
passed.
6. Thermo control amp. Thermo control amp. is composed of thermistor and amplifier. When the A/C switch signal is
received from the front air control, the thermo control amp. transmits the A/C ON signal to the
BCM according to evaporator fin temperature. When the thermistor detecting temperature of
the air that passes through evaporator is extremely low, the thermo control amp. sends the
A/C OFF signal to BCM, and stops the compressor.
7. Front air control The front air control controls the operation of the A/C and heating system.
AWIIA1862ZZ
Revision: August 2015 2016 Versa Note
cardiagn.com
Page 1981 of 3641
![NISSAN NOTE 2016 Service Repair Manual SYSTEMHAC-13
< SYSTEM DESCRIPTION > [MANUAL AIR CONDITIONING]
C
D
E
F
G H
J
K L
M A
B
HAC
N
O P
Low Temperature Protection Control
• When thermo control amp. detects
that evaporator fin temperature NISSAN NOTE 2016 Service Repair Manual SYSTEMHAC-13
< SYSTEM DESCRIPTION > [MANUAL AIR CONDITIONING]
C
D
E
F
G H
J
K L
M A
B
HAC
N
O P
Low Temperature Protection Control
• When thermo control amp. detects
that evaporator fin temperature](/manual-img/5/57363/w960_57363-1980.png)
SYSTEMHAC-13
< SYSTEM DESCRIPTION > [MANUAL AIR CONDITIONING]
C
D
E
F
G H
J
K L
M A
B
HAC
N
O P
Low Temperature Protection Control
• When thermo control amp. detects
that evaporator fin temperature
is 1.5° C (35° F) or less, thermo control amp. switches A/C ON sig-
nal to OFF and stops the compressor.
When the evaporator fin temperature returns to 3 °C (37° F) or
more, the compressor is activated.
CONTROL BY ECM
Refrigerant Pressure Protection
The refrigerant system is protected against excessively high- or low-pressures by the refrigerant pressure s\
en-
sor, located on the liquid tank on the condenser. The refr igerant pressure sensor detects the pressure inside
the refrigerant line and sends a voltage signal to the ECM. If the system pressure rises above or falls below
the following values, the ECM requests the IPDM E/ R to de-energize the A/C relay and disengage the com-
pressor.
• 3.12 MPa (31.82 kg/cm
2, 452.4 psi) or more (When the engine speed is less than 1,500 rpm)
• 2.74 MPa (27.95 kg/cm
2, 397.3 psi) or more (When the engine speed is 1,500 rpm or more)
• 0.14 MPa (1.43 kg/cm
2, 20.3 psi) or less
Compressor Oil Cir culation Control
When the engine starts while the engine coolant temperature is 56 °C (133° F) or less, ECM activates the com-
pressor for approximately 6 seconds and circulates the compressor oil once.
Air Conditioning Cut Control
When the engine is under a high load condition, the ECM transmits an A/C relay OFF request to IPDM E/R,
and stops the compressor. Refer to EC-37, "
AIR CONDITIONING CUT CONTROL : System Description".
Door ControlINFOID:0000000012430719
SWITCHES AND THEIR CONTROL FUNCTIONS
JMIIA1228GB
Revision: August 2015 2016 Versa Note
cardiagn.com