2016 NISSAN NOTE window
[x] Cancel search: windowPage 1932 of 3641
GI-44
< BASIC INSPECTION >
SERVICE INFORMATION FOR ELECTRICAL INCIDENT
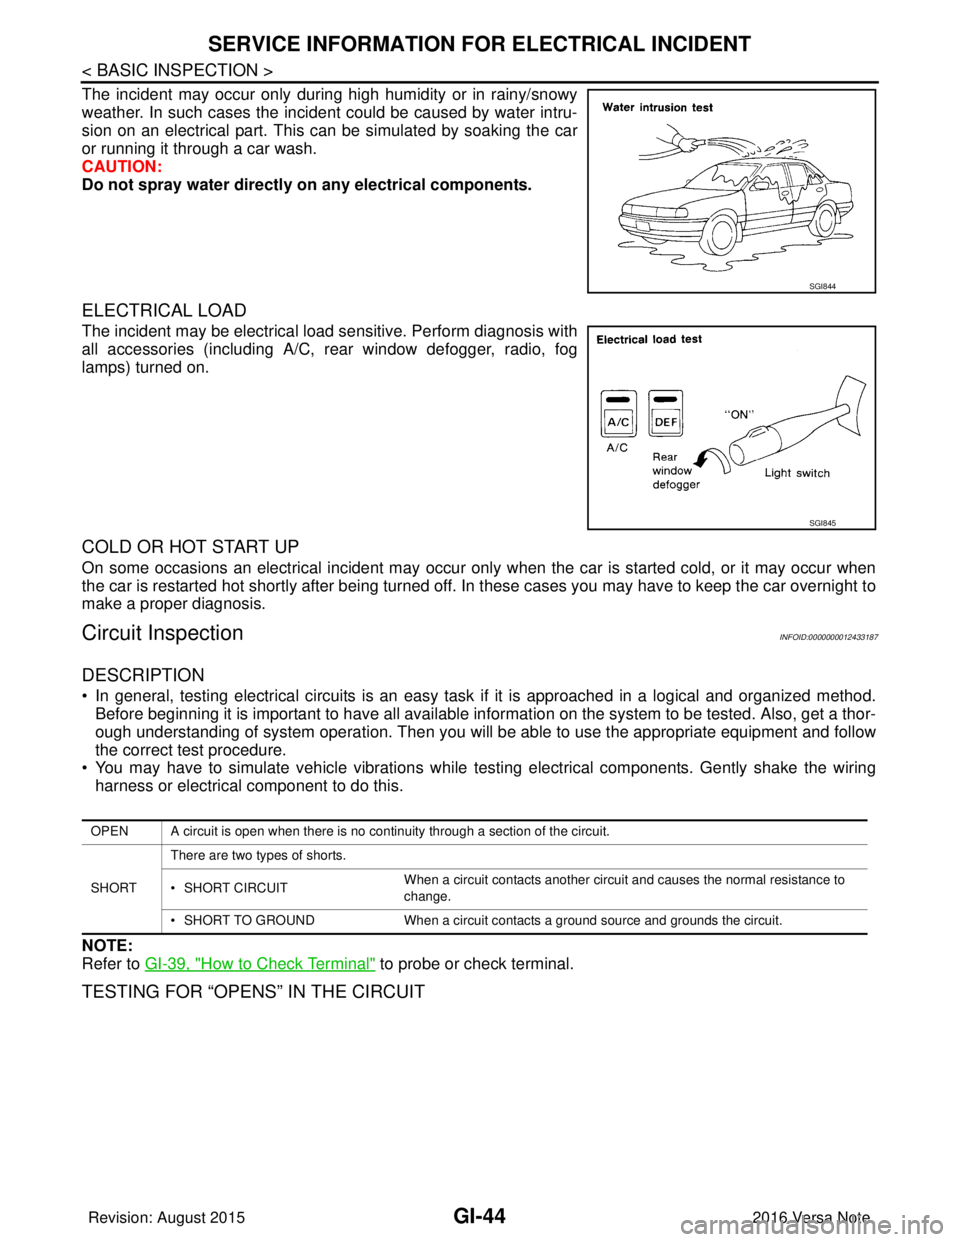
The incident may occur only during high humidity or in rainy/snowy
weather. In such cases the incident could be caused by water intru-
sion on an electrical part. This can be simulated by soaking the car
or running it through a car wash.
CAUTION:
Do not spray water directly on any electrical components.
ELECTRICAL LOAD
The incident may be electrical load sensitive. Perform diagnosis with
all accessories (including A/C, rear window defogger, radio, fog
lamps) turned on.
COLD OR HOT START UP
On some occasions an electrical incident may occur only when the car is started cold, or it may occur when
the car is restarted hot shortly after being turned off. In these cases you may have to keep the car overnight to
make a proper diagnosis.
Circuit InspectionINFOID:0000000012433187
DESCRIPTION
• In general, testing electrical circuits is an easy task if it is approached in a logical and organized method.
Before beginning it is important to have all available information on the system to be tested. Also, get a thor-
ough understanding of system operation. Then you will be able to use the appropriate equipment and follow
the correct test procedure.
• You may have to simulate vehicle vibrations while te sting electrical components. Gently shake the wiring
harness or electrical component to do this.
NOTE:
Refer to GI-39, "
How to Check Terminal" to probe or check terminal.
TESTING FOR “OPENS” IN THE CIRCUIT
SGI844
SGI845
OPEN A circuit is open when there is no continuity through a section of the circuit.
SHORT There are two types of shorts.
• SHORT CIRCUIT
When a circuit contacts another circuit and causes the normal resistance to
change.
• SHORT TO GROUND When a circuit contacts a ground source and grounds the circuit.
Revision: August 2015 2016 Versa Note
cardiagn.com
Page 1941 of 3641

GW-1
BODY EXTERIOR, DOORS, ROOF & VEHICLE SECURITY
C
DE
F
G H
I
J
L
M
SECTION GW
A
B
GW
N
O P
CONTENTS
GLASS & WINDOW SYSTEM
PRECAUTION ....... ........................................2
PRECAUTIONS .............................................. .....2
Precaution for Supplemental Restraint System
(SRS) "AIR BAG" and "SEAT BELT PRE-TEN-
SIONER" ............................................................. ......
2
Handling for Adhesive and Primer ............................2
Precaution for Work ..................................................2
PREPARATION ............................................4
PREPARATION .............................................. .....4
Special Service Tool ........................................... ......4
Commercial Service Tool ..........................................4
SYMPTOM DIAGNOSIS ...............................5
SQUEAK AND RATTLE TROUBLE DIAG-
NOSES ........................ ........................................
5
Work Flow ........................................................... ......5
Generic Squeak and Rattle Troubleshooting ............6
Diagnostic Worksheet ...............................................9
REMOVAL AND INSTALLATION ...............11
WINDSHIELD GLASS .................................... ....11
Exploded View .................................................... ....11
Removal and Installation ..................................... ....12
OPERA WINDOW .............................................14
Exploded View .........................................................14
Removal and Installation .........................................14
SIDE WINDOW GLASS ....................................16
Exploded View .........................................................16
Removal and Installation .........................................17
BACK DOOR WINDOW GLASS ......................19
Exploded View ..................................................... ....19
Removal and Installation .........................................19
FRONT DOOR GLASS AND REGULATOR .....21
Exploded View .........................................................21
Removal and Installation .........................................21
FRONT POWER WINDOW MOTOR .................24
Removal and Installation .........................................24
REAR DOOR GLASS AND REGULATOR .......25
Exploded View .........................................................25
Removal and Installation .........................................25
REAR POWER WINDOW MOTOR ...................28
Removal and Installation .........................................28
Revision: August 2015 2016 Versa Note
cardiagn.com
Page 1952 of 3641
GW-12
< REMOVAL AND INSTALLATION >
WINDSHIELD GLASS
Removal and Installation
INFOID:0000000012430531
REMOVAL
1. Remove front pillar finishers (LH/RH). Refer to INT-21, "FRONT PILLAR FINISHER : Removal and Instal-
lation".
2. Partially remove the headlining (front edge).
3. Remove cowl top cover. Refer to EXT-37, "
Removal and Installation".
4. Remove inside mirror. Refer to MIR-14, "
Removal and Installation".
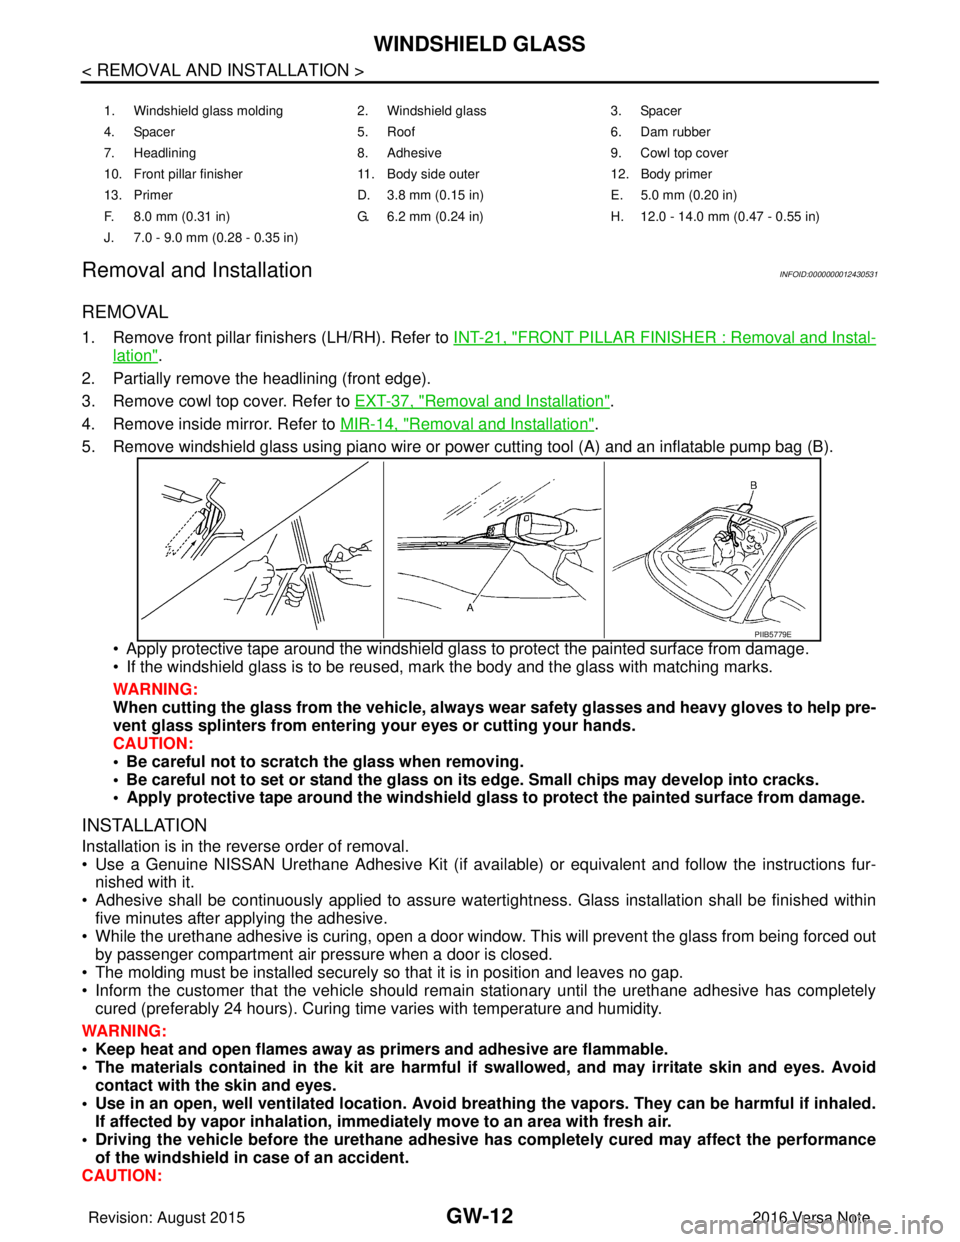
5. Remove windshield glass using piano wire or pow er cutting tool (A) and an inflatable pump bag (B).
• Apply protective tape around the windshield gla ss to protect the painted surface from damage.
• If the windshield glass is to be reused, mark the body and the glass with matching marks.
WARNING:
When cutting the glass from the vehicle, always wear safety glasses and heavy gloves to help pre-
vent glass splinters from entering your eyes or cutting your hands.
CAUTION:
• Be careful not to scratch the glass when removing.
• Be careful not to set or stand the glass on its edge. Small chips may develop into cracks.
• Apply protective tape around th e windshield glass to protect the painted surface from damage.
INSTALLATION
Installation is in the reverse order of removal.
• Use a Genuine NISSAN Urethane Adhesive Kit (if availabl e) or equivalent and follow the instructions fur-
nished with it.
• Adhesive shall be continuously applied to assure watert ightness. Glass installation shall be finished within
five minutes after applying the adhesive.
• While the urethane adhesive is curing, open a door window . This will prevent the glass from being forced out
by passenger compartment air pressure when a door is closed.
• The molding must be installed securely so that it is in position and leaves no gap.
• Inform the customer that the vehicle should remain stationary until the urethane adhesive has completely
cured (preferably 24 hours). Curing time varies with temperature and humidity.
WARNING:
• Keep heat and open flames away as primers and adhesive are flammable.
• The materials contained in the kit are harmful if swallowed, and may irritate skin and eyes. Avoid
contact with the skin and eyes.
• Use in an open, well ventilated location. Avoid breathing the vapors. They can be harmful if inhaled. If affected by vapor inhalation, imme diately move to an area with fresh air.
• Driving the vehicle before the urethane adhesive has completely cured may affect the performance
of the windshield in case of an accident.
CAUTION:
1. Windshield glass molding 2. Windshield glass 3. Spacer
4. Spacer 5. Roof 6. Dam rubber
7. Headlining 8. Adhesive 9. Cowl top cover
10. Front pillar finisher 11. Body side outer 12. Body primer
13. Primer D. 3.8 mm (0.15 in) E. 5.0 mm (0.20 in)
F. 8.0 mm (0.31 in) G. 6.2 mm (0.24 in) H. 12.0 - 14.0 mm (0.47 - 0.55 in)
J. 7.0 - 9.0 mm (0.28 - 0.35 in)
PIIB5779E
Revision: August 2015 2016 Versa Note
cardiagn.com
Page 1954 of 3641
GW-14
< REMOVAL AND INSTALLATION >
OPERA WINDOW
OPERA WINDOW
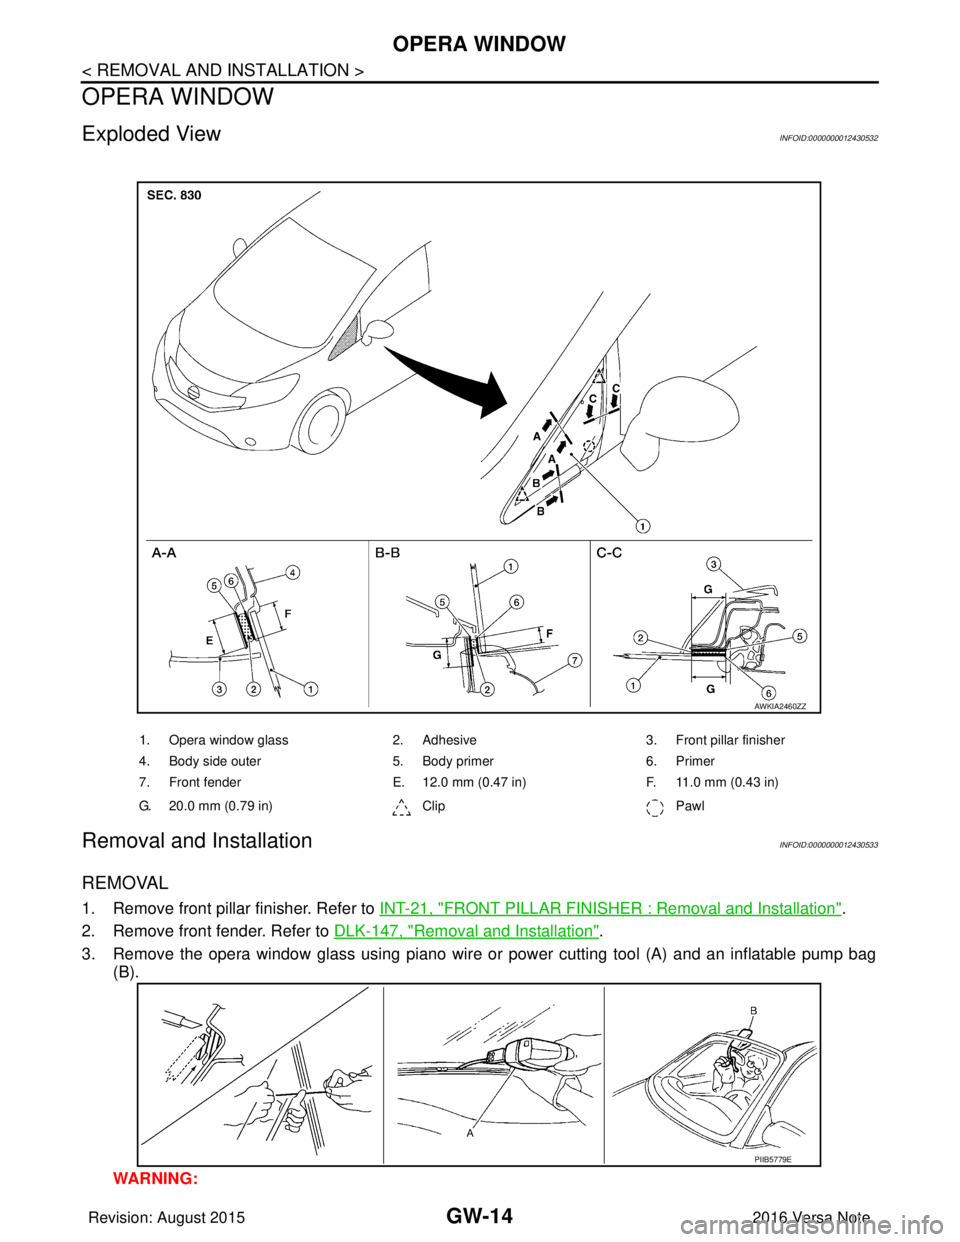
Exploded ViewINFOID:0000000012430532
Removal and InstallationINFOID:0000000012430533
REMOVAL
1. Remove front pillar finisher. Refer to INT-21, "FRONT PILLAR FINISHER : Removal and Installation".
2. Remove front fender. Refer to DLK-147, "
Removal and Installation".
3. Remove the opera window glass using piano wire or power cutting tool (A) and an inflatable pump bag (B).
WARNING:
1. Opera window glass 2. Adhesive3. Front pillar finisher
4. Body side outer 5. Body primer6. Primer
7. Front fender E. 12.0 mm (0.47 in) F. 11.0 mm (0.43 in)
G. 20.0 mm (0.79 in) ClipPawl
AWKIA2460ZZ
PIIB5779E
Revision: August 2015 2016 Versa Note
cardiagn.com
Page 1955 of 3641

OPERA WINDOWGW-15
< REMOVAL AND INSTALLATION >
C
DE
F
G H
I
J
L
M A
B
GW
N
O P
When cutting glass from the vehicle, always wear safety glasses and heavy gloves to prevent
glass splinters from entering your eyes or cutting your hands.
CAUTION:
• Be careful not to scratch the glass when removing.
• Do not set or stand the glass on its ed ge. Small chips may develop into cracks.
• Apply protective tape around the opera windo w glass to protect the painted surface from dam-
age.
INSTALLATION
• Use a Genuine NISSAN Urethane Adhesive Kit (if avail able) or equivalent and follow the instructions fur-
nished with it.
• Adhesive shall be continuously applied to assure watert ightness. Glass installation shall be finished within
five minutes after applying the adhesive.
• The start and finisher of the urethane adhesive applicati on should be located at the bottom to assure water-
tightness.
• While the urethane adhesive is curing, open a door window . This will prevent the glass from being forced out
by passenger compartment air pressure when a door is closed.
• Inform the customer that the vehicle should rema in stationary until the urethane adhesive has completely
cured (preferably 24 hours). Curing time varies with temperature and humidity.
WARNING:
• Keep heat and open flames away as primers and adhesive are flammable.
• The materials contained in the kit are harmful if swallowed, and may irritate skin and eyes. Avoid
contact with skin and eyes.
• Use in an open, well ventilated lo cation. Avoid breathing the vapors. They can be harmful if inhaled.
If affected by vapor inhalation, imme diately move to an area with fresh air.
• Driving the vehicle before the urethane adhesive is completely cured may affect the performance of
the opera window glass in case of an accident.
CAUTION:
• Do not use an adhesive which is past its usable te rm. Shelf life of this product is limited to six
months after the date of manufacture. Carefully ad here to the expiration or manufacture date printed
on the box.
• Keep primers and adhesive in a cool, dry place. Id eally, they should be stored in a refrigerator.
• Do not leave primers or adhesive cartridge unattended with their caps open or off.
• The vehicle should not be driven for at least 24 hours or until the urethane adhesive is completely
cured. Curing time varies depe nding on temperature and humidity. The curing time increases under
lower temperature and lower humidity.
REPAIRING WATER LEAKS FOR OPERA WINDOW GLASS
• Leaks can be repaired without removing and reinstalling opera window glass.
• If water is leaking between the urethane adhesive materi al and body or glass, determine the extent of the
leak.
• This can be done by applying water to the opera window glass area while pushing glass outward.
• To stop the leak, apply primer (if necessary ) and then urethane adhesive to the leak point.
Revision: August 2015 2016 Versa Note
cardiagn.com
Page 1956 of 3641
GW-16
< REMOVAL AND INSTALLATION >
SIDE WINDOW GLASS
SIDE WINDOW GLASS
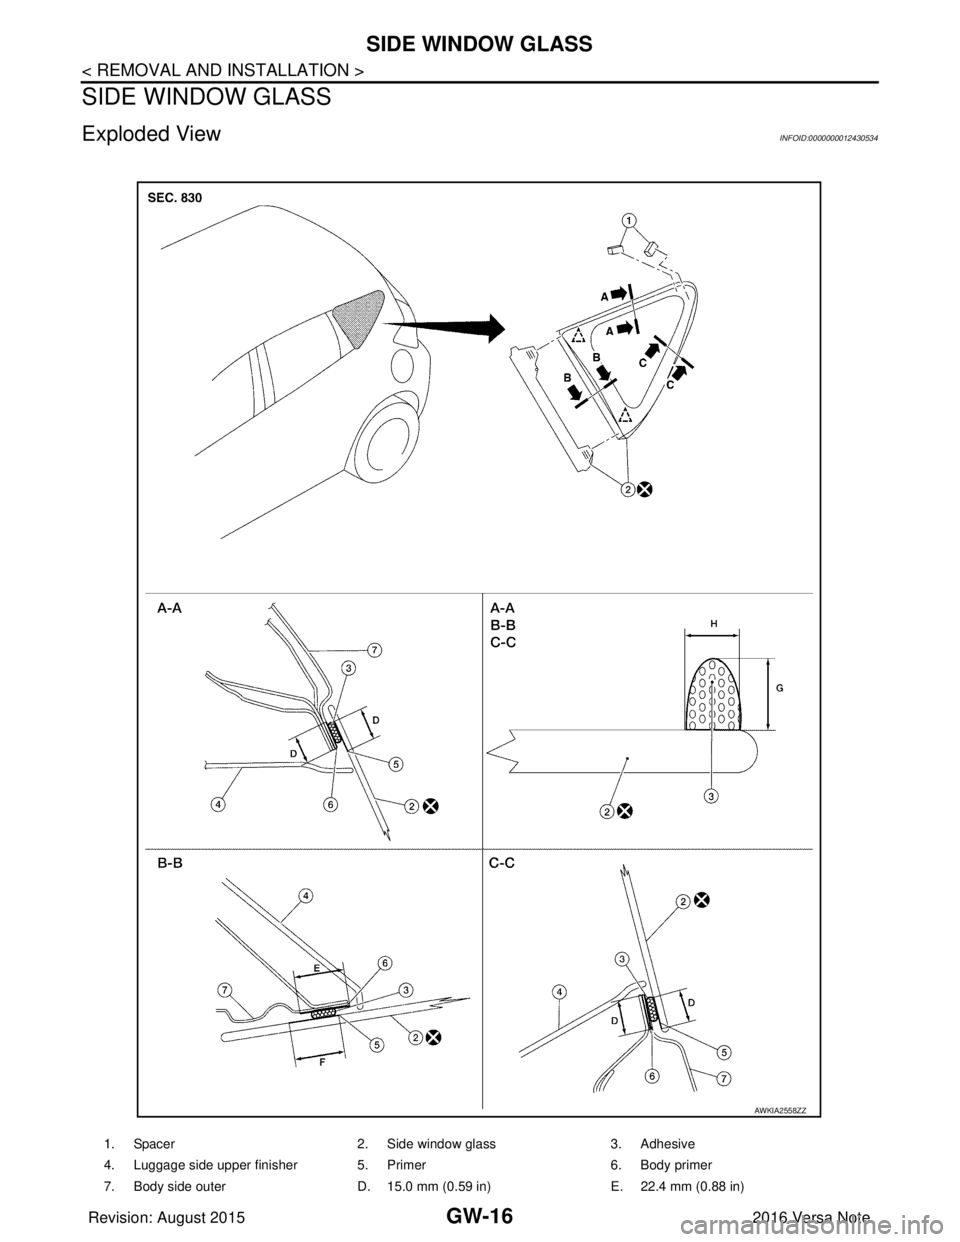
Exploded ViewINFOID:0000000012430534
1. Spacer2. Side window glass3. Adhesive
4. Luggage side upper finisher 5. Primer 6. Body primer
7. Body side outer D. 15.0 mm (0.59 in)E. 22.4 mm (0.88 in)
AWKIA2558ZZ
Revision: August 2015 2016 Versa Note
cardiagn.com
Page 1957 of 3641
SIDE WINDOW GLASSGW-17
< REMOVAL AND INSTALLATION >
C
DE
F
G H
I
J
L
M A
B
GW
N
O P
Removal and InstallationINFOID:0000000012430535
REMOVAL
1. Remove luggage side upper finisher. Refer to INT-35, "LUGGAGE SIDE UPPER FINISHER : Removal
and Installation".
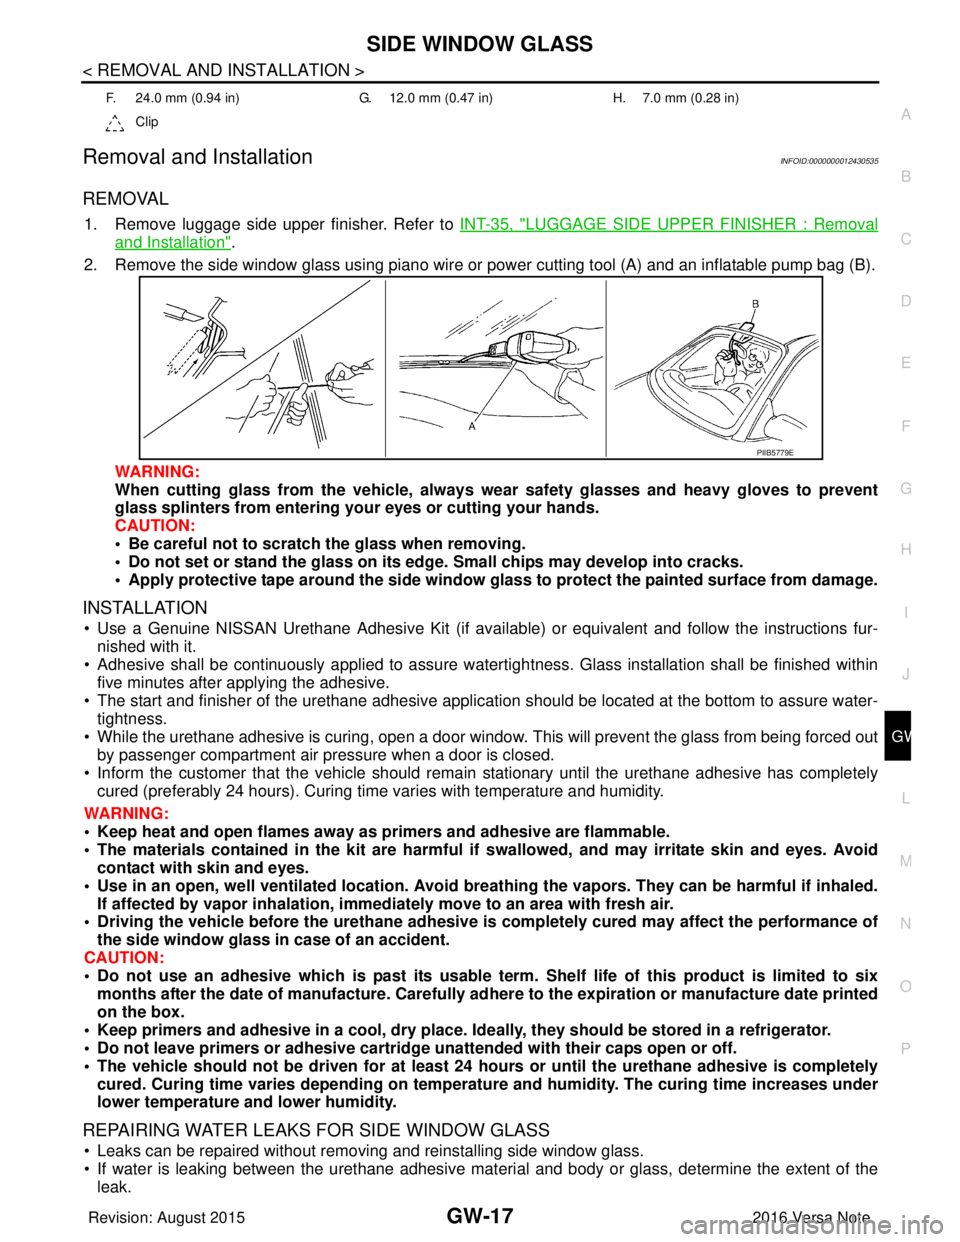
2. Remove the side window glass using piano wire or power cutting tool (A) and an inflatable pump bag (B).
WARNING:
When cutting glass from the vehicle, always wear safety glasses and heavy gloves to prevent
glass splinters from entering your eyes or cutting your hands.
CAUTION:
• Be careful not to scratch the glass when removing.
• Do not set or stand the glass on its ed ge. Small chips may develop into cracks.
• Apply protective tape around the side window gl ass to protect the painted surface from damage.
INSTALLATION
• Use a Genuine NISSAN Urethane Adhesive Kit (if avail able) or equivalent and follow the instructions fur-
nished with it.
• Adhesive shall be continuously applied to assure watert ightness. Glass installation shall be finished within
five minutes after applying the adhesive.
• The start and finisher of the urethane adhesive applicati on should be located at the bottom to assure water-
tightness.
• While the urethane adhesive is curing, open a door window . This will prevent the glass from being forced out
by passenger compartment air pressure when a door is closed.
• Inform the customer that the vehicle should rema in stationary until the urethane adhesive has completely
cured (preferably 24 hours). Curing time varies with temperature and humidity.
WARNING:
• Keep heat and open flames away as primers and adhesive are flammable.
• The materials contained in the kit are harmful if swallowed, and may irritate skin and eyes. Avoid
contact with skin and eyes.
• Use in an open, well ventilated lo cation. Avoid breathing the vapors. They can be harmful if inhaled.
If affected by vapor inhalation, imme diately move to an area with fresh air.
• Driving the vehicle before the urethane adhesive is completely cured may affect the performance of
the side window glass in case of an accident.
CAUTION:
• Do not use an adhesive which is past its usable te rm. Shelf life of this product is limited to six
months after the date of manufacture. Carefully ad here to the expiration or manufacture date printed
on the box.
• Keep primers and adhesive in a cool, dry place. Id eally, they should be stored in a refrigerator.
• Do not leave primers or adhesive cartridge unattended with their caps open or off.
• The vehicle should not be driven for at least 24 hours or until the urethane adhesive is completely
cured. Curing time varies depe nding on temperature and humidity. The curing time increases under
lower temperature and lower humidity.
REPAIRING WATER LEAKS FO R SIDE WINDOW GLASS
• Leaks can be repaired without removing and reinstalling side window glass.
• If water is leaking between the urethane adhesive materi al and body or glass, determine the extent of the
leak.
F. 24.0 mm (0.94 in) G. 12.0 mm (0.47 in)H. 7.0 mm (0.28 in)
Clip
PIIB5779E
Revision: August 2015 2016 Versa Note
cardiagn.com
Page 1958 of 3641

GW-18
< REMOVAL AND INSTALLATION >
SIDE WINDOW GLASS
• This can be done by applying water to the side window glass area while pushing glass outward.
• To stop the leak, apply primer (if necessary) and then urethane adhesive to the leak point.
Revision: August 20152016 Versa Note
cardiagn.com