Page 217 of 261

The following cause engine failure or damage
to the exhaust system:
R Use of engine oils and oil filters that have
not been expressly approved for the service
system
R Replacement of engine oil and oil filter after
the replacement interval specified by the
service system has expired
R Use of engine oil additives
! Do not add too much oil. If the oil level is
above the "max" mark on the dipstick ,too
much oil has been added. This can lead to
damage to the engine or the catalytic con-
verter .Have excess oil siphoned off. H
Environmental note
When topping up the oil, take care not to spill
any. If oil enters the soil or waterways, it is
harmful to the environment. X
Turn cap :anti-clockwise and remove it.
X Top up with the amount of engine oil required.
Observe the specification sinthe on-board com-
puter when doing so or fill carefully to the max- imum mark on the oil dipstick.
The differenc ebetween the minimum mark and
the maximum mark on the oil dipstick is approx- imately 2.0 litres.
X Replace cap :on the filler neck and turn
clockwise.
Make sure that the cap locks securely into
place.
For further information on engine oil, see
(Y page 252). Other service products
Important safety notes G
WARNING
Certain components in the engin ecompart-
ment coul dbevery hot, e.g. the engine, the
radiator and parts of the exhaust system.
There is arisk of injury when accessing the
engine compartment.
As far as possible,a llow the engine to cool
downa nd only touch the components descri-
bed in the following. G
WARNING
There are moving components in the engine
compartment. Certain components may con-
tinue to move or suddenly move again even
after the ignitio nhas been switched off, e.g.
the radiator fan. There is arisk of injury.
If you have to carry out work in the engine
compartment:
R switch off the ignition
R never touch the dangerous area ssurround-
ing moving components, e.g. the rotation
area of the fan
R remove jewellery and watches
R keep items of clothing and hair, for exam-
ple,a wayfrom moving parts. G
WARNING
The cooling system is pressurised ,particu-
larl yw hen the engine is warm .Ifyou open the
cap, you coul dbescalded if hot coolant
sprays out. There is arisk of injury.
Let the engine cool downb efore you open the
cap. Wearg lovesand eye protection. Open
the cap slowly to release the pressure. G
WARNING
If you open the bonnet while the engine is
overheating or while there is afire in the
engine compartment, you coul dcome into
contact with hot gase sorother leaking ser-
vice products. There is adange rofinjury. 214
Engine compartmentMaintenanc
eand care
Page 218 of 261

Allow an overheating engine to coo
ldown
before opening the bonnet. If ther eisafirein
the engine compartment, leav ethe bonnet
closed and notify the fir ebrigade.
Checkin gthe coolant level Example: checking the coolant level
X Park the vehicl eonalevel surface.
Check the coolant level onl yifthe vehicl eis
on alevel surface and the engine ha scooled
down.
X Turn the key to position 2in the ignition lock
(Y page 96).
X Check the coolant temperatur edisplay in the
instrument cluster.
The coolant temperatur emustbeb elow
70 †.
X Slowl yturnc ap : half aturna nti-clockwise
and allo wexcess pressure to escape.
X Turn cap :furthe ranti-clockwise and
remove it.
If the coolant is at the level of marker bar =
in the fille rneck when cold, there is enough
coolant in coolant expansio ntank ;.
If the coolant level is approximately 1.5 cm
above marker bar =in the fille rneck when
warm, there is enoug hcoolant in coolant
expansio ntank ;.
X If necessary ,top up with coolant tha thas
been teste dand approved by Mercedes-Benz.
X Replace cap :and tur nitclockwise as fa ras
it will go.
Furthe rinformatio noncoolant (Y page 253). Topping up the windscreen washe
rsys-
tem/headlamp cleanin gsystem G
WARNING
If wind screen washer concentrate comes into
contact with hot components of the engine or
the exhaust system, it can ignite. There is a
risk of fire and injury.
Make sure the windscreen washer concen-
trate does not come into contact with the filler neck. Example: topping up the windscreen washer
system
X To open: pull cap:upwards by the tab and
open.
X Top up with the premixed washe rfluid.
X To close: press cap :onto the fille rneck
unti lite ngages.
The washe rfluid reservoi risusedf or both the
windscree nwashe rs ystem and the headlamp
cleaning system.
If the washe rfluid level drops belo wthe recom-
mended minimu mof3.5 litres ,amessage
appear sinthe multifunctio ndisplay prompting
yo utot op up the washe rfluid (Y page 154).
Furthe rinformatio nonwashe rfluid
(Y page 254). Service
ASSYST service interval display
Service messages Yo
uc an obtain up-to-dat einformation concern-
ing the servicin gofyour vehicle from aqualified
specialis tworkshop, e.g. aMercedes-Ben zSer-
vice Centre. Service
215Maintenance and care Z
Page 219 of 261

The ASSYST service interval display inform
syou
of the next service due date.
If as ervice due date has been exceeded, you
also hear awarning tone.
The multifunction display shows aservice mes-
sage for afew seconds, e.g.:
Service Ain999,999 km
Service Ain999,999 km
Service Ain..d ays
Service Ain..d ays
Service Adue
Service Adue
Service Aoverdue by 999,999 km
Service Aoverdue by 999,999 km
Service Aoverdue by .. days
Service Aoverdue by .. days
Maintaining the time-dependent service sched-
ule:
X Call up and noted own the service due date
before disconnectin gthe battery.
or X After reconnecting the battery, subtract the
battery disconnection periods from the ser-
vice date shown on the display.
The symbol and the letter indicate which type of service is due:
¯ Minor service A
A
± Major service B B
The ASSYST service interval display does not
take into account any periods of time during
which the battery is connected.
Hiding service messages X
To hide the service message, press the %
back button on the multifunction steering
wheel (Y page 132).
Displaying service messages Use the buttons on the multifunction steering
wheel.
X Switch the ignition on.
X Press =or; to select the standard
display menu on the steering wheel
(Y page 133).
X Press 9or: to select the ASSYST ser-
vice interval display.
The ¯ or± service symbol and the ser-
vice due date are displayed. Special service requirements The prescribed service interval is based on nor-
mal operation of the vehicle. Servic ework will
need to be performed more often if the vehicle is operated under arduous conditions or increased
loads, for example:
R regular city driving with frequent intermediate
stops
R if the vehicle is primarily used to travel short
distances
R for frequent operation in mountainous terrain
or on poor road surfaces
R if the engine is often left idling for long periods
In these or similar operating conditions, have,
for example, the air filter, engine oil and oil filter changed more frequently. The tyres must be
checked more frequently if the vehicle is oper-
ated under increased loads. Further information can be obtained at aqualified specialist work-
shop, e.g. aMercedes-Benz Servic eCentre. Fuel/water separator
! If you continue driving without having the
fuel/wate rseparato rserviced, this could
caus edamag etotheengine. An yresulting
damag eisnotcovered by th ewarranty. H
Environmenta
lnote
Dispose of servic eproduct sinane nviron-
mentally-responsible manner.
If th efuel/water separator needs servicing:
R the ! Clean
Clean the thefuel
fuel filter
filter message
is shown in th emultifunction display
R aw arning tone sounds
X Consult aqualifie dspecialist workshop. Care
General notes
! For cleaning your vehicle, do not use any of
the following:
R dry ,rough or hard cloths
R abrasive cleaning agents
R solvents
R cleaning agents containing solvents
Do not scrub. 216
CareMaintenanc
eand care
Page 220 of 261

Do not touch the surfaces or protective films
with hard objects ,e.g.ar ingori ce scraper.
Yo uc ould otherwis escratch or damage the
surfaces and protective film.
! Do not park up your vehicl
efor alon gp eriod
of time immediatel yafter cleaning, particu-
larly after cleaning the whee lrim with wheel
cleaner. Whee lcleane rmaylead to increased
corrosion of the brake discs and pads .You
shoul dtherefore drive for afew minute safter
cleaning. By heating up the brakes ,the brake
discs and pads dry .The vehicl ecan the nbe
parked up for alon gp eriodoft ime. H
Environmental note
Dispose of empty packaging an dcleaning
cloths in an environmentally responsible man- ner.
Regular car eofyour vehicle is acondition for
retainin gqualit yint helongterm.
Use car eproduct sand cleaning agents recom-
mended and approved by Mercedes-Benz. Washin
gthe vehiclea nd cleaning the
paintwork
Automatic car wash G
WARNING
Braking efficiency is reduced after the vehicle has been washed. There is arisk of an acci-
dent.
After washing the vehicle, brake carefully
while paying attention to the traffic conditions in order to restore full braking efficiency.
! When the HOLD function is activated, the
vehicl ebrakes automatically in certain situa-
tions.
To avoi ddamage to the vehicle, deactivate
the HOLD function in the following or similar
situations:
R when towing away
R in ac ar wash
! Make sure that the automatic car washis
suitable for the size of the vehicle. Fold in the exterior mirrors before the vehicl eiswashed.
The exterior mirrors coul dotherwise be dam-
aged. !
Make sure that the automatic transmission
is in position Nwhen washing your vehicle in
at ow-through car wash. The vehicle could be
damagedift he transmission is in another
position.
! Make sure:
R the side windows and sliding sunroof are
closed completely.
R the blower is switched off
R the windscreen wiper switch is at position
0
The vehicle could otherwise be damaged.
You can wash the vehicle in an automatic car
wash from the very start.
If the vehicle is very dirty, wash off excess dirt
before cleaning the vehicle in an automatic car
wash.
After using an automatic car wash, wipe off the
wax from the windscreen and the windscreen
wiper blades. This will prevent smears and
reduce wiping noises caused by residue on the
windscreen.
Washing by hand In some countries, washing by hand is only
allowed at specially equipped washing bays.
Observe the legal requirements for each indi-
vidual country.
When using the vehicle in winter, remove all
traces of road salt deposits carefully and as
soon as possible.
When washing the underside of the vehicle, also
clean the insides of the wheels.
X Do not use hot water and do not wash the
vehicle in direct sunlight.
X Use asoft sponge to clean.
X Use amild cleaning agent, such as acar
shampo oapproved by Mercedes-Benz.
X Thoroughly hose down the vehicle with agen-
tle jet of water.
X Do not point the water jet directly towards the
air inlet.
X Use plenty of water and rinse out the sponge
frequently.
X Rinse the vehicle with clean water and dry
thoroughl ywithachamois.
X Do not let the cleaning agent dry on the paint-
work. Ca
re
217Maintenance an dcare Z
Page 221 of 261
 can caus edamage not visible from the
outside to tyres or chassi scomponents. Com-
ponents damaged in this way c")
High-pressure cleaner
G
WARNING
The wate rjet of circular-jet nozzles (dirt grind-
ers) can caus edamage not visible from the
outside to tyres or chassi scomponents. Com-
ponents damaged in this way can unexpect-
edlyf ail.There is arisk of an accident.
Do not use high-pressure cleaners with circu-
lar-jet nozzles to clea nthe vehicle. Have dam-
agedt yres or chassi scomponents replaced
immediately.
! Always maintai
nadistance of at least 30 cm
between the vehicl eand the high-pressure
cleaner nozzle. Information about the correct
distance is available from the equipment
manufacturer.
Move the high-pressure cleaner nozzle
around when cleaning yourv ehicle.
Do not aim directly at any of the following:
R tyres
R door gaps, roof gaps, joints etc.
R electrica lcomponents
R battery
R plugc onnectors
R lamps
R seals
R trim elements
R ventilation slots
Damag etosealsore lectrica lcomponents
can leadtol eaks or failures.
! Vehicles with decorative film: parts of your
vehicl eare covered with adecorative film.
Maintain adistance of at least 70 cm between
the parts of the vehicl ecovered with the film
and the nozzle of the high pressure cleaner.
Information about the correct distance is
available from the equipment manufacturer.
Move the high-pressure cleaner nozzle
around whilst cleaning.
Cleaning the paintwork !
Do not affix:
R stickers
R films
R magneti cplates or similari tems to painted surfaces. You could oth
erwise
damage the paintwork.
Scratches, corrosive deposits, area saffecte dby
corrosion and damage cause dbyinadequate
car ecannot always be completel yrepaired .In
such cases ,visit aquali fied specialis tworkshop.
X Remov eimpuri ties immediately, where pos-
sible, whilst avoiding rubbing too hard.
X Soa kinsect remains with insect remove rand
rinse off the treated area safterwards.
X Soa kbirdd ropping swithw ater and rinse off
the treated area safterwards.
X Remov ecoolant, brake fluid ,tree resins ,oils,
fuel sand greases by rubbing gently with a
cloth soaked in petroleu mether or lighter
fluid.
X Use tar remove rtoremove tar stains.
X Use silicone remove rtoremove wax. Cleanin
gvehicle parts
Cleaning th ewheels G
WARNING
Th ew ater jet of circular-jet nozzles (dirt grind-
ers) can caus edamage not visible from the
outside to tyres or chassi scomponents. Com-
ponents damaged in this way can unexpect-
edlyf ail.There is arisk of an accident.
Do not use high-pressure cleaners with circu-
lar-jet nozzles to clea nthe vehicle. Have dam-
agedt yres or chassi scomponents replaced
immediately.
! Do not use acidic whee
lcleaning products
to remove brake dust. This coul ddamage
whee lbolts and brake components.
! Do not park up yourv
ehiclefor along period
of time immediatel yafter cleaning, particu-
larl yafter cleaning the whee lrim with wheel
cleaner. Whee lcleaner may leadtoi ncreased
corrosio nofthe brake discs and pads. You
should therefore drive for afew minutes after
cleaning. By heating up the brakes ,the brake
discs and padsd ry. The vehiclecan then be
parked up for along period of time. 218
CareMaintenanc
eand care
Page 222 of 261

Cleaning th
ewindows G
WARNING
If th ewindscreen wipers are set in motion
when cleaning the windscreen or wiper
blades, you coul dbecome trapped. There is a
dange rofinjury.
Always switch off the windscreen wipers and
the ignitio nbefore cleaning the windscreen or
wiper blades.
! Do not use dry cloths, abrasive cleaning
agents, solvents or solvent-based cleaning
agents to clea nthe insid eofthe windows/
windscreen. Do not touch the insid eofthe
windows/windscreen with hard items such
as an ice scrape roraring. Otherwise, the
windows/windscreen coul dbedamaged.
! Clean the water drainage channels of the
windscreen and the rear windo watregular
intervals. Deposits such as leaves, petal sand
pollen may under certain circumstances pre-
vent water from draining away. This can lead
to corrosio ndamage and damage to elec-
tronic components.
X Clean the insid eand outside of the windows
with adamp cloth and acleaning agent that is
recommende dand approved by Mercedes-
Benz.
Cleaning the wiper blades G
WARNING
If the windscreen wipers are set in motion
when cleaning the windscreen or wiper
blades, you coul dbecome trapped. There is a
dange rofinjury.
Always switch off the windscreen wipers and
the ignitio nbefore cleaning the windscreen or
wiper blades.
! Do not pullont
he wiper blade. Otherwise,
the wiper blade coul dbedamaged.
! Do not clea
nwiper blades too often and do
not rub them too hard .Otherwise, the graph-
ite coating coul dbedamaged. This could
caus ewiper noise. !
Hold the wiper arm securel
ywhen folding
back. The windscreen could be damagedif
the wiper arm hits against it suddenly.
X Fold the wiper arms awayf rom the wind-
screen.
X Cleant he wiper bladesc arefully usingadamp
cloth.
X Fold the windscreen wipers back againb efore
switching on the ignition.
Cleaning the exterior lighting !
Only use cleaning agents or cleaning cloths
that are suitablef or plastic lenses. Unsuitable
cleaning agents or cleaning cloths could
scratch or damage the plastic lenses of the
exterior lighting.
X Cleant he plastic lenses of the exterior light-
ing using awet sponge and amild cleaning
agent, e.g. Mercedes-Benz car shampoo or
cleaning cloths.
Cleaning the exhaust pipe G
WARNING
The exhaust tail pipe and tail pipe trim can
become very hot. If you come into contact
with these parts of the vehicle, you could burn
yourself. There is arisk of injury.
Always be particularl ycarefu laround the
exhaust tail pipea nd the tail pipetrim. Allow
these components to cool downb efore touch-
ing them.
! Do not clea
nthe exhaust pipew ith acid-
base dcleaning agents, such as sanitary
cleanser or whee lcleaner.
Impurities combined with the effects of road grit and corrosive environmental factors may cause
flas hrust to form on the surface. You can
restore the original shine of the exhaust pipeby
cleaning it regularly, especially in winter and
after washing the vehicle.
X Clean the exhaust pipew ithacare product
tested and approved by Mercedes-Benz. Ca
re
219Maintenance an dcare Z
Page 223 of 261

Cleaning th
etrailer tow hitch !
Do not clean the bal
lcoupling with ahigh-
pressure cleaner. Do not use solvents.
! Please note the care instructionsint
he
trailer coupling manufacturer's operating
instructions. H
Environmental note
Dispose of oilya nd greasycloths in an envi-
ronmentally-responsible manner.
The ball coupling must be cleaned if it becomes dirt yorc orroded.
X Remov erust ,e.g.w ith aw ire brush.
X After cleaning ,lightly oil or greas ethe ball
coupling.
X Chec kthatthe vehicle' strailer to whitch is
working properly.
You can also have th emaintenanc ework on the
ball coupling and th etrailer to whitch carried out
by aq ualifie dspecialist workshop. Interior care
Cleaning th edisplay !
For cleaning, do not use any of the following:
R alcohol-based thinne rorpetrol
R abrasive cleaning agents
R commercially-available householdc leaning
agents
These may damage the displays urface. Do
not put pressure on the displays urface when
cleaning. This could lead to irreparable dam-
age to the display.
X Before cleaning the display, make sure that it
is switched off and has cooled down.
X Cleant he displays urface using acommer-
cially available microfibre cloth and TFT/LCD
displayc leaner.
X Dry the displays urface usingadry microfibre
cloth.
Cleaning the plastic trim G
WARNING
Care products and cleaning agents containing solvents can cause surfaces in the cockpit to become porous.T
his could result in plastic
parts breakin gaway when the airbags are
deployed. There is adanger of injury.
Do not use care product sand cleanin gagents
containin gsolvents to clean the cockpit.
! Never attac
hthe following to plastic surfa-
ces:
R stickers
R films
R perfume oil container or similar
You could otherwise damage the plastic.
! Do not allow cosmetics
,insec trepellent or
sunscreen to come in contact with the plastic trim .This maintains the high-quality look of
the surfaces.
X Wipe the plastic trim with adamp, lint-free
cloth, e.g. amicrofibre cloth.
X Heavy soiling: use care and cleanin gprod-
ucts recommended and approved by
Mercedes-Benz.
The surface may chang ecolour temporarily.
Wait until the surface is dry again.
Cleaning the steering wheel and selec-
tor lever X
Thoroughly wipe with adamp cloth or use
leather care agents that have been recom-
mended and approved by Mercedes-Benz.
Cleaning wood trim and trim elements !
Do not use solvent-based cleaning agents
such as tar remover, wheel cleaners, polishes
or waxes. There is otherwise arisk of damag-
ing the surface.
X Wipe the wood trim and trim elements with a
damp, lint-free cloth, e.g. amicrofibre cloth.
X Heavy soiling: use care and cleaning prod-
ucts recommended and approved by
Mercedes-Benz.
Cleaning the seat covers General notes
! Clean cloth covers with
amicrofibre cloth
moistened with asolution containing 1%
detergent (e.g. washing-up liquid). Rubc are-220
CareMaintenanc
eand care
Page 224 of 261

fully, and alwaysw
ipee ntire sea tsections to
avoi dleaving visible lines .Leave the sea tto
dry afterwards .Cleaning results depend on
the type of dirt and how long it has been there.
Note that regular care is essentia ltomake sure
that the appearance and comfort of the covers
are retained over time.
Cleaning the seat belts G
WARNING
Seat belts may be severely weakened if
bleached or coloured. This may lea dtothe
seat belts, for example, tearing or failing in an accident. There is an increased risk of injury,
possibly even fatal.
Never bleach or colou rseat belts.
! Do not clea
nthe seat belts using chemical
cleaning agents. Do not dry the seat belts at
temperatures above 80 †orindirect sun-
light.
X Use clean, lukewarm water and soap solution.
Cleaning the wood luggage-compart-
ment floor !
For cleanin
gand treating the wooden lug-
gage compartment floor, do not use any of the
following:
R microfibre cloth
R householdc leaning agents
R commercially available furniture polishes,
sprays or similari tems
R steam cleaners
Otherwise, the surface of the wooden luggage
compartment floor will be damaged.
! Do not apply self-adhesive films or masking
strips to the wooden luggage compartment
floor; the solvent residue and plasticisers con-
tained in them may destroy the paintwork.
Use alint-free cotton cloth to remove dust, dirt
and fingerprints. If necessary, dampen the lint-
free cotton cloth with asmall amount of clear
water.
Use wood oil recommended and approved by
Mercedes-Benz to treat and protect the wooden
luggage compartment floor. This revitalises the
wooden surface and increases the resilience of
the wood. To apply the wood oil:
X Using the sanding pad that comes with the
care set, sand the wooden surface in the
direction of the grain.
X Clean off the wood dust.
X Using acotton cloth, distribute athin layer of
wood oil evenly over the wooden surface
using asimple wiping motion .Always wipe
along the grain.
X Then, using asecond cotton cloth, apply the
remaining wood oil.
An ew protective coat forms within approx-
imately four hours.
As econd treatment with the wood oil is recom-
mended for extremely worn wooden luggage
compartment floor surfaces.
Cleaning the roof lining and carpets X
Roof lining: if it is verydirty, us easoft brush
or dry shampoo.
X Carpets: uset he carpet and textil ecleaning
agents recommended and approved by
Mercedes-Benz. Care
221Maintenanc eand care Z
 1
1 2
2 3
3 4
4 5
5 6
6 7
7 8
8 9
9 10
10 11
11 12
12 13
13 14
14 15
15 16
16 17
17 18
18 19
19 20
20 21
21 22
22 23
23 24
24 25
25 26
26 27
27 28
28 29
29 30
30 31
31 32
32 33
33 34
34 35
35 36
36 37
37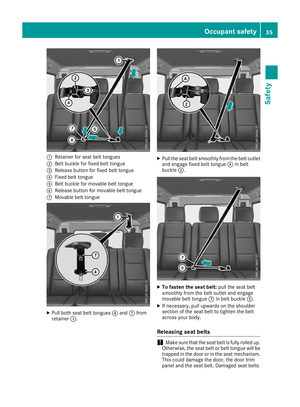 38
38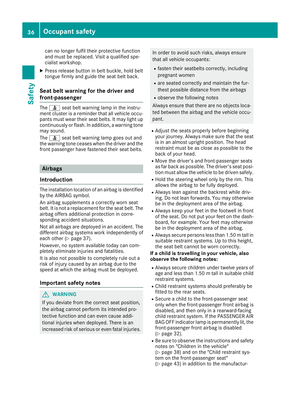 39
39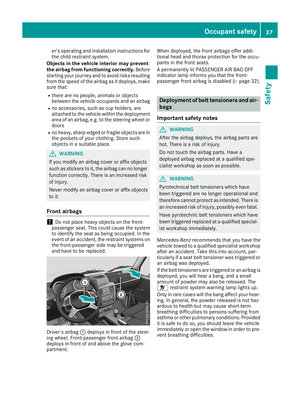 40
40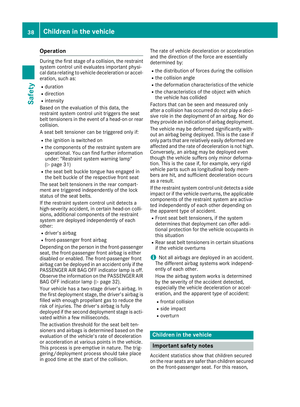 41
41 42
42 43
43 44
44 45
45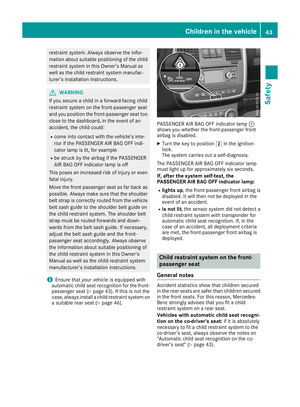 46
46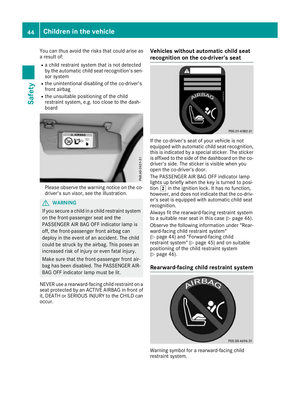 47
47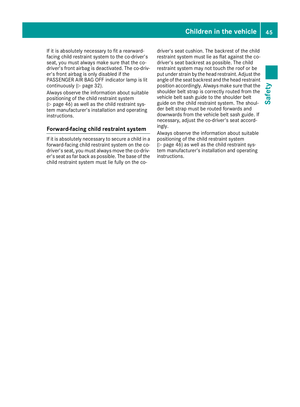 48
48 49
49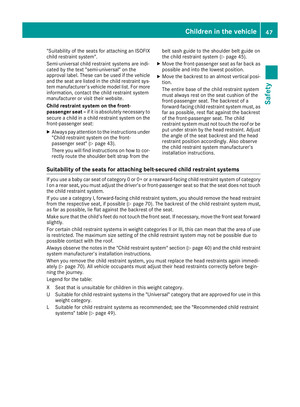 50
50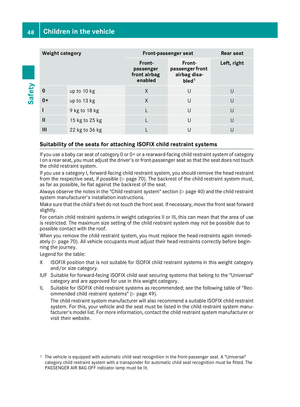 51
51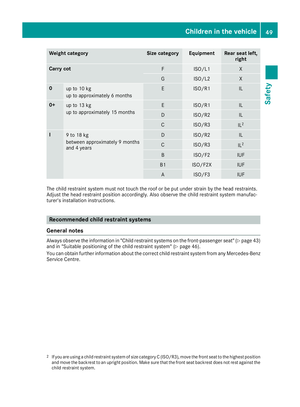 52
52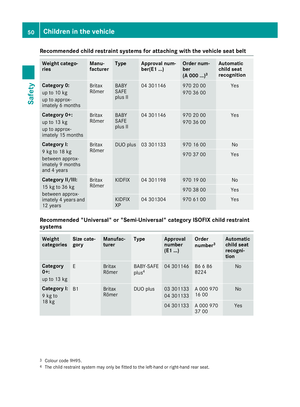 53
53 54
54 55
55 56
56 57
57 58
58 59
59 60
60 61
61 62
62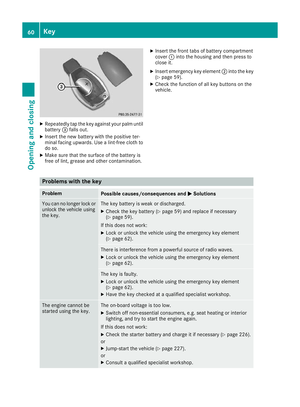 63
63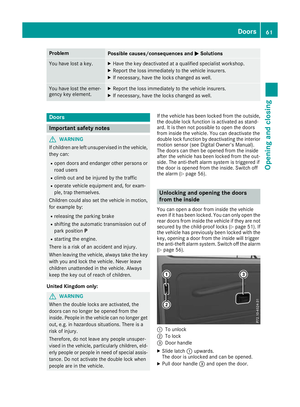 64
64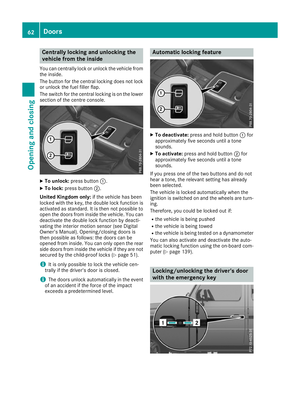 65
65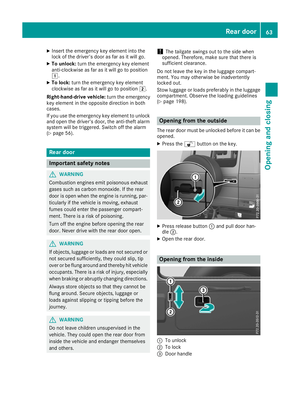 66
66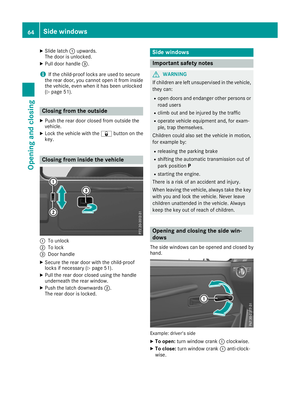 67
67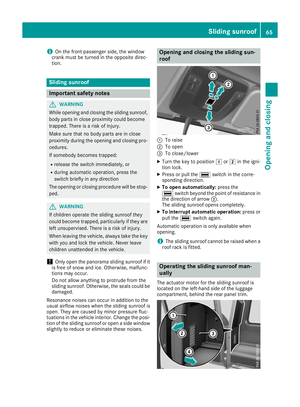 68
68 69
69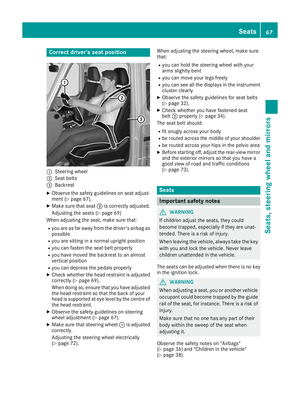 70
70 71
71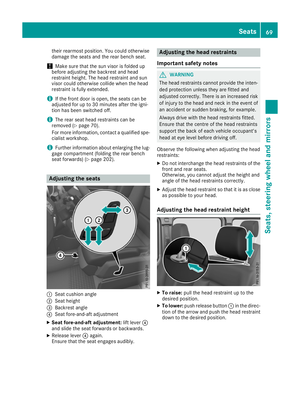 72
72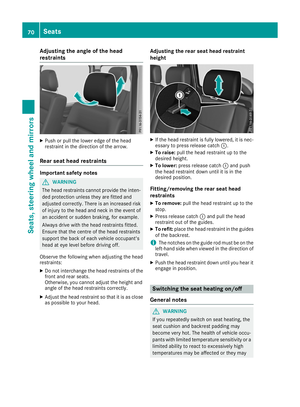 73
73 74
74 75
75 76
76 77
77 78
78 79
79 80
80 81
81 82
82 83
83 84
84 85
85 86
86 87
87 88
88 89
89 90
90 91
91 92
92 93
93 94
94 95
95 96
96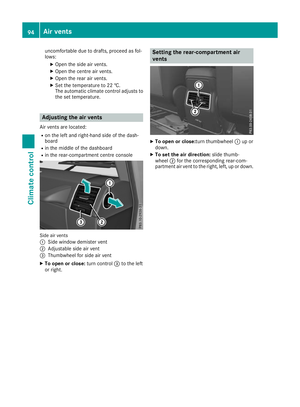 97
97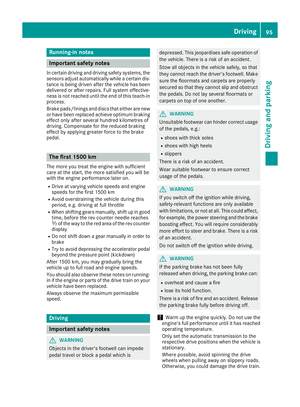 98
98 99
99 100
100 101
101 102
102 103
103 104
104 105
105 106
106 107
107 108
108 109
109 110
110 111
111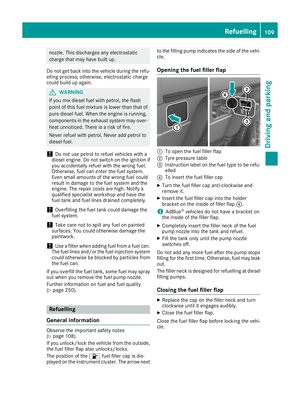 112
112 113
113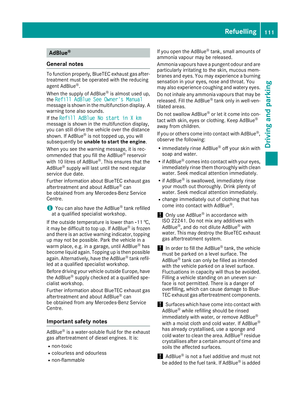 114
114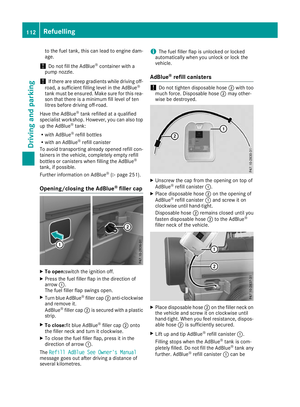 115
115 116
116 117
117 118
118 119
119 120
120 121
121 122
122 123
123 124
124 125
125 126
126 127
127 128
128 129
129 130
130 131
131 132
132 133
133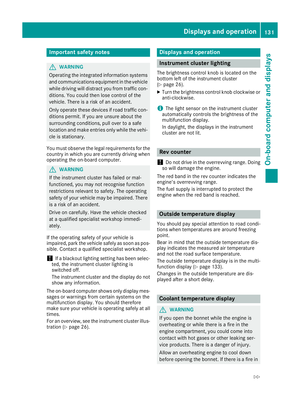 134
134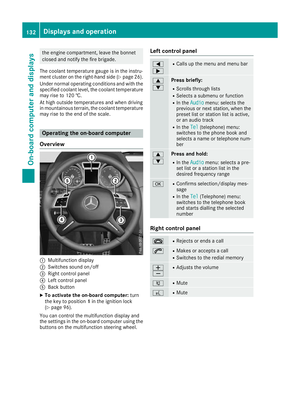 135
135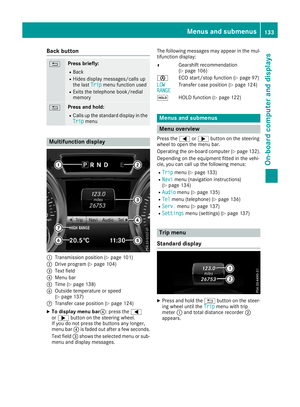 136
136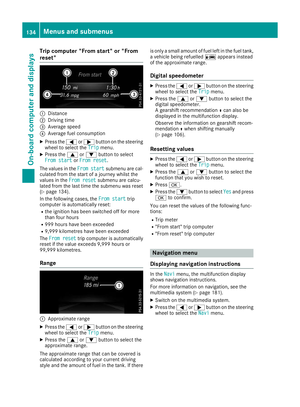 137
137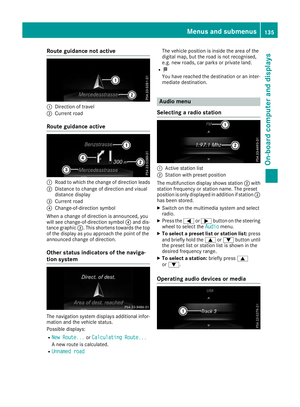 138
138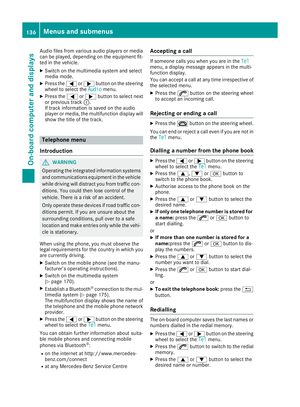 139
139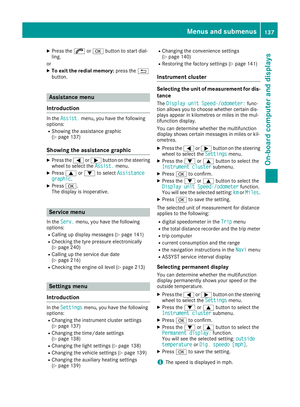 140
140 141
141 142
142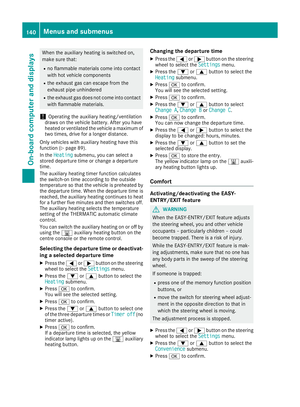 143
143 144
144 145
145 146
146 147
147 148
148 149
149 150
150 151
151 152
152 153
153 154
154 155
155 156
156 157
157 158
158 159
159 160
160 161
161 162
162 163
163 164
164 165
165 166
166 167
167 168
168 169
169 170
170 171
171 172
172 173
173 174
174 175
175 176
176 177
177 178
178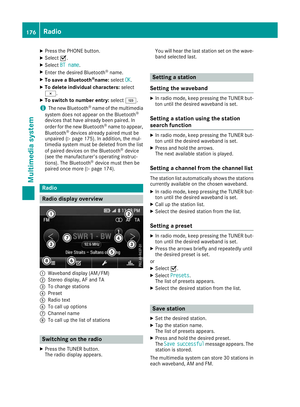 179
179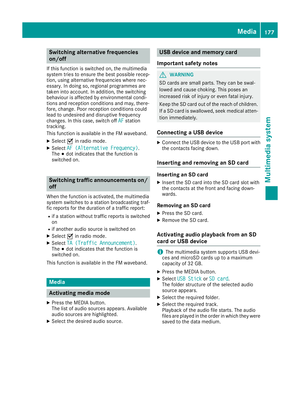 180
180 181
181 182
182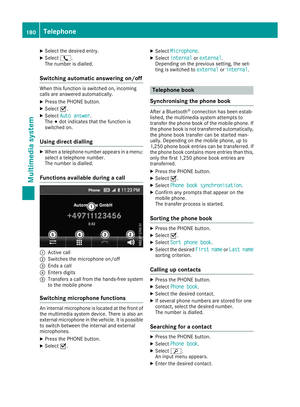 183
183 184
184 185
185 186
186 187
187 188
188 189
189 190
190 191
191 192
192 193
193 194
194 195
195 196
196 197
197 198
198 199
199 200
200 201
201 202
202 203
203 204
204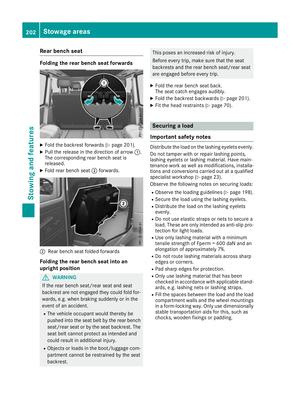 205
205 206
206 207
207 208
208 209
209 210
210 211
211 212
212 213
213 214
214 215
215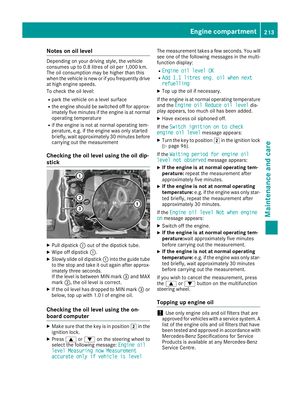 216
216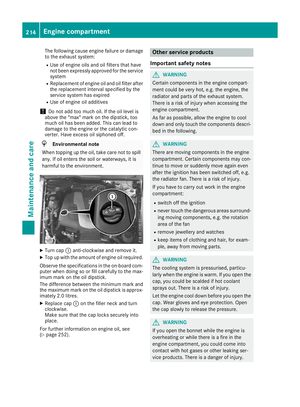 217
217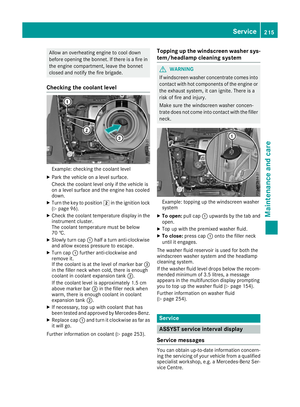 218
218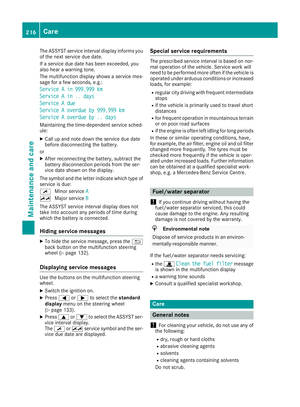 219
219 220
220 221
221 222
222 223
223 224
224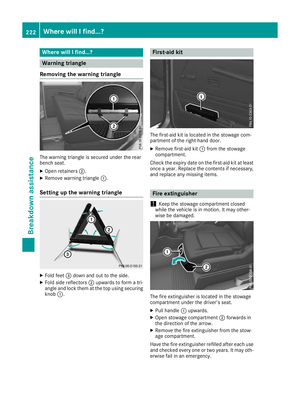 225
225 226
226 227
227 228
228 229
229 230
230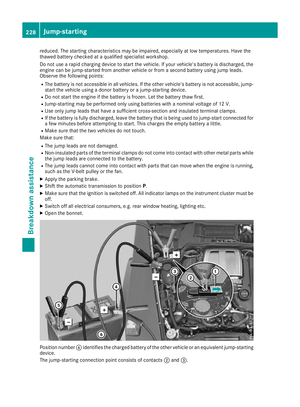 231
231 232
232 233
233 234
234 235
235 236
236 237
237 238
238 239
239 240
240 241
241 242
242 243
243 244
244 245
245 246
246 247
247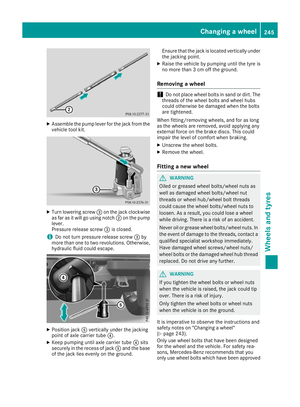 248
248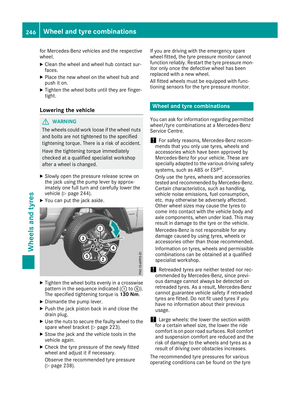 249
249 250
250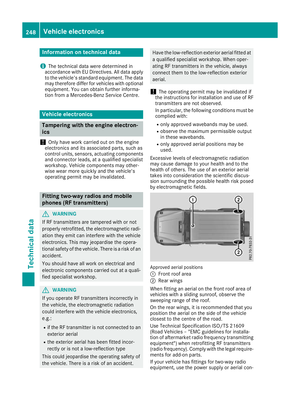 251
251 252
252 253
253 254
254 255
255 256
256 257
257 258
258 259
259 260
260