Page 137 of 261

Trip compute
r"From start" or "From
reset" :
Distance
; Driving time
= Averag espeed
? Averag efuelconsumption
X Press the =or; button on the steering
whee ltoselect the Trip
Tripmenu.
X Press the 9or: button to select
Fro mstart
From start orFrom reset
From reset.
The valuesint heFrom
From start
start submenu are cal-
culated from the start of ajourney whilst the
valuesint heFrom reset
From reset submenu are calcu-
lated from the last time the submenu was reset
(Y page 134).
In the following cases, the From start
From start trip
computer is automaticallyr eset:
R the ignition has been switched off for more
than four hours
R 999 hours have been exceeded
R 9,999 kilometres have been exceeded
The From reset From reset trip computer is automatically
reset if the value exceeds 9,999 hours or
99,999 kilometres.
Range :
Approx imaterange
X Press the =or; button on the steering
whee ltoselect the Trip
Tripmenu.
X Press the 9or: button to select the
approximate range.
The approximate range tha tcan be covered is
calculate daccording to your current driving
style and the amount of fuel in the tank. If there is only
asmall amount of fuel left in the fuel tank,
av ehicle being refuelled Cappears instead
of the approximate range.
Digita lspeedometer X
Press the =or; button on the steering
wheel to select the Trip
Tripmenu.
X Press the 9or: button to select the
digital speedometer.
Ag earshift recommendation Zcan also be
displayed in the multifunction display.
Observe the information on gearshift recom-
mendation Zwhen shiftin gmanually
(Y page 106).
Resetting values X
Press the =or; button on the steering
wheel to select the Trip Tripmenu.
X Press the 9or: button to select the
function that you wish to reset.
X Press a.
X Press the :button to select Yes Yesand press
a to confirm.
You can reset the values of the following func-
tions:
R Trip meter
R "From start "trip computer
R "From reset" trip computer Navigat
ionm enu
Displaying navigatio ninstructions In the
Navi Navimenu, the multif unction display
shows navigation instructions.
For more information on navigation, see the
multimedia system (Y page 181).
X Switch on the multimedia system.
X Press the =or; button on the steering
wheel to select the Navi Navimenu. 134
Menu
sand submenusOn-boar dcomputer and displays
Page 138 of 261

Route guidanc
enotactive :
Direction of travel
; Current road
Route guidanc eactive :
Road to which the change of direction leads
; Distance to change of direction an dvisual
distanc edisplay
= Curren troad
? Change-of-direction symbol
When achang eofd irection is announced, you
will see change-of-direction symbol ?and dis-
tance graphic ;.This shorten stow ards th etop
of th edisplay as you approac hthe poin toft he
announce dchang eofd irection.
Other status indicators of th enaviga-
tion system The navigation system displays additional infor-
mation and the vehicle status.
Possible displays:
R New Route... New Route... orCalculating Route...
Calculating Route...
An ew route is calculated.
R Unnamed road
Unnamed road The vehicle position is inside the area of the
digital map, but the road is not recognised,
e.g. new roads, car parks or private land.
R O
You have reached the destination or an inter-
mediate destination. Audio menu
Selecting aradio station :
Active station list
; Station wit hpreset position
The multifunctio ndisplay shows station ;with
statio nfrequency or statio nname. The preset
positio niso nlyd isplayed in additio nifstation ;
ha sb eens tored.
X Switch on the multimedia system and select
radio.
X Press the =or; button on the steering
whee ltoselect the Audio
Audio menu.
X To select apreset list or station list: press
and briefl yholdt he 9 or: button until
the preset list or statio nlistiss hown in the
desired frequency range.
X To select astation: brieflypress 9
or :.
Operatin gaudi odevices or media Menus and subme
nus
135On-boa rdcomputer and displays Z
Page 139 of 261

Audio files from various audi
oplayer sorm edia
can be played ,depen ding on the equipment fit-
ted in the vehicle.
X Switch on the multimedia system and select
media mode.
X Press the =or; button on the steering
whee ltoselect the Audio
Audio menu.
X Press the =or; button to select next
or previous track :.
If trac kinformatio niss aved on the audio
player or media ,the multifunctio ndisplay will
sho wthe titl eofthe track. Telephon
emenu
Introduction G
WARNING
Oper ating the integrated information systems
and communications equipment in the vehicle
while driving willd istract you from traffic con-
ditions. You coul dthen lose control of the
vehicle. There is arisk of an accident.
Only operate these devices if road traffic con-
ditions permit. If you are unsure about the
surrounding conditions, pullo ver toasafe
location and make entries only while the vehi-
cle is stationary.
When using the phone, you must observe the
lega lrequirements for the country in which you
are currently driving.
X Switch on the mobil ephone (see the manu-
facturer' soperating instructions).
X Switch on the multimedi asystem
(Y page1 70).
X Establish aBluetooth ®
connection to the mul-
timedi asystem (Y page175).
The multifunction display show sthe name of
the telephone and the mobil ephone network
provider.
X Press the =or; button on the steering
whee ltoselect the Tel Telmenu.
You can obtai nfurther information about suita-
ble mobil ephones and connecting mobile
phones via Bluetooth ®
:
R on the internet at http://www.mercedes-
benz.com/connect
R at any Mercedes-Benz Service Centre Accepting
acall If someon
ecalls you when you are in the Tel
Tel
menu, adisplay messag eappears in the multi-
function display.
You can accept acall at any time irrespective of
the selected menu.
X Press the 6button on the steering wheel
to accept an incoming call.
Rejecting or ending acall X
Press the ~button on the steering wheel.
You can end or reject acall even if you are not in
the Tel Tel menu.
Dialling anumber from the phone book X
Press the =or; button on the steering
wheel to select the Tel
Tel menu.
X Press the 9,:ora button to
switch to the phone book.
X Authorise access to the phone book on the
phone.
X Press the 9or: button to select the
desired name.
X If only one telephone number is stored for
an ame: press the 6ora button to
start dialling.
or X If more thano
ne number is stored for a
name:press the 6ora button to dis-
play the numbers.
X Press the 9or: button to select the
number you want to dial.
X Press the 6ora button to start dial-
ling.
or X To exit the telephone book: press the%
button.
Redialling The on-board computer saves the last names or
numbers dialled in the redial memory.
X Press the =or; button on the steering
wheel to select the Tel Telmenu.
X Press the 6button to switch to the redial
memory.
X Press the 9or: button to select the
desired name or number. 136
Menus and submenusOn-board computer and displays
Page 140 of 261

X
Press the 6ora button to start dial-
ling.
or X To exit the redial memory: press the%
button. Assistance menu
Introduction In the
Assist.
Assist. menu, you have the following
options:
R Showin gthe assistance graphic
(Y page 137)
Showing the assistanc egraphic X
Press the =or; button on the steering
wheel to select the Assist.
Assist. menu.
X Press 9or: to select Assistance
Assistance
graphic
graphic.
X Press a.
The displa yisinoperative. Service menu
In the Serv.
Serv. menu, you have the following
options:
R Calling up display messages (Y page 141)
R Checking the tyre pressure electronically
(Y page 240)
R Calling up the service due date
(Y page 216)
R Checking the engine oil level (Y page 213)Settings menu
Introduction In the
Settings
Settings menu, you have the following
options:
R Changing the instrument cluster settings
(Y page 137)
R Changing the time/date settings
(Y page 138)
R Changing the light settings (Y page 138)
R Changing the vehicle settings (Y page 139)
R Changing the auxiliary heating settings
(Y page 139) R
Changing the convenience settings
(Y pag e140)
R Restorin gthe factory settings (Y page 141)
Instrumen tcluster Selecting the uni
tofmeasurement for dis-
tance
The Display unit Speed-/odometer: Display unit Speed-/odometer: func-
tion allowsy ou to choose whether certain dis-
playsa ppear in kilometres or miles in the mul-
tifunction display.
You can determine whether the multifunction
display shows certain messages in miles or kil-
ometres.
X Press the =or; button on the steering
wheel to select the Settings Settingsmenu.
X Press the :or9 button to select the
Instrument cluster
Instrument cluster submenu.
X Press ato confirm.
X Press the :or9 button to select the
Display unit Speed-/odometer
Display unit Speed-/odometer function.
You will see the selected setting: km
kmorMiles
Miles.
X Press ato save the setting.
The selected unit of measurement for distance
applies to the following:
R digital speedometer in the Trip Tripmenu
R the total distance recorder and the trip meter
R trip computer
R current consumption and the range
R the navigation instruction sintheNavi
Navi menu
R ASSYST service interval display
Selecting permanent display You can determine whether the multifunction
displayp ermanently shows your speed or the
outside temperature.
X Press the =or; button on the steering
wheel to select the Settings
Settingsmenu.
X Press the :or9 button to select the
Instrument cluster
Instrument cluster submenu.
X Press ato confirm.
X Press the :or9 button to select the
Permanent display:
Permanent display: function.
You will see the selected setting: outside
outside
temperature
temperature orDig. speedo [mph]
Dig. speedo [mph].
X Press ato save the setting.
i The speed is displayed in mph. Menus and submenus
137On-boardcomputer and displays Z
Page 141 of 261

i
Vehicles for the United Kingdom: this func-
tion is unavailable.
Selects language
X Press the =or; button on the steering
wheel to select the Settings
Settingsmenu.
X Press the :or9 button to select the
Instrument cluster
Instrument cluster submenu.
X Press ato confirm.
X Press :or9 to select the Language:
Language:
function.
You will see the current setting.
X Press ato confirm.
X Press the :or9 button to change the
setting.
X Press ato store the entry.
Time/date Setting the date
X Press the =or; button on the steering
wheel to select the Settings Settingsmenu.
X Press :or9 to select the Time/Date Time/Date
submenu.
X Press ato confirm.
X Press :or9 to select the Date: Date:func-
tion.
You will see the current setting.
X To set the date: pressaagain.
X Press =or; to switch between the
day, month and year.
X Press :or9 to set the day, month or
year.
X Press ato store the entry.
The display shows the selected date.
Setting the time X Press the =or; button on the steering
wheel to select the Settings
Settings menu.
X Press :or9 to select the Time/Date Time/Date
submenu.
X Press ato confirm.
X Press :or9 to select the Time:
Time:func-
tion.
You will see the current setting.
X To set the time: pressaagain.
X Press =or; to switch between hours
and minutes. X
Press :or9 to set the hours or
minutes.
X Press ato store the entry.
The display shows the selected time.
Lights Setting the daytime driving lights
The Daytime driving lights Daytime driving lights function can
only be switched on with the engine switched
off.
X Press the =or; button on the steering
wheel to select the Settings Settingsmenu.
X Press the :or9 button to select the
Lights
Lights submenu.
X Press ato confirm.
X Press the :or9 button to select the
Daytime driving lights
Daytime driving lights function.
If the Daytime
Daytime driving
drivinglights
lightsfunction has
been switched on, the cone of light and the
W symbol are shown in red in the multi-
function display.
X Press ato save the setting.
Further information on daytime driving lights
(Y page 74).
Surround lighting and exterior lighting
delayed switch-off X Press the =or; button on the steering
wheel to select the Settings Settingsmenu.
X Press the :or9 button to select the
Lights
Lights submenu.
X Press ato confirm.
X Press the :or9 button to select the
Surround lighting
Surround lighting function.
When the Surround lighting
Surround lighting function has
been activated, the cone of light is shown in
red in the multifunction display.
X Press ato save the setting.
Activating exterior lighting delayed switch-off
temporarily:
X Before leaving the vehicle, turn the key to
position 0in the ignition lock (Y page 96).
X Turn the key to position 2in the ignition lock
(Y page 96).
Exterior lighting delayed switch-off is deacti-
vated.
Exterior lighting delayed switch-off is reactiva-
ted the next time you start the engine. 138
Menus and submenusOn-boardc
omputer and displays
Page 142 of 261

i
Depending on your vehicle's equipment,
when the surround lighting and exterio rlight-
ing delaye dswitch-off ar eon, the following
light up:
R side lamps
R dipped-beam headlamps
Switchin gthe interior lighting delayed
switch-off on/off
If yo uactivate the Lighting
Lighting delayed
delayedsw.-off
sw.-off
function, the interio rlighting remains on for
20 second safter yo uremove the key fro mthe
ignition lock.
X Press the =or; button on the steering
whee ltoselect theSettings
Settings menu.
X Press the :or9 button to select the
Lights
Lights submenu.
X Press ato confirm.
X Press the :or9 button to select the
Lighting delaye dsw.-off
Lighting delayed sw.-off function.
If the Lighting delayed sw.-off
Lighting delayed sw.-off function
has been activated, the vehicle interior is dis-
played in red in the multifunction display.
X Press ato save the setting.
Vehicle Activating/deactivating the automatic
locking feature
If you activate the Automatic door locks Automatic door locks
function, the vehicle is centrallyl ockedabov ea
spee dofa pproximately 15 km/h.
X Press the =or; buttononthesteering
whee ltos elect the Settings
Settings menu.
X Press the :or9 buttontos elect the
Vehicle
Vehicle submenu.
X Press ato confirm.
X Press the :or9 button to select the
Automatic doo rlocks
Automatic door locks function.
When the Automatic
Automatic door
doorlocks
locks function is
activated, the vehicle doors are displayed in
red in the multifunction display.
X Press ato save the setting.
For further information on the automatic locking
feature; see (Y page 62). Activating/deactivating the acoustic
locking confirmation
If you swi tchont heAcoustic Acoustic Lock
Lockfunction ,an
acoustic signal sounds when you loc kthe vehi-
cle.
X Press the =or; buttononthesteering
whee ltos elect the Settings
Settings menu.
X Press the :or9 buttontos elect the
Vehicle
Vehicle submenu.
X Press ato confirm.
X Press the :or9 button to select the
Acoustic Lock
Acoustic Lock function.
If the Acoustic Lock
Acoustic Lock function is activated,
the & symbol in the multifunctio ndisplay
lights up red.
X Press ato save the setting.
Heating Auxiliary heating departure time
G
DAN
GER
If th eexhaust pipe is blocke dorsufficient
ventilation is no tpossible, toxic exhaust
fumes can ente rthe vehicle, especially car-
bon monoxide. This is th ecase, e.g. in
enclosed spaces, or if th evehicl eiss tuck in
snow. There is ariskoff atal injuries.
You should switch off th eauxiliary heating in
enclosed spaces whic hdonothav eane xtrac-
tion system, e.g. agarage. If th evehicl eis
stuck in snow and you mus tleav ethe auxiliary
heating running, keep th eexhaust pipe and
th ea rea around th evehicl eclear of snow. To
guarantee asufficien tsupply of fresh air, open
aw indow on th eside of th evehicl eaway from
th ew ind. G
WARNING
When th eauxiliary heating is switched on,
parts of the vehicl ecan become very hot.
Flammable materials such as leaves, grass or twigs may ignite if they come into contact
with:
R hot parts of the exhaust system
R the exhaust gas itself
There is arisk of fire. Menus and submenus
139On-boardcomputer and displays
Z
Page 143 of 261

When the auxiliary heating is switched on,
make sure that:
R no flammable materials come into contact
with hot vehicle components
R the exhaust gas can escape from the
exhaust pipe unhindered
R the exhaust gas does not come into contact
with flammable materials.
! Operatin
gthe auxiliary heating/ventilation
draws on the vehicle battery. After you have
heated or ventilated the vehicle amaximum of
two times, drive for alonger distance.
Only vehicles with auxiliary heating have this
function (Y page 89).
In the Heating Heating submenu, you can select a
stored departure time or change adeparture
time.
The auxiliary heating timer function calculates
the switch-on time accordin gtothe outside
temperature so that the vehicle is preheated by the departure time. When the departure time isreached, the auxiliary heating continues to heat for afurther five minutes and then switches off.
The auxiliary heating selects the temperature
setting of the THERMATIC automatic climate
control.
You can switch the auxiliary heating on or off by
using the &auxiliary heating button on the
centre console or the remot econtrol.
Selecting the departure time or deactivat- ing aselected departure time
X Press the =or; button on the steering
wheel to select the Settings Settingsmenu.
X Press the :or9 button to select the
Heating
Heating submenu.
X Press ato confirm.
You will see the selected setting.
X Press ato confirm.
X Press the :or9 button to select one
of the three departur etimes or Timer
Timeroff
off(no
timer active).
X Press ato confirm.
If ad eparture time is selected, the yellow
indicator lamp lights up on the &auxiliary
heating button. Changing the departure time
X
Press the =or; buttonont hesteering
wheel to selec tthe Settings Settings menu.
X Pres sthe : or9 button to selec tthe
Heating
Heating submenu.
X Press ato confirm.
Yo uw ill see the selected setting.
X Press ato confirm.
X Press the :or9 button to select
Change A Change A, Change B
Change BorChange C
Change C.
X Press ato confirm.
You can now change the departure time.
X Press the =or; button to select the
displaytobec hanged: hours, minutes.
X Press the :or9 button to set the
selected display.
X Press ato store the entry.
The yellow indicator lamp on the &auxili-
ary heating button lights up.
Comfort Activating/deactivating the EASY-
ENTRY/EXIT feature
G
WARNING
When the EASY-ENTRY/EXI Tfeature adjusts
the steering wheel, you and other vehicle
occupants –particularl ychildren –could
become trapped. There is arisk of injury.
Whil ethe EASY-ENTRY/EXIT feature is mak-
ing adjustments, make sure that no one has
any body parts in the swee pofthe steering
wheel.
If someone is trapped:
R press one of the memory function position
buttons, or
R move the switch for steering whee ladjust-
ment in the opposite direction to that in
which the steering whee lismoving.
The adjustment process is stopped.
X Press the =or; button on the steering
whee ltoselect the Settings Settings menu.
X Press the :or9 button to select the
Convenience
Convenience submenu.
X Press ato confirm. 140
Menu
sand submenusOn-boar dcomputer and displays
Page 144 of 261

X
Press the :or9 button to select the
Easy Entry/Exit
Easy Entry/Exit function.
If the Easy
Easy Entry/Exit
Entry/Exit function is activated,
the vehicle steering wheel appears in red in
the multifunction display.
X Press ato save the setting.
Further informatio nonthe EASY-ENTRY/EXIT
feature (Y page 72). Resetting to factory settings
X Press the =or; button on the steering
wheel to select the Settings
Settingsmenu.
X Press the :or9 button to select the
Factory setting Factory setting submenu.
X Press ato confirm.
The Reset
Reset all allsettings?
settings? displaymessage
appears.
X Press the :or9 button to select No
Noor
Yes
Yes.
X Press ato confirm the selection.
If you have selected Yes
Yesand confirmed, the
multifunction displays howsaconfirmation
message. Display messages
Intro
duction
General notes Display messages appear in th
emultifunction
display.
Display message swithg raphic symbols ar esim-
plified in the Owner' sManualand ma ydiffer
fro mt he symbols in the multifunctio ndisplay.
Please respond in accordance with the display
message sand follo wthe additional note sinthis
Owner' sManual.
Certain displa ymessage sareaccompanied by
an audibl ewarning tone or acontinuous warning
tone. When yo
ustop and park the vehicle, please
observe the notes on:
R HOLD function (Y page 122)
R Parking (Y page 113)
Hiding displa ymessages X
Press the aor% button on the steering
wheel.
The multifunction display hides the display
message.
High-priority display messages are shown in red in the multifunction display. Some high-priority
display messages cannot be hidden.
The multifunction display shows these mes-
sages continuously until the causes for the mes- sages have been remedied.
Message memor ymenu The on-board computer saves certain display
messages in the
message memory.Y ou can
call up the display messages:
X Press the =or; button on the steering
wheel to select the Serv. Serv.menu.
If there are display messages, the multifunc-
tion display shows 2messages
2m essages ,for example.
X Press the 9or: button to select the
entry, e.g. 2messages
2m essages.
X Press ato confirm.
X Press the 9or: button to scroll
through the display messages.
When the ignition is switched off, all display
messages are deleted apart from some high-
priority display messages. Once the causes of
the high-priorit ydisplay messages have been
rectified, these display messages are deleted as well. Display me
ssages
141On-board compute rand displays Z
 1
1 2
2 3
3 4
4 5
5 6
6 7
7 8
8 9
9 10
10 11
11 12
12 13
13 14
14 15
15 16
16 17
17 18
18 19
19 20
20 21
21 22
22 23
23 24
24 25
25 26
26 27
27 28
28 29
29 30
30 31
31 32
32 33
33 34
34 35
35 36
36 37
37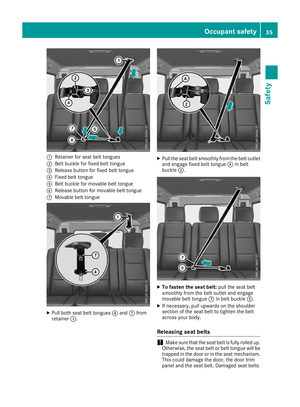 38
38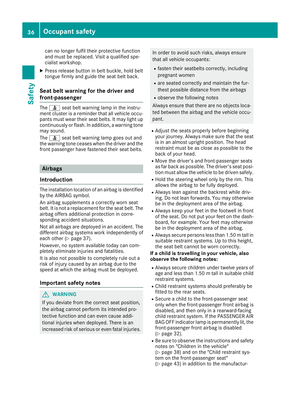 39
39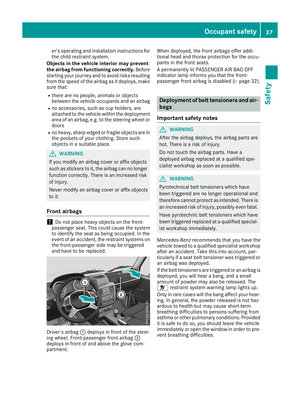 40
40 41
41 42
42 43
43 44
44 45
45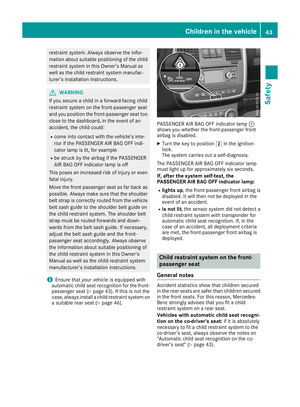 46
46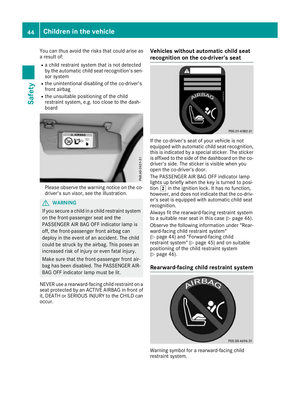 47
47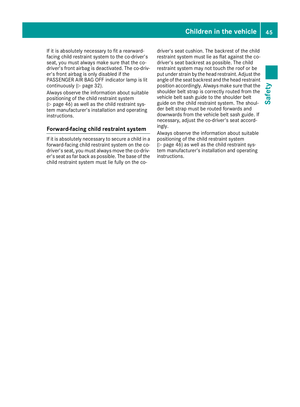 48
48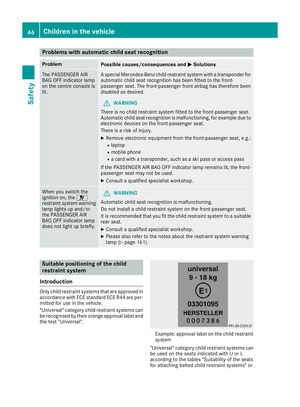 49
49 50
50 51
51 52
52 53
53 54
54 55
55 56
56 57
57 58
58 59
59 60
60 61
61 62
62 63
63 64
64 65
65 66
66 67
67 68
68 69
69 70
70 71
71 72
72 73
73 74
74 75
75 76
76 77
77 78
78 79
79 80
80 81
81 82
82 83
83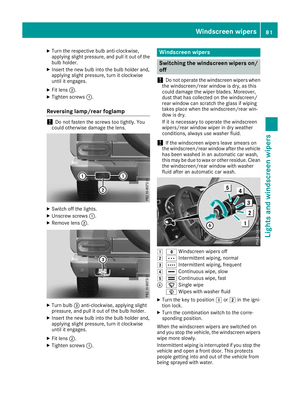 84
84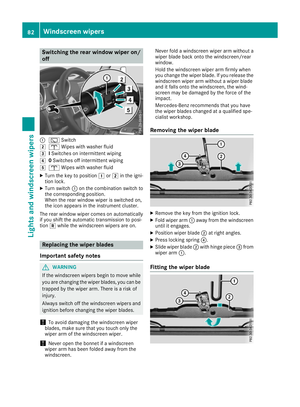 85
85 86
86 87
87 88
88 89
89 90
90 91
91 92
92 93
93 94
94 95
95 96
96 97
97 98
98 99
99 100
100 101
101 102
102 103
103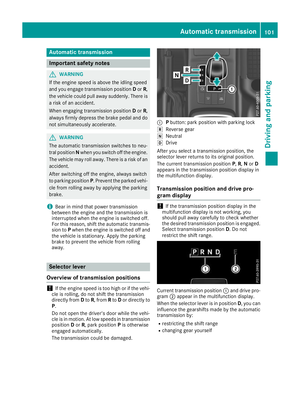 104
104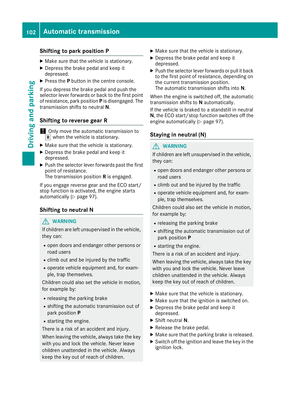 105
105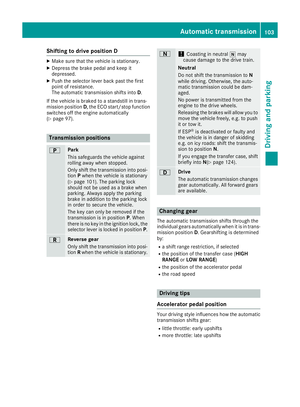 106
106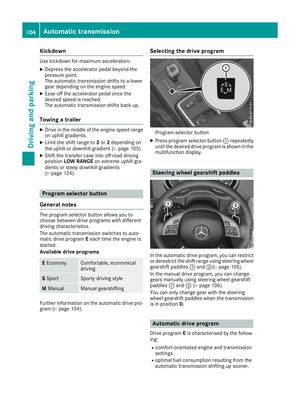 107
107 108
108 109
109 110
110 111
111 112
112 113
113 114
114 115
115 116
116 117
117 118
118 119
119 120
120 121
121 122
122 123
123 124
124 125
125 126
126 127
127 128
128 129
129 130
130 131
131 132
132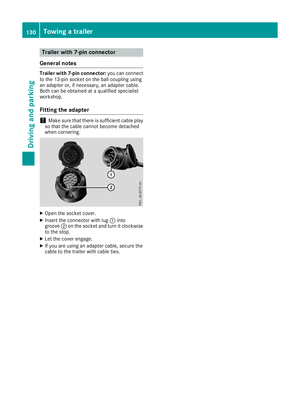 133
133 134
134 135
135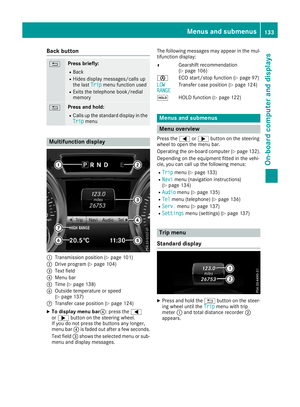 136
136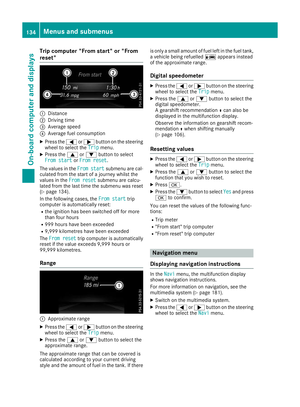 137
137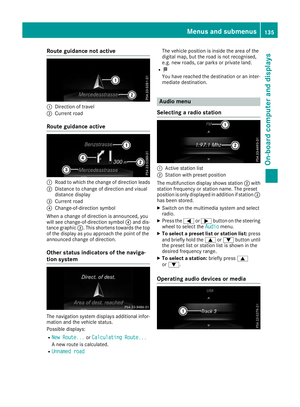 138
138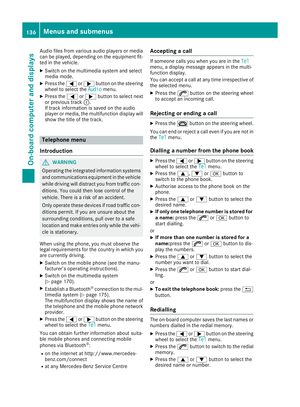 139
139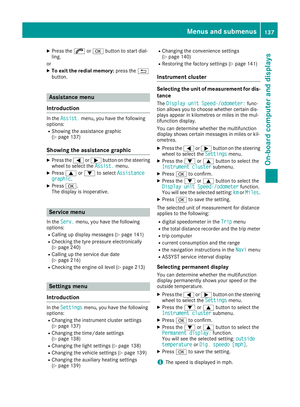 140
140 141
141 142
142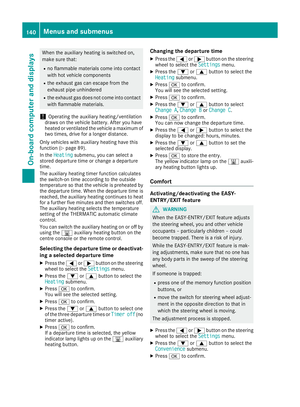 143
143 144
144 145
145 146
146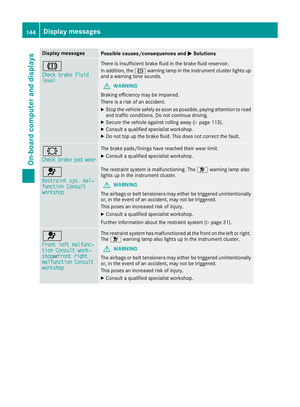 147
147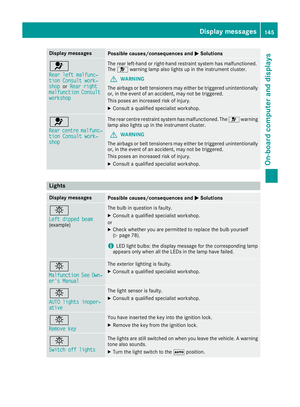 148
148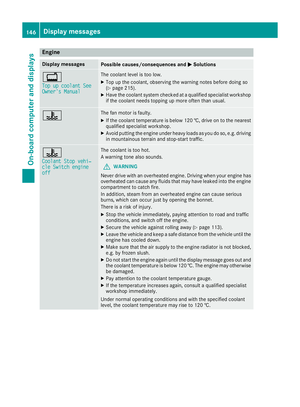 149
149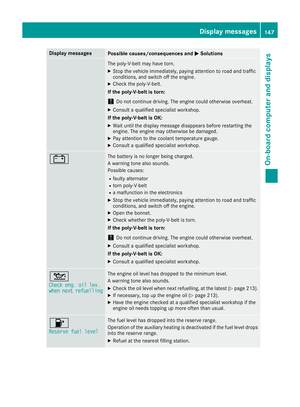 150
150 151
151 152
152 153
153 154
154 155
155 156
156 157
157 158
158 159
159 160
160 161
161 162
162 163
163 164
164 165
165 166
166 167
167 168
168 169
169 170
170 171
171 172
172 173
173 174
174 175
175 176
176 177
177 178
178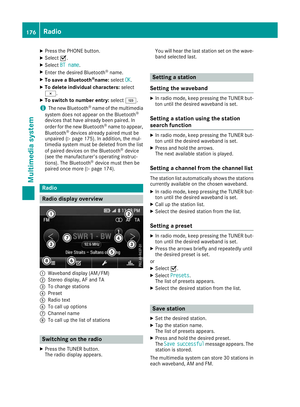 179
179 180
180 181
181 182
182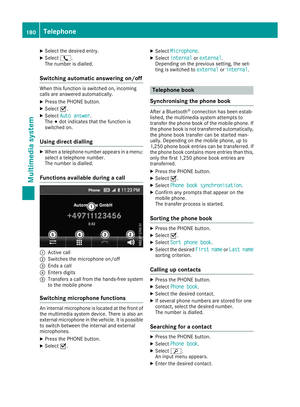 183
183 184
184 185
185 186
186 187
187 188
188 189
189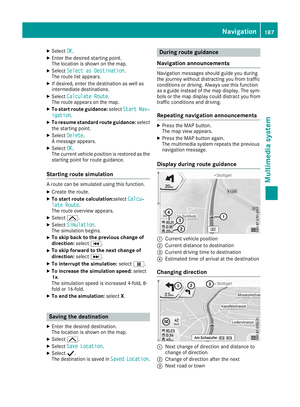 190
190 191
191 192
192 193
193 194
194 195
195 196
196 197
197 198
198 199
199 200
200 201
201 202
202 203
203 204
204 205
205 206
206 207
207 208
208 209
209 210
210 211
211 212
212 213
213 214
214 215
215 216
216 217
217 218
218 219
219 220
220 221
221 222
222 223
223 224
224 225
225 226
226 227
227 228
228 229
229 230
230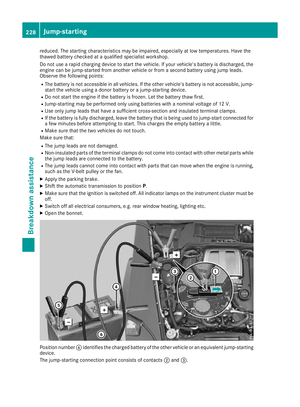 231
231 232
232 233
233 234
234 235
235 236
236 237
237 238
238 239
239 240
240 241
241 242
242 243
243 244
244 245
245 246
246 247
247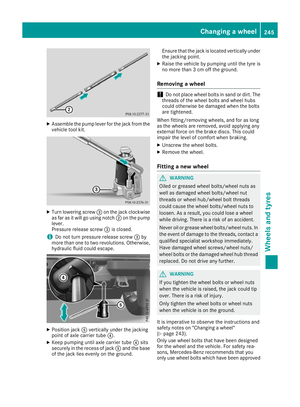 248
248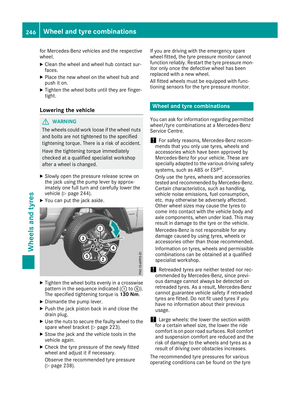 249
249 250
250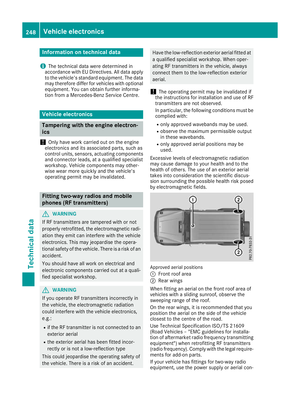 251
251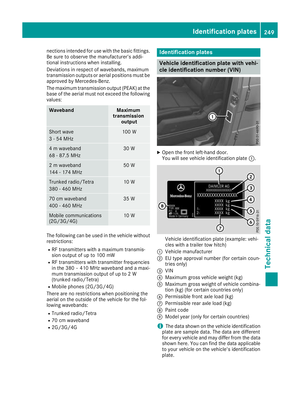 252
252 253
253 254
254 255
255 256
256 257
257 258
258 259
259 260
260