2016 MERCEDES-BENZ G-CLASS SUV washer fluid
[x] Cancel search: washer fluidPage 21 of 261
Unlocking
Emergenc yunlocking .......................62
From inside the vehicle (central
unlocking button) ............................. 62
Updatin gthe digital map .................. 197
USB (audio)
Connecting adevice ...................... 177
Selecting ........................................ 177 V
Vanity mirror Sun visor ........................................ 208
Vehicle
Correct us e...................................... 23
Data acquisition ............................... 24
Displa ymessage ............................ 153
Electronics ..................................... 248
Equipment ....................................... 21
Implied warranty .............................. 23
Individua lsettings .......................... 137
Leaving parked up ......................... 115
Locking (i nanemergency) ............... 62
Locking (key) ................................... 57
Lowering ........................................ 246
Parking .......................................... 113
Pulling away ..................................... 97
Raising ........................................... 244
Registration ..................................... 23
Securing from rolling away ............ 244
Tow-starting ................................... 232
Towing ........................................... 229
Transporting .................................. 231
Unlocking (i nanemergency) ........... 62
Unlocking (key) ................................ 57
Vehicl edata. .................................. 254
Vehicl edata ....................................... 254
Vehicl edata (off-road driving)
Approach/departure angle ............ 255
Fording depth ................................ 255
Maximu mgradient climbing abil-
ity .................................................. 255
Vehicl edimensions ........................... 254
Vehicl eemergenc yloc king ................ 62
Vehicl eidentificatio nnumber
see VIN
Vehicl eidentificatio nplate .............. 249
Vehicl etoolkit.................................. 223 Vehicl
etoolkit pocket ...................... 223
Vehicl eweigh ts................................. 254
Ventilation
Setting the airflow ........................... 87
VIN
Type plate ...................................... 249
Volume
Adjusting ....................................... 170 W
Warning and indicator lamps ABS ................................................ 158
Brake s.......................................... .157
ESP ®
.............................................. 159
ESP ®
OFF ....................................... 160
Fuel tank ........................................ 162
General notes ................................ 155
Overview .......................................... 26
Parking brake ................................ 157
PASSENGER AIR BAG OFF .............. .32
Reserv efuel .................................. .162
Seat bel t........................................ 155
Tyr ep ressure monitor ................... 164
Warning triangle ................................ 222
Washer fluid
Display message ............................ 154
Whee land tyre combinations
Tyres .............................................. 246
Whee lboltt ightening torque ........... 246
Wheels
Changing awheel .......................... 243
Changing/replacing ....................... 243
Checking ........................................ 235
Cleaning ......................................... 218
Fitting anew wheel ........................ 245
Fitting awheel ............................... 243
Important safety notes .................. 235
Information on driving .................... 235
Removing awheel .......................... 245
Snow chains .................................. 237
Storing .......................................... .243
Tightening torqu e........................... 246
Whee lsize/tyre size ..................... .246
Winch ................................................. 210
Windscreen
Demisting ........................................ 87
Windscreen heating ............................ 8818
Index
Page 22 of 261
Windscreen washe
rfluid
see Windscreen washer system
Windscreen washe rsystem
Notes ............................................. 254
Topping up .................................... .215
Windscreen wipers
Problem (malfunction) ..................... 83
Rea rwindow wiper .......................... 82
Replacing the wiper blades .............. 82
Switching on/off .............................. 81
Winte roperation
Important safety notes .................. 236
Overview ........................................ 236
Radiator cover ............................... 212
Slippery road surfaces ................... 118
Snow chains .................................. 237
Summer tyres ................................ 237
Winte rtyres
M+S tyres ...................................... 237
Wiper blades
Cleaning ......................................... 219
Important safety notes .................... 82
Replacing ......................................... 82
Wooden load compartment floor
(cleaning instructions) ......................221
Wooden trim (cleaning instruc-
tions) ................................................. .220 Index
19
Page 78 of 261
Automati
cheadlamp mode G
WARNING
When th elight switch is set to Ã,the
dipped-beam headlamps may not be switched on automatically if there is fog, snow or othercauses of poor visibility due to the weather
conditions such as spray. There is arisk of an
accident.
In such situations, turn the light switch to
L.
The automatic headlamp feature is only an aid.
The drive risresponsibl efor the vehicl elighting
at all times.
à is the preferre dlight switch position.
The light setting is automatically selected
according to the brightness of the ambient light,
but not in the event of poor visibility due to
weather conditions such as fog, snow or spray.
X To switch on the automatic headlamps:
turn the light switch to the Ãposition.
With the key in position 1in the ignitio nlock,
the side lamp sare switched on or off auto-
matically depending on the brightness of the
ambient light.
If you have switched on the Daytime driv‐ Daytime driv‐
ing lights
ing lights functionvia the on-board com-
puter, the daytime driving lights or the side
lamps and dipped-beam headlamps will
switch on or off automaticallyw hile the
engine is running.
When the dipped-beam headlamps are
switched on, the green Lindicator lamp in
the instrument cluster lights up. Rear foglamp
The rear fog lamp improves the visibility of your vehicle for the traffic behind in the event of
heavy fog. You must observe the legal require-
ment sfor the country in which yo uare currently
driving when operating the rea rfog lamp.
X To switc honthe rear fog lamp: turn the key
in the ignition lock to position 2or star tthe
engine.
X Turn the light switch to the Lposition.
X Press the Rbutton.
The yellow Rindicator lamp on the instru-
ment cluster lights up. Sid
elamps
! When the battery is discharged heavily,t
he
side lamps or parking lamps are automatically
switched off to facilitate an engine start.
Always park your vehicle safely and in awell lit
area, in accordance with the relevant legal
stipulations. Avoid using the Tside lamps
for periods lasting several hours. Where pos-
sible, switch on the right Xor left W
parking lamp.
X To switch on: turn the light switch to the
T position.
The green Tindicator lamp on the instru-
ment cluster lights up. Parking lamps
Switching on the parking lamps ensures that the
correspondin gside of the vehicle is illuminated.
X To switch on the parking lamp: turn the key
to position uin the ignition lock or remove
the key.
X Turn the light switch to the W(left-hand
side of the vehicle) or X(right-hand side of
the vehicle) position. Headlamp cleaning system
The headlamps are cleaned automatically if the
"Wipe with washer fluid" function is operated
ten times (Y page 81) while the lights are on
and the engin eisrunning. When you switch off
the ignition, the automatic headlamp cleaning
system is reset and counting is resumed from 0. Exterior lighting
75Lightsand windscreen wipers Z
Page 84 of 261
X
Turn the respective bulb anti-clockwise,
applying slight pressure, and pull it out of the
bulb holder.
X Insert the new bulb into the bulb holder and,
applying slight pressure, turn it clockwise
until it engages.
X Fit lens ;.
X Tighten screws :.
Reversing lamp/rear foglamp !
Do not fasten the screws too tightly. You
could otherwise damage the lens. X
Switch off the lights.
X Unscrew screws :.
X Remove lens ;. X
Turn bulb =anti-clockwise, applying slight
pressure, and pull it out of the bulb holder.
X Insert the new bulb into the bulb holder and,
applying slight pressure, turn it clockwise
until it engages.
X Fit lens ;.
X Tighten screws :. Windscreen wipers
Switching the windscreen wipers on/
off
! Do not operate the windscreen wipers when
the windscreen/rear window is dry, as this
could damage the wiper blades. Moreover,
dust that has collected on the windscreen/
rear window can scratc hthe glass if wiping
takes place when the windscreen/rear win-
dow is dry.
If it is necessary to operate the windscreen
wipers/rear window wiper in dry weather
conditions, always use washer fluid.
! If the windscreen wipers leave smears on
the windscreen/rear window after the vehicle has been washed in an automatic car wash,
this may be due to wax or other residue. Clean
the windscreen/rear window with washer
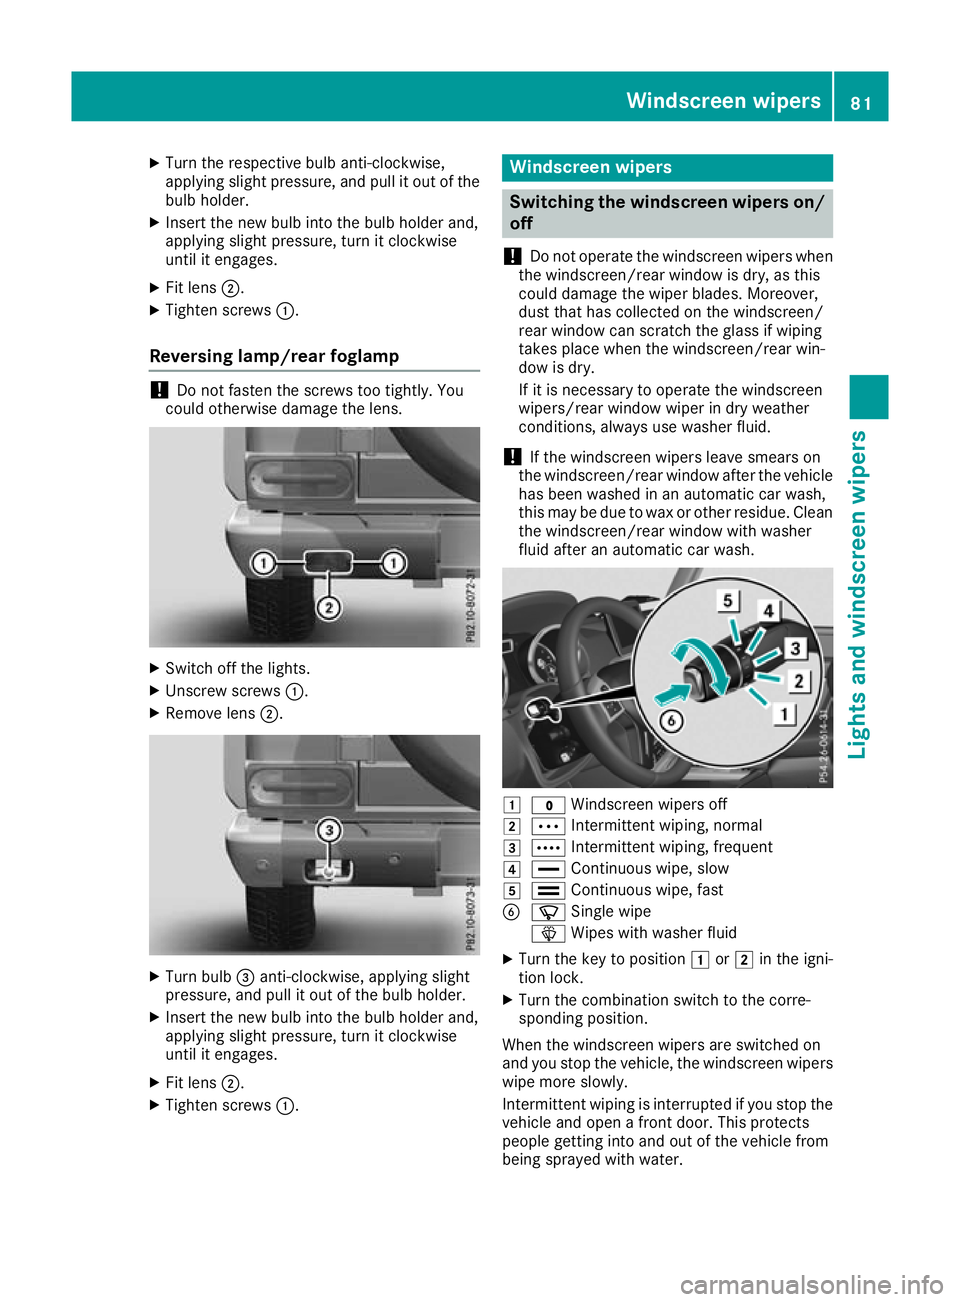
fluid after an automatic car wash. 1
$ Windscreen wipers off
2 Ä Intermittent wiping, normal
3 Å Intermittent wiping, frequent
4 ° Continuous wipe, slow
5 ¯ Continuous wipe, fast
B í Single wipe
î Wipes with washer fluid
X Turn the key to position 1or2 in the igni-
tion lock.
X Turn the combination switch to the corre-
sponding position.
When the windscreen wipers are switched on
and you stop the vehicle, the windscreen wipers
wipe more slowly.
Intermittent wiping is interrupted if you stop the
vehicle and open afron tdoor. This protects
people getting into and out of the vehicle from
being sprayed with water. Windscreen wipers
81Lightsand windscreen wipers Z
Page 85 of 261
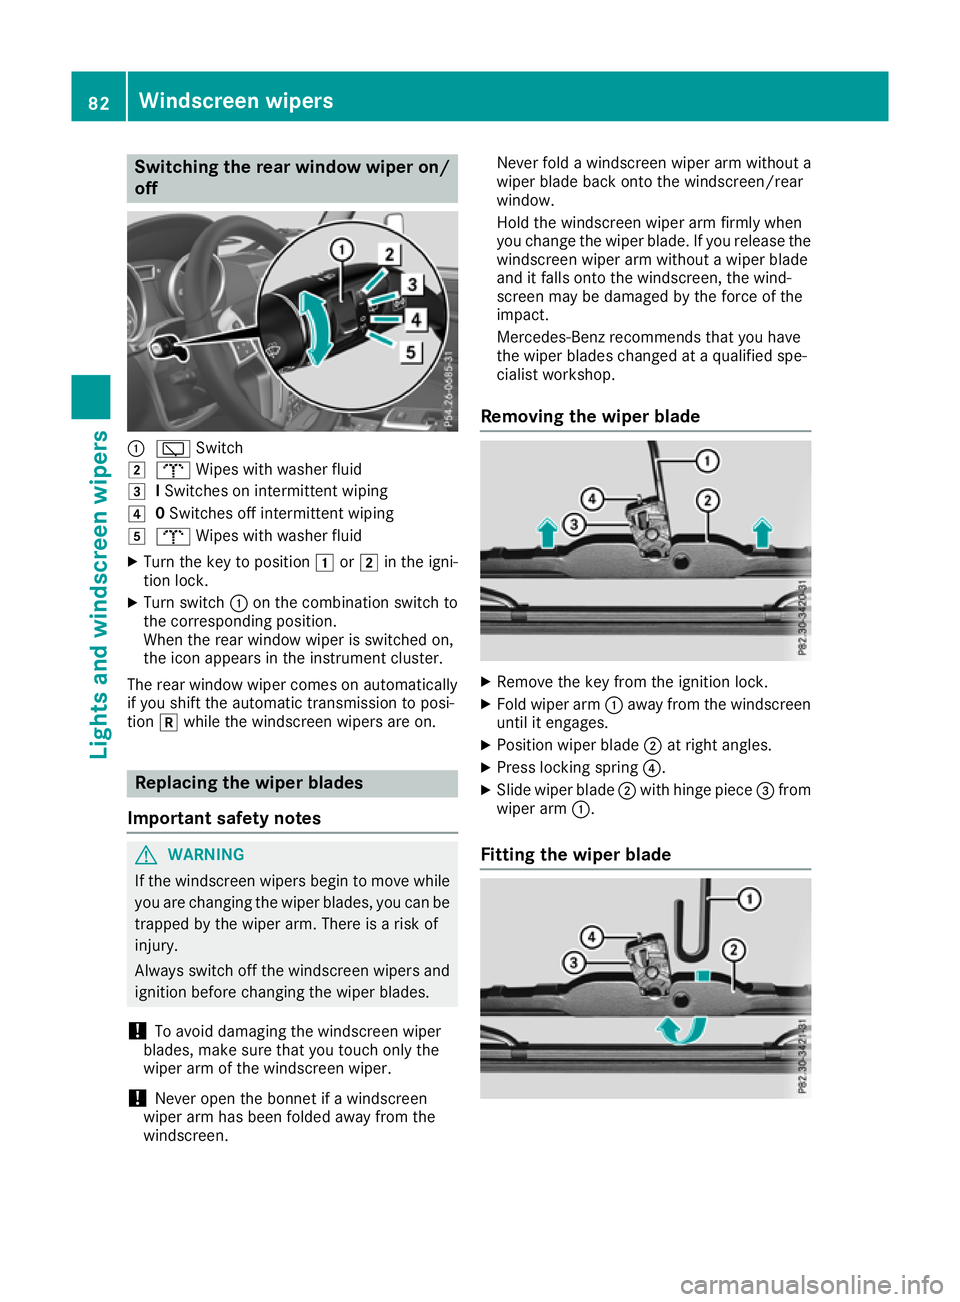
Switching the rear window wiper on/
off :
è Switch
2 b Wipes with washer fluid
3 ISwitches on intermittent wiping
4 0Switches off intermittent wiping
5 b Wipes with washer fluid
X Turn the key to position 1or2 in the igni-
tio nlock.
X Turn switch :on the combination switch to
the corresponding position.
Whe nthe rea rwindow wiper is switched on,
the ico nappears in the instrument cluster.
The rea rwindow wiper come sonautomatically
if yo ushift the automatic transmissio ntoposi-
tion kwhil ethe windscreen wiper sare on. Replacing the wiper blades
Important safety notes G
WARNING
If the windscreen wipers begi ntomove while
you are changing the wiper blades, you can be trappe dbythe wiper arm. There is arisk of
injury.
Always switch off the windscreen wipers and
ignitio nbefore changing the wiper blades.
! To avoi
ddamaging the windscreen wiper
blades, make sure that you touch only the
wiper arm of the windscreen wiper.
! Never open the bonnet if
awindscreen
wiper arm has been folde dawayfrom the
windscreen. Never fold
awindscreen wipera rm withouta
wiperb ladeback onto the windscreen/rear
window.
Hold the windscreen wipera rm firmly when
you change the wiperb lade. If you release the
windscreen wipera rm withoutawiperblade
and it falls onto the windscreen, the wind-
screen may be damaged by the force of the
impact.
Mercedes-Benz recommends that you have
the wiperb lades changed at aqualifieds pe-
cialist workshop.
Removing the wiper blade X
Remove the key from the ignitio nlock.
X Fold wiper arm :away from th ewindscreen
until it engages.
X Position wiper blade ;at right angles.
X Press lockin gspring ?.
X Slide wiper blade ;withhinge piece =from
wiper arm :.
Fitting th ewiper blade 82
Windscreen wipersLight
sand windscreen wipers
Page 86 of 261
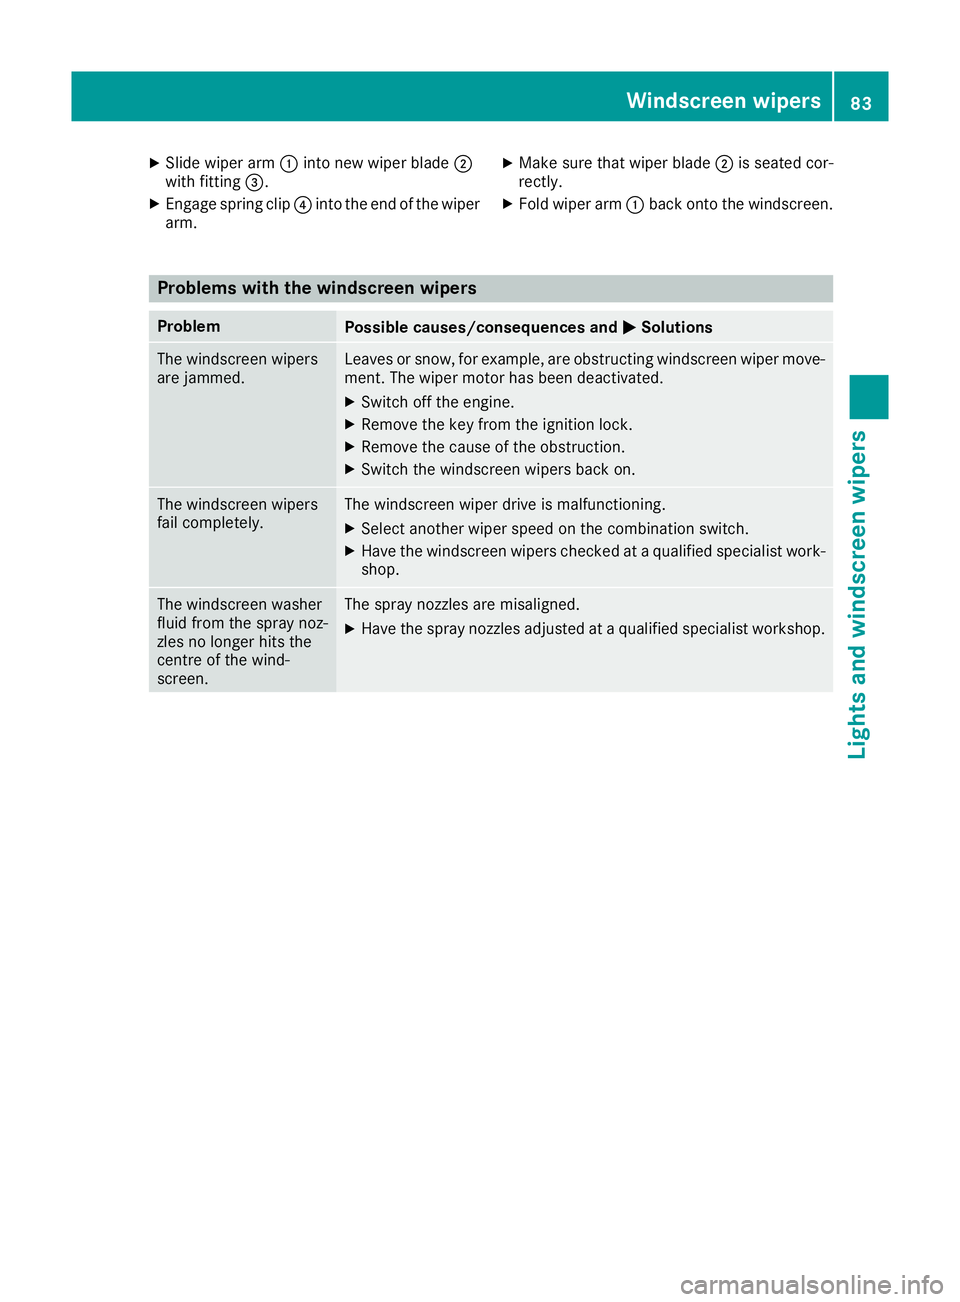
X
Slide wiper arm :into new wiper blade ;
with fitting =.
X Engag espring clip ?into the end of the wiper
arm. X
Mak esure that wiper blade ;is seated cor-
rectly.
X Fold wiper arm :back onto the windscreen. Problems with the windscreen wipers
Problem
Possible causes/consequences and
M
MSolutions The windscreen wipers
are jammed. Leaves or snow, for example, are obstructing windscreen wiper move-
ment. The wiper motor has been deactivated.
X Switch off the engine.
X Remove the key from the ignition lock.
X Remove the cause of the obstruction.
X Switch the windscreen wipers back on. The windscreen wipers
fail completely. The windscreen wiper drive is malfunctioning.
X Select another wiper speed on the combination switch.
X Have the windscreen wipers checked at aqualified specialist work-
shop. The windscreen washer
fluid from the spray noz-
zles no longer hits the
centre of the wind-
screen. The spray nozzles are misaligned.
X Have the spray nozzles adjusted at aqualified specialist workshop. Windscreenw
ipers
83Lightsand windscreen wipers Z
Page 157 of 261
Display messages
Possible causes/consequence
sand M
MSolutions ^
Rear Rear
left
leftseat
seatback‐
back‐
rest not
rest not
locked lockedorFront right Front right
seat backrest not
seat backrest not
locked locked G
WARNING
The driver's or front-passenger seat backrest is not engaged.
X Push the backrest back until it engages. D
Power steering mal‐ Power steering mal‐
function See Own‐ function See Own‐
er's Manual er's Manual The power steering assistance is faulty.
Aw
arning tonea lso sounds.
G WARNING
You will need to use more force to steer.
There is arisk of an accident.
X Check whether you are able to apply the extras teeringforce
required.
X If you are able to steer safely: carefully drive on toaqualified
specialist workshop.
X If you are unable to steer safely: do not drive on. Contact the
nearest qualified specialist workshop. &
inoperative inoperative
Battery
Battery
low
low You have attempted to switch on the auxiliary heating or to activate a
departure time using the on-board computer after operating the aux-
iliary heating twice.
X Let the engine run for ten seconds.
The auxiliary heating is operational again. The on-board voltage is too low. The auxiliary heating has switched
itself off or cannot be switched on (Y page 89).
X Drive for aconsiderable distance.
The battery charges. The auxiliary heating is operational again as
soon as the on-board electrical system voltage is sufficient. &
inoperative Refuel inoperative Refuel
vehicle vehicle There is too little fuel in the fuel tank.T
he auxiliary heating cannot be
switched on (Y page 89).
X Refuel at the nearest filling station. &
inoperative inoperative
See
SeeOwn‐
Own‐
er's Manual
er's Manual The auxiliary heating is temporarily malfunctioning or faulty.
X When the vehicle is on alevel surface and the engine has cooled
down, make up to four attempt stoswitch on the auxiliary heating,
waiting several minutes between each attempt (Y page 89).
X If the auxiliary heating does not switch on, consult aqualified spe-
cialist workshop. ¥
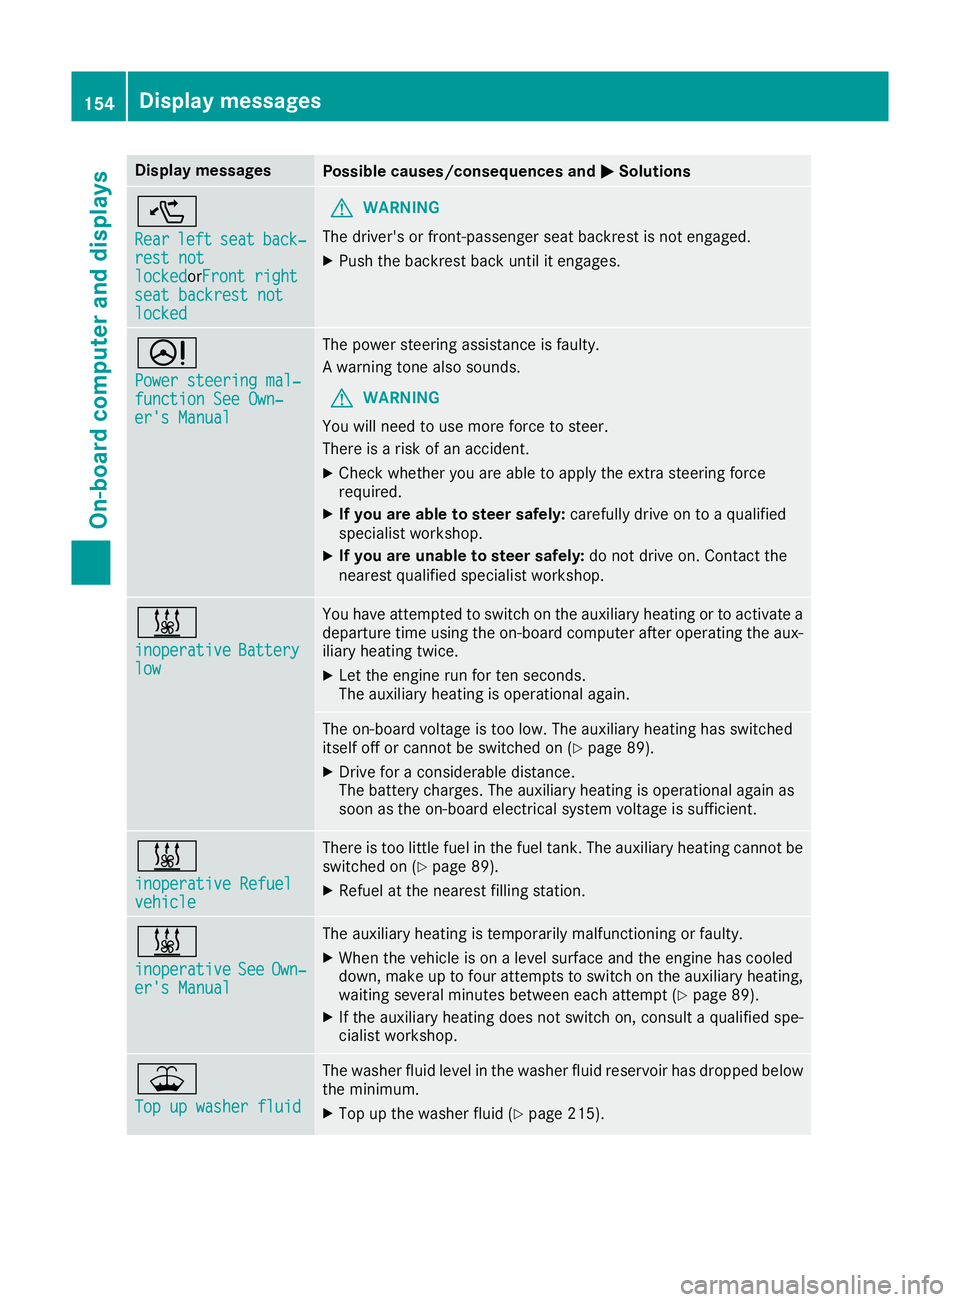
Top up washer fluid Top up washer fluid The washer fluid level in the washer fluid reservoir has dropped below
the minimum.
X Top up the washer fluid (Y page 215).154
Display messagesOn-board computer and displays
Page 218 of 261
Allow an overheating engine to coo
ldown
before opening the bonnet. If ther eisafirein
the engine compartment, leav ethe bonnet
closed and notify the fir ebrigade.
Checkin gthe coolant level Example: checking the coolant level
X Park the vehicl eonalevel surface.
Check the coolant level onl yifthe vehicl eis
on alevel surface and the engine ha scooled
down.
X Turn the key to position 2in the ignition lock
(Y page 96).
X Check the coolant temperatur edisplay in the
instrument cluster.
The coolant temperatur emustbeb elow
70 †.
X Slowl yturnc ap : half aturna nti-clockwise
and allo wexcess pressure to escape.
X Turn cap :furthe ranti-clockwise and
remove it.
If the coolant is at the level of marker bar =
in the fille rneck when cold, there is enough
coolant in coolant expansio ntank ;.
If the coolant level is approximately 1.5 cm
above marker bar =in the fille rneck when
warm, there is enoug hcoolant in coolant
expansio ntank ;.
X If necessary ,top up with coolant tha thas
been teste dand approved by Mercedes-Benz.
X Replace cap :and tur nitclockwise as fa ras
it will go.
Furthe rinformatio noncoolant (Y page 253). Topping up the windscreen washe
rsys-
tem/headlamp cleanin gsystem G
WARNING
If wind screen washer concentrate comes into
contact with hot components of the engine or
the exhaust system, it can ignite. There is a
risk of fire and injury.
Make sure the windscreen washer concen-
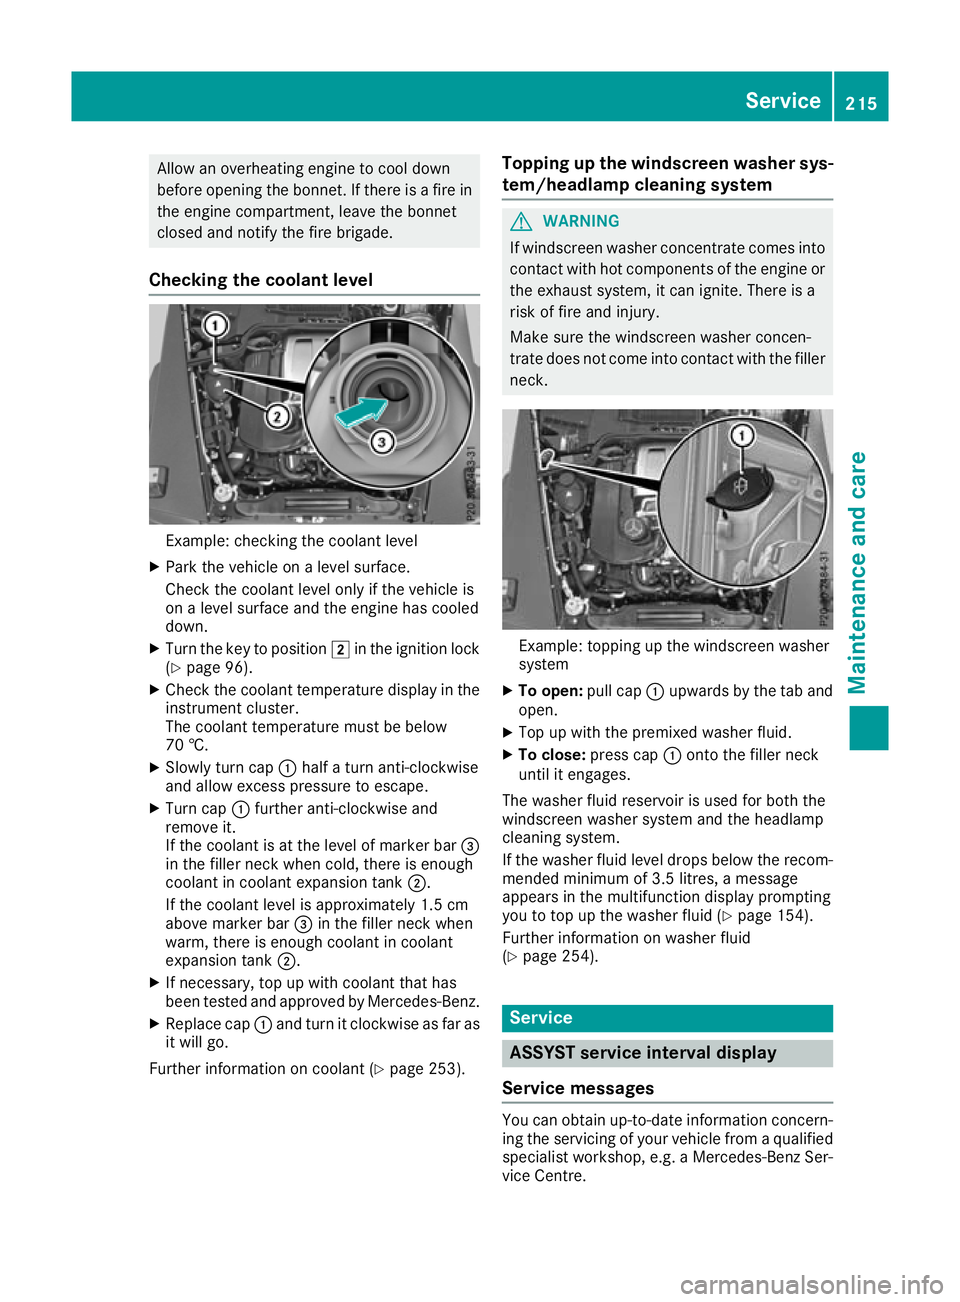
trate does not come into contact with the filler neck. Example: topping up the windscreen washer
system
X To open: pull cap:upwards by the tab and
open.
X Top up with the premixed washe rfluid.
X To close: press cap :onto the fille rneck
unti lite ngages.
The washe rfluid reservoi risusedf or both the
windscree nwashe rs ystem and the headlamp
cleaning system.
If the washe rfluid level drops belo wthe recom-
mended minimu mof3.5 litres ,amessage
appear sinthe multifunctio ndisplay prompting
yo utot op up the washe rfluid (Y page 154).
Furthe rinformatio nonwashe rfluid
(Y page 254). Service
ASSYST service interval display
Service messages Yo
uc an obtain up-to-dat einformation concern-
ing the servicin gofyour vehicle from aqualified
specialis tworkshop, e.g. aMercedes-Ben zSer-
vice Centre. Service
215Maintenance and care Z