2016 MERCEDES-BENZ G-CLASS SUV fuel consumption
[x] Cancel search: fuel consumptionPage 12 of 261

Electromagnetic compatibility
Declaratio nofconformit y................ 22
Emergenc ycall9 99 or 112 .............. 179
Emergenc ykey
Unlocking the driver' sdoor.............. 62
Emergenc ykey element
Function/note s................................ 58
Genera lnotes .................................. 58
Inserting .......................................... 59
Locking vehicl e................................ 62
Removing ......................................... 58
Emergenc yrelease
Driver's doo r.................................... 62
Emergenc yunlocking
Vehicl e............................................. 62
Engine
Displa ymessage ............................ 146
ECO start/stop function .................. 97
Engine number ............................... 250
Jump-starting ................................. 227
Running irregularly ......................... 100
Starting problems .......................... 100
Starting the engine with the key ...... 96
Stopping ........................................ 114
Tow-starting (vehicle )..................... 232
Warning lamp (engine diagnos-
tics) ............................................... 162
Engine electronics
Note s............................................. 248
Problem (fault) ............................... 100
Engine oil
Additives ........................................ 253
Checking the oi llev el ..................... 213
Checking the oi llev el using the
dipstick .......................................... 213
Checking the oi llev el using the
on-board compute r........................ 213
Displa ymessage ............................ 147
Filling capacity ............................... 253
Genera lnotes ................................ 252
Note sabout oilg rade s................... 252
Note sono illevel/consumption .... 213
Topping up ..................................... 213
Entering an address .......................... 182
Entering the town .............................. 182
Environmental protection
Returning an end-of-life vehicl e....... 20 ESP
®
(Electroni cStability Pro-
gram)
Characteristics ................................ .54
Deactivating/activating ................... 54
Display message ............................ 142
Function/note s................................ 53
Genera lnotes .................................. 53
Important safety guideline s............. 54
Trailer stabilisation .......................... 55
Warning lamp ................................. 159
ETS/4ETS (Electroni cTraction Sys-
tem) ...................................................... 54
Exhaust
see Exhaus tpipe
Exhaus tpipe
Cleaning ......................................... 219
Exterior lighting
Cleaning ......................................... 219
see Lights F
Factor ysettings ................................ 173
Fault message
see Display messages
File formats ........................................ 178
Filler cap
see Fuel fille rflap
Fire extinguisher .............................. .222
First-aid kit ......................................... 222
Fitting awheel
Fitting awheel ............................... 245
Lowering the vehicle ..................... .246
Preparing the vehicle ..................... 243
Raising the vehicle ......................... 244
Removing awheel .......................... 245
Securing the vehicle against roll-
ing away ........................................ 244
Flat tyre
Changing awheel/fitting the
spare wheel ................................... 243
Preparing the vehicle ..................... 224
Foldin gthe seat backrest (rear)
forwards/back .................................. 201
Frequencies
Mobile phone ................................. 248
Two-way radio ................................ 248 Index
9
Page 23 of 261

Environmental protection
General notes
H
Environmenta
lnote
Daimler' sdeclared polic yisone of compre-
hensive environmental protection.
Our objectives are to use th enatural resour-
ces whic hformt hebasis of our existence on
this plane tsparingl yand in amanner which
takes th erequirements of bot hnature and
humanity int oconsideration.
You to ocan help to protect th eenvironment
by operatin gyour vehicle in an environmen-
tally-responsible manner.
Fuel consumption and th erateofe ngine,
transmission ,brak eand tyr ewear depen don
th ef ollowing factors:
R operatin gcondition sofyour vehicle
R your personal driving style
You can influenc ebothf actors. Therefore,
please bear th efollowing in mind:
Operatin gconditions:
R avoid shor ttrips, as these increase fuel
consumption.
R observe th ecorrec ttyrep ressure.
R do not carry any unnecessar yweight in the
vehicle.
R remove th eroof rac koncey ou no longer
nee dit.
R ar egularly serviced vehicle will contribute
to environmental protection .You should
therefore adher etotheservic eintervals.
R all maintenanc ework should be carried out
at aq ualifie dspecialist workshop.
Personal driving style:
R do not depress th eaccelerator pedal when
starting th eengine.
R do not warm up th eengine when th evehicle
is stationary.
R driv ecarefully and maintain asafe distance
fro mt hevehicle in front.
R avoid frequent, sudden acceleration and
braking. R
change gear in good time an duseeach gear
only up to Ôof its maximum engine speed.
R switch off the engine in stationar ytraffic.
R monitor the vehicle's fue lconsumption. Returnin
ganend-of-life vehicle
EU countrie sonly:
Mercedes-Benz will take back your end-of-life
vehicl efor environmentally friendl ydisposa lin
accordance with the Europea nUnion(EU) End-
Of-Life Vehicles Directive.
An etwork of return points and disassembly
plants ha sbeene stablished for yo utoreturn
your vehicle. Yo ucan leave it at any of these
points free of charge .Thism akesani mportant
contribution to closing the recycling circl eand
conserving resources.
For further information abou tthe recycling and
disposa lofend-of-life vehicles, and the take-
back conditions ,pleas evisit the national
Mercedes-Benz website for your country. Genuine Mercedes-Benz parts
H
Environmental note
Daimle rAGalso supplies reconditioned
assemblies and part swhicha re of th esame
qualit yasnew parts. For these, th esame war-
ranty applies as for new parts.
! Airbags and seat belt tensioners
,aswell as
control unit sand sensor sfor these restraint
systems, may be installe dinthefollowing
areas of your vehicle:
R doors
R door pillars
R door sills
R seats
R dashboard
R instrumen tcluster
R centr econsole
Do not install accessories such as audio sys-
tem sint hese areas. Do not carry out repairs
or welding. You could impair th eoperating
efficiency of th erestraint systems. 20
Introduction
Page 107 of 261

Kickdown
Use kickdown for maximu
macceleration:
X Depress the accelerator pedal beyond the
pressure point.
The automatic transmission shifts to alower
gear depending on the engine speed.
X Ease off the accelerator pedal once the
desired speed is reached.
The automatic transmission shifts back up.
Towing atrailer X
Drive in the middle of the engine speed range
on uphill gradients.
X Limit the shift range to 3or 2depending on
the uphill or downhill gradient (Y page 105).
X Shift the transfer case int ooff-roa ddriving
position LOWR ANGE on extreme uphill gra-
dients or stee pdownhil lgradients
(Y page 124). Progra
mselector button
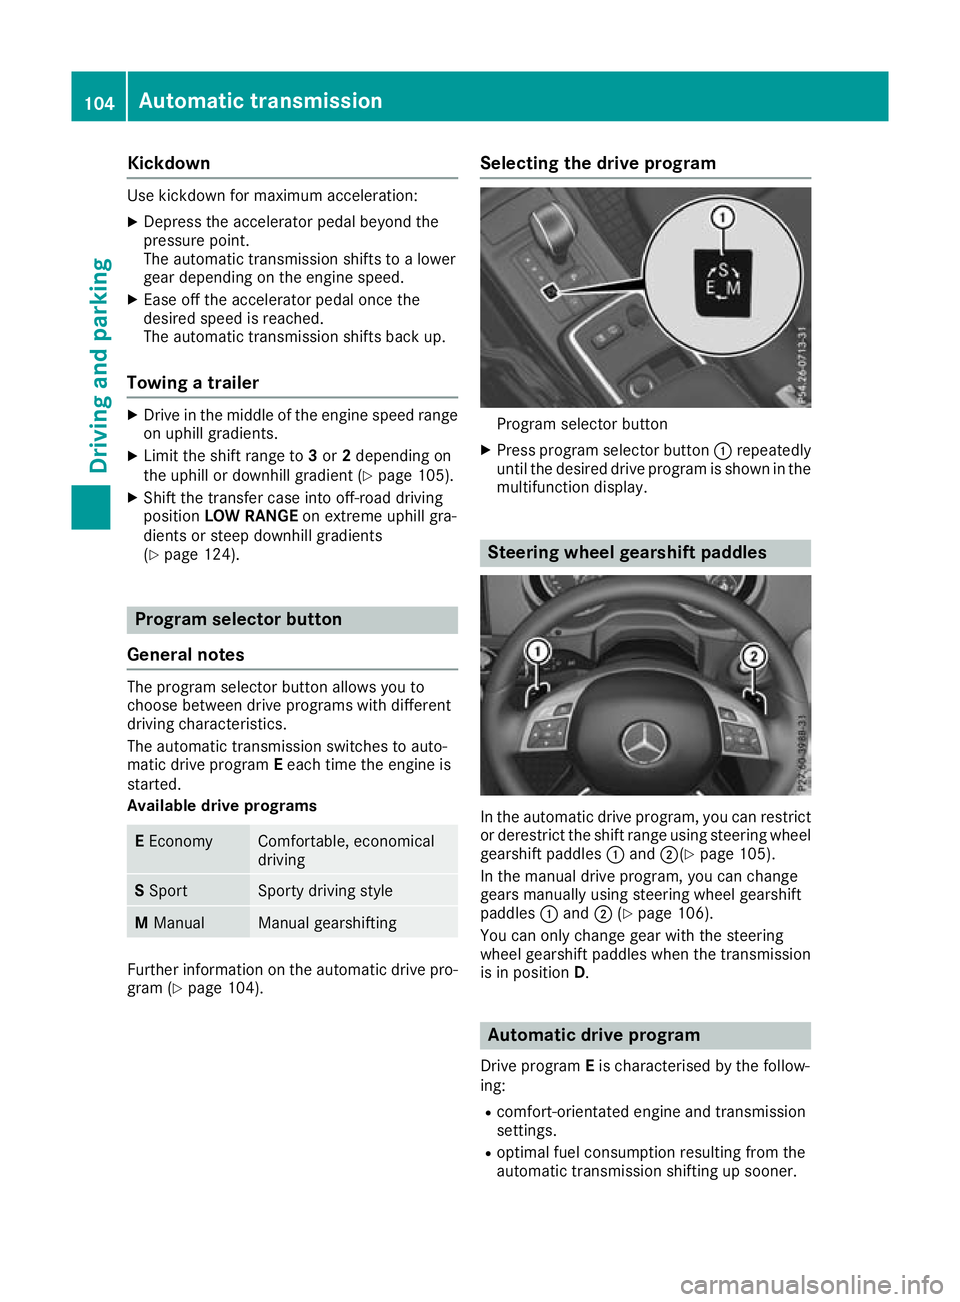
General notes The program selector button allows you to
choose between drive programs with different
driving characteristics.
The automatic transmission switches to auto-
matic drive program Eeach time the engine is
started.
Available drive programs E
Economy Com
fortable, economical
driving S
Sport Sport
ydriving style M
Manual Manual gearshifting
Furthe
rinformation on the automatic drive pro-
gra m( Ypage 104). Select
ing the drive program Program selector button
X Press program selector button :repeatedly
until the desired drive program is shown in the multifunction display. Steering wheel gearshift paddles
In the automatic drive program
,you can restrict
or derestrict the shift range using steering wheel gearshift paddles :and ;(Y page 105).
In the manuald rive program, you can change
gears manually using steering wheel gearshift
paddles :and ;(Ypage 106).
You can only change gear with the steering
wheel gearshift paddles when the transmission
is in position D. Automatic drive program
Drive program Eis characterised by the follow-
ing:
R comfort-orientated engine an dtransmission
settings.
R optimal fuel consumption resulting from the
automatic transmission shifting up sooner. 104
Auto
matictransmissionDriving and parking
Page 108 of 261

R
the vehicl epulls away mor egently in forward
and revers egears unles sthe accelerator
peda lisdepresse dfully.
R increase dsensitivity. Thi simp roves driving
stability on slippery roa dsurfaces ,for exam-
ple.
R the automatic transmission shifts up sooner.
Thi sresults in the vehicl ebeing driven at
lowe rengine speeds and the wheels being
less likel ytospin.
Drive program Sis characterise dbythe follow-
ing:
R sporty engine and transmission settings.
R the vehicl epulls away in first gear.
R the automatic transmission shifts up later.
R fuel consumption ma ybehighe rasa resultof
the later automatic transmission shift points. Shift ranges
Introduction When th
eautomatic transmission is in position
D,itisp ossible to restrict or derestrict the shift
range.
The shift range selected is shown in the multi-
function display. The automatic transmission
shifts only as far as the selected gear.
Driving situations =
To use the engine's braking effect
5
To use the engine's braking effect
This setting is particularly suited for
driving:
R on steep mountain roads
R in mountainous terrain
R in arduous conditions 4
The braking effect of the engine can
be utilised on extremely steep down-
hill gradients and long downhill
stretches. Restrictin
gthe shift range X
Pul lthe left-hand steerin gwheel gearshift
paddle (Y page 104).
The automatic transmission shifts down one
gear and restricts the shift range to the rele-
vant gear. To protec
tagainst engine damage, the auto-
matic transmission:
R does not shift down if doing so would cause
the engine to exceed the maximum engine
speed
R shifts up, even if the shift range is restricted,
if the maximum engine speed for the shift
range is reached and you continue to accel-
erate
Derestricting the shift range X
Pull the right-hand steerin gwheel gearshift
paddle (Y page 104).
The automatic transmission shifts up one
gear and restricts the shift range to the rele-
vant gear.
Clearing the shift range restriction X
Pull and hold the right-hand steerin gwheel
gearshift paddle (Y page 104) until transmis-
sion position Dis shown in the multifunction
display.
The automatic transmission shifts from the
curren tshift range directly to D.
Selecting the ideal shift range X
Pull the left-hand steerin gwheel gearshift
paddle and hold it in position (Y page 104).
The automatic transmission shifts to the gear
which allows optimum acceleration and
deceleration. To do this, the automatic trans- mission shifts down one or more gears.
The automatic transmission cannot shift down
beyond second gear. To shift into first gear, you
must pull the left-hand steerin gwheel gearshift
paddle. Automatic transmission
105Driving and parking Z
Page 118 of 261

X
To apply: pull parking brake lever ;up
firmly.
Whe nthe ignition is switched on, the red J
indicator lamp in the instrument cluster lights up.
X To release: pull parking brake lever ;
slightly.
X Press release button :and guid eparking
brake ;down to the stop.
The J indicator lamp in the instrument
cluster goe sout.
The vehicl ecan also be braked during an emer-
genc ybyu sing the parking brake.
X To brake in an emergency: press and hold
release button :and carefull ypullp arking
brake lever ;upwards.
If yo udrive on we troads or dirt-covered surfa-
ces, roa dsalta nd/or dirt could get into the
parking brake.
In order to prevent corrosion and areduction in
the braking powe rofthe parking brake, observe
the following:
R pull the parking brake upwards with release
button :depresse dfrom time to time before
beginning ajourney
R drive for approximatel y100 ma tamaximum
speed of 20 km/h Parkin
gupthe vehicle
If you leave the vehicle parked up for longer than
four weeks, the battery may be damaged by
exhaustive discharging.
If you leave the vehicle parked up for longer than
six weeks, it may suffer from lack of use.
X Contact aqualified specialist workshop and
seek advice.
i You can obtain information on trickle charg-
ers from aqualified specialist workshop. Driving tips
General drivin
gtips
Important safety notes G
WARNING
If you switch off the ignition while driving,
safety-relevant functions are only available wit
hlimitations, or not at all. This could affect,
for example, th epower steerin gand th ebrake
boosting effect .You will requir econsiderably
mor eeffort to steer and brake. Ther eisarisk
of an accident.
Do not switch off th eignitio nwhile driving.
Drive sensibly –savef uel Observe the following tips to save fuel:
X The tyre sshould always be inflated to the rec-
ommended tyre pressure.
X Remove unnecessary loads.
X Remove roof carriers when they are not nee-
ded.
X Warm up the engine at low engine speeds.
X Avoid frequent acceleration or braking.
X Have all service and maintenance work car-
ried out at the specified intervals.
Fuel consumption also increases when driving in
cold weather, in stop-start traffic, on short jour- neys and in hilly terrain. Short journeys
! Vehicles with
adiesel particle filter: if the
vehicle is mostly driven for short distances, it
is possible that malfunction smay occur dur-
ing the automatic cleaning of the diesel par-
ticle filter. This may lead to fuel collecting in
the engine oil and cause engine failure. There- fore, if you frequently drive short distances,
you should take a20minute trip on amotor-
way or rural road at least every 500km. Brakes
Imp ortant safety notes G
WARNING
If you shift dow nonaslippery road surface in
an attempt to increas ethe engine's braking
effect, the drive wheels coul dlose their grip.
This increases the risk of skidding and having
an accident.
Do not shift downf or additionalengine brak-
ing on aslippery road surface. Drivingt
ips
115Driving an dparking Z
Page 132 of 261

also applies in countries in whic
hthe maximum
permissible spee dfor car/trailer combinations
is greate rtha n1 00 km/h.
When towing atrailer, your vehicle's handling
characteristics will be differen ttowhen driving
without atrailer and th evehicle will consume
mor efuel.
Driving tips R
Maintain agreater distance to the vehicle in
front than when driving without atrailer.
R Avoid braking abruptly. If possible, brake gen-
tly at first to allow the trailer to run on. Then,
increase the braking force rapidly.
R The values given for gradient-climbing capa-
bilities from astandstill refer to sea level.
When driving in mountainous areas, note that
the power output of the engine, and conse-
quently the vehicle's gradient-climbing capa-
bility from astandstill, decrease with increas-
ing altitude.
If the trailer swings from side to side:
X Do not accelerate under any circumstances.
X Do not countersteer.
X Brake, if necessary. Coupling up
atrailer
! Do no
tconnect th etrailer brak esystem (if
th et railer is fitte dwitho ne)d irectly to the
towing vehicle's hydraulic brak esystem,
since this is equipped wit hananti-lock brak-
ing system. Otherwise, neither th ebrakes on
th et ow ing vehicle no rthe brakes on the
trailer will work.
Observ ethe maximum permissible trailer
dimension s(widt hand length).
X Apply th evehicle's parking brake.
X Mak esure that th eautomatic transmission is
in transmission position P.
X Positio nthe trailer on aleve lsurface behind
th ev ehicle.
X Couple up th etrailer.
X Establish th eelectrical connection between
th ev ehicle and th etrailer.
X Chec kthatthe trailer lighting system is work-
ing.
X Push th ecombinatio nswitch upward sand
downwards and check whether th ecorre- sponding tur
nsignal indicator on the trailer is
flashing.
Ac onnected trailer is only detected when the
electrical connection is established correctly
and when the lighting system is working prop-
erly. The function of other systems, such as
ESP ®
also depends on this. Uncoupling
atrailer G
WARNING
If you uncouple atrailer with an engaged over-
run brake, you coul dtrap yourh and between
the vehicl eand the trailer drawbar. This poses
ar isk of injury.
Do not uncouple atrailer with an engaged
overru nbrake.
! Do not disconnect
atrailer with an engaged
overru nbrake. Otherwise, yourv ehiclecould
be damaged by the rebounding of the overrun brake.
X Apply the parking brake.
X Make sure that the automatic transmission is
in transmission position P.
X Secure the vehicl eand trailer against rolling
away.
X Close all doors, including the rear door.
X Remove the trailer cable.
X Uncoupl ethe trailer. Traile
rpower supply
! Yo
uc an connect accessories with amaxi-
mu mp ower consumption of 180 Wtothe
permanent powe rsupply.
Yo um ustn ot charge atrailer battery using the
powe rsupply.
The trailer socket of your vehicl eisequippe dat
the factory with apermanent powe rsupply.
The permanent powe rsuppl yiss upplie dvia
trailer socket pi n9.
Yo uc an find mor einformatio nabout installing
the trailer electrics at aquali fied specialis twork-
shop. Towin
gatrailer
129Driving an dparking Z
Page 137 of 261

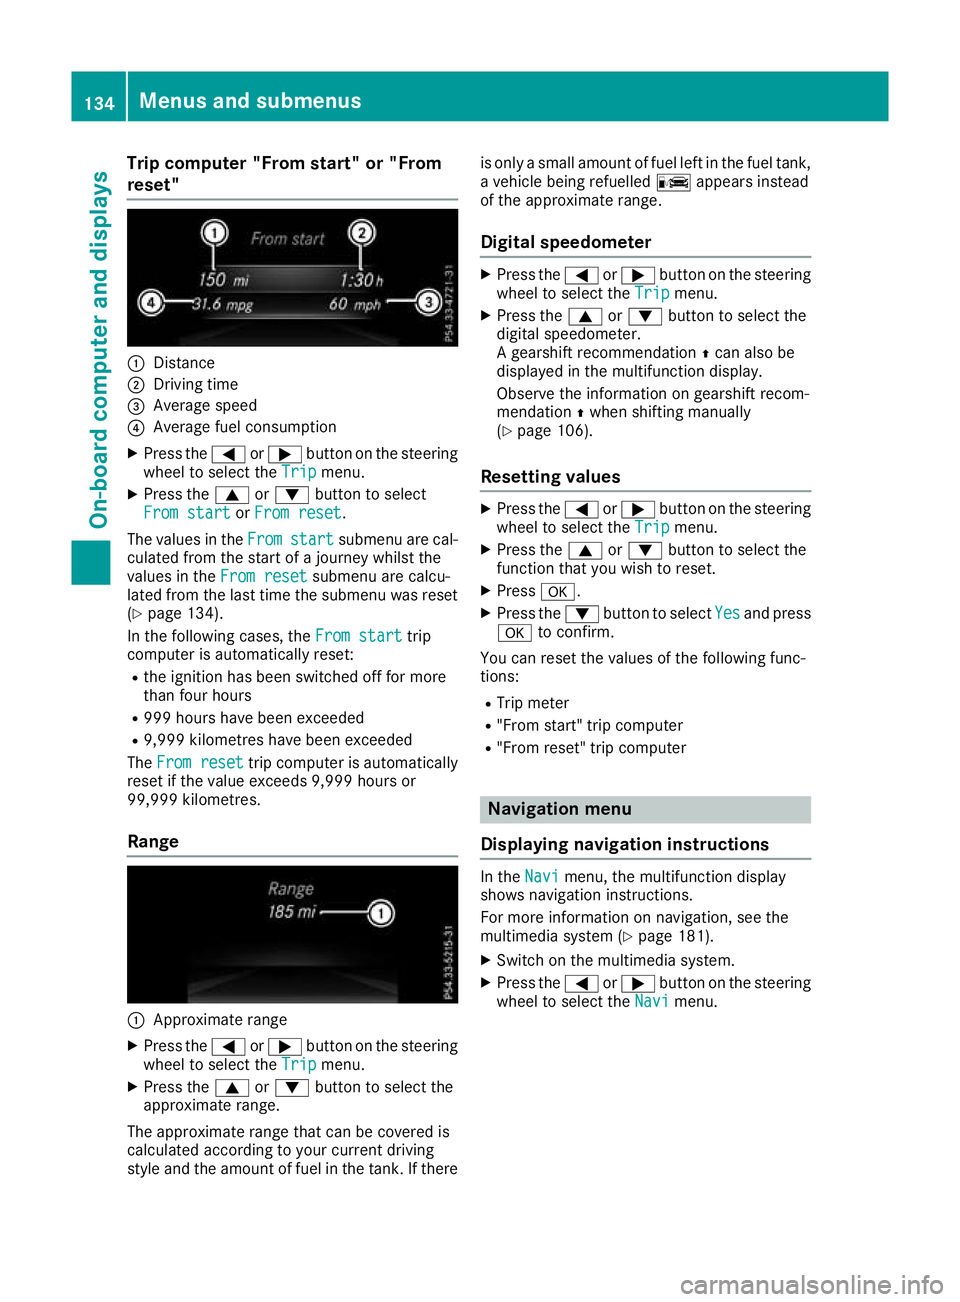
Trip compute
r"From start" or "From
reset" :
Distance
; Driving time
= Averag espeed
? Averag efuelconsumption
X Press the =or; button on the steering
whee ltoselect the Trip
Tripmenu.
X Press the 9or: button to select
Fro mstart
From start orFrom reset
From reset.
The valuesint heFrom
From start
start submenu are cal-
culated from the start of ajourney whilst the
valuesint heFrom reset
From reset submenu are calcu-
lated from the last time the submenu was reset
(Y page 134).
In the following cases, the From start
From start trip
computer is automaticallyr eset:
R the ignition has been switched off for more
than four hours
R 999 hours have been exceeded
R 9,999 kilometres have been exceeded
The From reset From reset trip computer is automatically
reset if the value exceeds 9,999 hours or
99,999 kilometres.
Range :
Approx imaterange
X Press the =or; button on the steering
whee ltoselect the Trip
Tripmenu.
X Press the 9or: button to select the
approximate range.
The approximate range tha tcan be covered is
calculate daccording to your current driving
style and the amount of fuel in the tank. If there is only
asmall amount of fuel left in the fuel tank,
av ehicle being refuelled Cappears instead
of the approximate range.
Digita lspeedometer X
Press the =or; button on the steering
wheel to select the Trip
Tripmenu.
X Press the 9or: button to select the
digital speedometer.
Ag earshift recommendation Zcan also be
displayed in the multifunction display.
Observe the information on gearshift recom-
mendation Zwhen shiftin gmanually
(Y page 106).
Resetting values X
Press the =or; button on the steering
wheel to select the Trip Tripmenu.
X Press the 9or: button to select the
function that you wish to reset.
X Press a.
X Press the :button to select Yes Yesand press
a to confirm.
You can reset the values of the following func-
tions:
R Trip meter
R "From start "trip computer
R "From reset" trip computer Navigat
ionm enu
Displaying navigatio ninstructions In the
Navi Navimenu, the multif unction display
shows navigation instructions.
For more information on navigation, see the
multimedia system (Y page 181).
X Switch on the multimedia system.
X Press the =or; button on the steering
wheel to select the Navi Navimenu. 134
Menu
sand submenusOn-boar dcomputer and displays
Page 198 of 261

Setting map view and alignment
The following options are available:
R 3D map: the map view is aligned to the direc-
tion of travel
R 2D map in direction of travel: the map view is
aligned to the direction of travel. The direction
of travel is alwaysatt he top.
R North-oriented 2D map: the map view is dis-
played so that northisa lwaysatthe top
X Press the NAVI button.
The main menu appears.
X Dependin gonthe current setting, select 3D 3D,
2D
2D or2D
2DLL.
In accordance with your selection, the setting
changes to 3D
3D, 2D
2Dor2D
2DLL.
Defining regional settings Setting the user interface language
X Press the NAVI button.
The main menu appears.
X Select Settings Settings.
X Select Regional
Regional.
X Select Language
Language.
Al ist of available languages appears.
X Select the desired language.
The multimedia system is restarted with the
selected language set.
Setting the language for voice output
X Press the NAVI button.
The main menu appears.
X Select Settings Settings.
X Select Regional
Regional.
X Select Voice Language
Voice Language.
Al ist of the available languages and speakers
appears.
X Select the desired language and speaker.
The selected language and speaker are adop-
ted for the voice output.
Setting units and formats The following functions are available:
R Distance
Distance
R Fuel consumption Fuel consumption
R Weight
Weight
R Time Format
Time Format
R Date Format
Date Format R
Date Delimiter
Date Delimiter
R Coordinate Display Format
Coordinate Display Format
X Press the NAVI button.
The main menu appears.
X Select Settings
Settings.
X Select Regional Regional.
X Select Units &Formats
Units &Formats.
X Select the desired function.
Am enu appears.
X Select the desired setting.
The Ytick indicates the activated function.
Setting the time zone and daylight saving
time
X Press the NAVI button.
The main menu appears.
X Select Settings
Settings.
X Select Regional Regional.
X Select Time Zone
Time Zone.
X To set the time zone automatically: select
Automatic Time Zone
Automatic Time Zone.
Am enu appears.
X Select the desired setting.
The Ytick indicates the activated function.
X To set the time zone manually: select
Automatic Time Zone Automatic Time Zone.
Am enu appears.
X Select Manual Time Zone Manual Time Zone.
The Ytick indicates the activated function.
X Select Time Zone
Time Zone.
X Set the desired time zone using the slider.
X To activate or deactivate daylight saving
time:
select Daylight Saving Time Daylight Saving Time.
The function is activated or deactivated.
Activating or deactivating menu anima-
tions If this function is activated, buttons in menus,
keyboard displays and screen transitions are
animated.
X Press the NAVI button.
The main menu appears.
X Select Settings Settings.
X Select Display
Display.
X Select Menu Animations
Menu Animations.
The function is activated or deactivated. Navigation
195Multimedia system Z