2016 MERCEDES-BENZ G-CLASS SUV steering wheel adjustment
[x] Cancel search: steering wheel adjustmentPage 70 of 261

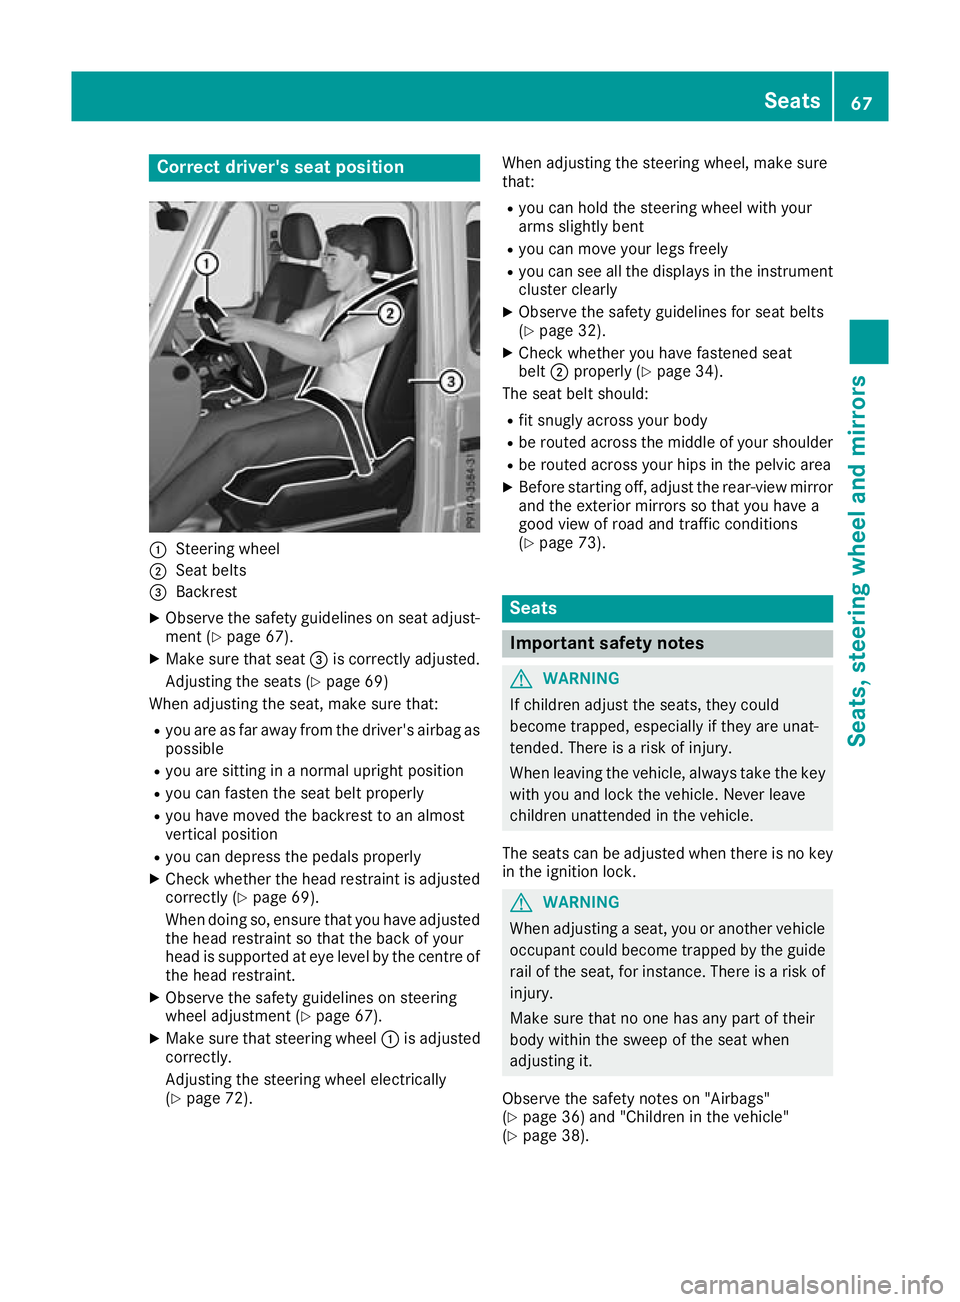
Correct driver's seat position
:
Steerin gwheel
; Seatbelts
= Backrest
X Observe the safety guideline sonseata djust-
ment (Y page 67).
X Make sure that seat =is correctly adjusted.
Adjusting the seats (Y page 69)
Whe nadjusting the seat, make sure that:
R youa re as far away from the driver' sairba gas
possible
R youa re sitting in anorma lupright position
R youc an fasten the sea tbeltp roperly
R youh avem ovedthe backrest to an almost
vertical position
R youc an depress the pedal sproperly
X Check whethe rthe hea drestraint is adjusted
correctly (Y page 69).
Whe ndoing so, ensure that yo uhavea djusted
the hea drestraint so that the back of your
hea diss upported at ey elev el by the centre of
the hea drestraint.
X Observe the safety guideline sonsteering
wheel adjustment (Y page 67).
X Make sure that steering wheel :is adjusted
correctly.
Adjusting the steering wheel electrically
(Y page 72). Whe
nadjustin gthe steerin gwheel, make sure
that:
R you can hold the steerin gwheel with your
arms slightly bent
R you can move your legs freely
R you can see all the displays in the instrument
cluster clearly
X Observe the safety guidelines for seat belts
(Y page 32).
X Check whether you have fastened seat
belt ;properly (Y page 34).
The seat belt should:
R fit snugly across your body
R be routed across the middle of your shoulder
R be routed across your hips in the pelvic area
X Befor estarting off, adjust the rear-view mirror
and the exterior mirrors so that you have a
good view of road and traffic conditions
(Y page 73). Seats
Important safety notes
G
WARNING
If children adjust the seats, they could
become trapped, especially if they are unat-
tended. Ther eisarisk of injury.
When leaving the vehicle, alwayst ake the key
with you and lock the vehicle. Never leave
children unattended in the vehicle.
The seats can be adjusted when there is no key
in the ignitio nlock. G
WARNING
When adjusting aseat, you or another vehicle
occupant coul dbecome trappe dbythe guide
rail of the seat, for instance. There is arisk of
injury.
Make sure that no one has any part of their
body withi nthe swee pofthe seat when
adjusting it.
Observe the safety notes on "Airbags"
(Y page3 6) and "Children in the vehicle"
(Y page3 8). Seats
67Seats,steering wheela nd mirrors Z
Page 72 of 261

their rearmost position. Yo
ucould otherwise
damage the seats and the rea rbench seat.
! Make sure tha
tthe su nvisor is folde dup
befor eadjusting the backrest and head
restraint height. The head restraint and sun
visor could otherwis ecollide when the head
restraint is full yextended.
i If the front door is open, the seats can be
adjusted for up to 30 minute safter the igni-
tio nh asbeen switched off.
i The rea
rseath eadr estraints can be
remove d(Ypage 70).
For mor einformation, contact aquali fied spe-
cialist workshop.
i Furthe
rinformation abou tenlarging the lug-
gage compartment (folding the rea rbench
seat forwards )(Ypage 202). Adjustin
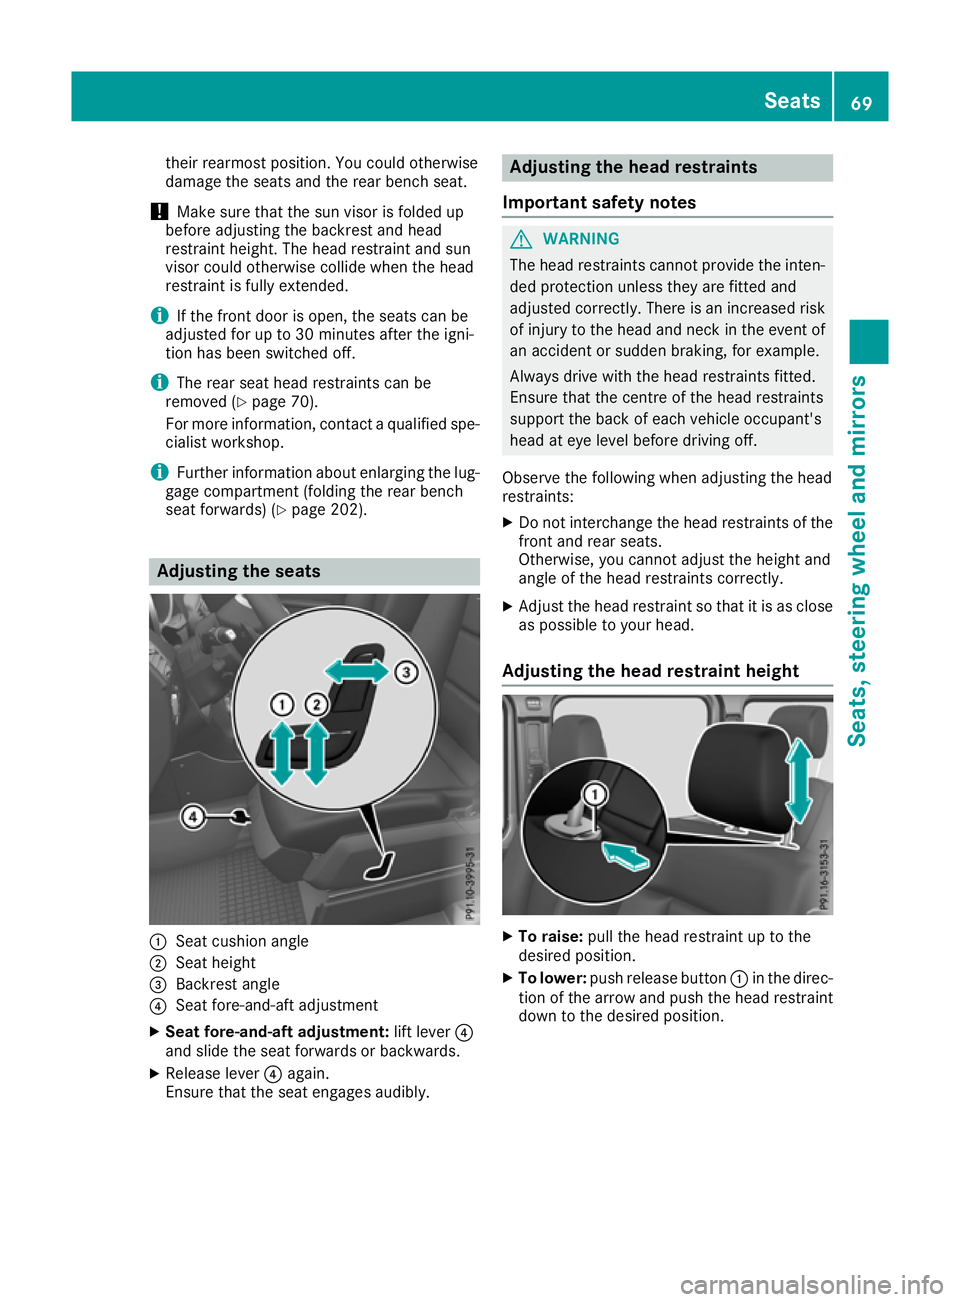
gthe seats :
Seat cushion angle
; Seat height
= Backrest angle
? Seat fore-and-aft adjustment
X Sea tfore-and-aft adjustment: lift lever?
and slide the sea tforward sorbackwards.
X Releas elever ? again.
Ensur ethat the sea tengages audibly. Adjustin
gthe hea drestraints
Important safety notes G
WARNING
Th eh ead restraints cannot provid ethe inten-
ded protection unless they are fitted and
adjusted correctly. There is an increased risk of injury to the head and neck in the event of
an accident or sudden braking, for example.
Always drive with the head restraints fitted.
Ensure that the centre of the head restraints
support the back of each vehicl eoccupant's
head at eye leve lbefore driving off.
Observe the following when adjusting the head
restraints:
X Do not interchange the head restraints of the
front and rear seats.
Otherwise, you cannot adjust the height and
angle of the head restraints correctly.
X Adjust the head restraint so that it is as close
as possible to yourh ead.
Adjusting the head restraint height X
To raise: pull the head restraint up to the
desired position.
X To lower: push release button :in the direc-
tion of the arrow and push the head restraint down to the desired position. Seats
69Seats,steering wheela nd mirrors Z
Page 75 of 261

When leaving the vehicle, alway
stake the key
with you and lock the vehicle. Never leave
children unattended in the vehicle.
The electrically adjustable steerin gwheel can
still be adjusted when there is no key in the igni-
tion lock. Adjust
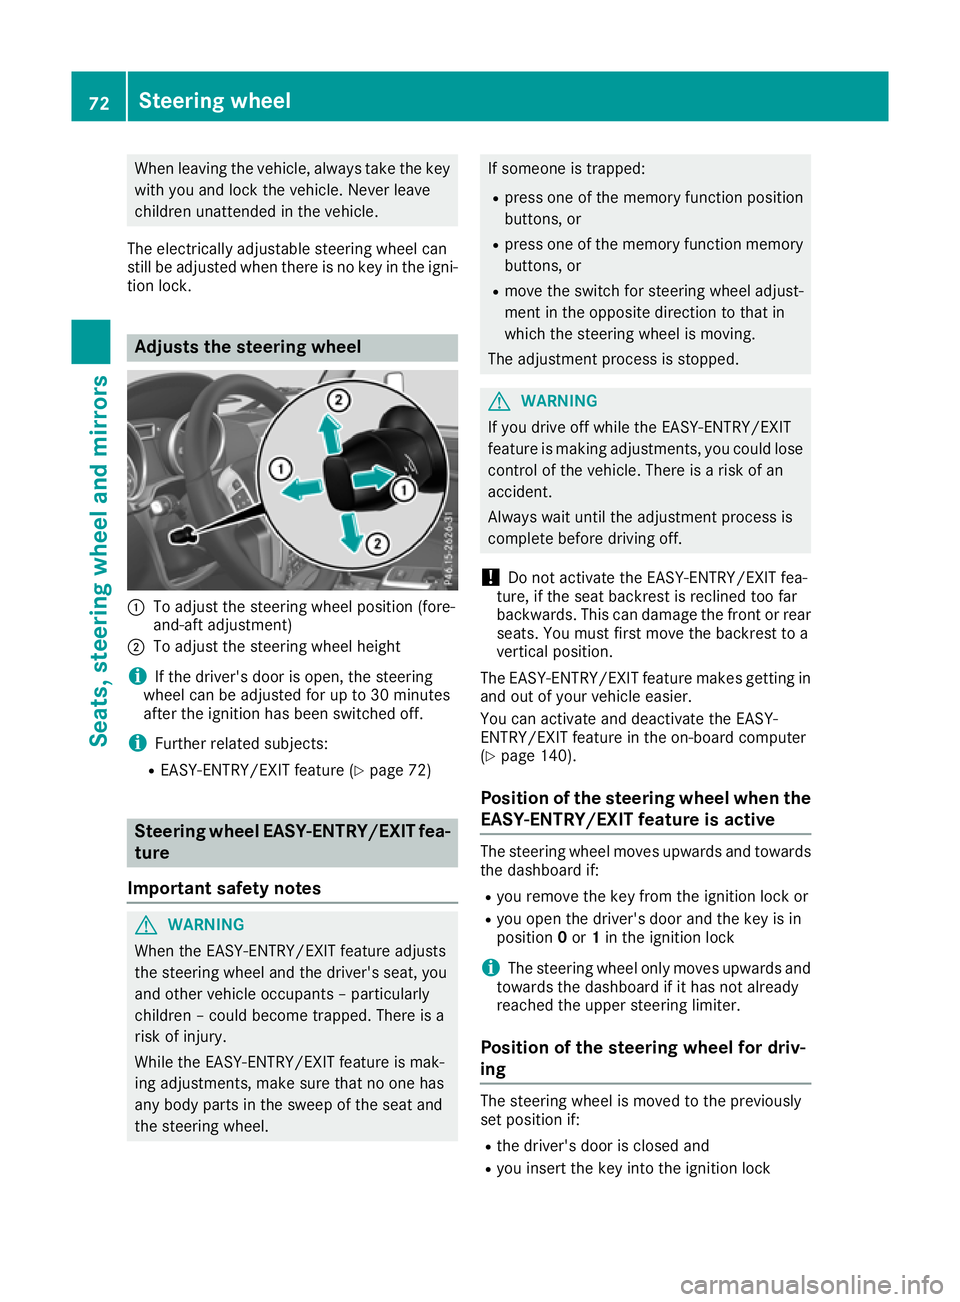
sthe steering wheel :
To adjust the steeri ngwheel position (fore-
and-aft adjustment)
; To adjust the steerin gwheel height
i If the driver's door is open, the steering
wheel can be adjusted for up to 30 minutes
after the ignition has been switched off.
i Further related subjects:
R EASY-ENTRY/EXIT feature (Y page 72)Steering wheel EASY-ENTRY/EXIT fea-
ture
Important safety notes G
WARNING
When the EASY-ENTRY/EXIT feature adjusts
the steering wheel and the driver's seat, you
and other vehicle occup ants –p articularly
children –couldb ecome trapped. There is a
risk of injury.
Whil ethe EASY-ENTRY/EXIT feature is mak-
ing adjustments, make sure that no one has
any body parts in the swee pofthe seat and
the steering wheel. If someone is trapped:
R press one of the memory function position
buttons, or
R press one of the memory function memory
buttons, or
R move the switch for steering wheel adjust-
ment in the opposite direction to that in
which the steering wheel is moving.
The adjustment process is stopped. G
WARNING
If you drive off while the EASY-ENTRY/EXIT
feature is making adjustments, you coul dlose
control of the vehicle. There is arisk of an
accident.
Always waitu ntil the adjustment process is
complete before driving off.
! Do not activate the EASY-ENTRY/EXIT fea-
ture, if the seat backrest is recline dtoo far
backwards. This can damage the front or rear seats. You must first move the backrest to a
vertical position.
The EASY-ENTRY/EXIT feature makes getting in
and out of yourv ehicleeasier.
You can activate and deactivate the EASY-
ENTRY/EXIT feature in the on-board computer
(Y page1 40).
Position of the steering wheel whent he
EASY-ENTRY/EXIT feature is active The steering wheel moves upwards and towards
the dashboard if:
R you remov ethe key from the ignition lock or
R you open the driver's door and the key is in
position 0or 1in the ignition lock
i The steerin
gwheel only moves upwards and
towards the dashboard if it has not already
reached the upper steerin glimiter.
Position of the steering wheel for driv-
ing The steerin
gwheel is moved to the previously
set position if:
R the driver's door is closed and
R you insert the key into the ignition lock 72
Steering wheelSeats, steering wheel and mirrors
Page 143 of 261

When the auxiliary heating is switched on,
make sure that:
R no flammable materials come into contact
with hot vehicle components
R the exhaust gas can escape from the
exhaust pipe unhindered
R the exhaust gas does not come into contact
with flammable materials.
! Operatin
gthe auxiliary heating/ventilation
draws on the vehicle battery. After you have
heated or ventilated the vehicle amaximum of
two times, drive for alonger distance.
Only vehicles with auxiliary heating have this
function (Y page 89).
In the Heating Heating submenu, you can select a
stored departure time or change adeparture
time.
The auxiliary heating timer function calculates
the switch-on time accordin gtothe outside
temperature so that the vehicle is preheated by the departure time. When the departure time isreached, the auxiliary heating continues to heat for afurther five minutes and then switches off.
The auxiliary heating selects the temperature
setting of the THERMATIC automatic climate
control.
You can switch the auxiliary heating on or off by
using the &auxiliary heating button on the
centre console or the remot econtrol.
Selecting the departure time or deactivat- ing aselected departure time
X Press the =or; button on the steering
wheel to select the Settings Settingsmenu.
X Press the :or9 button to select the
Heating
Heating submenu.
X Press ato confirm.
You will see the selected setting.
X Press ato confirm.
X Press the :or9 button to select one
of the three departur etimes or Timer
Timeroff
off(no
timer active).
X Press ato confirm.
If ad eparture time is selected, the yellow
indicator lamp lights up on the &auxiliary
heating button. Changing the departure time
X
Press the =or; buttonont hesteering
wheel to selec tthe Settings Settings menu.
X Pres sthe : or9 button to selec tthe
Heating
Heating submenu.
X Press ato confirm.
Yo uw ill see the selected setting.
X Press ato confirm.
X Press the :or9 button to select
Change A Change A, Change B
Change BorChange C
Change C.
X Press ato confirm.
You can now change the departure time.
X Press the =or; button to select the
displaytobec hanged: hours, minutes.
X Press the :or9 button to set the
selected display.
X Press ato store the entry.
The yellow indicator lamp on the &auxili-
ary heating button lights up.
Comfort Activating/deactivating the EASY-
ENTRY/EXIT feature
G
WARNING
When the EASY-ENTRY/EXI Tfeature adjusts
the steering wheel, you and other vehicle
occupants –particularl ychildren –could
become trapped. There is arisk of injury.
Whil ethe EASY-ENTRY/EXIT feature is mak-
ing adjustments, make sure that no one has
any body parts in the swee pofthe steering
wheel.
If someone is trapped:
R press one of the memory function position
buttons, or
R move the switch for steering whee ladjust-
ment in the opposite direction to that in
which the steering whee lismoving.
The adjustment process is stopped.
X Press the =or; button on the steering
whee ltoselect the Settings Settings menu.
X Press the :or9 button to select the
Convenience
Convenience submenu.
X Press ato confirm. 140
Menu
sand submenusOn-boar dcomputer and displays