2016 MERCEDES-BENZ G-CLASS SUV wheel bolts
[x] Cancel search: wheel boltsPage 221 of 261

High-pressure cleaner
G
WARNING
The wate rjet of circular-jet nozzles (dirt grind-
ers) can caus edamage not visible from the
outside to tyres or chassi scomponents. Com-
ponents damaged in this way can unexpect-
edlyf ail.There is arisk of an accident.
Do not use high-pressure cleaners with circu-
lar-jet nozzles to clea nthe vehicle. Have dam-
agedt yres or chassi scomponents replaced
immediately.
! Always maintai
nadistance of at least 30 cm
between the vehicl eand the high-pressure
cleaner nozzle. Information about the correct
distance is available from the equipment
manufacturer.
Move the high-pressure cleaner nozzle
around when cleaning yourv ehicle.
Do not aim directly at any of the following:
R tyres
R door gaps, roof gaps, joints etc.
R electrica lcomponents
R battery
R plugc onnectors
R lamps
R seals
R trim elements
R ventilation slots
Damag etosealsore lectrica lcomponents
can leadtol eaks or failures.
! Vehicles with decorative film: parts of your
vehicl eare covered with adecorative film.
Maintain adistance of at least 70 cm between
the parts of the vehicl ecovered with the film
and the nozzle of the high pressure cleaner.
Information about the correct distance is
available from the equipment manufacturer.
Move the high-pressure cleaner nozzle
around whilst cleaning.
Cleaning the paintwork !
Do not affix:
R stickers
R films
R magneti cplates or similari tems to painted surfaces. You could oth
erwise
damage the paintwork.
Scratches, corrosive deposits, area saffecte dby
corrosion and damage cause dbyinadequate
car ecannot always be completel yrepaired .In
such cases ,visit aquali fied specialis tworkshop.
X Remov eimpuri ties immediately, where pos-
sible, whilst avoiding rubbing too hard.
X Soa kinsect remains with insect remove rand
rinse off the treated area safterwards.
X Soa kbirdd ropping swithw ater and rinse off
the treated area safterwards.
X Remov ecoolant, brake fluid ,tree resins ,oils,
fuel sand greases by rubbing gently with a
cloth soaked in petroleu mether or lighter
fluid.
X Use tar remove rtoremove tar stains.
X Use silicone remove rtoremove wax. Cleanin
gvehicle parts
Cleaning th ewheels G
WARNING
Th ew ater jet of circular-jet nozzles (dirt grind-
ers) can caus edamage not visible from the
outside to tyres or chassi scomponents. Com-
ponents damaged in this way can unexpect-
edlyf ail.There is arisk of an accident.
Do not use high-pressure cleaners with circu-
lar-jet nozzles to clea nthe vehicle. Have dam-
agedt yres or chassi scomponents replaced
immediately.
! Do not use acidic whee
lcleaning products
to remove brake dust. This coul ddamage
whee lbolts and brake components.
! Do not park up yourv
ehiclefor along period
of time immediatel yafter cleaning, particu-
larl yafter cleaning the whee lrim with wheel
cleaner. Whee lcleaner may leadtoi ncreased
corrosio nofthe brake discs and pads. You
should therefore drive for afew minutes after
cleaning. By heating up the brakes ,the brake
discs and padsd ry. The vehiclecan then be
parked up for along period of time. 218
CareMaintenanc
eand care
Page 234 of 261

X
When the vehicle is stationary, depress the
brake pedal and keep it depressed.
X Shift the transfer case to position Neutral
(Y page 125).
X Shift the automatic transmission to position
N.
X Leave the key in position 2in the ignition
lock.
X Release the brake pedal.
X Release the parking brake.
X Switc hont he hazard warning lamps
(Y page 76).
In order to signal achange of direction when
towing the vehicle with the hazard warning
lamps switched on, use the combination switch
as usual. In this case, only the turn signals for
the desired direction flash. When you reset the
combination switch, the hazard warning lamps
start flashing again.
i The automatic transmission can only
change gear when the batter yhas sufficient
charge.
If you cannot shift the automatic transmission
to position N,the propeller shafts to the
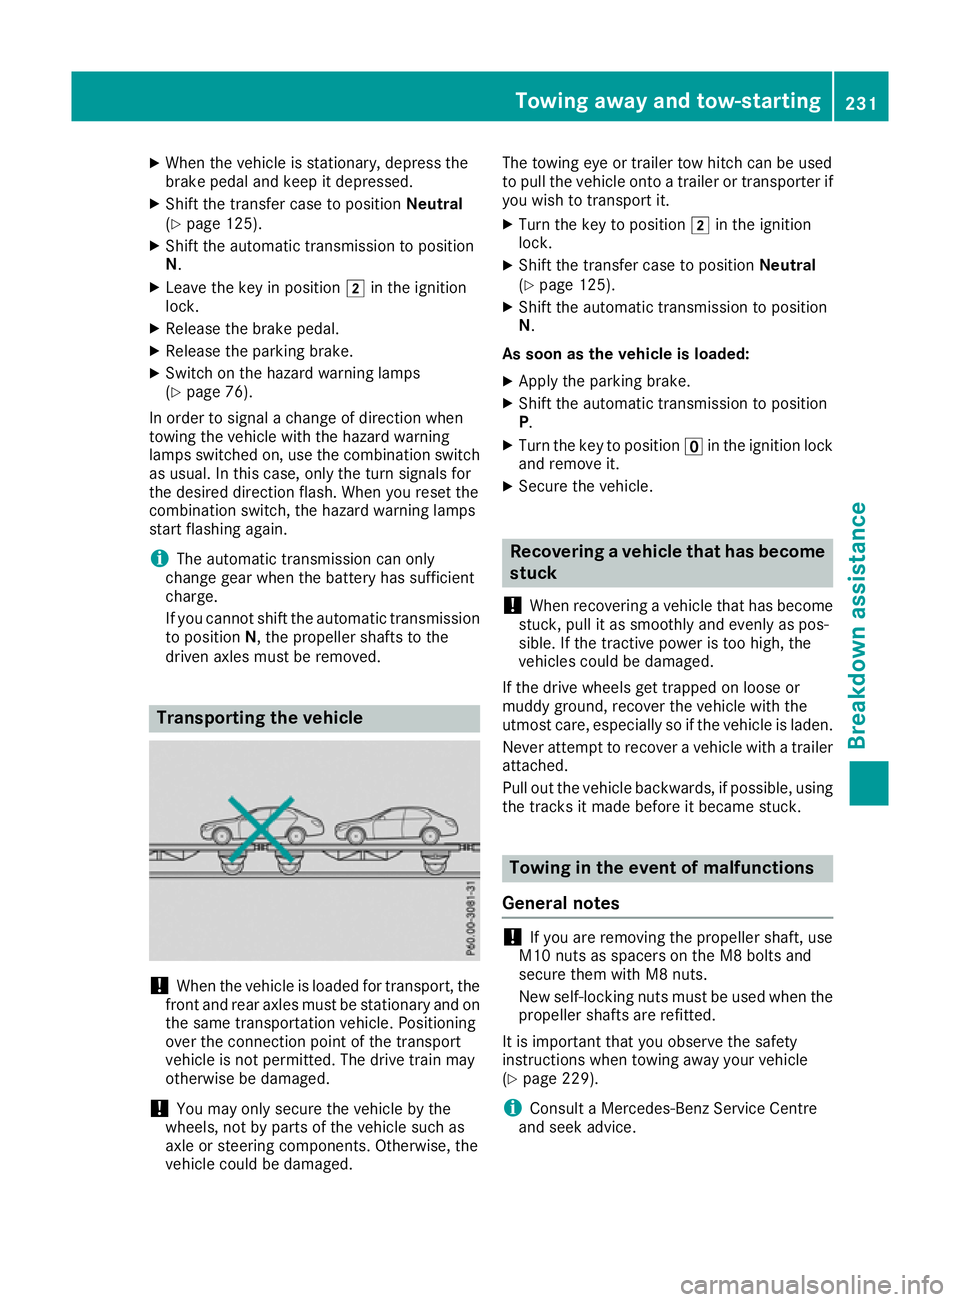
driven axles must be removed. Transporting thev
ehicle !
Whe
nthe vehicle is loadedf or transport, the
front and rear axles must be stationary and on the same transportation vehicle. Positioning
over the connection point of the transport
vehicle is not permitted. The drive train may
otherwise be damaged.
! You may only secure the vehicle by the
wheels, not by parts of the vehicle such as
axle or steering components. Otherwise, the
vehicle could be damaged. The towing eye or trailer tow hitch can be used
to pull the vehicle onto
atrailer or transporter if
you wish to transport it.
X Turn the key to position 2in the ignition
lock.
X Shift the transfer case to position Neutral
(Y page 125).
X Shift the automatic transmission to position
N.
As soon as the vehicle is loaded:
X Apply the parking brake.
X Shift the automatic transmission to position
P.
X Turn the key to position uin the ignition lock
and remove it.
X Secure the vehicle. Recovering
avehicle that has become
stuck
! Whe
nrecovering avehicl ethat ha sbecome
stuck, pull it as smoothly and evenly as pos-
sible .Ifthe tractive power is too high, the
vehicles could be damaged.
If the drive wheel sget trapped on loose or
muddy ground ,recover the vehicl ewitht he
utmost care ,especially so if the vehicl eisladen.
Neve rattempt to recover avehicl ewithat railer
attached.
Pull ou tthe vehicl ebackwards ,ifpossible ,using
the tracks it mad ebefore it became stuck. Towin
ginthe even tofm alfunctions
General notes !
If you are removing the propelle
rshaft, use
M10 nuts as spacers on the M8 bolts and
secure them with M8 nuts.
New self-locking nuts must be used when the propellers hafts are refitted.
It is important that you observe the safety
instructionsw hen towing awayy our vehicle
(Y page 229).
i Consult
aMercedes-Benz Service Centre
and seek advice. To
wing away and tow-starting
231Breakdown assis tance Z
Page 247 of 261

X
Stop the vehicl eonsolid,non-slipper yand
level ground.
X Appl ythe parking brake.
X Move the front wheel stothe straight-ahead
position.
X Shif tthe automatic transmissio ntoposition
P.
X Switch off the engine.
X Ifat raile risc oupled to the vehicle, uncouple
it.
X Remove the vehicl etool sand jack from the
vehicl e(Ypage 223).
X Remove the spare wheel from the spare wheel
bracket (Y page 223).
X Secure the vehicl eagains trolling away.
Securing the vehicle against rolling
away X
Place chocks or other suitable items under
the front and rea rofthe wheel that is diago-
nally opposite the wheel you wish to change.
Raising the vehicle G
WARNING
If you do not position the jack correctl yatthe
appropriate jacking point of the vehicle, the
jack coul dtip over with the vehicl eraised.
There is arisk of injury.
Only position the jack at the appropriate jack-
ing point of the vehicle. The base of the jack
must be positioned vertically,d irectly under
the jacking point of the vehicle.
! Only position the jack at the appropriate
jacking point of the vehicle. Otherwise, you
coul ddamage the vehicle.
Observe the following whenr aisingthe vehi-
cle:
R Use only the vehicle-specific jack that has
been tested and approved by Mercedes-Benz
to rais ethe vehicle. If the jack is used incor-
rectly, it coul dtip over while the vehicl eis
raised.
R The jack is designed only to rais ethe vehicle
for ashort time while awhee lisb eing
changed .Itisnot permissible to use it to per-
form maintenance work under the vehicle. R
Avoid changing the whee lonuphilland down-
hill slopes.
R Before raising the vehicle, secur eitagainst
rolling away by applying the parking brake and
positioning whee lchocks. Do not release the
parking brake whil ethe vehicl eisraised.
R The jack must be place donafirm, flatand
non-slip surface. On aloo se surface, alarge,
fla tload-beari ng underlay must be used .Ona
slippery surface, anon-slip underlay must be
used ,e.g.u se arubber matont iles.
R Do not us ewoode nblocks or similar objects
as ajack underlay .Otherwise, the jack will not
be able to achieve its load-bearing capacity
du etot he restricte dheight.
R Ensure tha tthe distance between the under-
side of the tyr eand the ground does not
exceed 3cm.
R Do not place your hands or fee tunder the
raised vehicle.
R Do not li eunder the raised vehicle.
R Do not start the engine when the vehicl eis
raised.
R Do not open or close adoorw hent he vehicle
is raised.
R Ensure tha tnopersons ar epresent in the
vehicl ewhenr aisin gthe vehicle. X
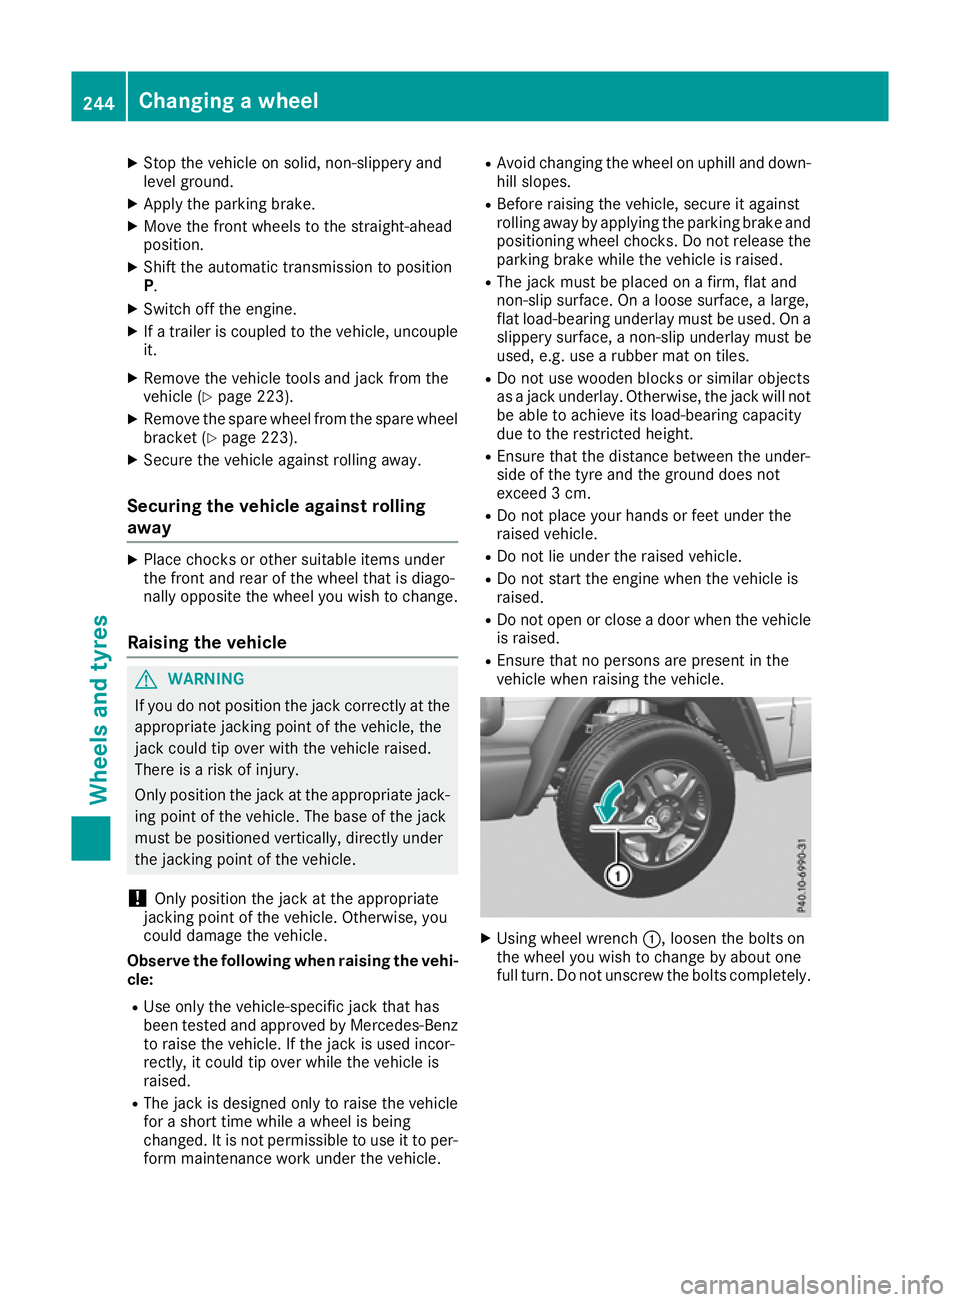
Using wheel wrench :,loosen the bolts on
the wheel you wish to change by abouto ne
full turn. Do not unscrew the bolts completely. 244
Changing
awheelWheels and tyres
Page 248 of 261

X
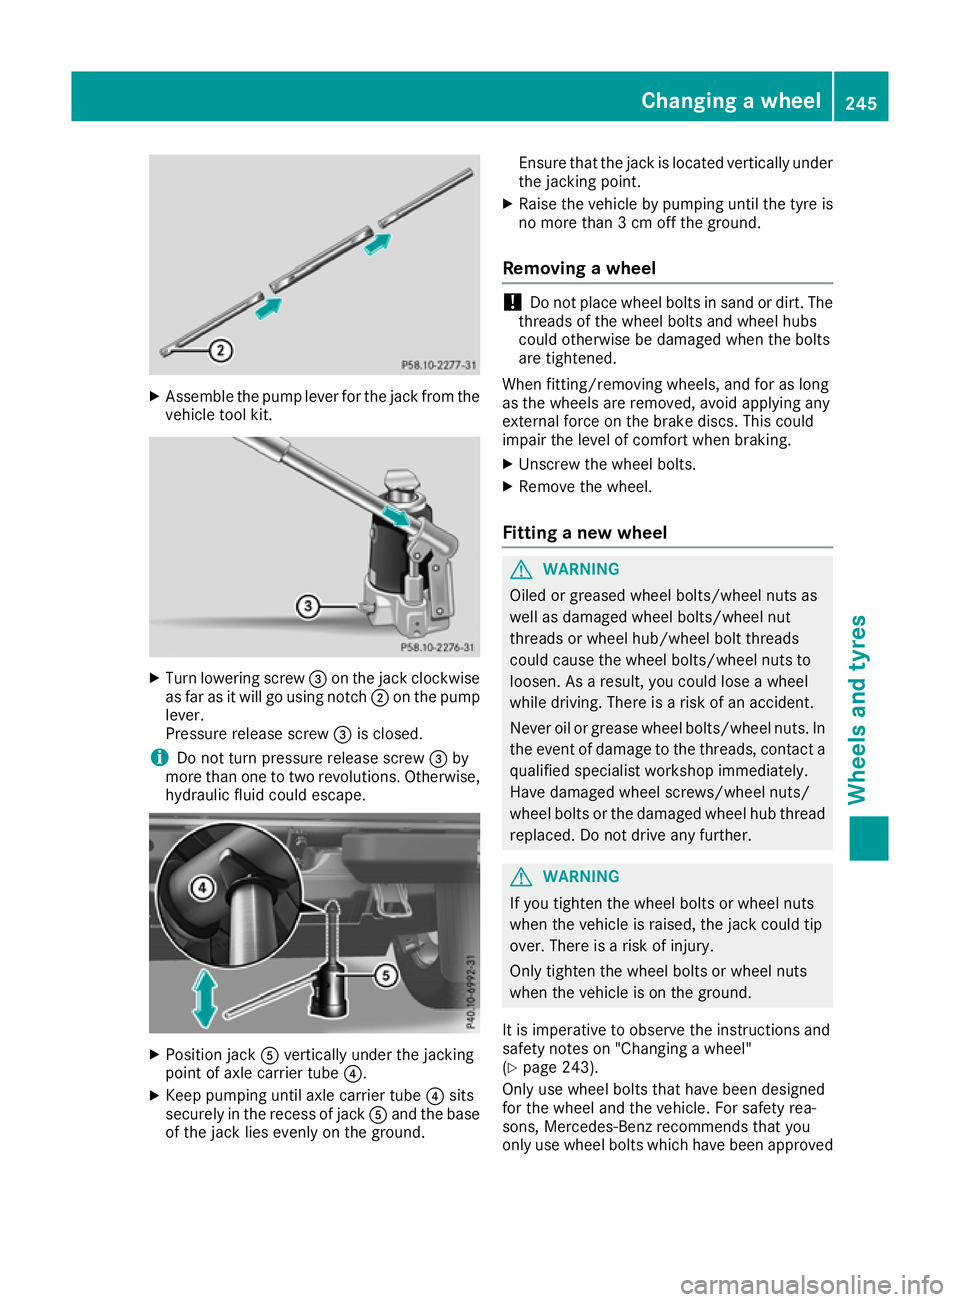
Assembl ethe pump lever for the jack from the
vehicl etool kit. X
Tur nlowering screw =on the jack clockwise
as far as it will go using notch ;on the pump
lever.
Pressure release screw =is closed.
i Do not turn pressure release screw
=by
more than one to two revolutions. Otherwise,
hydrauli cfluid could escape. X
Position jack Avertically under the jacking
point of axle carrier tube ?.
X Keep pumping until axle carrier tube ?sits
securely in the recess of jack Aand the base
of the jack lies evenly on the ground. Ensure that th
ejack is locate dverticall yunder
the jacking point.
X Rais ethe vehicl ebypumping unti lthe tyr eis
no mor ethan3cmo ff the ground.
Removing awheel !
Do no
tplace wheel bolts in sand or dirt. The
threads of the wheel bolts and wheel hubs
could otherwise be damagedw hen the bolts
are tightened.
When fitting/removing wheels, and for as long
as the wheels are removed, avoid applying any
external force on the brake discs. This could
impair the level of comfort when braking.
X Unscrew the wheel bolts.
X Remove the wheel.
Fitting anew wheel G
WARNING
Oiled or greased wheel bolts/wheel nuts as
well as damaged wheel bolts/wheel nut
threads or wheel hub/wheel bolt threads
could cause the wheel bolts/wheel nuts to
loosen. As aresult, you coul dlose awheel
while driving. There is arisk of an accident.
Never oil or grease whee lbolts/wheel nuts. In
the event of damage to the threads, contact a
qualified specialist worksho pimmediately.
Have damaged whee lscrews/wheel nuts/
whee lbolts or the damaged whee lhub thread
replaced. Do not drive any further. G
WARNING
If you tighten the whee lbolts or whee lnuts
when the vehicl eisraised, the jack coul dtip
over. There is arisk of injury.
Only tighten the whee lbolts or whee lnuts
when the vehicl eisonthe ground.
It is imperative to observe the instructions and
safety notes on "Changing awheel"
(Y page2 43).
Only use whee lbolts that have been designed
for the whee land the vehicle. For safety rea-
sons, Mercedes-Benz recommends that you
only use whee lbolts which have been approved Changing
awheel
245Wheels an dtyres Z
Page 249 of 261

for Mercedes-Benz vehicles and the respective
wheel.
X Clean the whee land whee lhub contact sur-
faces.
X Place the new whee lonthe whee lhub and
pus hito n.
X Tighten the whee lbolts until they are finger-
tight.
Lowering the vehicle G
WARNING
The wheels coul dwork loos eifthe whee lnuts
and bolts are not tightened to the specified
tightening torque .There is arisk of accident.
Have the tightening torque immediately
checked at aqualified specialist workshop
after awhee lisc hanged.
X Slowl yopen the pressure release screw on
the jack using the pump leve rbyapprox-
imatel yone full turn and carefully lower the
vehicl e(Ypage2 44).
X You can put the jack aside. X
Tighten the wheel bolts evenl yinacrosswise
pattern in the sequence indicated (: toA).
The specified tightening torque is 130 Nm.
X Dismantle the pump lever.
X Push the jack piston back in and close the
drain plug.
X Use the nuts to secure the faulty wheel to the
spare wheel bracket (Y page 223).
X Stow the jack and the vehicle tools in the
vehicle again.
X Check the tyre pressure of the newly fitted
wheel and adjust it if necessary.
Observe the recommended tyre pressure
(Y page 238). If you are drivin
gwith the emergency spare
wheel fitted, the tyre pressure monitor cannot
function reliably.R estart the tyre pressure mon-
itor only once the defective wheel has been
replaced with anew wheel.
All fitted wheelsm ust be equipped with func-
tioning sensors for the tyre pressure monitor. Wheel and tyre combinations
You can ask for information regarding permitted
wheel/tyre combinations at aMercedes-Benz
Service Centre.
! For safety reasons, Mercedes-Benz recom-
mends that you only use tyres, wheels and
accessories which have been approved by
Mercedes-Benz for you rvehicle. These are
speciall yadapted to the various driving safety
systems, such as ABS or ESP ®
.
Only use the tyres, wheels and accessories
tested and recommende dbyMercedes-Benz.
Certain characteristics, such as handling,
vehicl enoise emissions, fuel consumption,
etc. may otherwise be adversely affected.
Other wheel sizes may caus ethe tyres to
come into contact with the vehicl ebody and
axle components, whe nunder load. This may
result in damage to the tyre or the vehicle.
Mercedes-Benz is not responsibl efor any
damage caused by using tyres, wheels or
accessories other than those recommended.
Informatio nontyres, wheels and permissible
combinations can be obtained at aqualified
specialist workshop.
! Retreaded tyres are neither tested nor rec-
ommende dbyMercedes-Benz, since previ-
ous damage cannot alwaysbed etected on
retreaded tyres. As aresult, Mercedes-Benz
cannot guarantee vehicl esafety if retreaded
tyres are fitted. Do not fit use dtyres if you
have no information about their previous
usage.
! Large wheels: the lower the section width
for acertain wheel size, the lower the ride
comfort is on poor road surfaces. Rol lcomfort
and suspension comfort are reduced and the risk of damage to the wheels and tyres as a
result of driving over obstacles increases.
The recommende dtyre pressures for various
operating conditions can be found on the tyre 246
Wheel and tyre combinationsWheels and tyres