2016 MERCEDES-BENZ G-CLASS SUV fuel reserve
[x] Cancel search: fuel reservePage 13 of 261

Front-passenger seat
Display message ............................ 154
Fuel
Consumptio nstatistic s................. .134
Displayin gthe range ...................... 134
Drivin gtips. .................................. .115
Fuel gauge ...................................... .26
Important safety notes .................. 250
Low outsid etemperature s.............2 51
Premium-grade unleade dpetrol ..... 251
Problem (malfunction) ................... 110
Quality (diesel )............................... 251
Refuelling ....................................... 108
Tank content/reserve fue l............. 251
Fue lfille rflap
Closing ........................................... 109
Emergency release ........................ 110
Opening ......................................... 109
Fue lfilter (white display message) .. 148
Fue llevel
Calling up the rang e(on-board
computer) ...................................... 134
Gaug e.............................................. 26
Fue ltank
Capacity ........................................ 251
Problem (malfunction) ................... 110
Fuel/wate rseparator
Service ........................................... 216
Fus eallocatio nchart ........................ 233
Fus ebox
Dashboard ..................................... 233
Front-passenger footwell ............... 233
Luggage compartment ................... 233
Transmission tunne l....................... 233
Fuses
Allocation chart ............................. 233
Before changing ............................. 232
Dashboard fus ebox ....................... 233
Fus ealloc ation chart ..................... 233
Fus ebox in the front-passenger
footwell .......................................... 233
Fus ebox in the luggage compart-
ment .............................................. 233
Fus ebox in the transmissio ntun-
nel ................................................. 233
Important safety notes .................. 232 G
Genui neMercedes-Benz parts ...........20
Glove compartment ..........................199
GPS reception ................................... .181 H
Hazard warnin glamps ........................ 76
Head restraints
Adjusting ........................................ .69
Adjusting (rear )................................ 70
Fitting/removing (rear ).................... 70
Headlamp
Cleaning system (function) .............. 75
Cleaning system (notes) ................ 254
Headlamp flasher ................................ 76
Headlamps
Misting up ........................................ 76
see Automati cheadlamp mode
Heating
see Climate control
High-pressure cleaners .................... 218
HOL Dfunction
Activating ....................................... 123
Activation conditions ..................... 123
Deactivating ................................... 123
Function/note s............................. 122
Genera lnotes ................................ 122
Horn ...................................................... 25 I
Ignition lock seeK ey positions
Immobiliser .......................................... 56
Indicator and warning lamp
Restrain tsystem ............................ 161
Indicator and warning lamps
Coolan t......................................... .162
Engin ediagnostics ........................ .162
Indicator lamps
Display message ............................ 145
Insectp rotection on the radiator .... 212
Instrument cluster
Overview .......................................... 26
Warning and indicator lamps ........... 26
Instrument cluster lighting .............. 13110
Index
Page 17 of 261
Station list ..................................... 176
Storing stations manually .............. 176
Switching on .................................. 176
Switching to alternative frequen-
cie s................................................ 177
Radio aerial
Assembl ytool ................................ 210
Removing ....................................... 210
Removing the radio aeria l.............. 210
Securing ........................................ 210
Securing the radio aeria l................ 210
Radio-based vehicle components
Declaration of conformity ................ 22
Rear benc hseat
Folding forward .............................. 202
Rear compartment
Setting the ai rvents ........................ 94
Rear door
Displa ymessage ............................ 153
Important safety notes .................... 63
Rear foglamp
Changing the bulb ............................ 81
Displa ymessage ............................ 145
Switching on/of f.............................. 75
Rear seat bench
Folding into an upright position ..... 202
Rear windo wheating
Problem (fault) ................................. 88
Switching on/of f.............................. 88
Rear windo wwiper
Replacing the wipe rblade ................ 82
Switching on/of f.............................. 82
Refuelling
AdBlue ®
......................................... 111
Fue lgauge ....................................... 26
Important safety notes .................. 108
Refuelling process ......................... 109
see Fuel
Remote control
Auxiliary heating/ventilation ............ 90
Changing the batteries (auxiliary
heating) ........................................... 92
Replacing bulbs
Brake lamp ...................................... 80
Important safety notes .................... 78
Overview of bulb types .................... 79
Rear fog lamp .................................. 81
Reversing lamp ................................ 81 Tai
llamp .......................................... 80
Turn signal (rear) .............................. 80
Turn signals (front )........................... 80
Rescue card ......................................... 24
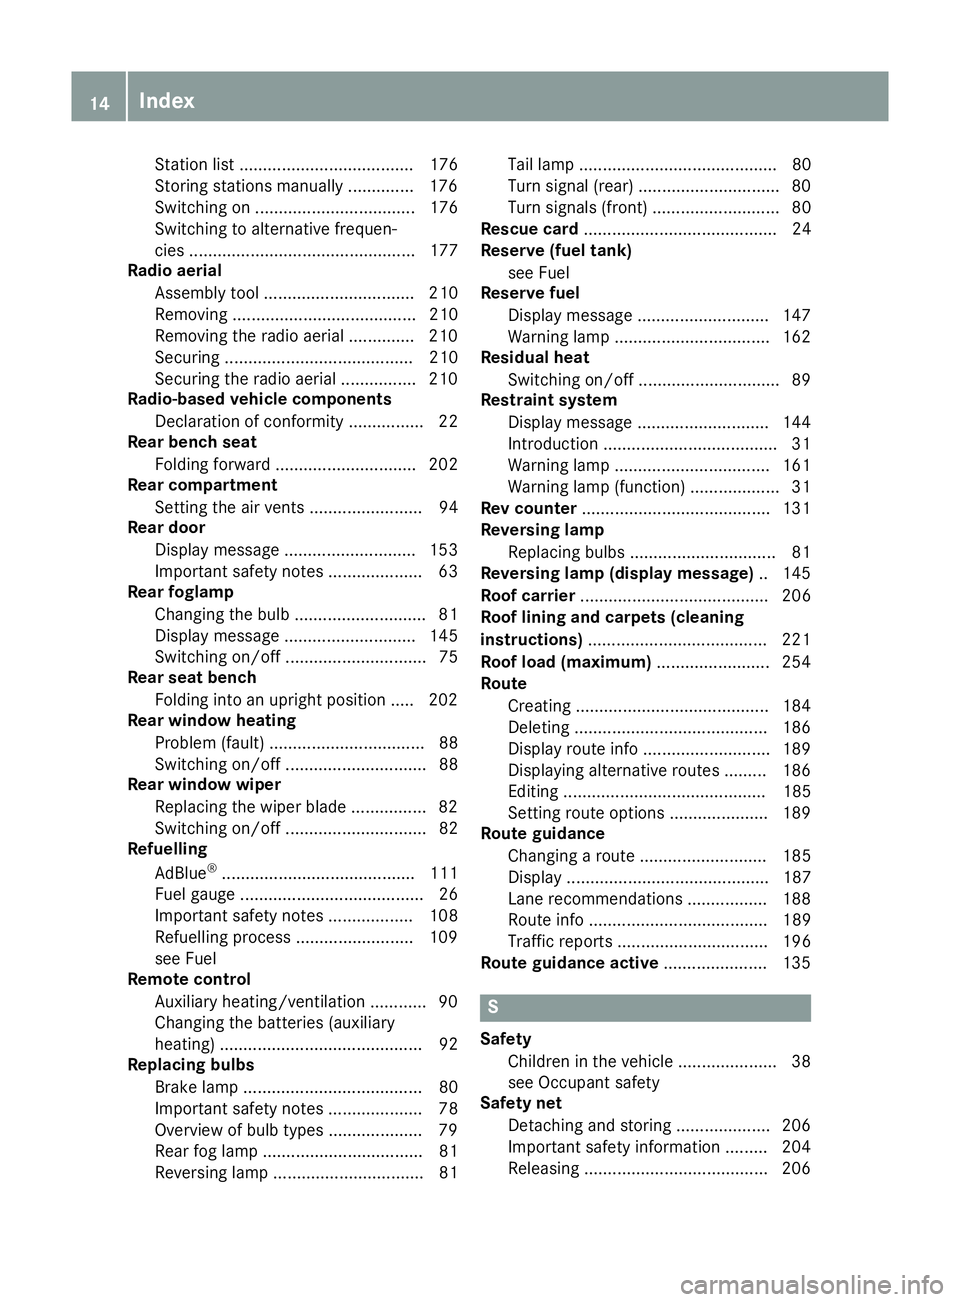
Reserve (fuel tank)
see Fuel
Reserve fuel
Display message ............................1 47
Warning lamp ................................. 162
Residual heat
Switching on/off .............................. 89
Restrain tsystem
Display message ............................ 144
Introduction ..................................... 31
Warning lamp ................................. 161
Warning lamp (function) ................... 31
Rev counter ........................................ 131
Reversing lamp
Replacing bulbs ............................... 81
Reversing lamp (display message) .. 145
Roof carrier ........................................ 206
Roof lining and carpets (cleaning
instructions) ...................................... 221
Roof load (maximum) ........................ 254
Route
Creating ......................................... 184
Deleting ......................................... 186
Display route info ........................... 189
Displaying alternative route s......... 186
Editing ........................................... 185
Setting route options ..................... 189
Route guidance
Changing aroute ........................... 185
Displa y........................................... 187
Lane recommendations ................. 188
Route info ...................................... 189
Traffi creports ................................ 196
Route guidanc eactive ...................... 135 S
Safety Children in the vehicl e..................... 38
see Occupant safety
Safety net
Detachinga nd storing .................... 206
Important safety information ......... 204
Releasing ....................................... 206 14
Index
Page 29 of 261
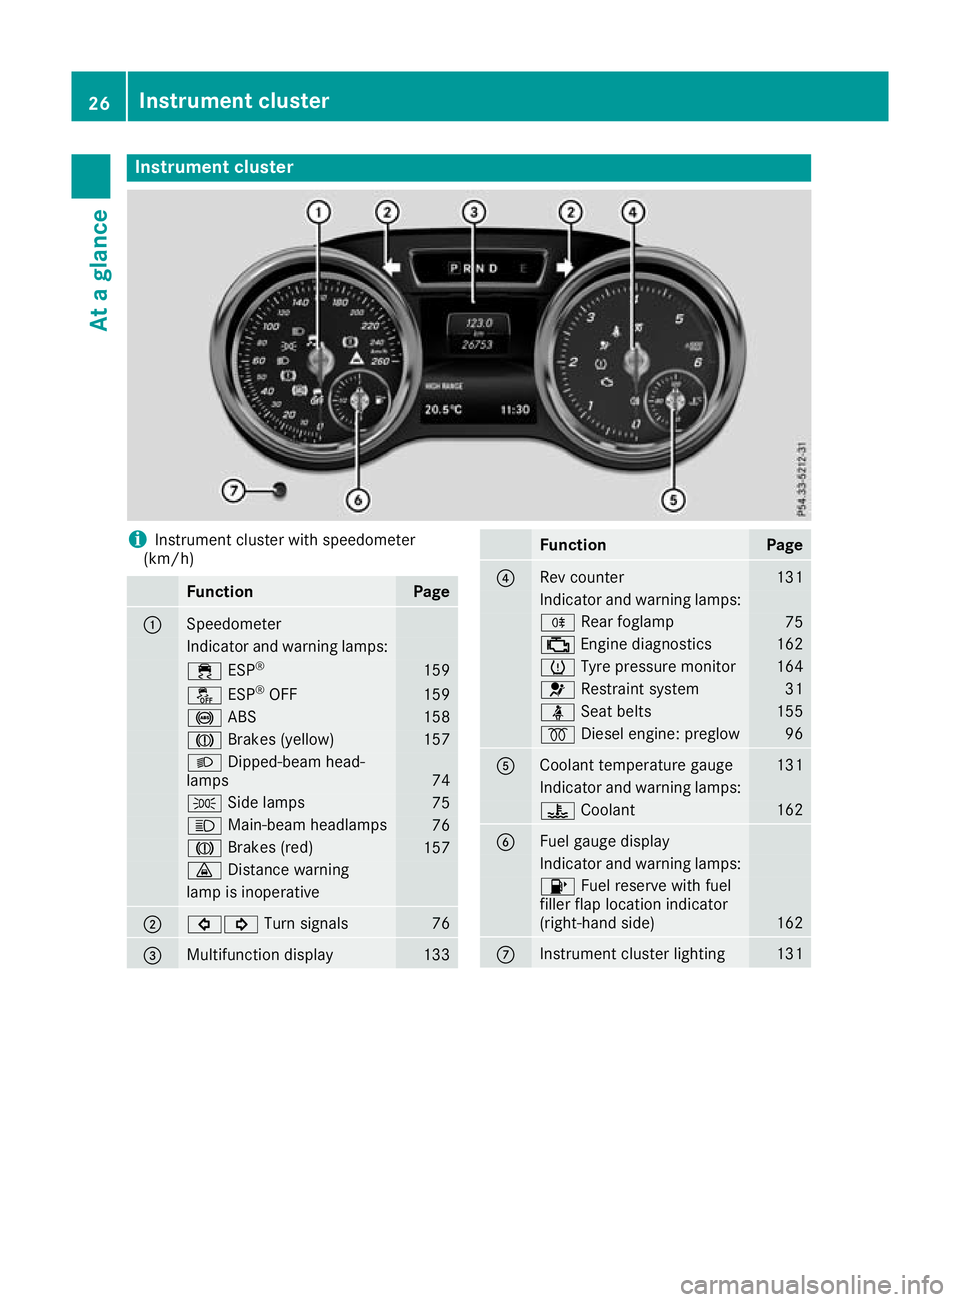
Instrumen
tcluster i
Instrument cluste
rwith speedometer
(km/h) Function Page
:
Speedometer
Indicator and warning lamps:
÷
ESP® 159
å
ESP®
OFF 159
!
ABS 158
J
Brakes (yellow) 157
L
Dipped-bea mhead-
lamps 74
T
Sidelam ps 75
K
Main-beam headlamps 76
J
Brakes(red) 157
·
Distance warning lamp is inoperative
;
#!
Turn signals 76
=
Multifunctio
ndisplay 133 Function Page
?
Rev counter 131
Indicato
rand warning lamps: R
Rear foglamp 75
;
Engine diagnost ics 162
h
Tyre pressure monitor 164
6
Restraint system 31
ü
Seat belts 155
%
Diesel engine: preglow 96
A
Coolant temperature gauge 131
Indicator and warning lamps:
?
Coolant 162
B
Fuel gaug
edisplay Indicator and warnin
glamps: 8
Fuel reserve with fuel
filler flap location indicator
(right-hand side) 162
C
Instrument cluster lighting 13126
Instrument clusterAt
ag lance
Page 93 of 261
Flammable materials such as leaves, grass or
twig smay ignite if they come into contact
with:
R hot parts of the exhaust system
R the exhaust ga sitself
There is arisk of fire.
Whe nthe auxiliary heating is switched on,
make sur ethat:
R no flammable materials come into contact
with hot vehicle components
R the exhaust ga scan escape from the
exhaust pip eunhindered
R the exhaust ga sdoesn ot come into contact
with flammable materials.
! Operating the auxiliary heating/ventilation
draws on the vehicle battery. After yo uhave
heated or ventilated the vehicle amaximum of
two times ,drive for alonger distance.
i Switch the auxiliary heating on regularly –
once amonth –for abou tten minutes.
The auxiliary heating heats the ai rinthe vehicle
interior to the set temperature. Thi soccur swith-
ou tu sing the hea tofthe running engine. The
auxiliary heating is operate ddirectly using the
vehicle' sfuel. For this reason, the fue ltank level
mus tbea bove the reserve rang etoensure that
the auxiliary heating functions.
The auxiliary heating or auxiliary ventilation
automaticall yadjusts to changes in tempera-
ture and weathe rconditions. For this reason,
the auxiliary heating could switch from ventila-
tion mode to heating mode or from heating
mode to ventilation mode.
The auxiliary heating switches off automatically afte r30m inutes. Thi stime period can be
altered .Todot his, consult aquali fied specialist
workshop.
You cannot use the auxiliary ventilation to cool
the vehicle interior to atemperature lower than
the outsid etemperature.
Before switchin gonX
Turn the key to position 2(Ypage 96) in
the ignition lock.
X Set the desired temperature.
Auxiliary heating or auxiliary ventilation can also
be switched on if the manually set climate con- trol is activated. Optimum comfort is attained by
settin gthe syste mtoautomatic mode. Set the
temperatur eto22†.
The auxiliary heating or auxiliary ventilatio ncan
be switched on/off using the button on the
centr econsol eorthe remote control.
The on-board compute rcan be used to specify
up to thre edepartur etimes ,one of which may
be preselected (Y page 139).
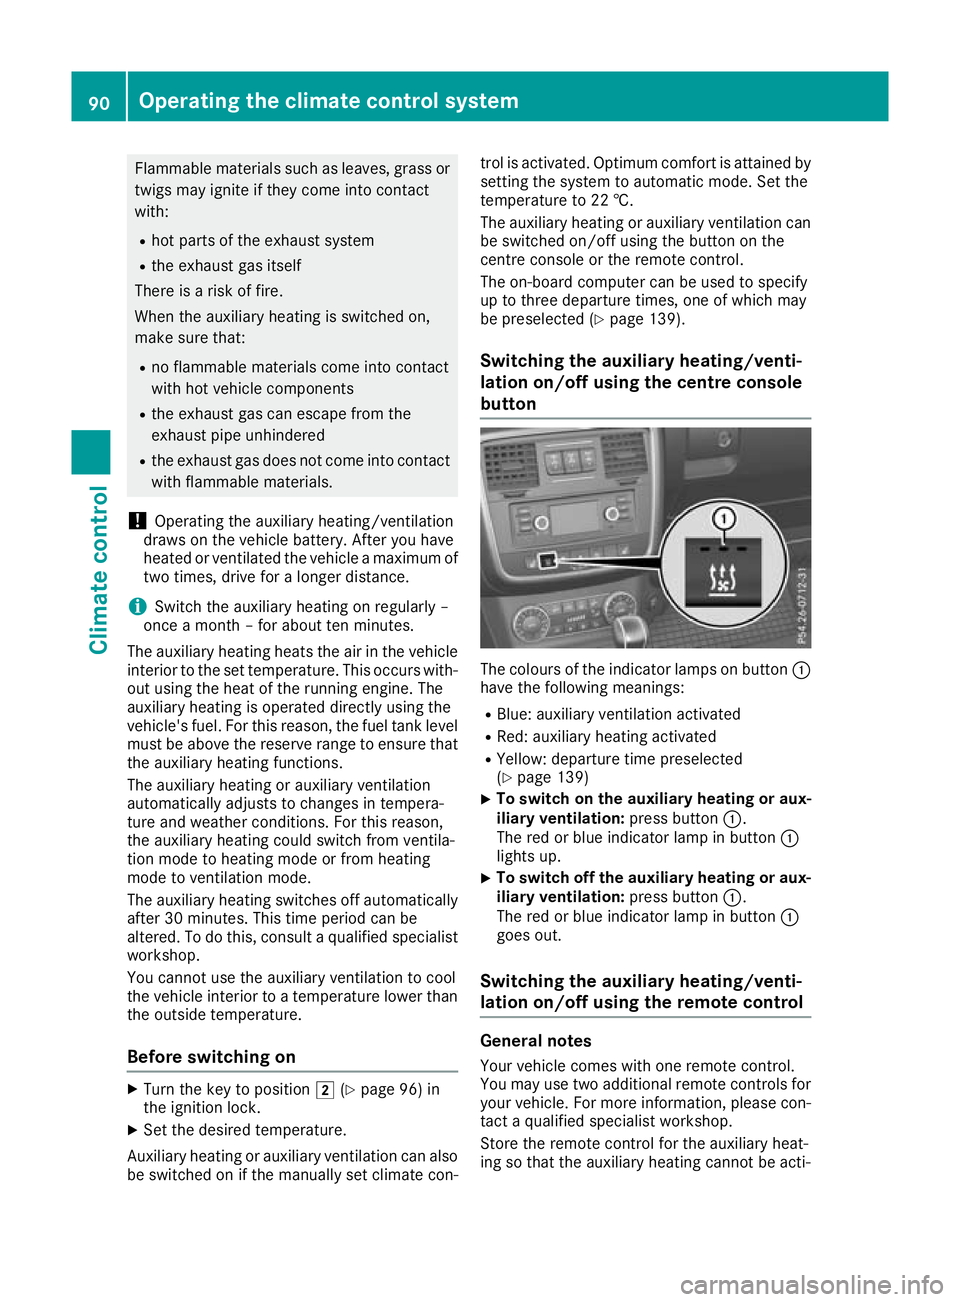
Switchin gthe auxiliary heating/venti-
lation on/off using the centre console
button Th
ec olours of the indicator lamps on button :
have the following meanings:
R Blue: auxiliary ventilation activated
R Red: auxiliary heating activated
R Yellow: departure time preselected
(Y page 139)
X To switch on the auxiliar
yheating or aux-
iliary ventilation: press button:.
The red or blue indicator lamp in button :
lights up.
X To switch off the auxiliar
yheating or aux-
iliary ventilation: press button:.
The red or blue indicator lamp in button :
goes out.
Switching the auxiliar yheating/venti-
lation on/off using the remotec ontrol General notes
Your vehicle comes with one remot econtrol.
You may use two additional remote controls for
yourv ehicle.For more information, please con-
tact aqualified specialist workshop.
Store the remote control for the auxiliary heat-
ing so that the auxiliary heating cannot be acti- 90
Operating the climate control systemClimate control
Page 96 of 261
X
Insert new battery =with the lettering facing
upwards. X
Slide battery cover :onto the remote con-
trol in the opposite direction to the arrow until it engages.
X Use the remote control to check the vehicle's
auxiliary heating functions.
Problems with the auxiliary heating/ventilation Problem
Possible causes/con
sequences andM
MSolutions FAIL
¨ The signal transmission between the transmitter and the vehicle is
faulty.
X
Change your position in relation to the vehicle, moving closer if
necessary. FAIL The auxiliary heating or auxiliary ventilation cannot be switched on or
has switched itself off.
The starter battery is not sufficiently charged.
X Charge the starter battery. The fuel level has dropped into the reserve range.
X Refuel at the nearest filling station. The auxiliary heating or auxiliary ventilation is faulty.
X Have the auxiliary heating or auxiliary ventilation checked at a
qualified specialist workshop. The auxiliary heating or auxiliary ventilation was started more than
twice when the engine was switched off.
X Switch on the engine and let it run for more than 10 seconds. The battery symbol on
the left of the remote
control display is shown
as empty. The remote control battery is discharged.
X Replace the remote control battery (Y page 92).Air ven
ts Important safety notes
G
WARNING
Very ho torvery cold air can flow from the air
vents. This coul dresult in burns or frostbite in
the immediate vicinity of the air vents. There
is ar isk of injury.
Make sure that all vehicl eoccupants always
maintai nasufficient distance to the air out-
lets. If necessary, redirect the airflow to
another area of the vehicl einterior. In order to ensure the direct flow of fresh air
through the air vents into the vehicle interior,
please observe the following notes:
R keep the air inlet betwee nthe windscree nand
the bonnet free of blockages, such as ice,
snow or leaves
R never cover the vents or ventilation grilles in
the vehicle interior
i For virtually draught-free ventilation, adjust
the sliders of the air vents to the centre posi- tion.
i If the automatic climate control regularly
deviates from the selected temperature or is Airv
ents
93Climatecont rol Z
Page 103 of 261
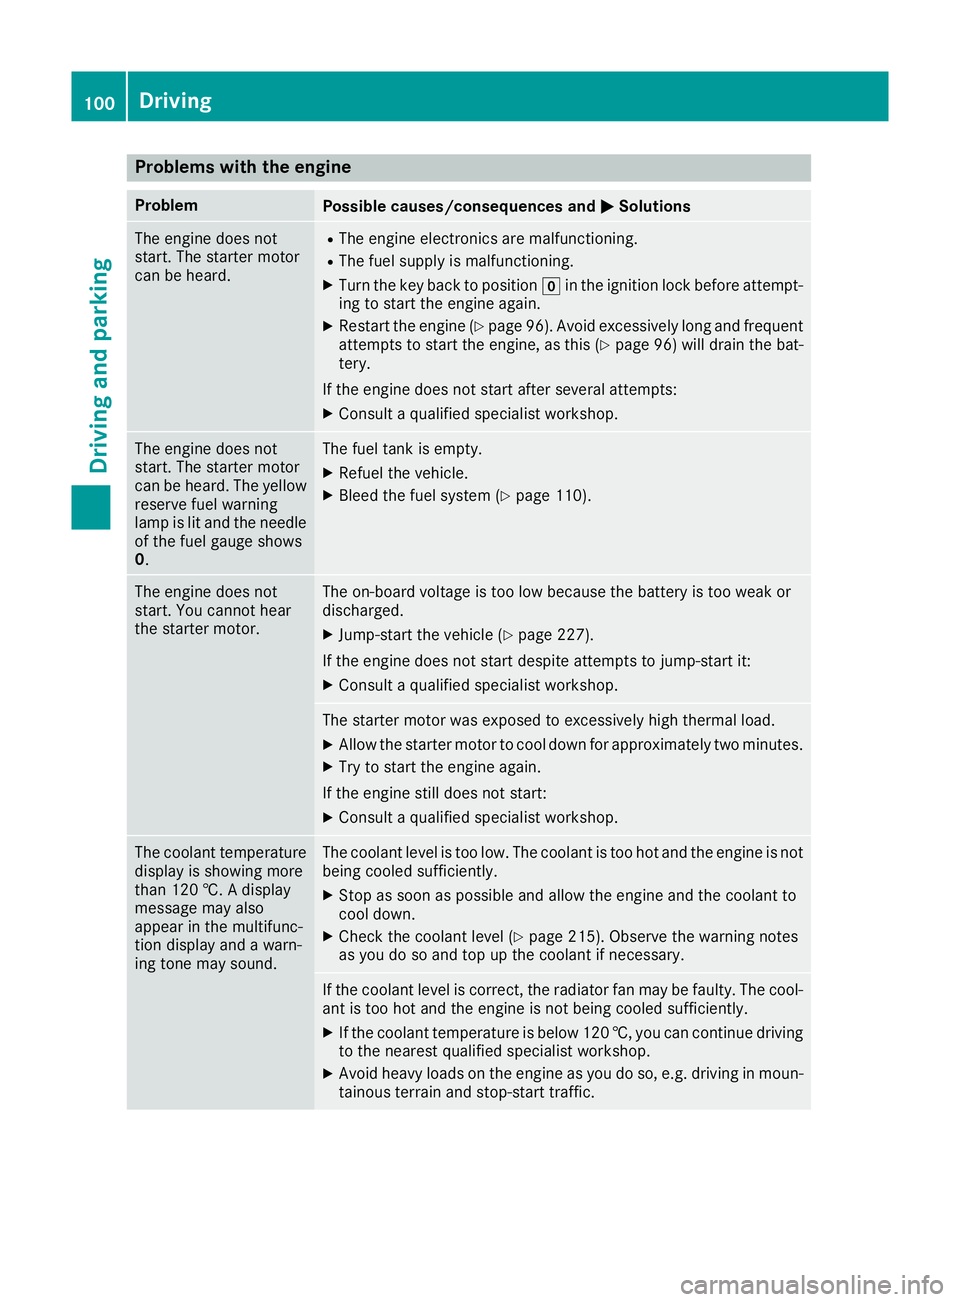
Problems with the engine
Problem
Possible causes/consequences and
M
MSolutions The engine does not
start. The starter motor
can be heard. R
The engine electronics are malfunctioning.
R The fuel supply is malfunctioning.
X Turn the key back to position gin the ignition lock before attempt-
ing to start the engine again.
X Restart the engine (Y page 96). Avoid excessively long and frequent
attemptstos tart the engine, as this (Y page 96) will drain the bat-
tery.
If the engine does not start after several attempts:
X Consult aqualified specialist workshop. The engine does not
start
.The starter motor
can be heard. The yellow reserve fuel warning
lamp is lit and the needle
of the fuel gauge shows
0. The fuel tank is empty.
X Refuel the vehicle.
X Bleed the fuel system (Y page 110).The engine does not
start
.You cannot hear
the starter motor. The on-board voltage is too low because the battery is too weak or
discharged.
X Jump-start the vehicle (Y page 227).
If the engine does not start despite attempt stojump-start it:
X Consult aqualified specialist workshop. The starter motor was exposed to excessively high thermal load.
X Allow the starter motor to cool down for approximately two minutes.
X Try to start the engine again.
If the engine still does not start:
X Consult aqualified specialist workshop. The coolant temperature
display is showing more
than 120 †. Adisplay
message may also
appear in the multifunc-
tion display and awarn-
ing tonem ay sound. The coolant level is too low. The coolant is too hot and the engine is not
being cooled sufficiently.
X Stop as soon as possible and allow the engine and the coolant to
cool down.
X Check the coolant level (Y page 215). Observe the warning notes
as you do so and top up the coolant if necessary. If the coolan
tlevel is correct, the radiator fan may be faulty. The cool-
ant is too hot and the engine is not being cooled sufficiently.
X If the coolant temperature is below1 20 †, you can continue driving
to the nearest qualifieds pecialist workshop.
X Avoid heavy loadsont he engine as you do so, e.g. driving in moun-
tainous terrain and stop-start traffic. 100
DrivingDriving and parking
Page 150 of 261
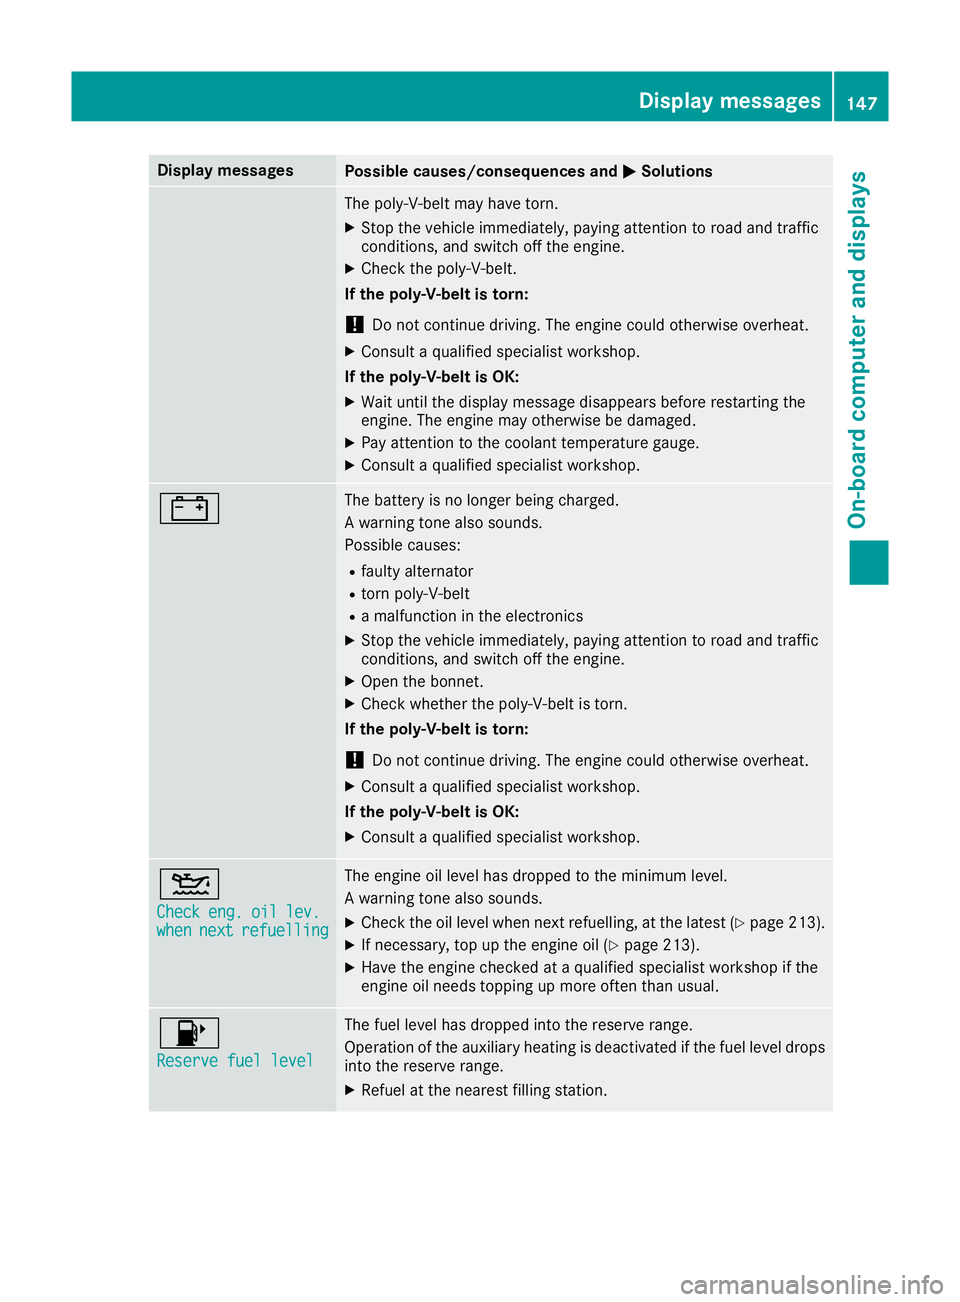
Display messages
Possible causes/consequence
sand M
MSolutions The poly-V-belt may have torn.
X Stop the vehicle immediately, paying attention to road and traffic
conditions, and switch off the engine.
X Check the poly-V-belt.
If the poly-V-belt is torn:
! Do not continue driving. The engine could otherwise overheat.
X Consult aqualified specialist workshop.
If the poly-V-belt is OK:
X Wait until the display message disappears before restarting the
engine. The engine may otherwise be damaged.
X Pay attention to the coolant temperature gauge.
X Consult aqualified specialist workshop. # The battery is no longer being charged.
Aw
arning tonea lso sounds.
Possible causes:
R faulty alternator
R torn poly-V-belt
R am alfunction in the electronics
X Stop the vehicle immediately, paying attention to road and traffic
conditions, and switch off the engine.
X Open the bonnet.
X Check whether the poly-V-belt is torn.
If the poly-V-belt is torn:
! Do not continue driving. The engine could otherwise overheat.
X Consult aqualified specialist workshop.
If the poly-V-belt is OK: X Consult aqualified specialist workshop. 4
Check Check
eng.
eng.oil
oillev.
lev.
when
when next
nextrefuelling
refuelling The engine oil level has dropped to the minimum level.
Aw
arning tonea lso sounds.
X Check the oil level when next refuelling, at the latest (Y page 213).
X If necessary, top up the engine oil (Y page 213).
X Have the engine checked at aqualified specialist workshop if the
engine oil needs topping up more often than usual. 8
Reserve fuel level Reserve fuel level The fuel level has dropped into the reserve range.
Operation of the auxiliary heating is deactivated if the fuel level drops
into the reserve range.
X Refuel at the nearest filling station. Display me
ssages
147On-board compute rand displays Z
Page 151 of 261
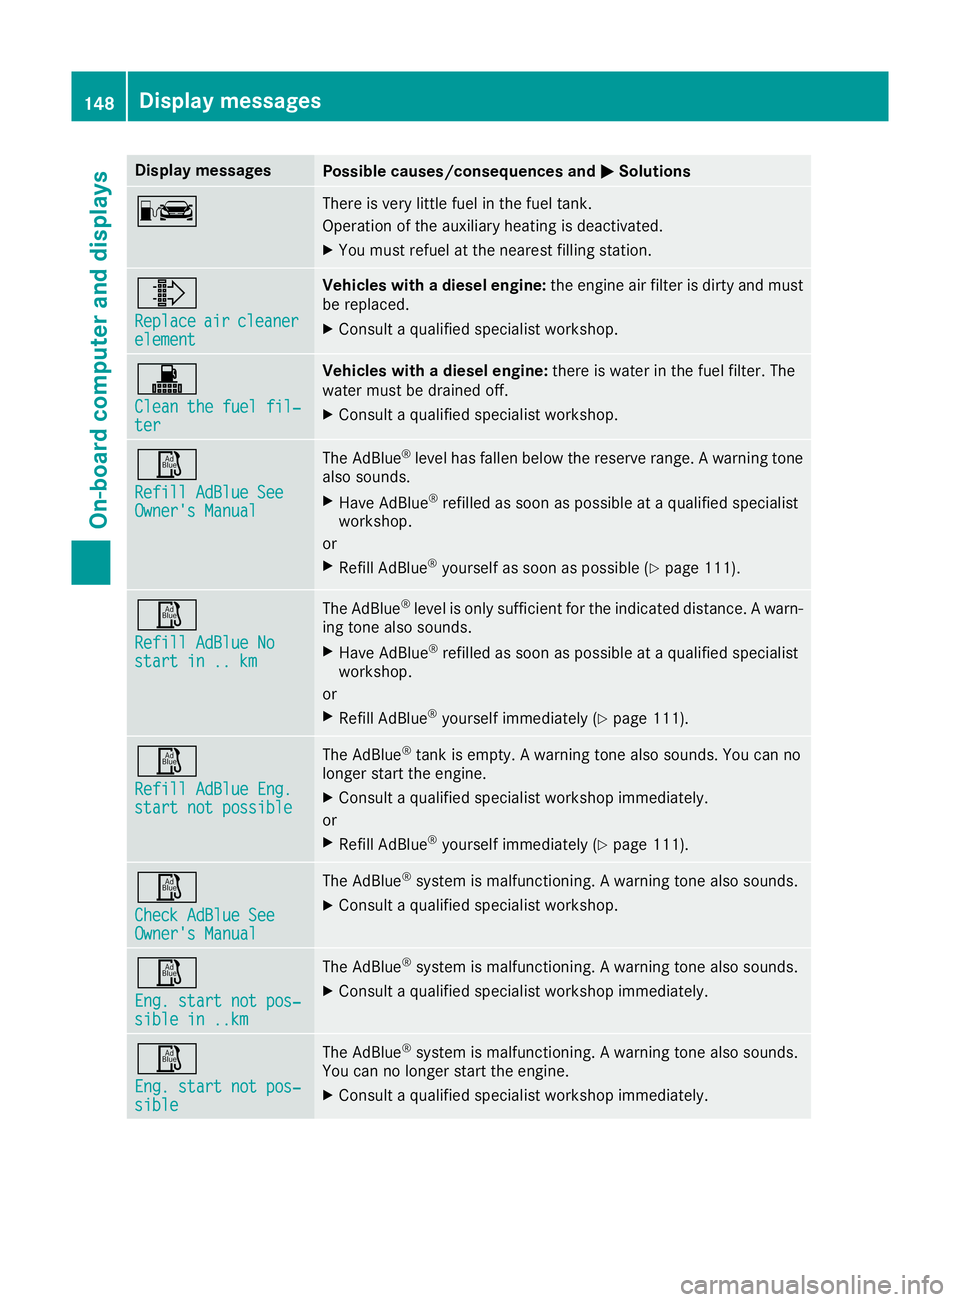
Display messages
Possible causes/consequence
sand M
MSolutions C There is very little fuel in the fuel tank.
Operation of the auxiliary heating is deactivated.
X You must refuel at the nearest filling station. ¸
Replace Replace
air
aircleaner
cleaner
element
element Veh
icleswithad ieselengine: the engine ai rfilter is dirty and must
be replaced.
X Consult aquali fied specialist workshop. !
Clean the fue
lfil‐
Clean the fuel fil‐
ter ter Veh
icleswithad ieselengine: there is water in the fue lfilter. The
water mus tbed raine doff.
X Consult aquali fied specialist workshop. Ø
Refill AdBlue See Refill AdBlue See
Owner'
sManual
Owner's Manual The AdBlue
®
level has fallen below the reserve range. Awarning tone
also sounds.
X Have AdBlue ®
refilled as soon as possible at aqualified specialist
workshop.
or X Refill AdBlue ®
yourself as soon as possible (Y page 111).Ø
Refill AdBlue No Refill AdBlue No
start in .. km start in .. km The AdBlue
®
level is only sufficient for the indicated distance. Awarn-
ing tonea lso sounds.
X Have AdBlue ®
refilled as soon as possible at aqualified specialist
workshop.
or
X Refill AdBlue ®
yourself immediately (Y page 111).Ø
Refill AdBlue Eng. Refill AdBlue Eng.
start not possible start not possible The AdBlue
®
tank is empty. Awarning tonea lso sounds. You can no
longer start the engine.
X Consult aqualified specialist workshop immediately.
or X Refill AdBlue ®
yourself immediately (Y page 111).Ø
Check AdBlue See Check AdBlue See
Owner's Manual Owner's Manual The AdBlue
®
system is malfunctioning. Awarning tonea lso sounds.
X Consult aqualified specialist workshop. Ø
Eng. start not pos‐ Eng. start not pos‐
sible in ..km sible in ..km The AdBlue
®
system is malfunctioning. Awarning tonea lso sounds.
X Consult aqualified specialist workshop immediately. Ø
Eng. start not pos‐ Eng. start not pos‐
sible sible The AdBlue
®
system is malfunctioning. Awarning tonea lso sounds.
You can no longer start the engine.
X Consult aqualified specialist workshop immediately. 148
Display messagesOn-board computer and displays