2016 MERCEDES-BENZ G-CLASS SUV height
[x] Cancel search: heightPage 71 of 261
G
WARNING
You coul dlose control of the vehicl ewhile
driving if you:
R adjust the driver's seat, steering whee lor
mirrors
R fasten the seat belt
There is arisk of an accident.
Adjust the driver's seat, headr estraint, steer-
ing whee land mirrors and fasten yours eat
beltb efore starting the engine. G
WARNING
The headr estraints cannot provid ethe inten-
ded protection unless they are fitted and
adjusted correctly. There is an increased risk of injury to the heada nd neck in the event of
an accident or sudden braking, for example.
Always drive with the headr estraints fitted.
Ensure that the centre of the headr estraints
support the back of each vehicl eoccupant's
headate ye levelbefore driving off.
Make sure that you do not interchange the head restraints of the front and rear seats when
adjusting the headr estraints. Otherwise, you
cannot adjust the height and angle of the head
restraints correctly.
Adjust the headr estraint so that it is as close as
possible to yourh ead. G
WARNING
If the driver's seat is not correctly engaged, it coul dunexpectedly move while driving. This
coul dcausey ou to lose control of the vehicle.
There is arisk of an accident.
Always ensure that the driver's seat is
engaged before starting the vehicle. G
WARNING
If you adjust the seat height carelessly, you or other vehicl eoccupants coul dbetrappe dand
thereby injured .Childre ninparticular could
accidentally press the electrica lseat adjust-
ment buttons and become trapped. There is a
risk of injury.
Whil emoving the seats, make sure that your
hands or other body parts do not get under the lever assembly of the sea
tadjustmen tsys-
tem. G
WARNING
Whe nadjusting aseat, you or another vehicle
occupant coul dbecome trappe dbythe guide
rail of the seat, for instance. There is arisk of
injury.
Make sure that no one has any part of their
body withi nthe swee pofthe seat when
adjusting it. G
WARNING
If the seat beltisn ot in the seat beltg uide, it
no longer offers the intended leve lofprotec-
tion. An incorrectly fastened seat beltc an also
caus eadditiona linjuries. This poses an
increased risk of injury or even fatal injury.
Before starting ajourney ,alwaysm ake sure
that the seat beltisint he seat beltguide and
all vehicl eoccupants have fastened their seat
belts properly.
! To avoi
ddamage to the seats and the seat
heating, observe the following information:
R do not spil lany liquidsont he seats. If liquid
is spilled on the seats, dry them as soon as possible.
R if the seat covers are damp or wet, do not
switch on the seat heating. The seat heat-
ing should alson ot be used to dry the seats.
R clea nthe seat covers as recommended;
see "Interio rcare".
R do not transport heav yloads on the seats.
Do not place sharp objects on the seat
cushions, e.g. knives, nail sortools. The
seats should only be occupied by passen-
gers, if possible.
R when the seat heating is in operation, do
not cover the seats with insulating materi-
als,e .g. blankets, coats, bags, seat covers,
child seats or booster seats.
! Make sure that there are no objects in the
footwel lunder or behind the seats when mov-
ing the seats back. There is arisk that the
seats and/or the objects coul dbedamaged.
! When the rear bench seat is folde
dfor-
wards, the front seats cannot be moved to 68
SeatsSeats
,steering wheela nd mirrors
Page 72 of 261
their rearmost position. Yo
ucould otherwise
damage the seats and the rea rbench seat.
! Make sure tha
tthe su nvisor is folde dup
befor eadjusting the backrest and head
restraint height. The head restraint and sun
visor could otherwis ecollide when the head
restraint is full yextended.
i If the front door is open, the seats can be
adjusted for up to 30 minute safter the igni-
tio nh asbeen switched off.
i The rea
rseath eadr estraints can be
remove d(Ypage 70).
For mor einformation, contact aquali fied spe-
cialist workshop.
i Furthe
rinformation abou tenlarging the lug-
gage compartment (folding the rea rbench
seat forwards )(Ypage 202). Adjustin
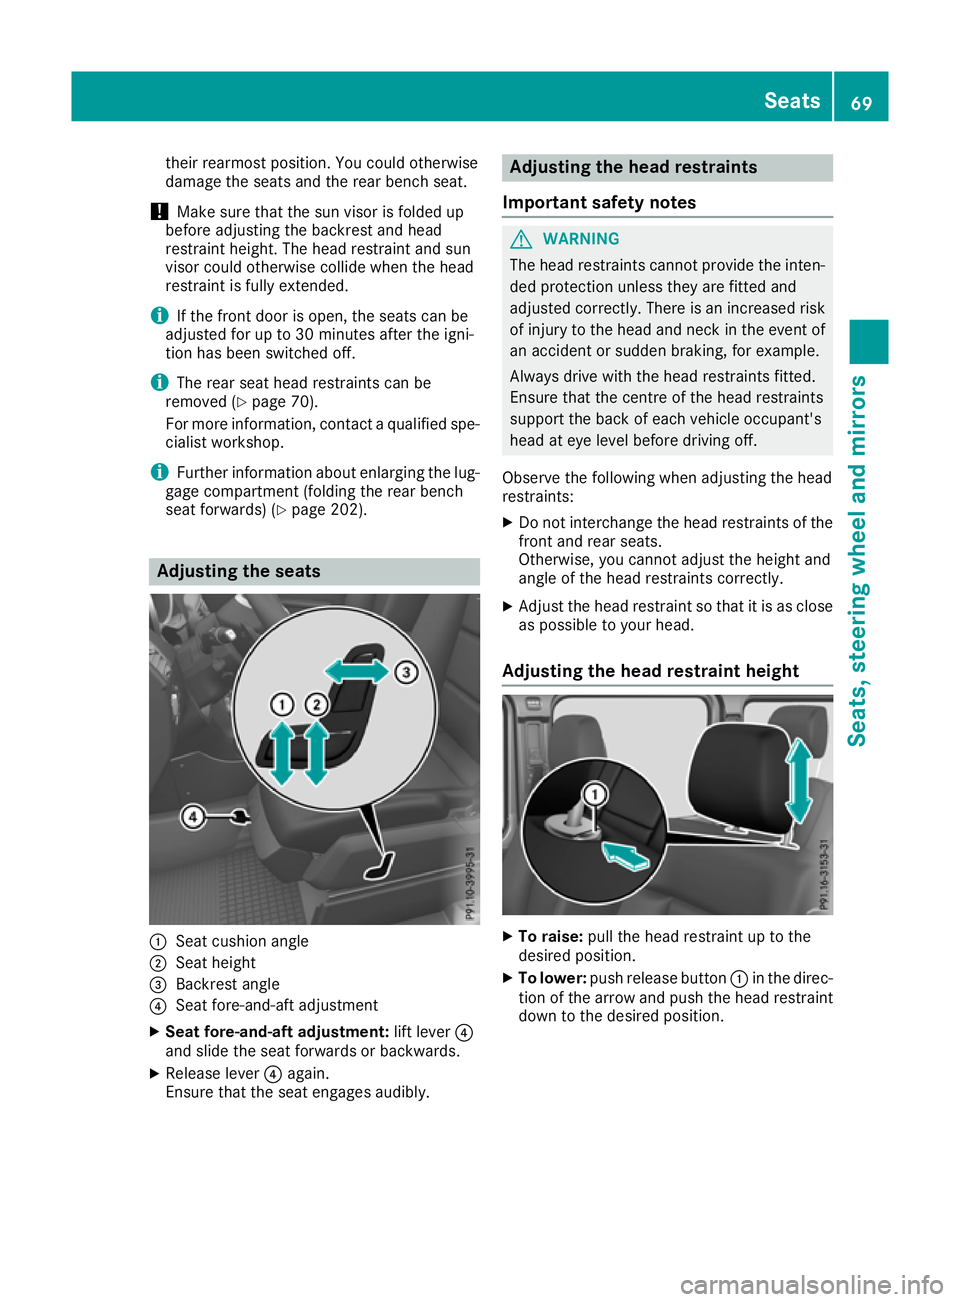
gthe seats :
Seat cushion angle
; Seat height
= Backrest angle
? Seat fore-and-aft adjustment
X Sea tfore-and-aft adjustment: lift lever?
and slide the sea tforward sorbackwards.
X Releas elever ? again.
Ensur ethat the sea tengages audibly. Adjustin
gthe hea drestraints
Important safety notes G
WARNING
Th eh ead restraints cannot provid ethe inten-
ded protection unless they are fitted and
adjusted correctly. There is an increased risk of injury to the head and neck in the event of
an accident or sudden braking, for example.
Always drive with the head restraints fitted.
Ensure that the centre of the head restraints
support the back of each vehicl eoccupant's
head at eye leve lbefore driving off.
Observe the following when adjusting the head
restraints:
X Do not interchange the head restraints of the
front and rear seats.
Otherwise, you cannot adjust the height and
angle of the head restraints correctly.
X Adjust the head restraint so that it is as close
as possible to yourh ead.
Adjusting the head restraint height X
To raise: pull the head restraint up to the
desired position.
X To lower: push release button :in the direc-
tion of the arrow and push the head restraint down to the desired position. Seats
69Seats,steering wheela nd mirrors Z
Page 73 of 261
Adjusting th
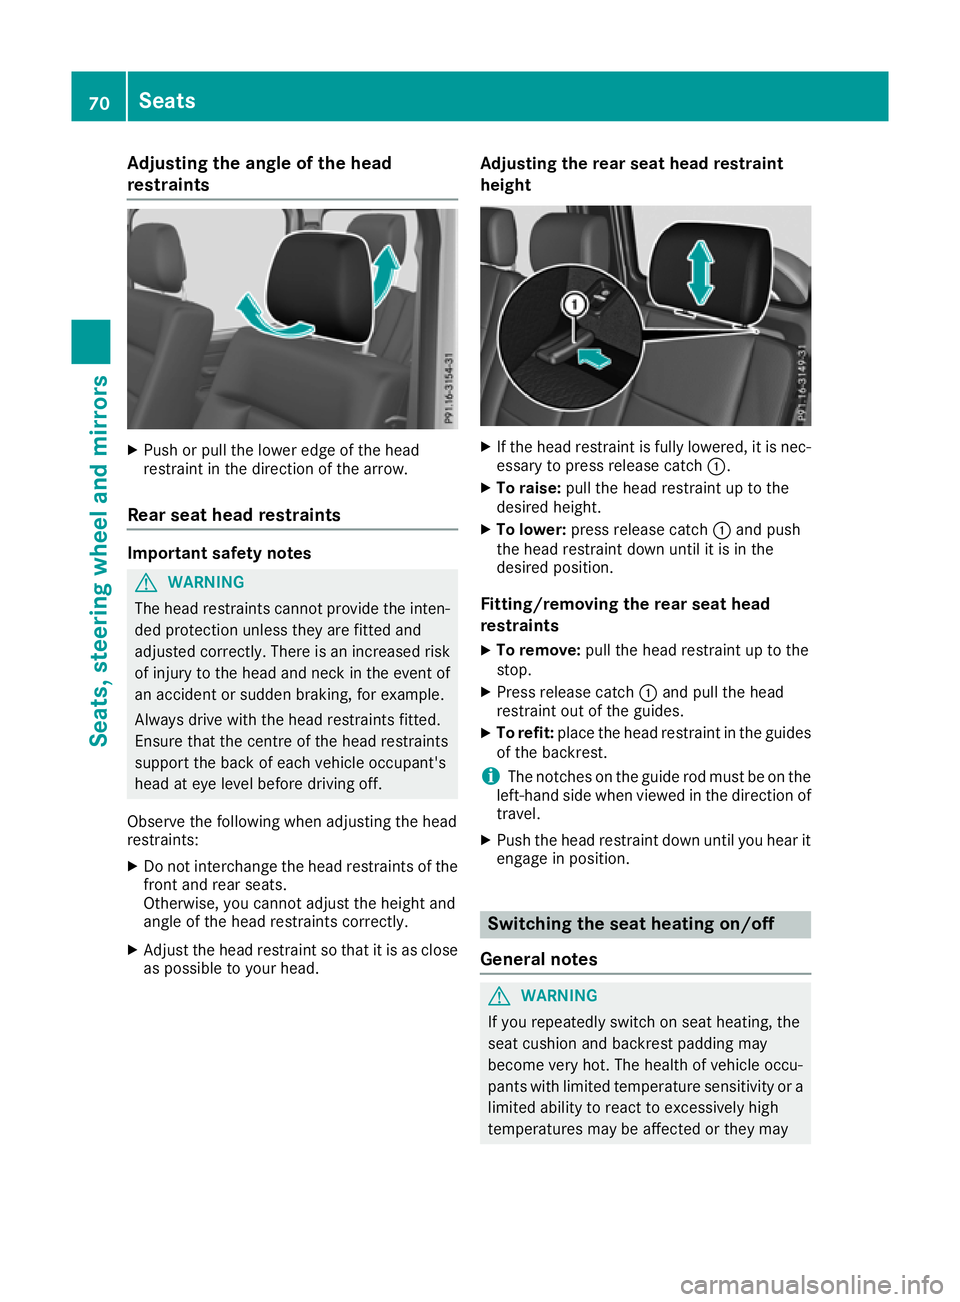
eangle of th ehead
restraints X
Push or pull the lowe redge of the head
restraint in the direction of the arrow.
Rear seat head restraints Important safety notes
G
WARNING
The head restraints cannot provide the inten-
ded protection unless they are fitted and
adjusted correctly. Ther eisanincreased risk
of injury to the heada nd neck in the event of
an accident or sudden braking, for example.
Always drive with the headr estraints fitted.
Ensure that the centre of the headr estraints
support the back of each vehicl eoccupant's
headate ye levelbefore driving off.
Observe the following when adjusting the head
restraints:
X Do not interchange the headr estraints of the
front and rear seats.
Otherwise, you cannot adjust the height and
angle of the headr estraints correctly.
X Adjust the headr estraint so that it is as close
as possible to yourh ead. Ad
justing th erears eat hea drestraint
height X
If th ehead restraint is fullyl owered, it is nec-
essary to press release catch :.
X To raise: pullthe head restraint up to the
desire dheight.
X To lower: press release catch :and push
the head restraint down until it is in the
desire dposition.
Fitting/removin gthe rear seat head
restraints
X To remove: pullthe head restraint up to the
stop.
X Press release catch :and pullt he head
restraint out of the guides.
X To refit: place the head restraint in the guides
of the backrest.
i The notches on the guide rod must be on the
left-hand side when viewedint he direction of
travel.
X Push the head restraint down until you hear it
engage in position. Switching the seat heating on/off
General notes G
WARNING
If you repeatedly switch on seat heating, the
seat cushion and backrest padding may
become very hot. The health of vehicle occu-
pants with limited temperature sensitivity or a limited ability to react to excessively high
temperatures may be affected or they may 70
SeatsSeats, steerin
gwheela nd mirrors
Page 75 of 261
When leaving the vehicle, alway
stake the key
with you and lock the vehicle. Never leave
children unattended in the vehicle.
The electrically adjustable steerin gwheel can
still be adjusted when there is no key in the igni-
tion lock. Adjust
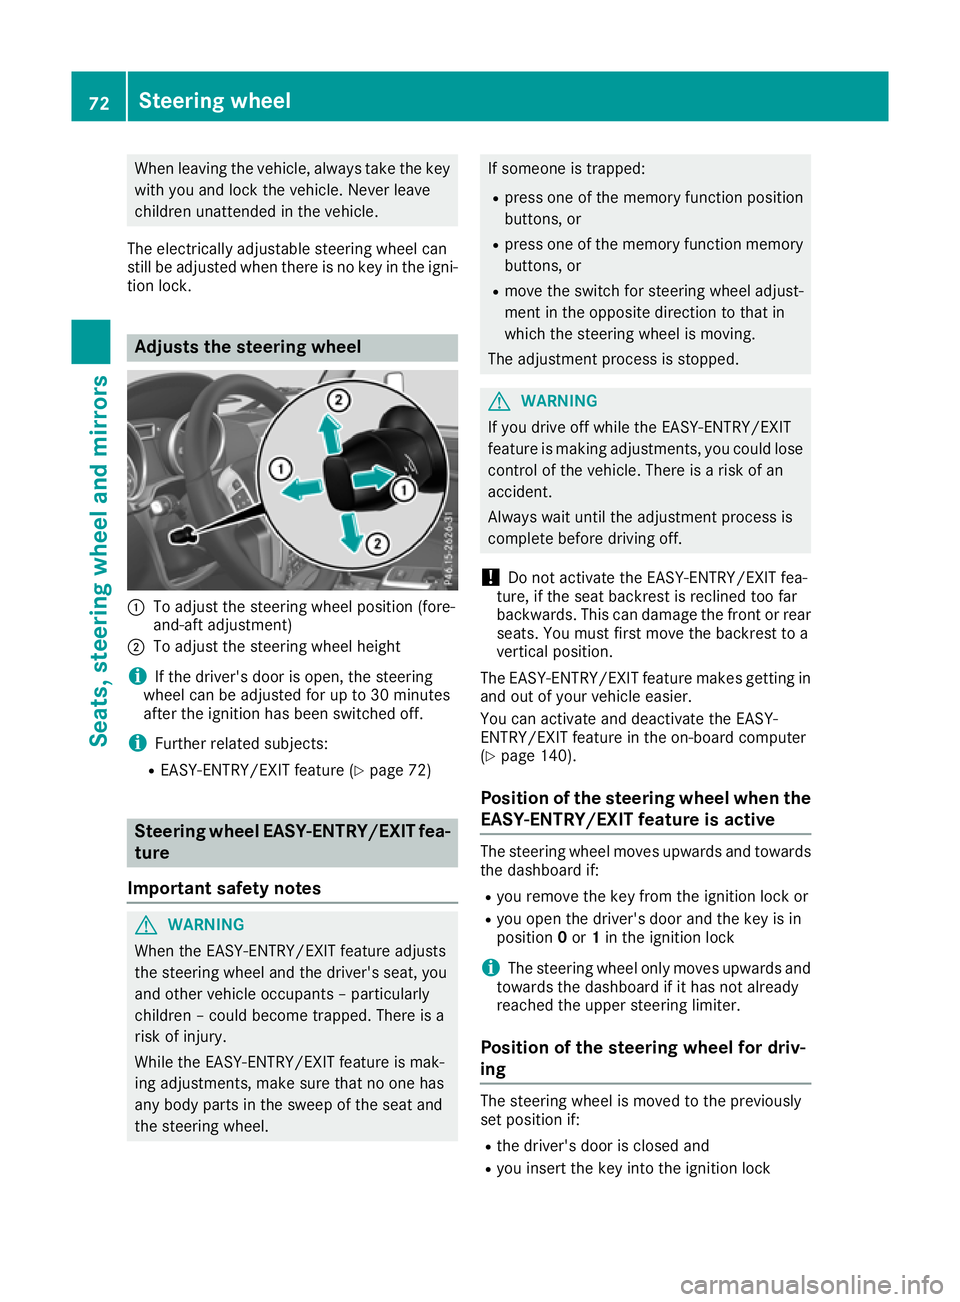
sthe steering wheel :
To adjust the steeri ngwheel position (fore-
and-aft adjustment)
; To adjust the steerin gwheel height
i If the driver's door is open, the steering
wheel can be adjusted for up to 30 minutes
after the ignition has been switched off.
i Further related subjects:
R EASY-ENTRY/EXIT feature (Y page 72)Steering wheel EASY-ENTRY/EXIT fea-
ture
Important safety notes G
WARNING
When the EASY-ENTRY/EXIT feature adjusts
the steering wheel and the driver's seat, you
and other vehicle occup ants –p articularly
children –couldb ecome trapped. There is a
risk of injury.
Whil ethe EASY-ENTRY/EXIT feature is mak-
ing adjustments, make sure that no one has
any body parts in the swee pofthe seat and
the steering wheel. If someone is trapped:
R press one of the memory function position
buttons, or
R press one of the memory function memory
buttons, or
R move the switch for steering wheel adjust-
ment in the opposite direction to that in
which the steering wheel is moving.
The adjustment process is stopped. G
WARNING
If you drive off while the EASY-ENTRY/EXIT
feature is making adjustments, you coul dlose
control of the vehicle. There is arisk of an
accident.
Always waitu ntil the adjustment process is
complete before driving off.
! Do not activate the EASY-ENTRY/EXIT fea-
ture, if the seat backrest is recline dtoo far
backwards. This can damage the front or rear seats. You must first move the backrest to a
vertical position.
The EASY-ENTRY/EXIT feature makes getting in
and out of yourv ehicleeasier.
You can activate and deactivate the EASY-
ENTRY/EXIT feature in the on-board computer
(Y page1 40).
Position of the steering wheel whent he
EASY-ENTRY/EXIT feature is active The steering wheel moves upwards and towards
the dashboard if:
R you remov ethe key from the ignition lock or
R you open the driver's door and the key is in
position 0or 1in the ignition lock
i The steerin
gwheel only moves upwards and
towards the dashboard if it has not already
reached the upper steerin glimiter.
Position of the steering wheel for driv-
ing The steerin
gwheel is moved to the previously
set position if:
R the driver's door is closed and
R you insert the key into the ignition lock 72
Steering wheelSeats, steering wheel and mirrors
Page 131 of 261

To avoid hazardous situations:
R make sure to check the noseweight before
each journey
R the noseweight should be as close as possible
to the maximum noseweight
R do not exceed the maximum permissible
noseweight
R the noseweight must not be lower than the
minimum permissible noseweight
Make sure that the following values are not
exceeded:
R the permissible noseweight
R the permissible trailer load
R the permissible rear axle load of the towing
vehicle
R the maximum permissible gross vehicle
weight of both the towing vehicle and the
trailer
When reversin gthe towing vehicle, make sure
there is nobody between the trailer and the vehi- cle.
The applicable permissible values, which must
not be exceeded, can be found:
R in your vehicle documents
R on the type plates for the trailer
R on the vehicle identification plate
If the values differ, the lowest value applies.
You will find the values approved by the manu-
facturer on the identification plates and for the
towing vehicle under "Technical data"
(Y page 256).
When reversin gthe towing vehicle, make sure
there is nobody between the trailer and the vehi- cle.
Couple and uncouple the trailer carefully. If youdo not couple the trailer to the towing vehicle
correctly, the trailer could become detached.
When towing atrailer, your vehicle's handling
characteristics will be different from when driv-
ing without atrailer.
The vehicle/trailer combination:
R is heavier
R is restricted in its acceleration and gradient-
climbing capability
R has an increased braking distance
R is affected more by stron gcrosswinds
R demands more sensitiv esteering
R has alarger turnin gcircle This can impair the vehicle's handling charac-
teristics. Adapt your driving style accordingly.
Maintain asafe distance. Drive carefully.
When towing atrailer, alway sadjust your speed
to the current road and weather conditions. Do
not exceed the maximum permissible speed for
your vehicle/trailer combination. Notes on to
wingatrailer
General notes When towing
atrailer, set the tyre pressure on
the rear axle of the towing vehicle for amaxi-
mum load. Further information on the tyre pres-
sure table in the fuel filler flap (Y page 109).
The height of the ball coupling changes with the load of the vehicle. If necessary, use atrailer
with aheight-adjustable drawbar.
You will find permissible trailer loads under
"Technical data" (Y page 256).
Driving tips X
Observe the information on ESP ®
trailer sta-
bilisation (Y page 55).
X On long and steep downhill gradients, select
shift range 1,2or 3(Y page 105) in good time.
X If necessary, shift the transfer case to LOW
RANGE (Ypage 124).
This will use the braking effect of the engine, so less braking will be required to maintain
the vehicle speed. This relieves the load on
the brake system and prevents the brakes
from overheating and wearing too quickly. If
you need additional braking, depress the
brake pedal repeatedly rather than continu-
ously.
The maximum permissible speed for vehicle/
trailer combinations depends on the type of
trailer. Before beginnin gthe journey, check the
trailer's documents to see what the maximum
permitted speed is. Observe the maximum per-
missible speed in the relevant country.
For certain Mercedes-Benz vehicles, the maxi-
mum permissibler ear axle load is increased
when towing atrailer. See the "Technical data"
section to find out whether this applies to your
vehicle (Y page 256). In the event of increased
rear axle load, the car/trailer combination may
not exceed amaximum speed of 100 km/h for
reasons concerning the operating permit. This 128
Towing
atrailerDriving and parking
Page 215 of 261
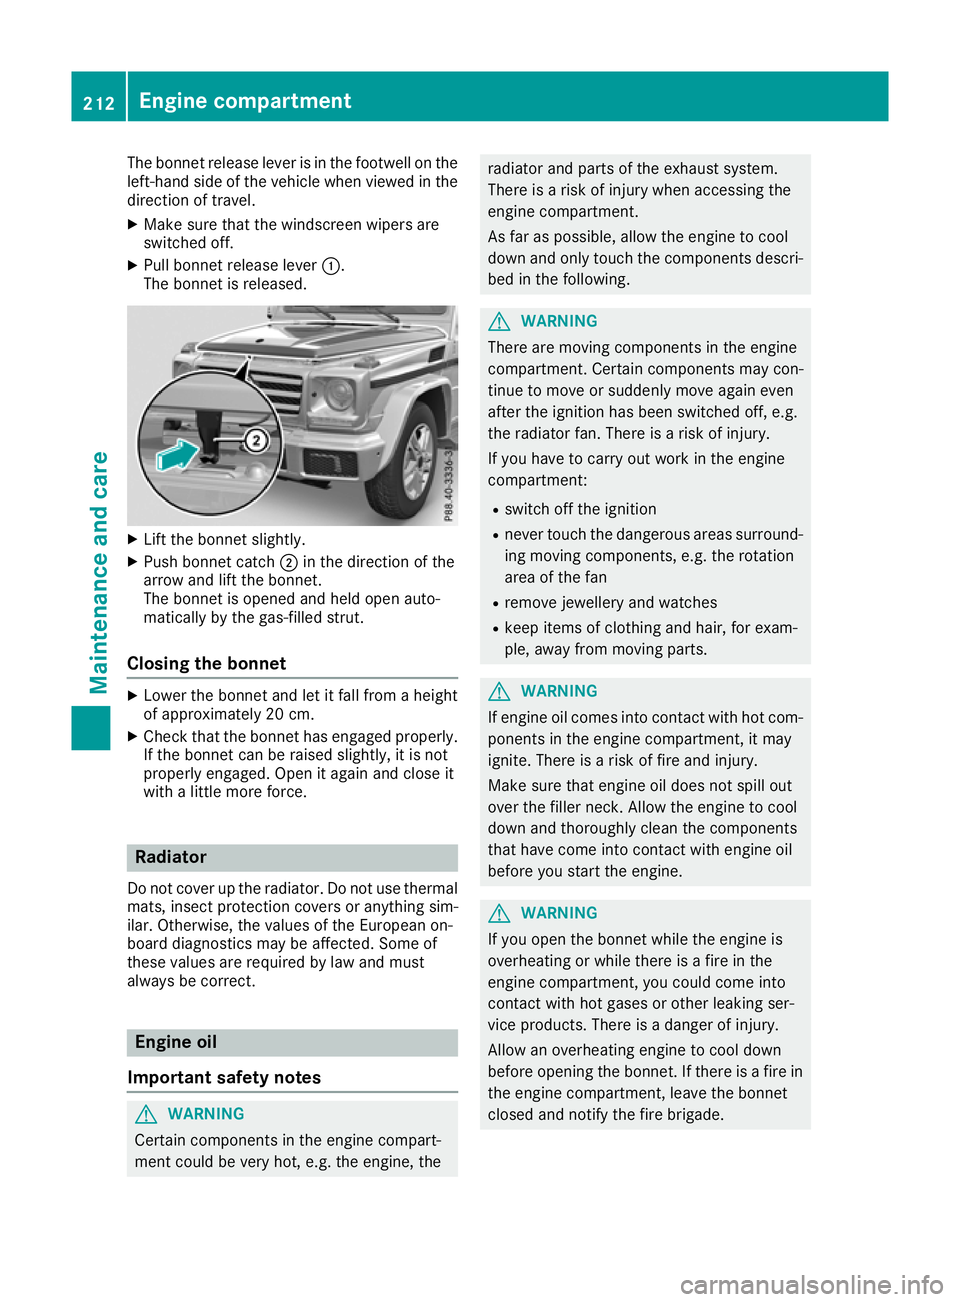
The bonnet release lever is in the footwell on the
left-hand side of the vehicle when viewed in the
direction of travel.
X Make sure that the windscreen wipers are
switched off.
X Pull bonnet release lever :.
The bonnet is released. X
Lift the bonnet slightly.
X Push bonnet catch ;in the direction of the
arrow and lift the bonnet.
The bonnet is opened and held open auto-
matically by the gas-filled strut.
Closing the bonnet X
Lower the bonnet and let it fall from aheight
of approximately 20 cm.
X Check that the bonnet has engaged properly.
If the bonnet can be raiseds lightly, it is not
properl yengaged .Open it again and close it
with alittle more force. Radiator
Do not cover up the radiator. Do not use thermal mats, insect protection covers or anything sim-
ilar. Otherwise, the valuesoft he Europeanon-
board diagnostics may be affected .Some of
thes evalue sare required by la wand must
always be correct. Engine oil
Importan tsafety notes G
WARNING
Certain components in th eengine compart-
ment coul dbevery hot, e.g. the engine, the radiator and parts of the exhaust system.
There is
arisk of injury when accessing the
engine compartment.
As far as possible, allow the engine to cool
down and only touch the components descri- bed in the following. G
WARNING
There are moving components in the engine
compartment. Certain components may con-
tinue to move or suddenly move again even
after the ignitio nhas been switched off, e.g.
the radiator fan. There is arisk of injury.
If you have to carry out work in the engine
compartment:
R switch off the ignition
R never touch the dangerous area ssurround-
ing moving components, e.g. the rotation
area of the fan
R remove jewellery and watches
R keep items of clothing and hair, for exam-
ple,a wayfrom moving parts. G
WARNING
If engine oil comes into contact with hot com- ponents in the engine compartment, it may
ignite. There is arisk of fire and injury.
Make sure that engine oil does not spil lout
over the filler neck. Allow the engine to cool
downa nd thoroughly clea nthe components
that have come into contact with engine oil
before you start the engine. G
WARNING
If you open the bonnet while the engine is
overheating or while there is afire in the
engine compartment, you coul dcome into
contact with hot gase sorother leaking ser-
vice products. There is adange rofinjury.
Allow an overheating engine to cool down
before opening the bonnet. If there is afire in
the engine compartment, leave the bonnet
closed and notify the fire brigade. 212
Engine compartmentMaintenanc
eand care
Page 247 of 261
X
Stop the vehicl eonsolid,non-slipper yand
level ground.
X Appl ythe parking brake.
X Move the front wheel stothe straight-ahead
position.
X Shif tthe automatic transmissio ntoposition
P.
X Switch off the engine.
X Ifat raile risc oupled to the vehicle, uncouple
it.
X Remove the vehicl etool sand jack from the
vehicl e(Ypage 223).
X Remove the spare wheel from the spare wheel
bracket (Y page 223).
X Secure the vehicl eagains trolling away.
Securing the vehicle against rolling
away X
Place chocks or other suitable items under
the front and rea rofthe wheel that is diago-
nally opposite the wheel you wish to change.
Raising the vehicle G
WARNING
If you do not position the jack correctl yatthe
appropriate jacking point of the vehicle, the
jack coul dtip over with the vehicl eraised.
There is arisk of injury.
Only position the jack at the appropriate jack-
ing point of the vehicle. The base of the jack
must be positioned vertically,d irectly under
the jacking point of the vehicle.
! Only position the jack at the appropriate
jacking point of the vehicle. Otherwise, you
coul ddamage the vehicle.
Observe the following whenr aisingthe vehi-
cle:
R Use only the vehicle-specific jack that has
been tested and approved by Mercedes-Benz
to rais ethe vehicle. If the jack is used incor-
rectly, it coul dtip over while the vehicl eis
raised.
R The jack is designed only to rais ethe vehicle
for ashort time while awhee lisb eing
changed .Itisnot permissible to use it to per-
form maintenance work under the vehicle. R
Avoid changing the whee lonuphilland down-
hill slopes.
R Before raising the vehicle, secur eitagainst
rolling away by applying the parking brake and
positioning whee lchocks. Do not release the
parking brake whil ethe vehicl eisraised.
R The jack must be place donafirm, flatand
non-slip surface. On aloo se surface, alarge,
fla tload-beari ng underlay must be used .Ona
slippery surface, anon-slip underlay must be
used ,e.g.u se arubber matont iles.
R Do not us ewoode nblocks or similar objects
as ajack underlay .Otherwise, the jack will not
be able to achieve its load-bearing capacity
du etot he restricte dheight.
R Ensure tha tthe distance between the under-
side of the tyr eand the ground does not
exceed 3cm.
R Do not place your hands or fee tunder the
raised vehicle.
R Do not li eunder the raised vehicle.
R Do not start the engine when the vehicl eis
raised.
R Do not open or close adoorw hent he vehicle
is raised.
R Ensure tha tnopersons ar epresent in the
vehicl ewhenr aisin gthe vehicle. X
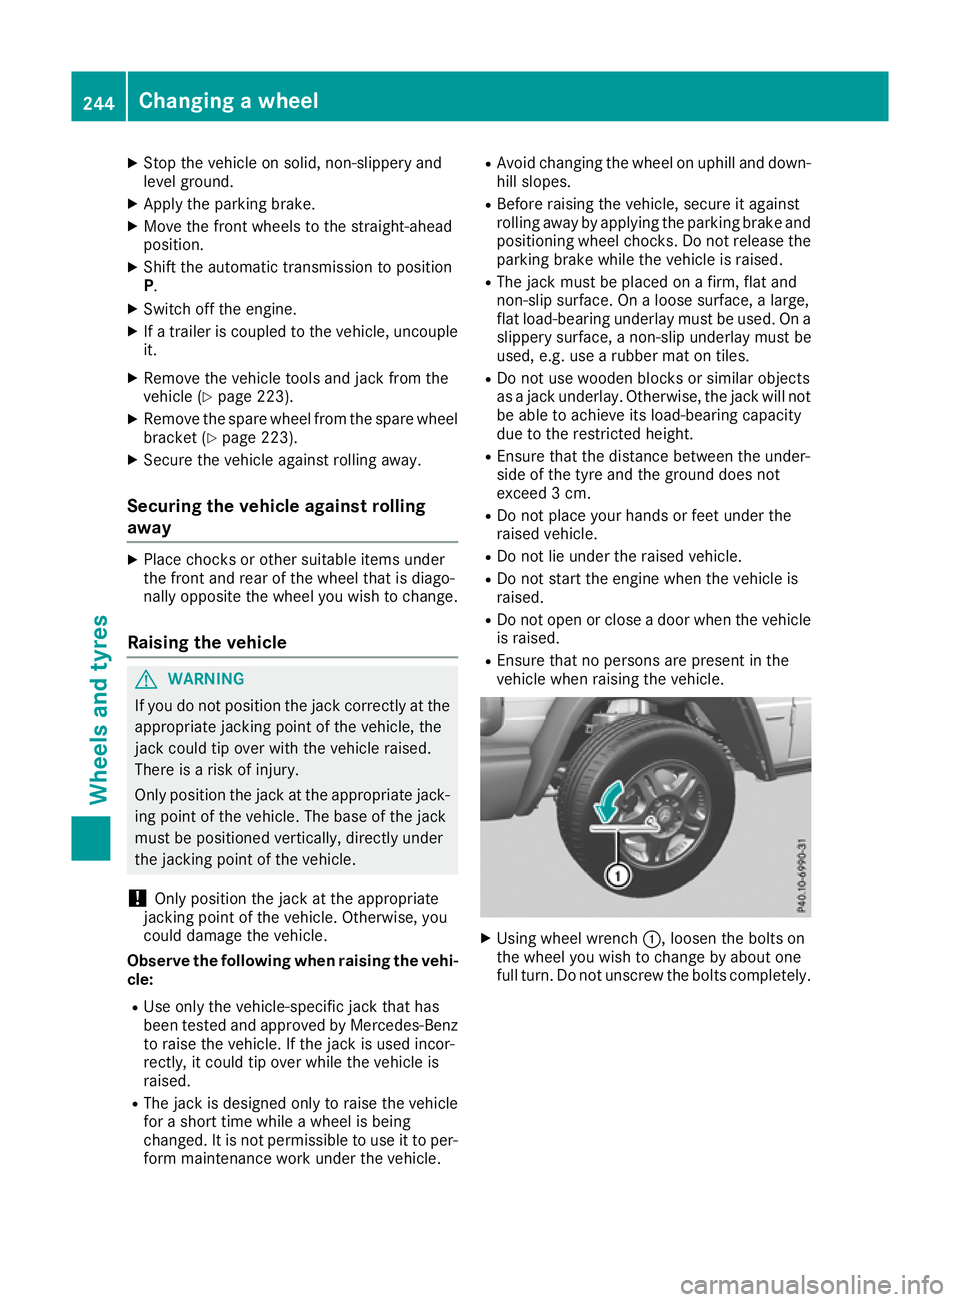
Using wheel wrench :,loosen the bolts on
the wheel you wish to change by abouto ne
full turn. Do not unscrew the bolts completely. 244
Changing
awheelWheels and tyres
Page 258 of 261
G3
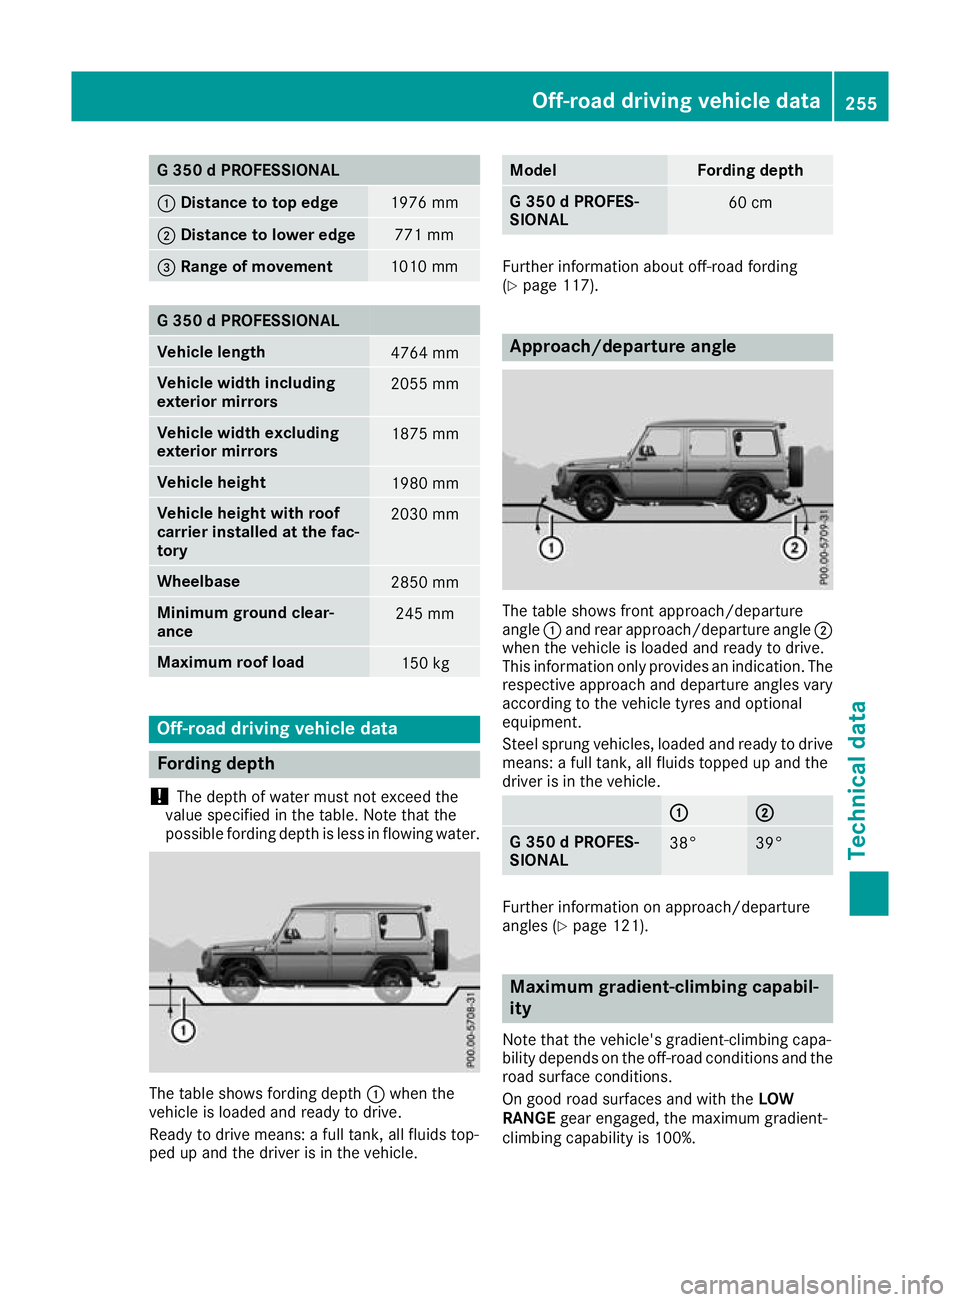
50dPROFESSIONAL :
Distance to to pedge 1976 mm
;
Distanc etolower edge 77
1mm =Rang
eofmovement 1010 mm
G3
50dPROFESSIONAL Vehicl
elength 4764 mm
Vehicl
ewidth including
exterior mirrors 2055 mm
Vehicl
ewidth excluding
exterior mirrors 1875 mm
Vehicl
eheight 1980 mm
Vehicl
eheight with roof
carrier installe datthe fac-
tory 2030 mm
Wheelbase
2850 mm
Minimum ground clear-
ance
245 mm
Maximum roof load
150 kg
Off-road driving vehicl
edata Fording depth
! The depth of water must not exceed the
values pecifiedinthetable. Not ethatthe
possible fordin gdept hisl ess in flowin gwater. The tabl
eshows fording depth :when the
vehicle is loaded and ready to drive.
Ready to drive means: afull tank,a ll fluids top-
ped up and the driver is in the vehicle. Model Fording depth
G3
50dPROFES-
SIONAL 60 cm
Further information abouto
ff-roadfording
(Y page 117). Approach/departure angle
The table shows front approach/departure
angle
:and rea rapproach/departure angle ;
when the vehicle is loaded and ready to drive.
This information only provides an indication .The
respective approach and departure angles vary
according to the vehicle tyres and optional
equipment.
Steel sprung vehicles, loaded and ready to drive
means: afull tank,a ll fluids topped up and the
driver is in the vehicle. : : ;
;
G3
50dPROFES-
SIONAL 38° 39°
Further information on approach/departure
angles (Y
page 121). Maximum gradient-climbing capabil-
ity
Note that the vehicle's gradient-climbing capa-
bility depends on the off-road conditions and the
road surface conditions.
On good road surfaces and with the LOW
RANGE gear engaged, the maximu mgradient-
climbing capability is 100%. Off-roa
ddriving vehicle data
255Technical data Z